All Activity
- Today
-
The older generation of model makers including Sam Carse used tinplate spoke about sourcing tinplate from Belfast in a newspaper article on his CDJR system during the late 60s/early 70s, Harry Connaghton a Dublin based professional model maker active during 60s -80s trialed tinplate on some 7mm GNR 0-6-0s but reverted to n/s possibly customer preference. I think problems with rust was likely due to use of failure to neutralise Bakers Flux. When I started model making my main source of tin was from drinks cans! shifted to brass when Ks metal sheet became available in hobby shops. I built an O gauge Ranks wagon with a tinplate body on a Triang-Big-Big chassis over 40 odd years ago, corded solder and "Frys' flux not much of a paint job wonder if it survived.
-
A quiet evening at Dugort Harbour, after an hour of attempted indoctrination of an enthusiastic four year old…. As of now, A42 rests on the centre road after bringing in a goods train, while tomorrow’s down train from Tralee sits in the fiddle yard entrance awaiting an A class for its next jaunt to Castletown West… Meantime, silence in the fields above Dugort Harbour station, apart from a low breeze and the sound of lambs….

-
Gimme a shout when you’re coming and I’ll meet you there!
-
Intend to visit this fantastic layout at some stage this year.
-
Thanks Bob-yes,I have been invited to one during the year,must get a move on the fiddle yard now
-
Looking well Jonathan
-
Activity in Malahide this afternoon….
-
Here we go;
- Yesterday
-
ICPHOWWWARRR - 22000 Class Railcars In OO from IRM!
jhb171achill replied to Warbonnet's topic in News
Encouraging to know that far from any door being shut on future railcars (all here will be aware of the challenges); this gives the impression that an 80 or most importantly, an AEC is not beyond the bounds of possibility... -
Noel: Sorry to hear such devestating news, thankfully you, your family and pets are ok.
-
Thanks lads. It’s been quite the journey as we wanted to not simply make a unit but make a template for units that lead the space in realism, accuracy and fun to play Now the hard work has been invested, producing future units including Irish outline will be much simpler, quicker and cost effective.
-
I assume the jib was removed for clearance reasons,it being shes a crane tank,it used to be at Cranmore back in the day Andy
-

ICPHOWWWARRR - 22000 Class Railcars In OO from IRM!
Patrick Davey replied to Warbonnet's topic in News
Sadly not my era but this looks and sounds incredible!!! Truly world leading indeed and I hope they do very well for IRM after the huge effort to make the project happen. -
ICPHOWWWARRR - 22000 Class Railcars In OO from IRM!
Robert Shrives replied to Warbonnet's topic in News
Good progress on EPs also looking to sets. -
Andrew Barclay works no.880.
-
Thanks Guys. Paramedics were fantastic, they got our little pet dog's heart restarted and got him breathing again. 4 days in an oxygen tent and he was well again TG. Fortunanetly I only needed hospital treatment for two days (smoke inhalation). So grateful that all whom I love were unharmed. Thanks Stephen
- 393 replies
-
- 11
-

-

-
So sorry to hear this terrible news, Noel. Truly shocking. Just to echo what the lads have said above and to wish you and your family (and your furry family , not forgetting them) every good wish for the future. Concentrate on what you can manage going forward, and what makes you happy. Derek
-
That must have been a real blow - it's hard to imagine. My sympathies. Best wishes for the recovery and putting your life back together.
-
Some IRRS pics here of A60, which appears to have also had the wing mirrors as well as deflector plates behind the tablet catchers: https://www.flickr.com/photos/irishrailwayarchive/53449371141/ https://www.flickr.com/photos/irishrailwayarchive/53511772714/ https://www.flickr.com/photos/irishrailwayarchive/54419670804/
-
Sorry to hear that, glad to hear you and your family are ok and best wishes in your recovery
-
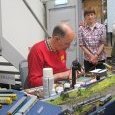
Great progress, ready for an Exhibition this year!
-
Thats truly awful, but glad to hear you all escaped
-
Excellent Fran, looking forward to the arrival of the ICRs
-
So sorry to hear of your misfortune,glad your loved ones are ok, Best of luck for the future.
-
Awful, Noel, all our sympathies from this household to you and your family. A truly traumatic and dreadful thing to happen, but as long as life and limb are OK, that's the main thing.