David Holman
-
Posts
4,359 -
Joined
-
Last visited
-
Days Won
117
Content Type
Profiles
Forums
Events
Gallery
Blogs
Everything posted by David Holman
-
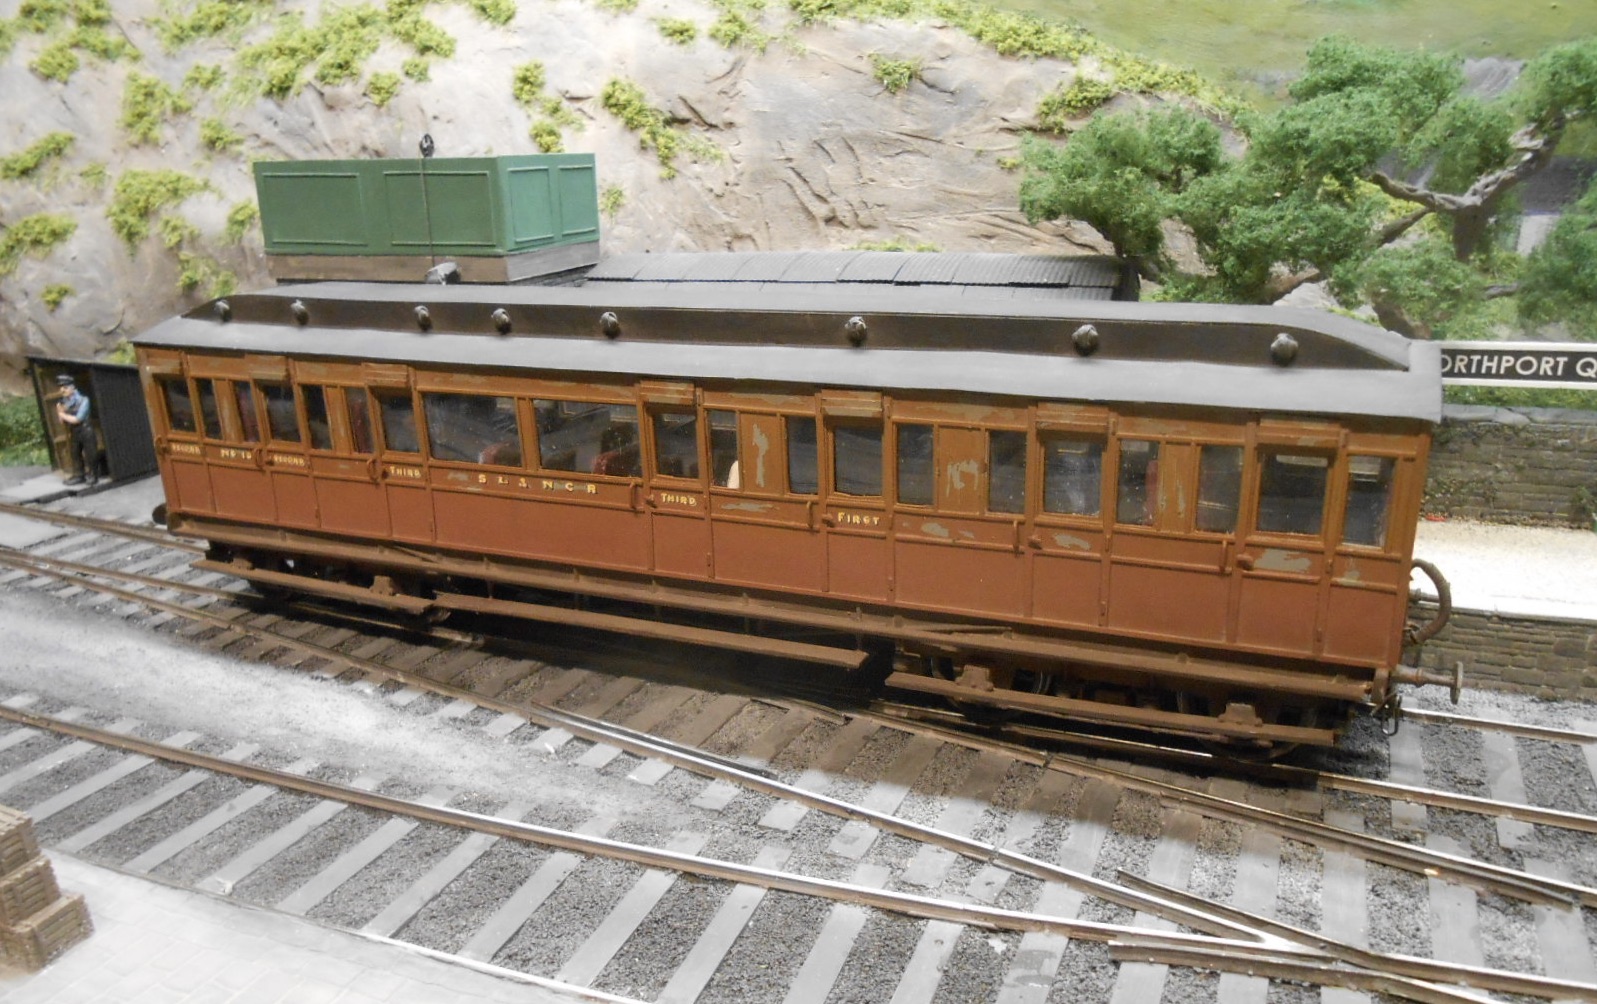
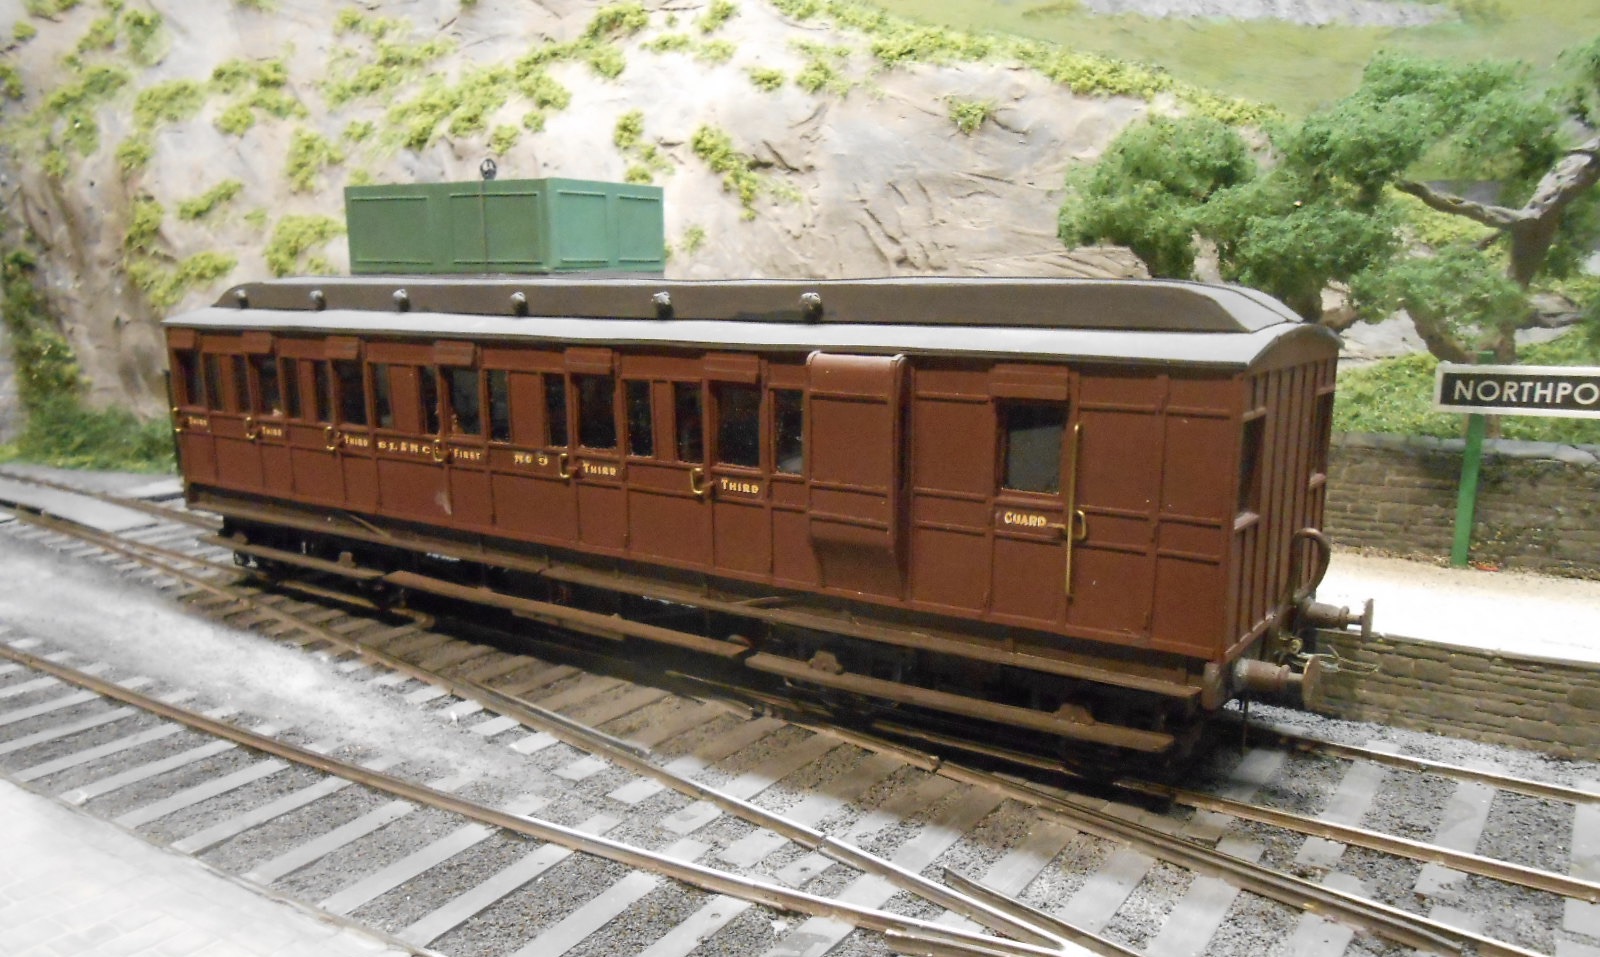
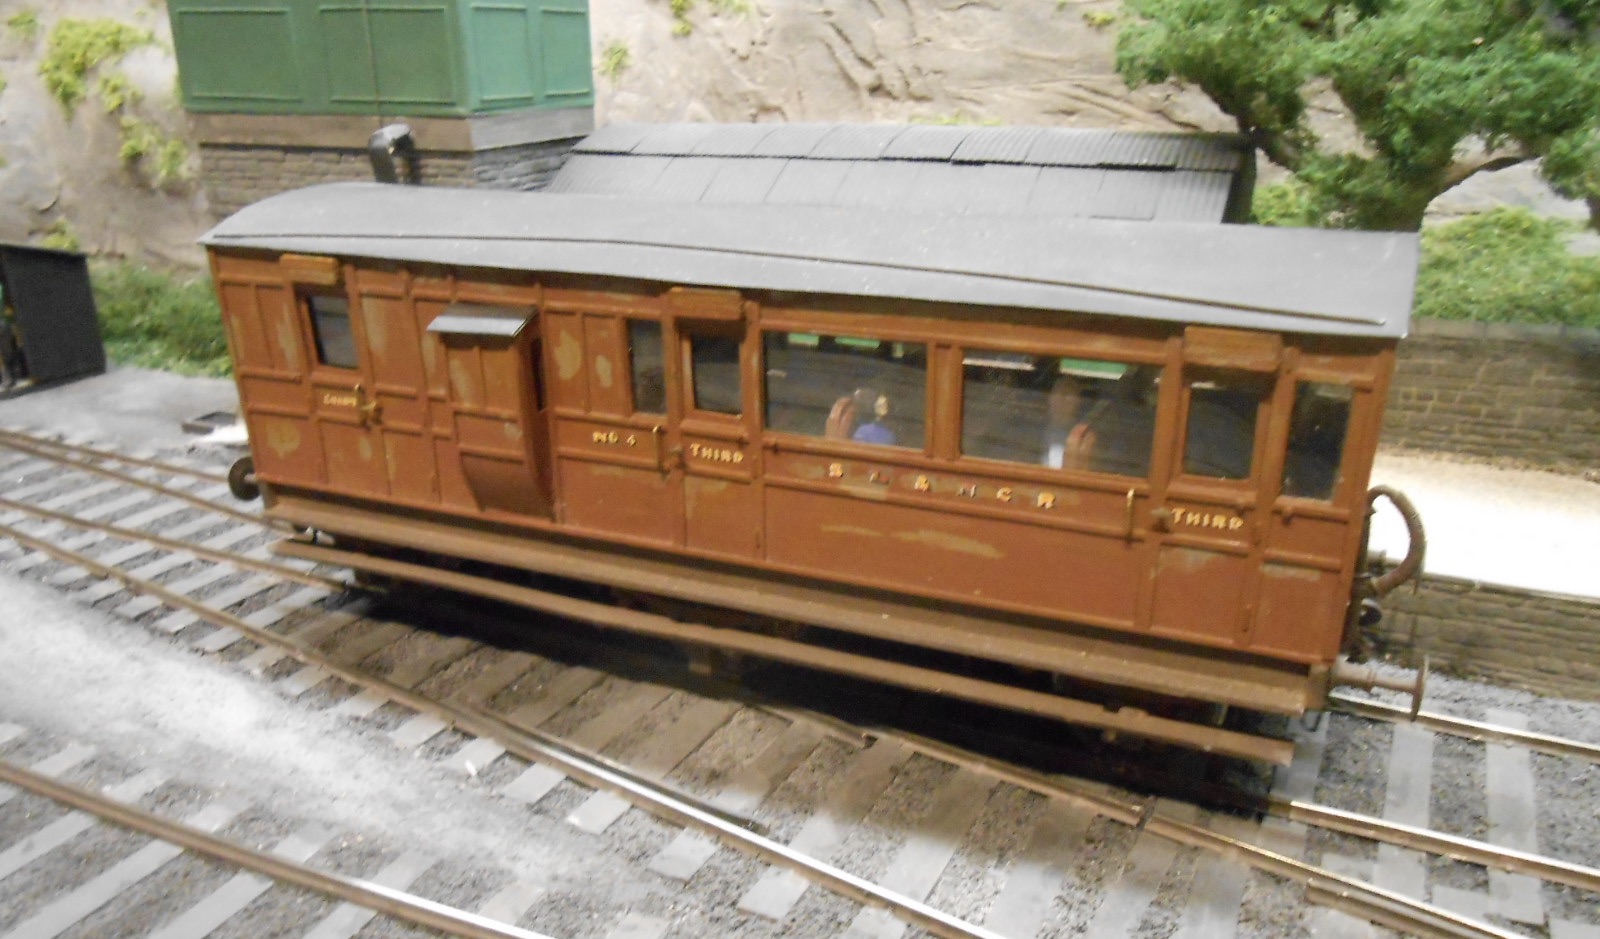
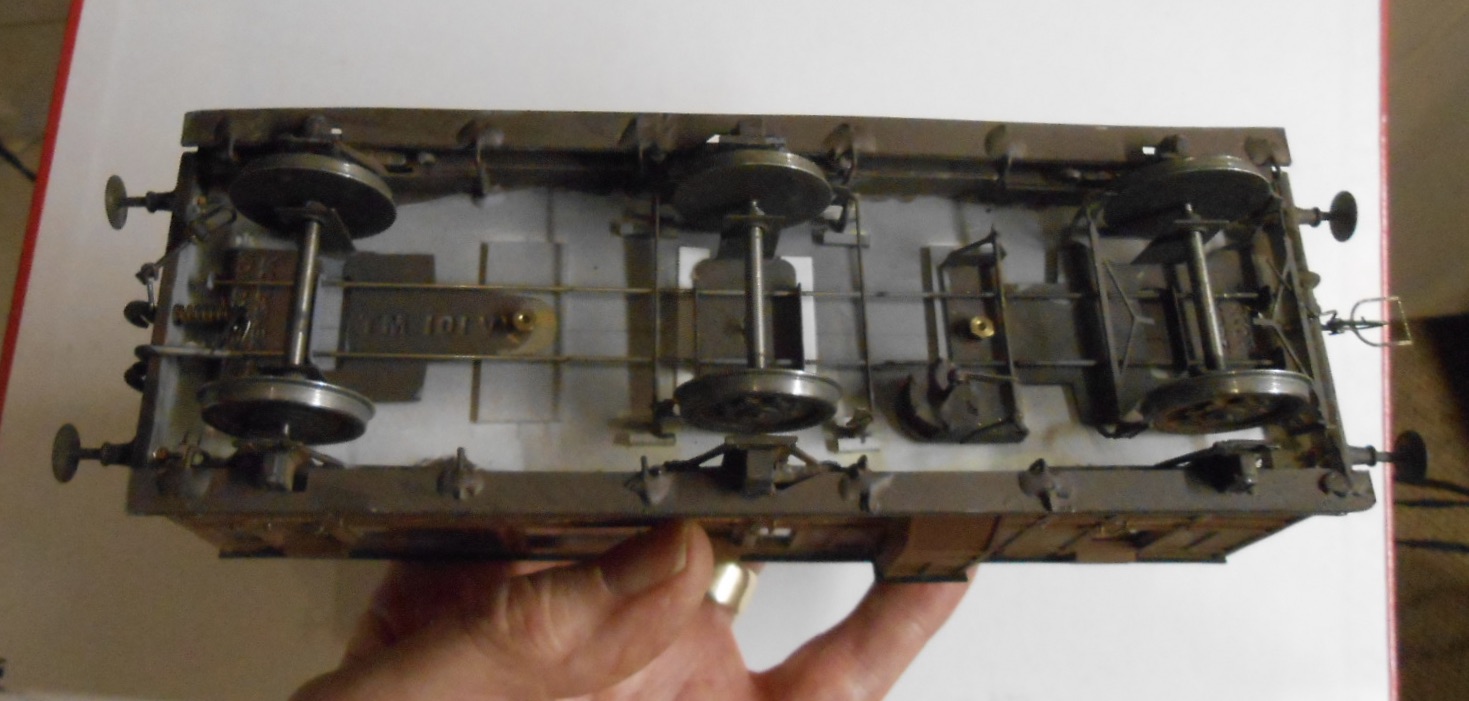
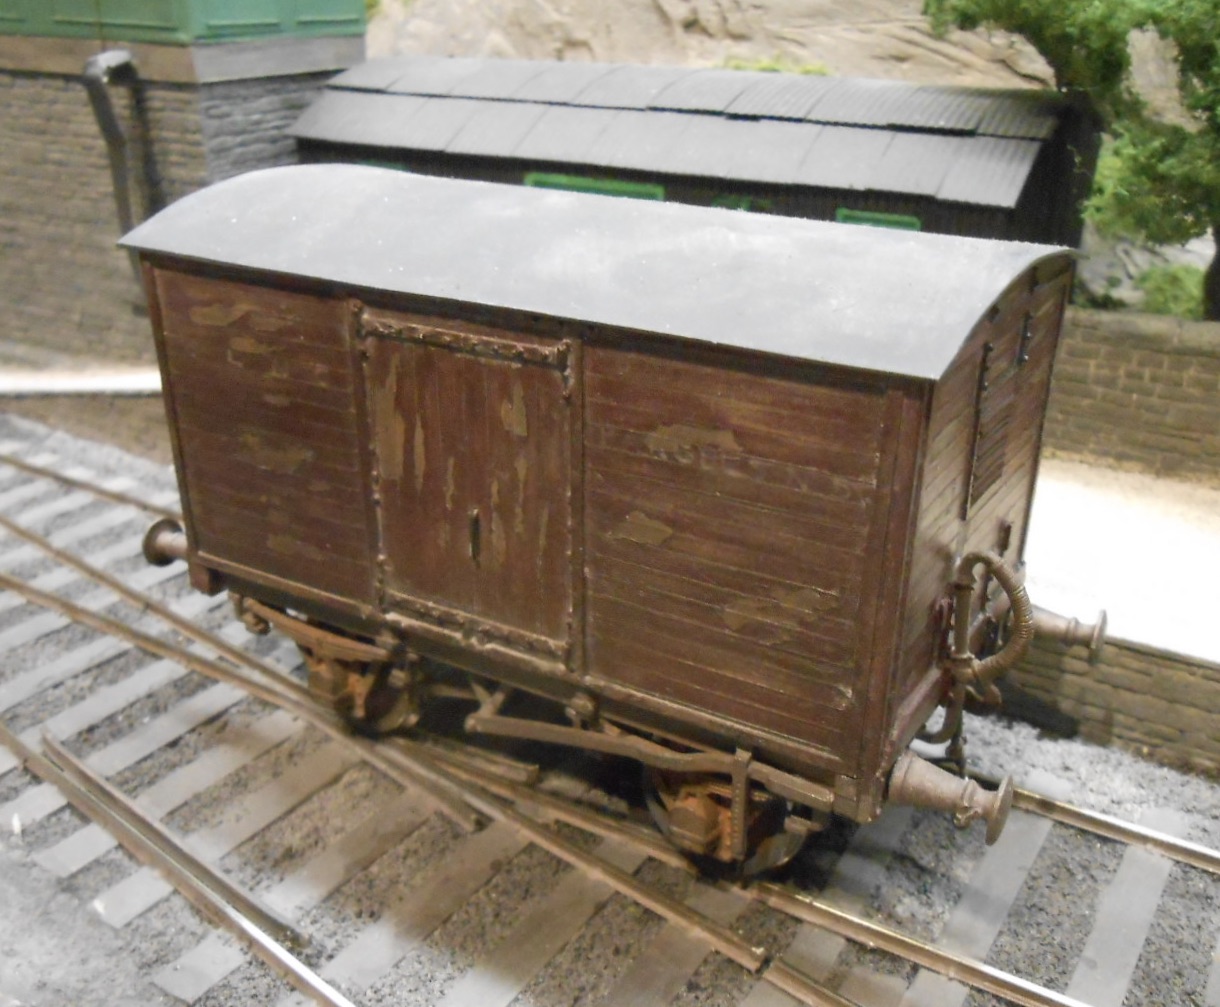
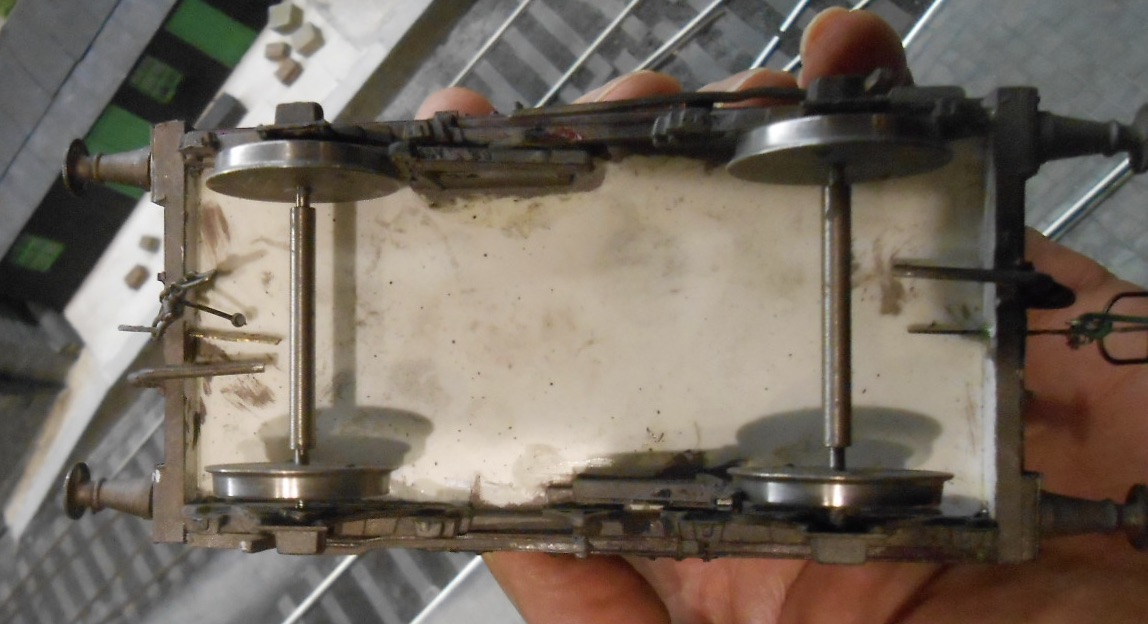
Passenger stock Still with the Sligo Leitrim, I've made three passenger coaches, plus the parcels van. Two of the coaches are the Hurst Nelson bogie vehicles built in the 1920s to replace stock lost during the troubles. At just over 44 feet long, with clerestory roofs, they were very much out of date from new. However, these vehicles were full of character and survived to the end in 1957. Number 9 was the brake 1st/3rd coach, often used on the 7.20pm mixed from Enniskillen, the only steam hauled passenger train in latter days. Number 10 is a composite, similar to No11, but the latter had a thin strip along the roof which tells us it had electric lighting. This was missing on number 10 and it was known as the 'day coach' for obvious reasons. Other unusual features of SLNCR coaches include the doors being hung on the right [the opposite to normal and the smoking and non-smoking compartments were split longitudinally by a sliding door. Alphagraphix card kits formed the starting point, though both coaches are scratch built in plastic sheet and strip, with cut down Slater's bogies. The square windows and panelling made first much simpler construction than rounded type! No 9's paint finish represents the fact that it had a bit of a makeover late in life, while No10 is presented looking very tired. The other coach is a six wheel saloon/brake 3rd, rebuilt later in life to this condition. The same construction methods were used, though the chassis is an etched kit from AlphaG which gives an effective representation of a Cleminson chassis. The parcels van is a simple four wheel affair, built the same way, but using cast white metal fittings for the W irons, springs and so on. The photos of the underside of this vehicle show how standard Slater's wagon wheels have room to be moved out on their axles to 5'3 gauge. The correct back to back is apparently 33.98mm, but 34mm does for me...

- 56 replies
-
- 15
-

-

-

-
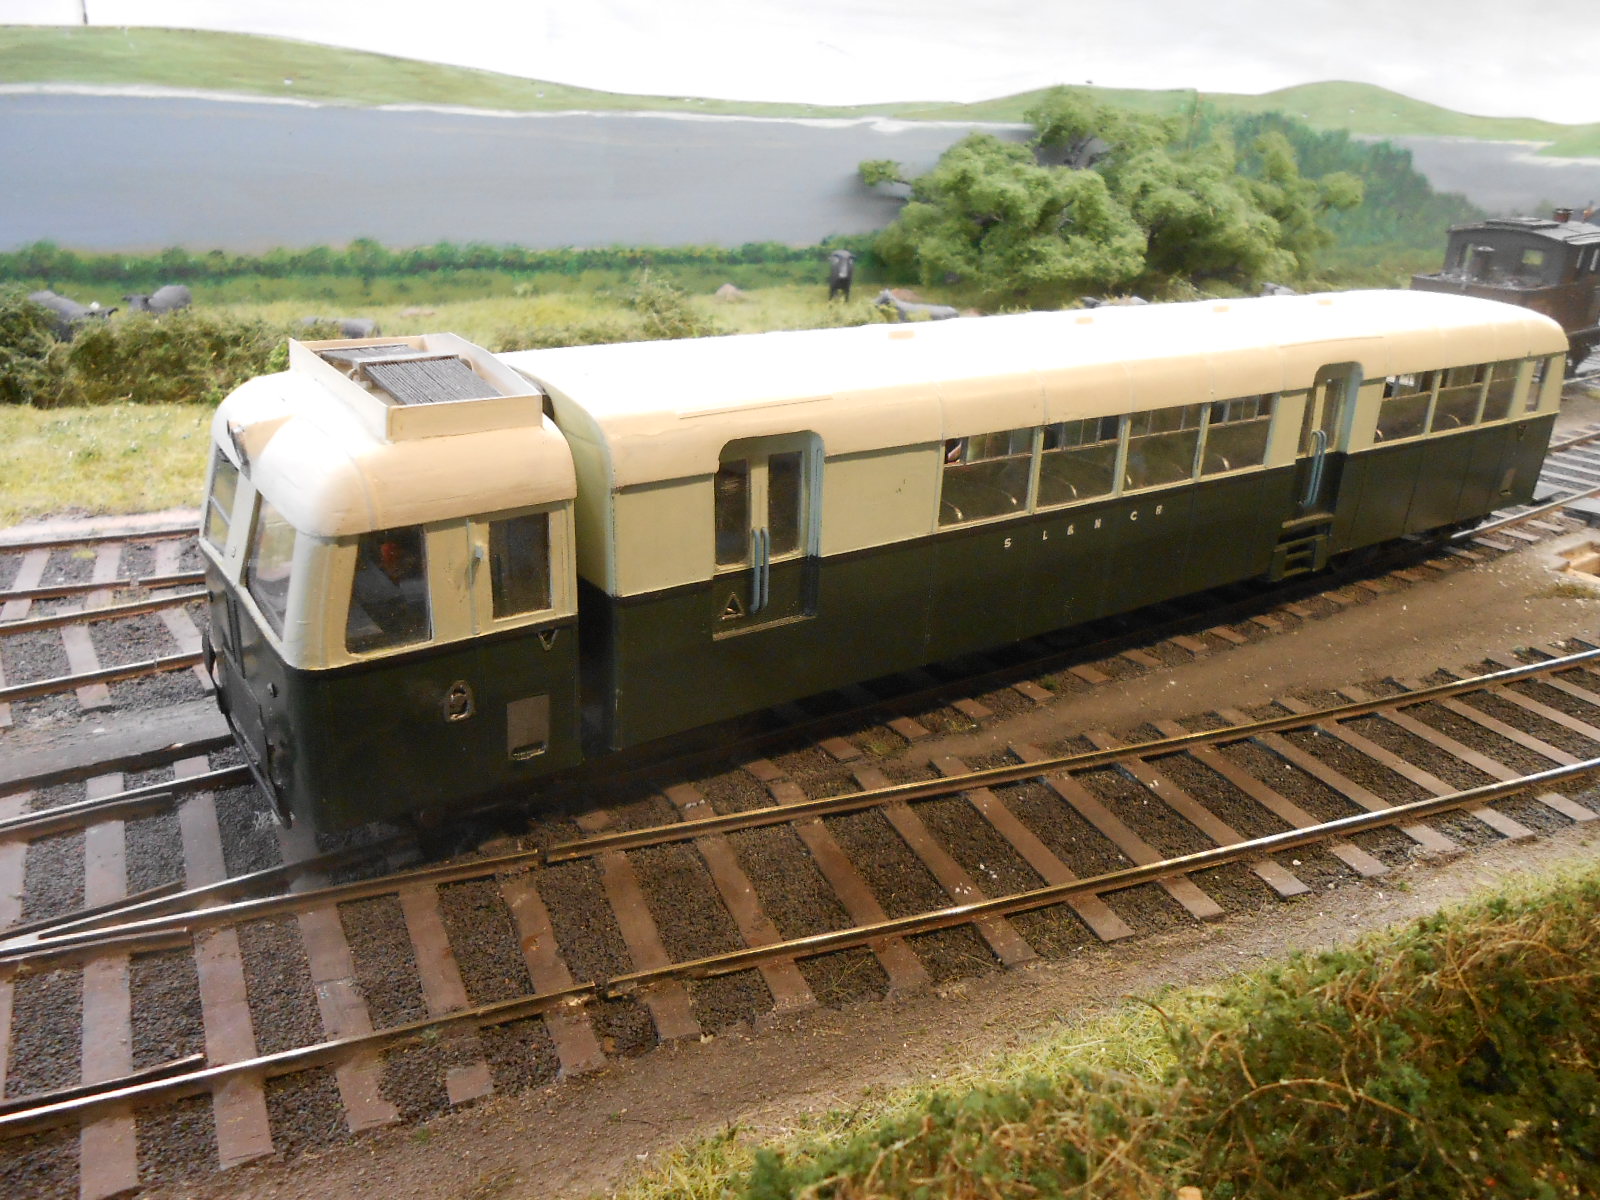
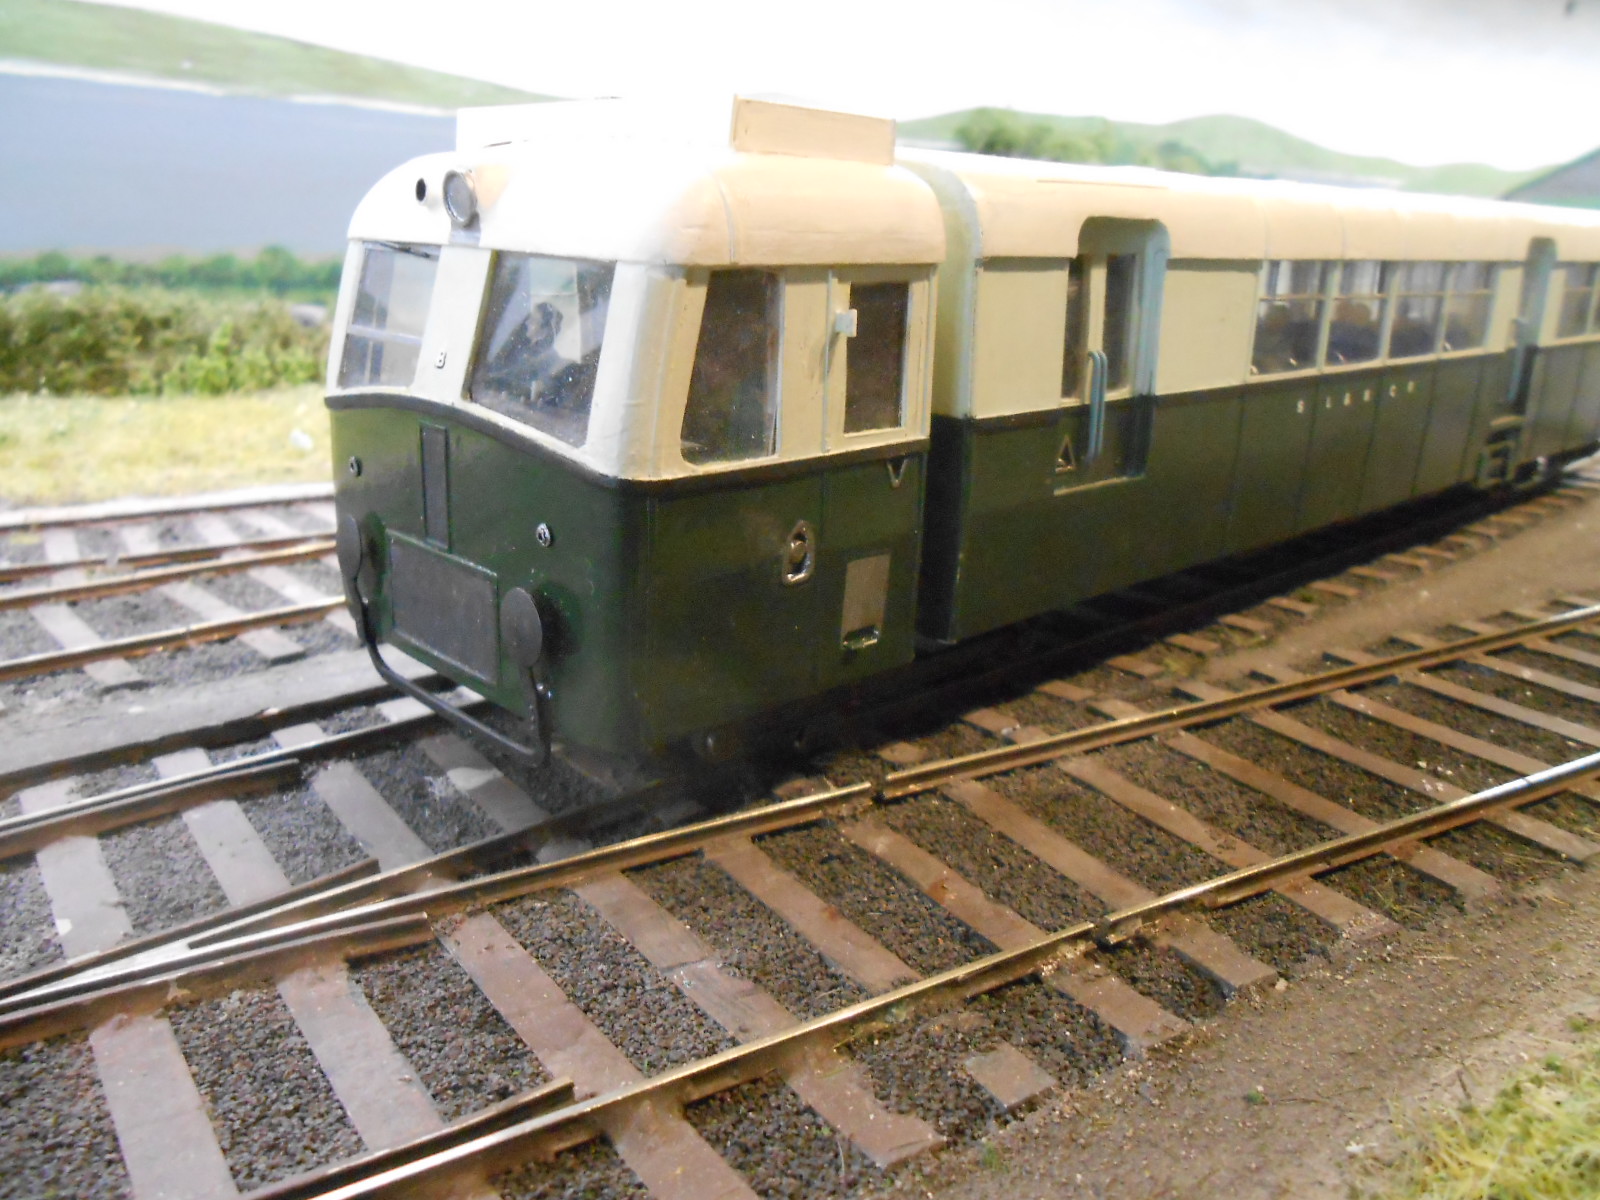
Thanks for the comments folks! Wasn't going to add anything so soon, but find myself waiting for information about an Ofsted inspection at one of the schools where I am a governor - something I don't enjoy - the waiting or Ofsted... You don't get to be a headteacher without at least a small control freak inside you and mine comes to the fore at times like these. Thank goodness I've retired from all that. Anyway, Galteemore mentioned Sligo diesels, so here are a couple of them. Railbus 2b came first and owes its existence to the three quid Alphagraphix card kit. This makes for a very effective drawing to start a scratchbuild & actually I think this is an easier course, given all the complex shapes involved. It's a proper mixed media jobbie with a nickel silver chassis, plastic body and balsa roof. Somehow, I've managed to capture the character of the prototype & it is definitely one of my favourite models. Despite being only two wheel drive, it runs well too, though keeping the pickups on the trailer as light as possible, while still ensuring good current collection was a case of careful balance. A key feature are the Howden-Meredith Patent wheels. On the prototype, these are flanged steel rims outside the standard pneumatic tyres. For the model, I sliced thin outer sections from the wheels of a Corgi Lipton's Tea Van and stuck them to standard Slater's wagon wheels. The front axle pivots slightly and this is another pair of wheels that are on the cusp of not rotating if the fine PB wire pickups are not adjusted properly. The bodywork was slowly built up from plastic sheet and strip - the fiddly bit being the area around the cab. A compromise on Northport Quay is that there is no room for a turntable, so the railbus will have to reverse out to one deemed to be off scene, through the tunnel, as I very much want it to feature in the 1950s scene. Railcar B was a very different kettle of fish and it is a real shame that the iconic prototype may never run again. A giant Donegal railcar for 5'3, it was very advanced for its time, with sliding doors and able to be driven from either end. Another one exists and indeed still runs in Australia. There were numerous challenges in building the model. Starting with the chassis, I found some suitable diameter driving wheels, but they were on 1/8th inch axles, without square ends for quartering. I rang Slaters to see if they could help and was immediately put through to chief engineer David White. "That shouldn't be a problem", he said, "how many do you want?" Two, I replied. 'Ah", he said "I thought you might mean 100"! All down to the cost and setting up of machine tooling, you see. So, that wasn't going to happen and instead I went on the P4 Society website to learn how to quarter wheels like this and all has been well. The four coupled chassis is compensated and with pick up from all eight wheels, the model runs really well, though on Arigna Town it had a tendency to derail in one direction until I discovered the track was 1mm out of gauge at that point! The bodywork required a lot of effort to get all those complex curves right and was a reminder of how much effort must go into creating the moulds for die cast model cars - even small discrepancies stand out a mile. The roof required careful shaping too, while for the interior I made a couple of simple masters for the seats and then resin cast them. Although just being an 'out and back' on both NPQ and Belmullet, Railcar B has plenty of character & certainly looks the part with its outside rods twirling. Still no word from school on Ofsted - they should be fine, but the Dark Side still carry a threat to every teacher's well being. Every inspection is on the relentless side of thorough so I'd really like to know what they are looking for when governors get a grilling, sometime tomorrow or Wednesday.
- 56 replies
-
- 18
-
-
-
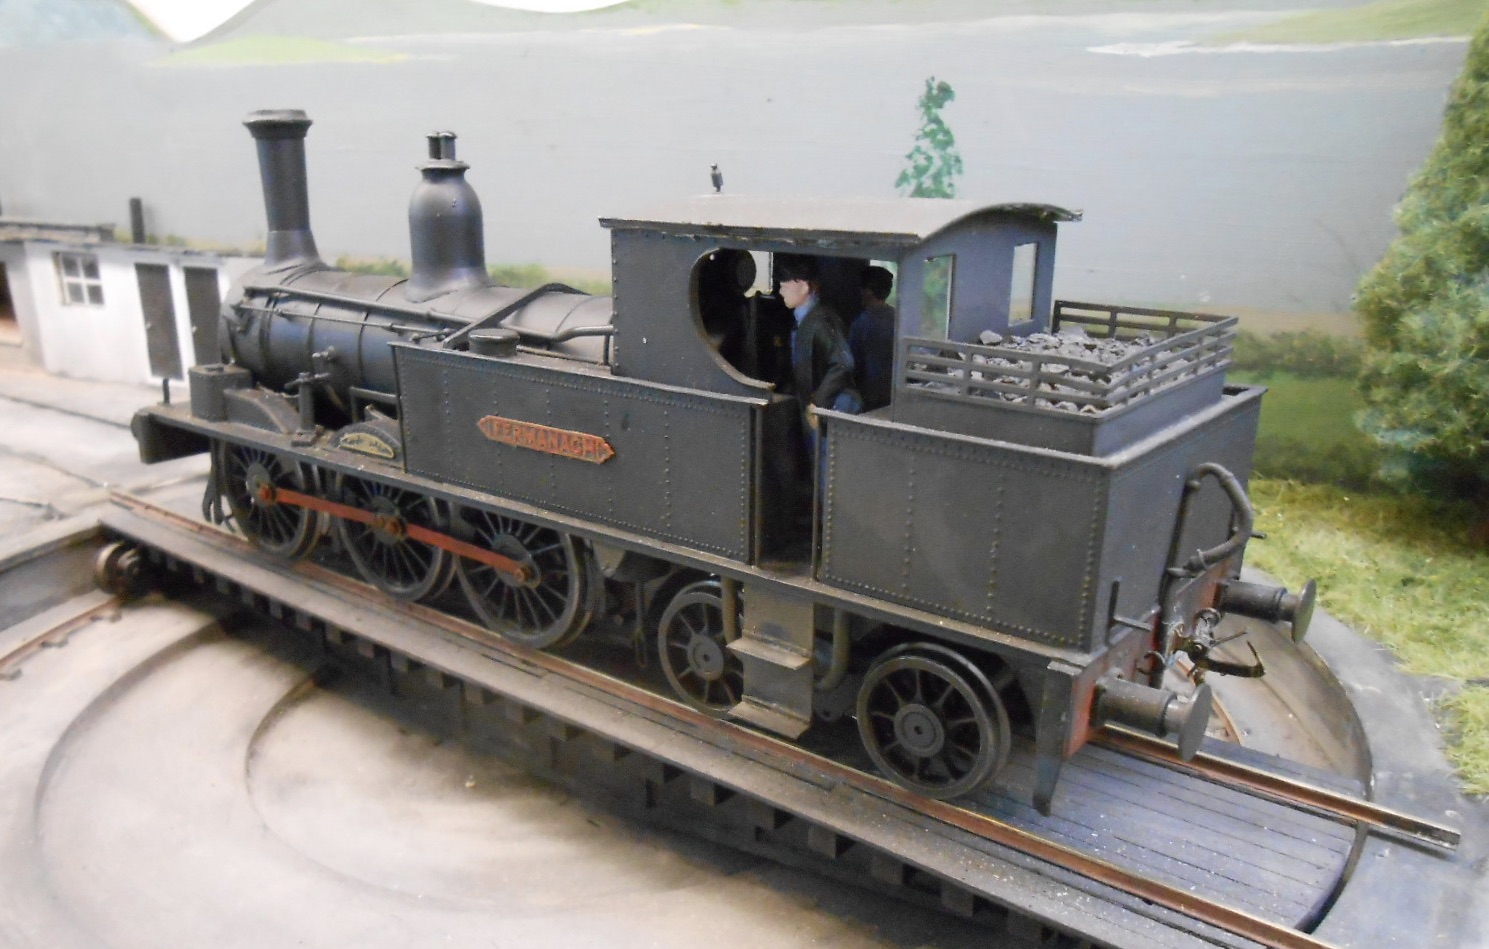
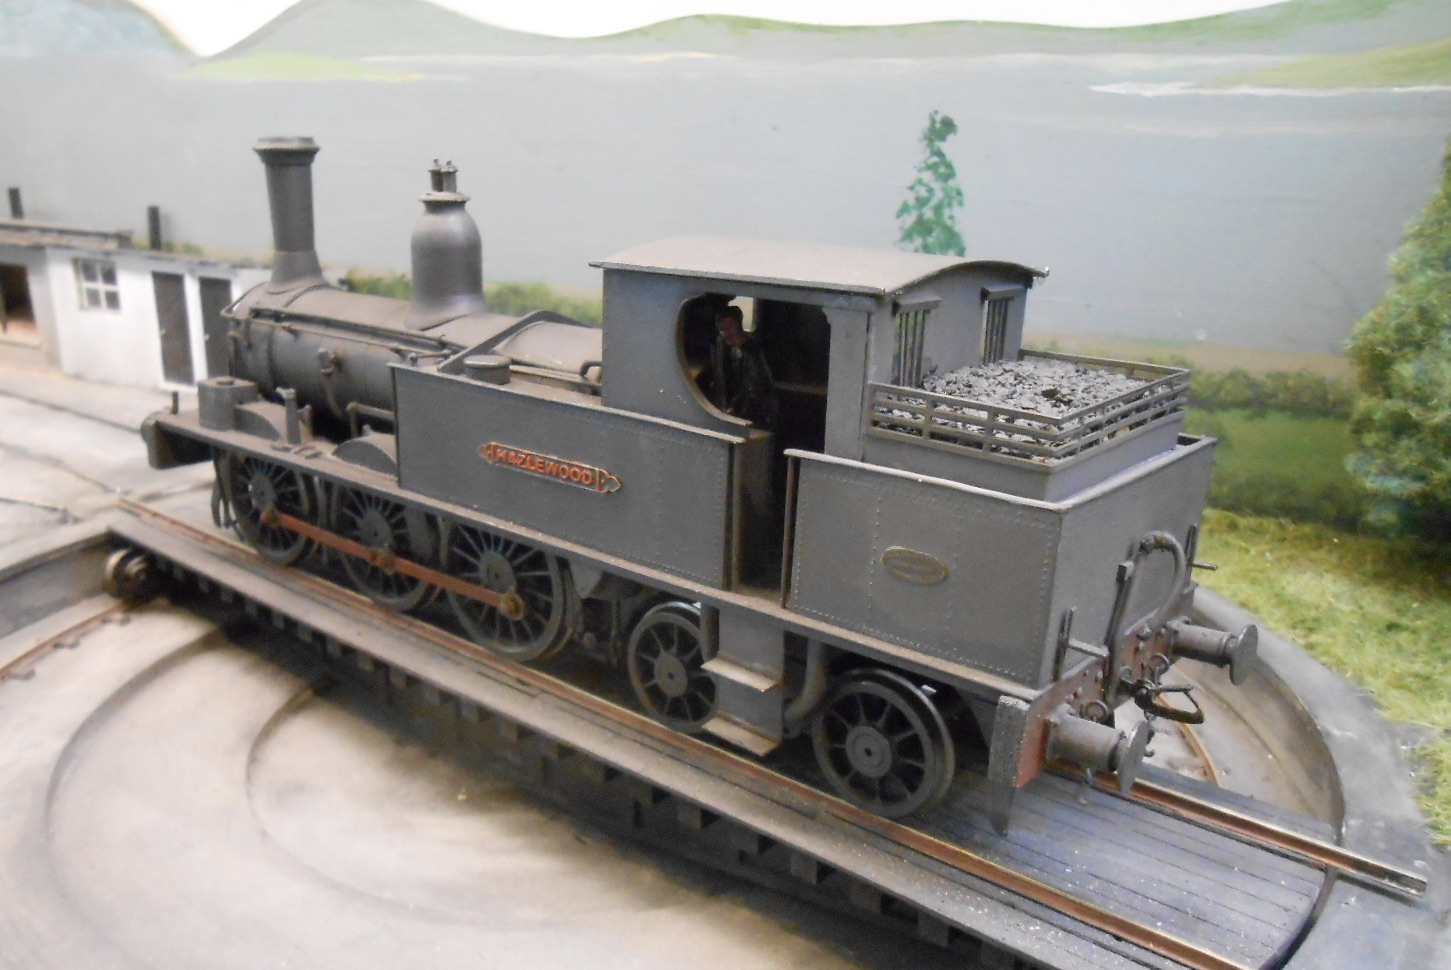
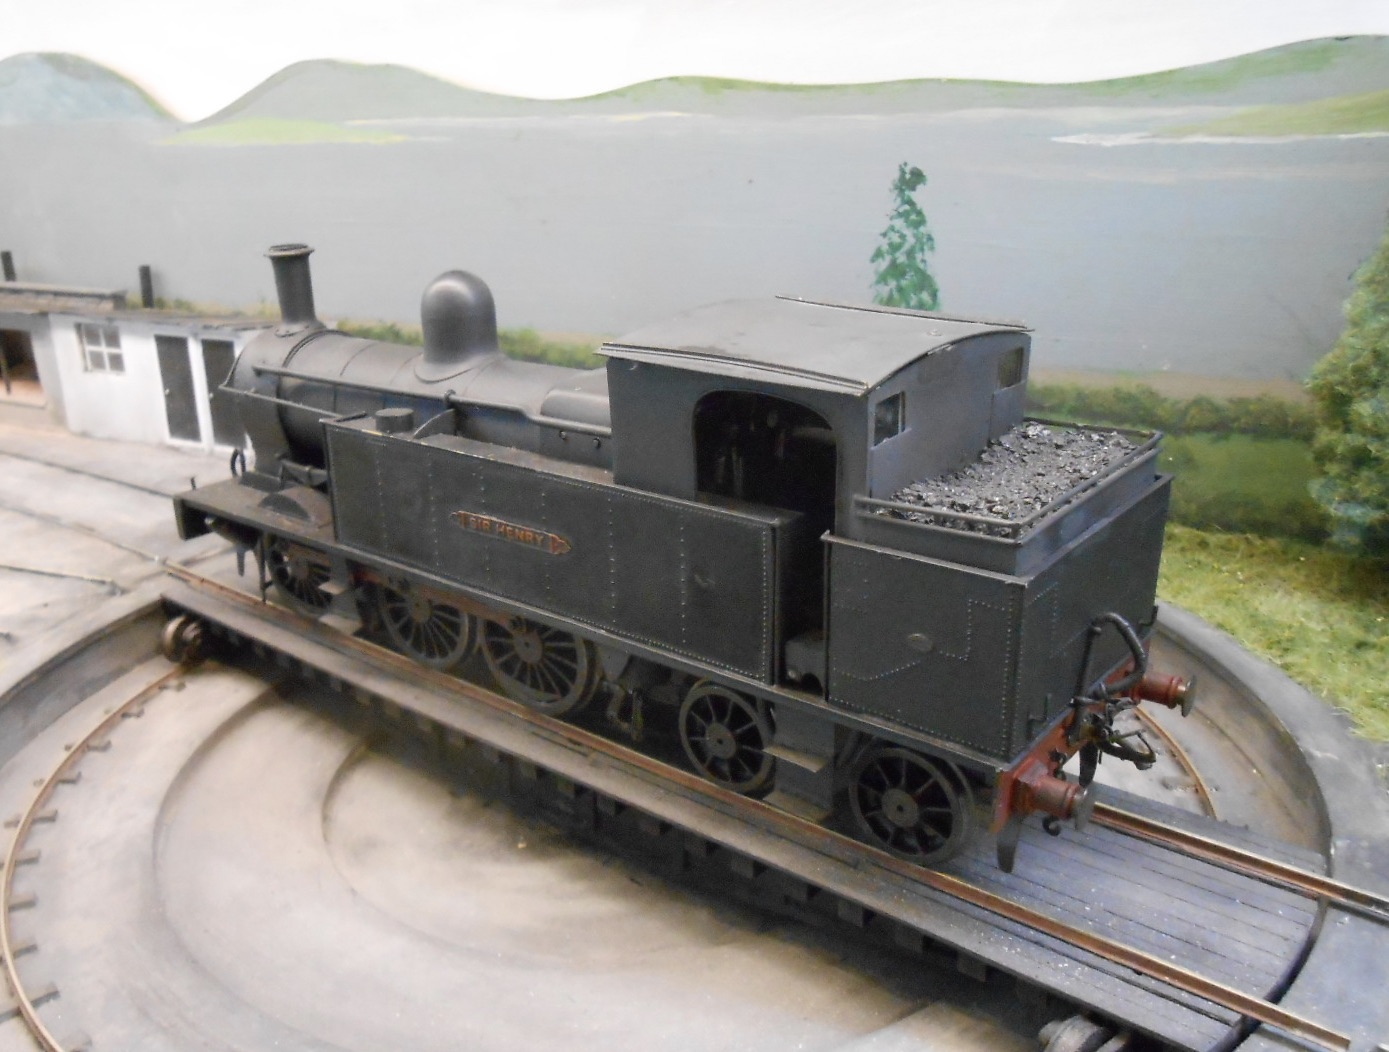
Let me begin by saying there is nothing new here for anyone following my ramblings, however my 'to do' list doesn't involve very much worth reporting at the moment, so this thread is an opportunity to review what I've built over the last ten years and reflect on a range of different models and techniques. Sligo, Leitrim & Northern Counties Railway If anything got me into Irish railways, it was this company and in particular the books of Neil Sprinks. With a surname like mine, an interest in Light Railways is perhaps inevitable, so the SLNCR certainly fitted the bill in my usual quest for something different. This was over ten years ago and all I knew at the time about commercial support for the Irish scene was held in the Alphagraphix catalogue, with its many card kits, plus a few etched brass items in the growing Tyconnel section. Then I found out about Northstar models, who unbelievably produced a kit of the SLNCR 0-6-4 'Small Tank'. Roger Cromblehome of AlphaG kind put me in touch with Northstar, from which I discovered that proprietor Adrian Rowlands was giving up production, but he did still have two kits in stock. Could I buy one then? No, came the answer, but I will sell both. Turns out that it was £750 well spent, both the kits came complete with motor, wheels, gears and couplings - not a lot more that it will cost for a single model these days. And what lovely kits they were too, being later versions than the one so beautifully put together recently by Galteemore of this parish. Hazlewood came first, followed sometime later by Fermanagh, the latter finished in somewhat cleaner condition. Really well designed, I don't remember using any filler in either model, so good was the fit of the parts. The rear bogie is rather clever too, featuring both vertical and lateral springing, so these locos run well too. On both Belmullet and Northport Quay Hazlewood works the 1950s sequence, while Fermanagh is used for the 1900s periods Lovely though the Small Tanks are, what I really wanted a model of was Sir Henry - the 'Large Tank' that features in so many 1950s photos. Nobody was ever going to produce a kit for this, so it became a full on scratch build in brass and nickel silver, with [apart from the usual wheels/motor/gears], the only bought in items were the chimney, buffers, dome and safety valves. I got a general arrangement drawing from Manchester Museum of Science and Industry and made a basic outline drawing from that. Outside of S7 though [and maybe not even then], driving wheel spacing had to be adjusted slightly, so close together are the wheels. Having the Small Tank instructions was a great help, as was owning a GW Models rivet press. All the Sligo tanks are festooned with rivets, around 1200 per loco, so getting them correctly spaced was a real challenge. Indeed, the inner side of Sir Henry's tanks are also fully riveted, but not quite as well as the mark 2 version. Waste not, want not... The other thing I did with Sir Henry was fit working inside motion. The boiler pitch is much higher on the Large Tanks, meaning you can clearly see between the frames. So, I invested £100 in a set of Laurie Griffin's excellent castings which proved easier to put together than outside Walschaert's - aided to no small extent by the greater space between the frames that one gets from 5'3. The exercise certainly proved worthwhile as the motion is clearly seen in [almost sewing machine like] action when the loco is running. Unfortunately, Sir Henry is currently prohibited from NPQ as its clearances are a bit tight on one of the points, causing it to derail - which is one of those jobs on my 'to do' list, along with making sure the uncoupling magnets work successfully. So, lots of playing trains then!
- 56 replies
-
- 20
-
-
-
That's well above my pay grade, but Am sure there are folk out there who will know.
-
Well done Alan, good to see things are back on track.
-
That looks high quality and deserves lots of sales.
-
No easy routes for this man! Great work John.
-
Tick VG, a sticker and extra house points! The photos clearly show that model locos should not be black - it is just too dense, so the weathering really brings the model to life. Having built two of these kits (later versions, mind), I reckon there were around 1200 rivets to press out on each one, so readers should have every sympathy and the Archer rivets transfers work really well. Why anyone would produce a kit of such an obscure loco, especially in 7mm scale and broad gauge is a bit of a mystery, but then look at the finished article and you start to see why. Still available from Studio Scale Models, by the way and the revised version is a delight - as long as you invest in a decent rivet punch! Running rights on Northport Quay a given, David. I think that is five Sligo tanks between us now...
-
Love this type of train - a real mix of vehicles height, length and colours.
-
Looks like very useful advice to me, John. A matt finish to body work and a bit of light use of weathering powders to roof and bogies maybe all that is needed. Interesting to reflect on the techniques require in the various scales, while dealing with 3D prints seems to require an approach all of its own!
-
Like???? This is astonishing work, Scahalane! That roof alone is just epic and good luck with the glazing, by the way... Most of us are happy to work at the smaller scale end of things, but every now and again, someone not only comes up with something truly remarkable in scope, but also has the skill, vision and determination to see it through. By the twitching of my thumbs, something extraordinary this way comes! Just wonderful. Well done sir!
-
Back in the day, when tv programmes were made for schools to watch, a favourite of mine was "Look, Look and Look again!" Sound advice for anyone and even when you look at early Picassos, it is clear he was a brilliant draughtsman before he followed other paths. Cubist model railways another matter methinks!
-
All sorts of lessons and inspiration here, not least that you don't need a huge space to produce something of quality. For me though, it also shows the influence of artistic talent, which makes this scene live and breathe. A great place to photograph favourite models too!
-
Fabulous! Time very well spent.
-
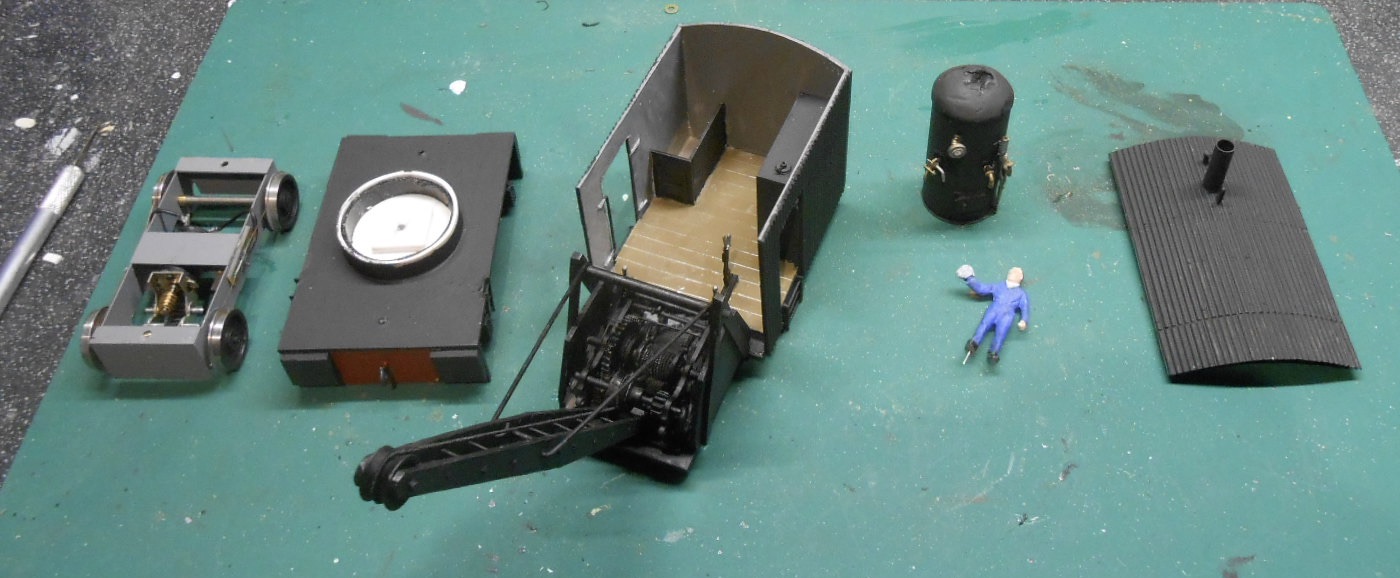
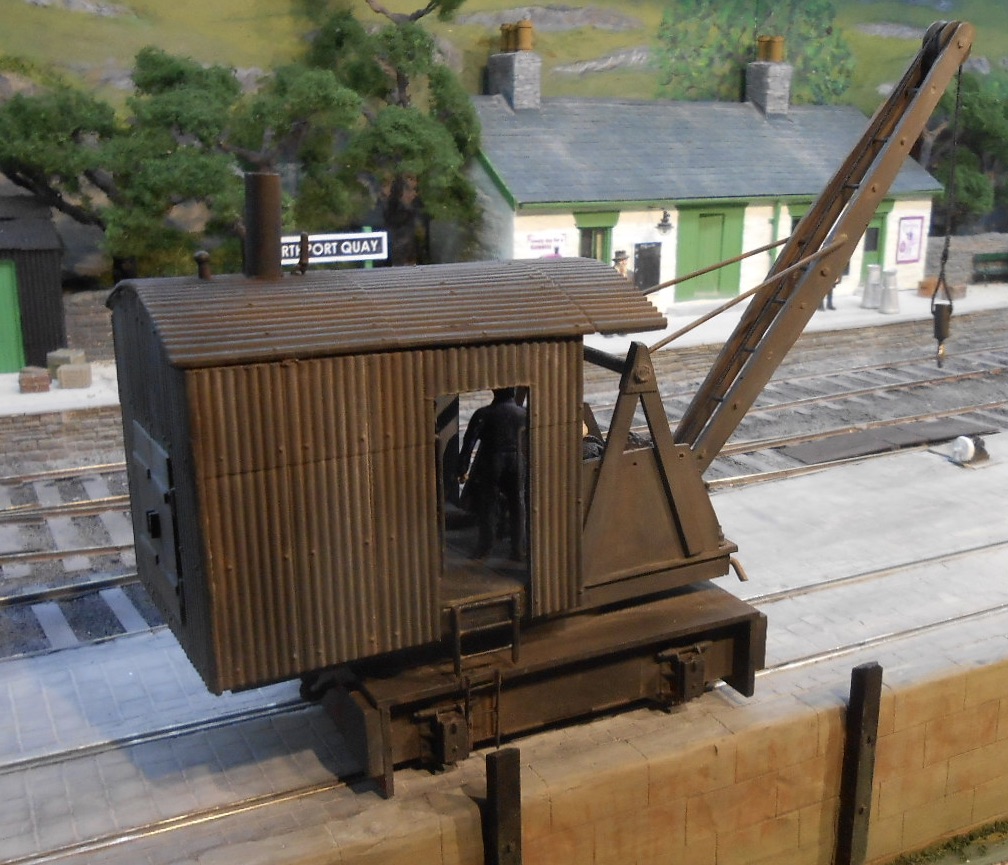
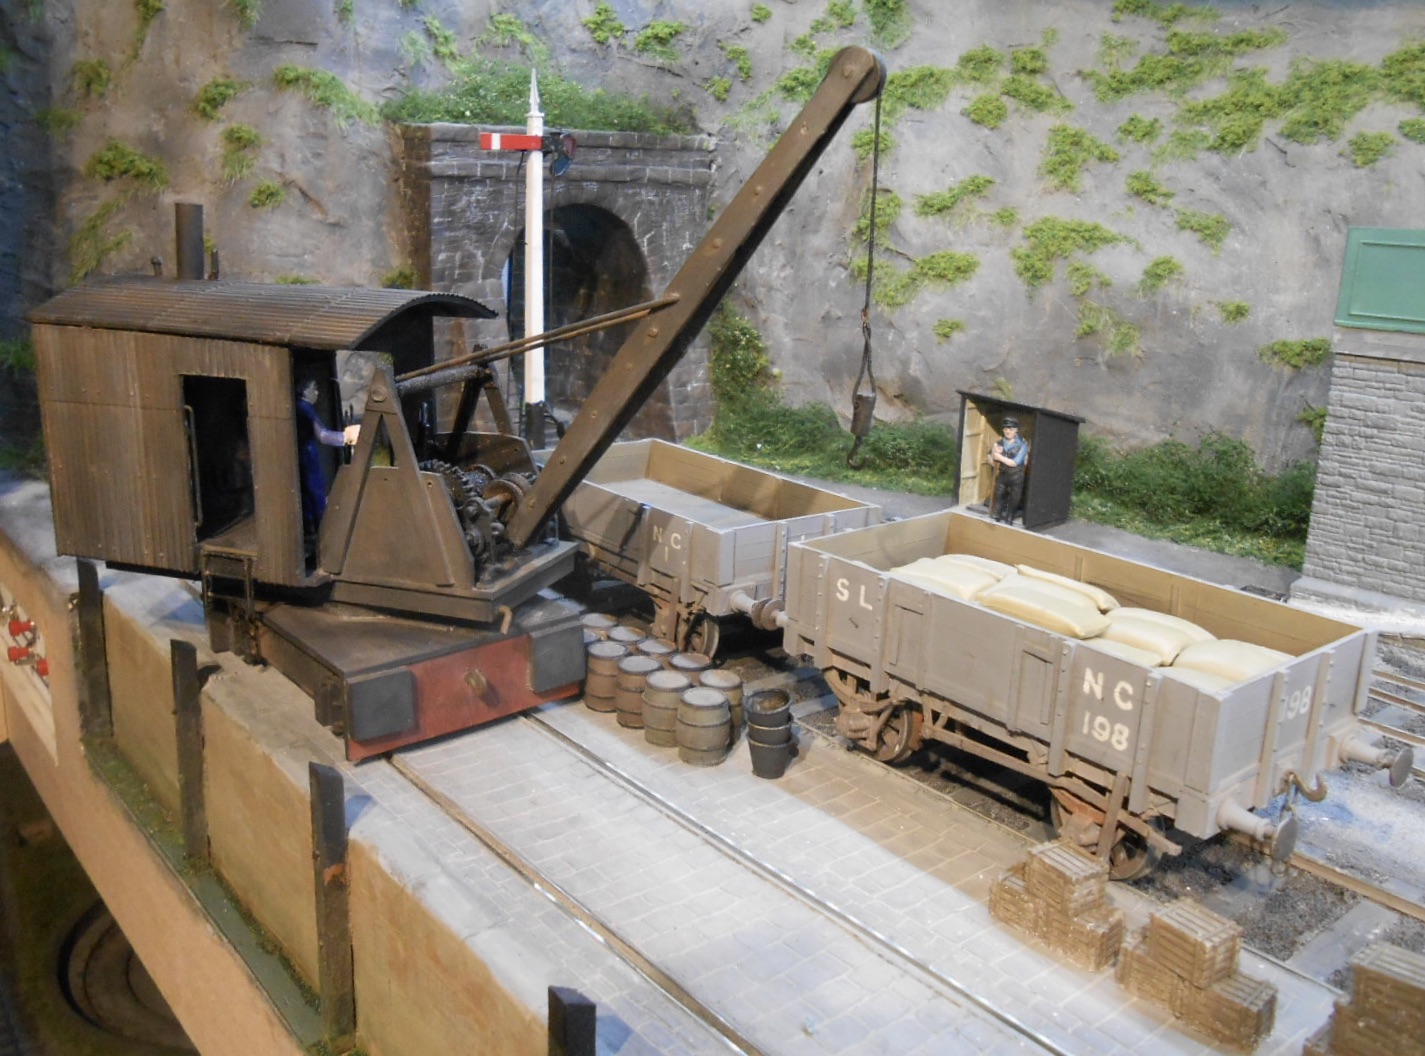
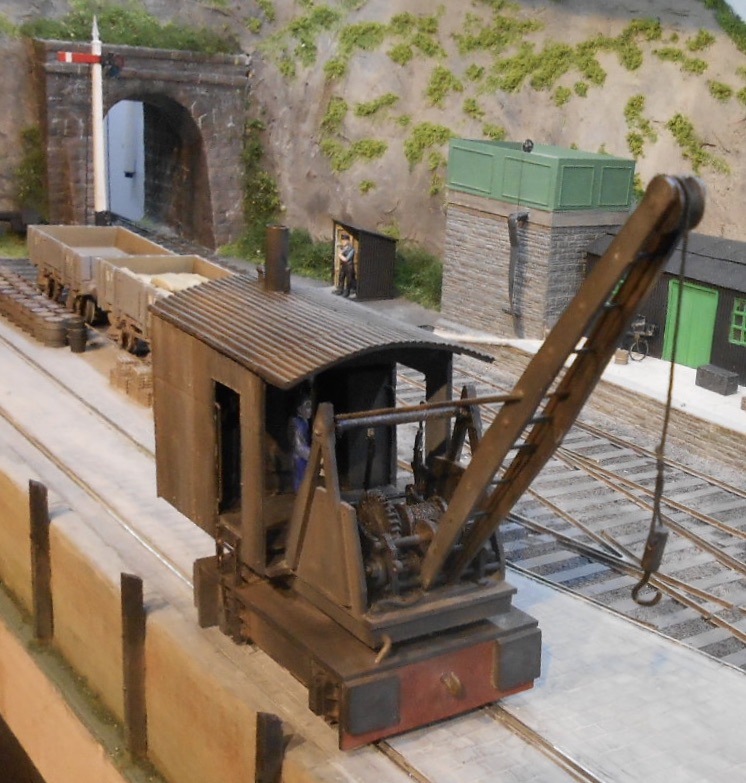
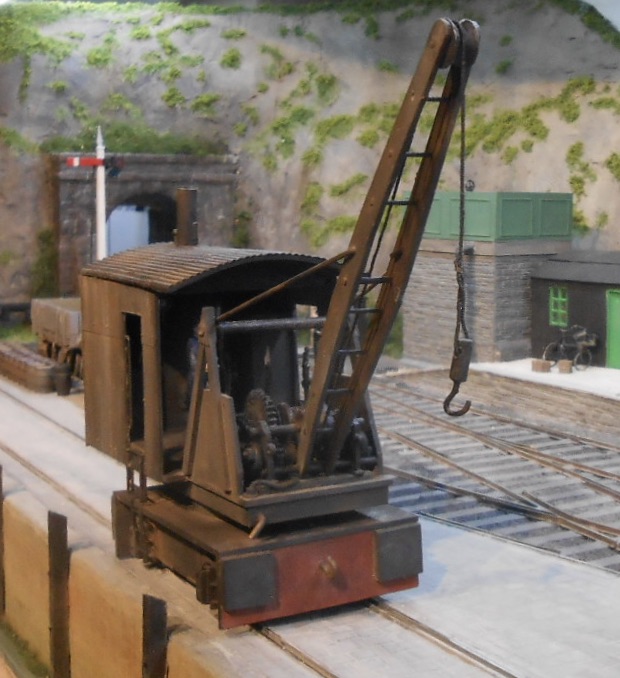
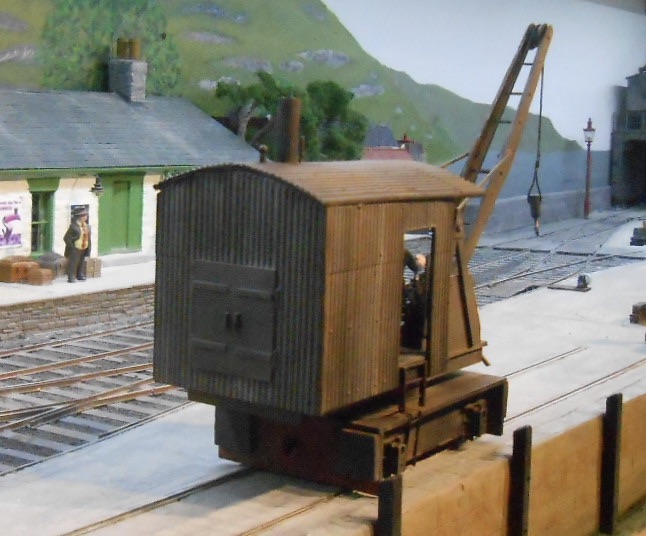
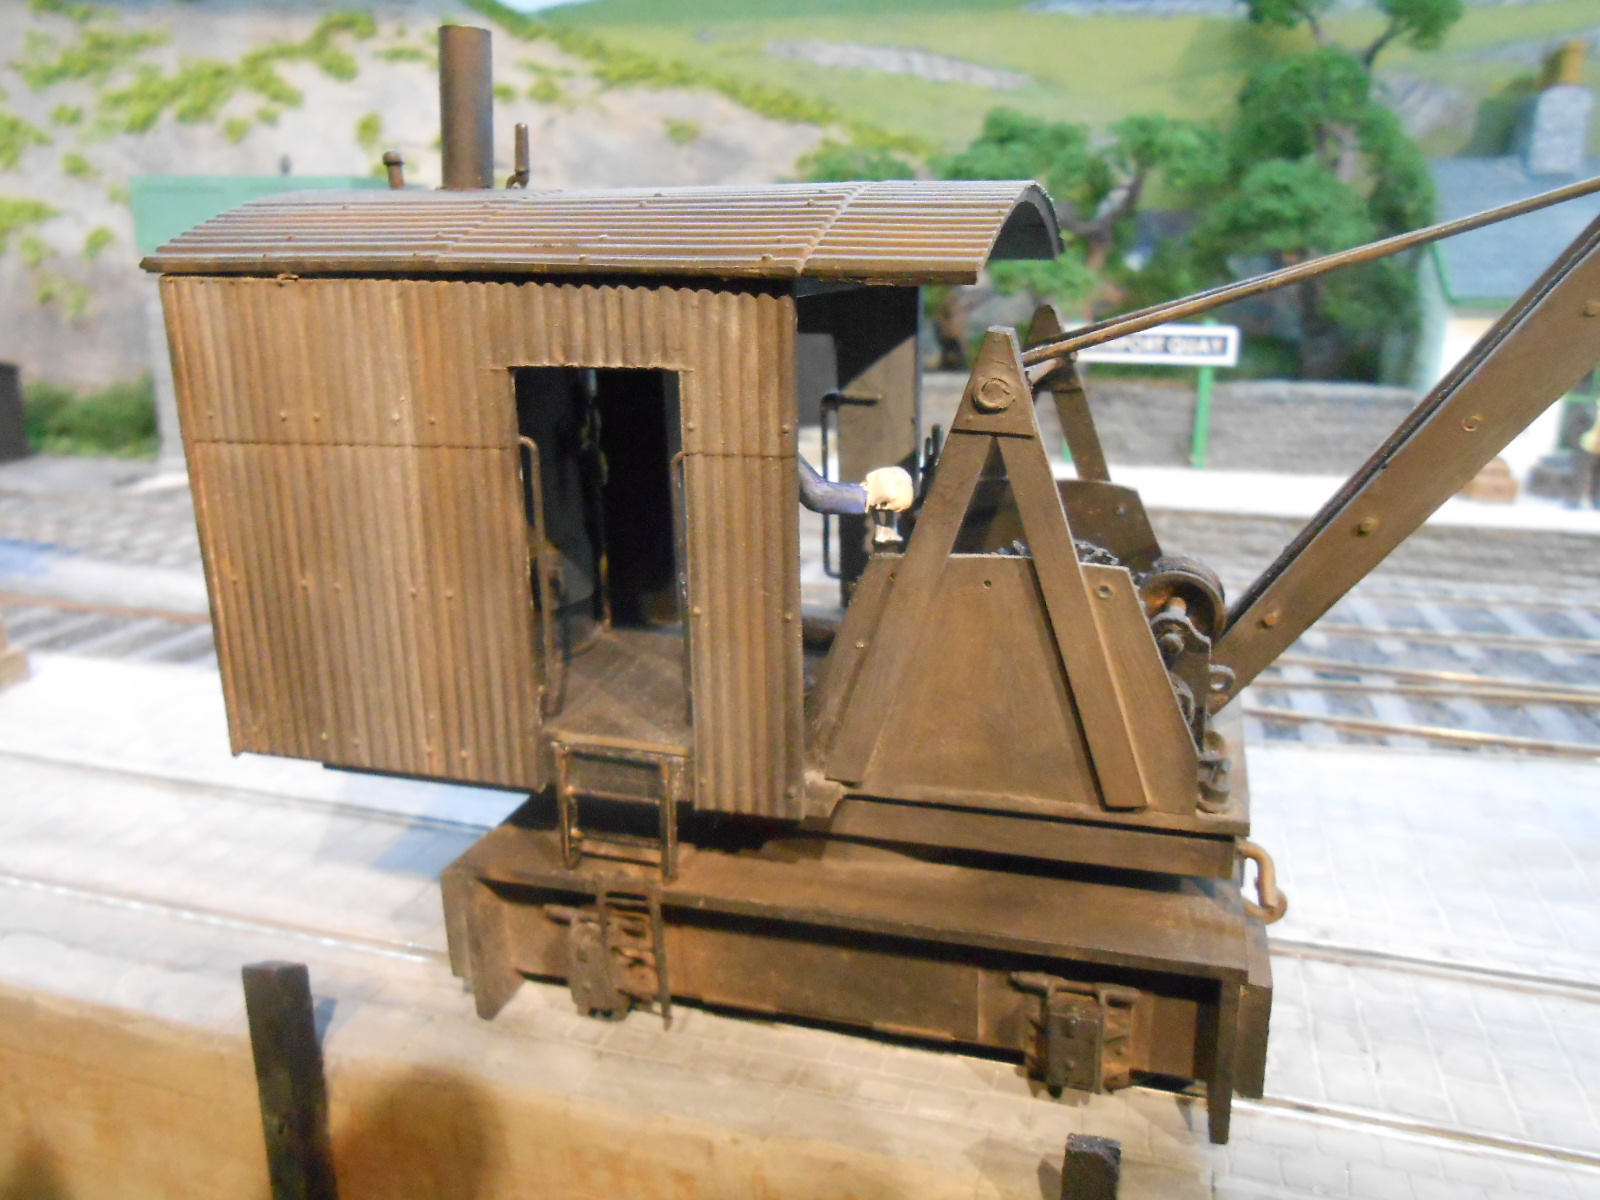
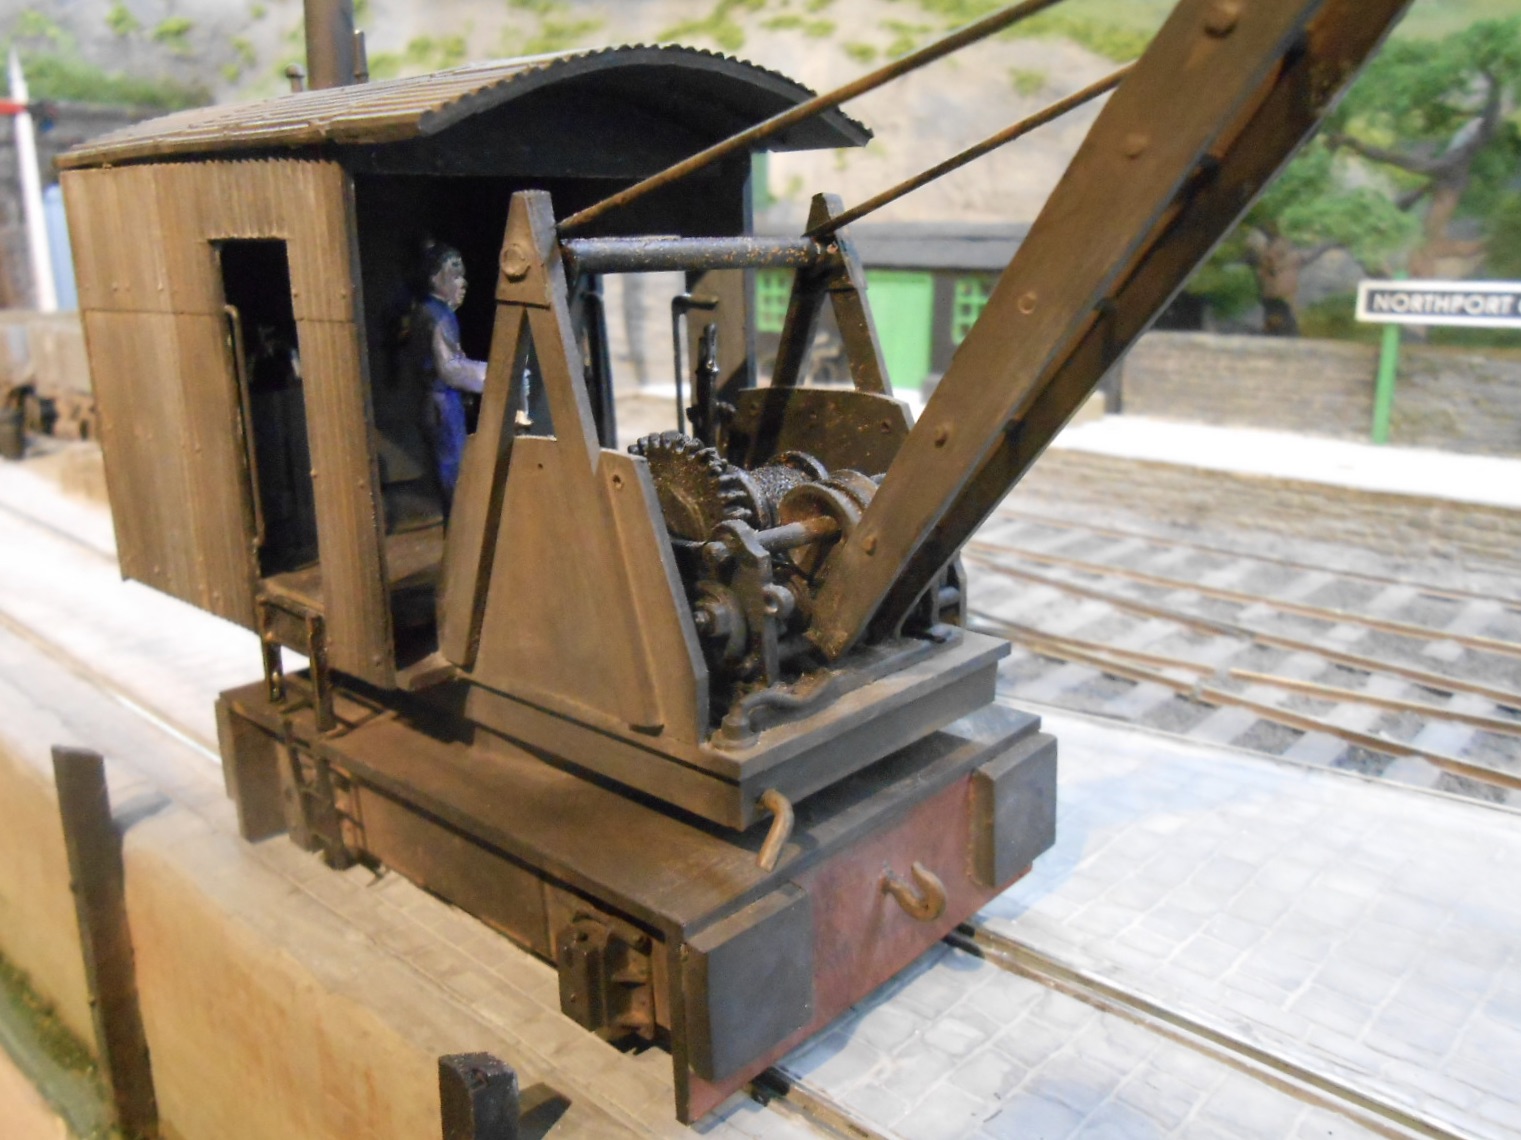
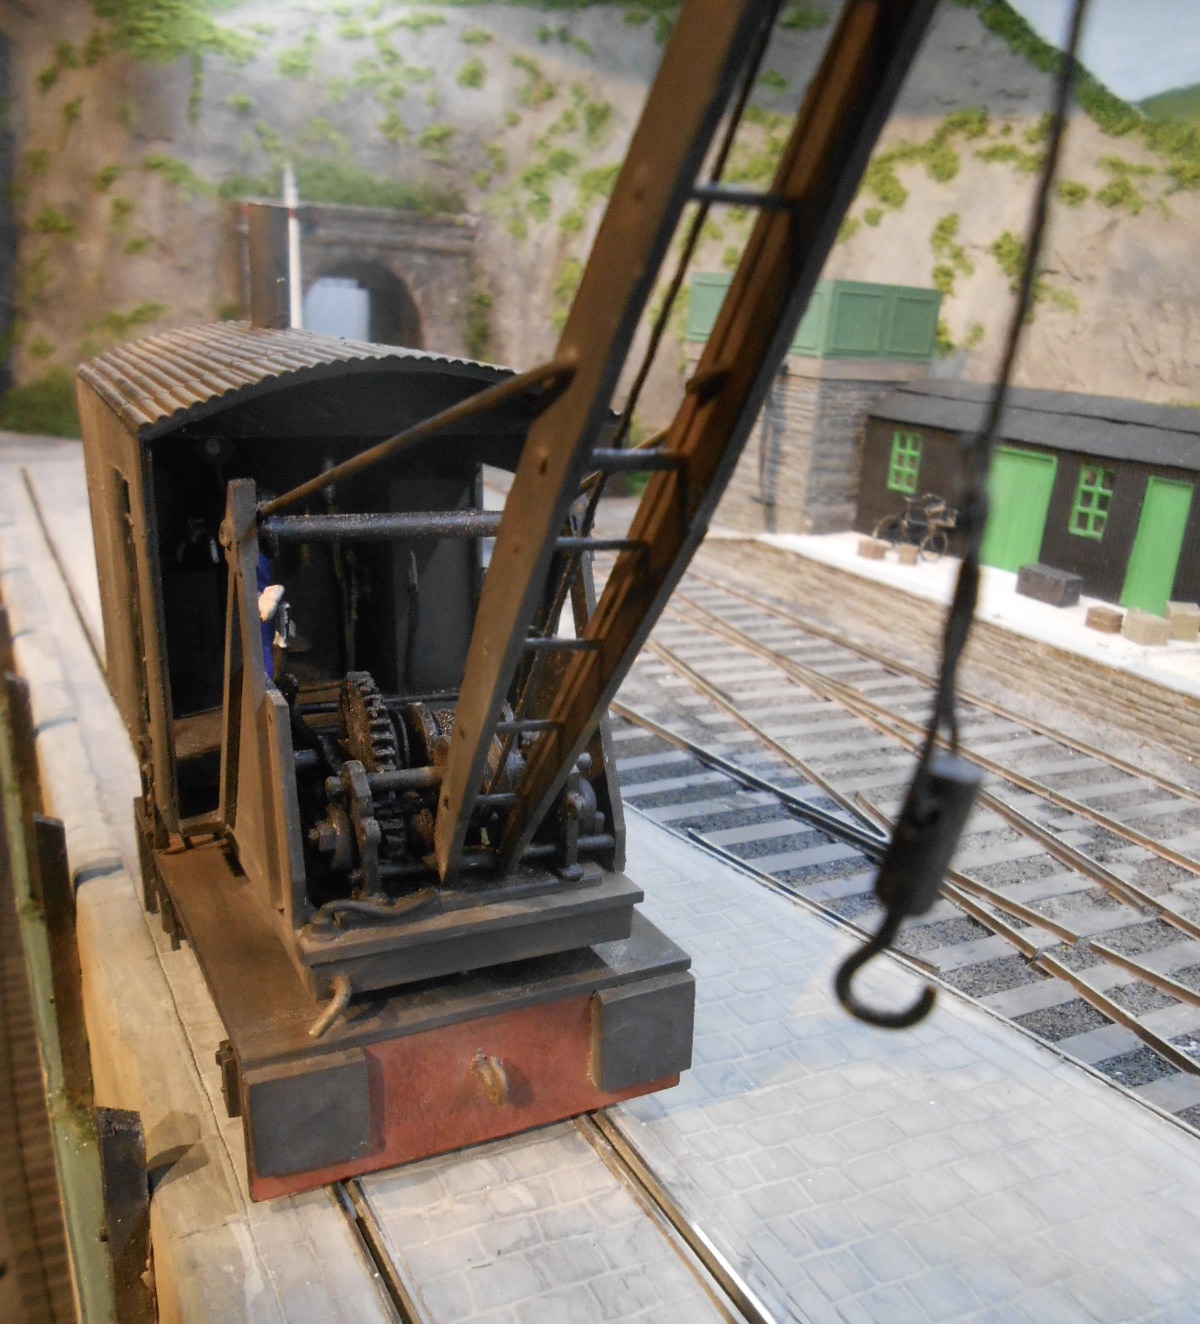
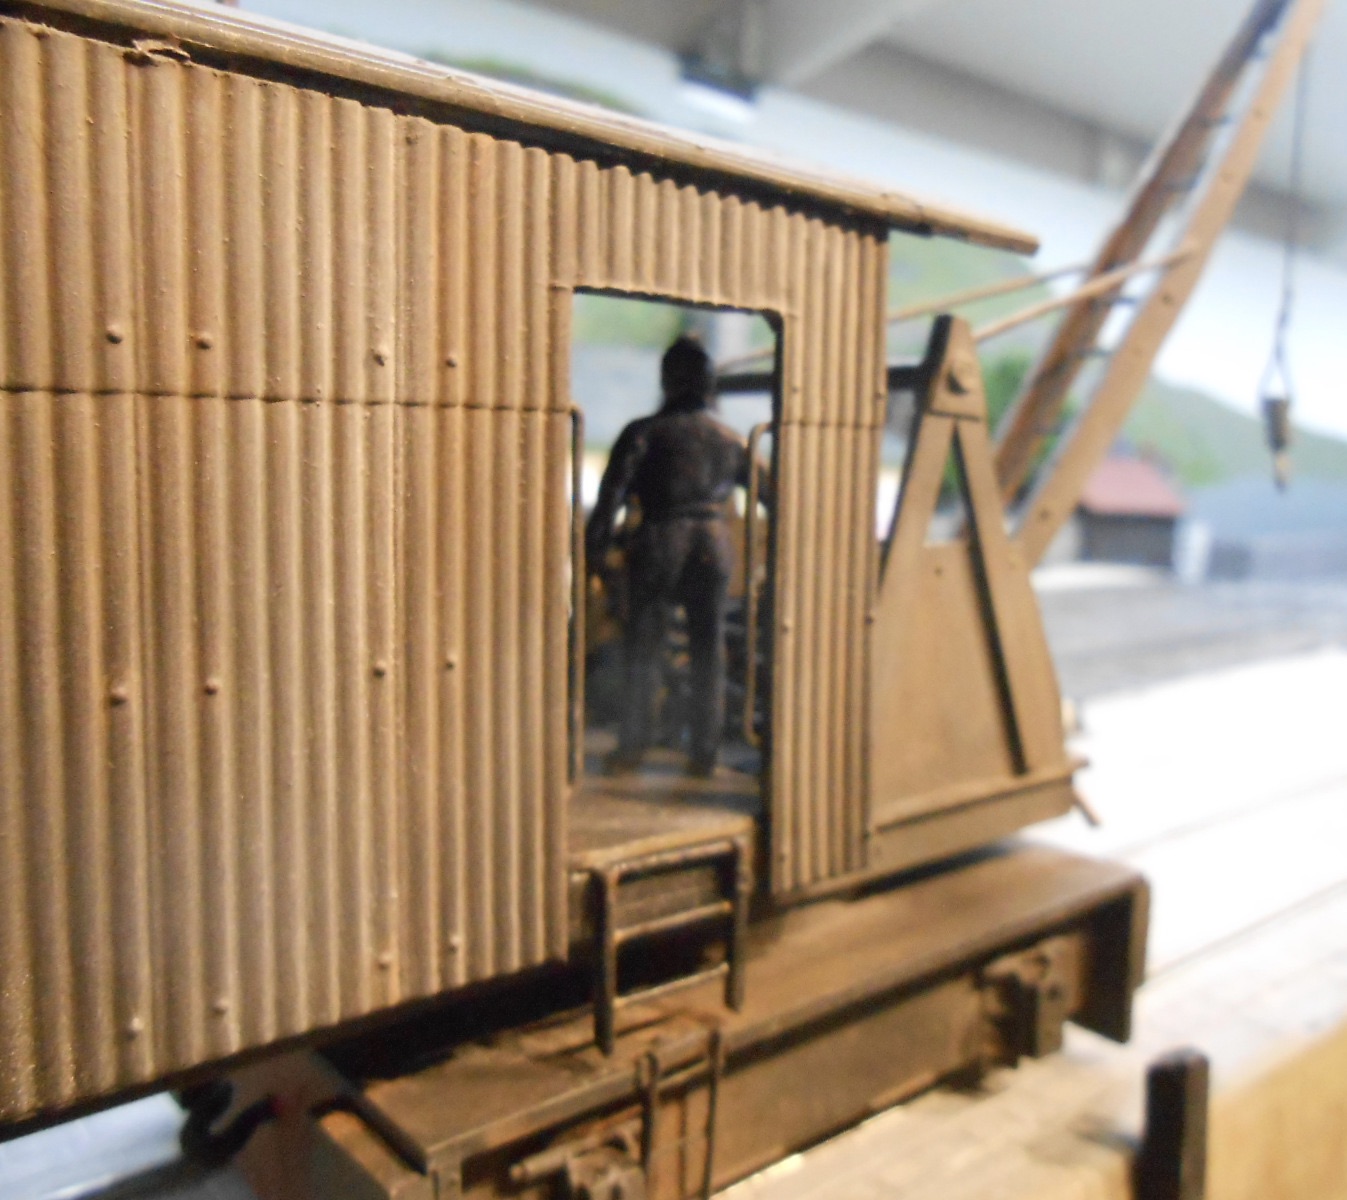
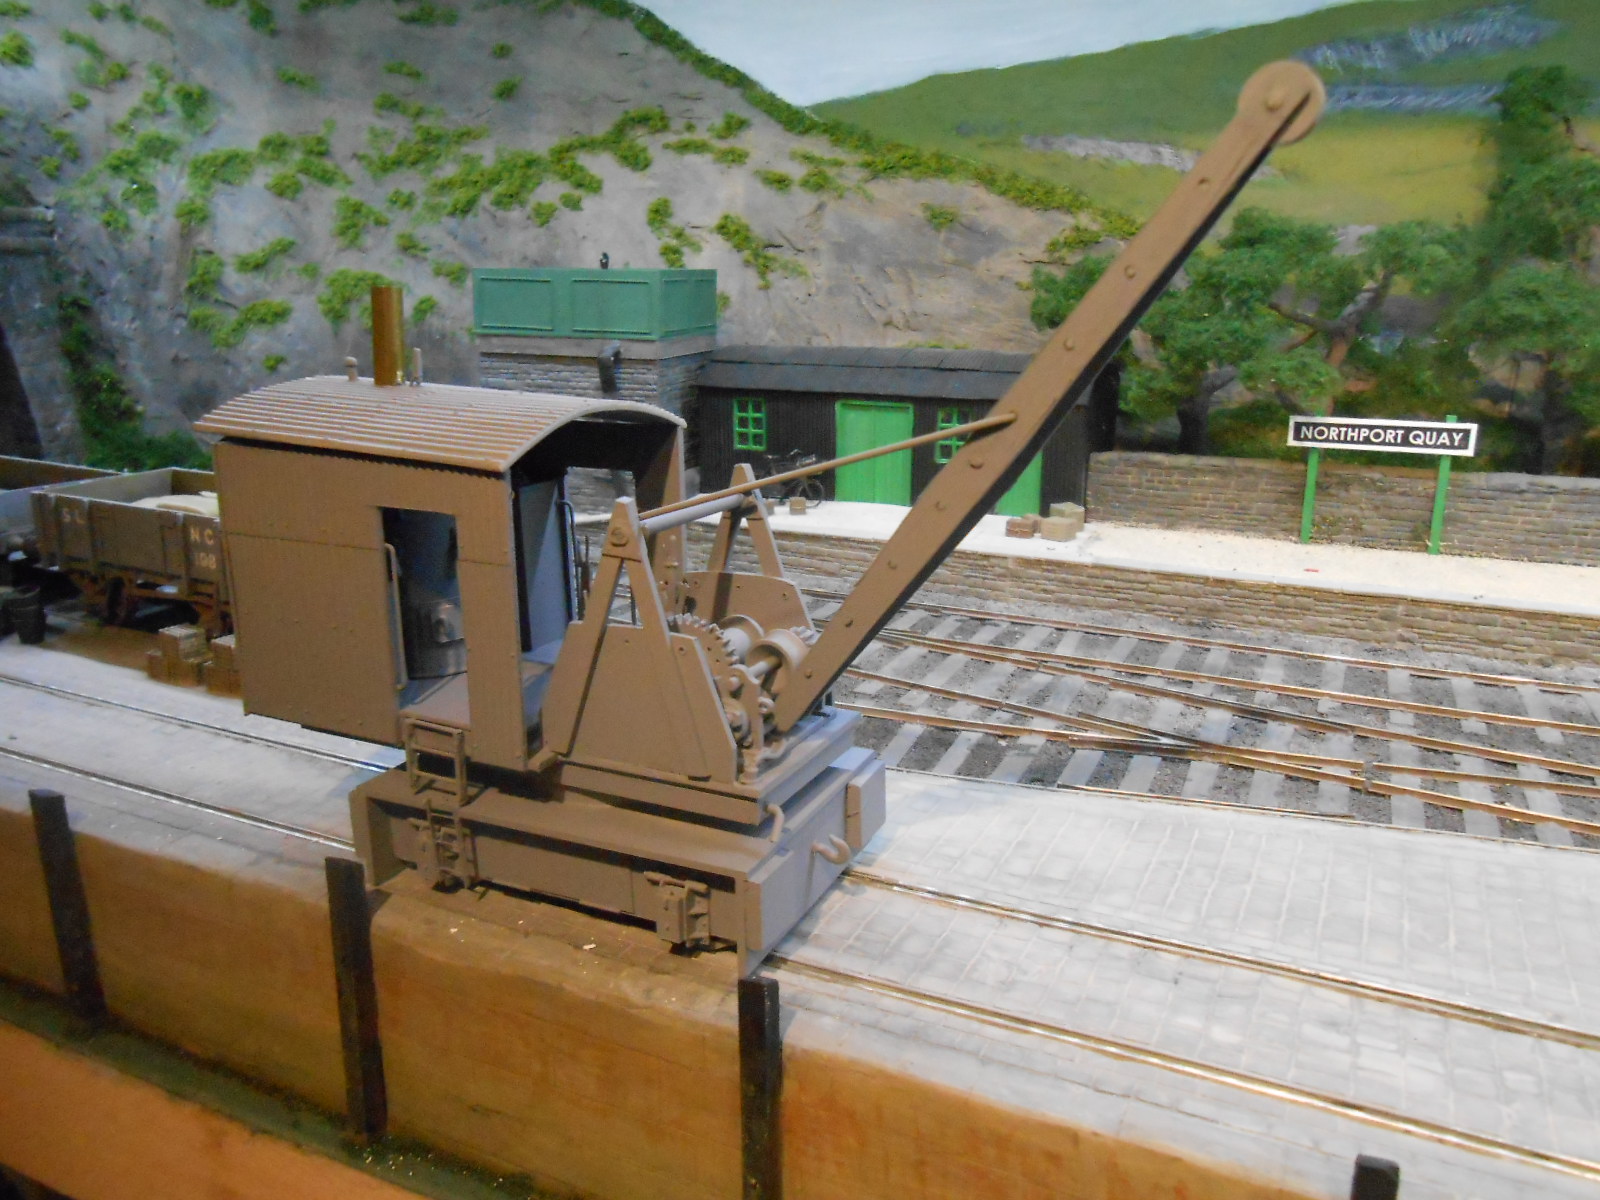
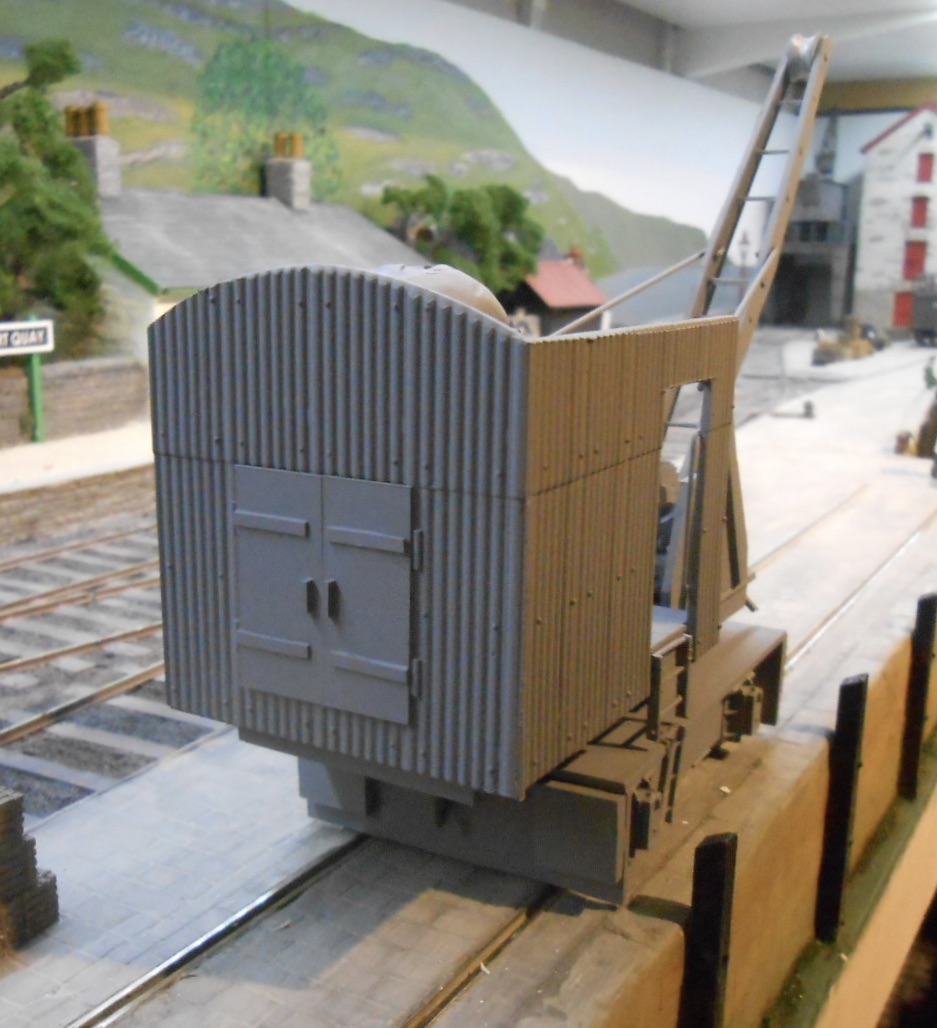
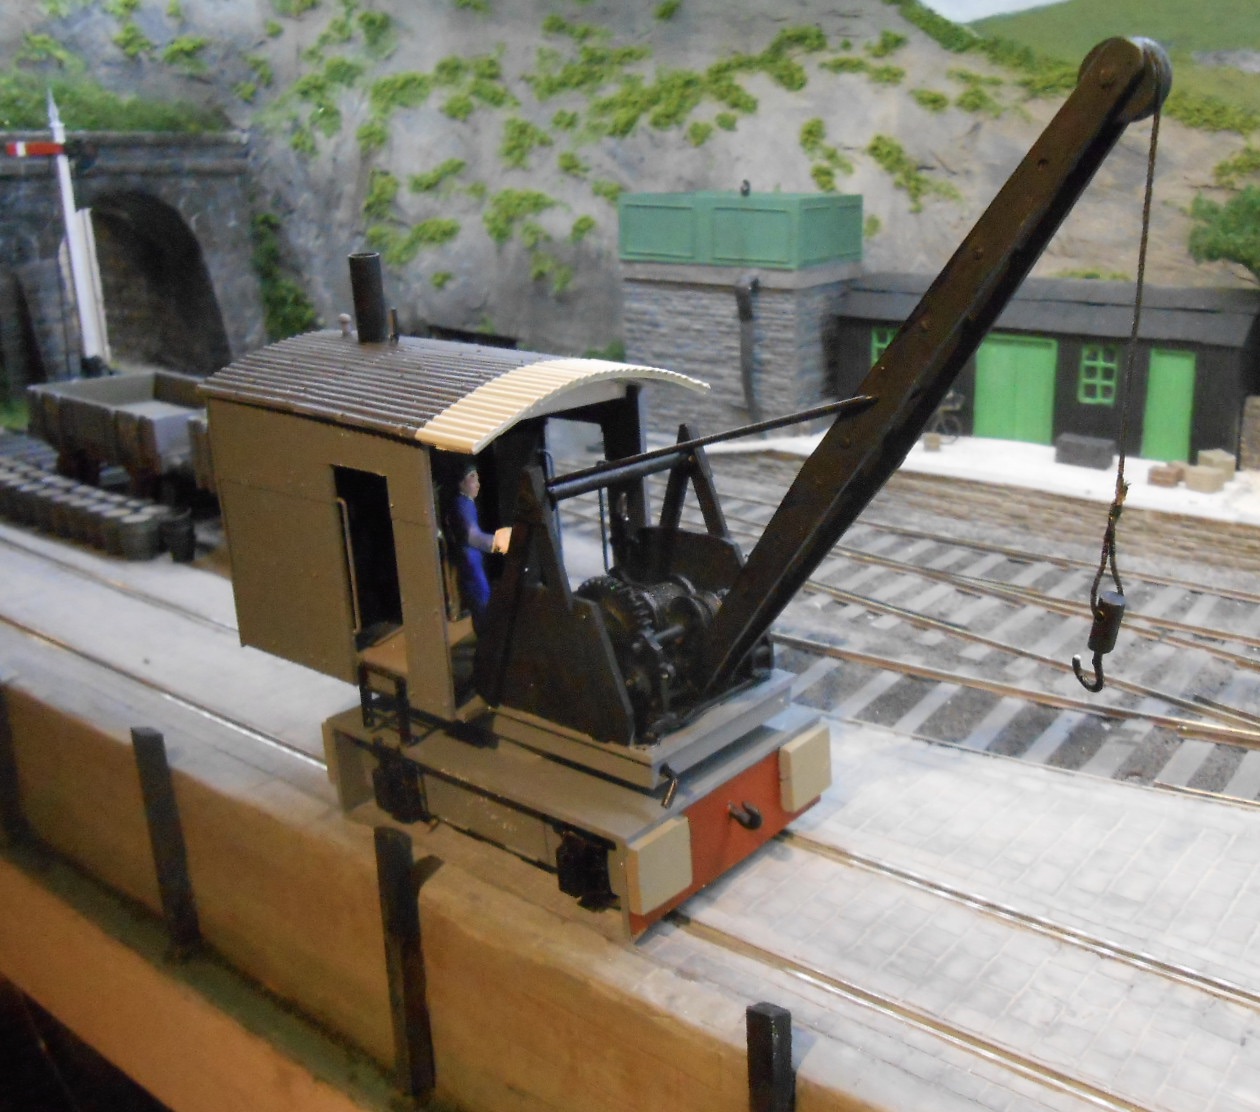
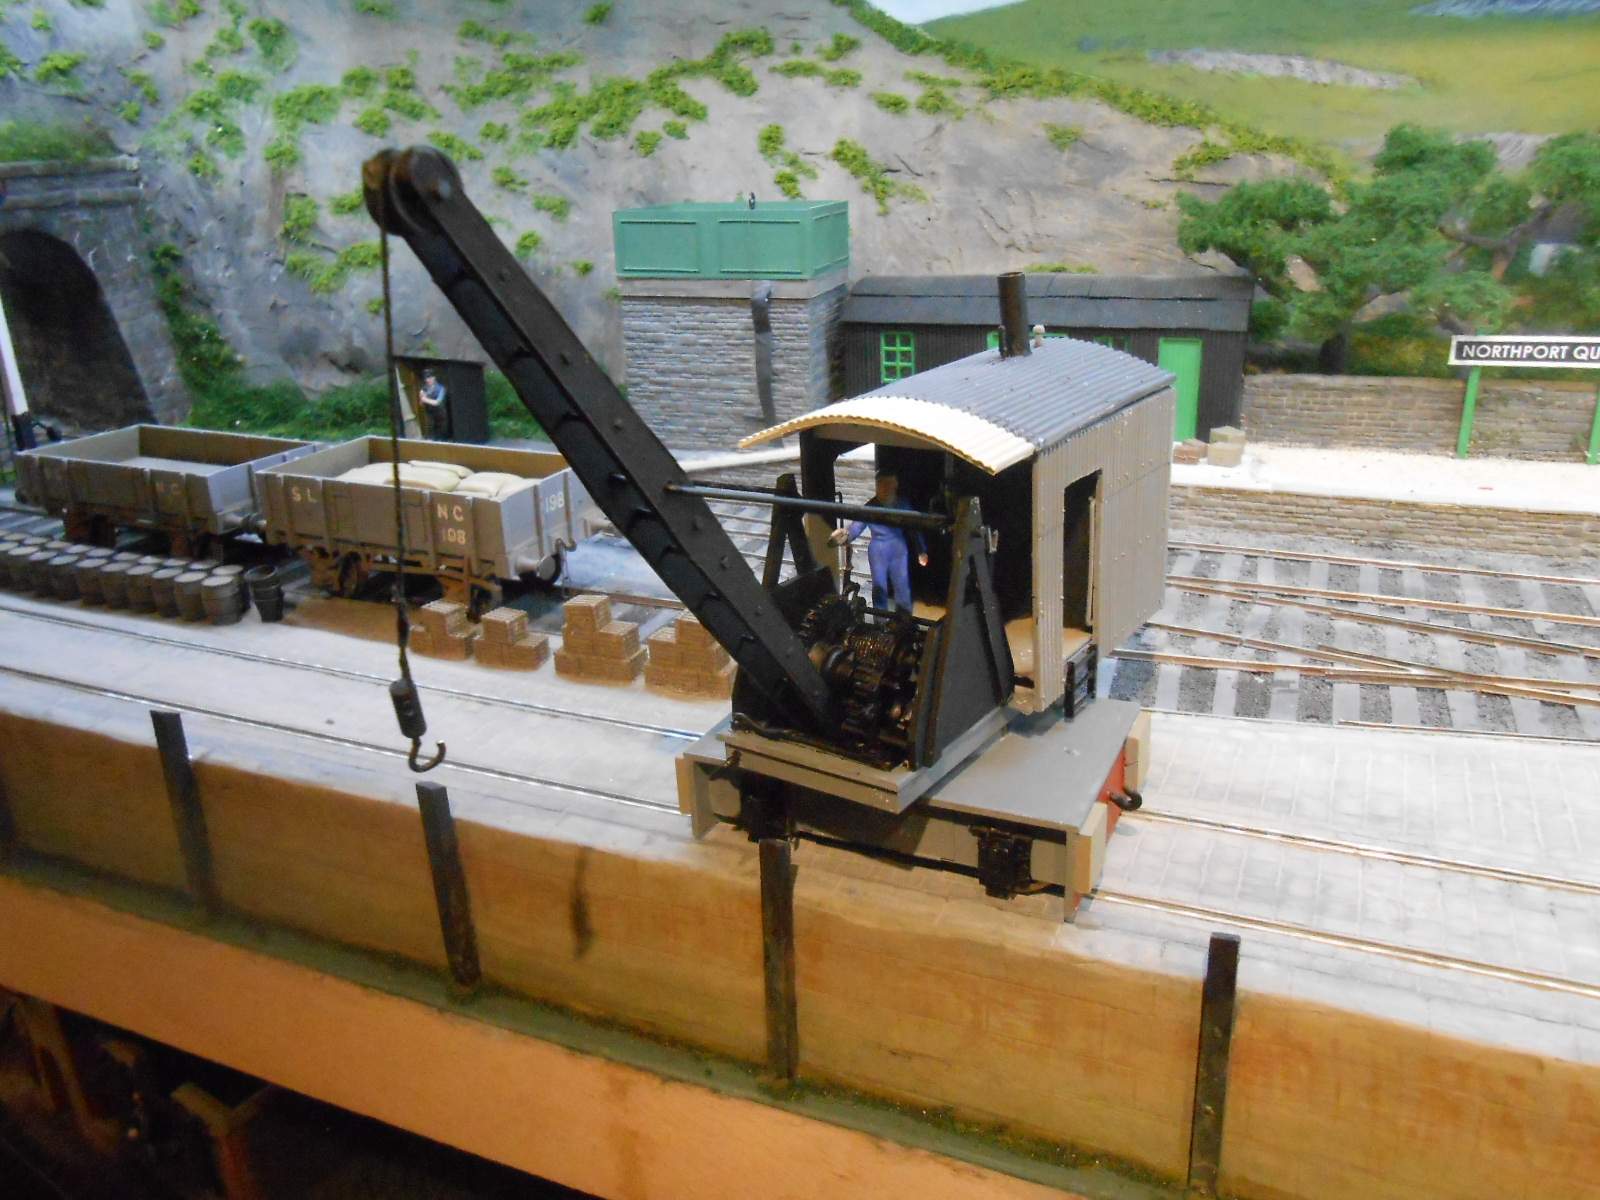
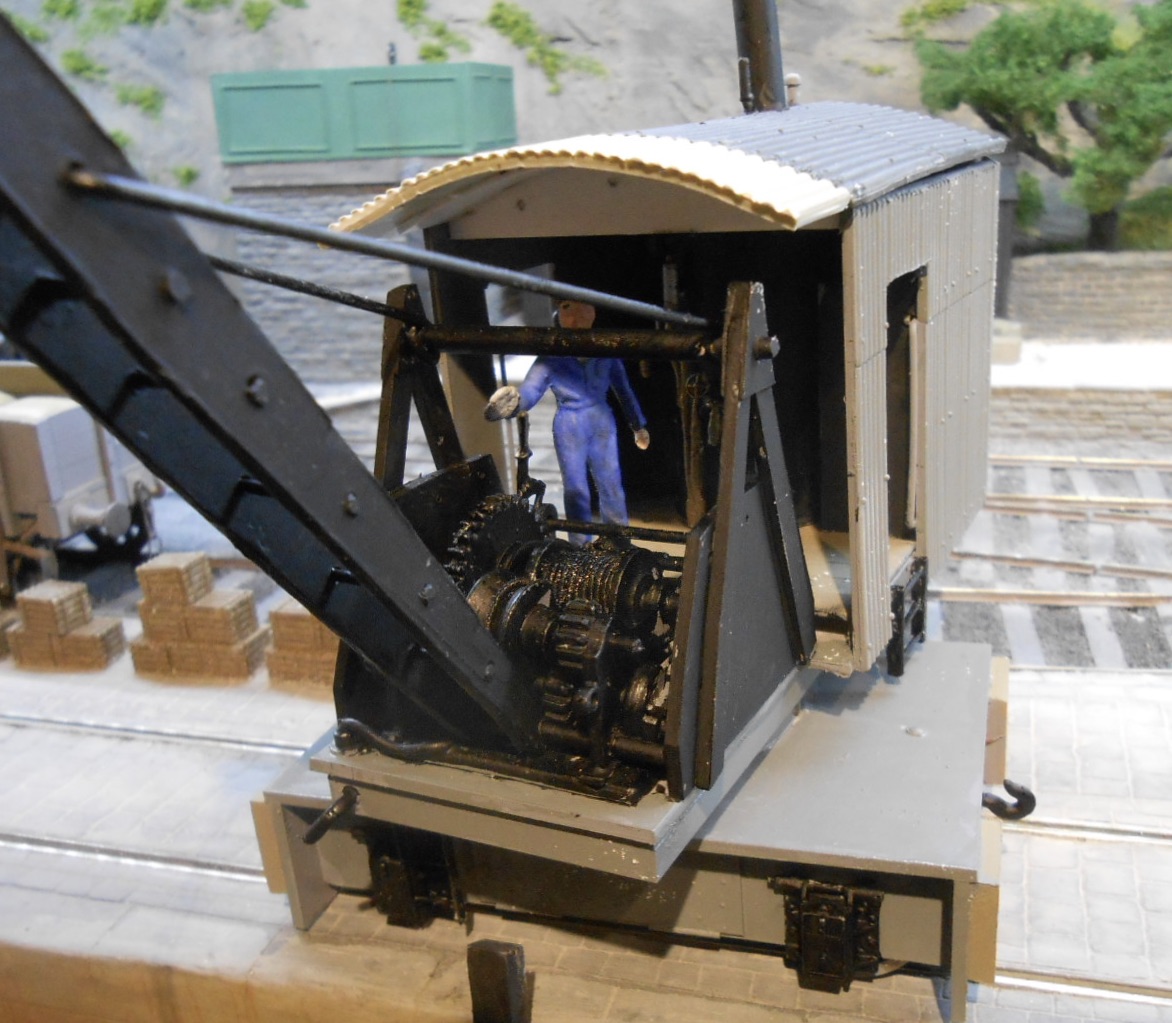
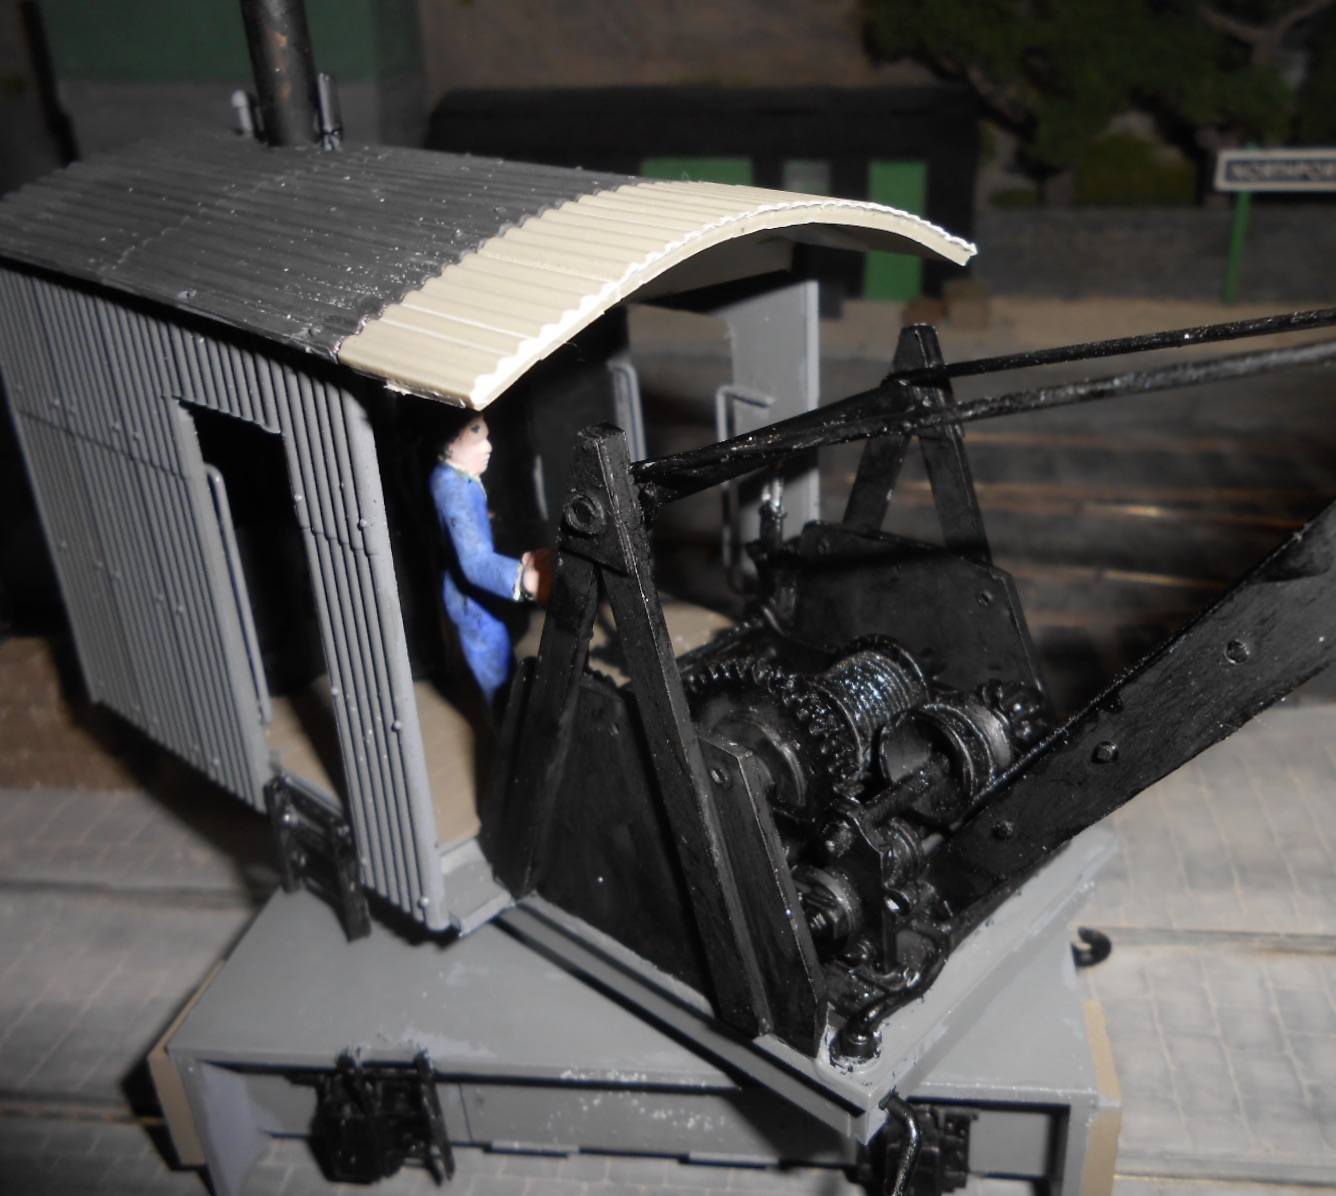
The crane is approaching completion now, with just a few tweaks here and there - plus a pair of axle boxes on the side I'm not showing! The component parts are shown below - separated for painting and weathering. After four days of waiting for the Precision paint to dry, decided to take a chance and over paint it with Humbrol and [fingers crossed], this seems to have worked, so as they are both enamels, looks like the Precision tins were missing something. It certainly wasn't a case of not stirring them enough. I've used a mix of matt black with No67, dark grey - the same as I've used on the Acla's hull. As you can see, most of the crane is this very dark grey now, apart from the red buffer beams and the light grey interior of the cab. The rest of the pictures show various angle of the model - as much a bit of 'proof reading' as anything. Weathering powders have been used extensively - burnt Sienna [for rust], black for soot and coal dust, plus pale grey which I find helps tone things down and avoid making the colours too stark or bright. Remaining jobs include the aforementioned axle box castings, some coal dust on the cab floor and maybe some lettering - though haven't decided what yet. Northport Quay No1 maybe? Alternatively, I've got a selection of brass name plates I could use - or I could just leave things as they are. The workbench needs a serious tidy up now and Fintonagh is off to a show in Guildford next Sunday. After that, a carry case for Acla is required, so I can take it to next month's club competition & I might just make it a display case as well. One thing for sure, there is always something new to look forward to!
-
Really big worms!
-
One wagon type that made it across the water unaltered is the standard tank wagon. Dapol do one and given the amount of work needed on a Slater's kit, are good value. In terms of rtr locos, don't forget there are a couple of nice industrial types available, which should go rather well with your chosen setting. Meanwhile, Alphagraphix do a whitemetal underframe kit for their wagons, along with an etched chassis for an H van.
-
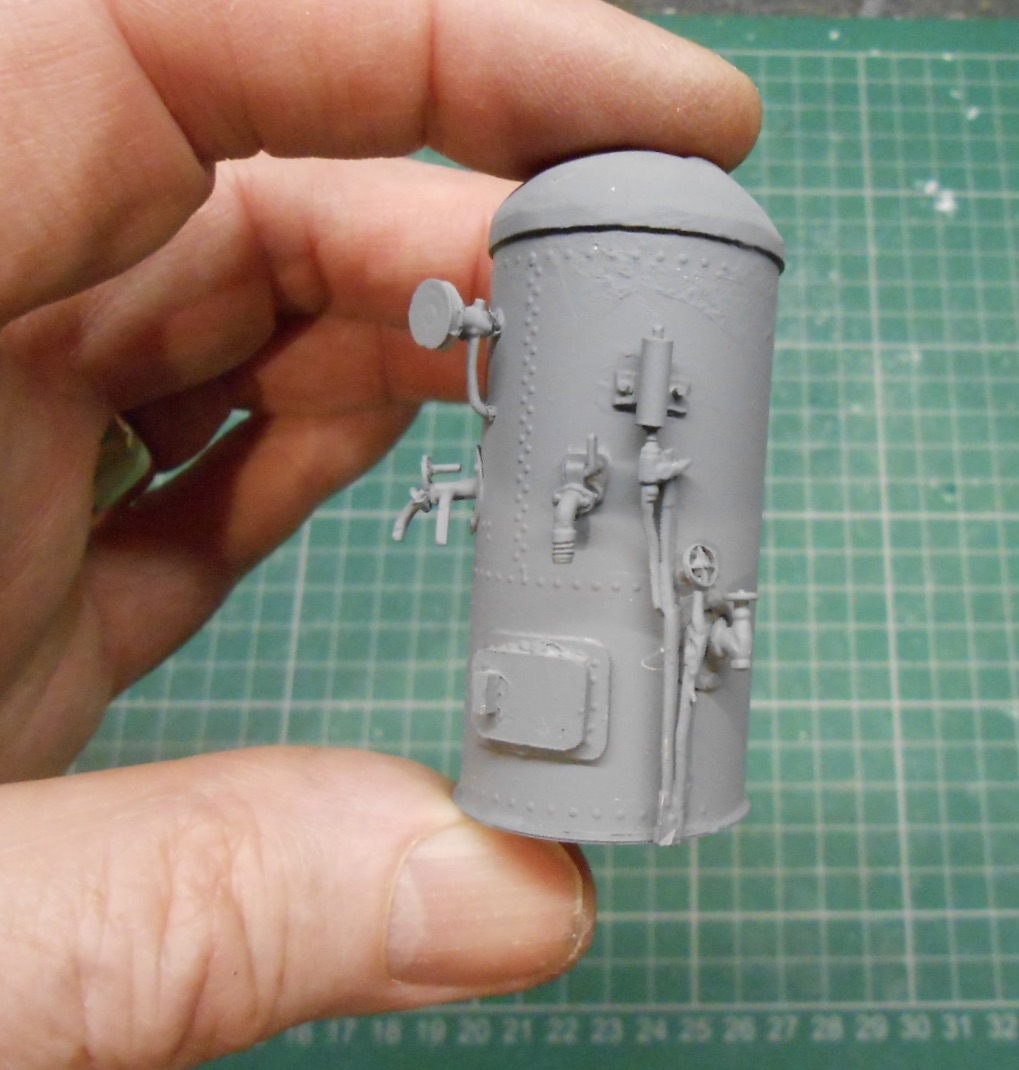
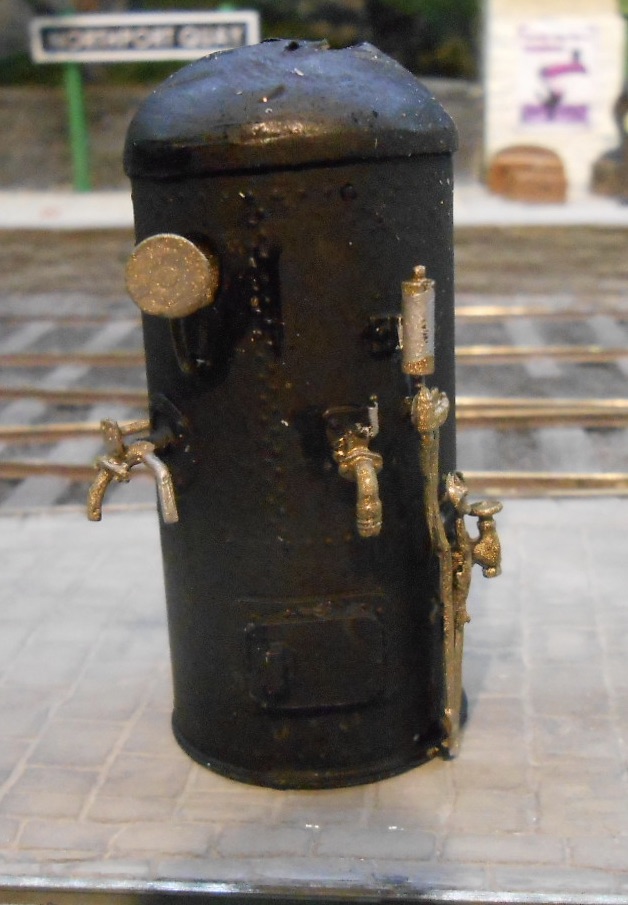
Various bits of detail have been added to the crane, then it was given a coat of spray primer. Looking at photos on the web, I got an idea that the corrugated body might be wagon grey, with the boiler, winch and jib black. Thinking about it, it would have been easier to spray the whole thing black first, but instead decided to brush paint and the Precision matt black I used still hasn't fully dried two days after application. Anyway, the first couple of pictures show the boiler, which is a piece of aluminium tube from an old roller blind. Made a conical top from 20thou plastic, then used plastic filler to adjust the shape. Details came from the spares collection, plus some Archer rivet transfers. Decide some rear access doors might be appropriate on the body, in case the rear of the boiler needed attention & these were quickly made from more plastic sheet. Cab steps also came from the spares box, along with a hook each on the buffer beams. An operator figure was added to the cab, while the roof has been given a small extension at the front. I've used elastic thread for the jib cable, carefully wrapped around the main winch drum and threaded up and over the jib to a piece of white metal, fitted with a home made hook. The weight of the white metal is enough to keep the elastic thread straight & have since used this method to replace the cables on my Airfix/Dapol crane. Am now thinking that I may spray the whole crane black, as adding weathering, rusty highlights and so on may well work better than the current grey-black combination.
-
Looks very 'in hand' to me!
-
That looks ridiculously good and with a fine cut in the rail top would challenge anyone to say it is not the real thing!
-
N Scale Ballywillan, Co Longford.
David Holman replied to Kevin Sweeney's topic in Irish Model Layouts
Ouch! -
Welcome to Irish 7mm scale, as I keep saying - the water is lovely! Overall, 10-12 feet is about the minimum for a terminus fiddle yard set up. Northport Quay is 7'6 of scenics, indicating 30" train length. You can get away with less if you use the fiddle yard as the entry cross over, as per several of Iain Rice's designs. Check out the Alphagraphix website for cheap ( proper Irish) wagon kits and more. The loco kits are designed for 32mm gauge as well. Think you are right to stick to freight only - coaches take up a lot of room and if you enjoy shunting, then 7mm scale is much easier and more fun. Enjoy the new toys and keep us posted!
-
For a mock up that is pretty darned good - but also very sensible, given the tolerances required. Must admit that I do most of my stuff on the hoof, as it were, but do make a lot of sketches to work out where things go and always draw out a new layout full size on lining paper. I also make lists of things to do, which I find helps getting stuff done in the right order.
-
Quality always sells, as the saying goes, so all power to your collective elbows.