Weshty
-
Posts
2,028 -
Joined
-
Last visited
-
Days Won
4
Content Type
Profiles
Forums
Events
Gallery
Blogs
Community Map
Everything posted by Weshty
-
Great photos Eamon, there look to have been some mighty fine layouts there. And well up to Seamus on the new 071 respray with Ssm transfers.
-
Lovely shots there. Semaphores, MK2's and a Bo Bo. And all of the past now.
-

Weeks Waterford Freight Workings
Weshty replied to gm171 kk's topic in What's happening on the network?
12 pockets.....managable but a 12' layout would be useful to get the full effect. -
Straight up, I won't be doing that. The expected volumes do not justify it. A detailing kit on the existing Horby/Lima version is the route I'll be going down.
-
Folks, I've been thinking about Ger's build and wondering would a D-Class detailing etch pack + transfers be of interest? Higher windows, side boxes, grills, footsteps etc. I'd need at least 10 kits to make it worthwhile. Over to y'all.
-
Ger, lovely job done on both!
-
Well..(cough) you know where to go for whatever combination or background shading you want...SSM at the ready.
-
To call it faultless would be to insult it. Really beautiful modelling work. The rivet work must have brought you close to weeping. The billboards really finish it off. I'm feeling homesick already!
-
Lovely weathering on the brakevan, it truly looks like it has gone through the wars. Is that an SSM oil lamp I see??
-
Great inspiration there Mick.
-
CIE locomotive livery variations 1960-1990
Weshty replied to jhb171achill's question in Questions & Answers
Cut, paste, collate, edit, index, size 9 times roman. PDF No bother. That's what desk top publishing is all about. Now photos.....that's a different matter. -
Sweet and tasty work.
-
Thanks Richie, the B4 holds a very special place in my heart. One of the most elegant of the tank locos, and George has done a great build with it.
-
Musically I would describe this weathering as "sotto voce". Just right!
-
T'will take more than the threat of a MIL to make me talk! I have to complement the Ballybeg layout as well, that corner section with the cutting is very classy, it really looks the part.
-
Oh SSM has some very interesting buns in the oven Shem....more anon.
-
That is just lovely, she really looks well in green! I feel like a proud daddy
-
Wow, now there is a contrast...
-
Stephen, great news, Orla will keep you on your toes!!
-
Lady Edith looks well here... http://ngdiscussion.net/phorum/read.php?1,108201,108247
-
Resin Casting Demo in Marks Models Cork this Coming Saturday.
Weshty replied to Georgeconna's topic in What's On?
Damn....I would have liked to attend that. Let us know he decides to do it again George. -
Kirley, really lovely job done and great weathering. Top class.
-
But sure all you need is the SSM A Class detailing kit and 'twill be grand
-
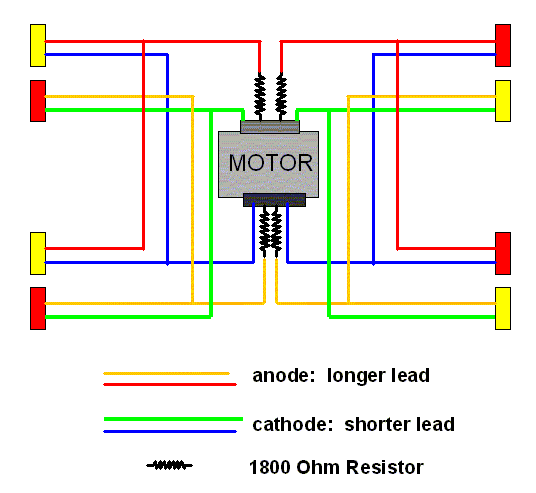
Props to Herr Scahalane as the first to put up a schematic, but here is my own version that I hope helps things along the way. I will include this in all future versions of relevant instructions. The resistors are a standard 0.25w so with a current draw of 7-9mA per LED, a single 1800Ω resistor should handle two LEDs ok.

-
Rangermouse, welcome onboard and nice work. A bit of tasty weathering brings out the plethora of detail in this little honey of a loco....every time.