David Holman
-
Posts
4,359 -
Joined
-
Last visited
-
Days Won
117
Content Type
Profiles
Forums
Events
Gallery
Blogs
Everything posted by David Holman
-
Guessed at Post Office and Google translate confirms! Wonderful lanuage.
-
Excellent website John and with carefully chosen products too, deserves to do well.
-
On my Arigna Town layout, I got told off for having Freisian cows, as they weren't seen in the 1950s. Guess by dieselisation they would be alright?
-
August 's Railway Modeller sees a multi page article on Ballyshannon, Alan Gee's latest 4mm scale creation of the Donegal. And very good it is too.
-
Know what you mean. Don't use mine anything as much as I should...
-
Am wondering if a resistance soldering unit (RSU) would help with the hand rails, brake gear and other fiddly stuff? Not readily available, or cheap for that matter, but the foot operated switch does give you that third hand for delicate work. You do have to be careful with the settings though - too high and small parts get vaporised! Been there, t-shirt, etc...
-
Walker Diesel Class F - ECMbuild in 4mm for OOn3
David Holman replied to murrayec's topic in Irish Models
Mmm, that is very much the theme of Martyn's book. Weathering is a subtle process and on the wrong setting, he likens an air brush to a muck spreader and not pretty! The best 'quick fix' I have found is through weathering powders, but getting them to stay where they are put is not straightforward. Martyn advocates Humbrol enamels. The trouble with that is some tinlets are not available since Hornby took over and it would be interesting to see a reprint as the book has been out over 20 years now. VERY much still worth having though! -
That's a wow then! Excellent work. Also worth adding that there is nothing wrong with mixing media. As well as acrylics, I also use crayons, felt pens and drawing pens.
-
Walker Diesel Class F - ECMbuild in 4mm for OOn3
David Holman replied to murrayec's topic in Irish Models
Missed these posts, but the simple answer is to get your hands on The Art of Weathering by Martyn Welch (Wild Swan). It is the definitive book on the subject and has never been bettered. Does locos, wagons, coaches, track and buildings. Although he makes use of that Spawn of Satan, the airbrush, quite a lot, he also just uses paint brushes. The techniques used are certainly no quick fix, but done carefully, results can be extremely satisfying. Probably my most 'go to' book!- 136 replies
-
- 3
-

-
- class f
- west clare
- (and 1 more)
-
Photographic backscene are ok, but you are right, JB - the same ones crop up all over the place. As Galteemore says, it is not that difficult to paint your own, while photos can be too sharp and distract from the layout itself. Sometimes, all you need is sky, especially if the on layout scenery is rising towards the backscene. Nothing fancy ended here either. Currently, outside my window, it is a very pale grey, pretty much all over and certainly not difficult to reproduce. Indeed, translating Galteemore's photo of the brooding mountains into a layout backscene, only the top half would need to be painted. Three or four outlines and a few shades of blue/grey. Don't make the backscene too dark though, or you'll need some very bespoke lighting and that is a completely different ball game.
-
While the liquid sunshine means Ireland's pastures can be very green in places, I like the subtlety thus far and the method of dry stone walling is very neat too. Indeed 'care and attention to detail' sums up the approach and it's working really well.
-
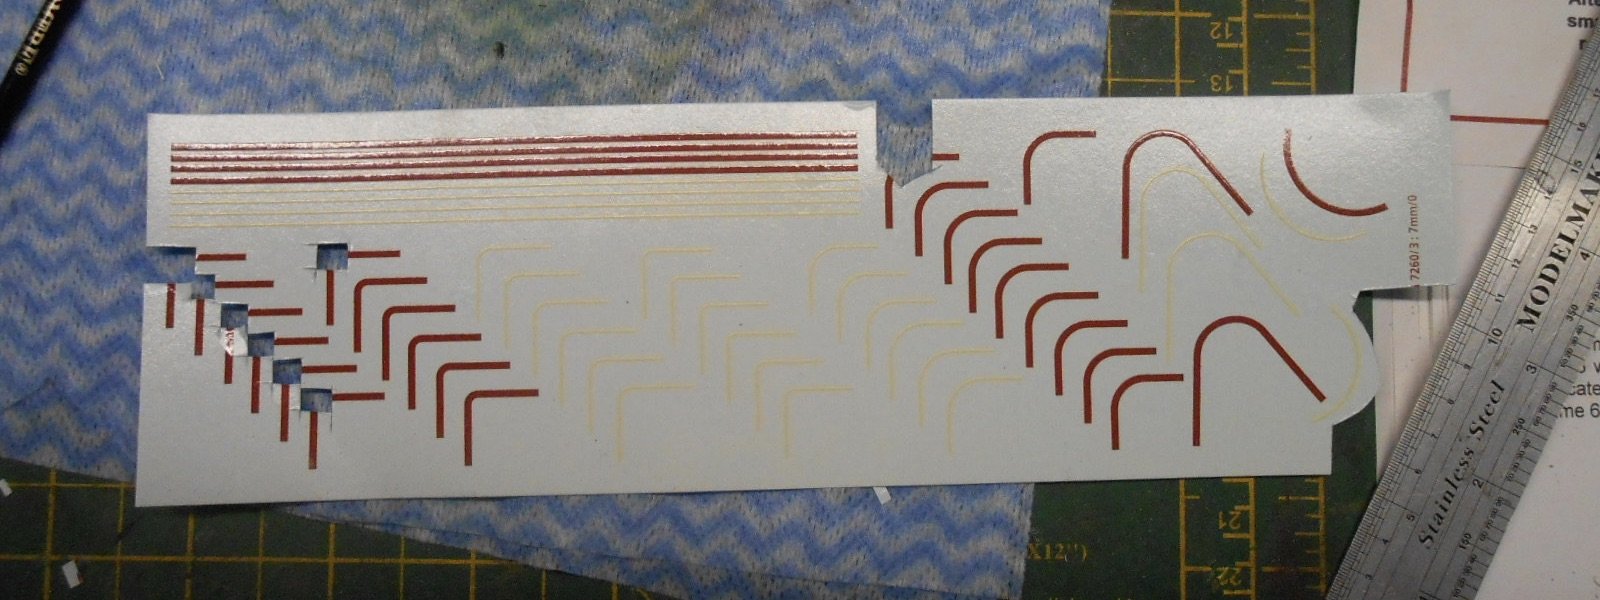
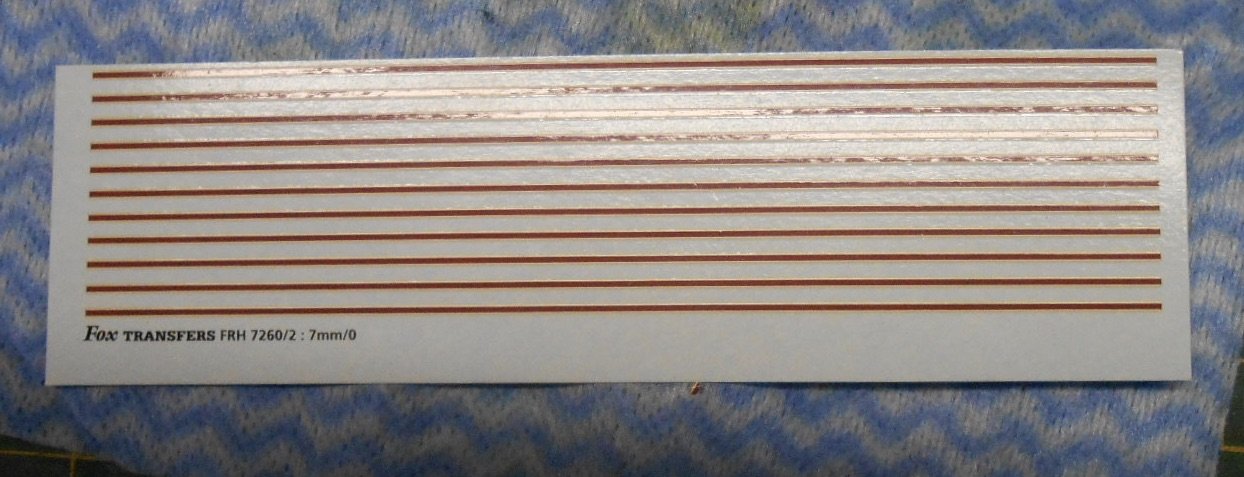
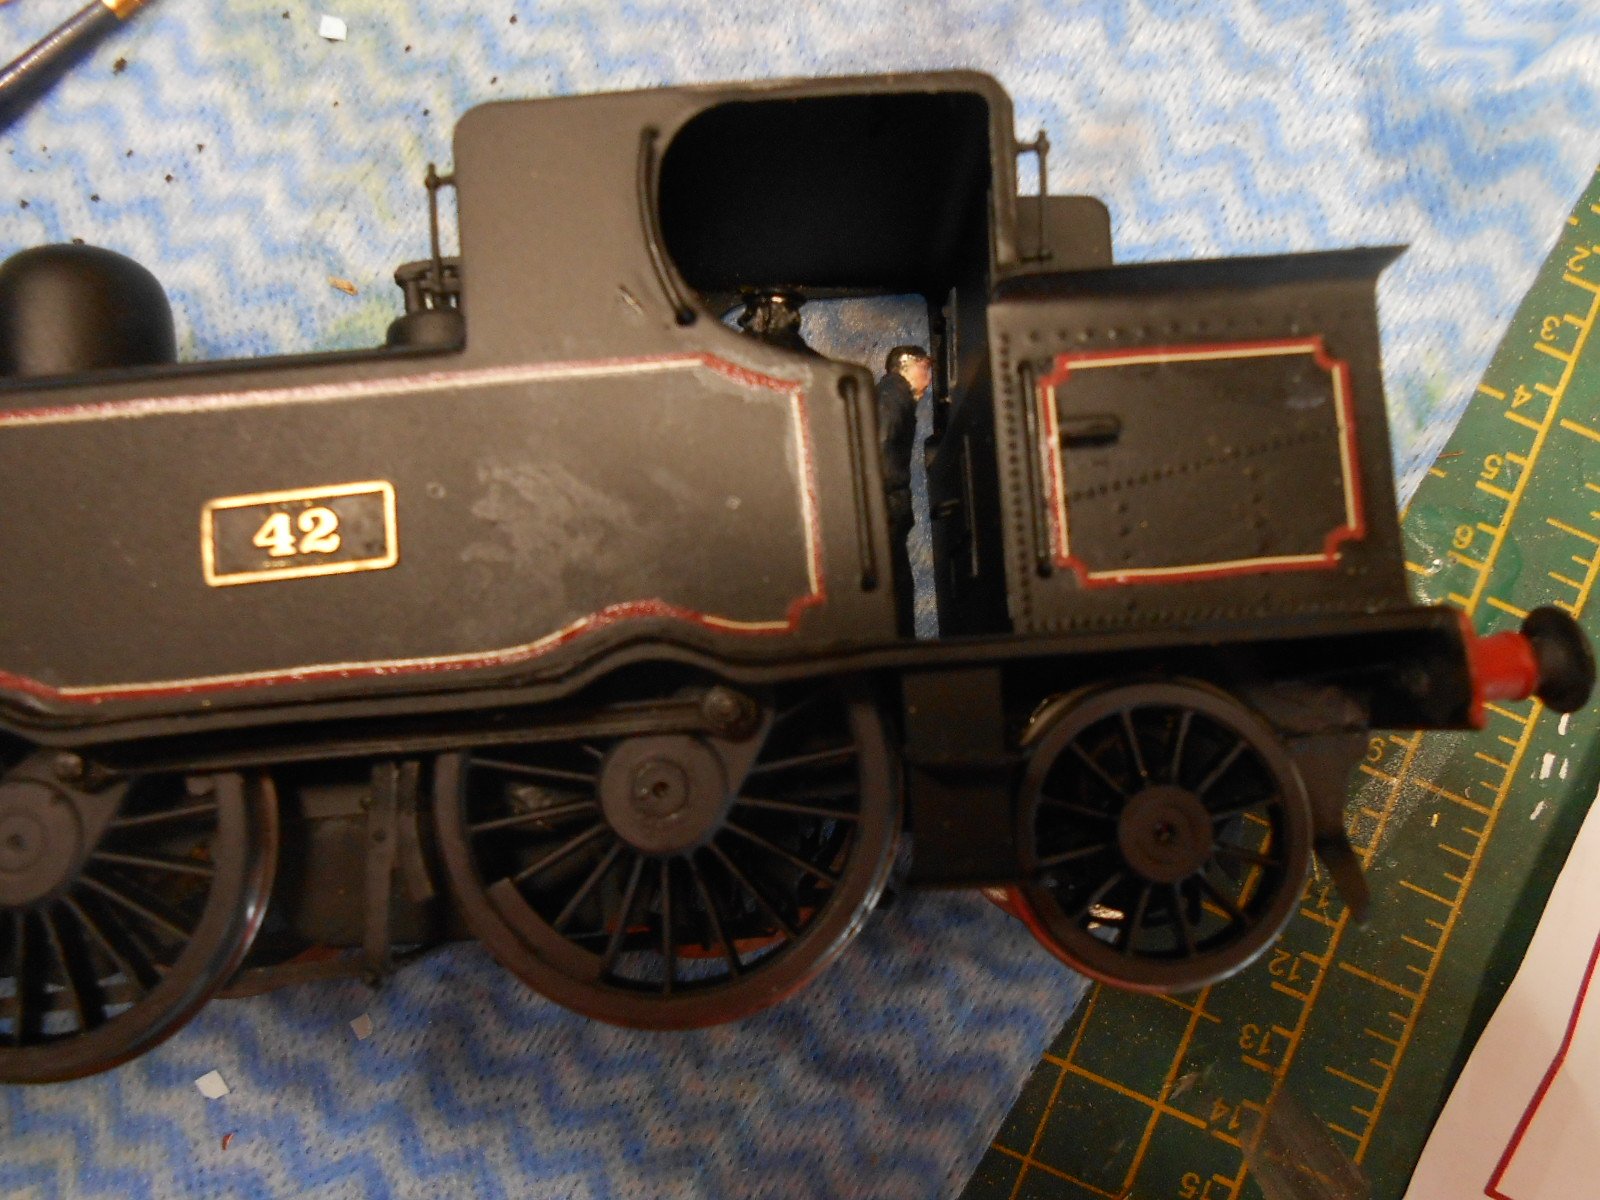
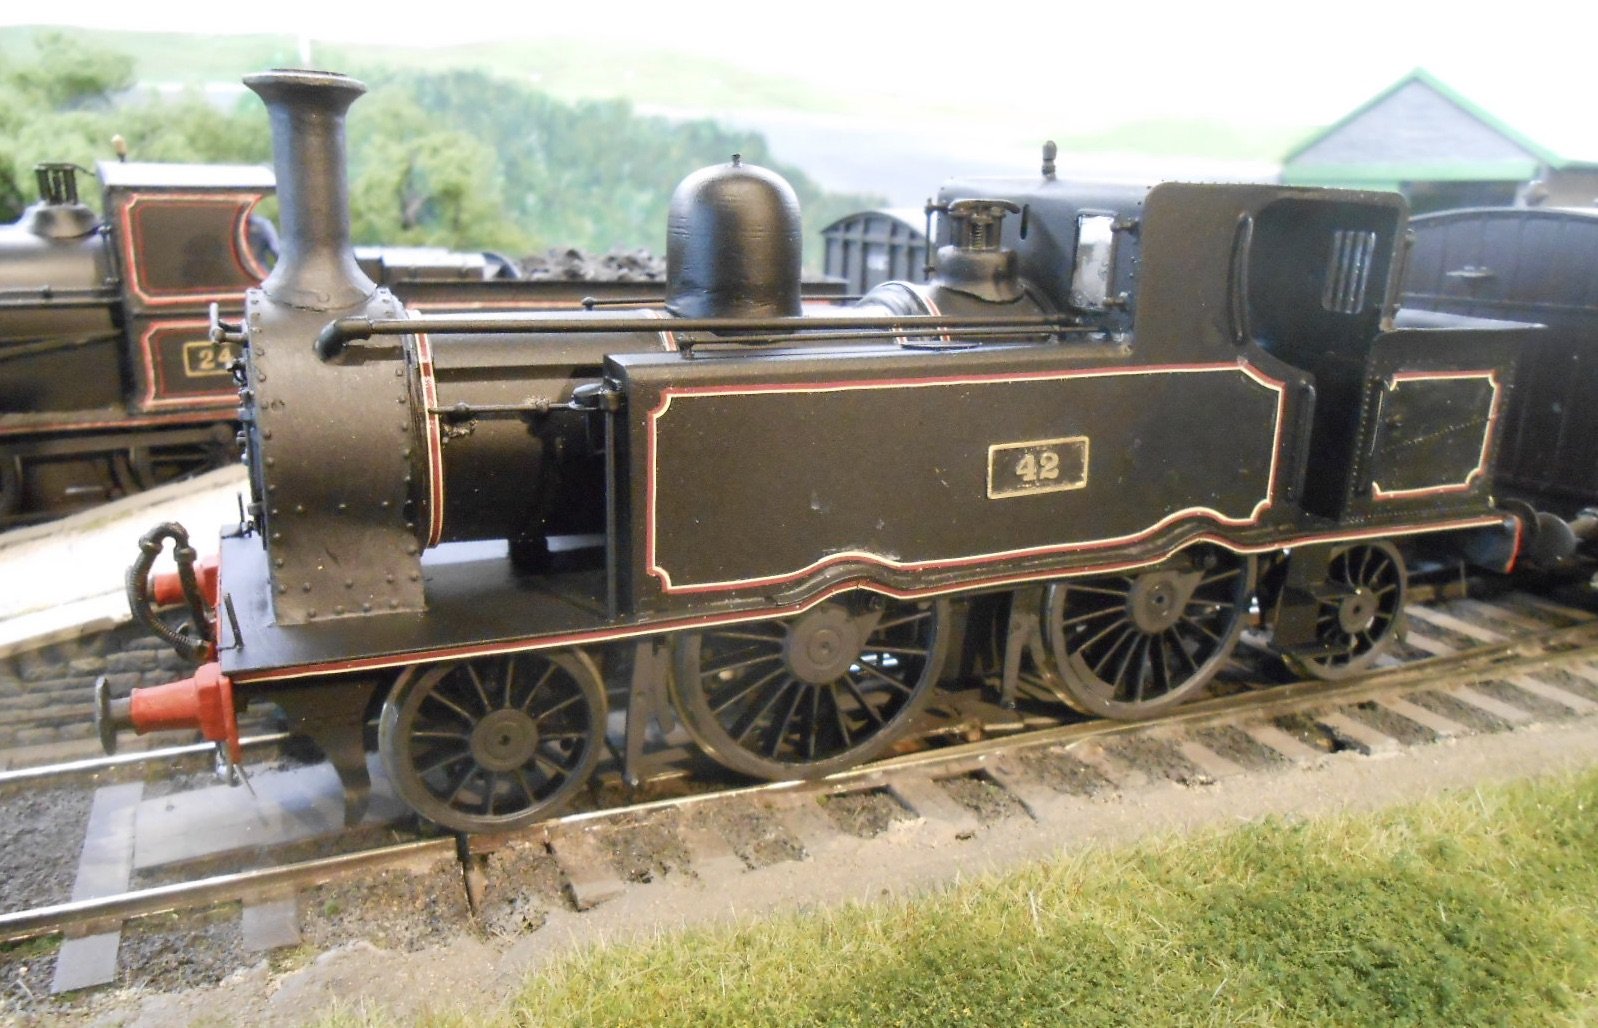
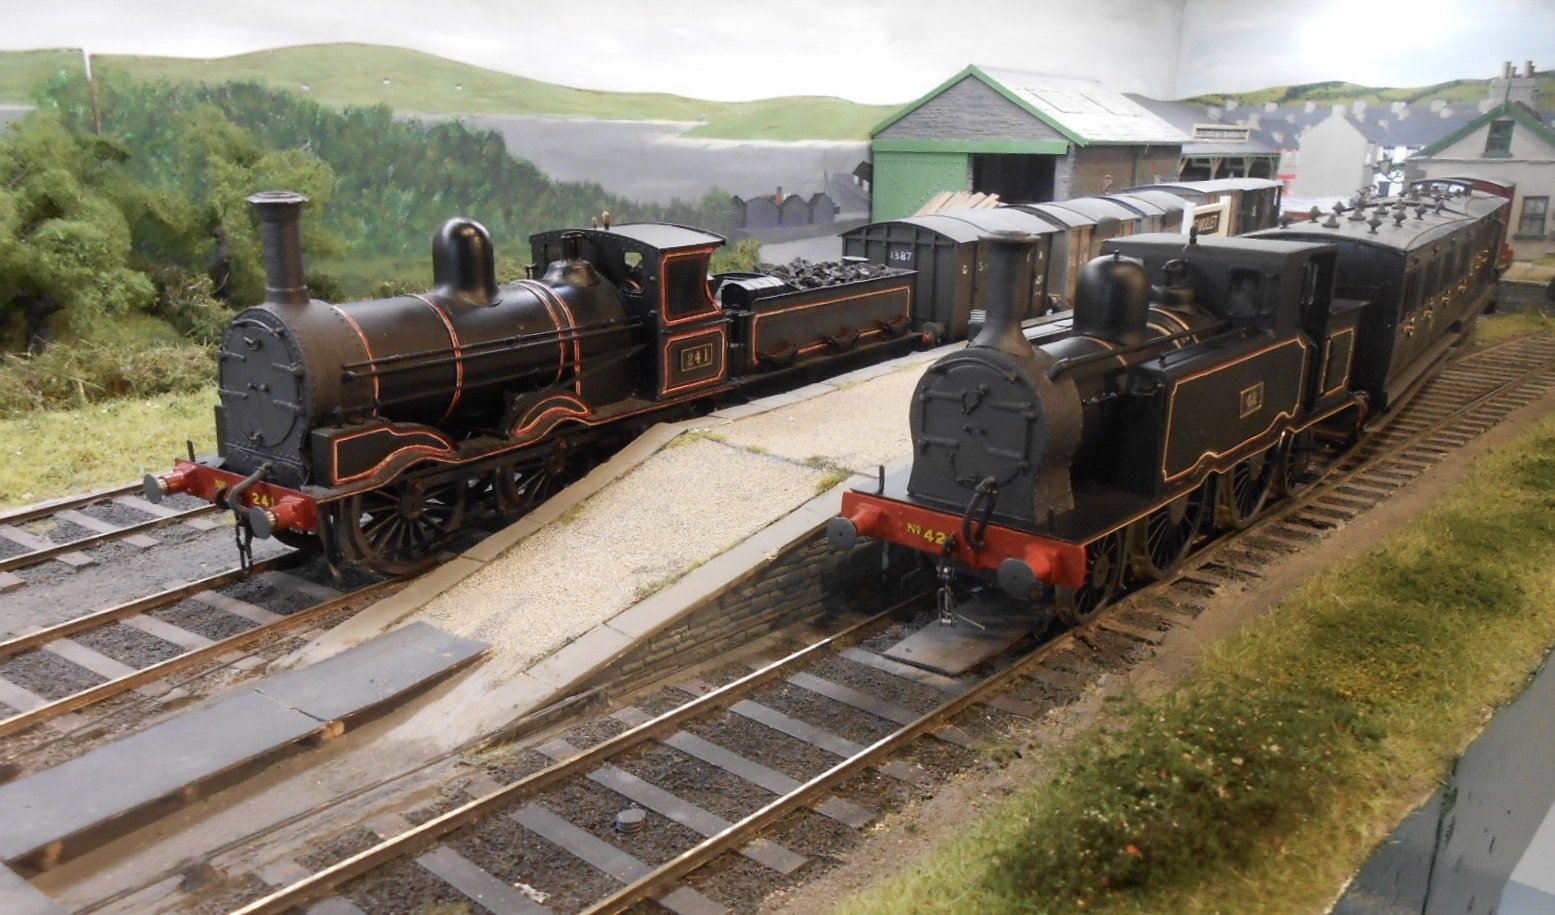
The latest challenge with the F6 is now the lining. Before starting that, the buffer beams have been painted red, the cab windows glazed, number plates have been properly fixed and the smokebox toned down with a greyer shade than the intense matt black of the rest of the loco. As mentioned previously, there seems no easy way of applying red and white GSWR red and white lining. Fox Transfers do a nice sheet for the boiler bands, but everything else has had to be cobbled together. Guess I should have got the bow pens out again, but I really don't feel I have the necessary skills. Yes, I know I should practice, but the process really doesn't inspire me. So, as you can hopefully see from the photos, the second sheet contains a range of curves and rounded corners in both red and white. Neither are ideal, as both are too wide, though not by much with the white ones. Hence carefully cut down the red rounded corners and then married these to straight pieces made by cutting off one of the white stripes. Once dry, a white stripe/curve was added on top, to get the appropriate effect. Fiddly, but reasonably effective as long as you don't look too close. See photos for how it developed. Have only done one side so far, but couldn't resist posing No 42 with its short train of six wheel coaches, alongside my 101 in the other platform, about to depart with a freight.

-
Really enjoying seeing how the 101 progresses, especially having done the same kit in 7mm scale. A whole different set of problems but, much as I don't enjoy doing them either, I can certainly appreciate how difficult they must be in 2mm. As for a K class, am ashamed to admit I had to look it up in the green bible before I realised it was a G2,. If you ever want to do an original K class in 7mm scale John, let me know.
-
That glass plate is a fabulous picture of a fine looking engine.
-
Exquisite. Am sure the 5p is getting bigger.
-
Excellent stuff, many thanks to both of you. Must go back to the Valencia photos. As for a fishy smell, wonder if any of those vaping oils come in that flavour?!?
-
Professional painter and liner Ian Rathbone shares a great tip in his books on the subject. Wait until the paint has gone half hard (up to 24 hours with enamels), then lightly wet a fine brush with thinners and you can then use it to remove any over painting or blemishes. Fiddly, but works a treat. Pushing the brush against any over painting lifts the paint a little; wipe the brush on a cloth and repeat the process until satisfied. Precision Paints are fine, but beware ordering by post. Delivery cost is eye watering if you only want small amounts.
-
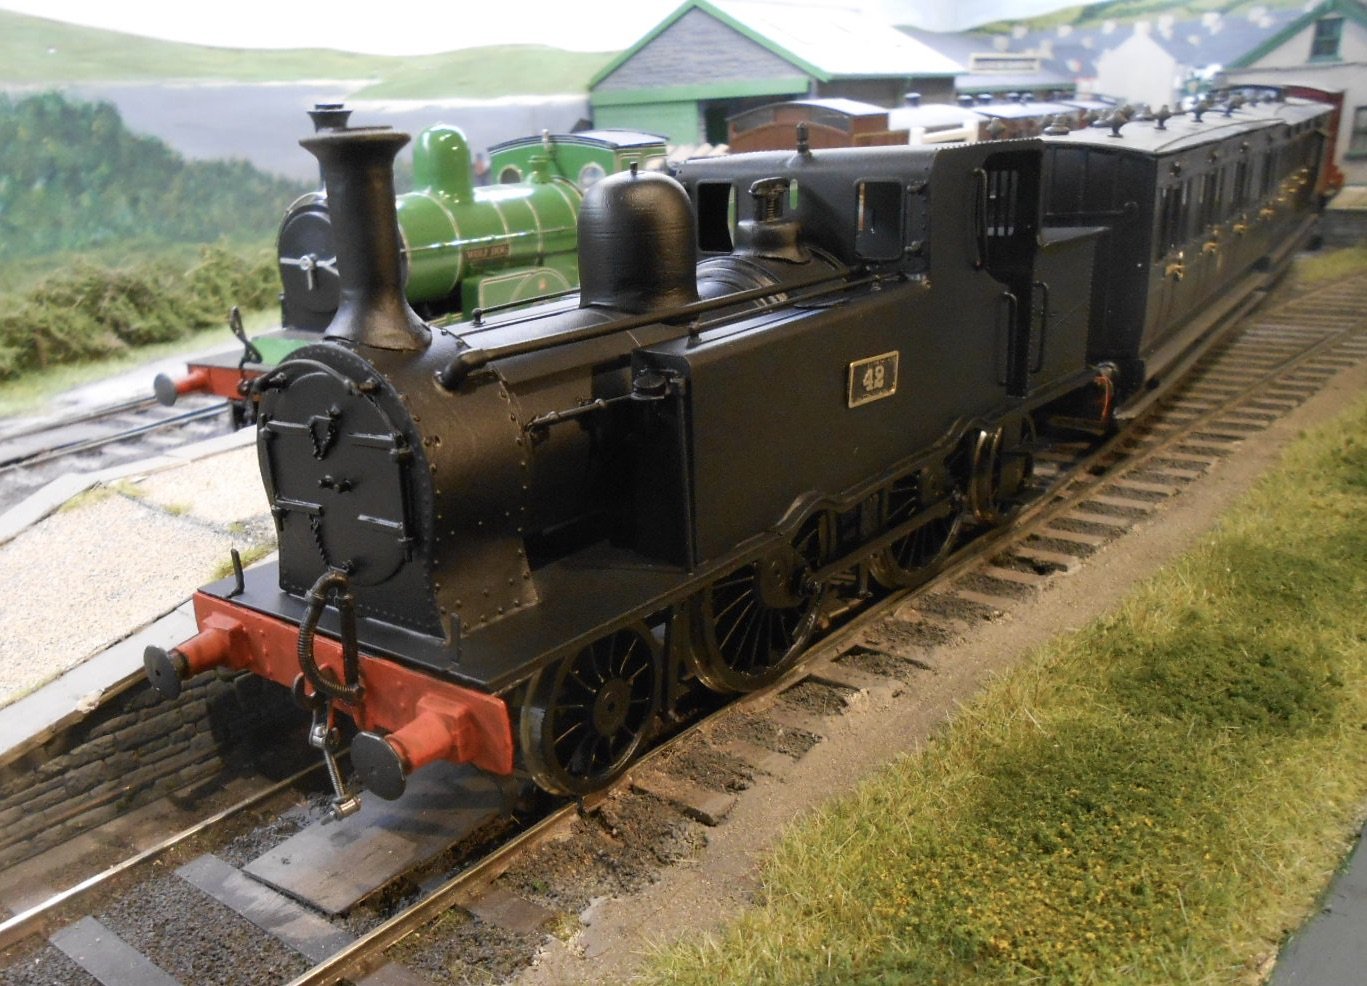
Back to black The loco has been primed & the top coat added, along with red buffer beams and the numberplates - Blutak for now. It seems to me that Irish locos tended not to wander from shed to shed over their lives, so with Galteemore's F6 being No 42, decided to apply the same number to my earlier version. The idea is that a couple of F6 were tried out on the Belmullet line because of its similarity to the Valencia Harbour route. However, I've never really liked any loco I've built in that first coat of black, it just looks too dense to my eyes. Hopefully, the application of some lining will help, though this brings up the same issues I had with the 101: white/red/white lining appears not readily available. Fox Transfers do straight lines in this combination, but curved corners for some reason are red/white/red! Hopefully a bit of brush and bow pen work will sort it out, thought its not my favourite occupation.
-
Some very neat modelling here - well done you. The only thing that stands out a little for me is the sides of the rails are shiny. Paint them a nice rust colour and they will blend in really well with the rest of the modelling.
-
Many thanks JB, I have a few semis/softwood on the roster, including a couple of GSWR ones, but if anyone has photos or plans of ventilated ones, I'd be only too pleased to have a go at building a couple. The idea of a pair of six wheelers with vans in the same livery has a nice feel to it.
-
Am interested to know how fish traffic was carried on the GS&WR, in particular in the early 1900s. My F6 2-4-2T is nearing completion and I already have two six wheel coaches to go with it, in purple lake livery. Hence thought it might be nice to add a couple of fish vans, ideally fitted ones so there would be no need for a brake van. Any ideas/thoughts welcome, please - including and livery differences compared to non-fitted wagons.
-
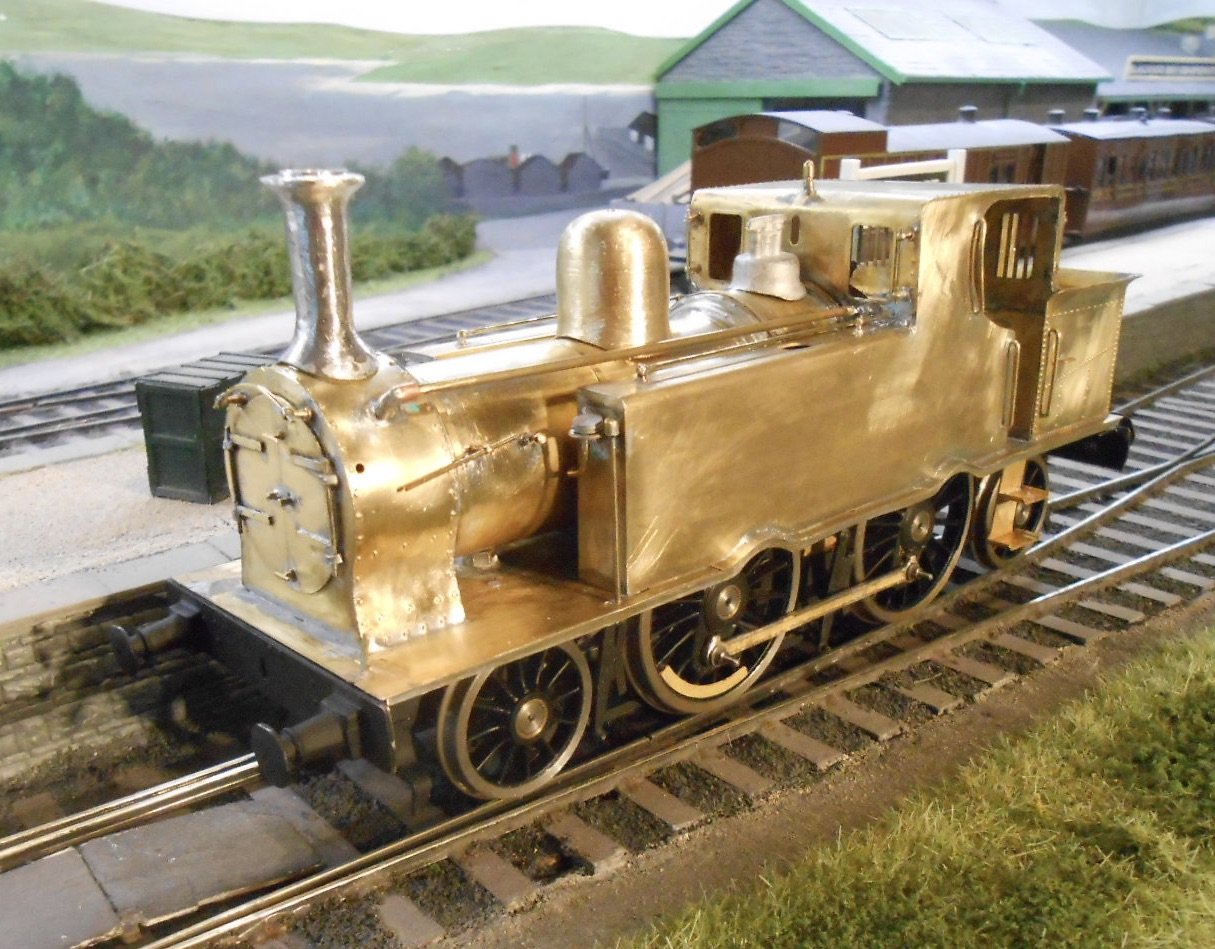
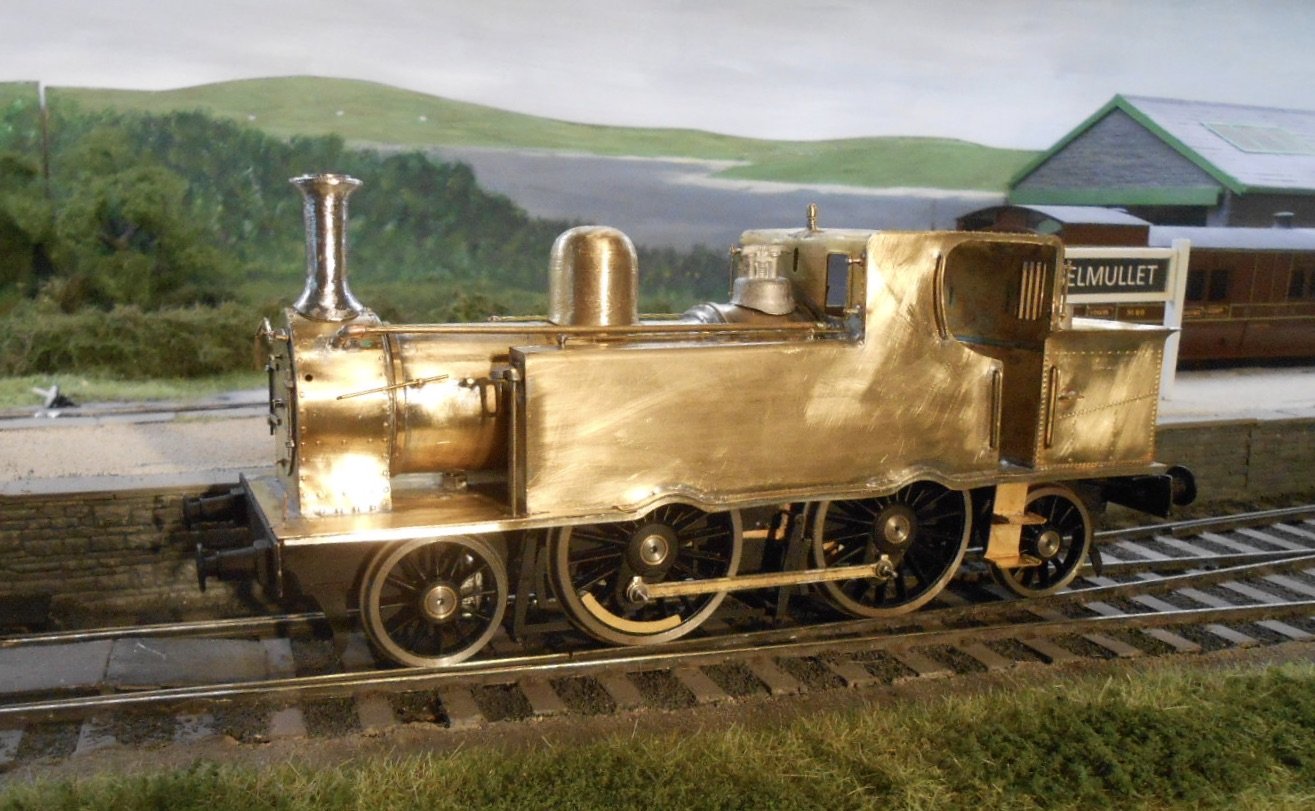
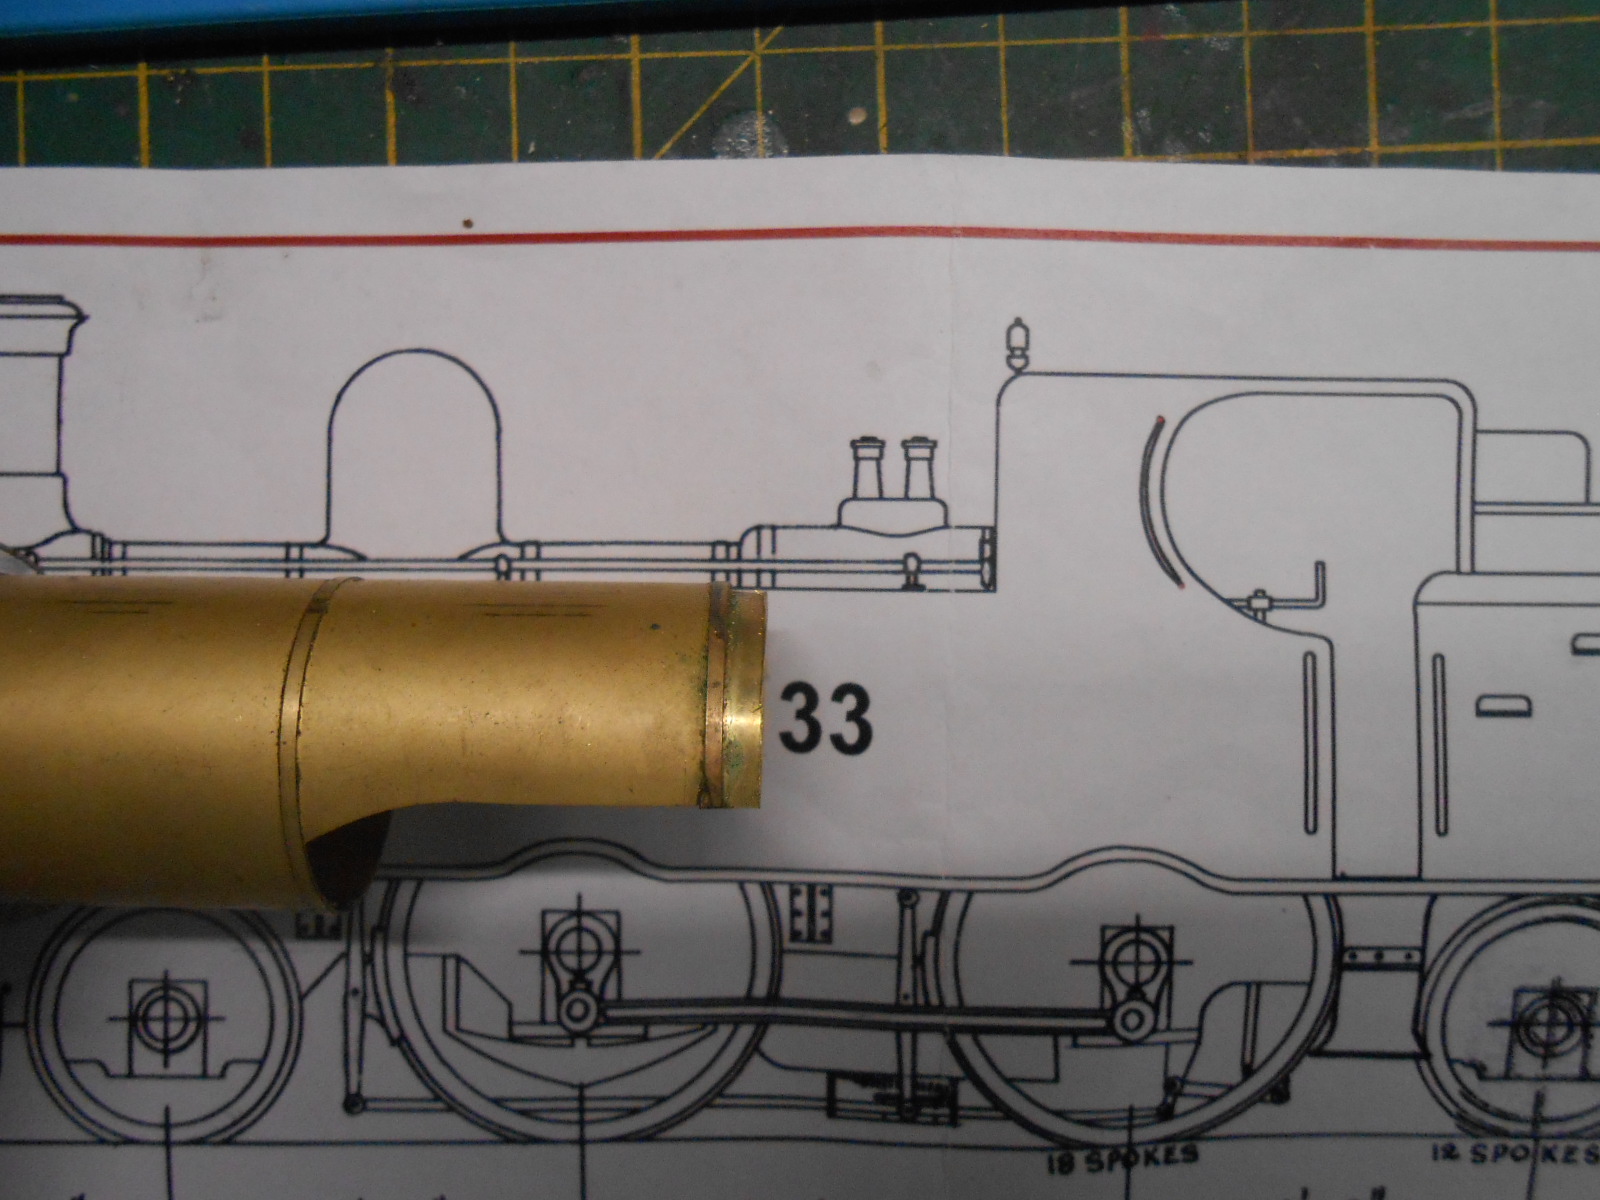
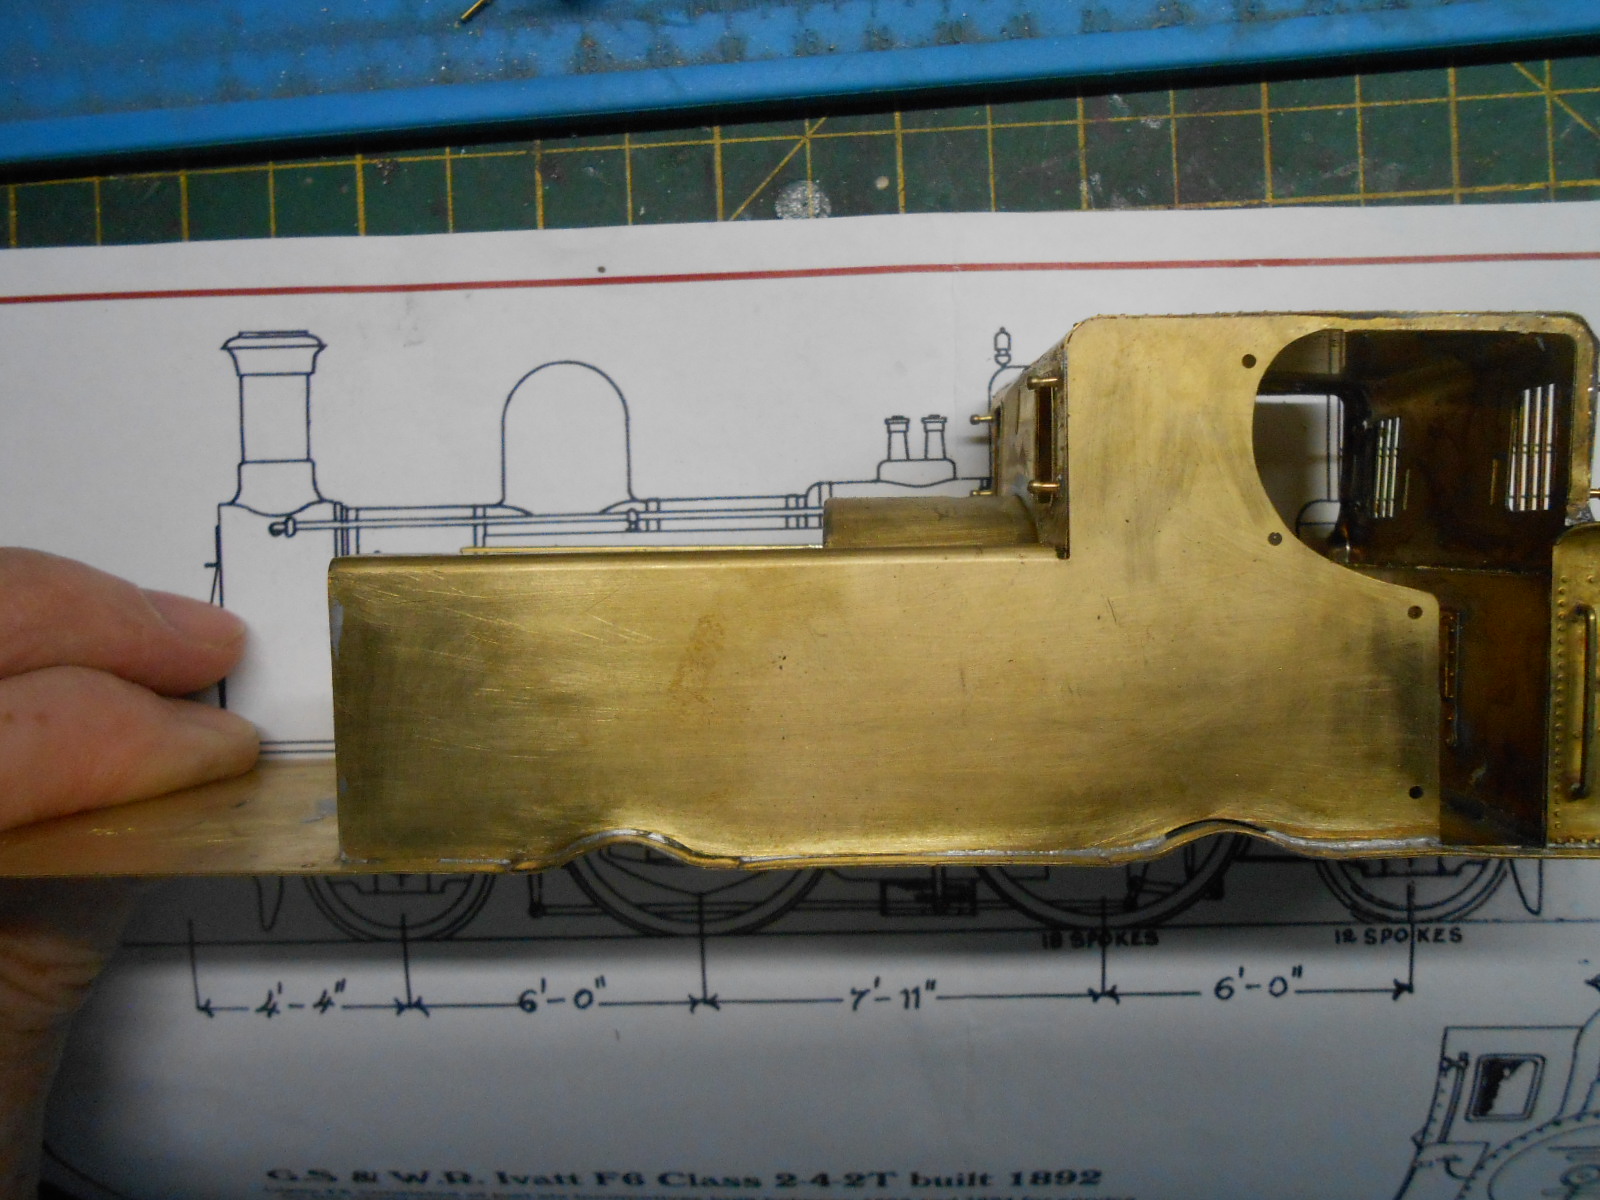
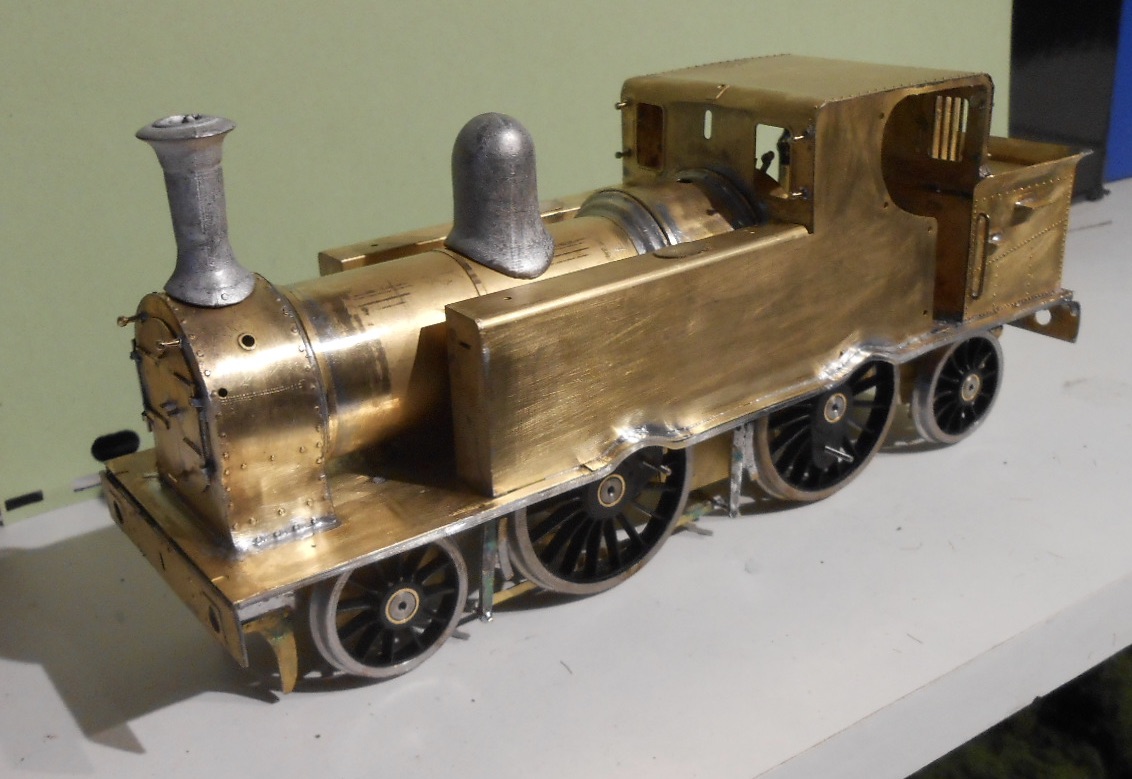
The little F6 is taking shape now, with most fittings added. It's a runner too, as pick ups were fitted this afternoon & wired to the motor. I used my mini lathe to turn up a new dome, as the casting provided is a good scale six inches too thin according to the drawing. Wasn't sure about the chimney either - in original form, the F6 chimney tapered towards the top; later versions are the other way round and photographic evidence suggests they were replaced with the latter before rebuilding with a straight sided smokebox took place. In the end, decided to use the casting provided, but did a bit of gentle fettling to reduce the size of the top flare and make a more pronounced top lip too. Something else that needed trimming was the water filler casting. Photos in the Oakwood Press book on the Valencia Harbour line show the filler was lower before raised coal rails were added. Before fitting the pickups, the chassis was cleaned up and sprayed with etching primer [Halfords rattle can], then used 5 minute epoxy to add small pieces of pcb to the frames to take 0.5mm phosphor bronze wire. Driving wheel pickups are easily hid up in the side tanks, those on the front and rear pony truck are tucked behind the wheels themselves as there is nowhere else to put them. It seems to run really well, though the gears are a little noisy at the moment. However, there's no lubrication yet, so hopefully a bit of gentle running in, along with some grease will quieten things down. Initial testing suggests the F6 should be ok with two six wheel coaches, but if not, there is plenty of room in the side tanks, boiler and firebox for ballast.
-
Looks like a fair bit of fettling has been going on, not least the loco chimney. Never mind the two foot rule, both models certainly merit much closer study. Lovely work.
-
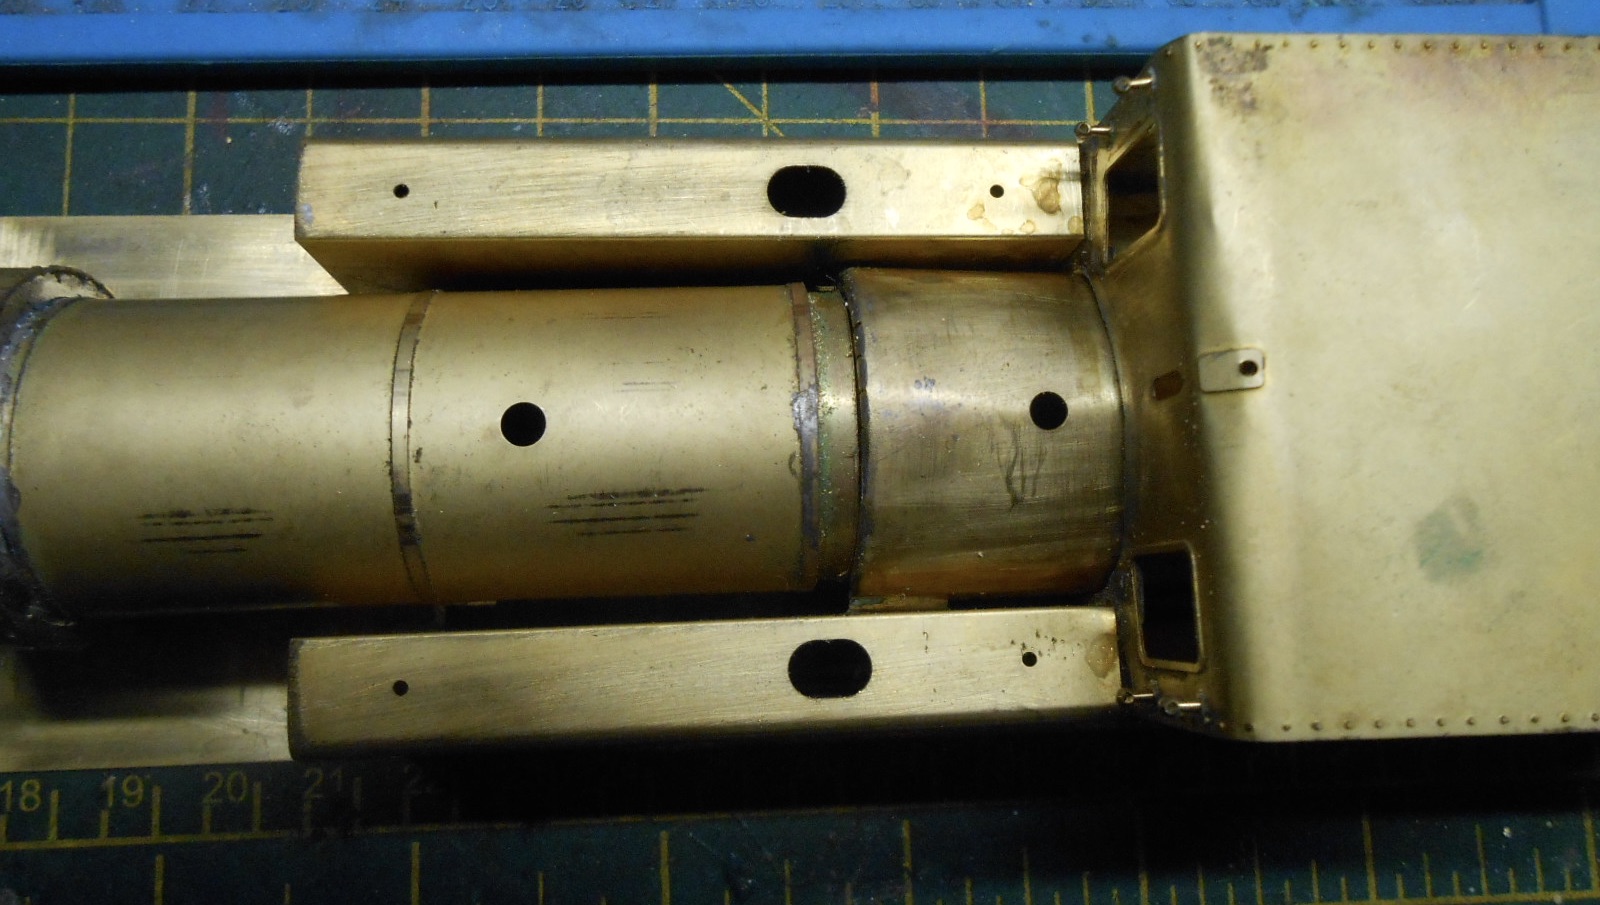
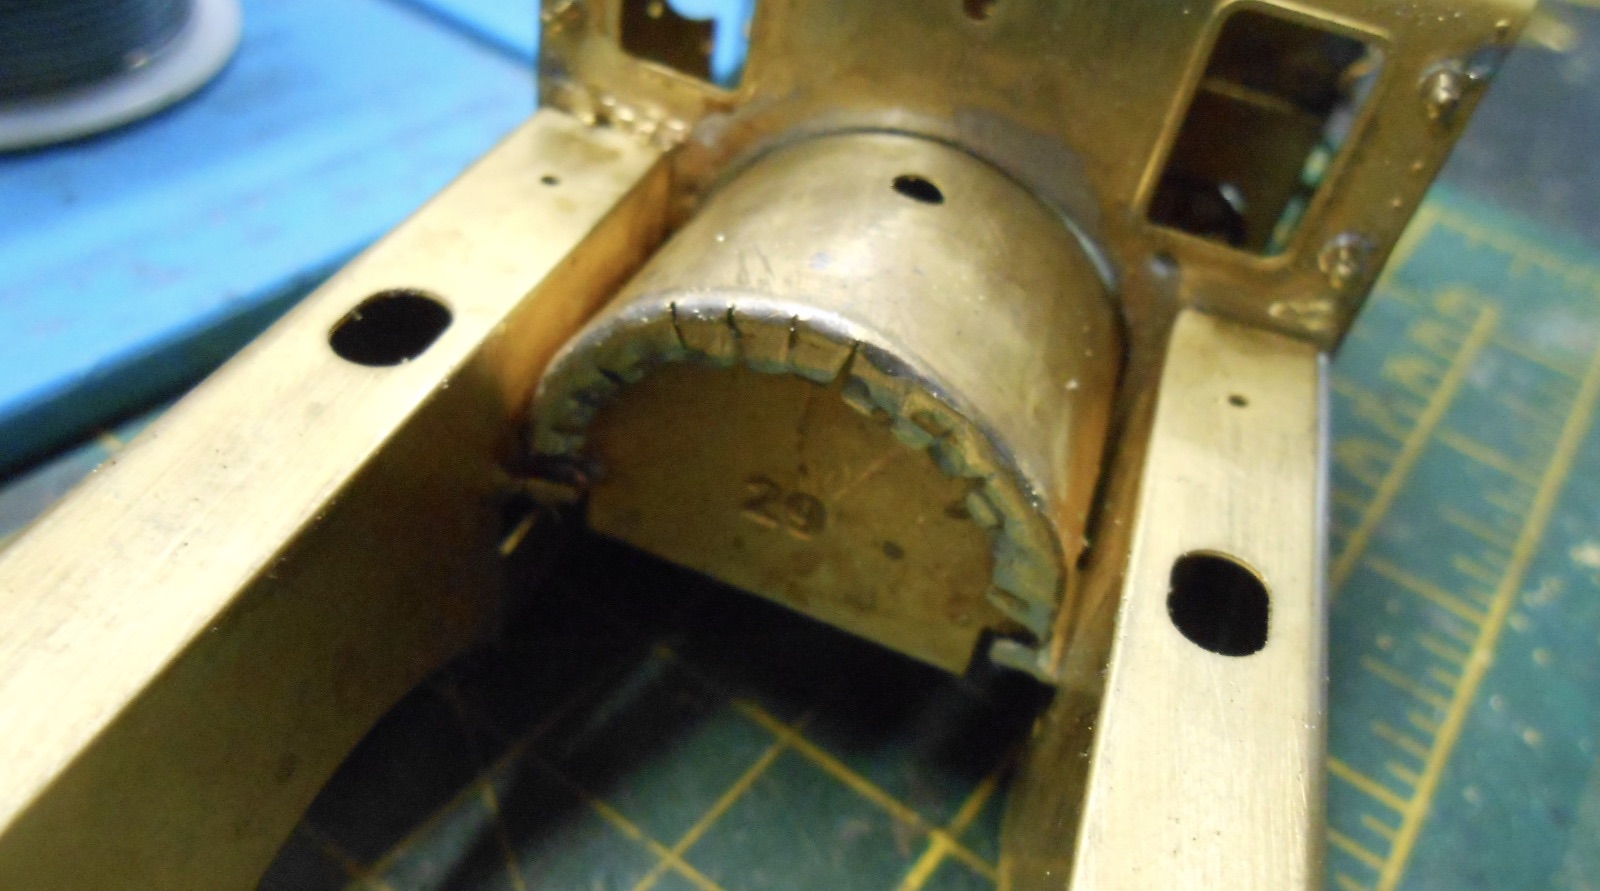
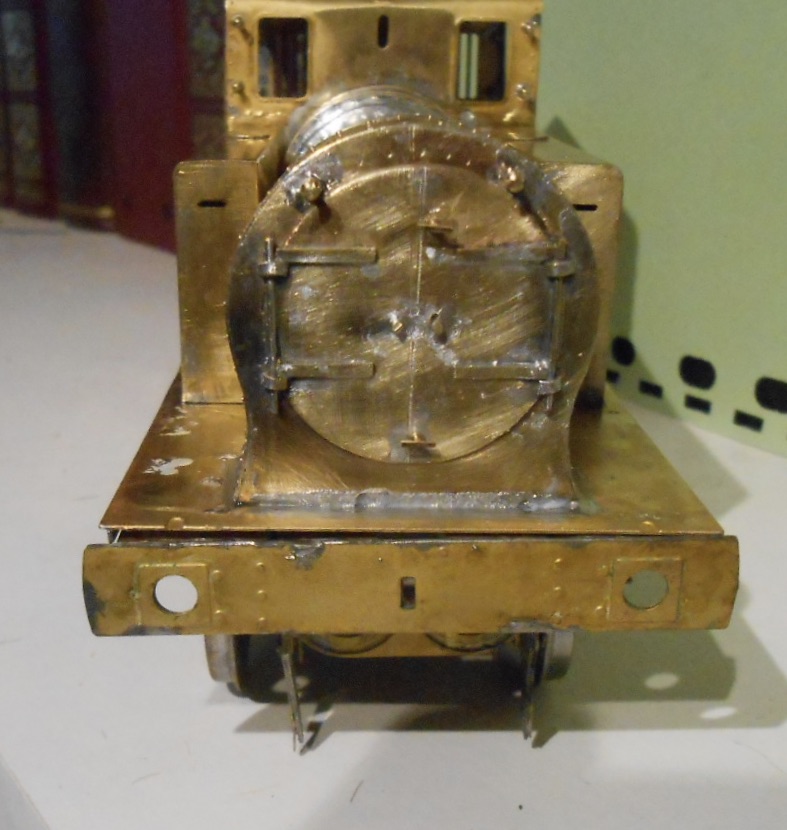
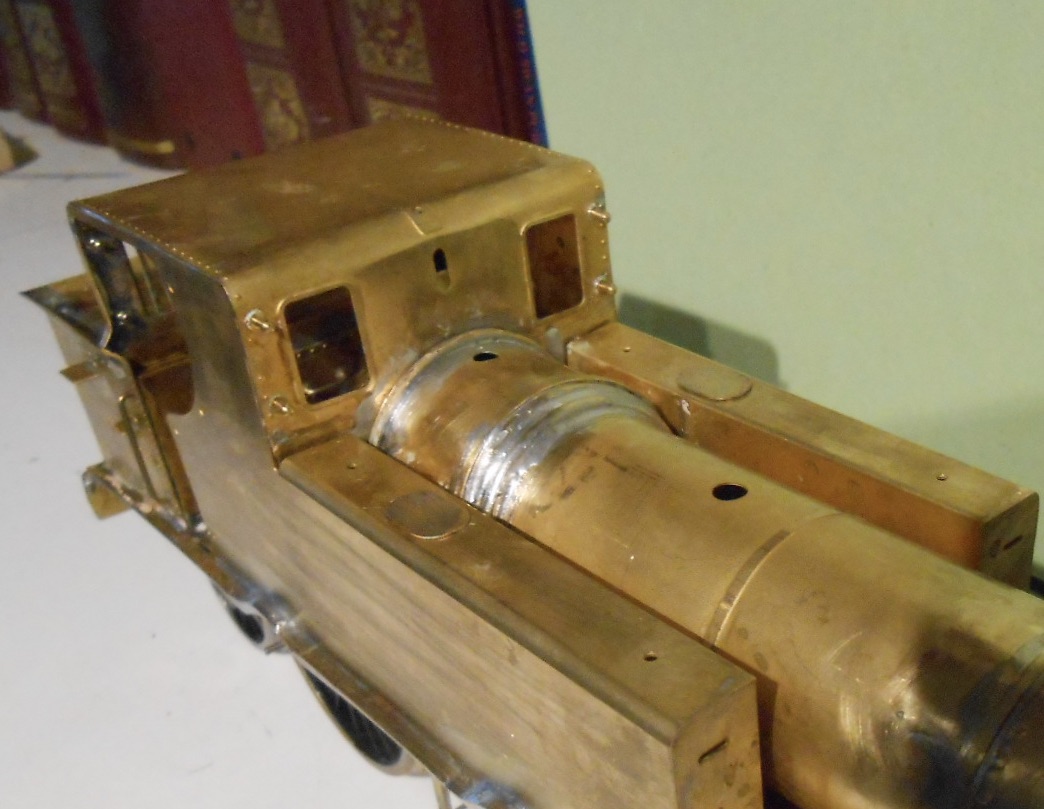
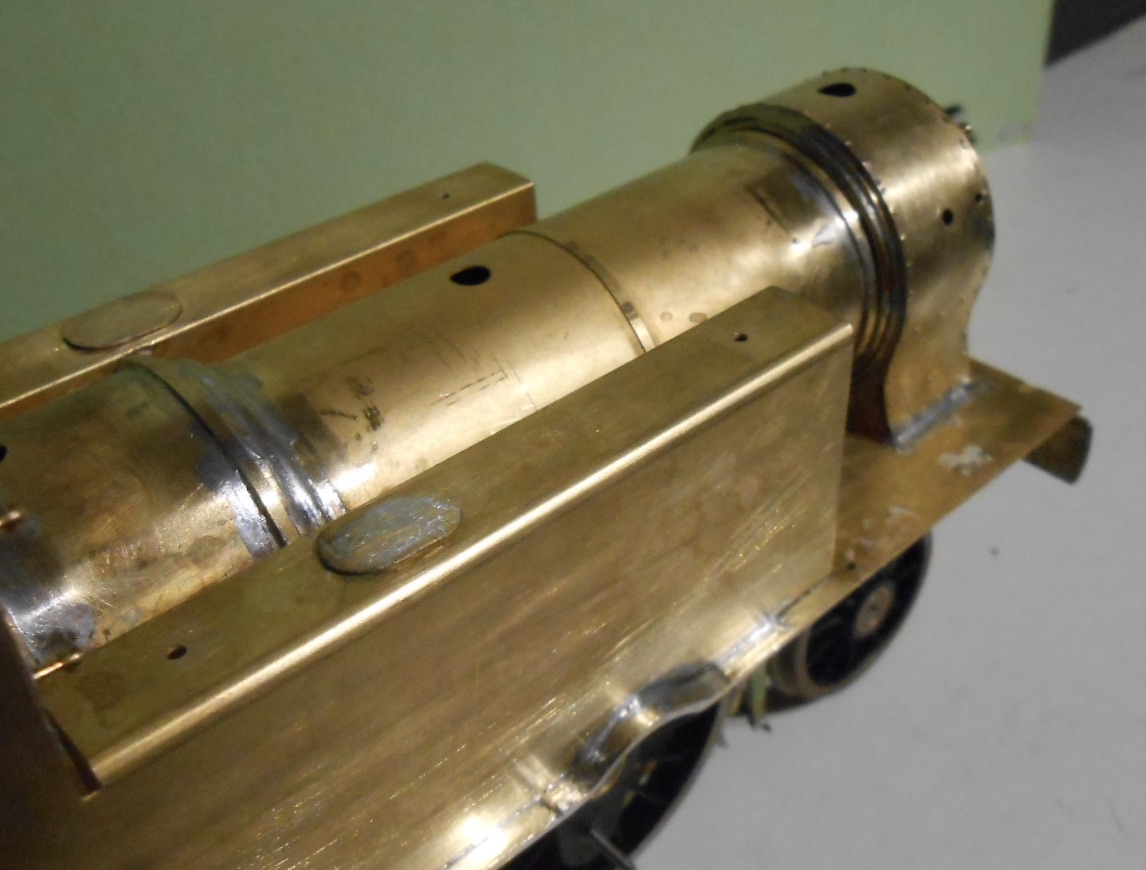
More challenges It seems to me that, as the basic parts of a kit come together, so do the chances of it not happening as intended. A couple of degrees out of alignment, a millimetre or so the wrong way and [just as everything should be lining nicely], suddenly problems appear. I remember once getting lucky with a 7mm scale white metal kit of a narrow gauge Baldwin 4-6-0T - nothing lined up, but somehow the sum of the parts was greater than the whole and it looked fine. Not so here though, for having made up the boiler and smokebox units, assembling them on the footplate showed all was not well. The boiler was simple enough to make, especially as I still have the club's set of rolling bars, while the smokebox has a neat inner frame to help you along. However, because I am modelling an F6 in near original condition, this has meant making it 'waisted', rather than straight sided, so this has meant making a new front, complete with oven type doors. The biggest problem here was adding the strapping, hinges, handles & so on, which was really fiddly and I ought to have used my RSU instead of a conventional soldering iron. I tried adding rivets using my GW Models press, but this didn't work out well, so they were sanded off & I'll eventually add them using ones from an Archer's transfer sheet. So far, so good, but in assembling the pieces problems arose. At the firebox end, there is a 3mm gap, which is supposed to be filled by bending out saw toothed sections on the firebox, but it didn't look right to me, so instead I've added a short section from curved brass strip and then filed it to be a nice fit. However, both the drawings and photos show the joint should curve down to the boiler from the firebox top, so I used a piece of 2mm brass wire, plus lots of solder to emulate this. As it stands, some filler will be needed though to get the right shape. At the smokebox end, there is a very noticeable drop down to the boiler, which should be in three shorter steps. Had I been thinking ahead, I could have cut two discs from 18 and 15thou brass sheet, which would have had the bonus of closing the gap at the firebox end. Instead, I used 0.9mm brass wire, bend around the join. Once soldered in place, this was carefully filed to a square profile, then a second ring of 0.7mm wire was added on top and given the same treatment. I then needed to add a new front boiler band from thin brass strip and did the same to the front edge of the firebox. Finally, I used a piece of small section L shaped brass, bent round a piece of one inch pipe to make a piece of beading to hide the join between the firebox and cab front. Still with me? Well done, because the work was indeed as tedious as this must read! One correction I now need to do is to grind off the top steps on the coal bunker, as early on their lives, these engines had no upper coal rails, so the steps weren't needed. However, I have a question for the cognoscenti among you - the water filler sits in the coal space, so would it have been originally as tall as it was later, to stand above coal rails? Speaking of corrections, am pretty sure I'll need to turn a new chimney, while the casting for the dome looks decidedly anorexic - compared to the drawing, it should be a scale six inches more in diameter. Life is complicated they say, that's why it is fun. Allegedly....
-
Works really well, Ken.