David Holman
-
Posts
4,359 -
Joined
-
Last visited
-
Days Won
117
Content Type
Profiles
Forums
Events
Gallery
Blogs
Everything posted by David Holman
-
More than a hint of alchemy going on here! Very impressive.
-
Another fine project!
-
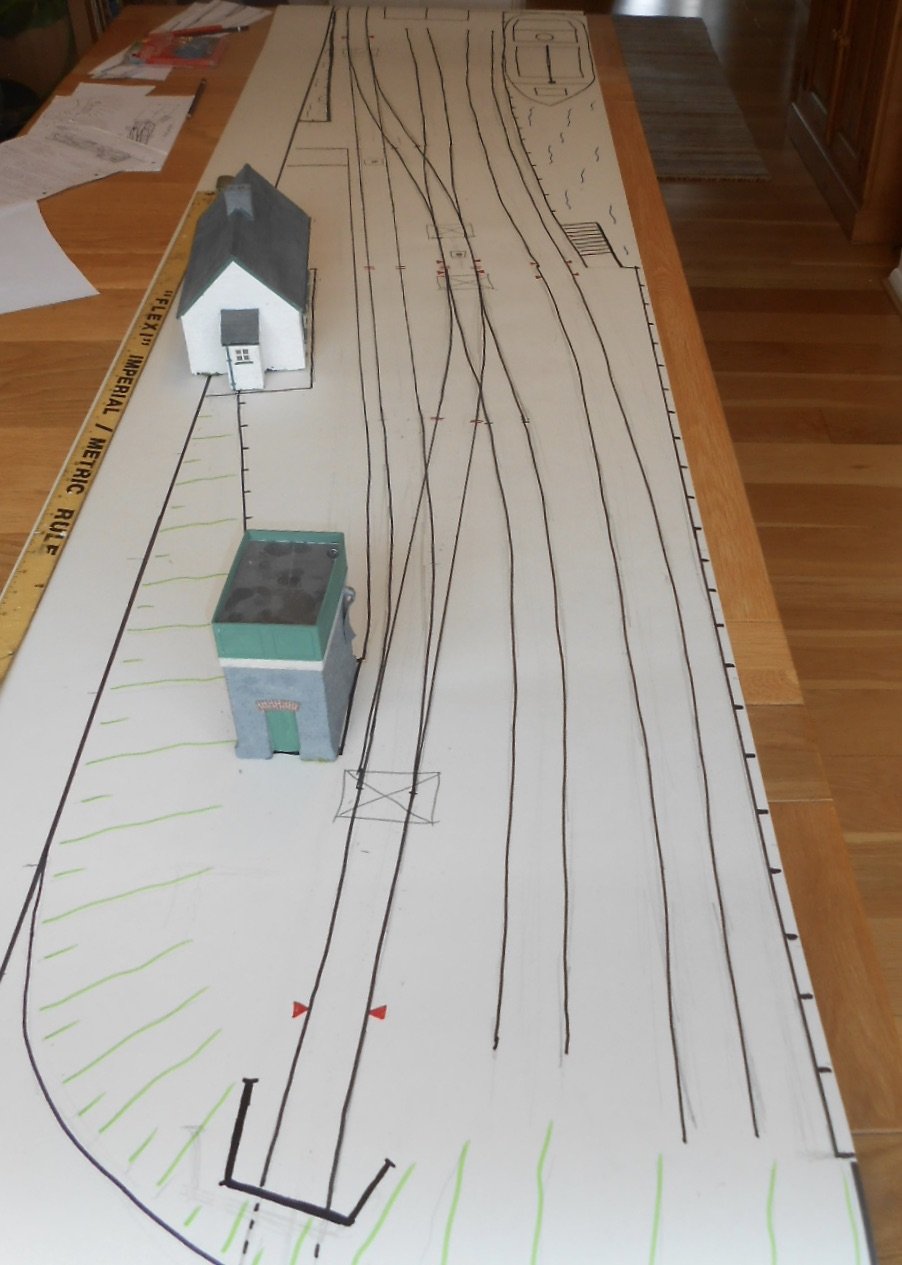
Not much time for modelling last week, or next for that matter, but have at least been able to do a bit more planning, in hope of having a shopping list for baseboard materials to get started eventually. Iain Rice's 'Cameo Layouts' is a mine of information, although some adaptation of his ideas was required, not least in having a pretty much flat baseboard surface throughout, as opposed to just having track bases as the flat surfaces. A bit more thinking has [at the moment] resulted in the addition of an extra crane, which it is hoped will mask both the square corner at the right hand end, and the exit on to the pier. I've also been pondering on hiding the baseboard join, especially in the back scene. Currently, a patch of woodland is favourite for hiding the join in the hillside, while the small piece of sky might be home to a wireless mast, perched on the horizon. The station building, which will be a mirror image of Westport Quay, will be removable, also helping to hide the join. With Fintonagh, which is the same depth but slightly shorter, I made the back scene and ends integral to the baseboard framing and the same will apply here, with a piece of MDF forming the left hand hillside as a curved section. The wings at each side will support a pelmet, with an LED lighting strip to illuminate the front edge of the scene and another along the centre to light the rest. Both of these double up with Belmullet. The revised plan [unlikely to be the last!] now shows where the point motors will go, along with the uncoupling magnets. I've found it is important to try and think through how a layout will be operated at this early stage, so such items can be planned in from the start. Likewise the wiring diagram, especially as the control panel will be inset into the front right fascia. As far as I can tell, it will be pretty simple - just two DPT switches to control the four points [which will work in pairs as crossovers], plus three push to make switches for the uncoupling magnets. Am expecting to add an on/off switch for the crane track too, with the crane controlled by a Heathcote Electronics shuttle unit. Gaugemaster do one, but it is simply stop/start and I want something more subtle - the idea being that the crane can traverse the front of the layout while a new train is being set up in the fiddle yard, thereby ensuring a bit of movement most of the time.

- 257 replies
-
- 13
-

-
Very classy. Great scenic work and a beautifully balanced setting.
-
Certainly works for me and oozes character from every corner. The perfect companion for a Large Tank
-
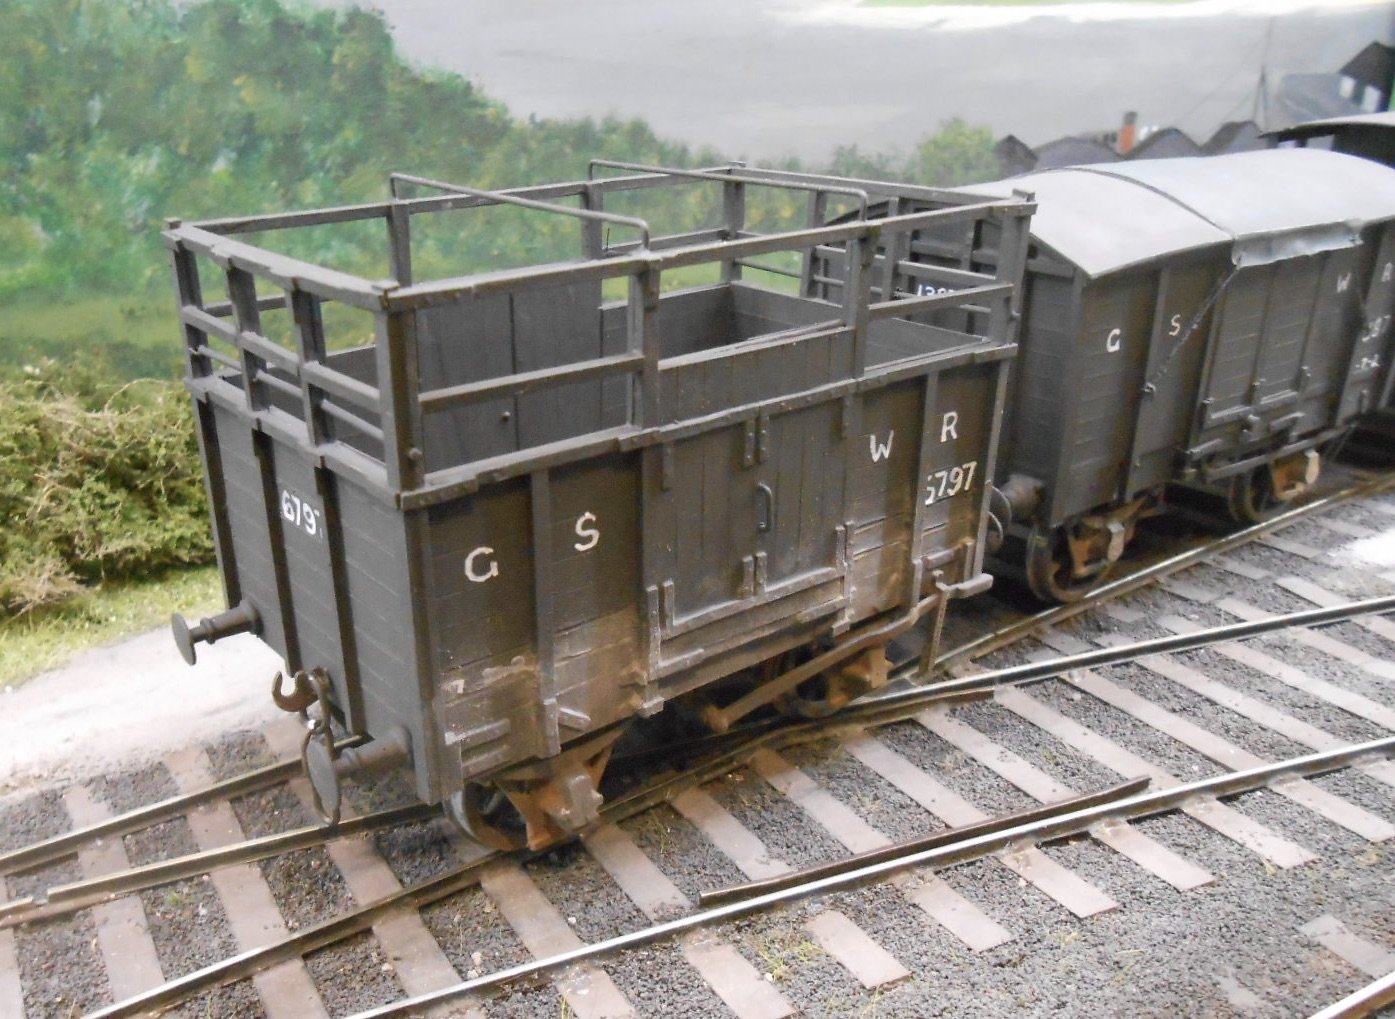
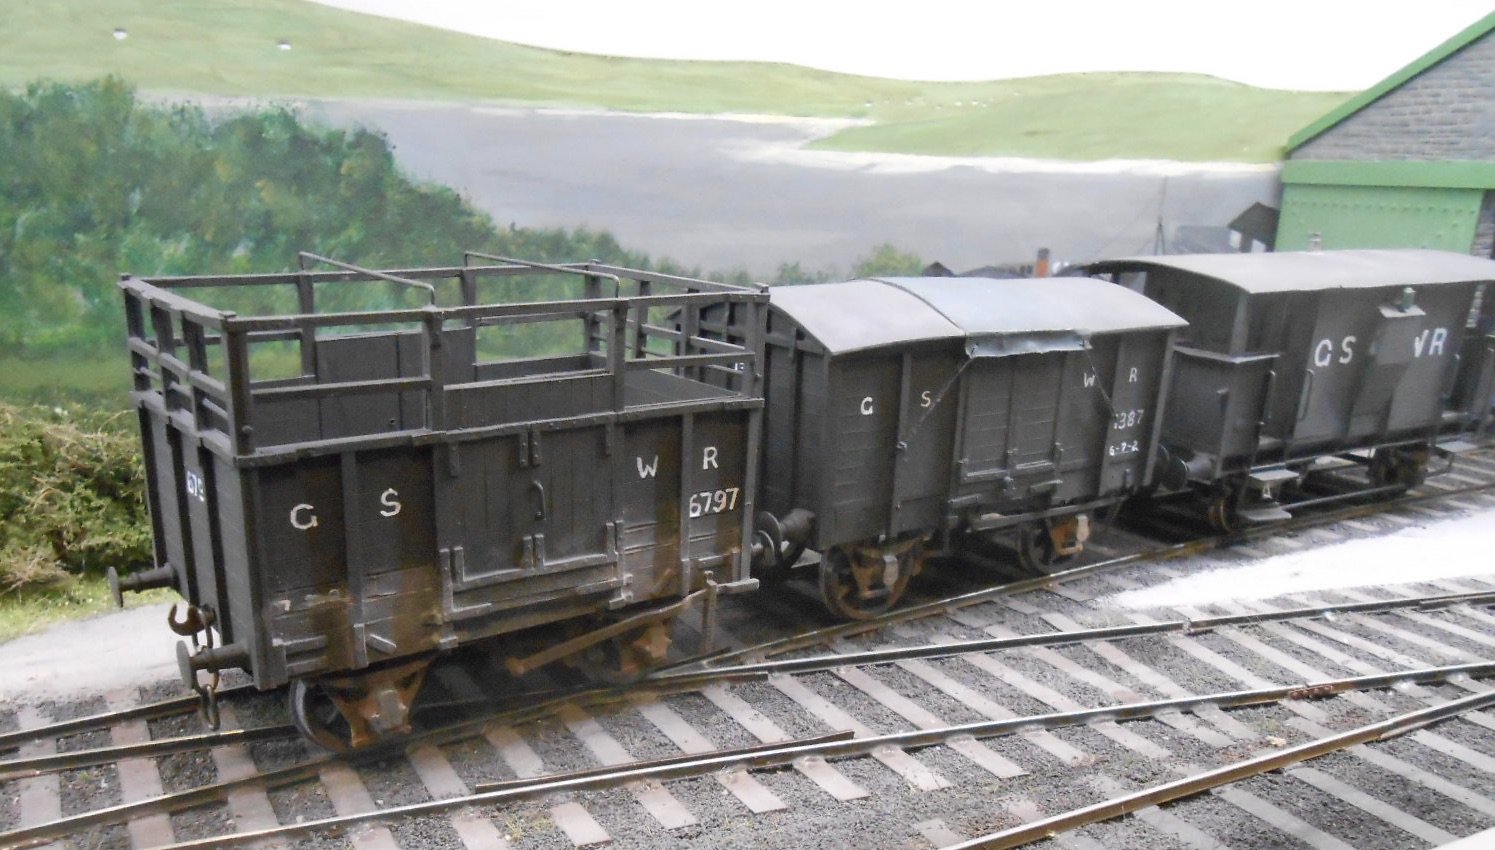
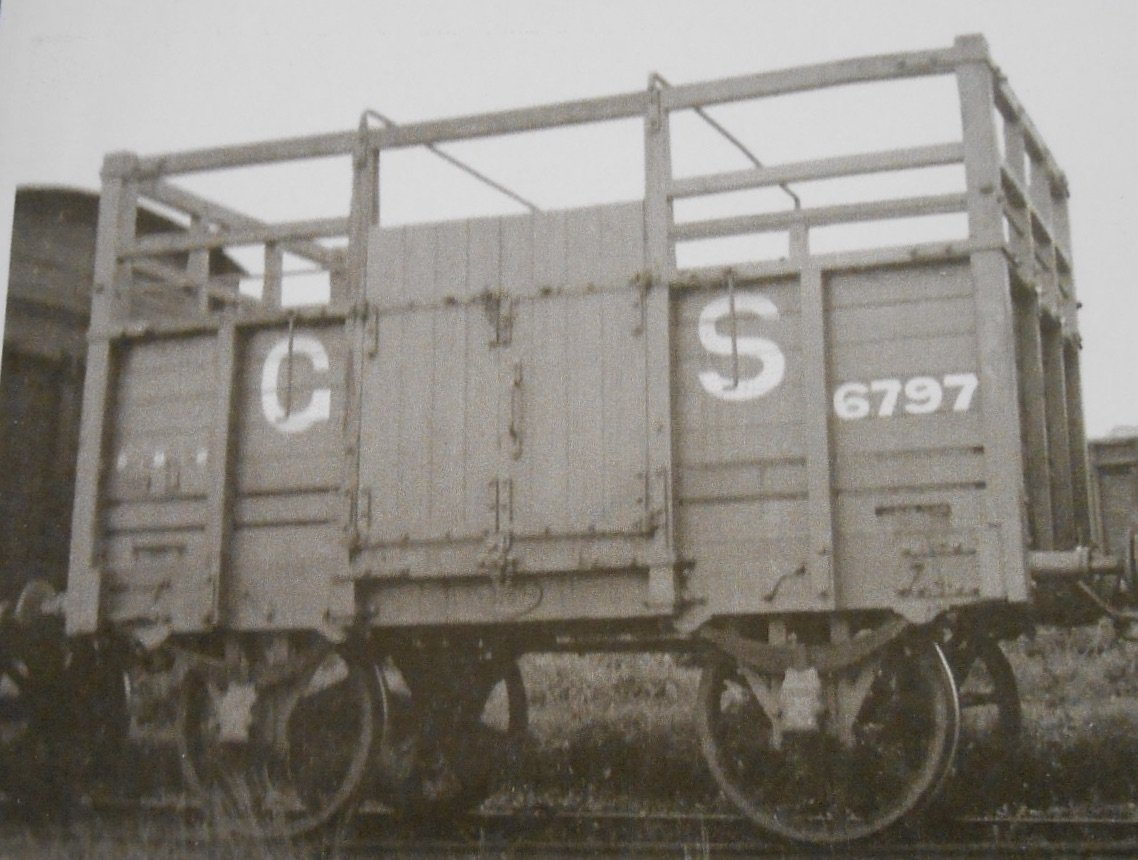
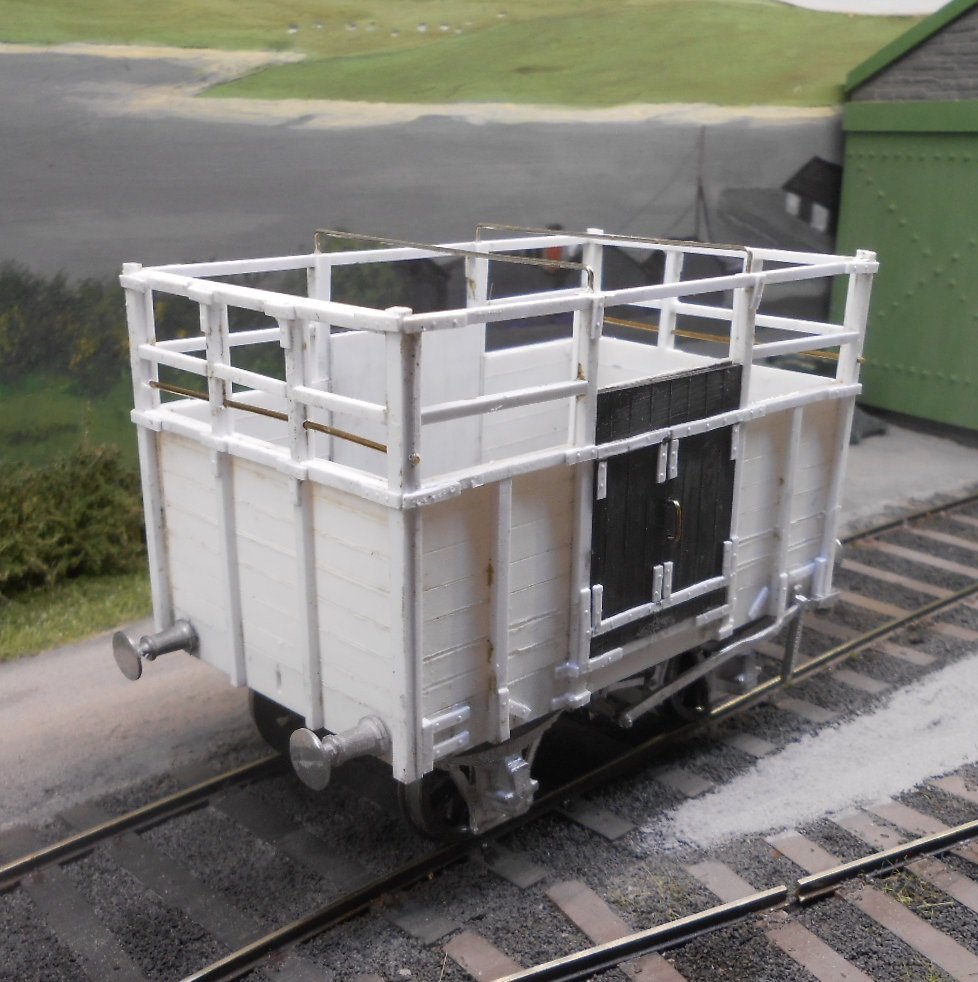
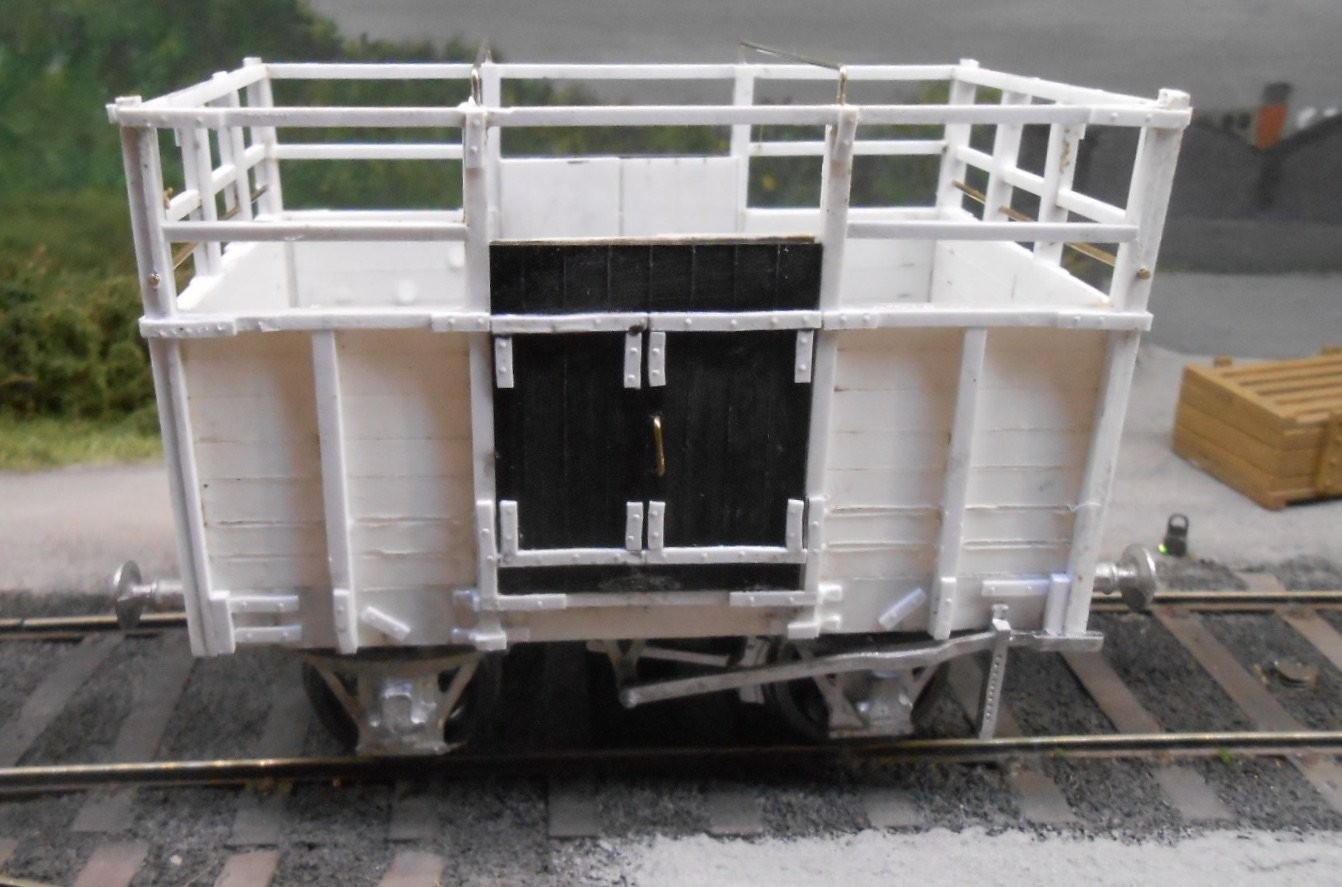
So, back to the open cattle wagon. Finished off in my usual way, with lettering done by hand using white acrylic ink and a dipping pen, followed by a dusting of weathering powders in appropriate places - in this case some pale grey to simulate an application of lime wash. May need to beef this up a bit, as the real stuff was slopped on with considerable enthusiasm if old photos are to be believed. Am also pondering on adding a load of cattle. Did this with my Sligo wagons, using home made beasts, so guess I need to find my original posting to remind myself of what I did!
-
Indeed, always something interesting going on and a fine way of introducing a new loco.
-
Done a few Courtmacsherry clone designs John, and even got as far as calling one Port Macsherry ergo moving it further along the coast. Very tempting in 7mm scale, with so much of the stock being in the Alphagraphix catalogue. For me, it is just about the perfect branch line trackplan and remain surprised there aren't lots of versions of it, never mind Andy's being the only proper one. Regarding loop length, though short, it is close to 2'/60cm, so as total train length (loco and stock) will be no more than 33" maximum, am happy with that. More important for me is have a short lead/shunting neck either end of the loop, so that all the action takes place in the open. Have seen some designs where the engine is off scene much of the time and aim to avoid that at all costs. While trains will be limited to two six wheel coaches or three wagons and a brake van, have found with other layouts that, being short, they fit in with the overall scene and operationally there is just as much to do as if they were twice as long. So, SLNCR Railcar B will do some of the passenger work, as will my F6 and two six wheelers, but even the D16 and two mail vans look fine as does any of the other tender engines. What I am going to need to do is get the autocouplings working efficiently for exhibitions, as front operation means not standing in front of the punters... Think it is great we have a number of new projects brewing on the forum and I'm certainly looking forward to seeing them progress.
-
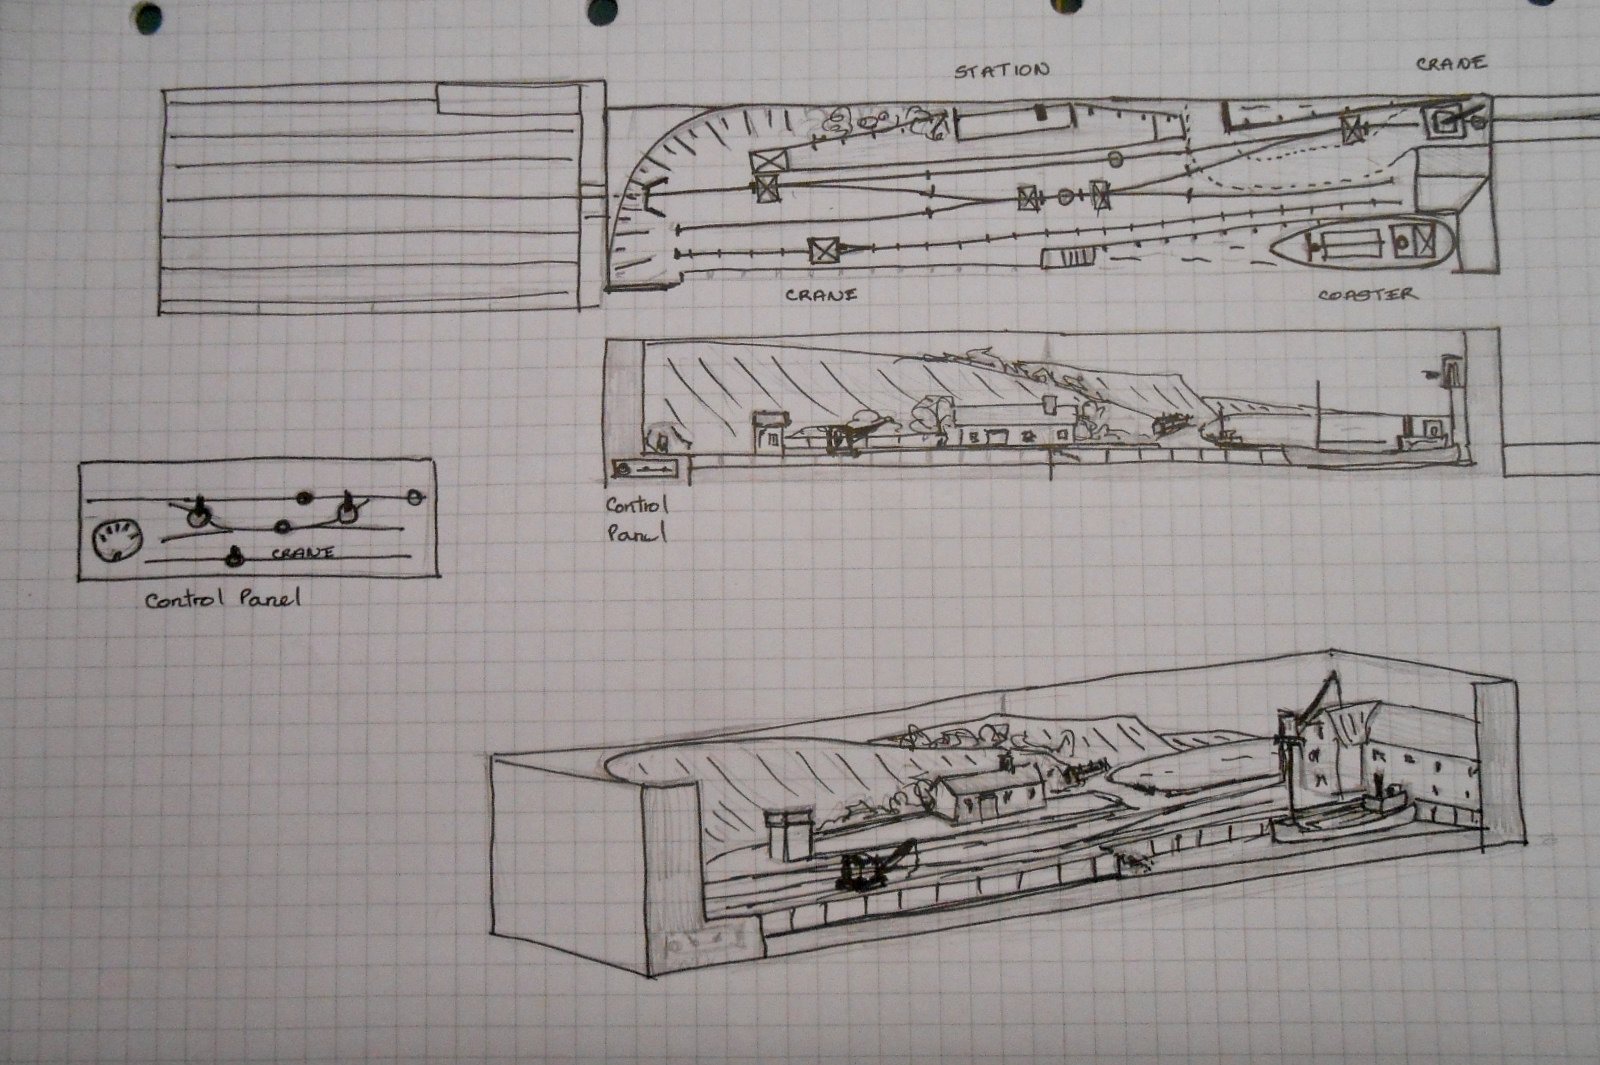
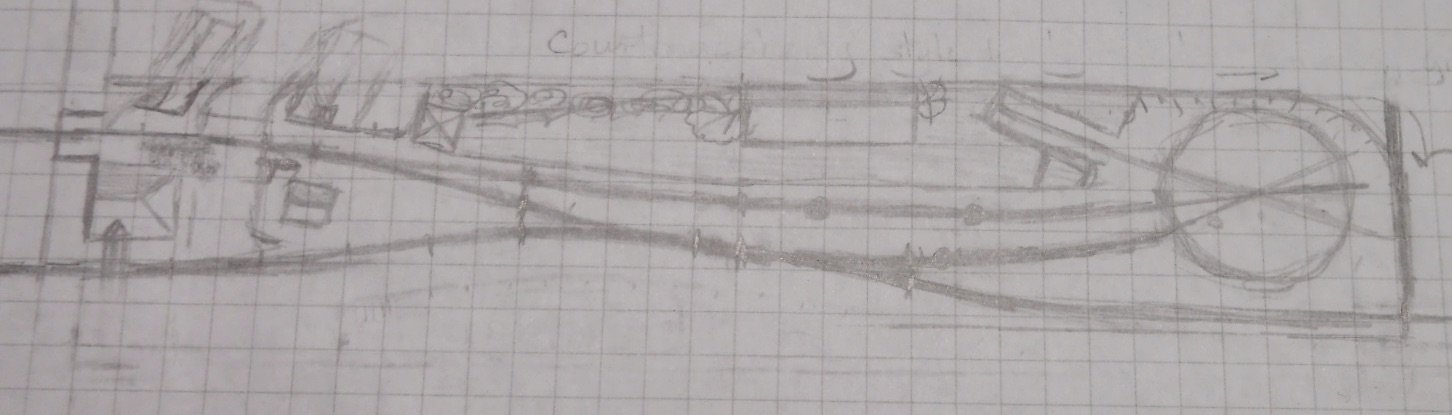
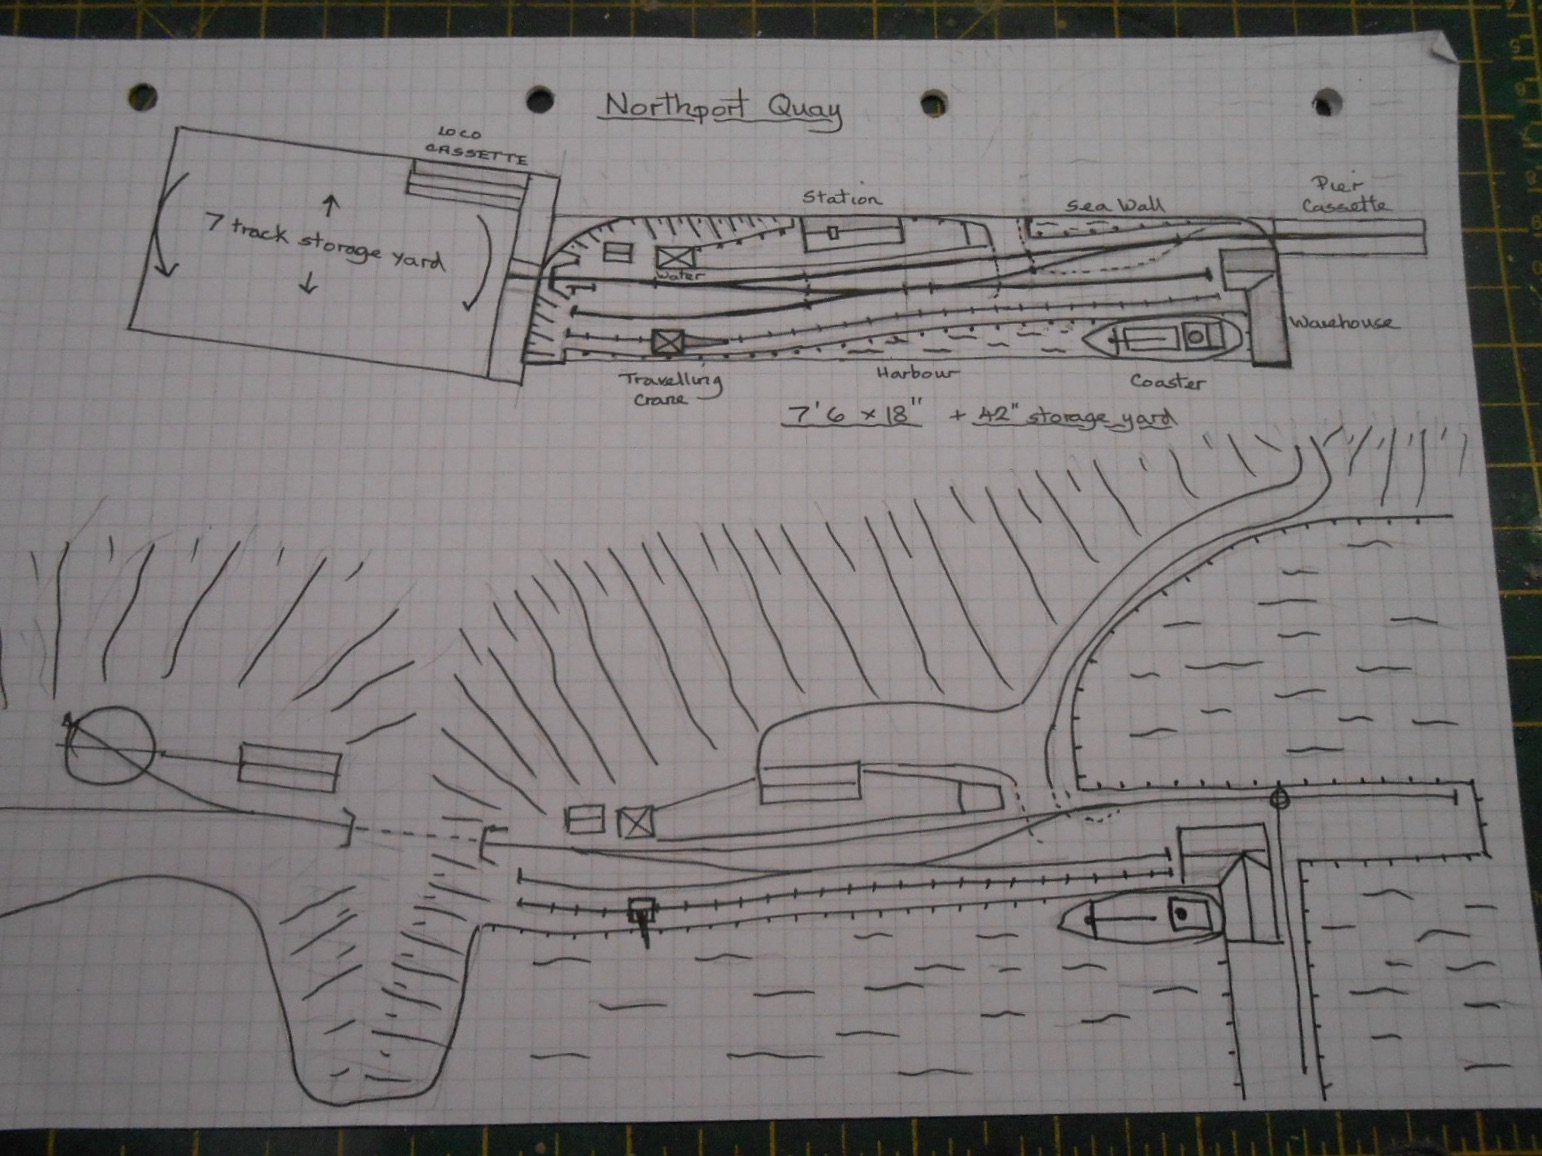
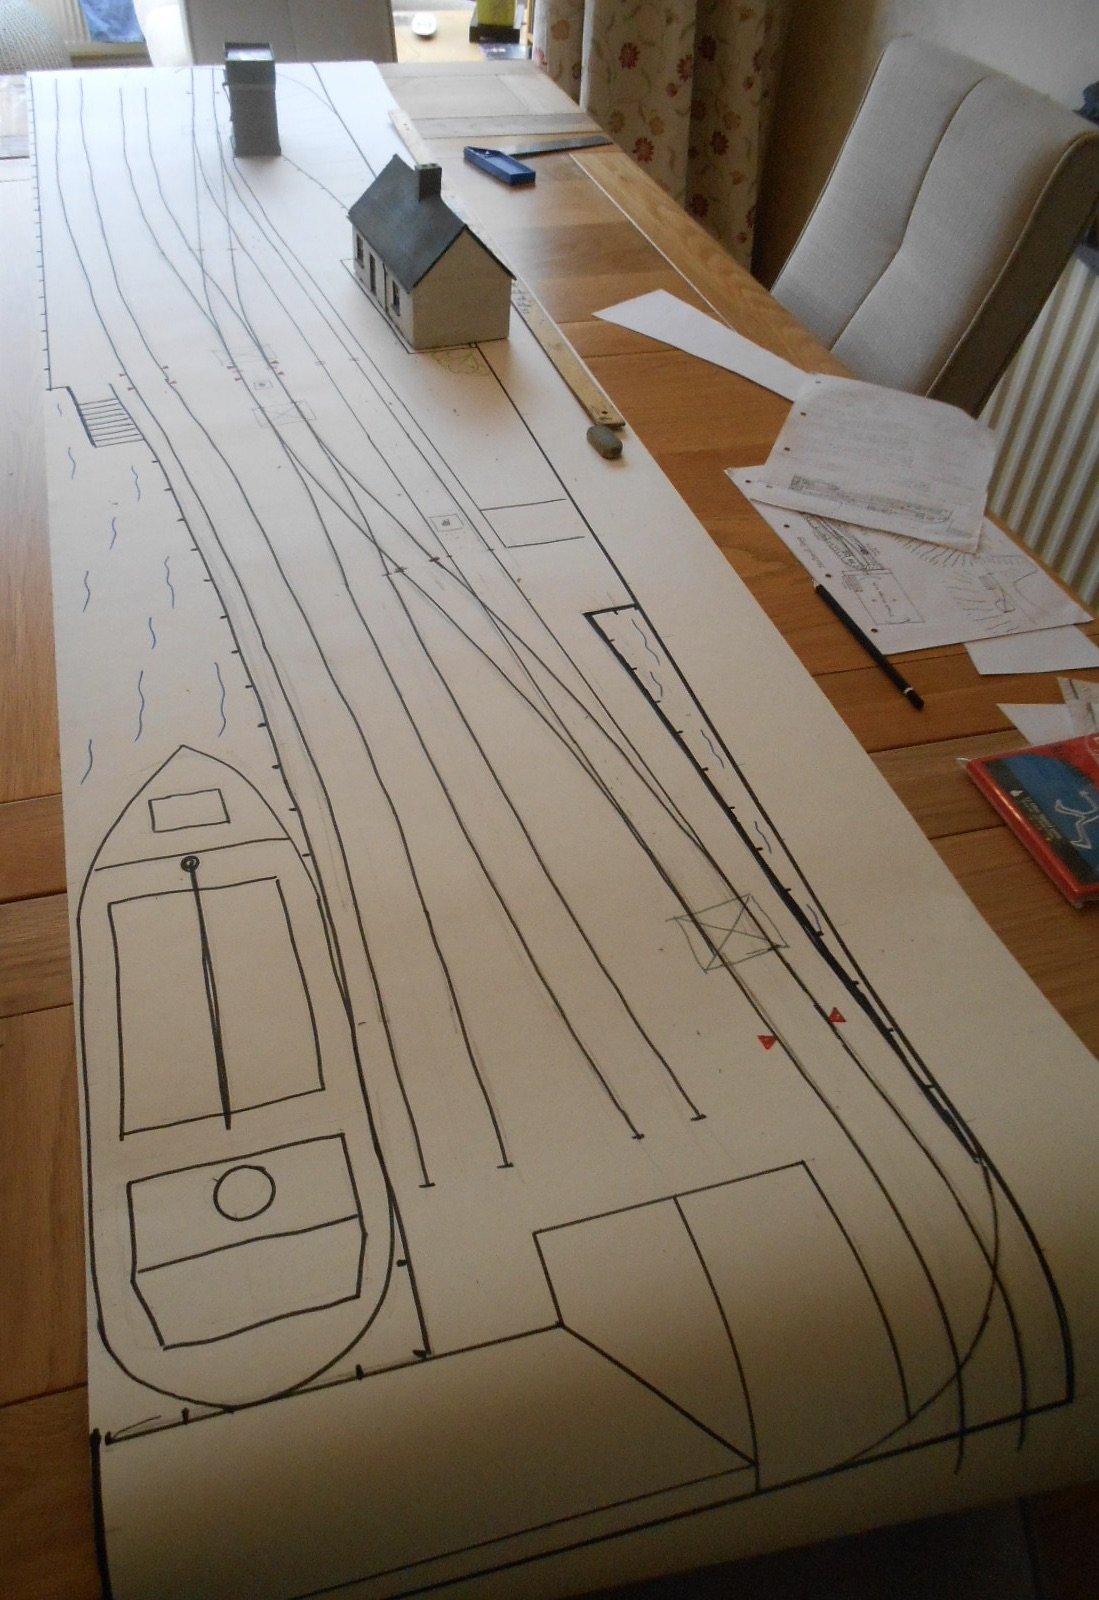
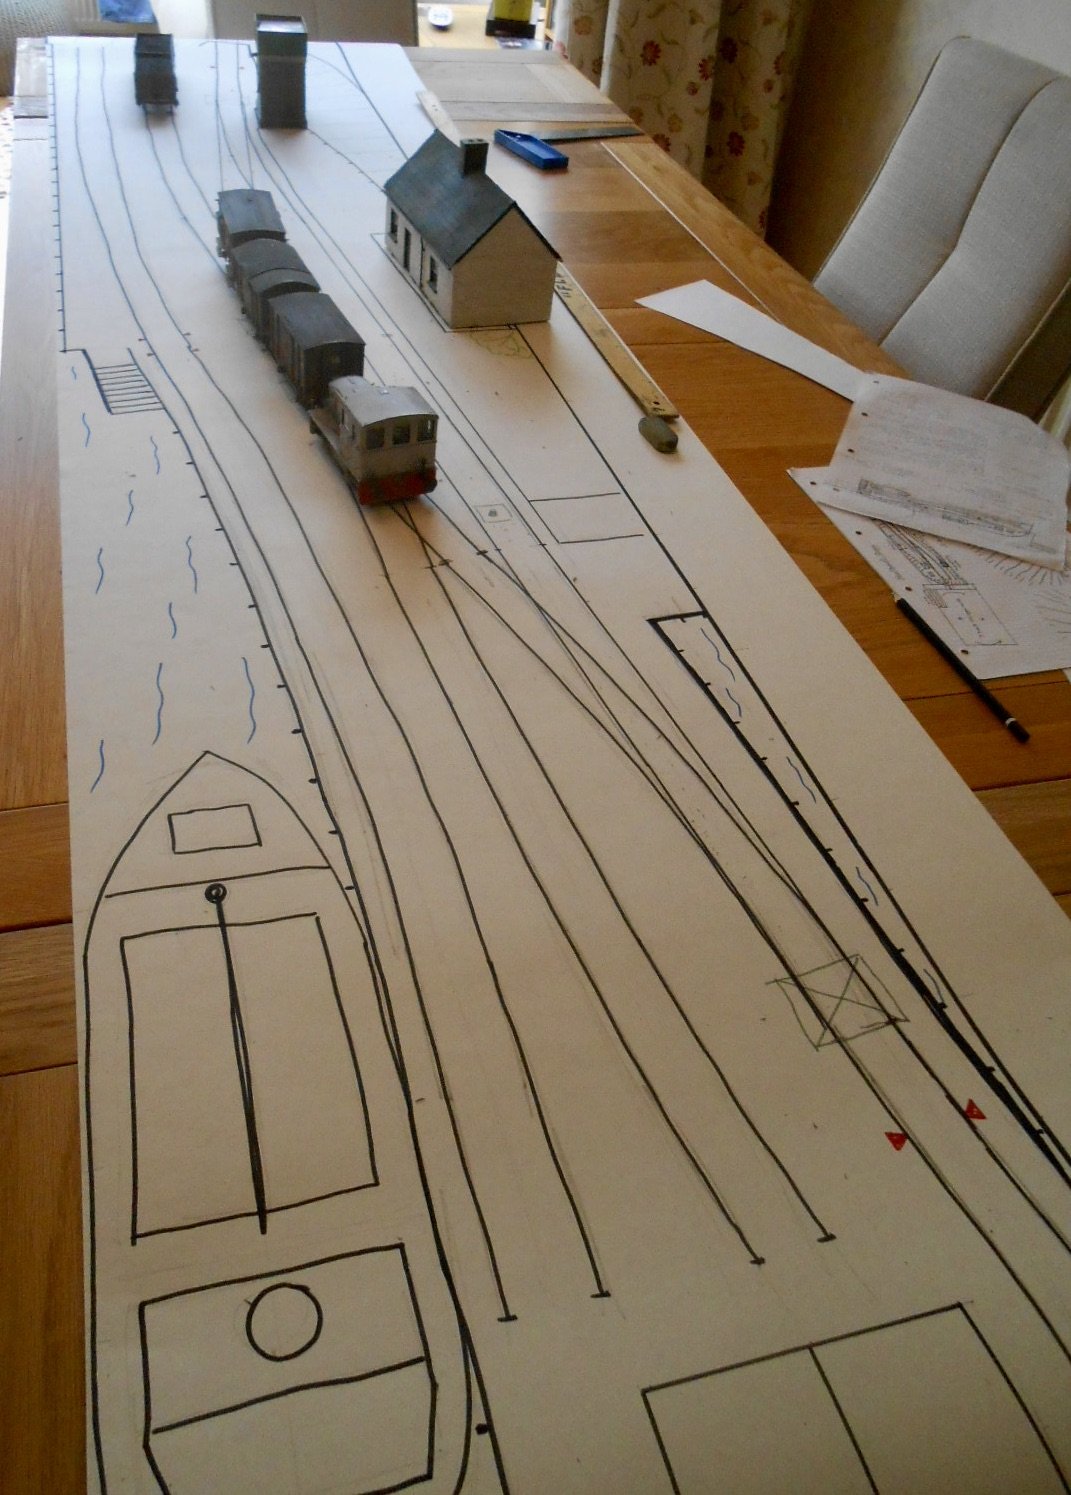
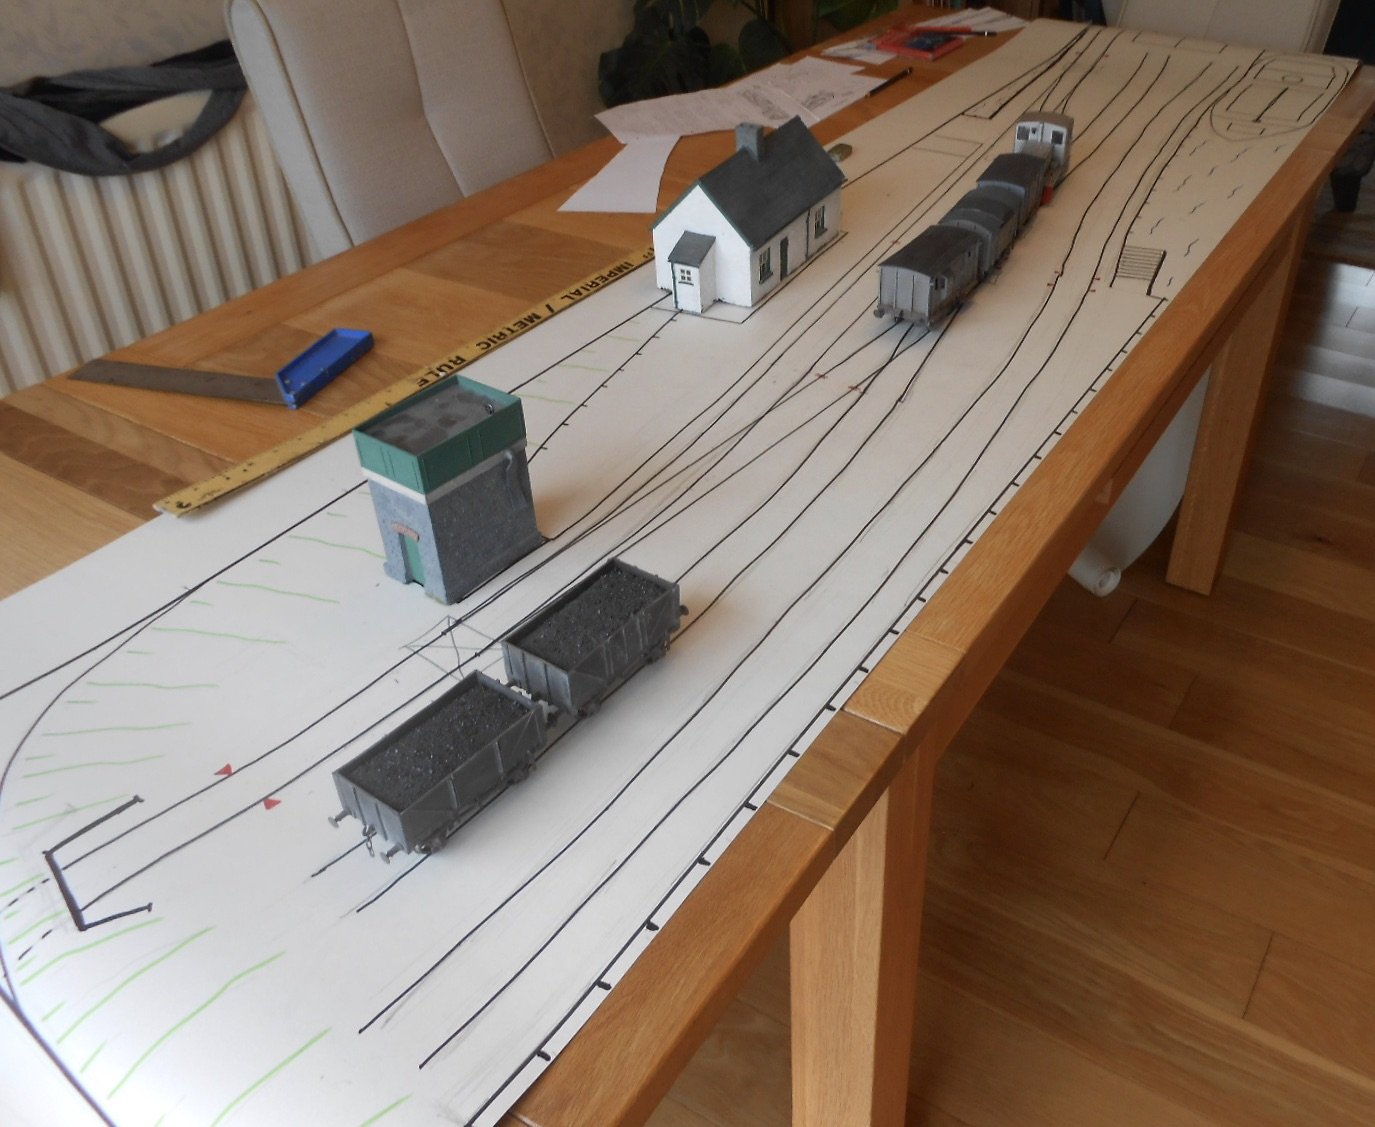
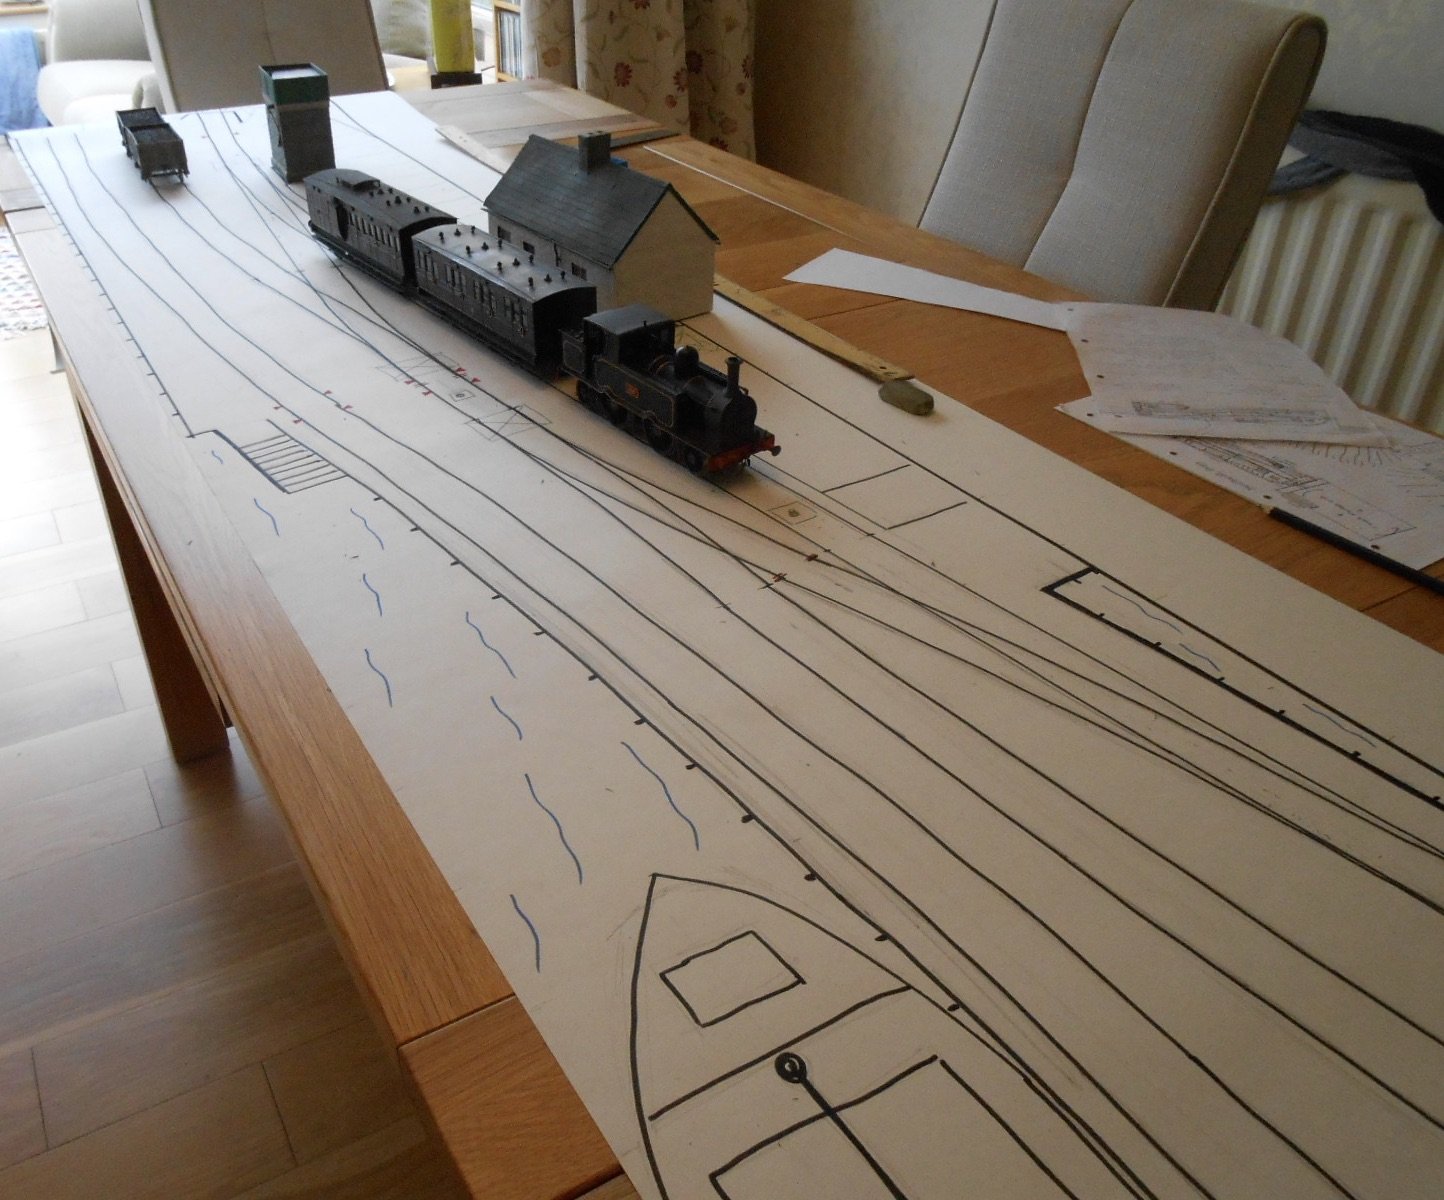
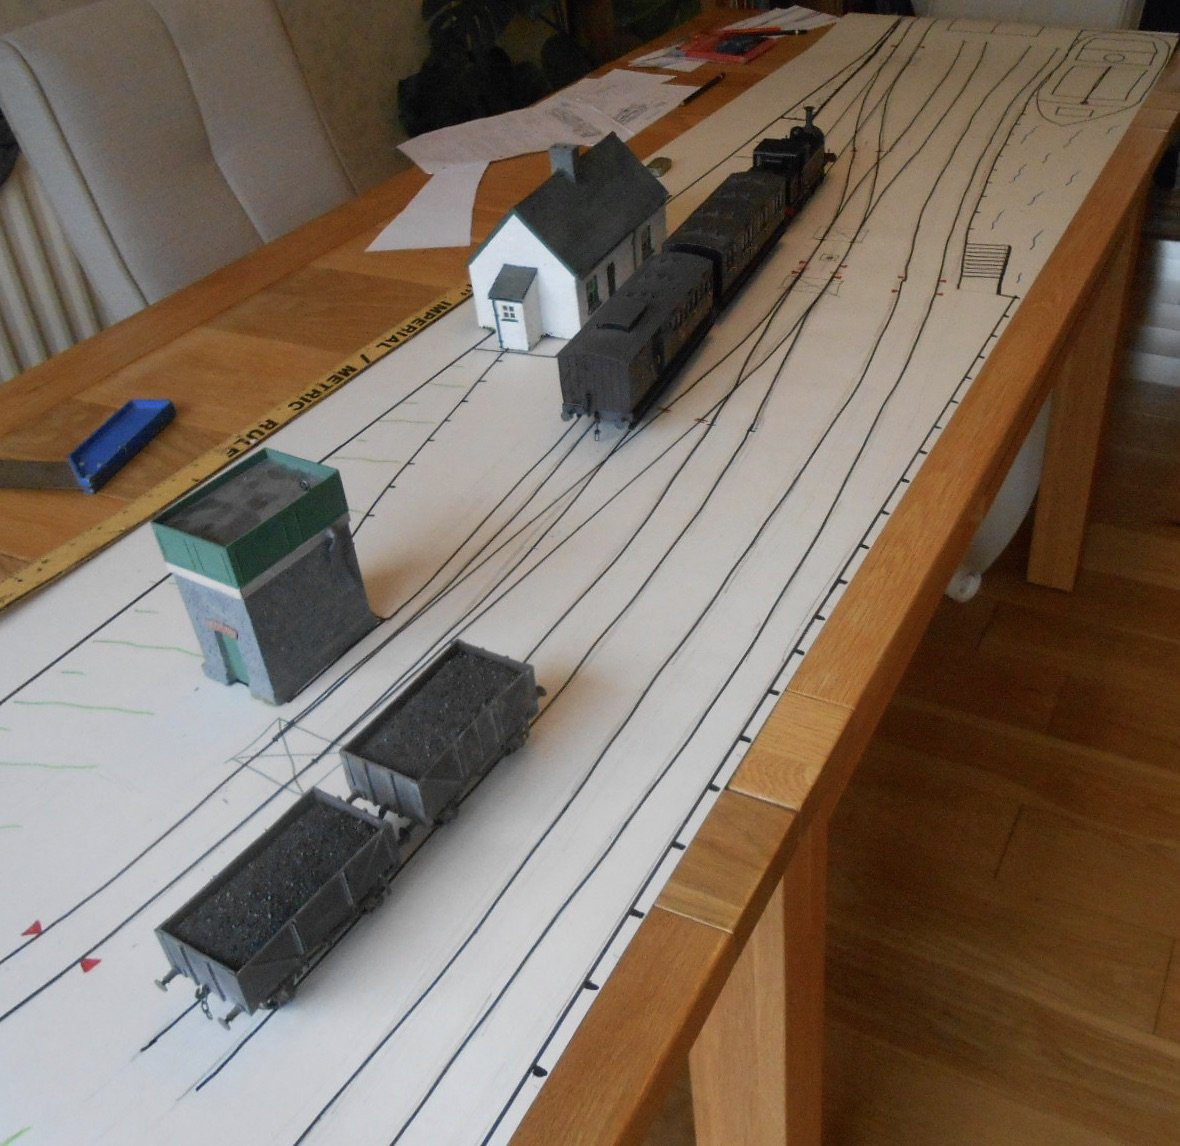
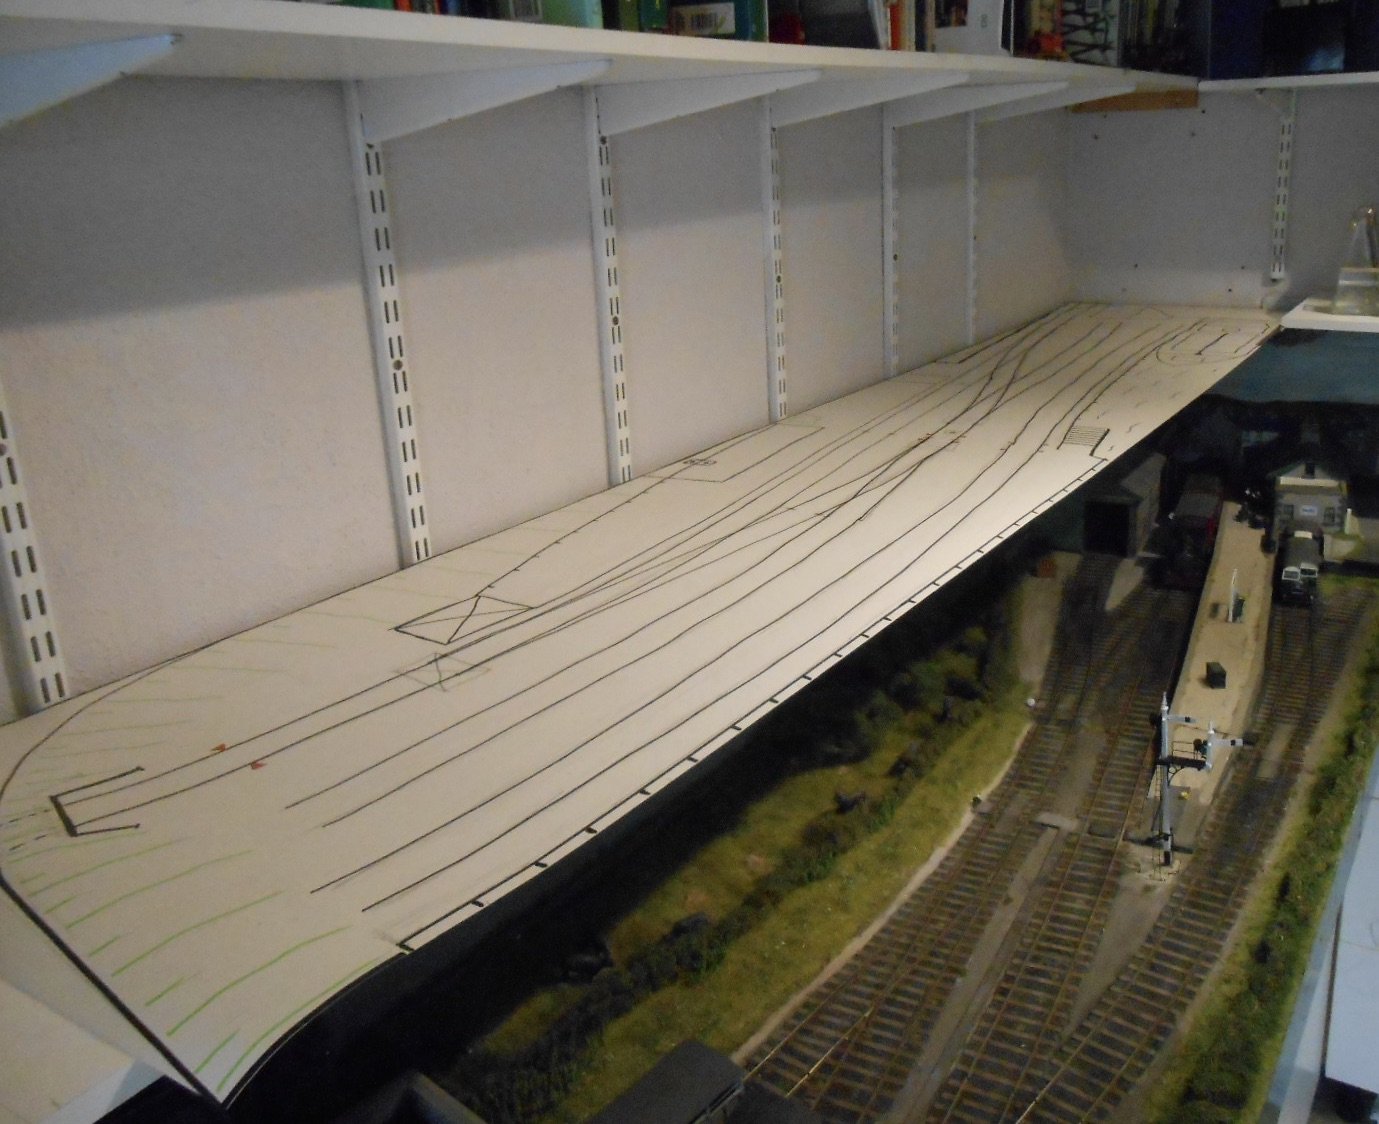
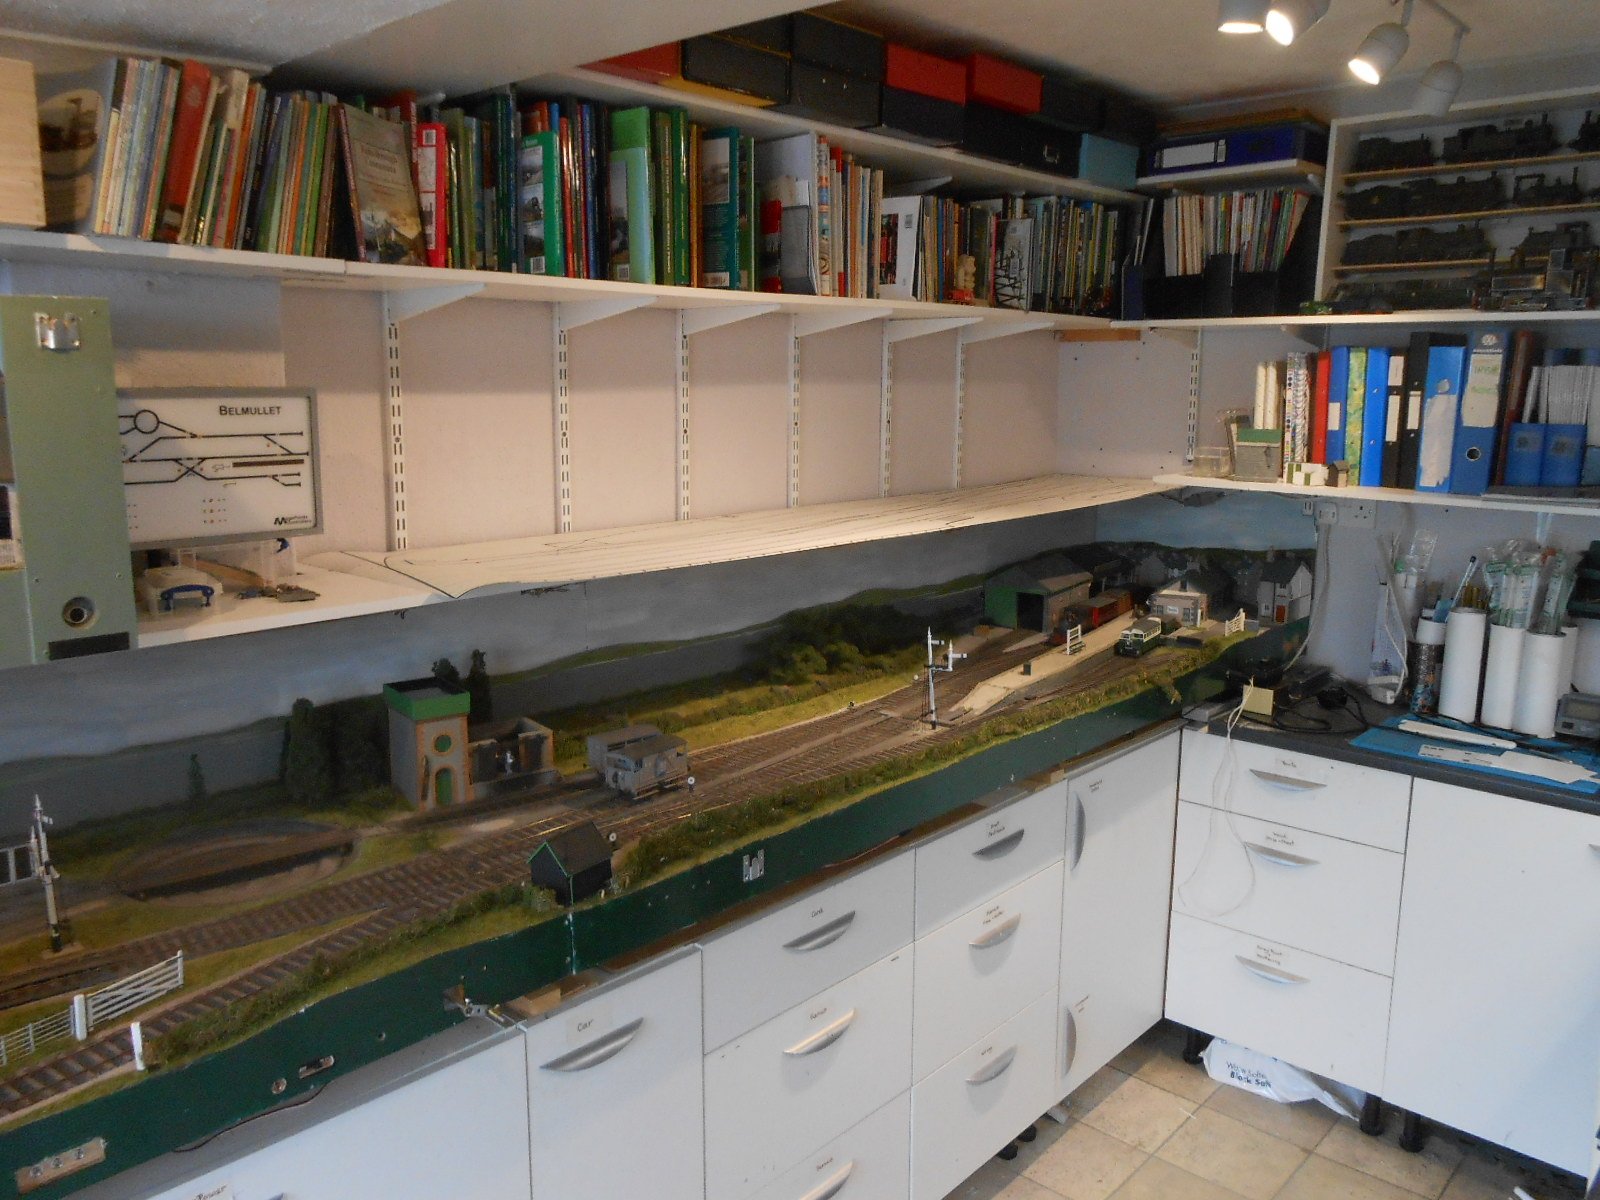
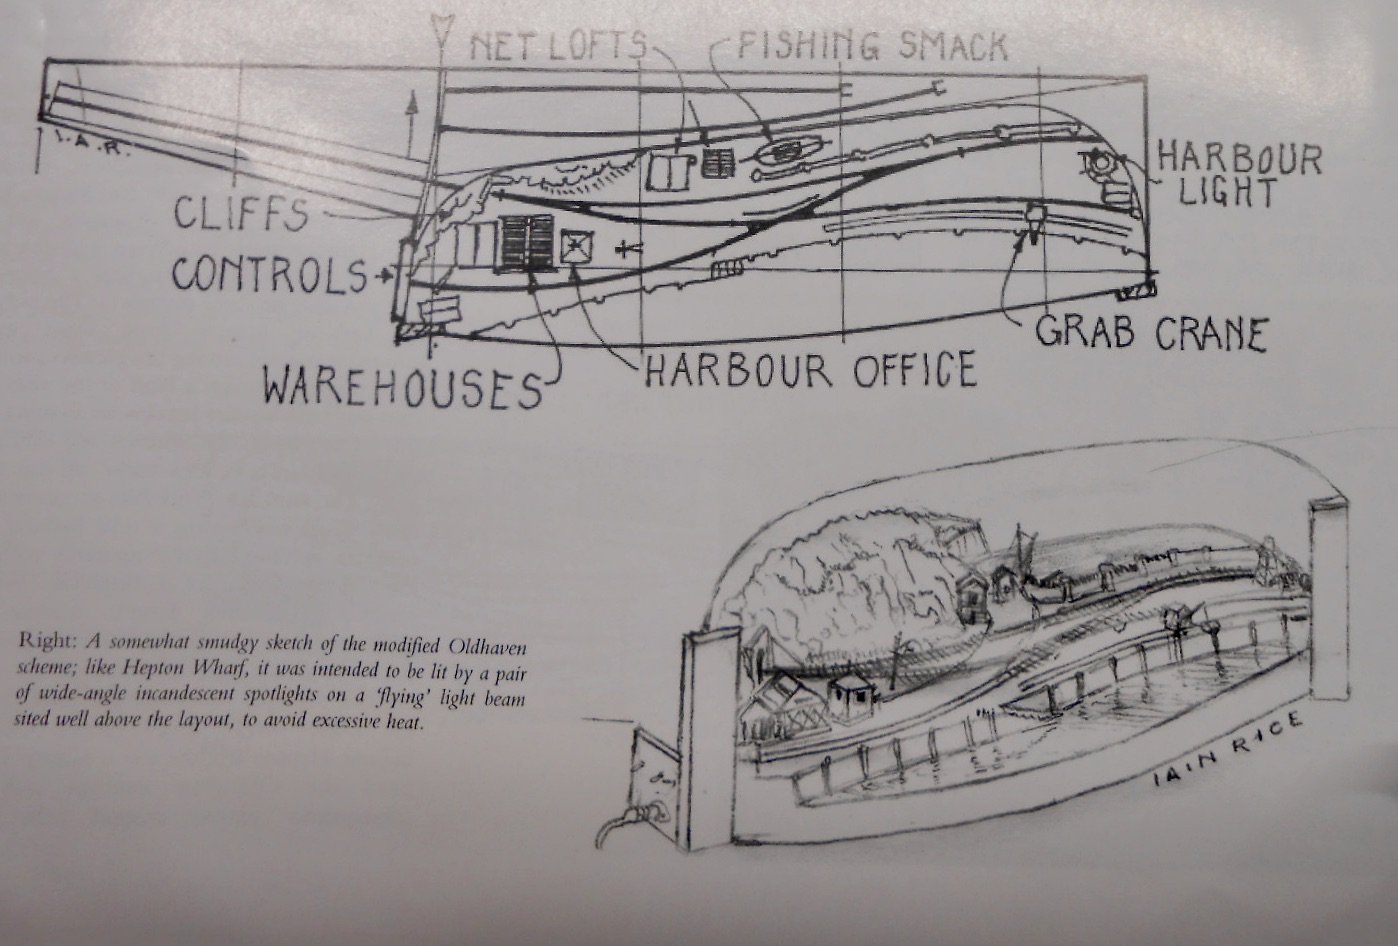
Northport Quay is the name I’m giving to my new project, a 7mm scale, 5’3” gauge cameo layout. Having only just had my current layout, Belmullet, make its debut at the Uckfield show, it might seem strange to be already starting a new one. However, Belmullet is a fairly large layout and a challenge to exhibit, so I don’t envisage taking it out more than once or twice a year. Fintonagh, my 3’ narrow gauge layout is booked for a number of shows next year – mainly catching up with ones postponed in 2020 due to Covid, but has already done a fair few, so given it can take a year or two to build even a small layout, then it is not so odd to begin again. Hence am starting this new thread to chart its progress, starting at the very beginning with the planning and thinking that is behind it. Northport Quay will have a foot print of 7’6 long and 1’6 wide, this being the shelf space I have available above where Belmullet sits in my workshop. These dimensions are obviously pretty small for a 7mm scale layout, so a lot of care has gone into its planning. The name is derived of course from Westport Quay and the geographical setting is presumed to be somewhere in the northwest of Ireland, enabling me to use the same locos and stock as on Belmullet. The trackplan is necessarily simple, inspired by Iain Rice’s Oldhaven Harbour design, though using four turnouts rather than his favoured single slip. Originally, I tried to design something based on Ricahrd Chown’s Castle Rackrent. This used a turntable as the headshunt /loco release, but try as I might, I couldn’t make the design look balanced in such a short space. The first few pictures show both Castle Rackrent & one of my early attempts at a design based on it. Iain’s design didn’t include a turntable, which is a bit of a must have for any Irish branchline, but Westport Quay didn’t have one & nor did Valencia Harbour, so there are precedents. For me, the really interesting features of Iain’s design are how it suggests the railway extending out on to the quayside, plus the travelling crane and the way the line enters from the fiddle yard via a short tunnel through a rocky headland. It is these features which I’ve tried to include on this project. The latest draft of its track plan hopefully shows what I will be trying to do and how it fits into the wider landscape. The line arrives on scene through a short tunnel, before which is assumed to be a turntable and small locoshed – meaning I can us a cassette in the fiddle yard to substitute for a ‘table on the layout, probably just for tender engines and the railbus. The run round loop and platform are quite short, but more than enough for a loco and two six wheel coaches – often a standard consist on smaller Irish branchlines. After the loop, the headshunt disappears off scene on to the pier at the other end of the layout, where a warehouse hides the exit. Of the two on scene sidings, one serves the travelling crane, but the other is just a shunting neck. The other main feature will be a small coaster. The rationale is that Northport deals with both fish traffic and goods, passengers and mails to some sparsely populated off shore islands. Tenuous, but hey, it works for me! I’m going to use Belmullet’s sliding and rotating fiddle yard with Northport Quay, not least because it saves me building another one. At 3’10” it is only slightly longer than each of the new baseboards [3’9], though train lengths will be limited to 2’6 overall, in order to meet the rule of no train being more than a third of the length of the scenic part of the layout. The fiddle yard has its own integral, folding legs and will probably use a single set of folding legs on each scenic board, so these can piggy back off the former. The aim is for the layout to be front operated, with a control panel built into the fascia of the first board, as per Fintonagh. This will cut down on the amount of wiring. I’ll also be aiming for a fully integrated backscene, pelmet and lighting too. All this should make for quick and easy setting up and there will be no need to crate baseboards together for transport either. The other photos show the next stage in planning, namely drawing the design out full size on a roll of lining paper. This enables clearances & things like turnout angles to be checked, while I also stood a few items of stock around the layout to see if the scene looked well balanced. Anyway, so far, so good and you can also see where I've cleared the shelf space above Belmullet too. There's still a fair bit more planning to do, as I need to draw out the baseboards [along with the presentation elements like legs, pelmets, back scenes, fascias etc], plus do a wiring diagram too, so I can ensure the point motors, uncoupling magnets, switches and so on will all fit. Will keep you posted!
- 257 replies
-
- 22
-
-

-
At exhibitions, what Galteemore and Broithe very much applies. Many layouts are operated from the rear at shows and some blank off the fiddle yard to use as information and display boards. A shame, I think as I not only want to see what trains will be used, but also how they are being managed. Giles Flavell's set designs really do work, because of clever lighting and so on - you really don't notice the fact everything is in the open. The more conventional approach is to frame the scenic area, like a picture. This means adding side frames and a pelmet across the top. The side frames only need to be about 10cm wide, but can be very effective at hiding where track exits the scenic section, if planned carefully. Iain Rice the master at this of course and his book 'Cameo Layouts' explores the presentation side of things in great detail. A pelmet doesn't just hide the top of the sky, it can help with lighting. Another Rice idea, my pelmets sit about 2cm out from the front edge of the layout and have an LED strip which means the front edge is well lit. If you only have light coming from the back of middle, this part of the scene can be in shadow. The moral of the story is the more thought given to the start of the project, the better chance it has of succeeding in the long run. It is also probably why I keep building new layouts, in the hope of eliminating mistakes made in the previous ones!
-
Leaning into the curve looks gteat.
-
Been a while, but worth the wait!
-
The latest newsletter from Lightmoor Press is advertising what is apparently the first ever proper history of this legendary railway. Written by Michael Whitehouse, son of the great railway photographer Patrick, it is going to be over 350 pages (!), covering the social history of the area as well as the railway and will include lots of photos, maps and drawings too. Due out in February/March next year. Definitely one to look forward to.
-
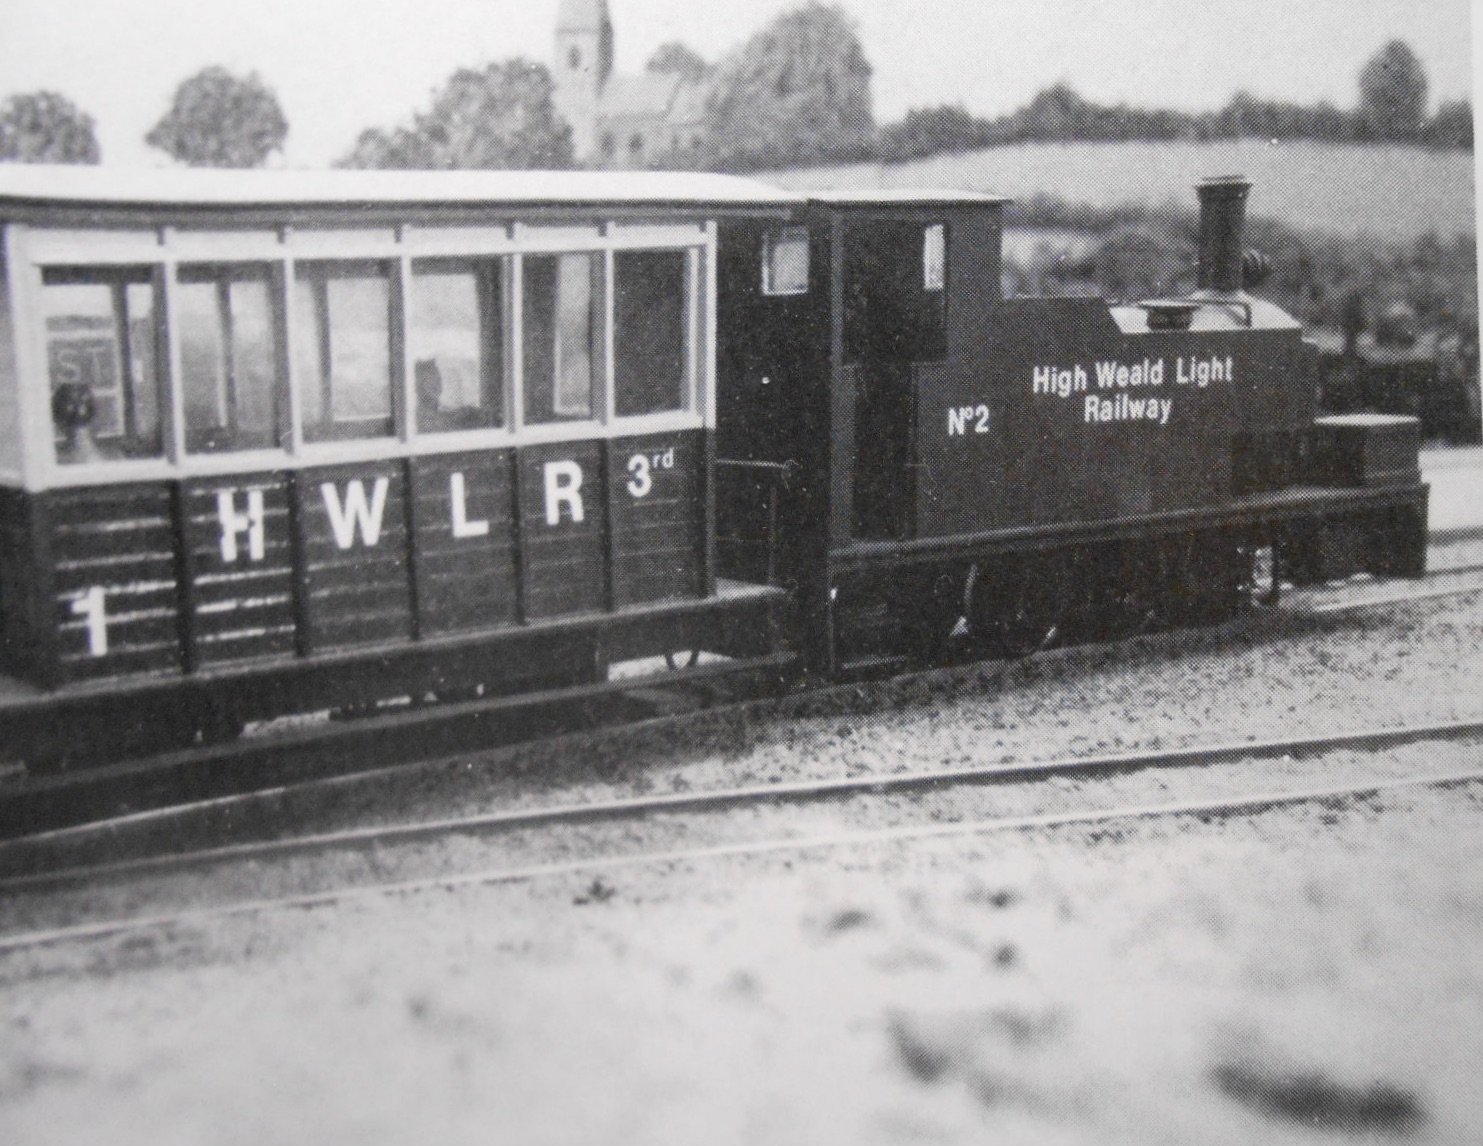
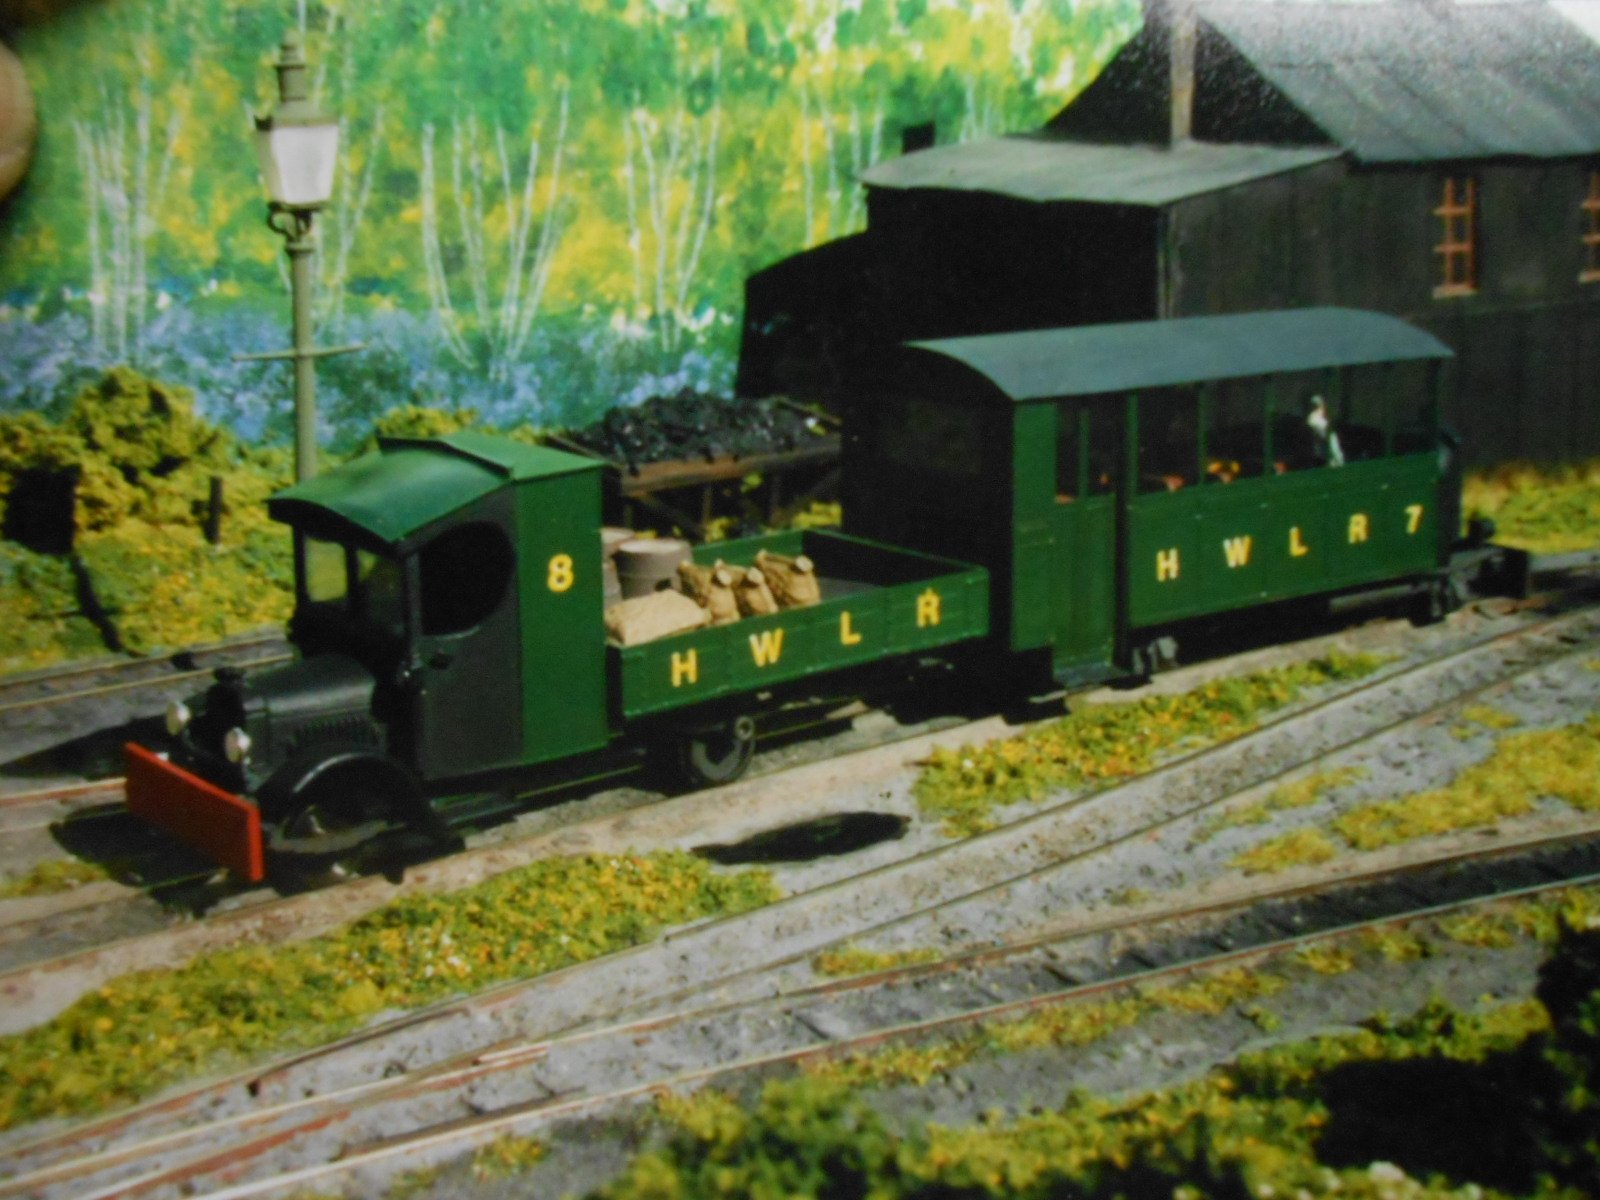
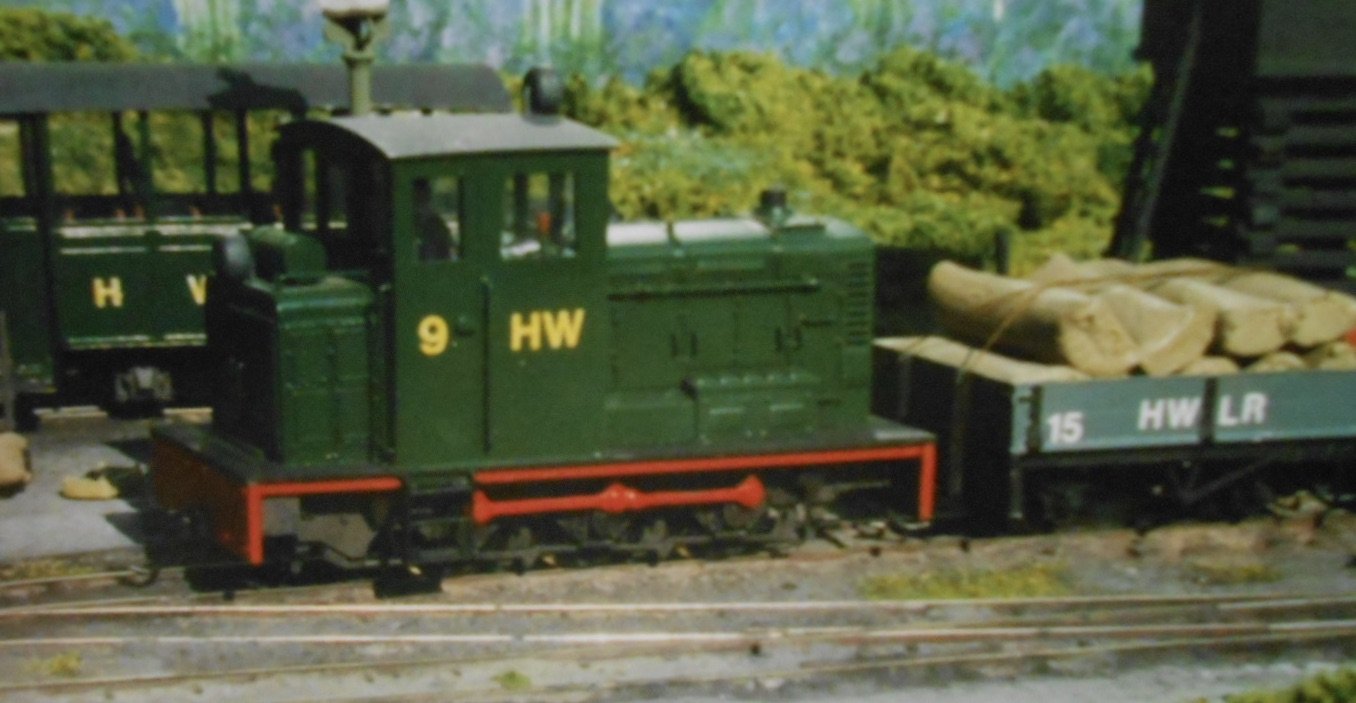
Freelance 0n16.5 Following comments on J-mo's thread other day, managed to dig a few old photos of my early narrow gauge work. Did it on two separate projects, based on fictional Colonel Stephens type lines in Kent. 'Hawkhurst, High Weald' was scrapped, but 'Cranbrook Town' was sold on, along with the stock, so may still exist somewhere. Being 'photos of photos' the quality of the images is not all it could be. The first picture is 2-6-0T I built around a Lima 08 diesel shunter chassis. The large side tanks were inspired by Clogher Valley Railway 0-4-2Ts and helped hide the large 'pancake' motor. The body is all plasticard, with a 22mm water pipe for the boiler. The chimney was a casting for a 4mm scale GWR King, sawn in half and separated by a piece of brass tube to make it longer. The front pony truck was from a Lima GWR 2-6-2T. Note the outside frames given by the 08 shunter chassis. Picture 2 was built in similar fashion, but this time on an old Hornby 0-6-0 chassis, with CVR style side skirts to hide it. Picture 3 was an 0-6-2T using the rest of the Lima 2-6-2T chassis - again with CVR style side tanks. The fourth, colour picture also shows this loco, but on Cranbrook Town, alongside white metal kit of a Baldwin 4-6-0T The 5th picture was my take on one of the early twin railcar units. The righthand unit is etched brass from an old MTK 'El Crappo' [yes, really] kit. The lefthand unit was built around a Corgi Lipton's Tea van. This was unpowered, but retained the cab unit of the tea van, with a plastic open truck body. The final picture shows my cut & shut version of the Hornby 08 shunter. The bonnet was chopped into three and rearranged either side of a home made cab on a new, wider footplate. It ran beautifully. Hopefully, this shows what can be done if you are happy to go 'freelance' as convincing models can be made very cheaply with a little imagination & patience. You may also spot a transporter wagon in the second picture, carrying a standard gauge open, as per the Leek & Manifold Railway and the end balcony coach, made of plasticard and strip, running on a standard 00 wagon chassis. Taught me a lot working in 0N16.5 and had a lot of fun along the way too.
-
Self propelled cranes and small coasters
David Holman replied to David Holman's question in Questions & Answers
Ye Gods! Thirty years ago, but still a book I regularly refer to. He also used Westport Quay as the basis for a plan in his Light Railways book - another gem. -
Persistence certainly paying off. There are some fine looking models emerging here.
-
Has more than a bit of Quarry Hunslet about it, though with its Robert McAlpine plates was clearly used in the construction industry - anything from railways to dams. He wasn't known as Concrete Bob for nothing! For me, freelance 7mm narrow gauge got me started on scratchbuilding, back at the end of the last century (winced at this thought). Plastic sheet for footplate and cab, plastic water pipe for the boiler and whatever was handy for fittings. It's amazing what can be done with brass tube, washers and some filler. These days would think freelancing is a good route to practice 3D printing, while a hybrid model as suggested should also work. That said, a more robust cab could mean printing the whole thing and avoid needing too much detail inside - though that is half the fun some might say.I 4mm scale chassis scale up very well in terms of performance, with slow running enhanced in the larger scale. My favourite was the 08 shunter, because of its outside frames. The early Lima version had the rods held on with small screws, which meant you could add outside cylinders and connecting rods quite easily. However, the large pancake motor meant big side tanks were necessary to hide it, but with freelancing anything goes! The later version by Hornby was even better. Remember buying one of the first and then sawing up the body and adding a new, wider footplate, to make a neat little diesel shunter which ran superbly. There's an article in RM somewhere, but will need to go through my photos as all this was in the pre-digital age. Sigh... Great sounding project and will certainly look forward to seeing progress.
-
Now that is rather splendid. Thank you kind sir!
-
Approximated dimensions from the photo, Ken. Around 14' long in old money, assuming 3' diameter wheels, which seems to match the basic size of many of these early 'short' vans.
-
GSWR Open Cattle Wagon After three months getting Belmullet exhibition ready, have finally got back to making something this week. Open topped cattle wagons were a regular feature on Irish railways prior to WW1, though eventually the Board of Trade decreed they shouldn't be used anymore. However, for my early 1900s period, one or two are very much appropriate - running to/from the off stage harbour. The model is fairly conventional, being a plasticard shell, embellished with micro strip of various sections for strapping and iron work. The only reason the doors are black by the way is because this is the only 60thou sheet I have at the moment! Whitemetal castings for buffers, brake gear, axle boxes and so on complete the picture. Unlike the prototype in the picture, the model will be finished in GSWR dark grey. A far from unusual prototype, though not one I've seen modelled that often, probably because unlike other wagon types, they didn't survive into CIE days. Cue Ken to 3D print some???
-
Self propelled cranes and small coasters
David Holman replied to David Holman's question in Questions & Answers
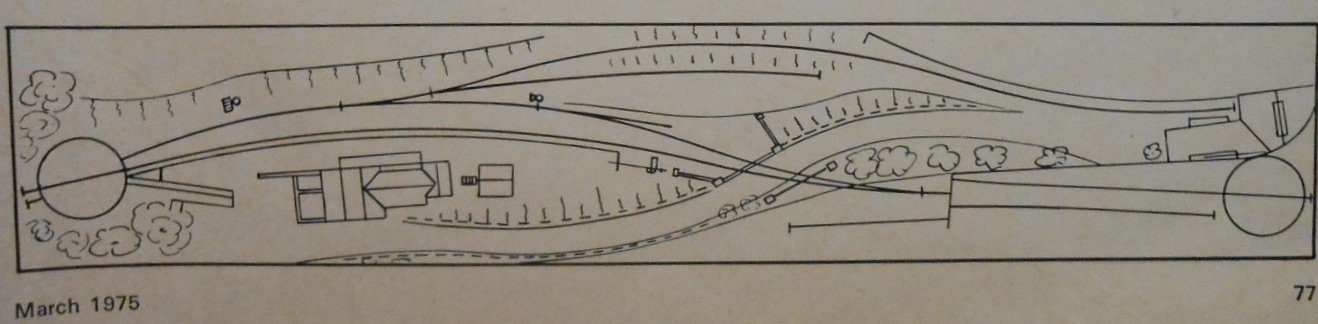
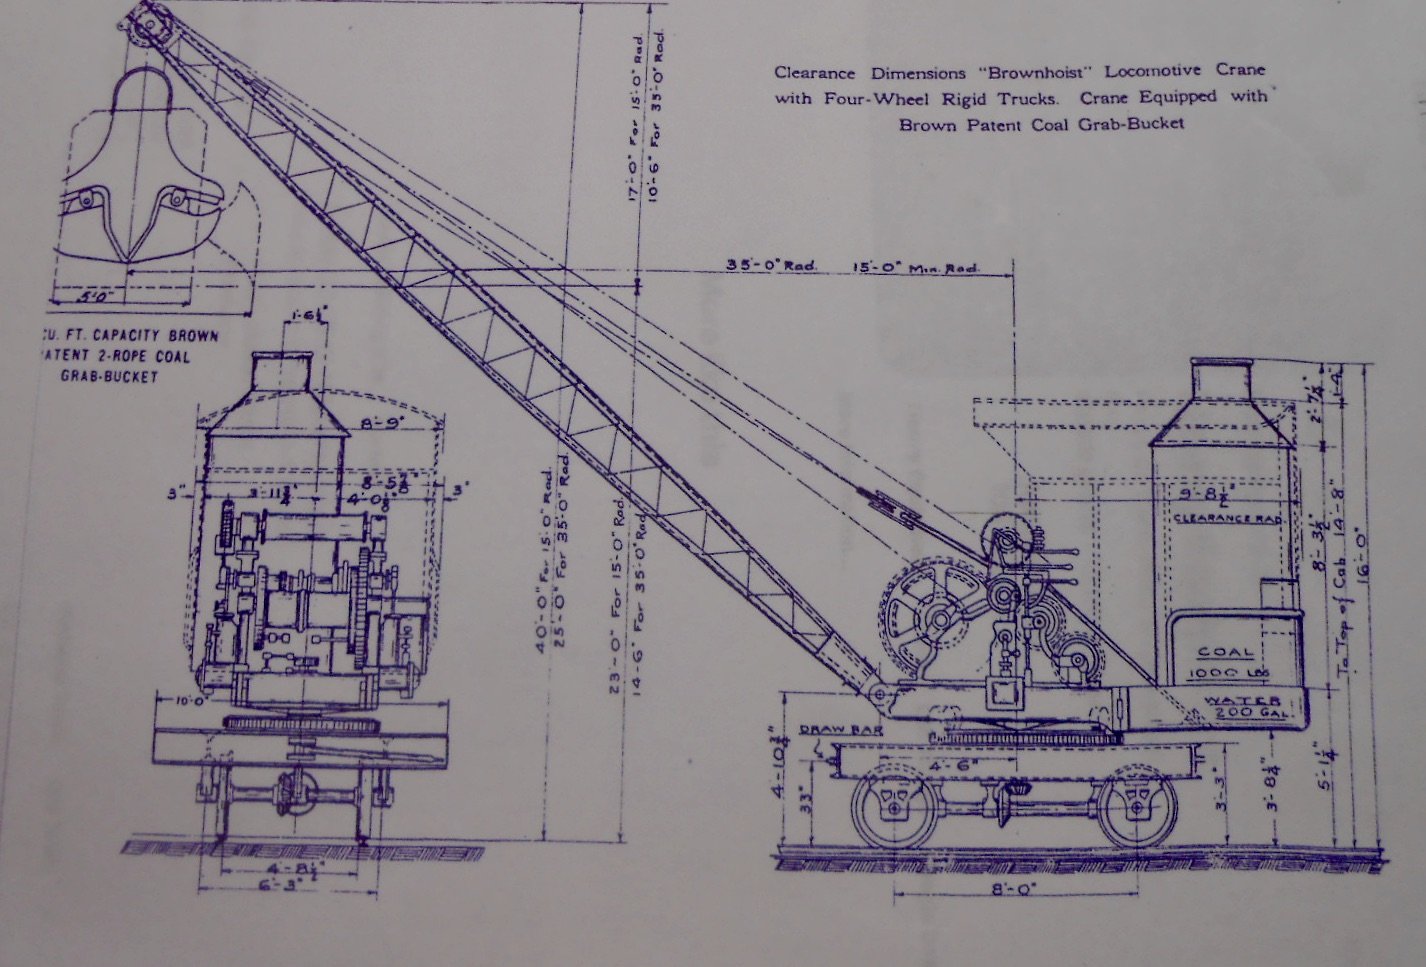
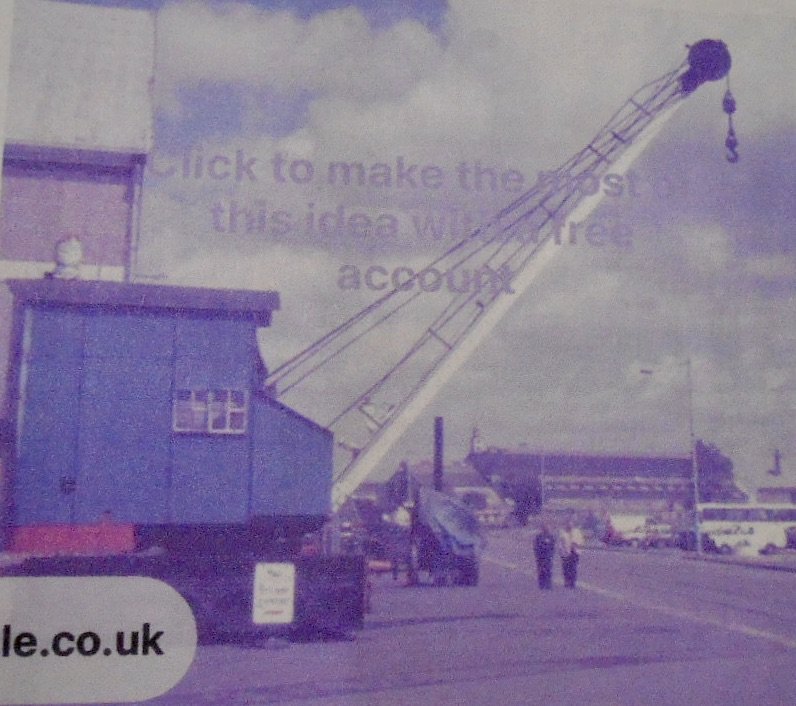
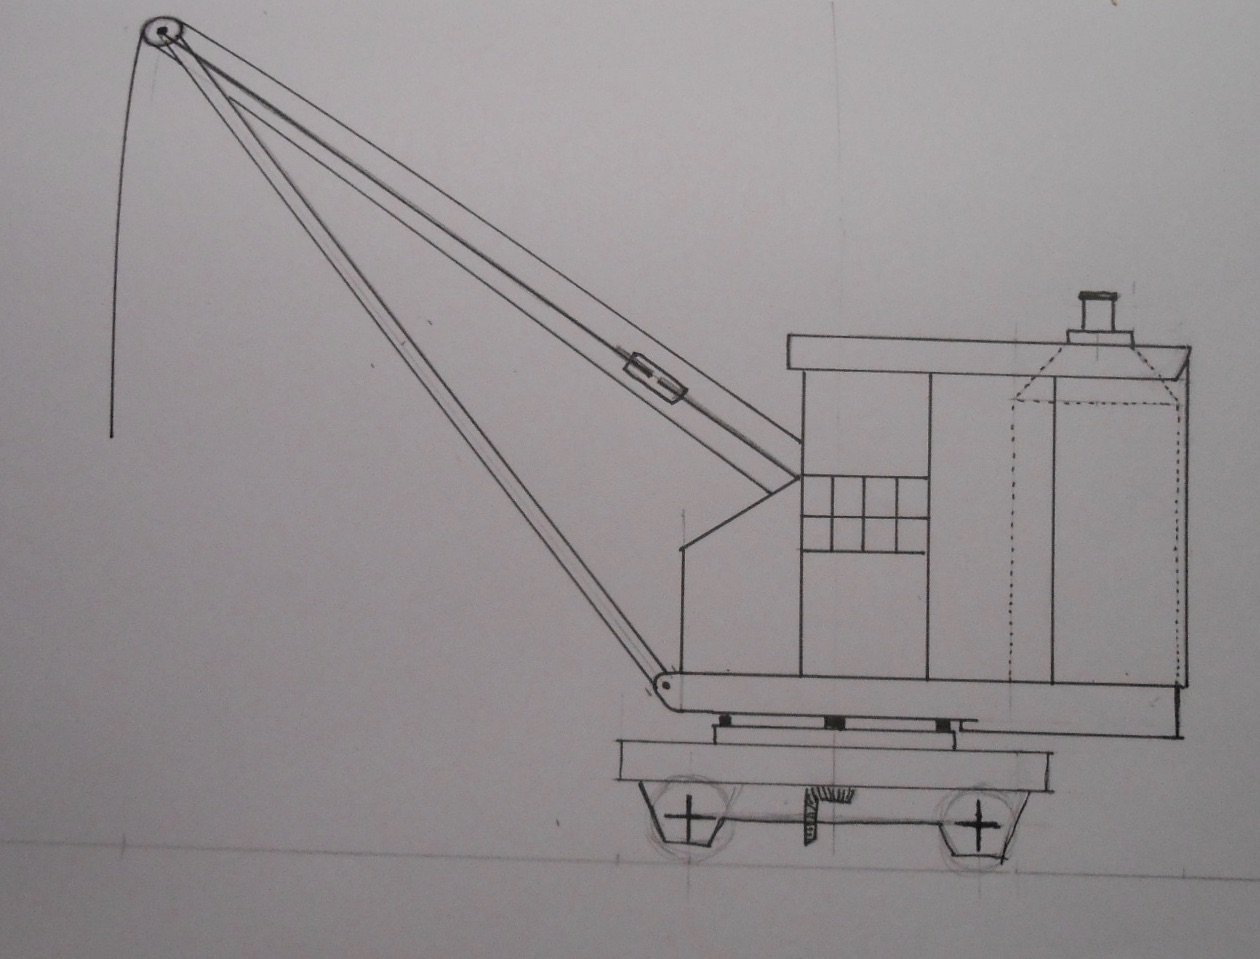
This is the sort of thing I've been looking at. Managed to find the drawing below on the internet, which seems to be a fairly standard design across a range of manufacturers across the world. Some appeared to have no protection whatsoever for the crew, while others had varieties of cover, including what look like locally made. The one at Donaghadee was like this, while the second picture shows the sort of thing we have at Chatham Historic Dockyard. For me, this has considerable merit, because much of the mechanism and boiler is nicely hidden away! Backwoods Miniatures did a really nice etched kit of one of the 'open' cranes, which was designed to sit on a narrow gauge 0-4-0 chassis. Unfortunately, they have ceased trading [though the website remains live]. Meanwhile there also exists a 1:48 kit from Eastern Europe, which might be useful, though I'm aiming to scratch build a model & have made a simple line drawing, as seen in the third picture. Why? Well ever since Iain Rice's 'Cameo Layouts' book came out, I've been fascinated by one of his plans, as shown in the last picture. A [very] simple harbour scene, which I've been slowly developing into a 7mm scale, 5'3" gauge idea - more of this eventually! For now though, you can see why I've got the interest in the crane - Iain's drawing shows a separate track for a self propelled crane, running along the quayside and while I have not intention at the moment of making the crane actually work, making it so it can trundle up and down the quay shouldn't be too difficult, hopefully...
-
Fantastic, well done Mike. Any plans for making it work?
-
Self propelled cranes and small coasters
David Holman replied to David Holman's question in Questions & Answers
Have turned up some interesting stuff on the web, including a nice example at Donaghadee quay. From what I can see, steam cranes followed a fairly standard design and often sported locally made bodywork/cabins, so looks like there's a project here! -
Just a thought, but with the poor availability and eye watering costs, have you considered trying automotive rattle cans or even artist's acrylic paints?
-
Self propelled cranes and small coasters
David Holman replied to David Holman's question in Questions & Answers
Continues to amaze me what you folk out there can contribute. Lovely stuff!