David Holman
-
Posts
4,359 -
Joined
-
Last visited
-
Days Won
117
Content Type
Profiles
Forums
Events
Gallery
Blogs
Everything posted by David Holman
-
Some sound advice here, which certainly highlights the complexities of 3D printing. All power to you folk who are doing this pioneering work!
-
Self propelled cranes and small coasters
David Holman replied to David Holman's question in Questions & Answers
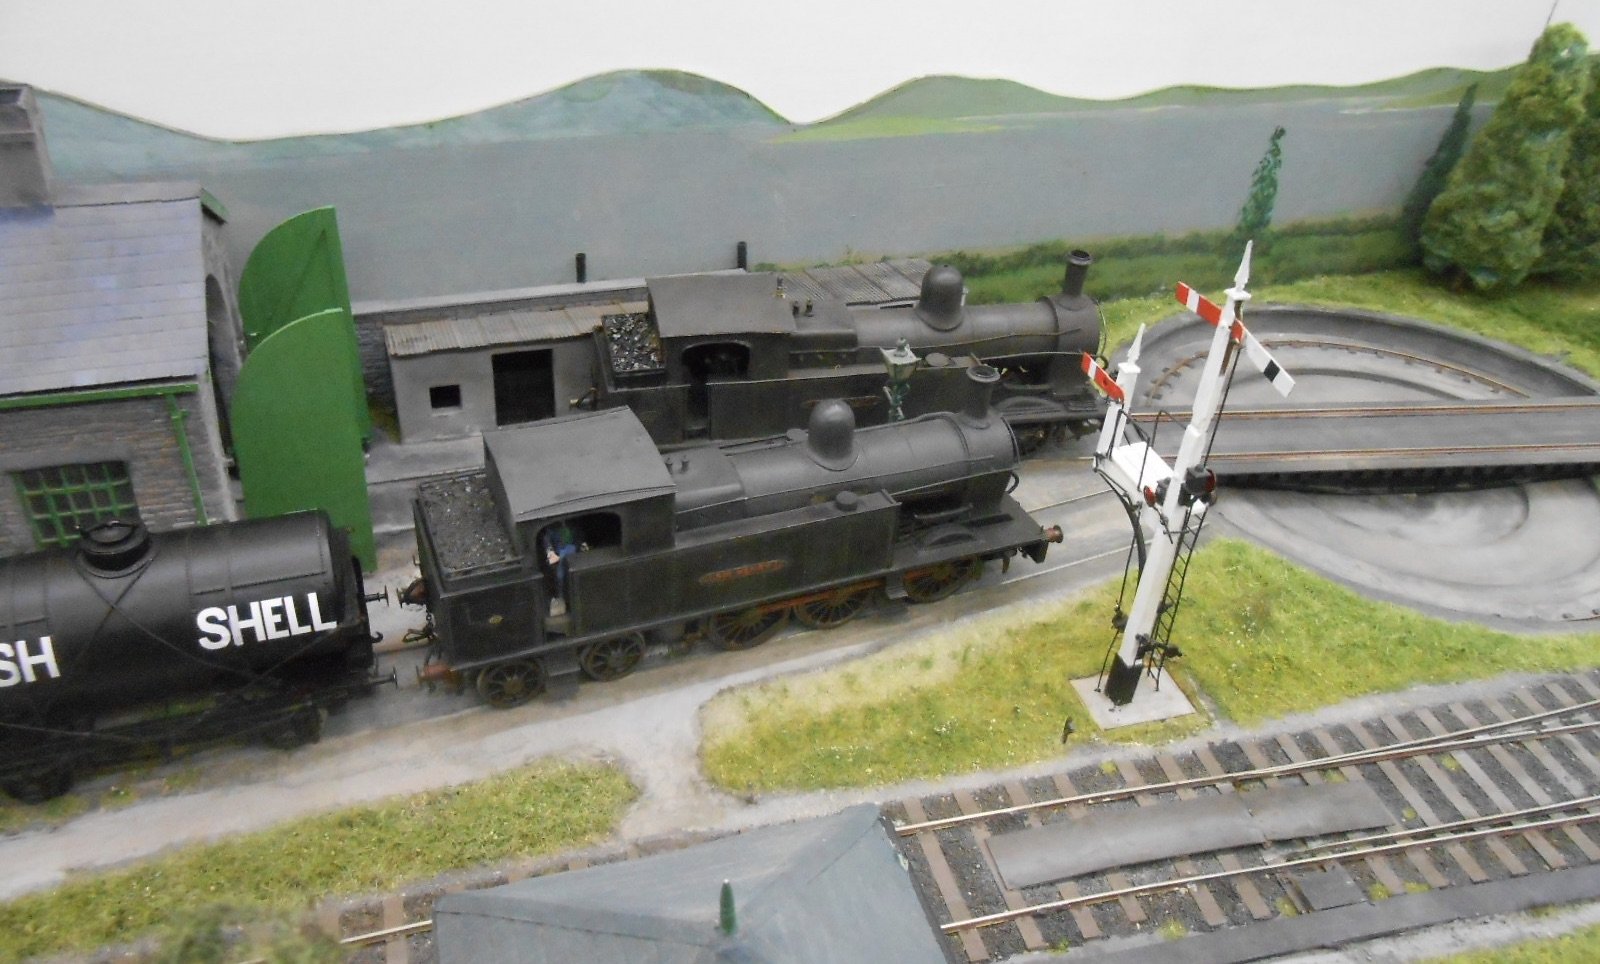
Thanks Ken. The crane I'm thinking of is a self propelled one, running on its own length of quayside track, to help unload said coasters. We have a couple outside the Chatham Club room - vertical boiler on a simple four wheel chassis, with a basic bombshell around the mechanisms. A bit like 'Pat', with a jib. -
Self propelled cranes and small coasters
David Holman replied to David Holman's question in Questions & Answers
Just remembered I asked about Puffers a while ago, but any other craft, including West coast fishing boats would be of interest. -
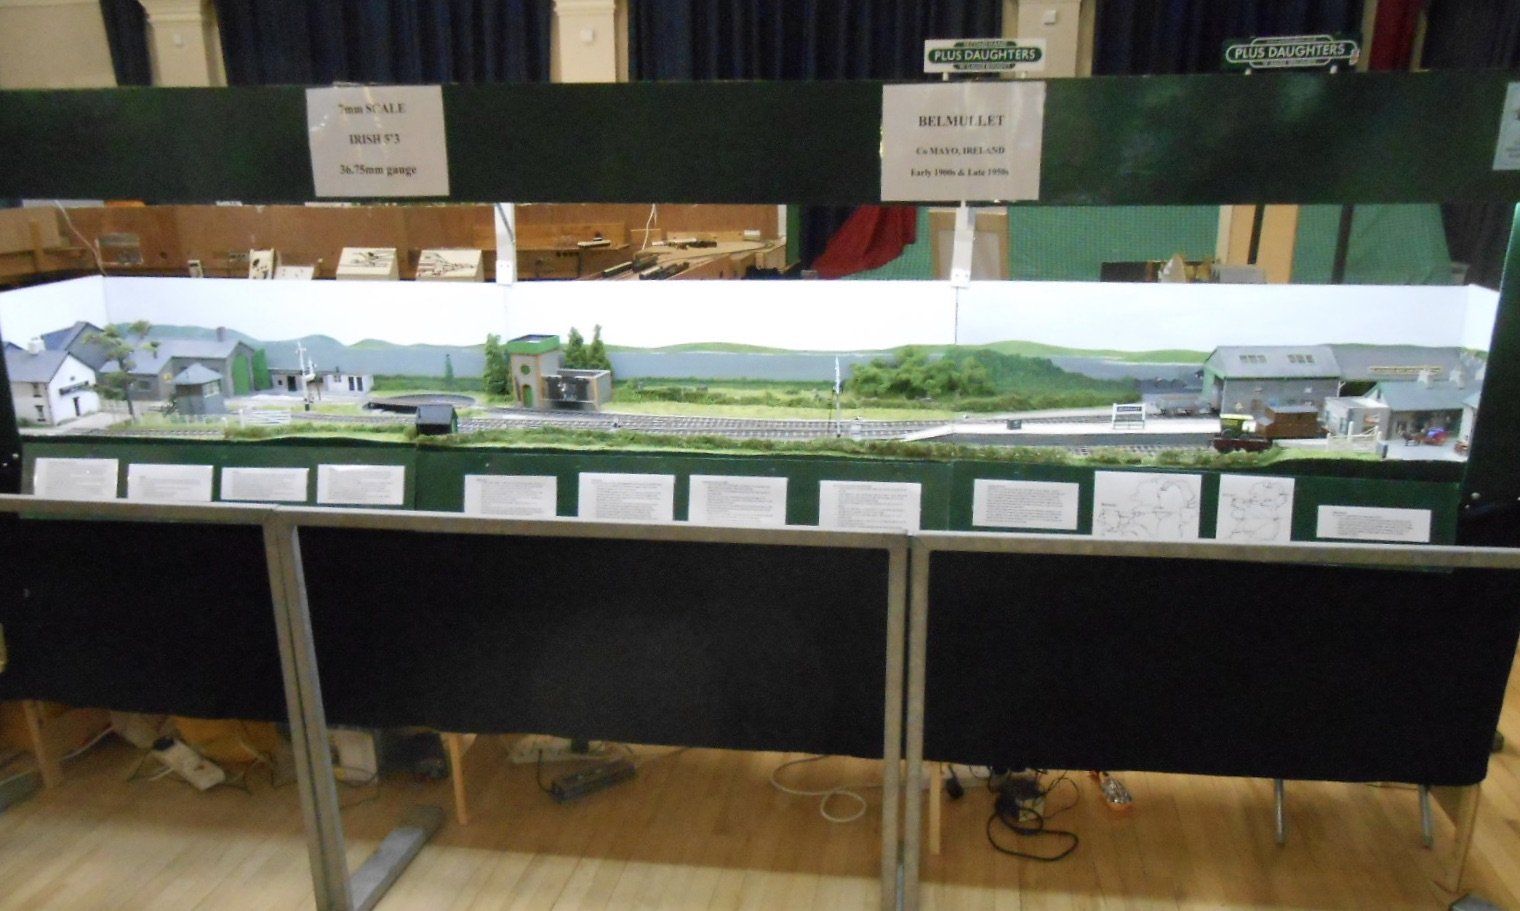
Been pondering on the above as a possible project for a while, so thought it time to try tapping into the immense resource of this website - note flattery! Seem to remember Fenit pier had several rail mounted cranes, but were there any other places? Also wondering if a smaller, wagon mounted crane, pushed/pulled by something like 'Pat' from the elevated track in Cork might be appropriate. Any pointers welcome. Likewise any info on small coastal ships that might have plied the west coast. Around the size of a Clyde Puffer, which works out at about 50cm x 15cm. Anyone would think I'm looking into creating a small harbour scene...
-
Didn't notice, but see what you mean and thank goodness for Archer's rivet transfers! The photos also show the considerable 'presence' Enniskillen emits - a combination of both model making and that paint job, which just looks so right.
-
Nice one!
-
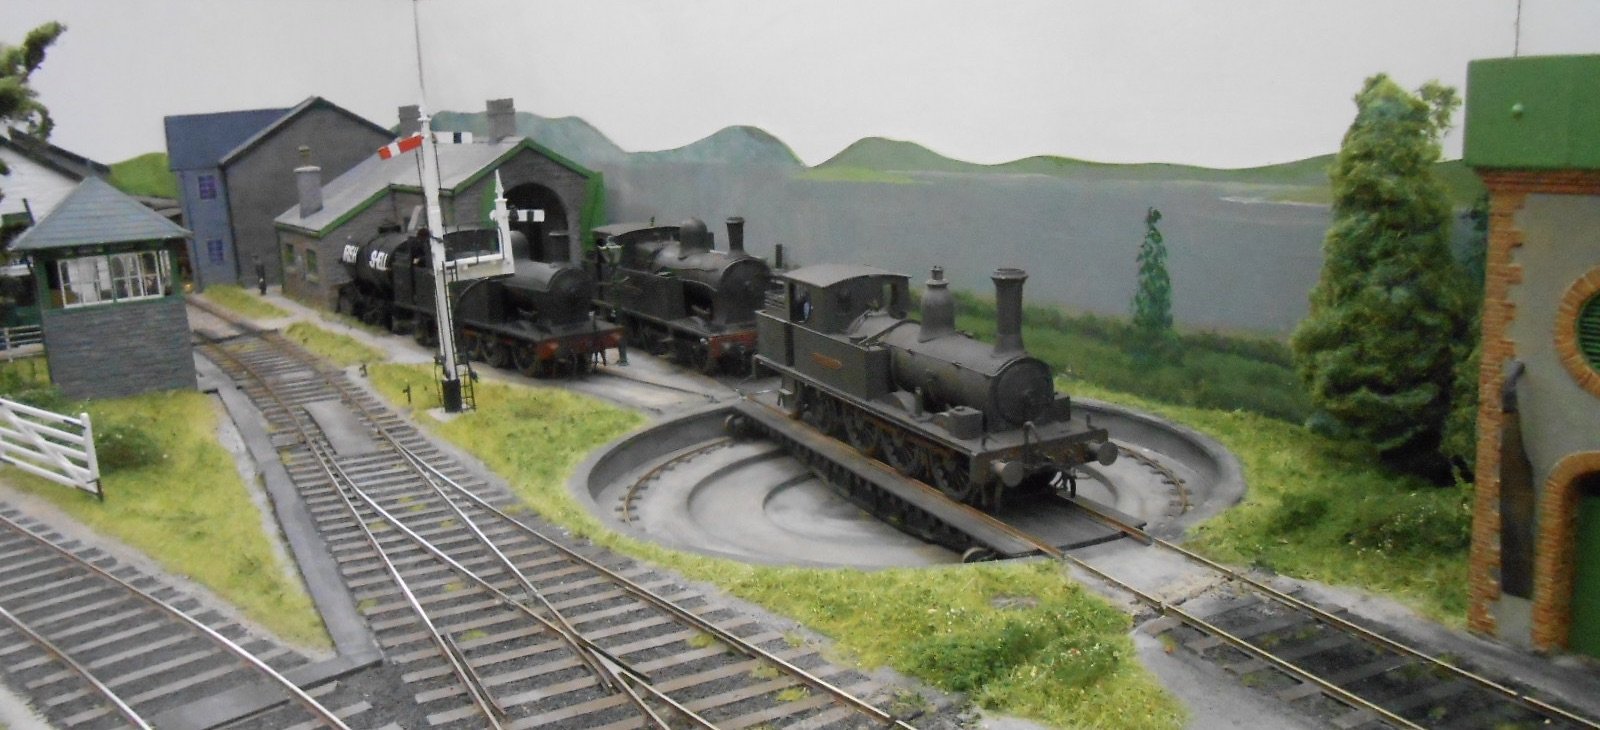
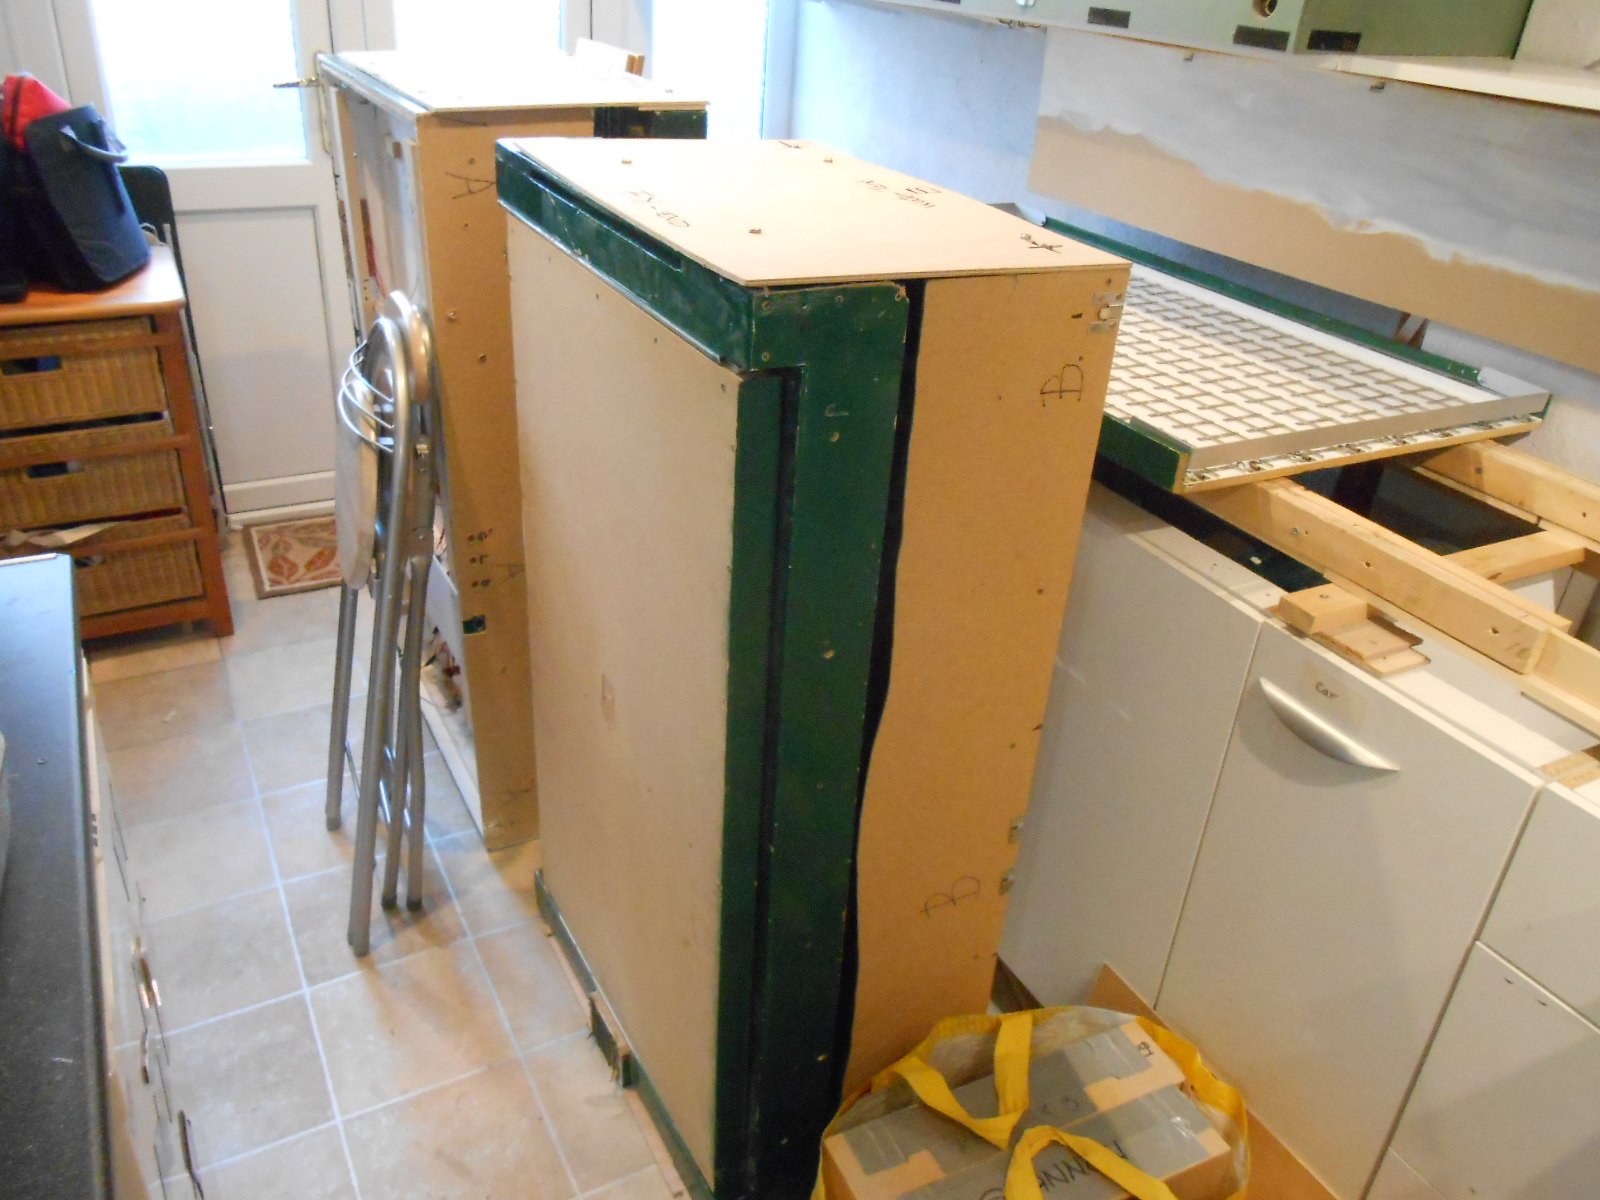
Thanks folks, it was great to meet you all at Uckfield, though anyone who went on Sunday got a far better deal than Saturday... Got to Uckfield for opening time on the Friday evening & spent the next two and a half hours carefully setting everything up. Far too long, but I was on my own, so would hope to halve this, now I know more about what I'm doing, especially as needed another hour setting out stock and doing basic running tests on Saturday morning. It was all going well at this point, but it seemed as soon as the public came in, problems began. Running became increasingly erratic. At first we thought it was something to do with the single slip and indeed later discovered a stray strand of wire was creating an intermittent short on the power feed to one of the Megapoint panels. However, the real elephant in the room turned out to be my Gaugemaster hand held controller, which eventually just packed up completely. My spare is another Gaugemaster, but a more basic model which doesn't even out power delivery as well as the other, so operators were still struggling to drive the trains smoothly. At this point, I was looking round the traders to see if anyone had any controllers for sale. Coastal DCC was right next door, but my stuff is analogue... Suddenly there was a moment of inspiration from regular operator John - have you checked the lead to the controller plug? And there it was, a loose wire in the five pin din plug. Two minutes with the soldering iron and all was [mostly] well, apart from my nervous system that is! By now, it was lunchtime, so decided to swap the 1950s stock for the 1900s stuff. A bit of a faff, to say the least, but finally got everything changed over & ran this for the rest of Saturday and all day Sunday. At last, things started to settle down & the only major problem after that was the failure of 0-4-2T 'Lark', which I've since found out has both a slipping main gear wheel and a broken slide bar set on one side. Substituted the J26 - wrong period, but better than the Deutz diesel! The highlight of Saturday was having Galteemore and his son helping to operate, while the icing on the cake was having Enniskillen and the 2-2-2T on the layout as well. Have included a few photos below, to go with theirs, along with an overall view of the layout itself, once set up. There are certainly things I would do differently. For starters, it is not practical to change periods part way through the day. Far better to give a whole day to one period & if it was a one day show, then it would have to be one or the other. Indeed, Friday evening setting up looks like it would be essential, while packing everything up takes time too - it was 75 minutes before I got away on Sunday. Compare that to Fintonagh, which can be set up in 45 minutes and back in the car in 15 after a show. It certainly makes you wonder. The next appearance certainly won't be for a while. Fintonagh has several outstanding bookings to fulfil from 2020, including Allypally, Tonbridge and Nailsea. Southampton, Tonbridge and Epsom have expressed interest in Belmullet, but not until at least 2022/3. Right now, I'm looking forward to doing some modelling for a change as I haven't made anything since before the summer and have several projects I want to do. Once again, many thanks for all the kind comments and especially the operators, because I could not have done it without you.

- 179 replies
-
- 12
-

-

-
Report to follow, but it was great to have a fellow Sligo fan operating for the day, as well as providing lots of new info. Enniskillen every bit as good as it looks in the photos while the little single was a treat. Electrical problems (eventually traced to the controller plug/socket plagued much of the morning, but things settled down pm. All to do again today!
-
Spring into summer down under, just as we in the North head towards winter. Enjoy!
-
Certainly agree there! Once again, impressive work Ken.
-
Thanks Paul. Hope the marathon goes well. Good training for a weekend of exhbiting!
-
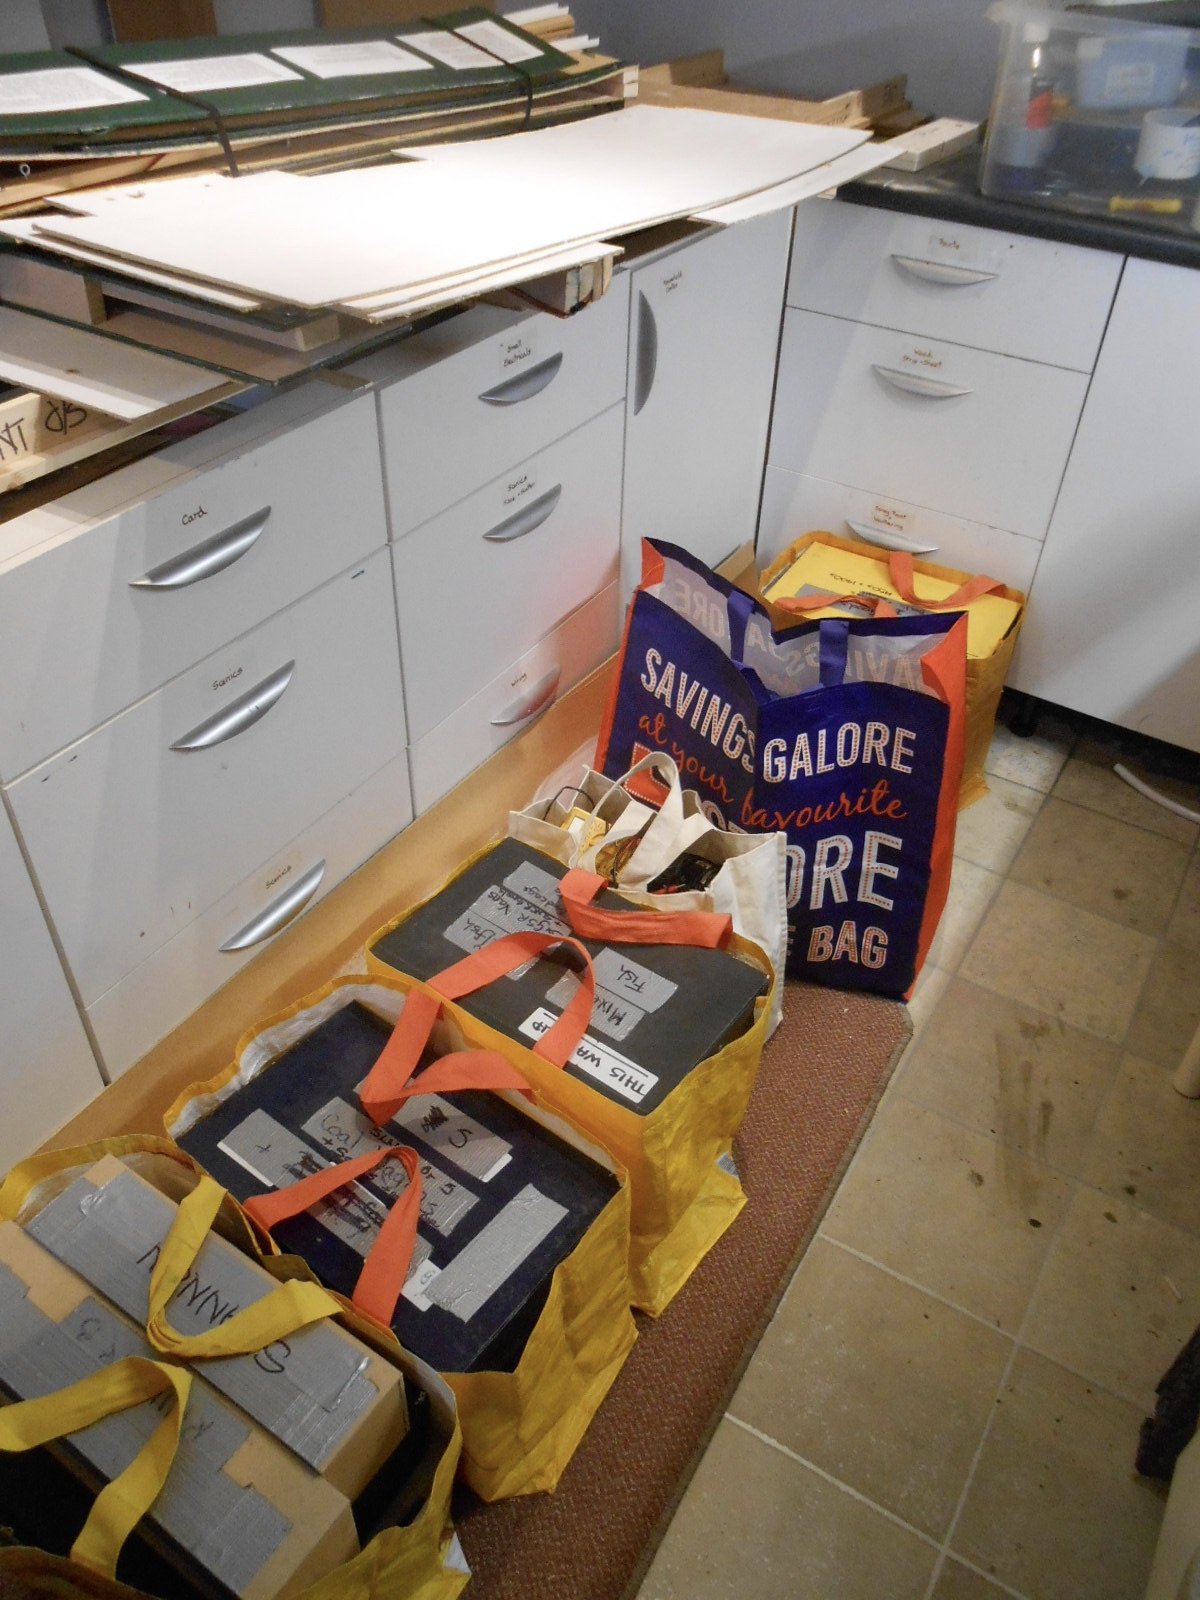
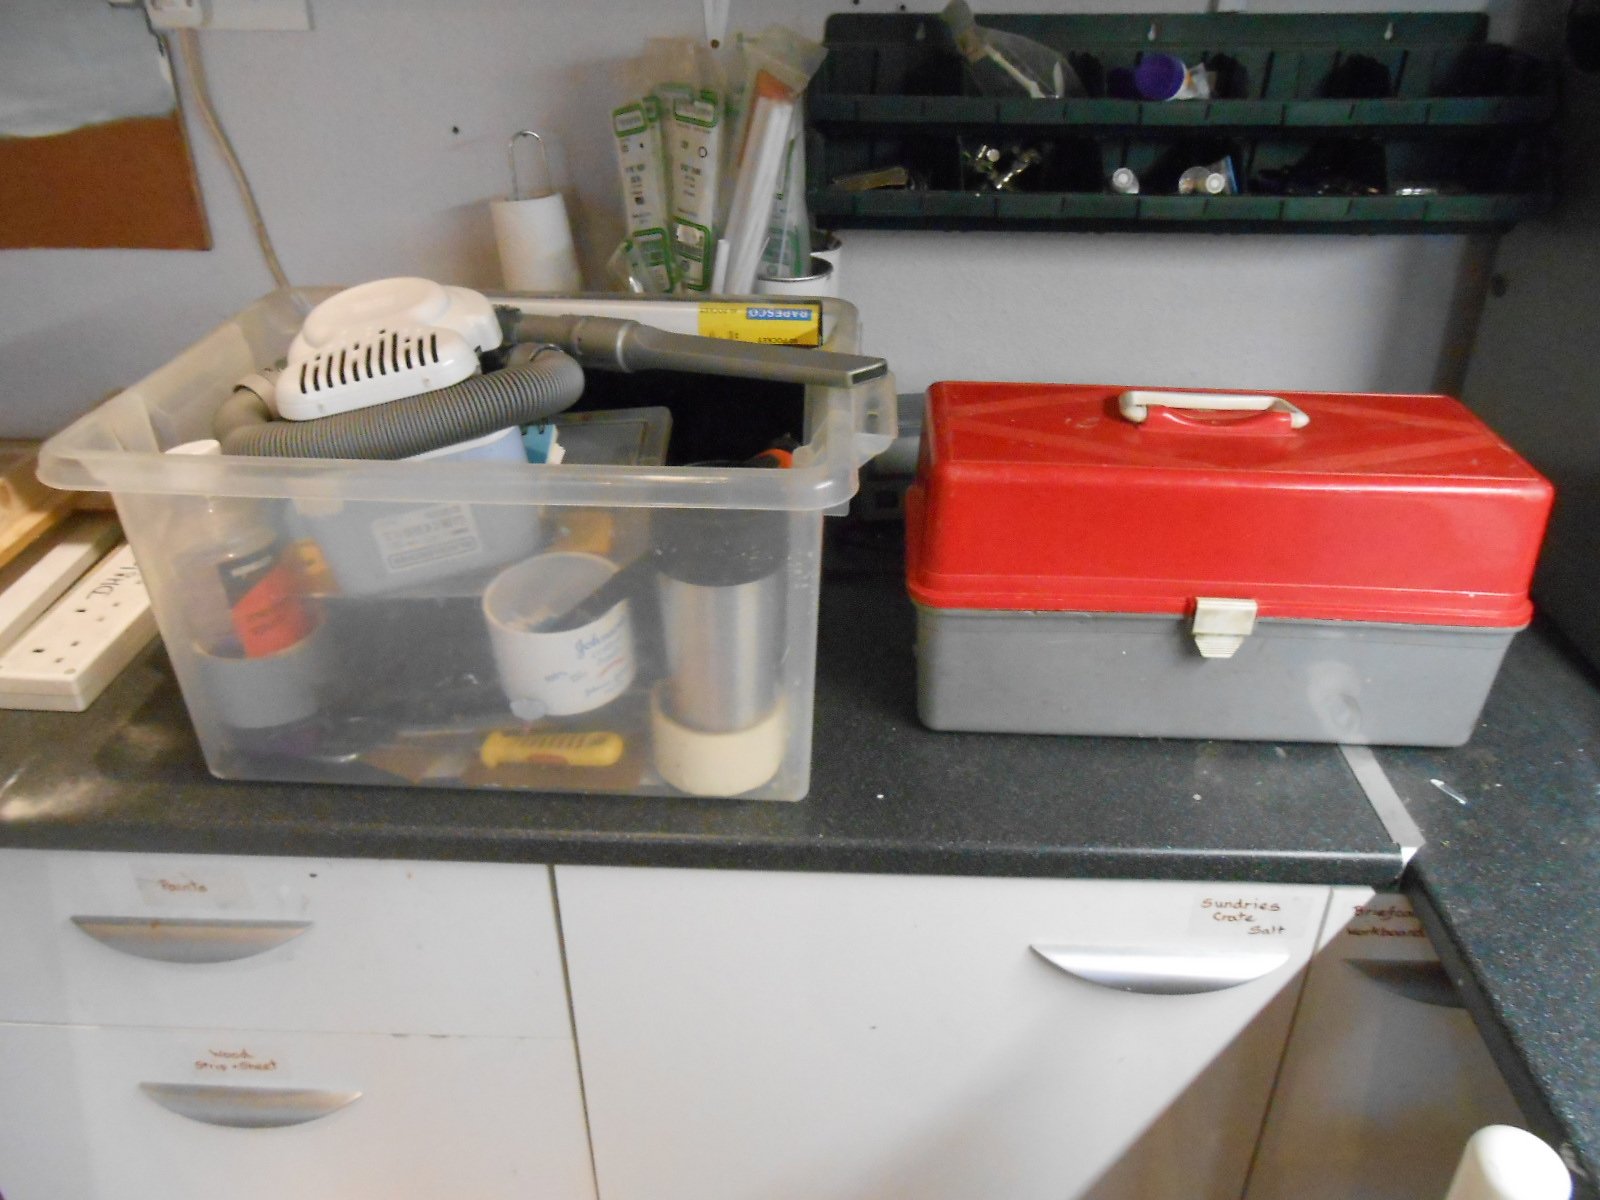
Uckfield Exhibition Belmullet makes its exhibition debut at the Uckfield Show this weekend. It's always worth visiting, with a very high standard of layouts and I've often said that if there was a prize for worst layout, I'd still be happy to be given it! Seems as though the last couple of months have been spent on little else but getting the layout ready - test running, fine tuning and making all the presentation elements such as pelmets, fascias and lighting. How effective it has all been waits to be seen - experience of over 100 shows tells me that there is nothing like dismantling your layout, loading it into the car and bouncing it over miles of tarmac is not the best recipe for reliability! There is also the constant thought that I might leave something important at home... The upside of all this is to meet new people, enjoy reacquainting with familiar faces and revel in the company of like minded modellers, including the all important traders. An added bonus on Saturday is that Galteemore is coming over and bringing some of his locos and stock. It is likely therefore that this will mean the largest gathering of 7mm scale, 36.75mm gauge, SLNCR stock anywhere in the world[!]. Indeed, am not sure anybody else other than us two are doing the Sligo in this scale/gauge, though there will be some of Richard Chown's stuff knocking around still of course. Anyone reading this, who can prove me wrong, is more than welcome to come along over the weekend. Running rights will be extended to anyone with 36.75mm stock. The idea this weekend is that we will start with the 1950s stock and change over to 1900s trains after lunch. This means I'm taking pretty much all my stock, so if there are any breakdowns, there are plenty of options. Sunday morning will carry on with the 1900s finishing off with the 1950s again in the afternoon. The photos show everything crated up & ready to be loaded into the car tomorrow afternoon. There's the four baseboards, crated up in pairs; all the presentation and lighting stuff comes next, then there are five bags of stock boxes. Finally there is a bag of all the electrical stuff [transformers, extension leads, controllers and the like] along with the all important tool box and what I call the Sundries Box, which includes everything from bits of hardboard for levelling the layout, drapes, meths [for track cleaning] and the vital box of bolts and screws that will hold everything together. On a trial run a few weeks ago, everything fitted in, but looking at it now, I still have my doubts. Wish us luck!
- 179 replies
-
- 13
-
-

-
Fabulous. Another unusual prototype chalked up, Ken and it does indeed complement a splendid train. Could we hope for an article somewhere, like the IRRS Journal on such vans? With so much cattle traffic across Ireland, the D&SER were by no means the only ones to have drovers' vans. The Sligo had a couple (candidates for 'shortest mixed train' award), while the MGW had its glasshouse brakes too. There are some fascinating comparisons to be made, though how much info is actually out there is another matter, I suppose.
-
Live frog all day, every day. Minimal extra work to wire up and certainly worth the effort in order to minimise stalling.
-
One of the remarkable things about Leslie's article is that he noted so much detail on the trip, in particular the consist of each train AND numbers of each coach. Thanks for pointing out Wolf Dog, John - I hadn't noticed, though not as pretty by this stage in its life, perhaps.
-
New edition now out and like any specialist periodical, doesn't always tick every box - though is ALWAYS interesting. However, this 75th anniversary issue for me at least, is really splendid. The cover pictures of C class diesels on a mixed train at Skibbereen and an excursion at Courtmacsherry are the wrapping to articles on West Cork railways, the Valencia Harbour branch and VS 4-4-0s, as well as lots of other lovely stuff. A modellers and a historians delight!
-
IRM A Class Minor Quality Control Issue
David Holman replied to DiveController's question in Questions & Answers
Looks like the speedometer cable and something that will always be vulnerable. Why not try a small drop of superglue, using a cocktail stick, or similar. That said, if the loco is going to work hard for its living, might be best to leave that part off anyway. -
Good stuff, poor things! As JB says, once the writing was on the wall, few bothered about cleaning steam locos, it was only about keeping them running. Given their use of such a dirty fuel, it doesn't take long for a coat of grime to appear and maybe because I'm old enough to remember the end of steam, I actually find weathered locos attractive. I think a coat of grime can serve to highlight certain features, while the initial cost of black or grey often does the opposite. Either way, nicely done.
-
Forgot about the Lazy Susan, they are used by cake makers for decorating and should also have known Andy would have a simple solution; Mayner likewise. That's engineers for you!
-
Enjoy!
-
Has to be worth it JB, they a such an integral part of (almost) every Irish branch terminus. Can only think of Valencia as doing without. If you don't fancy building one, then Peco's should be ok. Should have said that my experiences are all based on converting them to at least a scale bigger (two in the case of Fintonagh) and am sure the extra weight of locos is a factor. Peco also do their own motor now, so we'll worth a look.
-
Kitwood Hill models do a range of turntable kits in laser cut p!y. See my workshop thread. They are extremely well thought out and a joy to make. Have built a few over the years and my experiences as follows: Dapol kit: the old Airfix one. Very cheap, but can be made to work with the Freezinghall Models hand cranked or motor kits. Adapted mine to a 42', 7mm scale one by widening the deck. See the Arigna Town thread. Peco: used the N gauge on on Fintonagh, combined with a Freezinghall motor. An issue is that they use dummy wheels on the outer ends of the deck, so all the weight is taken by the centre boss. I added my own brass outer wheels and it works a lot better and is more stable. Southeast Finecast: this is a sort of upgrade to the Dapol- Airfix idea. About £50. Used one on Belmullet for a while. Works best if the outer deck wheels are replaced with small ball bearing races. Kitwood - definitely the best so far. Overall, turntables can be a challenge, which is why rtr ones are expensive. All the ones above rely on lining up by eye, but with a hand crank or slow running motor, is easy, assuming you are not feeding a full roundhouse fan. Fitting a TT needs care too. Apart from cutting a hole in the baseboard, there is the wiring to consider and either motor or hand crank mechanism. Ensuring a reliable connection to the deck track can be an issue too. Some, like Peco, use a split circle of pcb, which avoids the need for a reversing switch. Dapol one makes no provision at all. Kitwood version requires a reversing switch but has beefy plunger pickups to transmit power. Freezinghall kits require about 8-10cm space below the baseboard, but other motors I've seen can need up to 15cm. All in all, a lot to think about and probably why you don't see that many turntables on layouts.
-
Great to see this scene develop. At first glance, it could be the real thing, which says it all.
-
A stunner. Well done thus far and very much worth the effort.