David Holman
-
Posts
4,359 -
Joined
-
Last visited
-
Days Won
117
Content Type
Profiles
Forums
Events
Gallery
Blogs
Everything posted by David Holman
-
Atmosphere! Ballasting going well though you can get away without sawing through it. Rails yes, but gently break the boards apart and the ballast breaks along the grains so when put together again, you get an almost invisible join.
-
No offence DJ, but a lot prettier than the cuboid bus!
-
Jouef HDI for 630 euro landed cost..... is this some kind of joke?
David Holman replied to burnthebox's topic in Irish Models
A few years ago, there was an article about a couple of Dinky toys. The models had never been removed from their boxes, indeed the boxes had never been removed from their packaging! Hence valuation was totally speculative, but inevitably, folk were interested. This highlights the line between collectors who acquire stuff because they like it and those who think they can make money from it, artificially driving prices up and indeed down. Know which side of the fence I prefer. -
Got to be pleased with them!
-
Now that would make a nice model!
-
Many thanks both! Seems to me that brake vans are a sometimes neglected area in early Irish Railway history, but what is available can be fascinating - the MGWR examples especially, though my favourites remain the SLNCR road vans - possibly the shortest mixed train ever? As for the pay coach, the bank counter idea is an excellent one and one wonders if there were ever any Butch and Sundance style attacks, especially in the early years of seeking independence and the civil war too. You'd certainly think there would have to be a safe and the little ensemble must have been a tempting target. Am hoping to get up to Beamish this summer. Meanwhile, need to delve into my photos of Cultra, methinks.
-
Any idea where I might find photos or drawing of Waterford Limerick and Western Railway brake vans? Haven't been able to find anything thus far, but would like to build one to go with my 'mail goods', as hauled by 0-6-0 Shannon. While I'm here, something even more obscure. The new book Locomotives of the GSW has a drawing of Sprite with its 4w coach, which made up the 'pay train'. This toured the whole system on a fortnightly basis, so I fancy having a go at building a model. The question is, what was the internal layout of the coach? Suspect there may have been a toilet at the loco end, but what about the rest? Any ideas welcome, please...
-
That's on my list too...
-
Speaking of pretty engines, Robinson's WL&WR 4-4-0s, which became D15 class were also an elegant design, albeit with only 6' drivers. Featured on the cover of HC Casserley's history, they sported crimson lake livery too and occasionally cross my mind as a loco for Belmullet - but then so do half a dozen others!
-
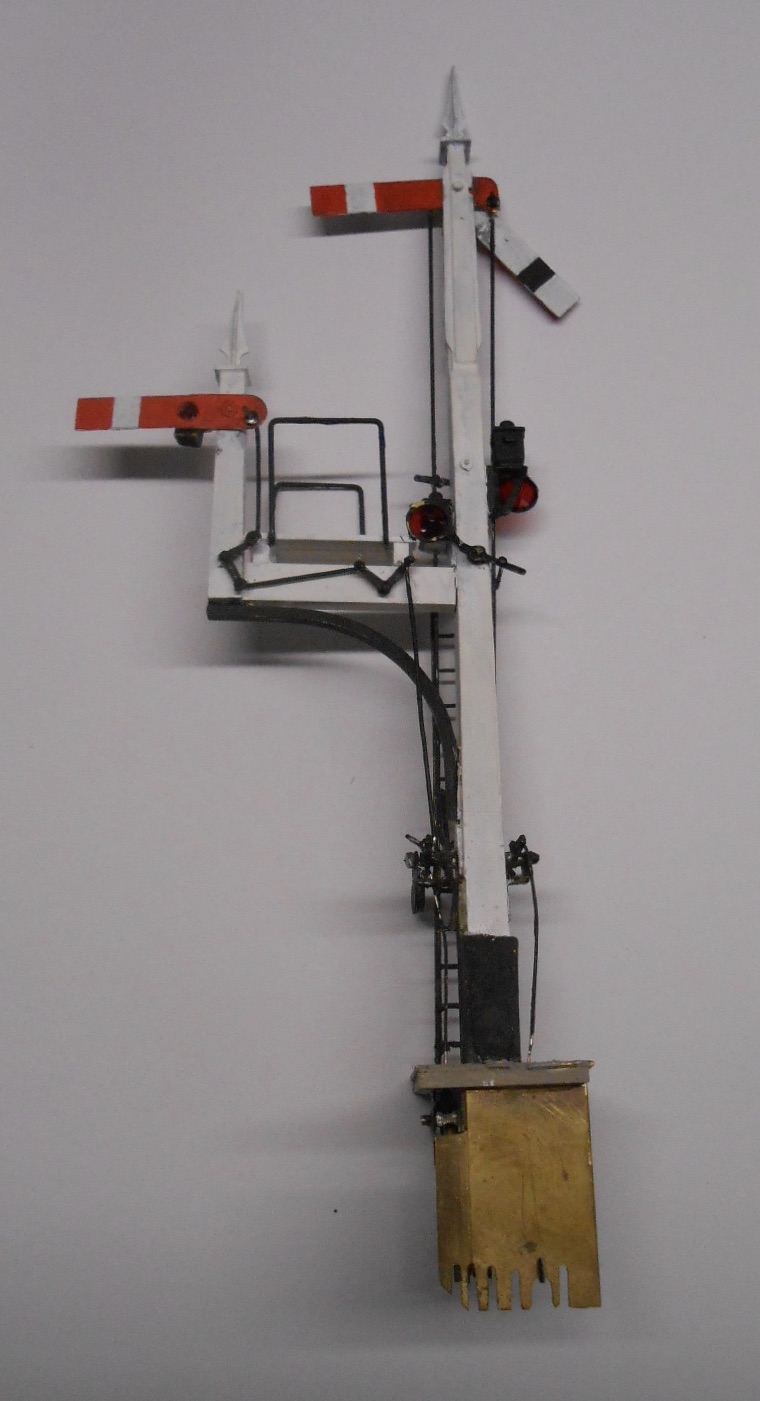
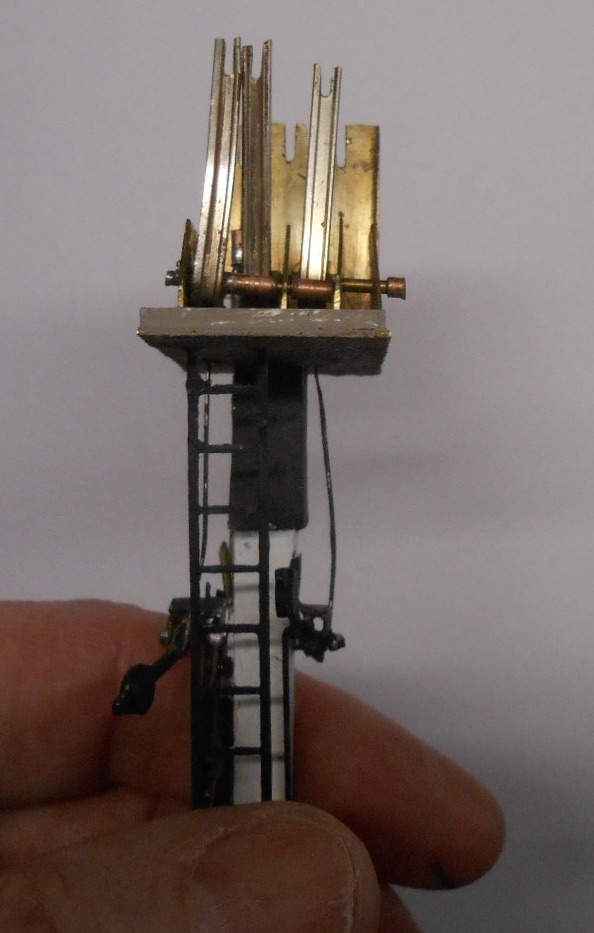
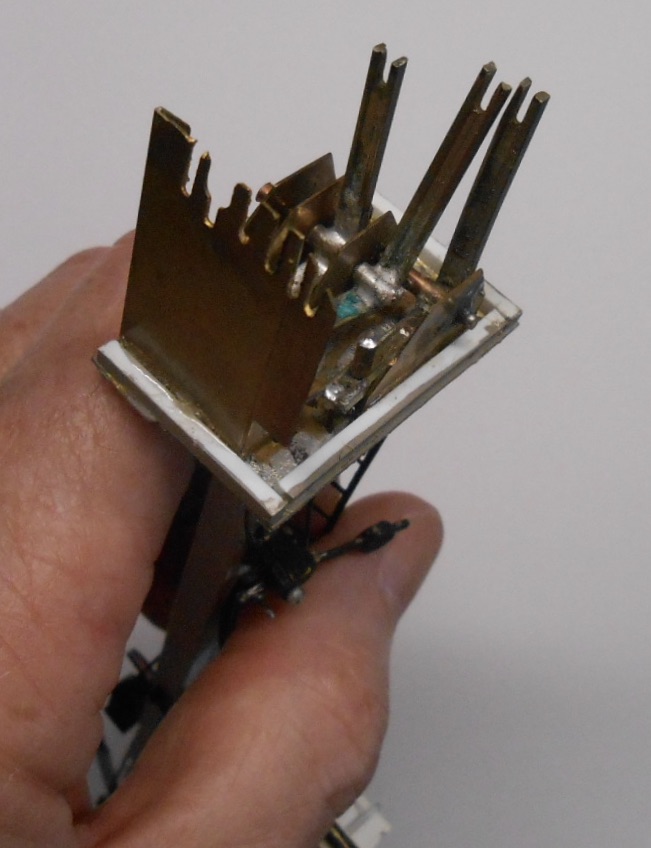
Made a start yesterday on the two doll signal post. Am using Model Signal Engineering etchings of Saxby and Farmer arms. Have built a few signals over the years and the one word that best sums up the process is - fiddly! I began with the post[s], using a 22ft cast white metal post for the main one and then sawed a second post into sections to make the other. Once assembled with 5 min epoxy, the two posts were drilled through about 2' from the top to take the pivot wire for the arms. The latter are etched in two parts [arm and spectacle plate], which need soldering together with a pivot wire attached. This is then fed through the hole in the post and fixed in place with a small washer on the other side. At the base of the main post two etched brackets are folded up and soldered in place with low melt, then the post is again drilled through for another wire pivot for the operating levers. Thus far, simple enough, but things now get complicated as the operating wires and pivots are added - plus the two lamps. The latter need careful positioning, so they are behind the two spectacle plates when the arms are up/down. The operating wire on the main post is fairly simple - just a matter of getting the length right, but for the subsidiary post [or more correctly 'doll'], which is the bay starter, this needs two pivots to get the operating wire down to the main post. Some railway companies were happy to take a robust operating rod straight down to the ground, but I prefer to route the wire to the base as, like the SLNCR signal, this means the entire unit can be removed for transport - or even to be shared with another layout. The photo shows progress thus far, though I need to rethink the linkage to the second doll as the weighted lever should pull the signal to danger should a wire break, whereas it is actually the other way round at the moment... As for linking the signal up to a couple of servos and the control panel, I may will need a lie down in a darkened room before doing that!

-
Like NIR80, my experience of Tortoise point motors has been excellent. They never seem to go wrong and are easy to set up. The two issues are cost and size, especially depth as they need 10cm baseboard frames to hide them. Having said that, you can fit them sideways with a bit of effort - see my Fintonagh thread in the layouts section. More recently, servos are becoming popular, but you need some sort of electronic control to limit their movement. Cheap to buy though. Basic wire in tube can be very good too and needs no electricity of course.
-
Jouef HDI for 630 euro landed cost..... is this some kind of joke?
David Holman replied to burnthebox's topic in Irish Models
Oh dear... -
You can stop taking the medicine, it's Sir Henry lurking in the background. However, there are problems with the space-time continuum, as it is actually sitting fifty years on the future!
-
Jouef HDI for 630 euro landed cost..... is this some kind of joke?
David Holman replied to burnthebox's topic in Irish Models
Not sure which is worse, the fact that it is wrong, or that somebody is hoping to get 130 quid for it. On reflection though, it has to be the latter. While I wouldn't spend money myself on collecting old model railway stuff, I can see the charm in some of these things and will happi!y spend a few minutes at shows (remember those?) watching Hornby template whizz round in a cloud of ozone. Like most things, gaffs occur and our hobby is not immune - but can't help thinking somebody tried to pull a fast one with a CIE 37 and actually shows the validity of have some sort of 'era labelling' as discussed on another thread. If so, an category now required - fake! -
Along the same lines, a man has the first few bars of Somewhere Over the Rainbow going incessantly through his head, but somehow can't remember the rest. This goes on all day until, very distracted, he steps out into the road and is knockdown by a bus. As he lies there on the ground, the song is still going through his head: Somewhere, over the rainbow, way up high, there's a land that I dreamed of, once in a lullaby... Suddenly, the two tone horn of the approaching ambulance finally jogs his memory: Na na na Na na na... Meanwhile, an Italian rabbit goes into a sandwich bar and asks for a toasted cheese sandwich. Next day he returns and orders a toasted ham sandwich. This goes on for several days, ordering a different one each time. However, at the end of the week he collapsed and is found lying on the floor. When asked what was wrong, he gasped: I mixeda my toasties! Finally, for now, a chicken goes into a library and the assistant is amazed when the chicken actually speaks and says 'Book'. So the assistant gives the chicken a book and off it goes. This happens several times and eventually the assistant decides to follow the chicken to see where it goes. First, it waits at the bus stop and eventually takes a bus going out into the countryside, getting off at the next village. There, by the pond is a frog, surrounded by the books the chicken has brought it. 'Book' says the chicken, placing the new one by the frog. 'Reddit', replies the frog...
-
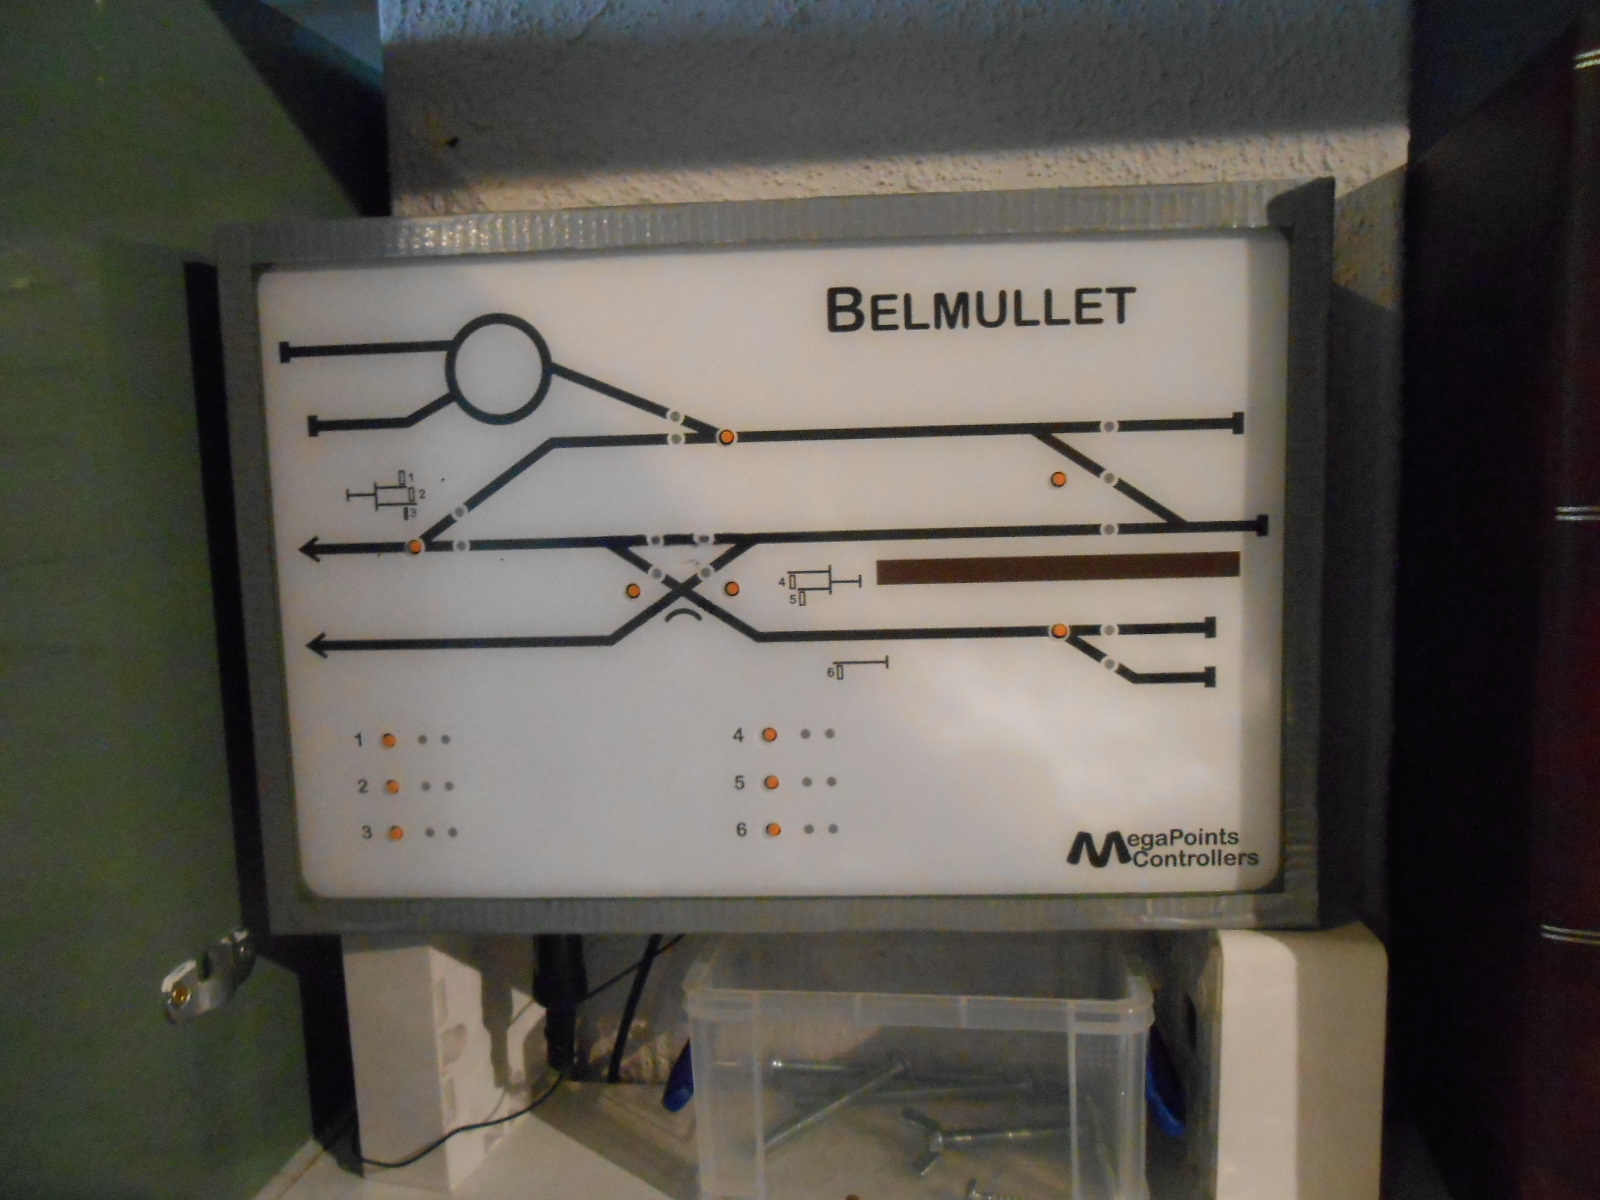
Thanks Brack & especially for taking time to do the drawing. Must admit I had to look up what a Geneva wheel was/did, but what a clever thing it is! The photo shows my Megapoints control panel. If I'm honest, the system requires more logical thinking than I possess, but is certainly very effective & clever in the right hands. Indeed, though I thought I'd worked out what I needed, I didn't get the specification quite right and now realise that the separate starter for the harbour branch was probably better as a ground signal on the single slip. Meanwhile, I don't have enough ports left in the control panel to add extra switches for the ground signals. I could fit 'Y' connectors so the push buttons for the slip points also operated new servos for the ground signals, but the panel processors control the amount of movement of each servo, so the extra required would only be possible via a lever/bell crank, so it is easier to try and do it straight off the point blades. Unfortunately, the ground signals need to rotate 90 degrees, so I'll need to do some experimenting to see if that is possible. For now, they will have to remain cosmetic.
-
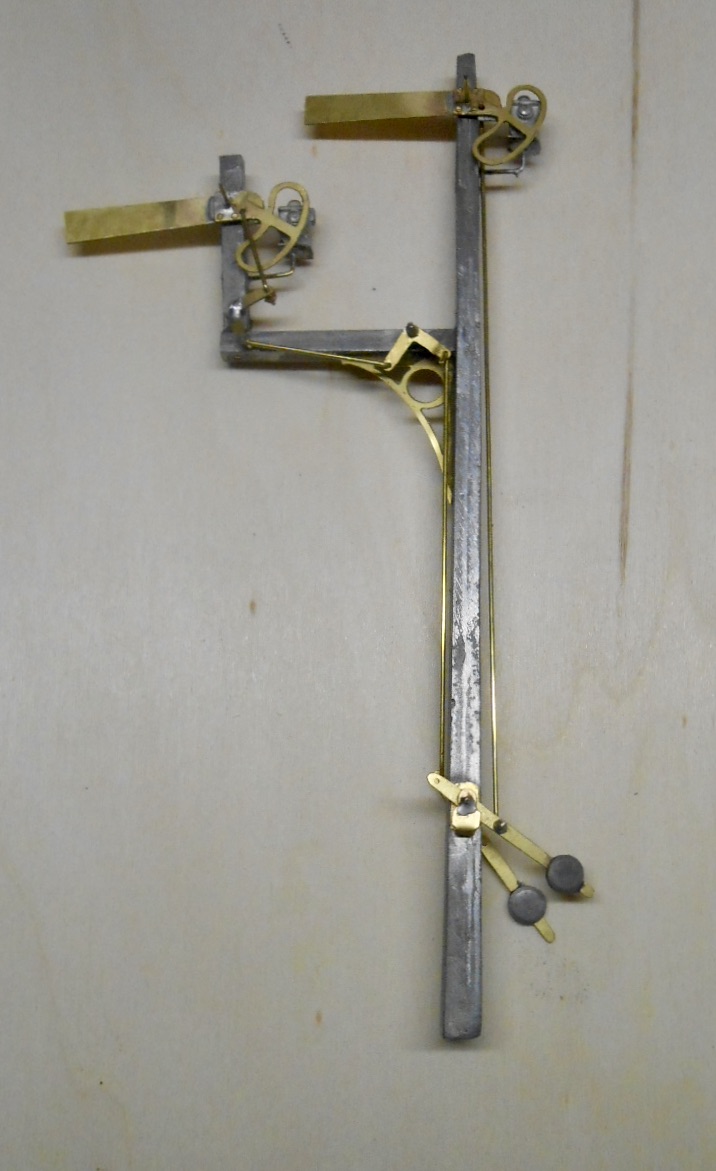
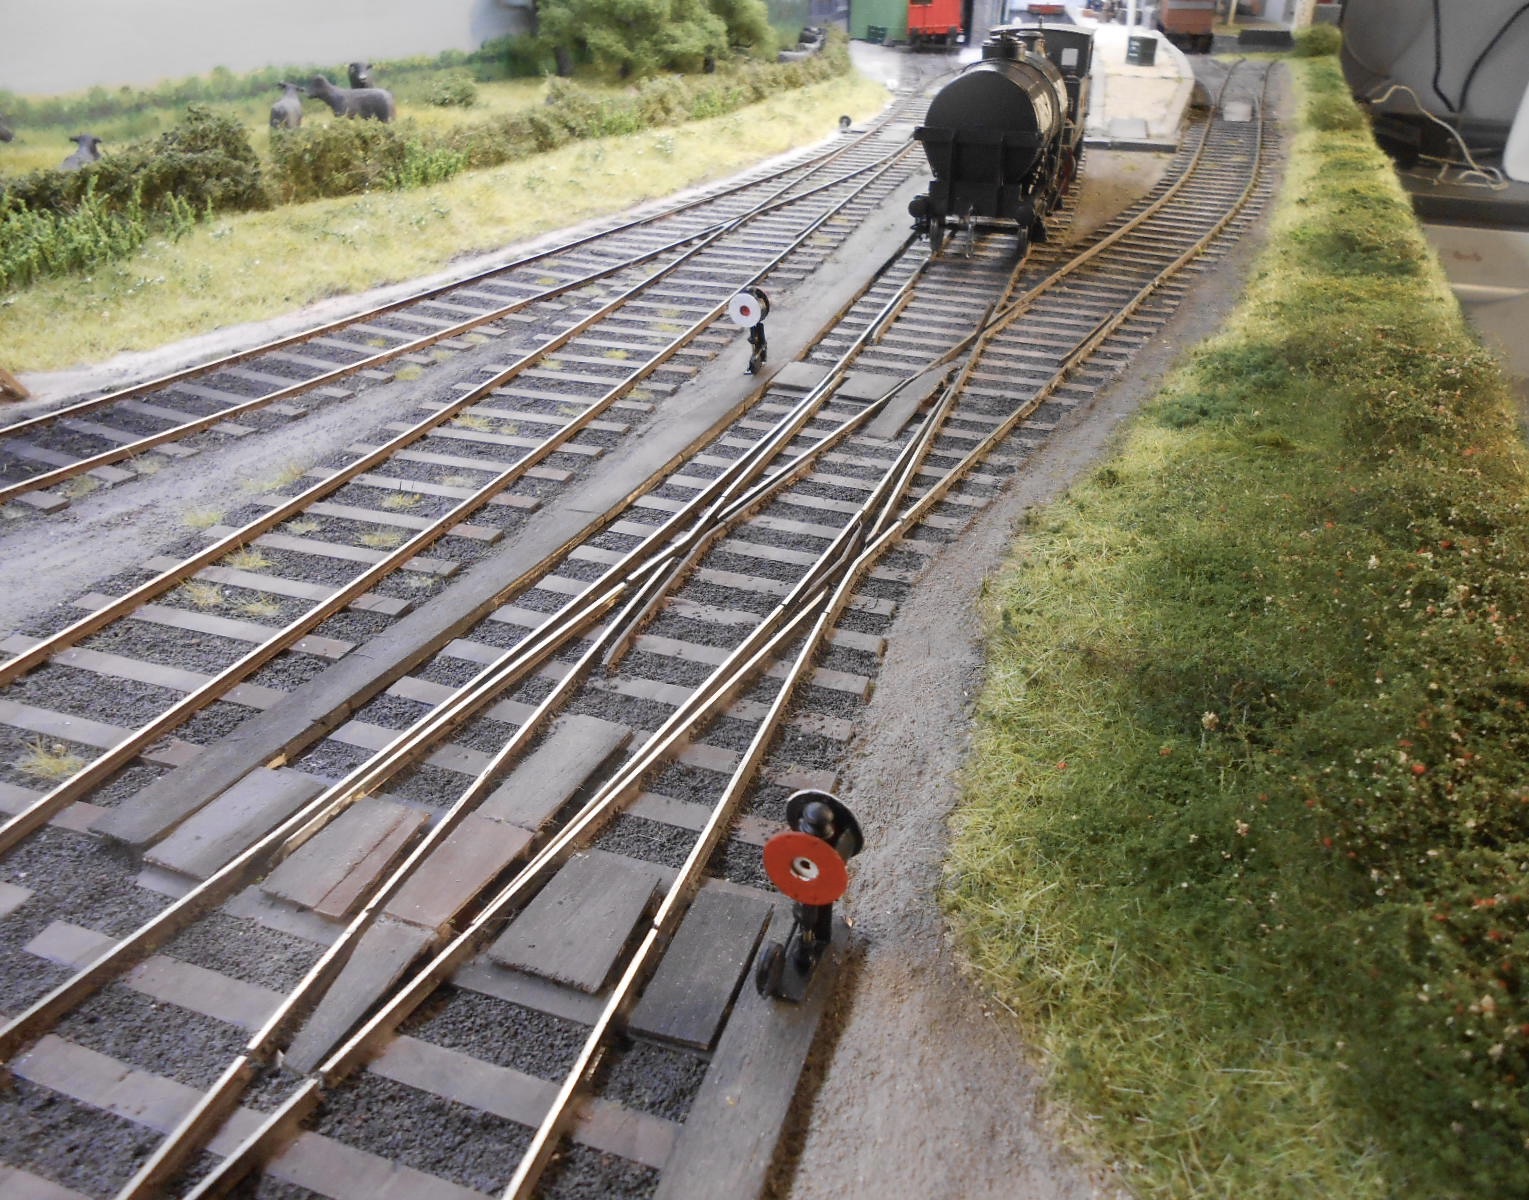
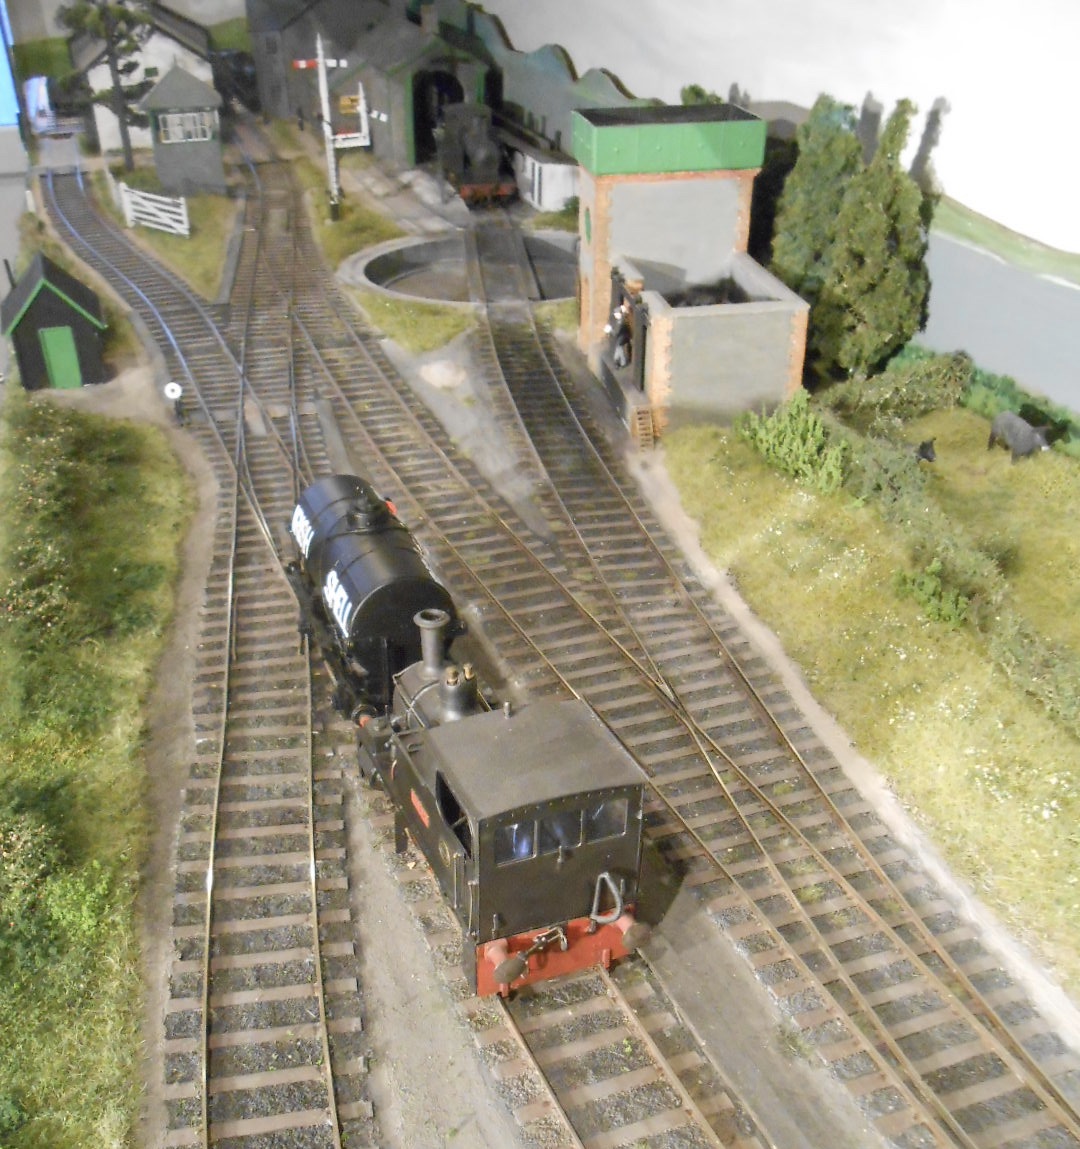
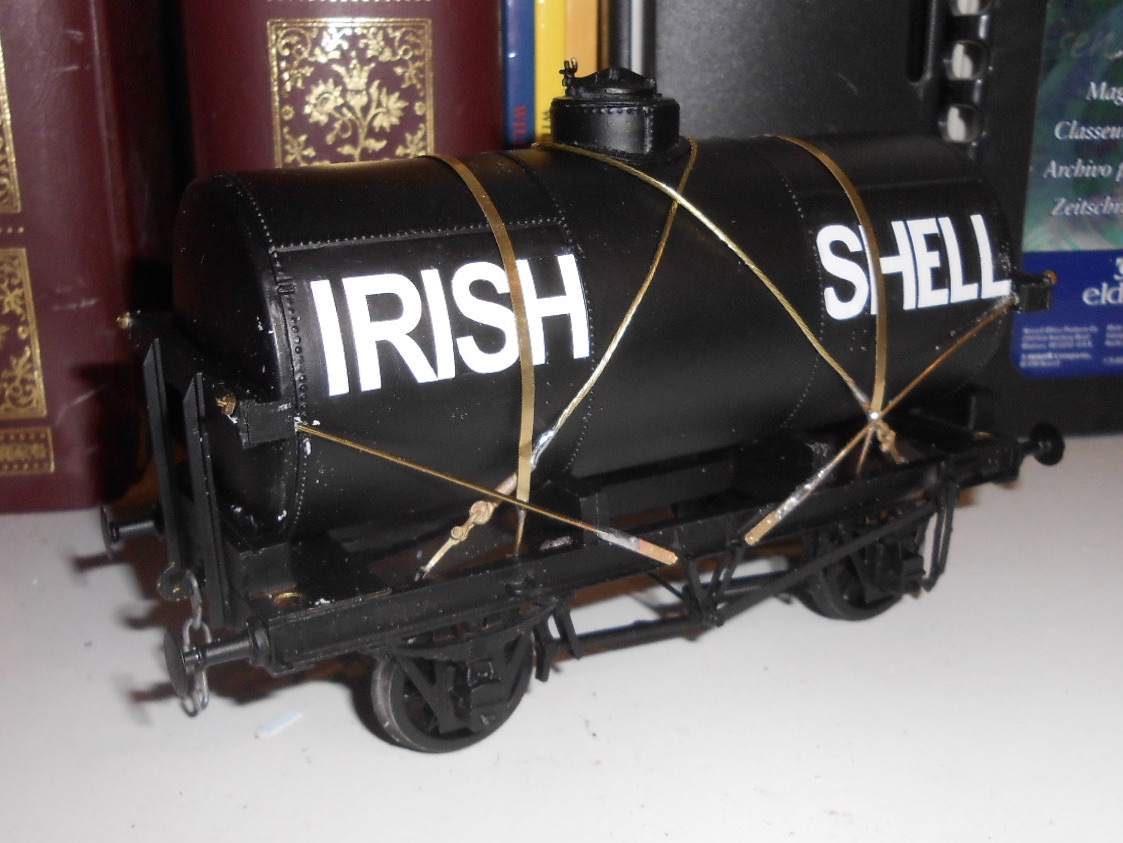
After months of working on locos and rolling stock, attention now turns to the signalling department. Belmullet currently only has the Arigna Town, three arm signal which was modelled on that one on the Sligo Leitrim that controlled three level crossings. Here, it covers arrivals to each side of the loop and also acts as an advanced starter. However, both the main platform and bay need departure signals, while the single slip ought to have at least a couple of ground signals, so these are forming the next projects. An order to Wizard Models quickly secured enough etched and cast parts to supplant what I had left over from the SLNCR signal construction, in the form of a set of Saxby and Farmer arms, a couple of cast posts and a couple of ground signal kits. The latter are actually GNR/LNER versions, but look very similar to the County Donegal ground signal from Alphagraphix. They are actually MSE kits and can be made to work. Was hoping to connect them to the blades of the single slip, so as these moved, they would make the discs turn. Unfortunately, the blades only move a couple of mm, but the signals should turn 90 or even 180 degrees, so quite how this can be made to happen, I currently have no idea! Anyway, the kits themselves are simple enough once you've read the instructions a few times & have been placed in what I hope are appropriate positions. The discs can be turned by hand for photographic purposes. Elsewhere, while I had black and white acrylic paint out, the Irish Shell tank wagon has had the bare metal on the strapping touched in, while the undergrowth on the front edge of the baseboards has been significantly embellished with a mixture of postiche, coarse and fine crumb to represent weeds, dog roses and the like - though I'd still like to add some nettles eventually too. The photos show the existing signal, plus the new ground signals and a sketch of what the starters should eventually look like, plus the new ground cover and Irish Shell tank.
-
The more you think about it, the more complicated it becomes, as there are overlaps everywhere. My impression with the Hatton's system is that is is designed as a guide for folk interested in getting into the hobby, who don't have much knowledge of railway history. While it should be fairly obvious that steam precedes diesel, after that, the lines do begin to blur, so guiding folk to know what coaches or wagons run with what loco at what time seems sensible. After that, then (hopefully) people will be drawn into deeper historic research as they start to focus on a particular time period and/or location. Something like jhb 's system makes good sense to me.
-
Meanwhile, back in the mists of time, the Vikings are raiding the coast of England, but after many expeditions over the years, Olaf decides he's getting old for this, plus his sight is failing, so plans that the next raid will be his last, so he asks his wife if she would like his to bring something home for her. As it happens, I would, she says - can you get me a stainless steel sink, dearie? Olaf is dubious about this, but promises to do his best. When the raiding party lands on the coast, he tells his crew to look out for a stainless steel and not come back without one. After a weekend of pillaging, the crew return to the ship, but apart from a few woad pots and other trinkets there is no sign of a sink. Eventually, the last crewman comes stumbling across the beach and certainly seems to be carrying something large on his shoulders. However, when he gets close enough for Olaf to see what it is, the old man realises that it is not what he wanted, but instead is a bricklayer's hod. Olaf demands and explanation and reply comes: Well, everybody knows a hod is as good as a sink to a blind Norse...
-
Every morning, a man takes the bus to his local golf course, where he has found that he can find lots of lost balls from those playing in the gloom the night before. On this particular morning, he fills his pockets to bursting point. Going back home on the bus, a young lady sits opposite him and he notices her staring at his trousers. Golf balls, he explains. Ooh, is that like housemaid's knee? She replies...
-
For me, that is a fabulous piece of weathering. So much subtlety - the overhead view along the boiler looks so right. As for all the oily bits, just superb and against the background of Rosses Point station the colours compliment each other beatifully. First glance, I thought you'd unearthed some new, digitally enhanced prototype photos. It really does look that good!
-
Not a lot to report on my usual Sunday evening slot, though the Irish Shell tank is now built - if far from finished. Largely enjoyable, though far from simple! I'd forgotten how much of a pain the strapping is to put together. It is one of those kits that a beginner could have a go at, but you certainly need a lot of tools to make it happen - if I could be bothered, I'd make a list. However, next step will be to get out my copy of The Art of Weathering, by Martin Welch. As hinted earlier, still a fair bit to do...
-
Trawling the web, noticed that Worsley Works are planning to do a range of GSWR six wheel coach body etchings. How soon, it doesn't say, but could be very useful when they are. Just sides, ends and fold down battery boxes, if appropriate, but will take much of the hard work out of building a panelled coach body for sure. There is also a selection of GNRI and NCC bogie coach bodies, which makes me wonder who has bought/made any and if so, why we haven't seen them here...
-
Roughly G scale, If think. 0 is 1/43 and Gauge 1 is approx 1/32
-
Very much good enough for the model press! Would make an interesting article, especially as something that isn't the usual branch line terminus. With all the adverts for models of Irish diesels, it would be great to see them in a proper setting. Plus, as we all know here of course, it is a layout that operates really well too. RM pay about £35 a page, including pictures, so not to be sniffed at either. They like as high a resolution as possible for photos, but are happy to turn sketch plans for track layouts into quality art work. Then there is the best thrill of seeing your own work in print. Go for it!
- 486 replies
-
- 5
-

-

-
- ballyercall
- layout
- (and 1 more)