murrayec
-
Posts
2,775 -
Joined
-
Last visited
-
Days Won
70
Content Type
Profiles
Forums
Events
Gallery
Blogs
Everything posted by murrayec
-
Have to agree there on brass kits! I would recommend kits from Studio Scale Models- J15, Bandon Tank, Maebh and Merlin are all available in full kit form including the chassis and can be built to 21mm if required. Eoin
-
Looks like I did! my under cover IP location has been found Eoin
-
Here is a link to the build, these are Studio Scale Model kits though, I have a few of the Worsley Works kits also, the advantage of the SSM kits is that you get all the parts for the model- seats, white metal castings, wheels and instructions! Though does cost a little bit more..... Eoin
-
Man! you cant put Donny Osmond in the same sentence as T Rex & Wizard!! Eoin
-
On DCC the led is getting 12v all the time irrespective of the throttle control, so if that's what you mean by 'increase power' all will be OK! Eoin
-

'Hibernia' Dublin & Kingstown Railway 2-2-0 Loco Build Gauge O
murrayec replied to murrayec's topic in ECM Model Trains
@seagoebox Yes a fantastic drawing and a great description in the Journal's text of the loco by the indexed letters assigned to parts in the drawing. When I first saw this it confused me, and others to, on the drawing detail of the bellcrank- the crank is outside the outer frame and the driver wheels are inside the frame!! After finding a copy of the Sharp Roberts works drawing which featured in The Engineer 1883, all was explained! The guy who did the Journal drawing obviously had no engineering experience - just a draughftsman. Eoin -
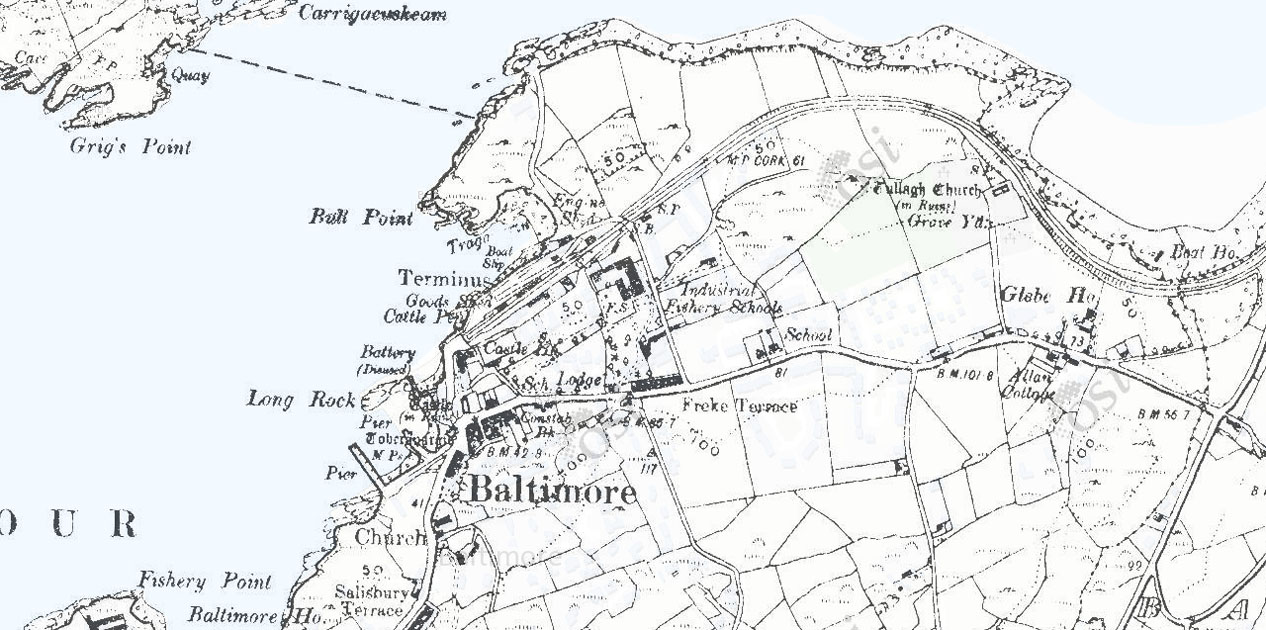
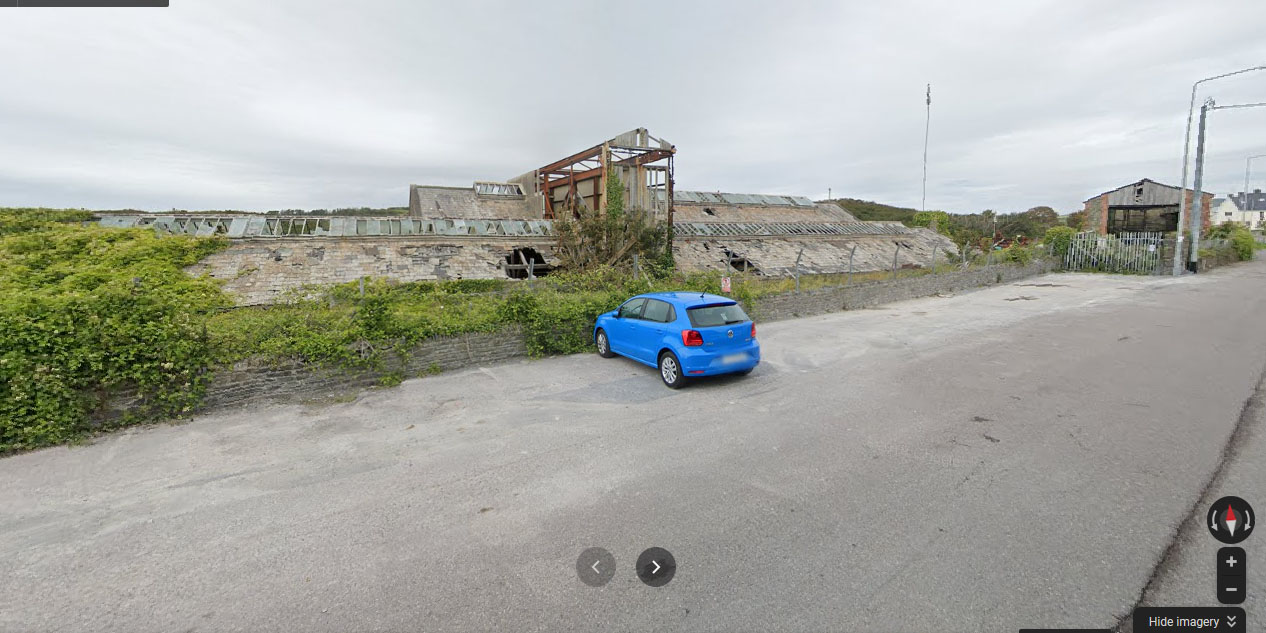
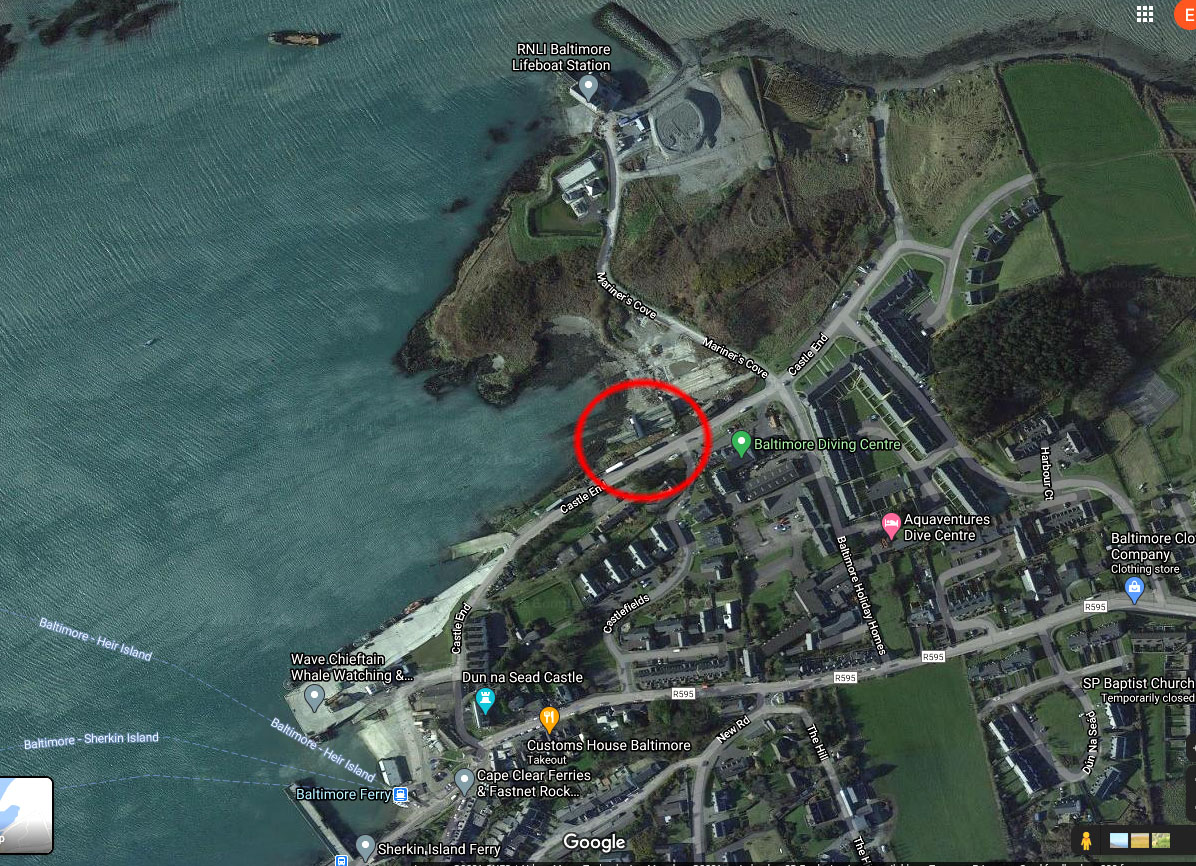
Baltimore railway station is closer to the village than the Lifeboat station, the building still stands although a bit modified by previous use as a sailing school and other things;- Eoin

-
'Hibernia' Dublin & Kingstown Railway 2-2-0 Loco Build Gauge O
murrayec replied to murrayec's topic in ECM Model Trains
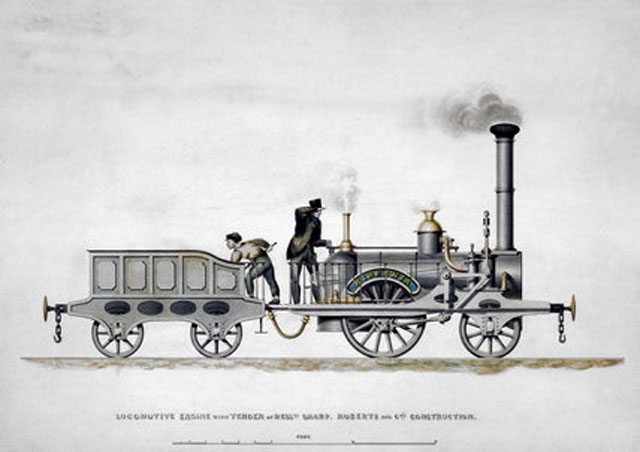
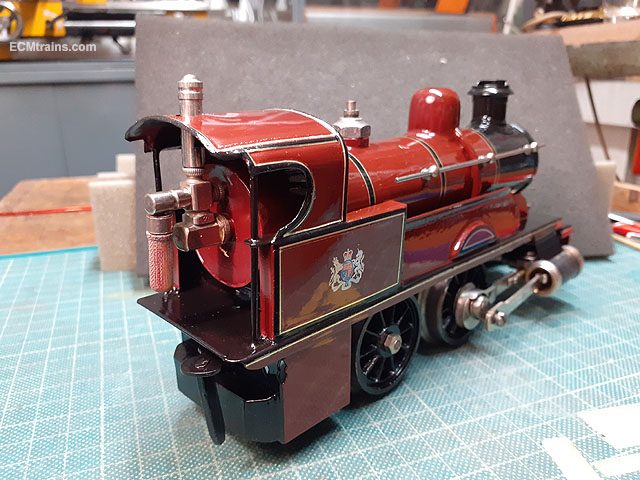
@ShaneC Old thread!! Your first enquiry;- It is believed that the 3 Hibernia type locos were supplied by the manufacture to the D&KR in light battleship grey, they later received livery colours like the Fry model- it's hard to find when this happened! I believe maybe much later in their lives?? but these locos were gone by 1842 with one of them blowing up in Kingstown station and the other two sold for scrapping. I found this painting in my search;- https://www.ssplprints.com/image/88968/steam-locomotive-hibernia-1834 © NRM / Pictorial Collection / Science & Society Picture Library The only problem with this picture is that the locos were originally supplied without tenders, the company believed they could run the locos from Dublin to Kingstown and back on coal & water fills at each end! As time went on with more stops along the way this became a problem and tenders were ordered to add to these locos and the Forresters. Your second enquiry;- I would say the newspaper article was taken from the picture above and its the 'nameplate' that's muted green not the footplate- no one would paint a footplate green, even back in those days..... and why would someone refer to the colour of the footplate. Your third enquiry;- I would say its not unreasonable to accept it was painted green all over at some time, can you show this drawing? Also there is this pen & ink drawing, and I believe there is a painted version, showing a D&KR train with loco & tender in a green & black livery;- The green could be grey on the loco but it's defo green on the tender. This loco looks more like a Forrester than a Hibernia type, but I understand all six tenders acquired by the company were of the same design type. I will be going for the light grey livery on the model above. Eoin.
-
It's looking great David, If the lining is water based a spray over of lacquer/varnish would seal it for handling. Eoin
-
Bing Live Steam Loco Gauge O - Repair & Restoration
murrayec replied to murrayec's topic in ECM Model Trains
Yes @Georgeconna it's a shame the track up the road is not used and left to rot! Interestingly though! that 3.5 inch gauge Royal Scott I mentioned above in this thread, is back on the list for repair & restoration to live steam running!! The chap also says if we can get it running he will build a track in his 'large' garden- this could be interesting? We have discussed about making it look like a Class 800!! Eoin
- 24 replies
-
- 2
-

-
- bing live steam
- bing gauge o
- (and 1 more)
-
1/32 Scale Mountfleet Round Table Minesweeper
murrayec replied to Georgeconna's topic in Aviation & Maritime Modelling
Amazing George, I was wondering about progress..... Eoin -
Bing Live Steam Loco Gauge O - Repair & Restoration
murrayec replied to murrayec's topic in ECM Model Trains
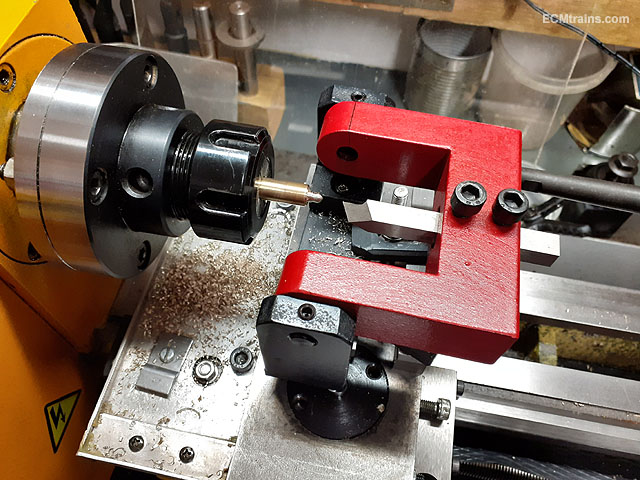
Final bits and assembly of the Bing! With the lathe back in operation the replacement steam whistle handle could be done. Turning the handle from 10mm square Tufnol. Part made. And stuck on with epoxy glue, the valve assembly was given a light wire-brushing and polished with Peek metal polish. The new boiler handrail knob being setup, using a bar of 6mm NS for the knob, a 10mm brass rod for making a holding mandrill when doing the round bit and drilling the rail hole, and 1.5mm NS wire for the new handrails. 6mm rod turned down to head diameter and just about to cut the 6BA thread on the end. After threading the knob blank its then threaded into the brass mandrill and the ball end turning is done with that red ball turning tool mounted on the lathe cross-slide. With the ball end complete the knob is screwed onto the boiler and the location of the hole is checked, marked, screwed back onto the mandrill, then the mandrill is put in the vice for drilling a 1.6mm hole. New knob fitted and new handrails trimmed to size and installed. After a good clean down of the paintwork the parts where given a few coats of lacquer, when well dry final assembly was done. Complete. Eoin
- 24 replies
-
- 7
-
-

-
- bing live steam
- bing gauge o
- (and 1 more)
-
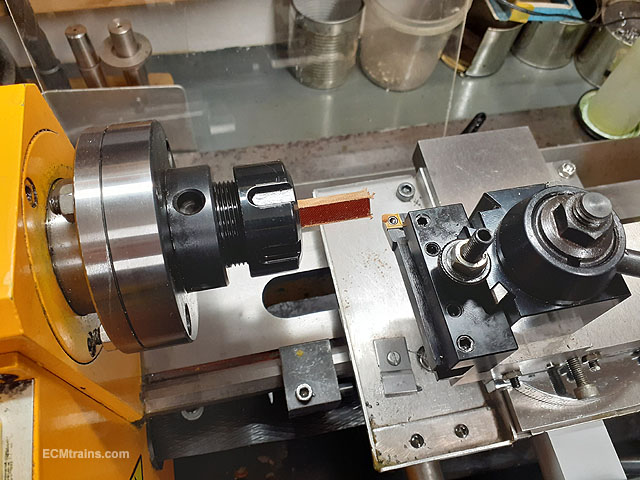
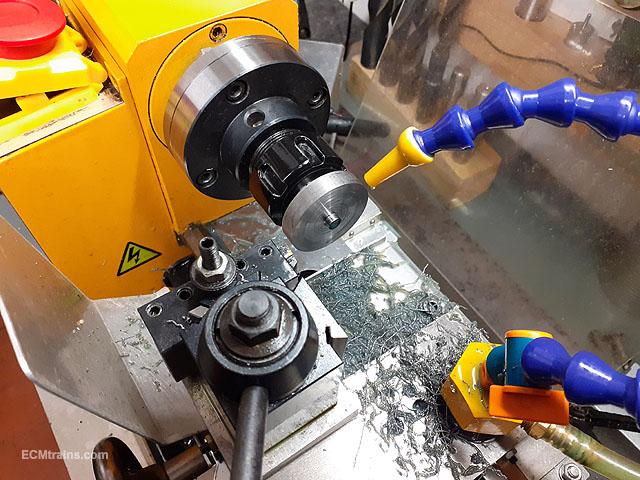
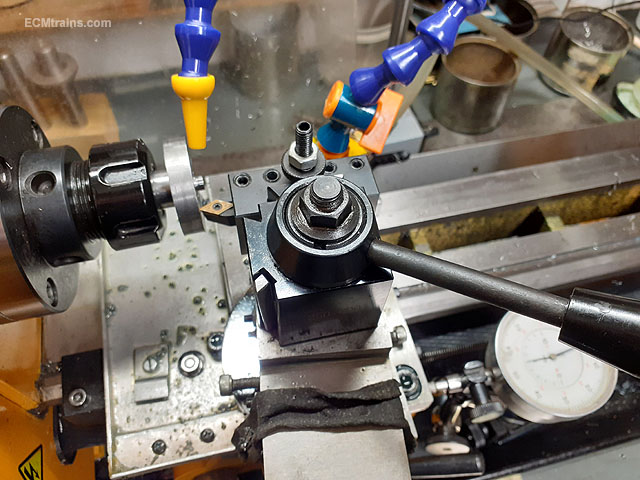
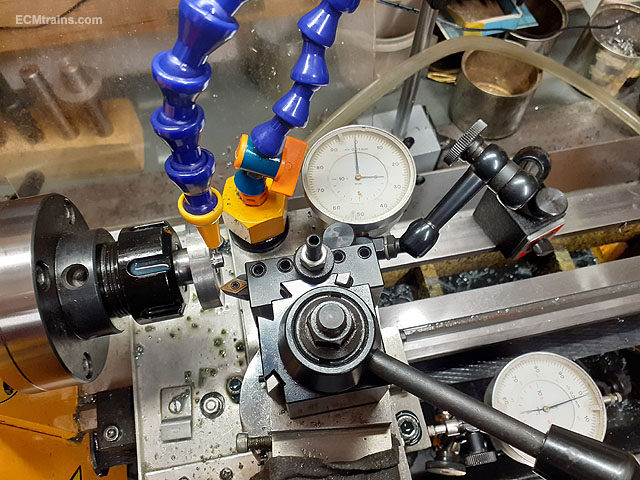
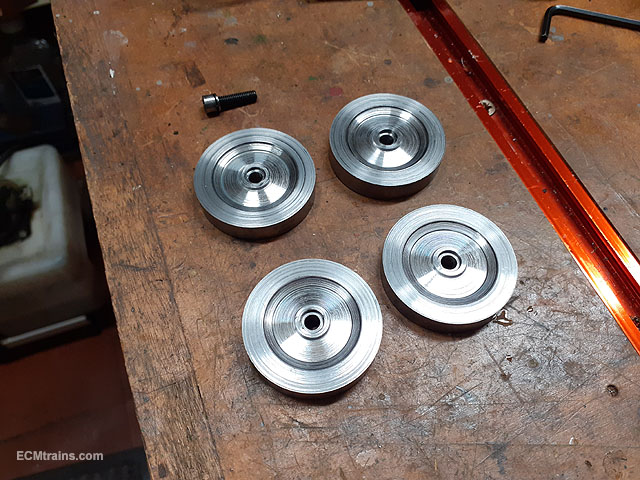
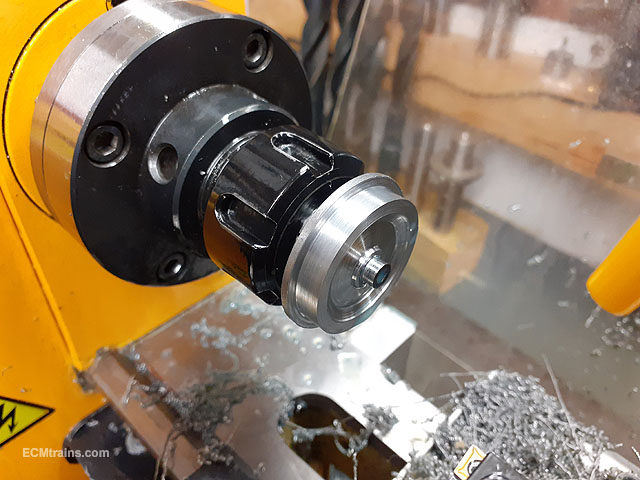
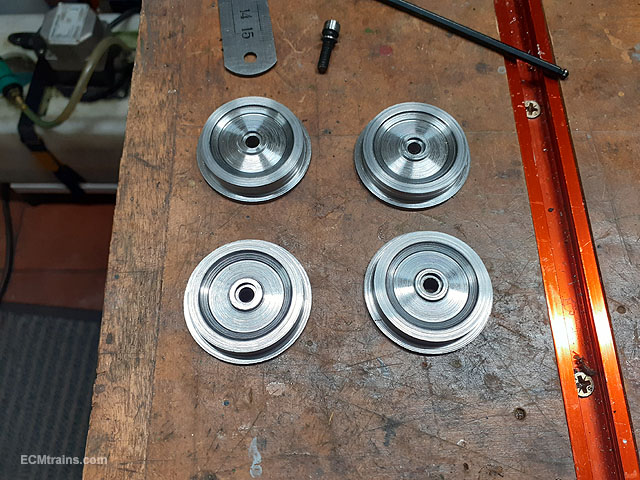
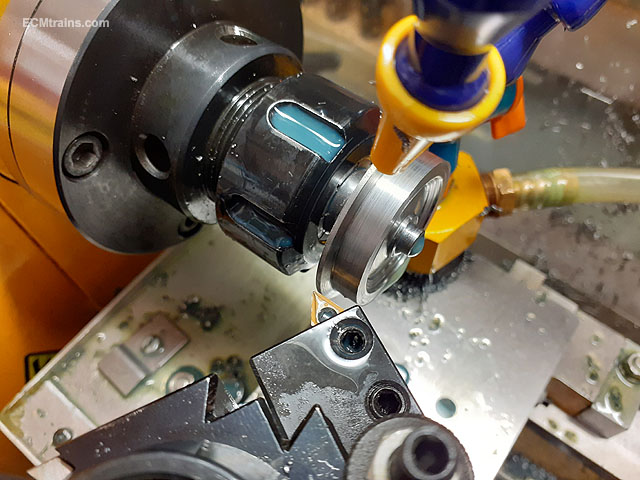
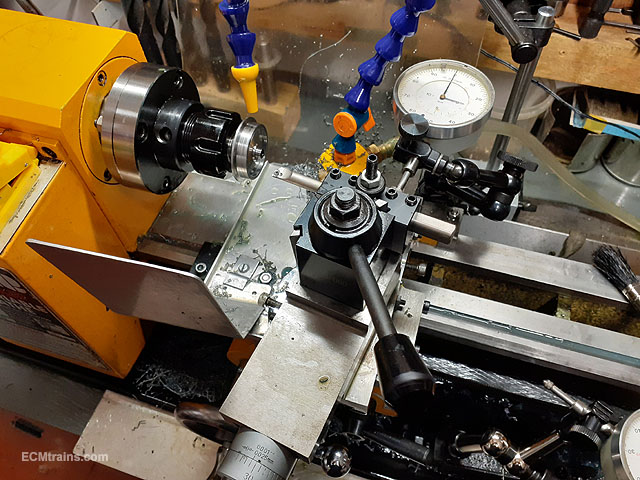
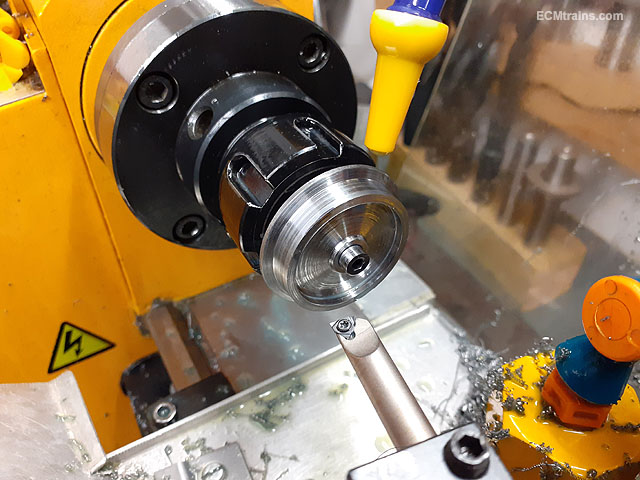
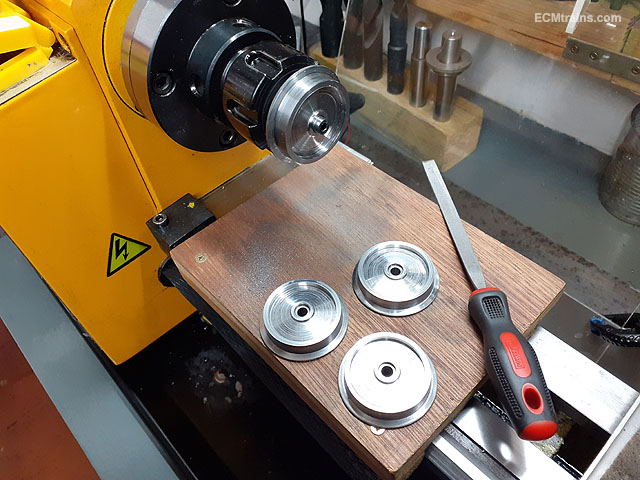
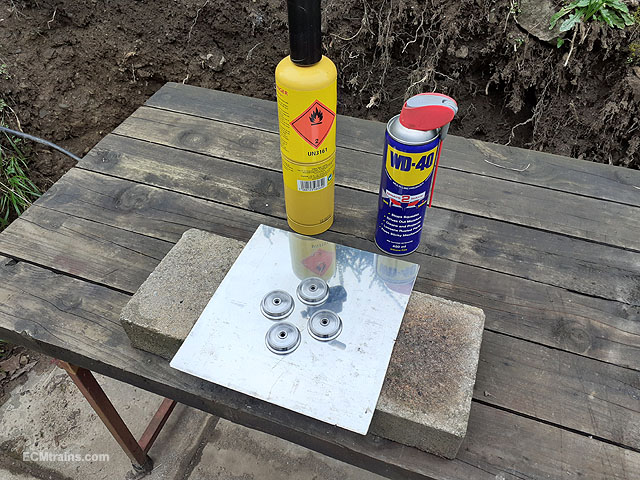
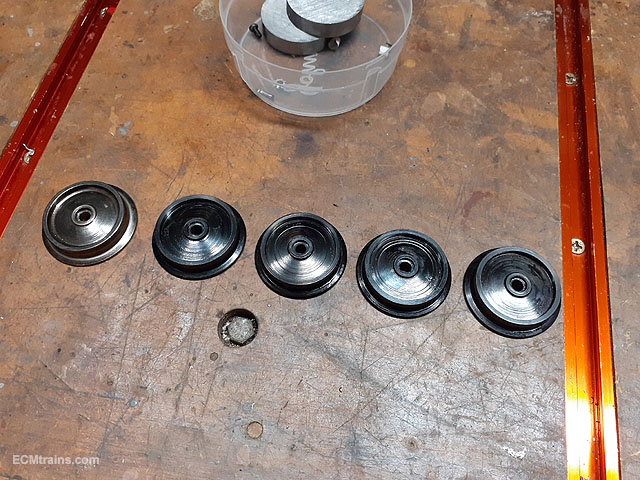
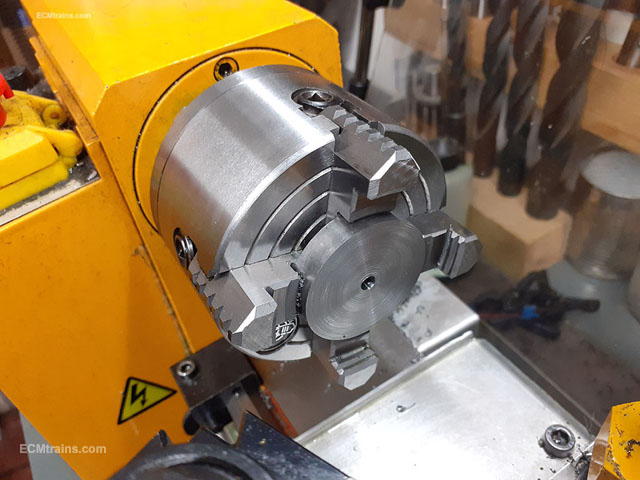
Lathe Turning Gauge G Wheels for an Alco RS-3 This is a job turning 4 replacement wheels for the loco, it was decided to change the traction tyre wheels for plain ones as the layout is relatively level and the tyres disintegrate over time. A 41mm dia EN8 mild steel bar was sourced for its relative hardness and ease of machining, the wheels are fixed on a 6mm taper axle with a screw to lock in place. This adds to the complexity having to turn a small taper bore from 4.8mm to 6mm, needing a rather small boring tool which had to be made. Also required to turn the taper was a 'taper gauge' - this is for testing the fit of the taper in the wheels while turning it and to hold the wheel blanks in the chuck as the face truing is being done, again this had to be made first. Boring tool being ground from a broken 3.75mm dia cnc tungsten carbide bit, using a green stone on the bench grinder to do this, grey stone does not cut carbide very well and generally just falls apart and over heats the tool which is not good- the tool looses it's hardness. An existing wheel was removed to use as a pattern, 10mm thick wheel blanks were cut from the 41mm bar on the bandsaw the final thickness of the wheel is 8mm so a bit to play with! the taper gauge/mandrel was turned from 16mm dia EN8 ms bar to replicate an axle end from the loco, it has a M4 bolt and washer to hold the wheels when being used as the mandrill, and the boring tool was setup. The wheel blanks were mounted in the 4 jaw chuck and dialled in to run on centre as the blanks were the exact diameter of the wheels including the flange so no waste to spare. The blank was faced off first as this is the back of the wheel and now is the time to do it. A 4mm dia hole was drilled through using a centre drill first 4mm gives just enough space to get the boring tool in. The boring was done by setting the top slide to the taper angle, the saddle and cross slide were locked and the cutting was carried out using the angled top slide only to create the taper. This is where the bore gauge comes in for checking the fit when doing the final cuts. When setting up a taper gauge to check fit in this kind of job one sets the top slide to the angle, cuts the gauge and then cuts the bore in the item being made- without resetting the top slide or the cutting tool so that the taper angles will be spot on! I have no photos of that work but this is one of the completed tapers and faced off wheel backface. The blanks were then turned around in the 4 jaw chuck and a counter bore was cut for the bolt recess when fitted to the loco and also to be used for holding the blank on the taper mandrill while processing the front of the wheel. The counter bore was done with the little boring bar. Now the taper gauge/mandrill is mounter in a collet chuck, this kind of chunk is very handy for round bar as it always tightens up on centre, even if one removes the bar and re chucks it- it will be on centre. This chuck is an ER25 type for the mini lathe and can hold bar from 1mm up to 16mm by changing the appropriate collet in the chuck- the 16mm collet is being used here. The wheel blank has been mounted on the mandrill with the M4 cap screw, the head of the screw and washer needs to be turned down to fit into the counter bore of the wheel blank, an extra washer is installed for packing to allow the outer washer to be turned down to size. After the screw and washer are turned down and re-fitted the full face of the wheel blank can be faced off and brought to the finished size of 8mm thick. A dial gauge is been used here off the saddle to measure the cut so that when the other 3 blanks are set up to be faced they will all end up at the same thickness. With all the blanks set to the same size the front of wheel recess detail is part done- the top slide is set to an 8deg angle as the recess is at an 8deg angle, it get deeper out near the tyre. The saddle has a dial gauge set up to watch the depth of the cut and only the top slide is used to traverse the tool. Inside done to 1mm deep but then the tool binds. The tool is changed to do part of the outside of the recess but cannot be completed yet until the wheel thread is cut to set the distance, so the detail will match the existing loco wheels. Outside being done but have to step the tool out near the tyre as it also starts to bind. Two dial gauges are used her, one to measure off the saddle for the depth of recess and the other off the top slide to stop at a point adjacent the location of the tyre. Recesses part complete which will be completed with a boring bar after the tyres are cut. Tyres and flanges are rough cut square first. All done square. Now the top slide is set over at 20deg to cut the flange faces. The tool is set in the post to have a 4deg angle to cut the tyre face when the top slide is wound in to the full flange depth. The saddle and cross slide are locked and only the cross slide is used clocked with a dial gauge to measure the depth and get all the wheels the same. Now that the tyres are finished the rim dimension can be set. The final cut being done on the front face using a boring bar tool to finish the outside of the recess. Dial gauges again being used to measure the depth of cut and distance out to the edge of the recess. Cleaning up the edges with a file. Blackening being done with blowtorch and WD40. Blackened. Complete, the one on the left is an original. Fitting and going for a test run........ Eoin.
- 26 replies
-
- 9
-
-

-
-
- lathe work
- machines
- (and 1 more)
-
It looks stunning, yes hours & hours! I stopped counting when working on models- just go till it's done..... Eoin
-
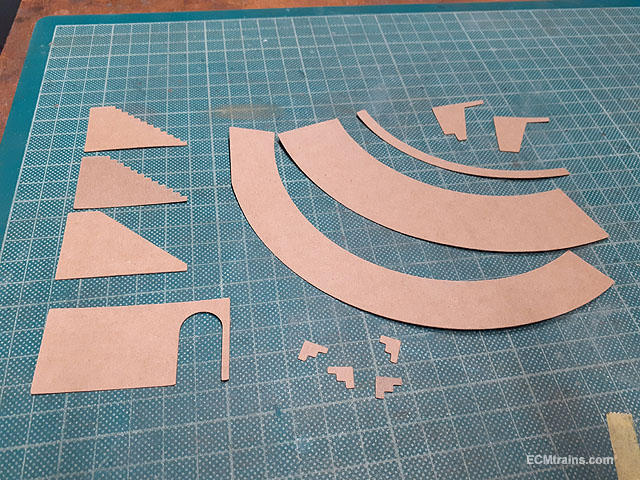
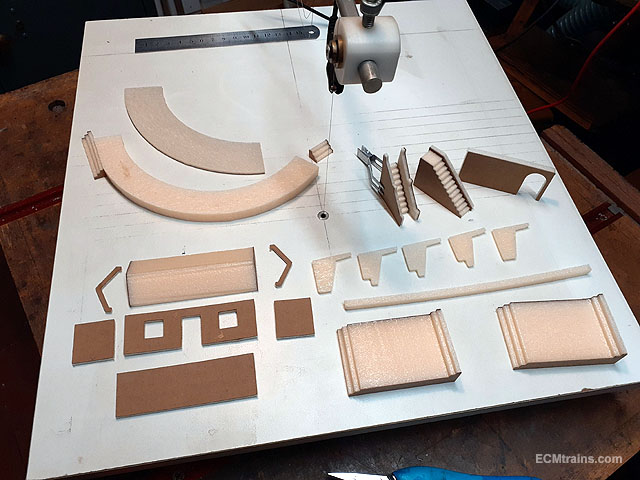
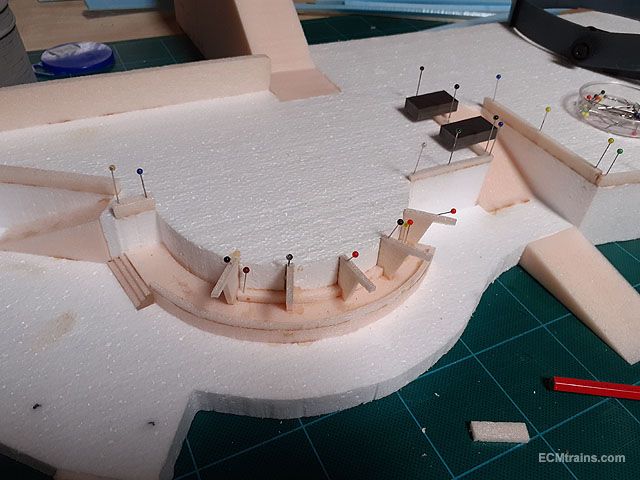
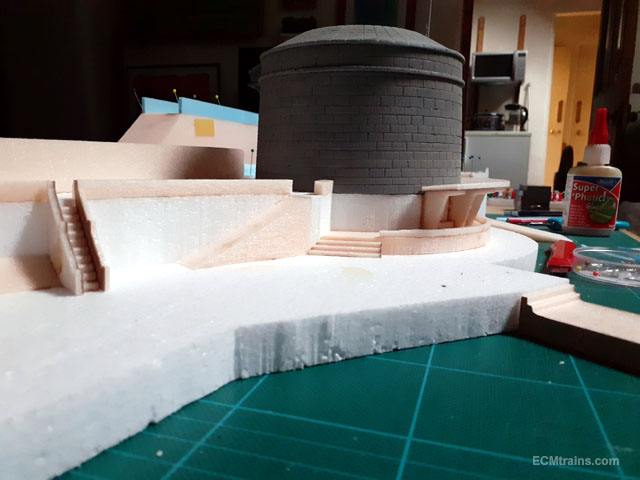
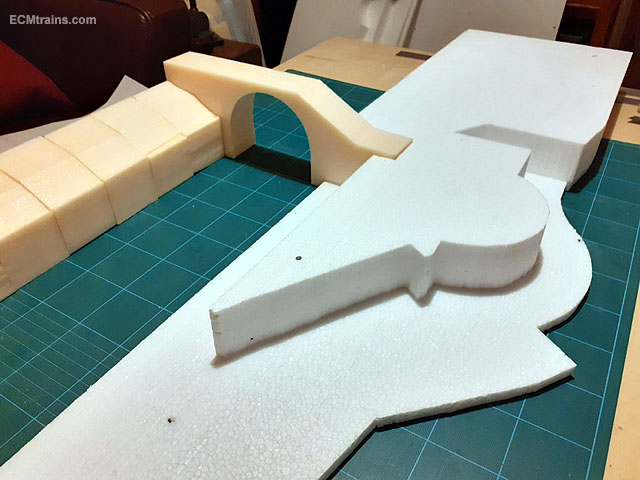
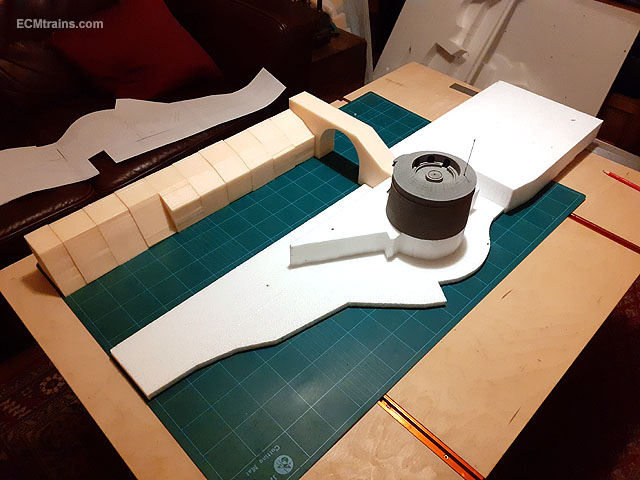
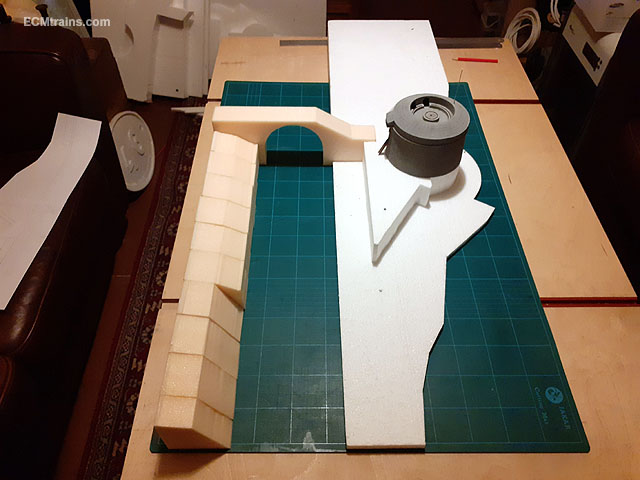
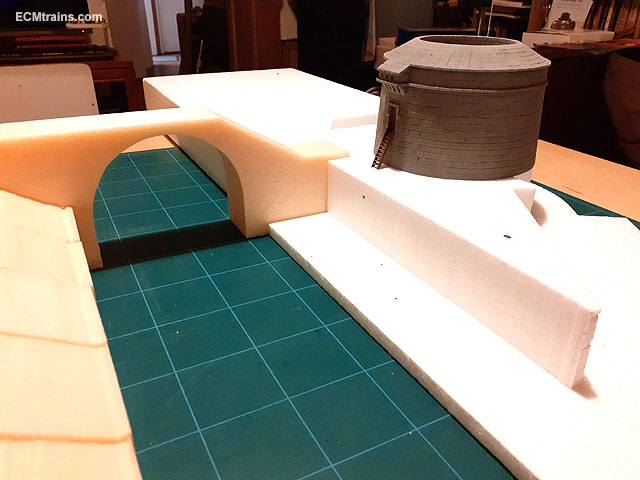
The smaller details going onto the Seapoint Martello Tower diorama;- Card templates were cut on the Cameo Silhouette for cutting the steps, the shed, and the bathing shelter. The foam is cut to applicable sizes and the card templates are pinned on, some of the templates are glued on to give strength and to guide the hot wire cutter on items like the steps which are cut vertically! And cut. Starting to glue on the bits. The bathing shelter coming together. Shelter roof on with the tower in place. Walls, footpath and kerbs done on the western side. Just the bridge and embankment to finish...... Eoin.
-
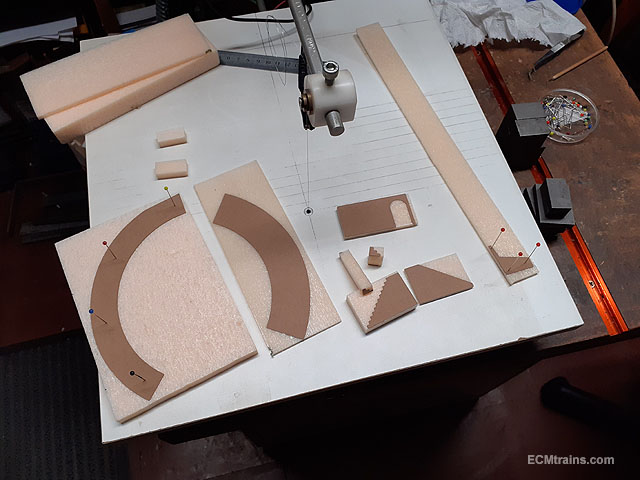
Back to the Martello Tower, just before Christmas the parts for the Seapoint tower diorama were set up and cut out of aeroboard and polyfoam;- These are the paper templates printed from the drawing, cut out and will be pinned to the foam to guide the hot wire cutter. The main parts cut and setup for a few photos. And with the tower on. Next is to add walls, steps, ramps, bathing shelter, and a few other bits of detail..... Eoin.
-
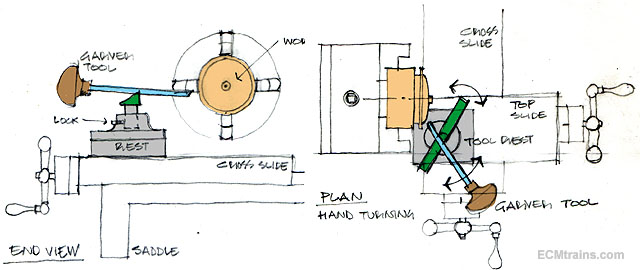
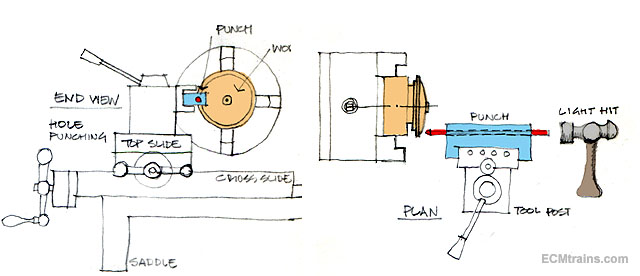
On my workbench thread @Galteemore asked about turning buffer housings and smokebox doors- I had thought about a thread on here about using machines for model building and about the machines themselves for anyone looking for info. So here we go;- First up Galteemore's request, there will be more about machines later as we go. Smokebox Door;- There is a few ways to do this, the two main ones are to spin a sheet of metal to form the door that way, or to turn it from a solid bar. Spinning a sheet of metal requires a former to be made out of hardwood first, which has the inside profile of the door, the former is mounted in the lathe chuck with the sheet of metal pressed up against it with the tailstock, its then 'spun' and a burnished tool is applied to the metal to push it into shape! This discussion will deal with the solid bar option. This option is simpler than spinning but is a more advanced lathe operation than most because of the curves to the door- 2 curves are generally required, a small radius curve at the outside edge with a larger curve across the door, some doors have compound curves. This is done by hand turning which requires additional tools. The round bar stock is mounted in the chuck with the minimum amount protruding for the part and a bit of safety from the chuck jaws, if the bar is the same size as the door a four jaw chuck is used and the bar has to be clocked to centre, if the bar diameter is larger than the door a three jaw chuck can be used as the bar will be turned down to size, then the part will be concentric. A four jaw chuck will hold the bar stock far better than the three jaw, very handy because we don't want the tailstock to be used as it will get in the way. Take light cuts and all should be OK. 1. Rough cut. The rough shape is cut to approx size, the cut to the rear of the door should allow for a flange to fit into the smokebox face plate, a parting tool is used to do this cut, just to the depth of the flange initially, allowing for the flange and the final parting cut. 2. Step Cuts to Curves. The front face is step cut to just over size of the final curves on the door to prepare for hand finishing. A flange is also cut on centre to a width n depth for the door handle detail. The centre hole is drilled to size- always use a centre drill to start a hole. 3. Hand Tool Curves. Hand turning is done with a Garver Tool held over a bar tool rest, the rest should be adjustable so that one can angle the tool to form the desired curve. Hand turning takes a bit of practice but once mastered any shape can be created, as long as its round! The other option is to use files to do the curves, ensure there is a handle on all files one uses on the lathe. The door handle flange could be ignored and a washer could be soldered or stuck on when the part is finished. 4. Parting Off. Use grades of emery paper or Scotchbright pads to finish the surface taking care not to loose the edges on the detail and then part off with a parting tool, ensure all slides and the saddle are locked when parting off, and if its a deep cut don't forget to allow for this in the initial setting up. Also don't forget to leave the flange on the back of the door! This is where the tailstock should be used but the centre hole is quite small, an adapter can be used to fit in the hole of the door and apply pressure on the handle flange with a revolving centre in the tailstock. Using a Garver Tool. Some chaps use a bar mounted in the toolpost as a rest, I have done this it works but I reckon the proper stand is better. Play with some aluminium bar stock to practice forming curves Hole setting out can be done before the part is parted off, a punch mounted in the tool post set on centre height can be employed to do this, the chuck is rotated by hand and the cross slide is used to locate where the centre pops are required. A handy device is a printed paper 360deg scale to fit around the chuck and a pointer mounted to indicate the deg of rotation. Tables are available in booklet form or on line to workout rotation. A long Hilti nail close fit in a block of mild steel makes a grand punch, just need to ensure one can get it on centre height. Garver tools, my paper 360deg strip and indicator. I do have an indexing tool but the paper strip is far quicker to set up and accurate enough for this kind of work. No workshop should be without this little booklet- threads, drill sizes, tolerance fit tables, PCD radial hole charts and log tables! Next well do the buffer housings....... Eoin
- 26 replies
-
- 3
-
-

-
- lathe work
- machines
- (and 1 more)
-
I had one of those- but it broke down and parts were not available! I decided to invest in other stuff Eoin @Galteemore What would interest you in seeing in a tutorial? Eoin.
-
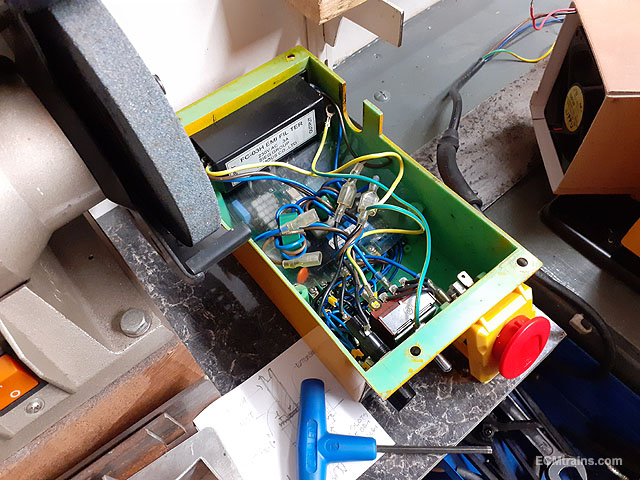
Not to leave youall hanging! Here is the progress on refitting the motor & fan on the Mini Lathe;- After making the cardboard template for the fan housing, it was scanned along with the existing motor housing and a drawing was prepared to cut the parts out in 1.5mm aluminium sheet. Parts being cut and scored - three sheets were needed for the parts. All cut out, cleaned up, fixing holes sized for self-tapper screws and ready to fold. Folding up. Folded and starting to assemble. This is a cover to screen the vent holes from swarf & coolant getting in as this end is under the chuck! All screwed up, joins sealed with silicone, test fitted, wire up the control box and run the new motor. It works..... I'm still waiting for the fan power supply and temperature control switch to arrive. Now that I know it works its time to silicone seal the new motor casing and control box to the lathe, once that's dry I can finish that wheel in the chuck...... Eoin
-
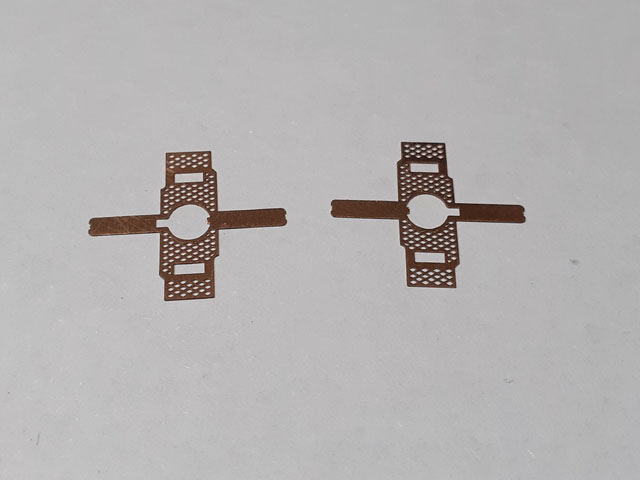
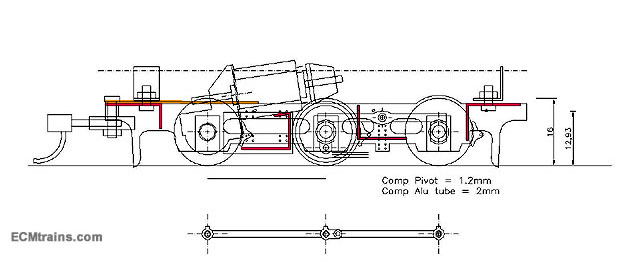
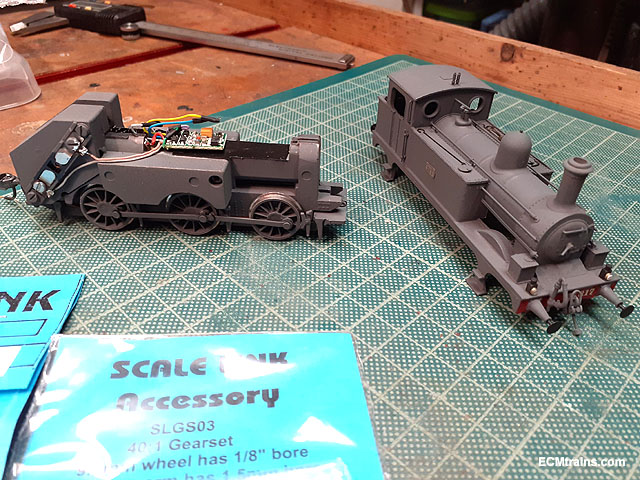
Here are a few graphics that show the make-up of the chassis in 3d;- The front wheel axle bearings go into the frame slots before the frame spacers are soldered in, there is a hole in the middle/front of the bearing tubes for oiling the axles. Eoin
-
@TimO Yes, you are correct on the dome hole drilling- I have drilled domes before without a guide and not getting it on centre makes the whole dome look off centre, so using a guide is now mandatory I'm slowly building up a collection of these guides for future use. On frame strength - if you look closely on the chassis side elevation you will see that there are four 90deg frame spacers planned (marked in red), also the one to hold the motor is actually a 'U' spacer on its side, allied with this there is a cab floor (marked in brown), and again the compensation beam on the front axles pivots on a tube which rotates on a brass .8mm pin soldered into each frame. I reckon its going to be quite strong, the first test build will let us know? And yes, the new chassis is being built as per the prototype with the front axles closer than the rear. Eoin.
-
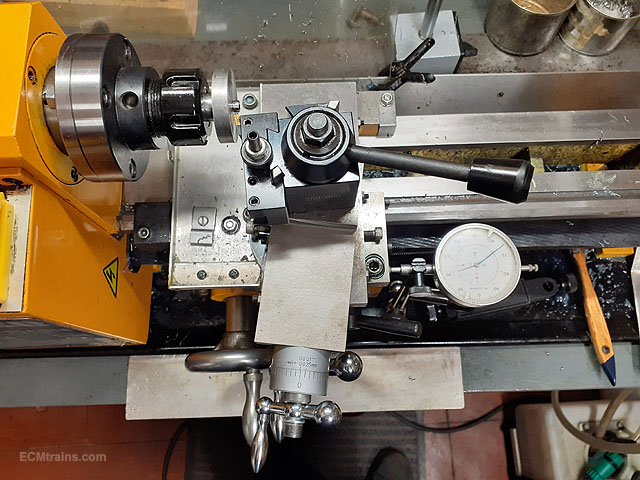
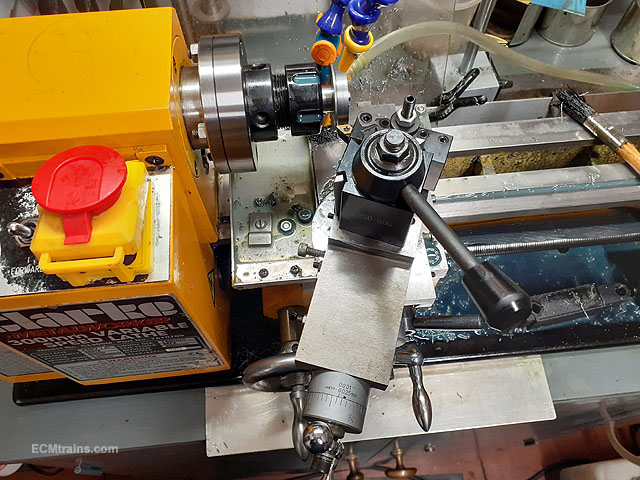
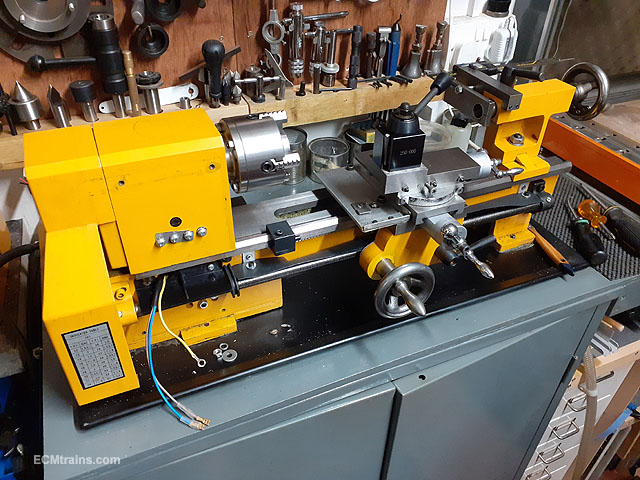
@Galteemore The lathe today, slightly dissembled with the front control box removed while installing the motor and fan modification. The new motor, waited 5 months for this. The guy I took the old motor to, to have it checked, advised me that although the motor has a fan inside it- an additional fan outside running full blast all the time would assist in cooling when the lathe is running slow, as the motors internal fan would not cool the windings at all at slow speed. This is the main problem with DC motors and is the most likely cause of failure. This is a mock up of the fan housing with cardboard to get the rough shape of things and make a template for cutting the parts from aluminium sheet. The motor is in behind the fan and has it's own cover which I will make a new one, not wanting to cut it up to keep the original. The control box. The fan housing is angled away from the chuck to protect it from swarf and coolant getting in. The fan will be controlled with a temperature switch. That part in the chuck has been there since the motor burn, not wanting to loose the setting as a taper bore was being cut in this blank for a Gauge G wheel. I will be able to finish this job now..... I have done quite a few mods to this machine over the years, it's not standard any-more and quite precise now. Eoin
-
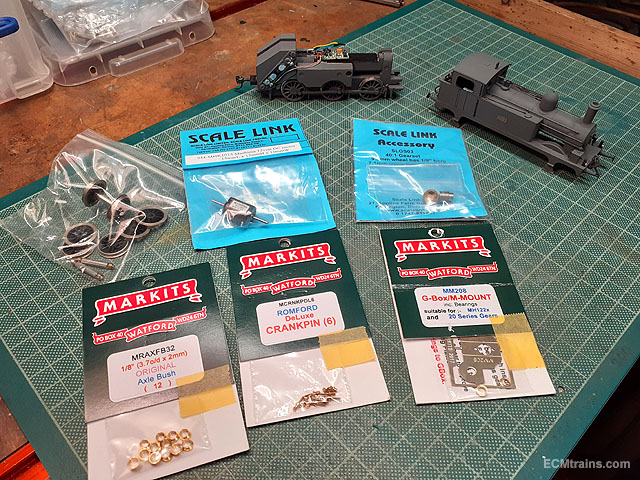
Westcorkrailway's post on converting the LNER J72 toJ26 reminded me of this current project, which has languished in the attic for the last five months while waiting for the new replacement motor for the mini lathe. When things happen they usually happen in 2's- with the death of Adobe Flash my CNC machine control software gave up also as it was dependant on Flash to run the graphics for the program! Thankfully the program designers brought out a new upgraded version in the new year that now runs. Also the motor for the lathe arrived yesterday and am currently installing it with a slight modification by adding a USB cooling fan! Hopefully this addition will protect the new motor from burning out like the last one....... Anyway- the J10 is back on the workbench for a chassis upgrade! The old Branchlines chassis works fine on the test loop track with a few pushes at first it finally gets up and running, when the motor warms up the loco runs fine, shunting, slow running and all. Though on the Greystones Layout which is an 'out and back' layout its not so great, warming it up is a problem and the awful Knock foam track underlay we used doesn't stay still, nor the track on the foam, due to the temperature changes in the layout room!! So last year at the railway company meeting it was decided that a new chassis would be fabricated, one with a Mashima motor and chassis compensation to the two front axles. The design work was completed last October but while in the queue for turning stuff the lathe motor burnt out and the project was put back. The chassis is also a test bed for future chassis- it's going to have full chassis width wheel bearing tubes that the axles will be threaded through. The tubes will have flats milled on their ends to slide in the chassis hornblocks to allow for compensation, ala Guy Williams design. The design of the chassis frames allows for frame holes like the prototype, frame spacers have been designed to strengthen the frames and allow this, also nickel silver will be used with it's added strength over brass . The first test cut and assembly will verify if this is possible, if not strong enough we will revert to solid frames. This is the setup drawing showing the main components, on the left are the axle bearing tubes with the x marking the flats, also the frame holes can be seen on the chassis side view. Motor, gearbox, wheels, and crankpins were sourced from Scale Link, it's the first time I'm going to try their own manufactured wheels with NS threads and Romford type axles. Once the lathe is up and running and the wheel bearings are turned the chassis cutting will commence....... there are a few other jobs in the queue first though! Eoin.
-
Fantastic, the loco chassis looks great, cant wait to see the boiler on. Eoin