murrayec
-
Posts
2,775 -
Joined
-
Last visited
-
Days Won
70
Content Type
Profiles
Forums
Events
Gallery
Blogs
Everything posted by murrayec
-

GSWR/GSR/CIE Six-Wheeled Coaches - ECMbuild in Gauge OO
murrayec replied to murrayec's topic in ECM Model Trains
Thanks George, I'm hoping an impression of the planking will show through the canvas! A lot of the tools I have are from the 1:1 scale and engineering projects, they work equally as well on the smaller stuff, like model trains- one cannot have enough tools...... Eoin -
GSWR/GSR/CIE Six-Wheeled Coaches - ECMbuild in Gauge OO
murrayec replied to murrayec's topic in ECM Model Trains
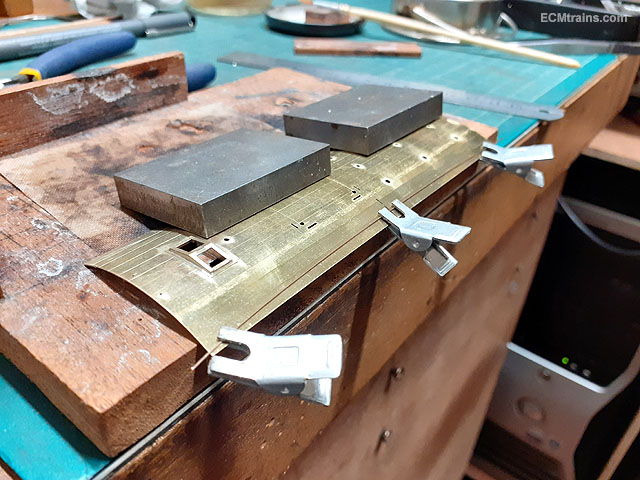
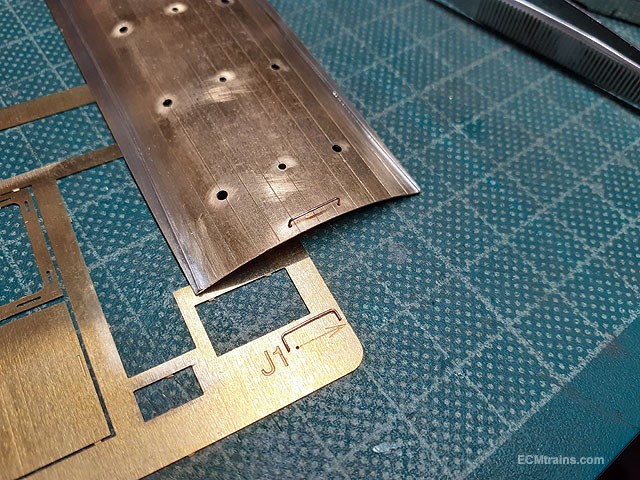
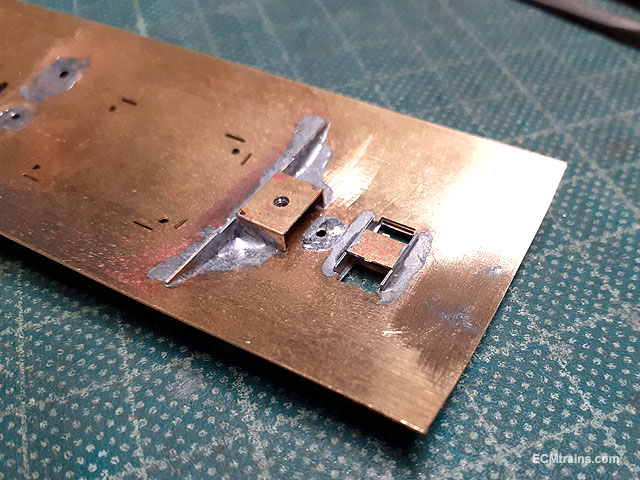
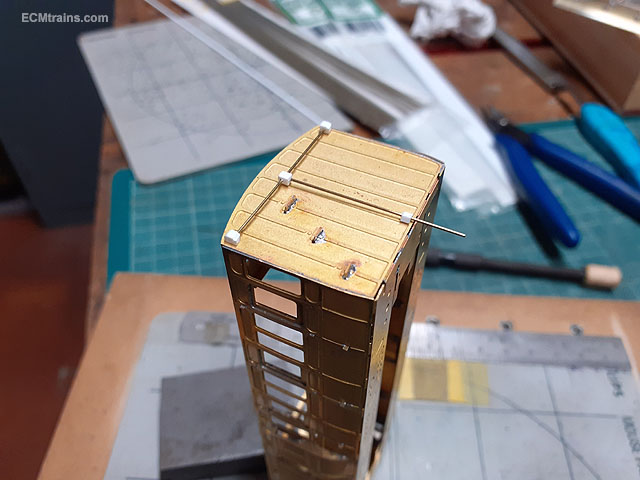
The other 3 kits have caught up with bodies n roofs together. Continuing on with roof details, again only showing the brake coach in the photos. It is actually the more complex roof than the other kits. Scribing roof planking with height gauge and angle block, all kit roofs were done at the same time to avoid repeat setting of the gauge! The brake area roof light was set up for soldering on, the roof light has a lower part to aid assembly and will be removed when it's complete. This trim piece to the rooflight opening will be soldered on by the solder wicking it's way under while soldering the main frame from the inside. Soldered in and needing a small bit of clean-up. The holes for the air vents and lights were pre-thinned with 180deg solder getting ready for 70deg lead soldering the white metal bits in. .35mm fb wire was setup for the roof rain strips, clamped in place ready for 145deg solder, using the lower melt solder to try and not over heat the wire, causing it to buckle and go out of shape. Tacked on in a few places ready to solder the whole. Both sides done. .35mm fb wire was bent up for the roof handrails using the jig J1 supplied on the fret of the kit. Held in place with a dinky clip and fingers! Then 180deg soldered on from the inside. The handrails ends and solder needs to be filed flush with the underside of the roof as these are right on the line of the body ends. The white metal lights and roof vents were cleaned up and sized to fit. These will be soldered with 70deg lead solder. First on are the lights and the gas supply pipes, the pipes were done with .35mm fp wire and 180 deg solder. The parts were soldered with tracing paper under to avoid soldering to the roof. Not sure yet how this pipe will be fixed on later after painting, also the roof edge detail where the pipe turns down the end of the coach?? The air vents were then soldered on. Setting up parts for the passenger emergency stop- .5mm brass wire and 1.5x1.5mm styrene. Test fitting and sizing the dropper. As usual another 3 times to go........ Eoin.
- 68 replies
-
- 14
-

-

-
Not knowing the plan of your layout! but you should consider access height between the levels? should something de-rail on the lower deck one needs to be able to get in at it! maybe you have a plan for this...... Eoin
-
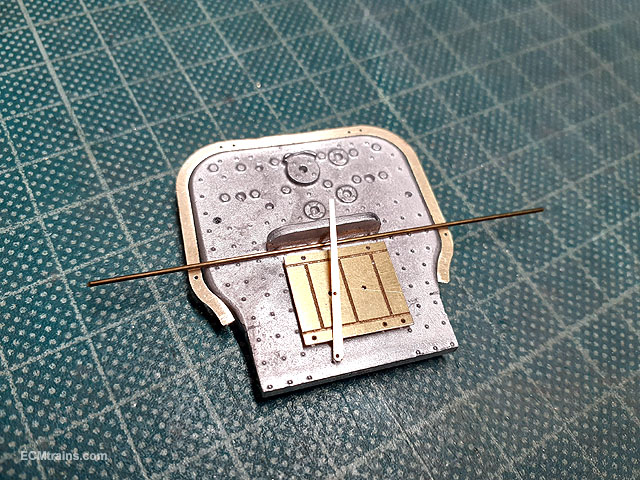
The hinges for the fall plate, done with .35mm fb wire- one side bent in a 'U' the other bent in a 'U' with a twist and then 180deg soldered to the copper board. Pipes bent up and ready to be epoxied on to the backhead- .5mm & 1mm soft copper wire that came with the Slaters kit. The steam brake system which is a brass casting designed for the right-hand side had its pipe sawn off to rotate it for the left-hand side mounting. The reverser handwheel mounting bracket and the fireman side sanding valve bracket were soldered onto the splashers. Backhead and cab stuff complete except for the gauges, a few more handwheels and painting of course. Eoin.
-
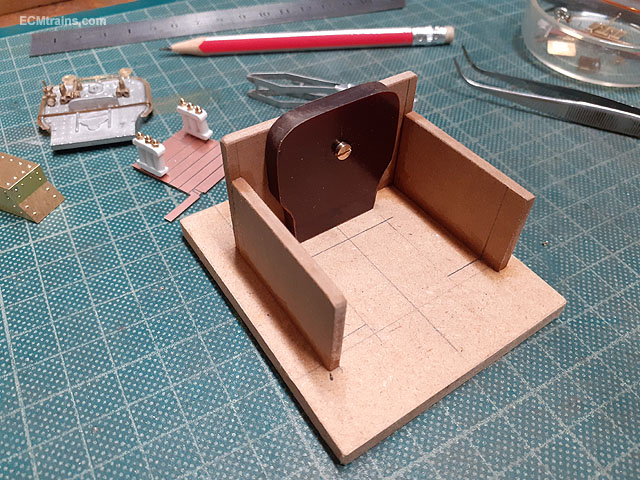
Yes, things were driving me nuts this morning- trying to hold everything within the model cab to mark and take measurements was so difficult, so I spent an hour setting up the jig! I reckon an hour well spent....... Eoin
-
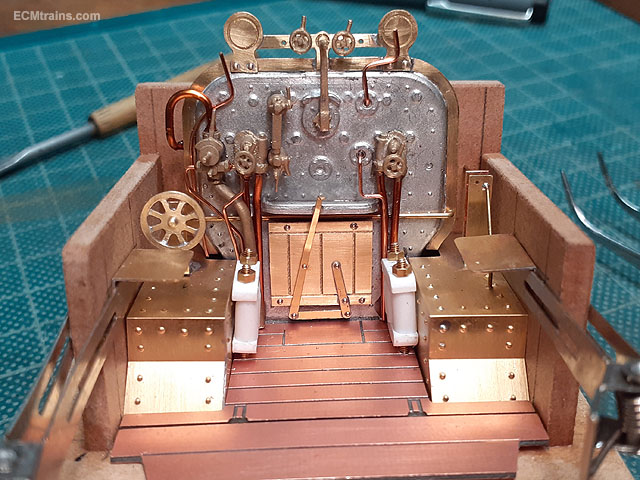
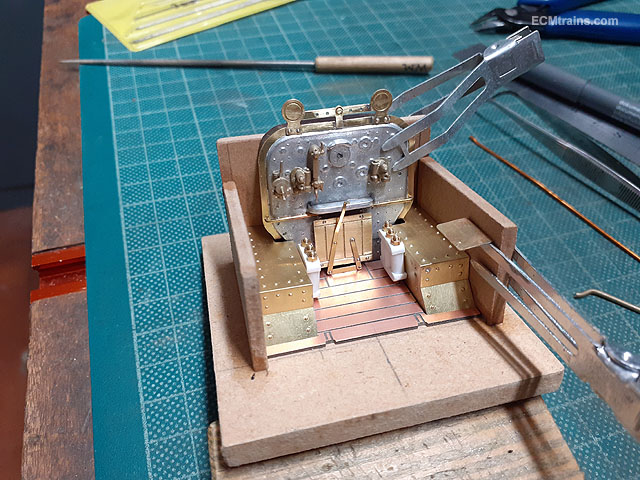
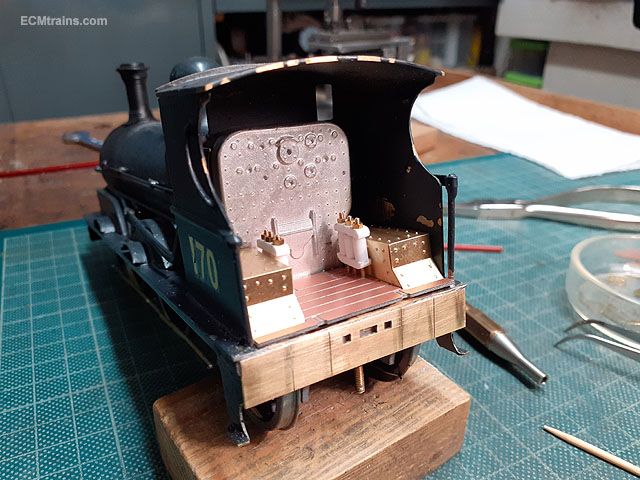
All the bits 180deg soldered and needing the rivets to be trimmed off. The fire hole door handle had a piece of tracing paper fitted so that if the solder wicked through from the back the handle would not get stuck on and could be bent up to miss the teapot shelf! The back of the boiler band was thinned with 180deg solder in readiness to 70deg lead solder it to the backhead. And soldered on. Next was time to fit some of the backhead fittings to set up the pipework, the parts were pierced from the sprew as these are cast brass and cutting them off with a snips can distort the bits. The holes were drilled out in the backhead- sized so that the parts are a push fit so that they will stay put while setting up. A .7mm brass wire was installed across the casting which will be soldered to the boiler frame at the sides rear. There is only one boiler water level fitting in the Slaters kit- so 170 must have had an accident and its second fittings is in the shop being repaired! While proceeding to set up the pipework and to fit some of the parts to the cab splashers- which is rather difficult to do in the model cab with everything loose and a roof in the way, so I made a jig out of mdf to hold all the bits which will make this task easier and will be able to get things more accurate. The axle springs have been lowered and one of the cab seats is clamped onto the side so that the fittings to be soldered to the splashers can be assessed. Position of the firebox door can now be determined and stuck on with epoxy and then the pipes can be done. Eoin
-
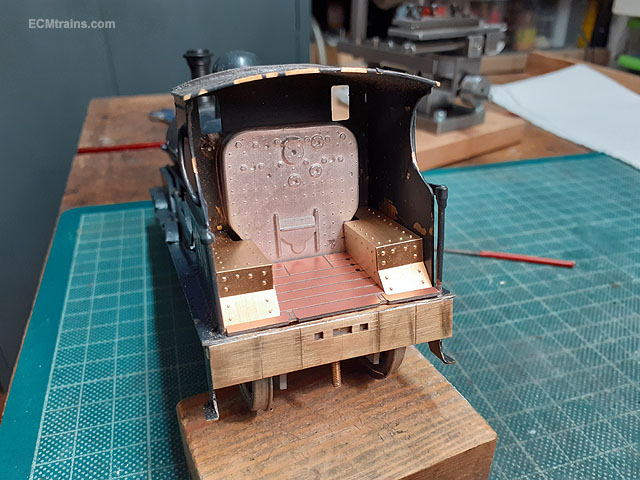
Cab bits cleaned up, I added the rear axle springs, left bottom, into the mix as they are so dominant in the prototype cab photos! The springs are done with 3.2mm styrene tube and 3.2 x 2mm styrene rod for the frames, all bolted together with 14BA bars n nuts- these should be 16BA but I don't have any long enough. The tool in centre of the photo is for processing the BA screws, it has tapped holes from 16BA up to 7BA in steps of 2 until 8BA, the screw being cut is threaded in and locked with a nut, the screw is then cut to size, and the tool is now the holder to dress the end of the screw threads with a file. A 5mm Tufnol spacer was cut out to pack out the backhead. With the splasher riveting done and folded up, it's time to test fit and see what requires adjustment, the floor plate needs a bit of adjustment but it looks like it's all going to work. The springs in- standing a bit high and going to need a little adjustment. The backhead packer was drilled and tapped 8BA for screw fixing into the cab and a hole drilled in the cab front to receive it. The Slaters casting will be epoxied to the packer when assembled. Setting up for soldering the brass parts, .5mm brass domed rivets will be used to fix the gauge mountings to the backhead frame, also used to make up the fire hole door and levers. The teapot shelf now needs to be soldered on to the backhead with 70deg lead solder so that the fire hole door operating lever can be sized for bending. Shelf on and parts being sized up. Eoin.
-
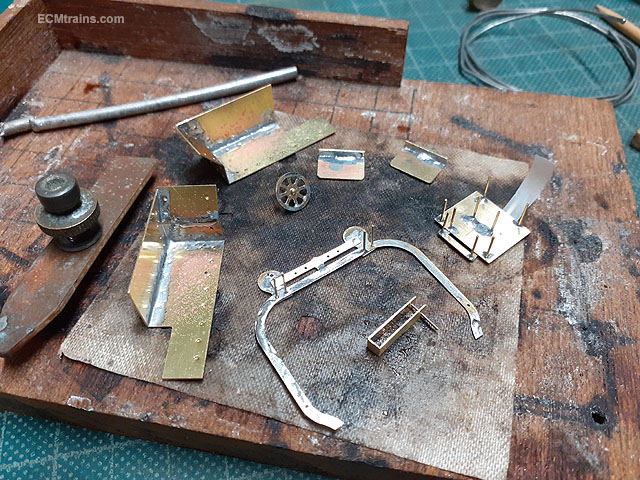
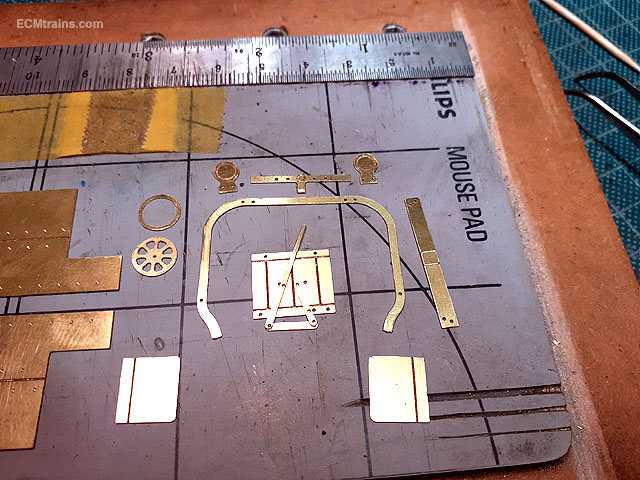
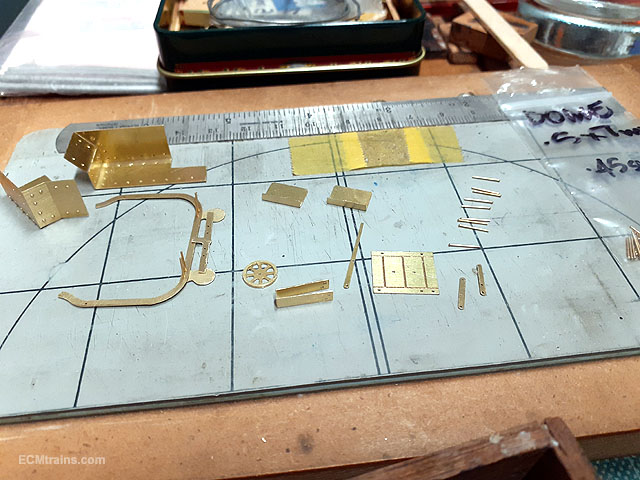
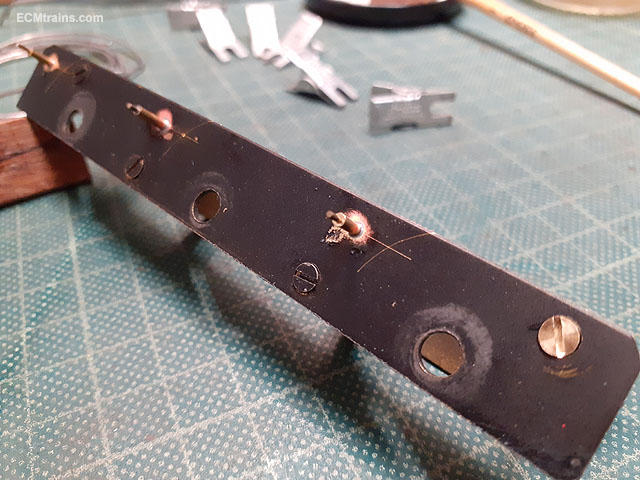
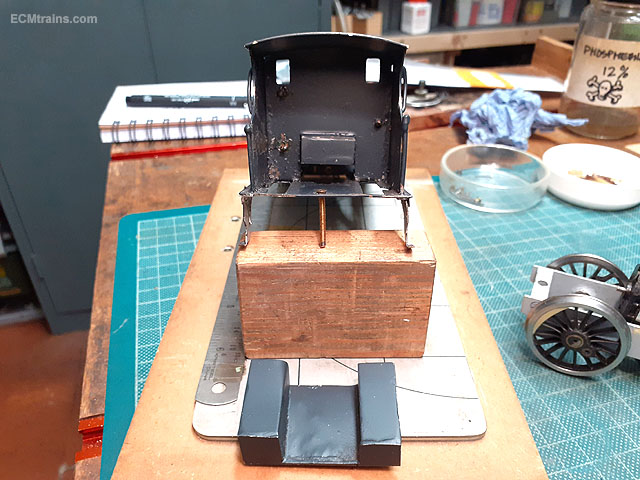
While sizing up the Slaters back-head I was reminded that that rear chassis mounting screw was way off centre and so was the boiler! So I set about straightening things up- the boiler was fixed to the smoke-box with two screws into a captive yoke! inside, all the holes were off centre in the smokebox but the chassis holes were very close. After jigging about with pushing the boiler I had to come to a compromise- pushing the boiler to centre would twist the cab and the running plate- I settled for the mid position! At least I could straighten up the left side sandbox which was at an awful angle! Once held in position I soldered the running plate to the smokebox rear, soldered in a BA chassis mounting screw with a washer to reinforce the join, and also soldered the top of the sandboxes to the smokebox sides from underneath it's not straight but a lot better. The rear chassis mounting screw hole was dragged back to centre with a round file. With the hole done I set up a drag beam from .5mm brass with some scoring and a few holes like the prototype. A BA screw, a washer, and a bit of brass tube to fit the hole in the chassis frame spacer was clamped to the footplate and then soldered on. Then the drag beam was soldered in. Now a better chance in getting things lined up. So back to the cab details - after playing with the backhead and looking at the prototype cab I decided to make a few more parts, the Slaters kit has different gauges, reverser hand wheel and fire box hole door! So I set up another drawing to cut out some parts- a backhead frame with gauge mountings, a top steam manifold, a prototypical fire hole door, a fireman side valve bracket (I think its the sander control?), some seats, splashers, reverser wheel, all cut from .35mm brass sheet. Also a cab floor and fall plate in .8mm PCB board. More bits to clean up....... Eoin
-
I reckon Bulleid was on the right track to developing efficient steam locos regardless of the type of fuel, but senior railway management and prominent engineers of the day stifled his endeavours! Engineers like LD Porta of Argentina, David Wardale of UK/South Africa/China, Alan J Haigh of UK, to name a few, have developed record braking locomotives using steam under all types of fuel. The main difference to their designs was to eliminate the 'old engineering designs' that the locomotives engineers used in the past and develop new ideas which were not well accepted, and still not- but they have proved that steam as an efficient power system for locos can go on! Some of Porta's steam engines still run today in Argentina's mountains, David Wardale's locos also run in SF and China, his 'Red Devil' in SA has been recently restored and is running well. And AJ Haigh's design for an efficient Hunslet steam loco on the Welsh Highland Heritage Railway has broken that railway's record for efficient running. If only Bulleid had continued with CC1 .........!! Eoin.
-
Bachmann N Class - How to Irish-ize Without Respraying or Weathering?
murrayec replied to DJ Dangerous's question in Questions & Answers
You could have the grey one off to the side with some chaps up ladders n buckets of green paint in hand!! Eoin -
@Hod Carrier According to Mr Shepherd's book- 'Click submitted a report to Bulleid at the end of the trials with the proviso that the report was premature as serious testing had not been carried out yet, he went on to say that the results of the first testing were satisfactory and some mods could be done to improve the loco'...... as you say diesel was coming in, Bulleid was leaving and senior management saw 'lucrative opportunities' buying into the diesel system so the project was mothballed and then later scrapped. Mark 1's are pretty close, we did not have them here, though that you have the design done, it looks great- I'd go with that Eoin
-
Bachmann N Class - How to Irish-ize Without Respraying or Weathering?
murrayec replied to DJ Dangerous's question in Questions & Answers
A dab of T-Cut on a cotton bud, allow the T-cut some time while gently rubbing at the edges of the transfer, it will eventually start to fall apart, remove the loose stuff don't swirl it around and then continue with more T-Cut. Look out as you go to make sure you don't remove the green- if that's paint! The T-Cut will leave a nice shiny finish for the new decals and then spray with a satin lacquer to seal. Eau-De-Nill for the snail and possibly the same for the number- or it could have been yellow or white. JHB will know. Snail Decals are available from Railteck or Studio Scale Models. The locos were black or green- JHB should know the loco numbers and a green reference Eoin -
@David Holman and you thought you were done buying the lathe! lathes cant work without the tooling- lots of tooling! more money that one spends on the lathe! I can recommend a few books;- The Amateur's Workshop by Ian Bradley ISBN 085242 4825. It's an old book but still available, it covers all tools in the workshop and how to use them, sharpen them and more, it has a small section on running a lathe, but is a great reference bible for the workshop covering things like 'blank end arbor, with morse taper' Metal Turning Lathes by ET Westbury ISBN 0852427840 Again an old one but a great introduction to lathes and using them- not sure if still available. The Amateur's Lathe by LH Sparey ISBN 085242 2881 Another old one but like Bradley's is a workshop lathe bible, again this one is still available. Eoin
-
You've built an excellent looking model, you cant quit now- do build the laminates, it will be a superb train and a first in Lego. I look forward to seeing more.... Eoin
-
@Hod Carrier The turf burner only lasted for it's trials, so any of the coaching used in the trials is applicable. The sides were handed so it looks like only one side was photographed but both were! More Info here;- Eoin
-
Bing Live Steam Loco Gauge O - Repair & Restoration
murrayec replied to murrayec's topic in ECM Model Trains
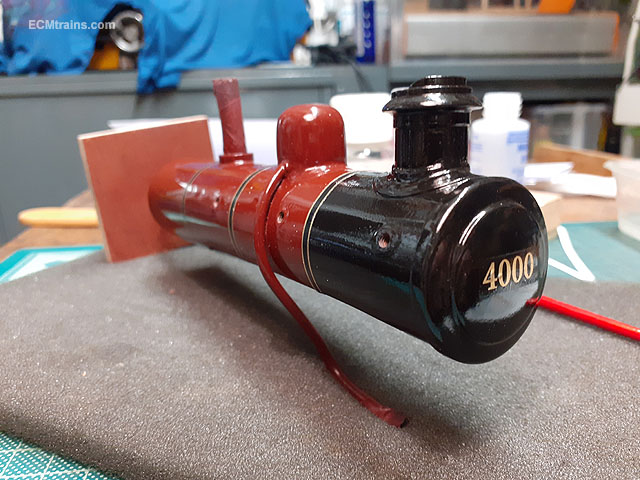
Yes, it's looking good, the photos are showing it up as more red than brown- it's the lighting in the workshop and the camera! I must play with the settings on the camera..... but I only remember after I post up photos!! Eoin -
Bing Live Steam Loco Gauge O - Repair & Restoration
murrayec replied to murrayec's topic in ECM Model Trains
After my second attempt to create the lining myself, which again ended up a mess, I gave up time wasting- drew up the lining artwork and got SSM to print out a sheet of decals in black & gold. So over Christmas the lining was done..... Decal sheets just after receiving a coat of lacquer. The buffer beam getting a coat of gloss red. The boiler bands and loco number on the smoke box door were done first. Loco body on the way. And completed. A few small gloss black touch ups are required on the cab edges and on the gold lining to trim the corners, then a final coat of lacquer and we're sticking it together.... The final job is the boiler handrails, I have to turn a handrail knob but unfortunately my lathe is still not operational, though the new replacement motor arrived from China into the UK last week so I expect it by courier very soon! Eoin.
- 24 replies
-
- 6
-
-
-
- bing live steam
- bing gauge o
- (and 1 more)
-
I found this link on RMW after a search in Google, this guy gives a discussion on that controller, the workings of a motor related to controllers and other controllers he's played with;- http://www.scottpages.net/ReviewOfControllers.html There are others if you do a search 'Duette-style AC transformers and modern motors' on Google Eoin
-
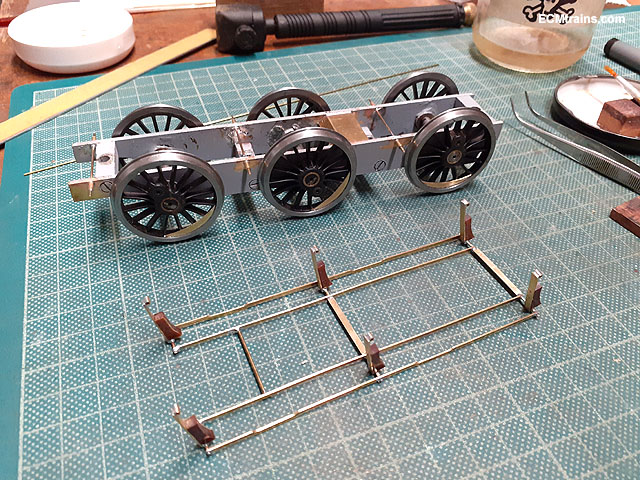
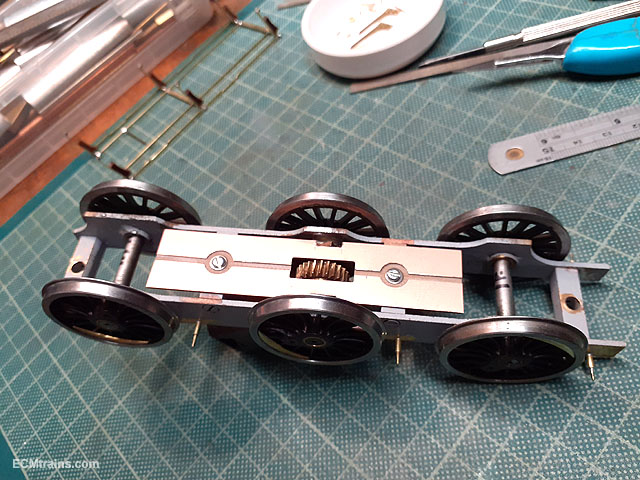
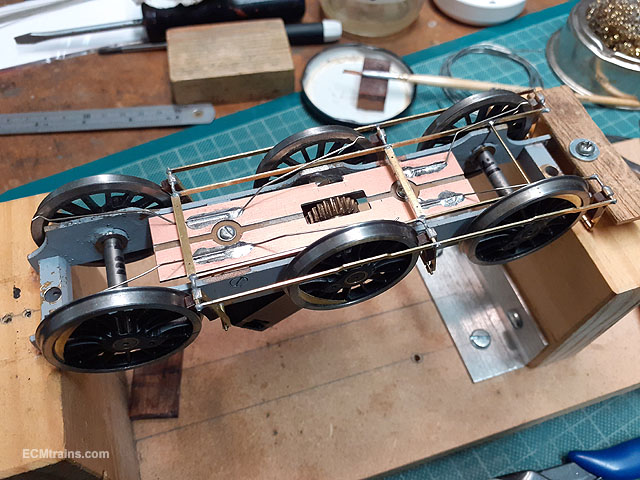
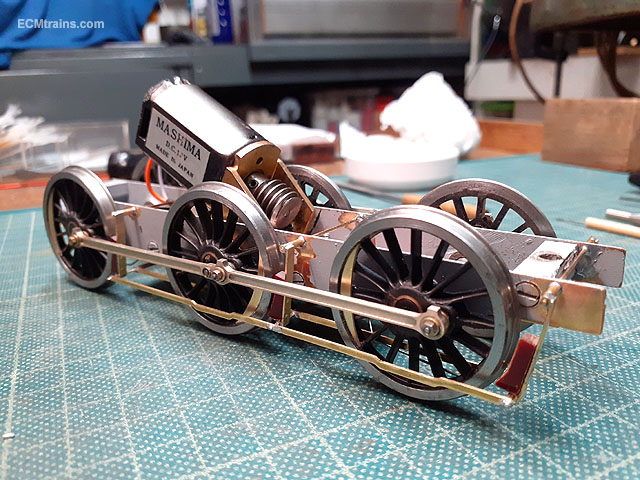
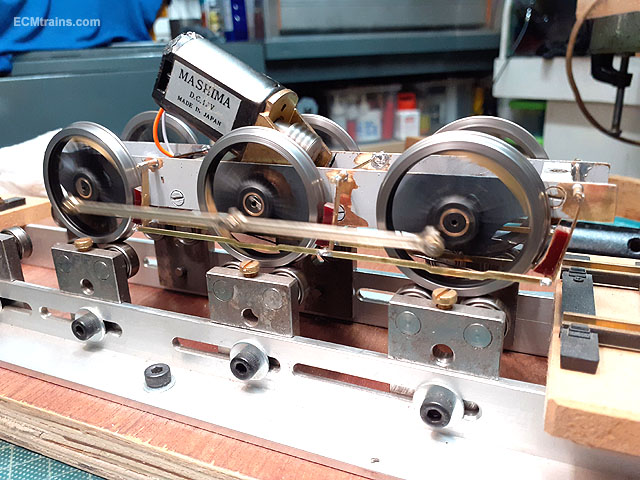
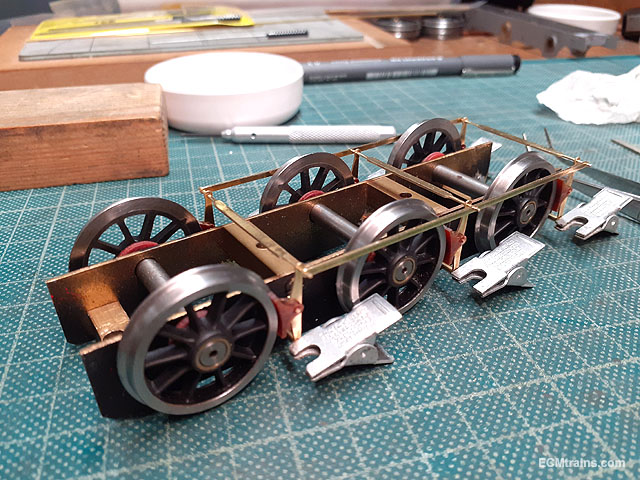
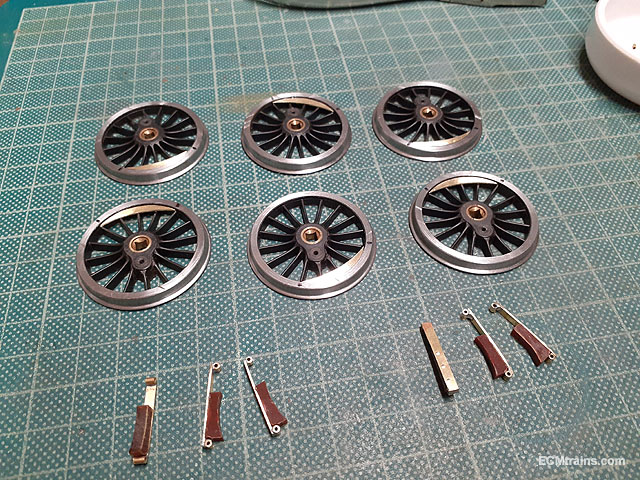
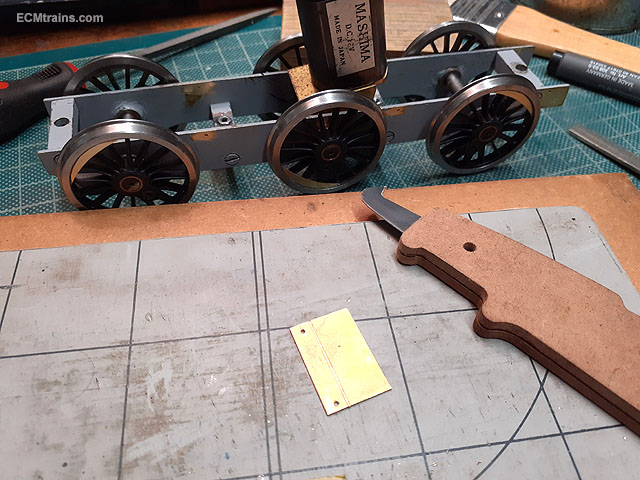
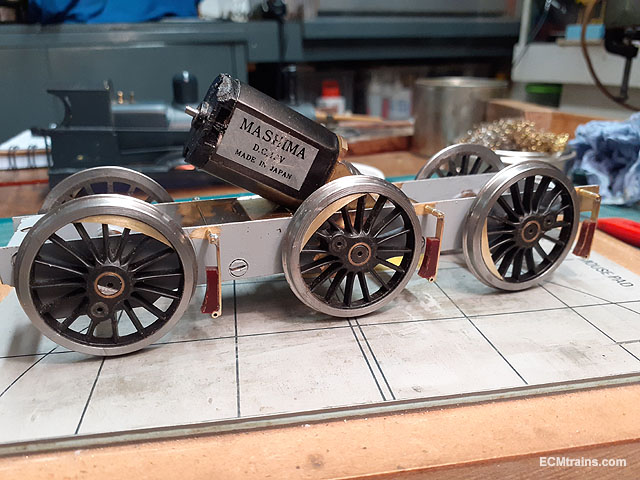
Ready for soldering the brakes on the loco chassis. Soldered with 145 deg solder hoping not to de-solder the tubes on the hangers- worked well! Brakes removed. Installing the motor and gearbox- a flat was milled on the axle for the gearwheel grub screw. A brass tube spacer was made to space the gear wheel on centre of the motor, a .45mm brass washers installed between the gearbox frame and axle bearings both sides to hold the whole assembly on centre of the chassis. Test fitting of the front guard irons to see if they need any mods, they fit fine, just need a few bends to line up with the wheels. These will be soldered on later. The electrical pickup plate was fitted to the chassis frame spacers with M2 screws. With the brakes back on, .4mm NS wire pickups were bent up and soldered onto the plate. After soldering, the wires were adjusted, a little bend was formed on the ends to rub the back of the wheel threads. Wired up and coupled up- some adjustments were done to the brake hangers and 12BA washers installed behind the crankpin bearings to make clearance so the coupling rods don't foul the brakes when running. The front and back axles have about 3mm side play. And up n running. A few wobbly wheels will have to be looked at! Checking the chassis fits the loco body- one wheel flange slightly rubs a splasher! a bit of packing between the chassis and body should sort that out. Thats the two chassis complete, they will be stripped down for a spot of painting. The new backhead will be next...... Eoin
-
Nicely done - it's looking great. I'm tempted to go at one of these myself- but a few other things to finish first! Eoin
-
There are drawings in the new book 'Locomotives of the Great Southern & Western Railway', a dimensioned drawing with plan, front and rear- even a longitudinal cross section and a lovely pen rendering of Class 45 Eoin
-
That sounds like the motor is free running as in the gears or drive shafts are slipping! I agree with PJR, return to sender! Eoin
-
As thumper says it might be mechanical- it's hard to tell from short file you uploaded! maybe trying a small dab of oil on the axles or if your up to it have a look inside the bogie under plate to see if its oiled inside or notice anything else? Eoin
-
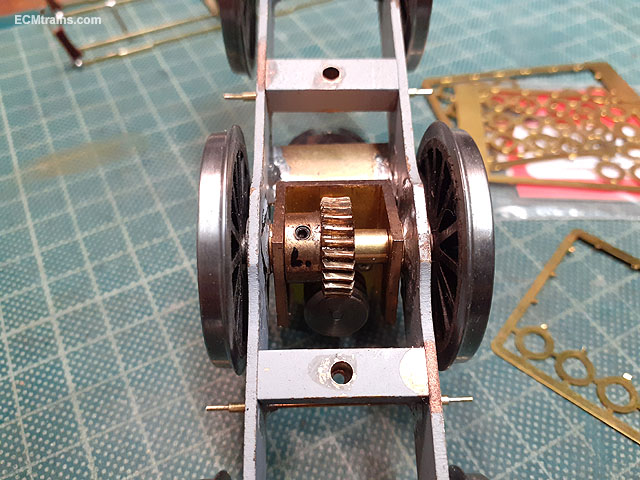
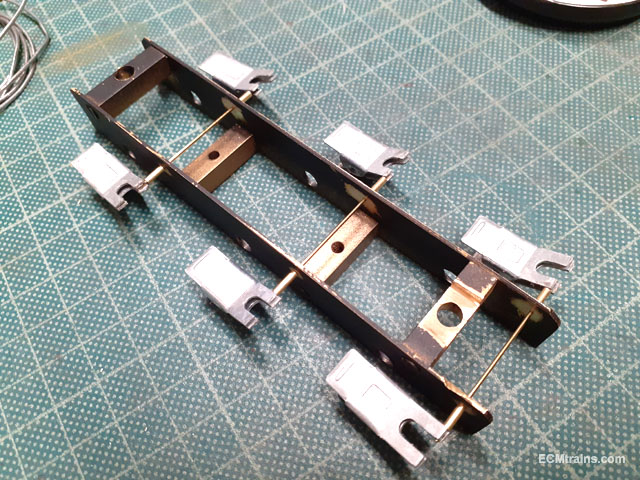
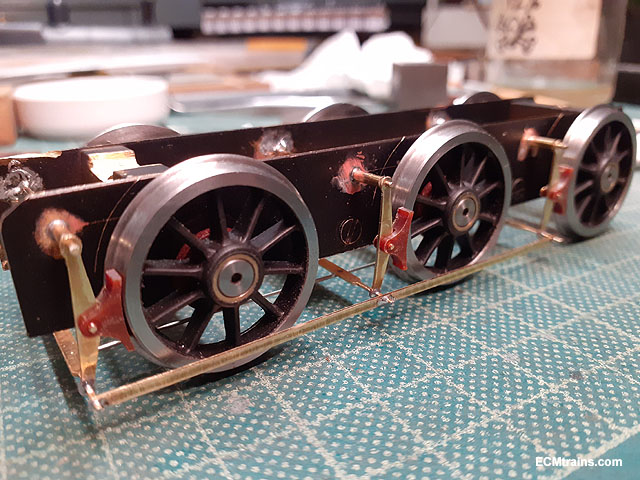
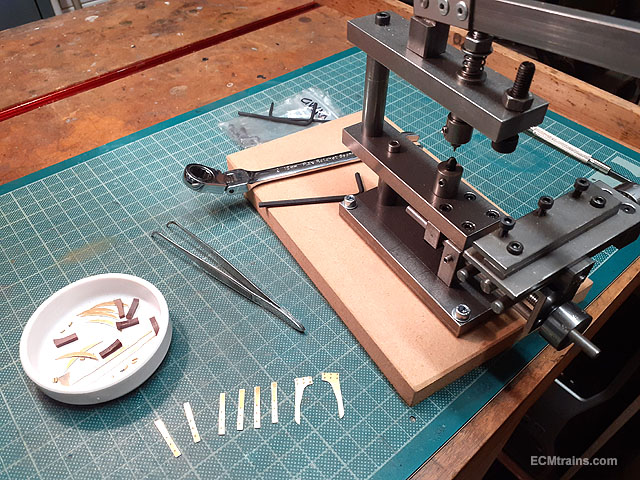
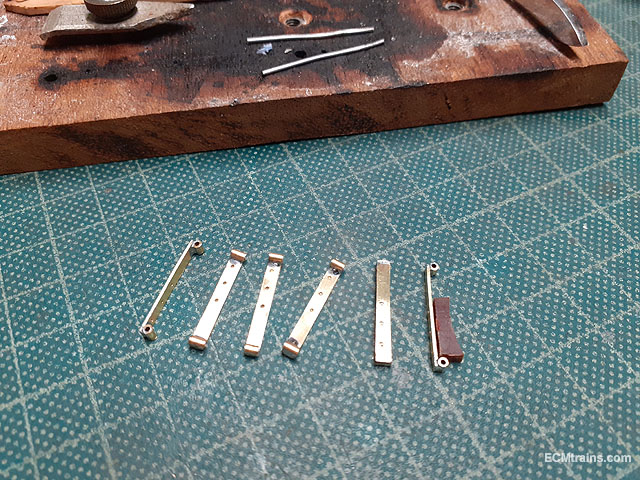
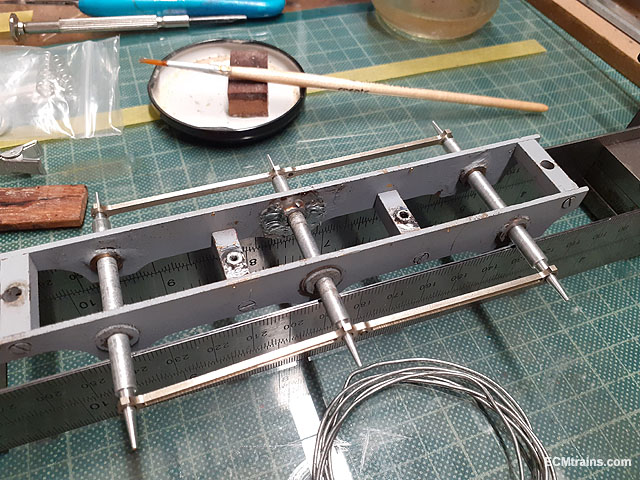
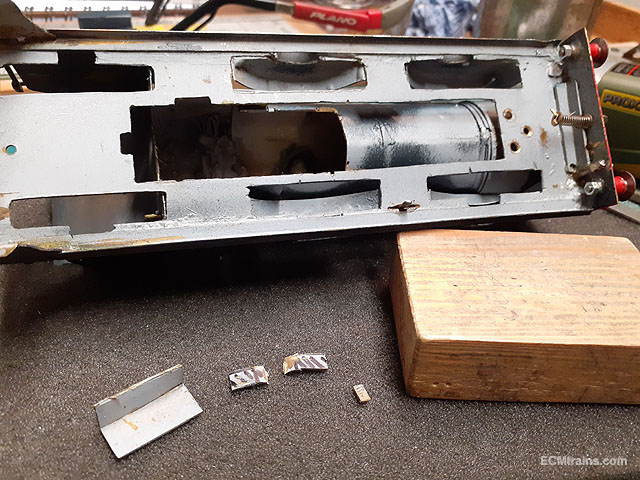
Tender brakes were next, 40mm long x .8mm brass wires with a 6mm .8mm id tubes where soldered into the chassis frames to make the brake hanger spigots. The dinky clips are there to hold the assembly in place while soldering. Soldered on the inside with the iron held there until the solder wicks through and forms a silver seam around the tube- one then knows the tube is soldered on. Brake assembly fitted to spigots, rods fitted and again dinky clips to hold in place while rods are soldered. Done. The hangers are not soldered to the spigots so the brakes can be removed. Next was the riveting to the loco brake hangers and guard irons. Here is a tip for this riveting press- a piece of 12/16'' fish tank tube pushed over the handle which makes the riveting process a bit more comfortable. With the rivets done its time to solder 2.5mm long x .8mm id brass tubes to the top n bottom of the hangers, jigged up with .8mm aluminium wires drilled into the hardwood base. Done, requiring a bit of clean-up and adjustment of the Tufnol brake blocks to fit. Wheel weights epoxied, brake blocks epoxied. Time to fix that loose wheel bearing, the chassis was jigged up with the coupling rods just in case it may go off-line when being soldered. Soldered on the inside and again the iron held there until the solder wicks through to the outside. M2 nuts were also soldered to the frame spacers to take the fixings for the electrical pick-up plate underneath. Next is the mounting of the motor- as originally built the motor was laid flat and stuck into the cab, with our new backhead the motor will now be mounted up at and angle to clear the backhead space. Once the angle was determined the gears were fouling the boiler so some cutting was required here- hatched in pen on the boiler. A motor cover plate was originally installed in the cab- so this was cut out at the same time. Done. A motor support plate was made up with .5mm brass sheet to hold the motor up at the angle, two holes were drilled in it to tie the motor in place with wire strap and then scored to fold the plate. Plate folded and soldered in position between the frames. Test fitting the brake parts, again 40mm long x .8mm brass wire and 4mm long x .8mm id brass tube was used for the support spigots. Done for now..... Eoin.
-
@David Holman Loco is looking great, as you mentioned about the chuck key- the best habit to adopt on this is- always remove the key as you remove your hand from it, never leave it in the chuck. Also just a mention on using files in a lathe (you probably know this)- ensure the file has a handle installed, most lathe users frown on the use of files, last thing one wants to do is stab themselves in the hand if the file should shoot backwards. Eoin