murrayec
-
Posts
2,763 -
Joined
-
Last visited
-
Days Won
70
Content Type
Profiles
Forums
Events
Gallery
Blogs
Everything posted by murrayec
-
The 'sleeper' stones and chairs are set in the ground outside & across from the Cultra building entrance, no track though.... Eoin
-

GSWR/GSR/CIE Six-Wheeled Coaches - ECMbuild in Gauge OO
murrayec replied to murrayec's topic in ECM Model Trains
I got to get a few of those.... Eoin
-
Wrennie, your on a roll this morning.... Eoin
-
GSWR/GSR/CIE Six-Wheeled Coaches - ECMbuild in Gauge OO
murrayec replied to murrayec's topic in ECM Model Trains
@Midland Man As far as I know SSM only do 4mm 6 wheelers;- http://www.studio-scale-models.com/Coaches.shtml Worsley Works do 7mm but not full kits, these are scratch aids and require a lot more working out and not always available;- http://www.worsleyworks.co.uk/7mm/7mm_Irish_Standard_Gauge.htm Alphagraphix do 7mm 6 wheelers, not sure if the do Irish ones, I have a few of their UK brass coach kits which are very nice- worth contacting them to see what they have, they advertise in Railway Modeller and you have to contact them that way- no website. Eoin -
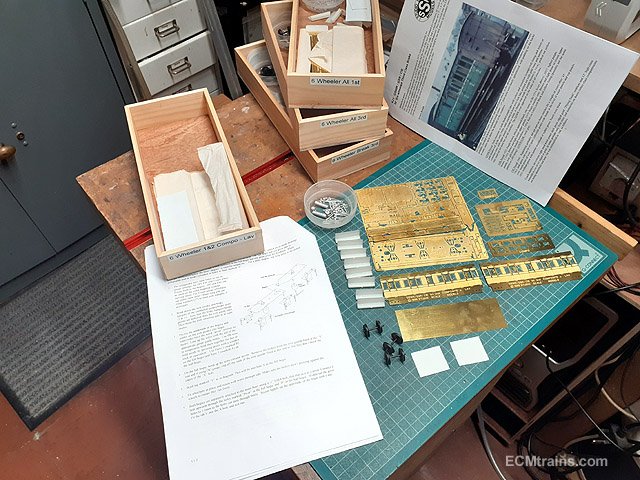
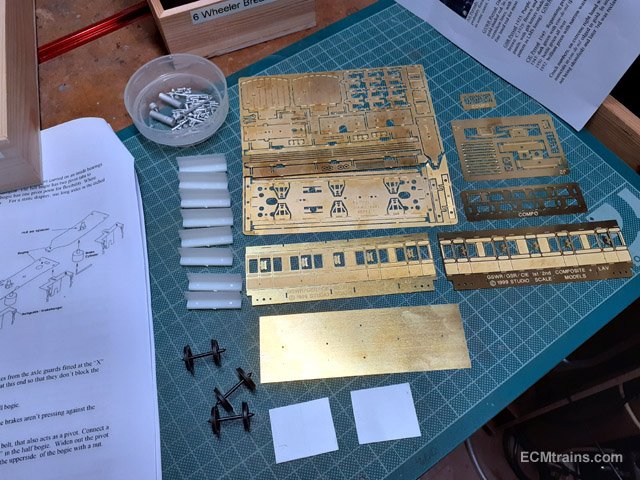
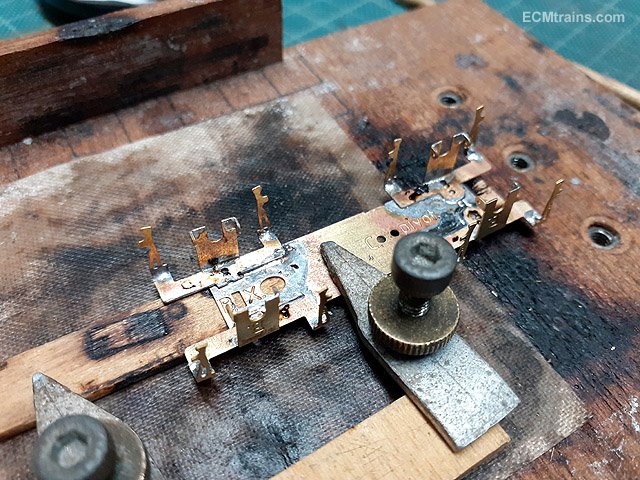
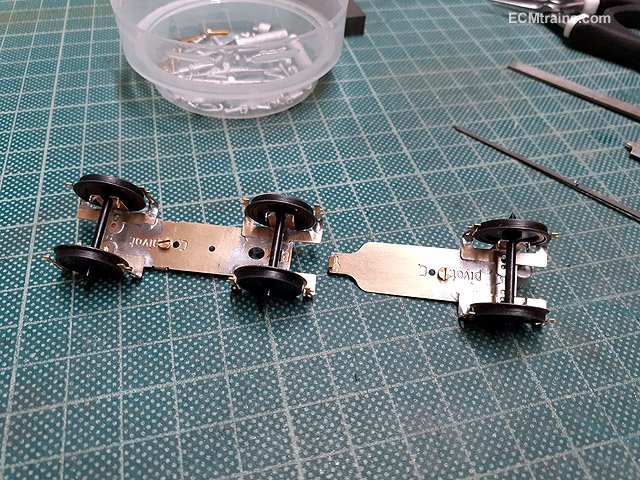
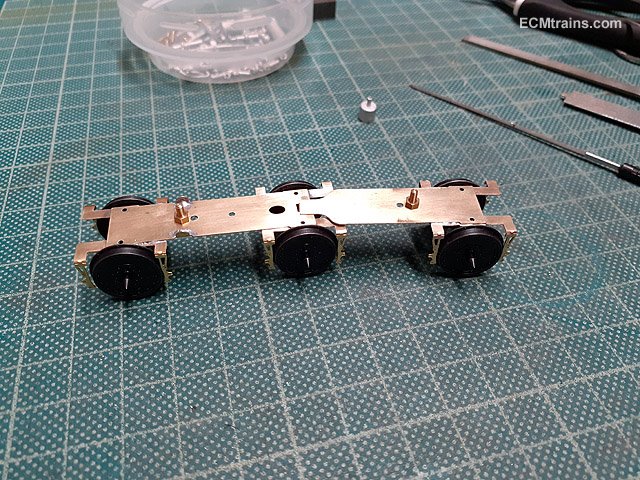
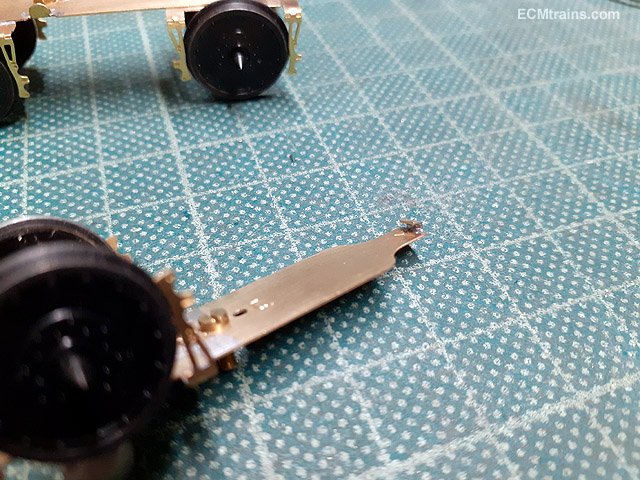
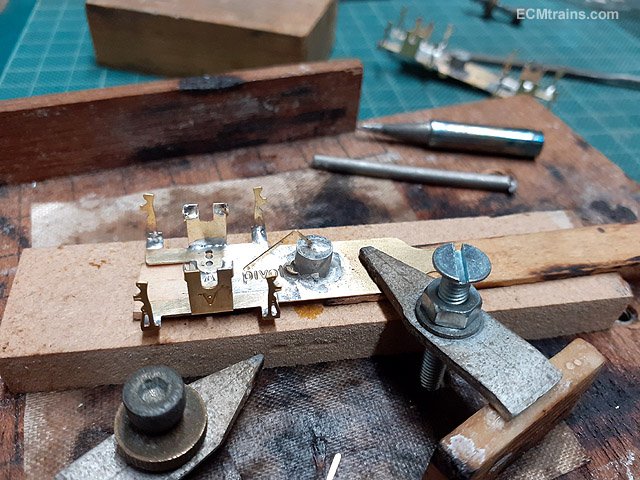
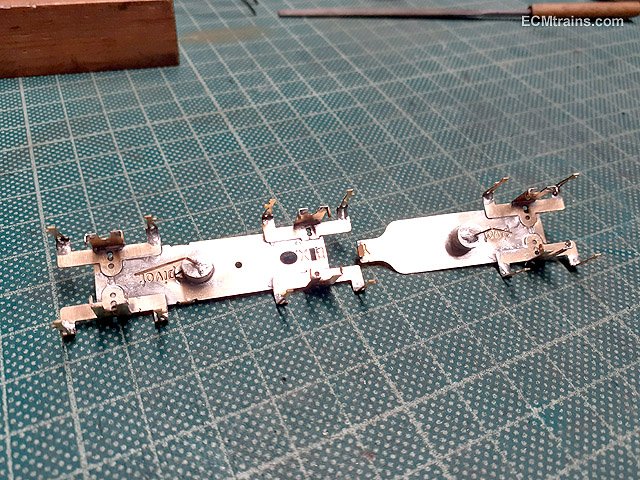
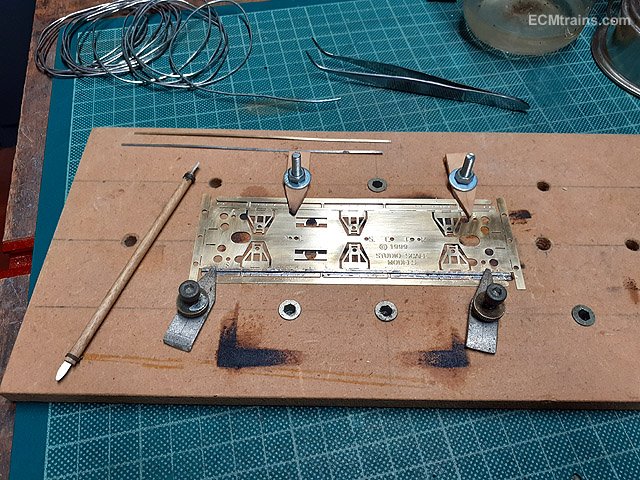
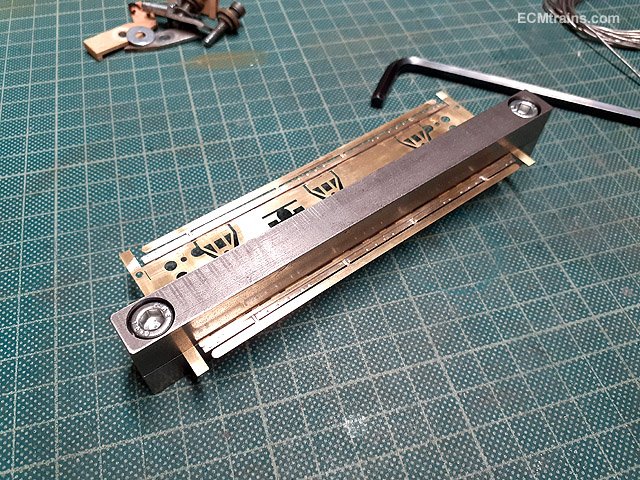
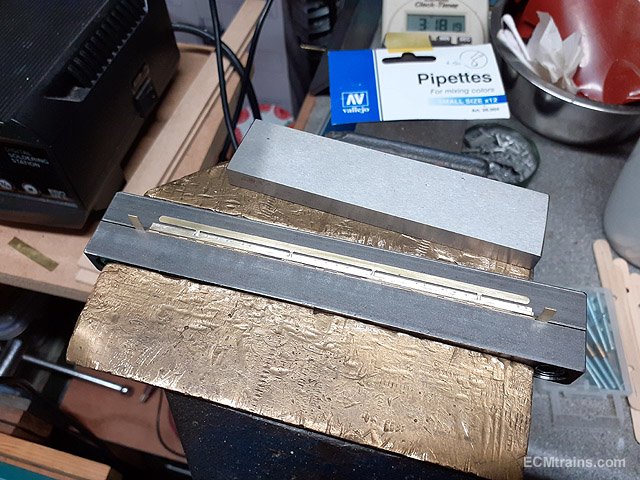
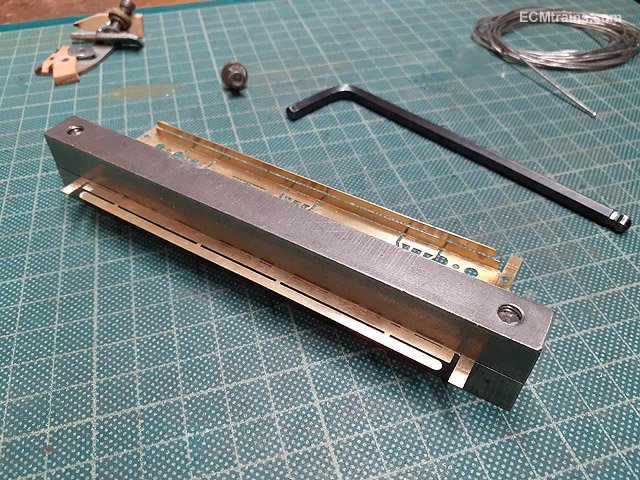
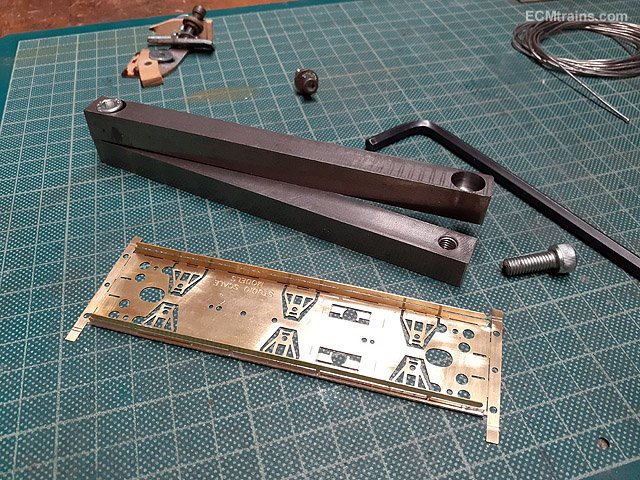
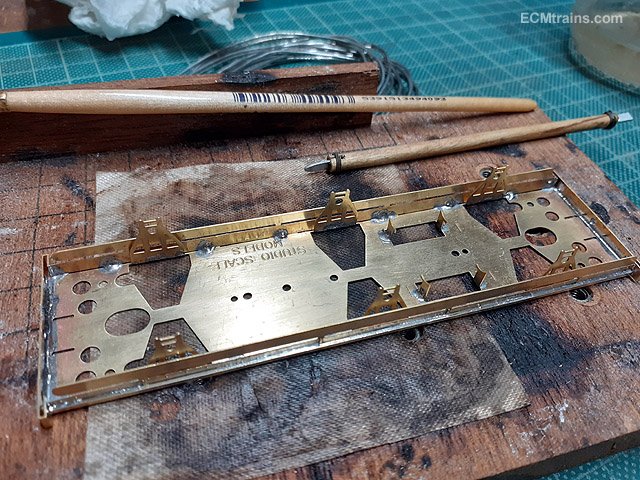
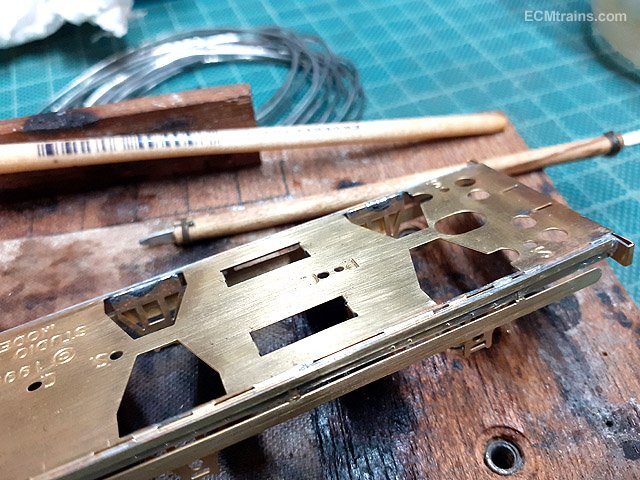
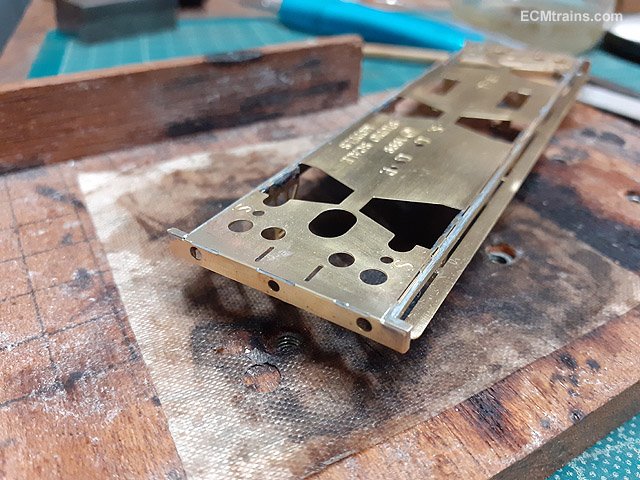
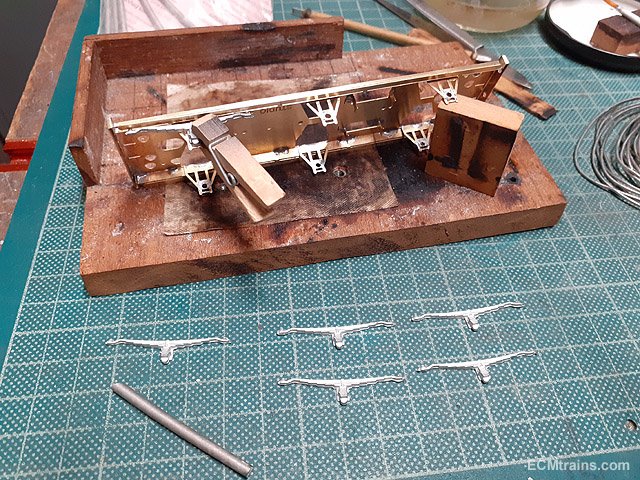
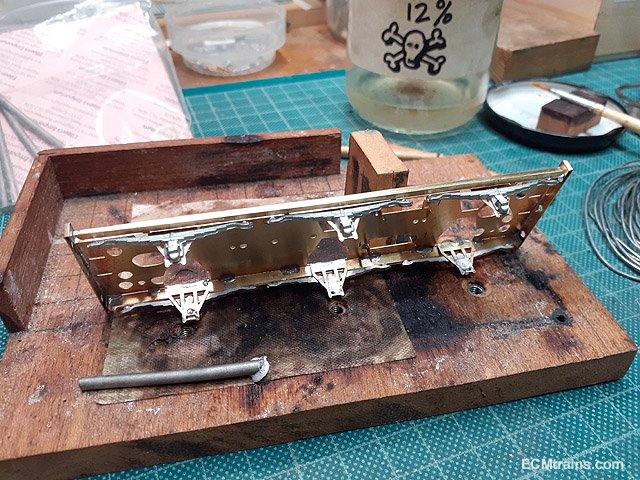
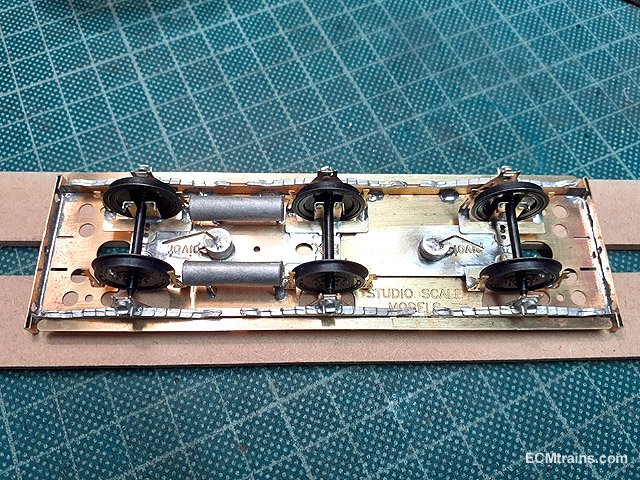
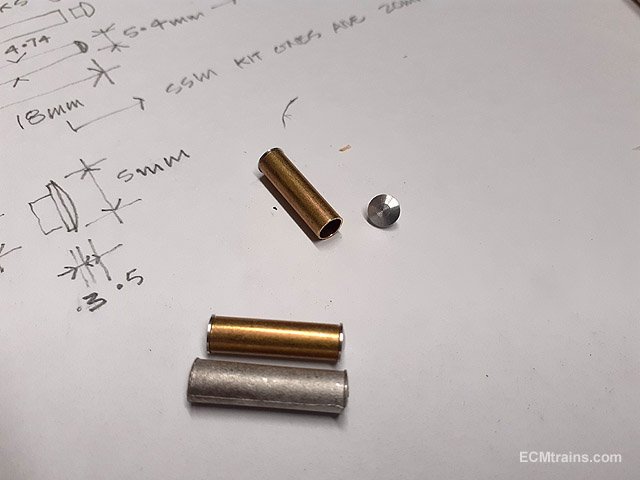
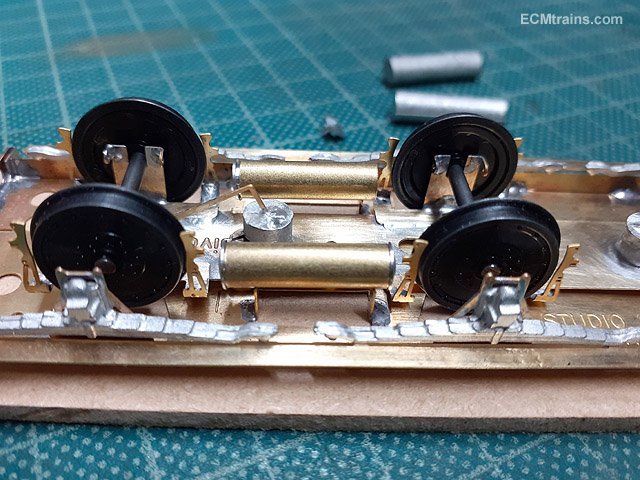
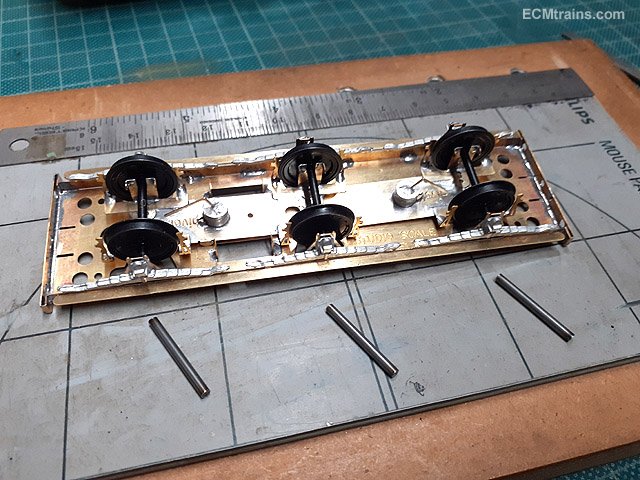
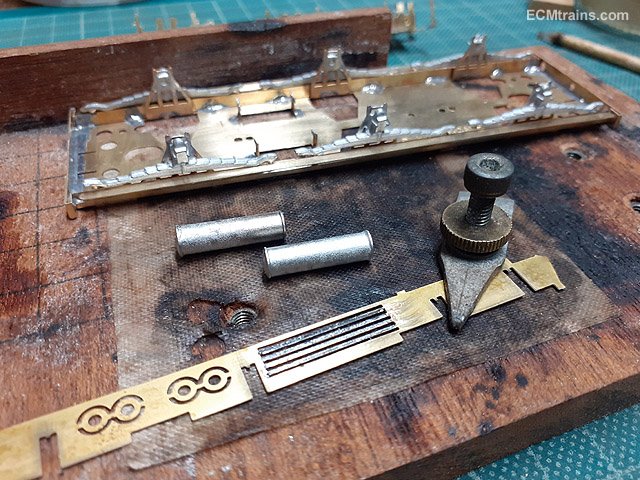
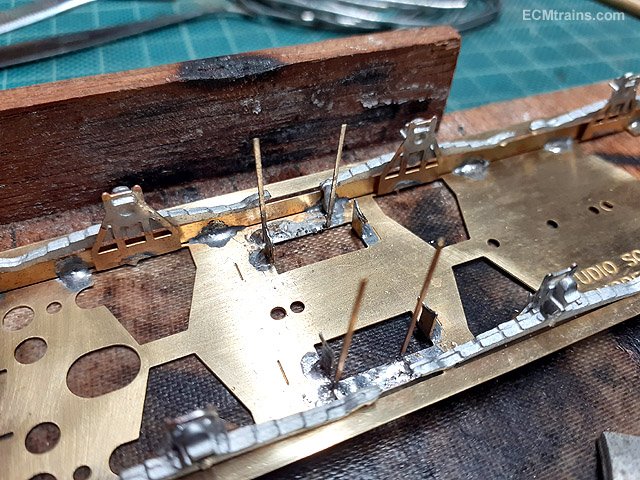
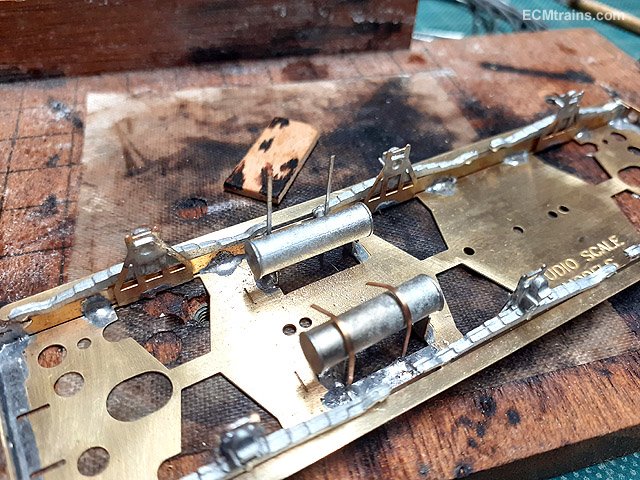
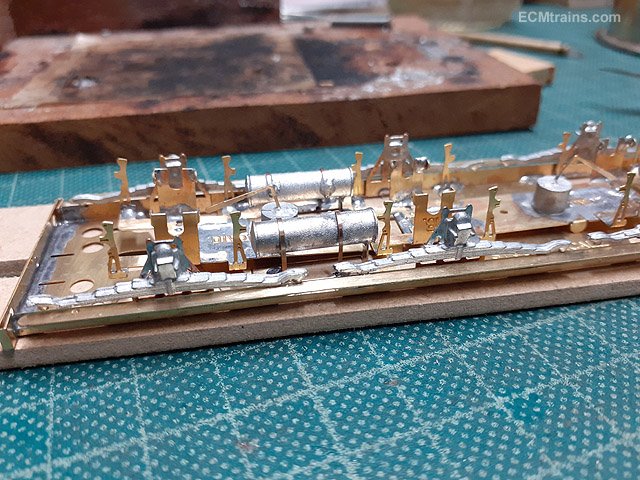
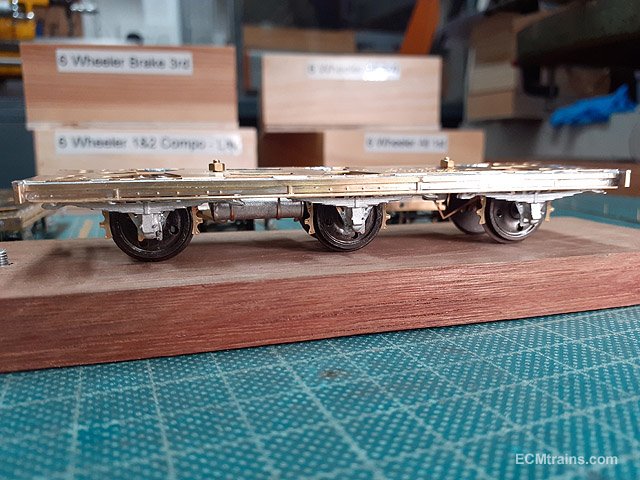
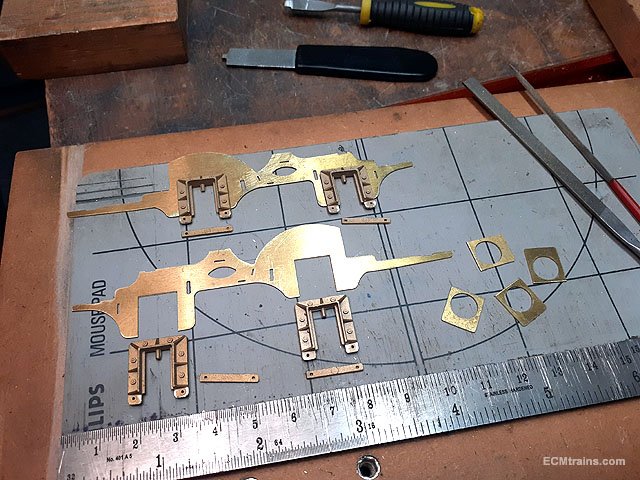
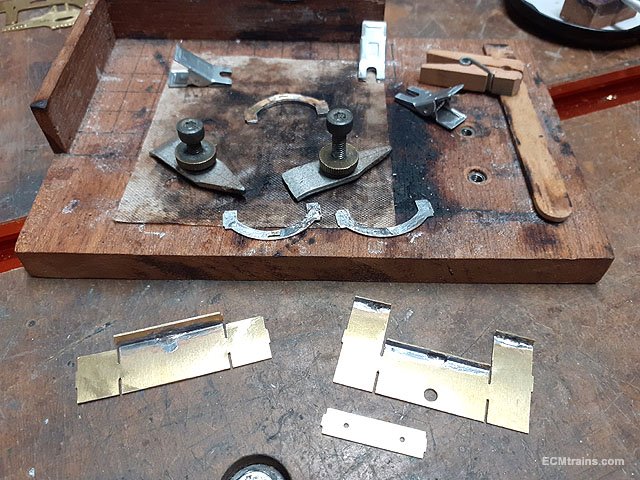
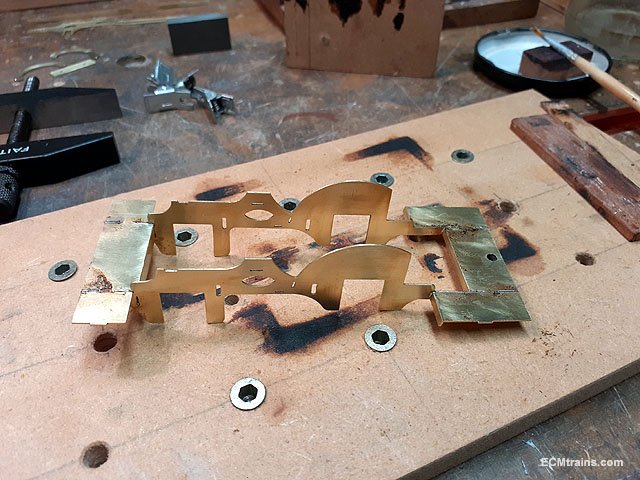
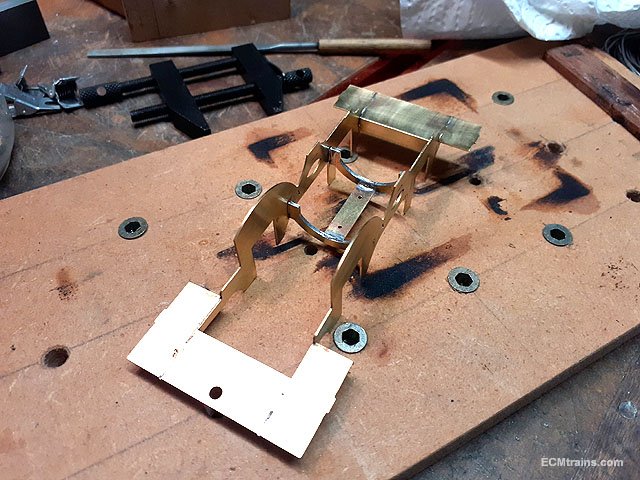
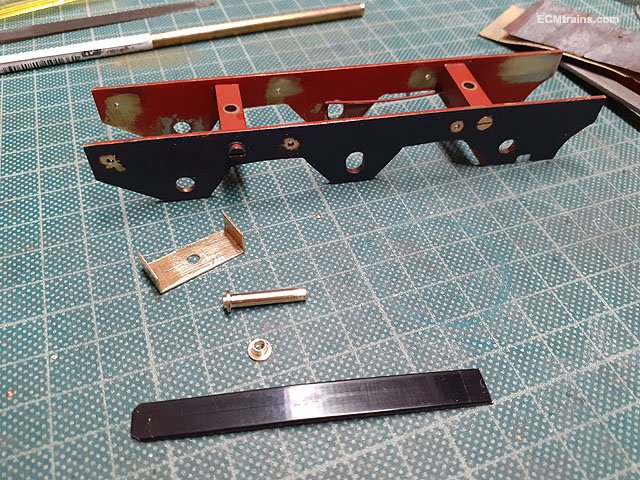
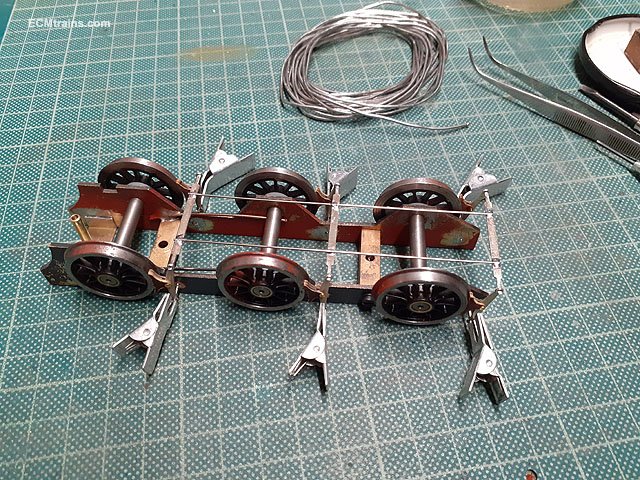
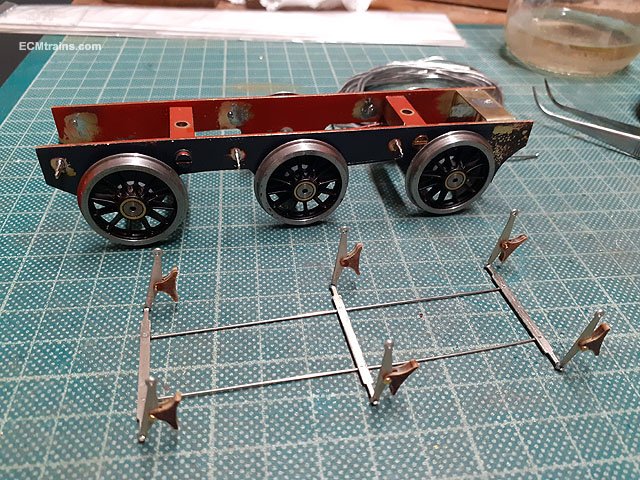
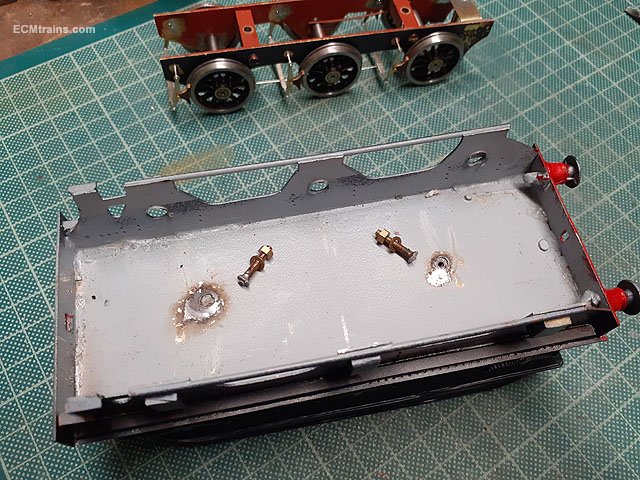
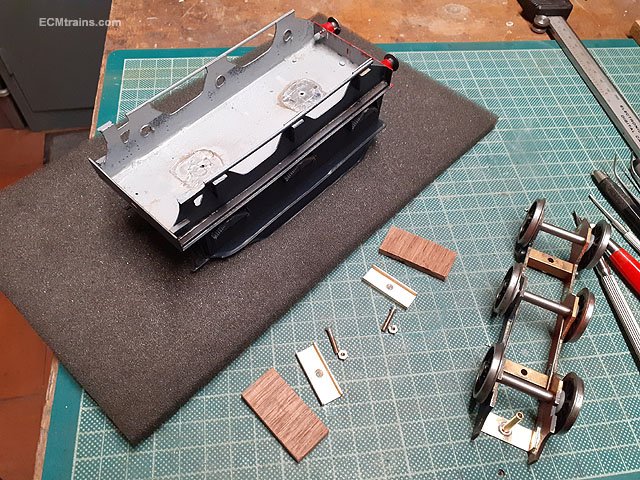
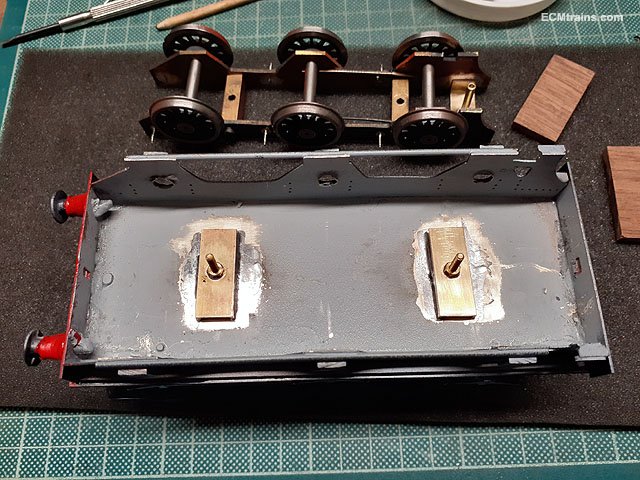
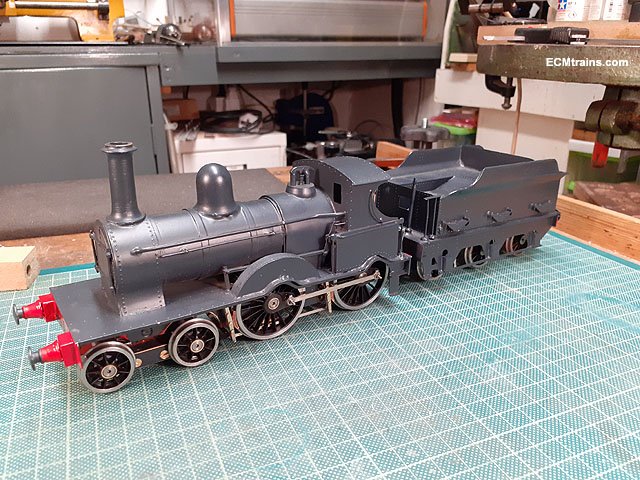
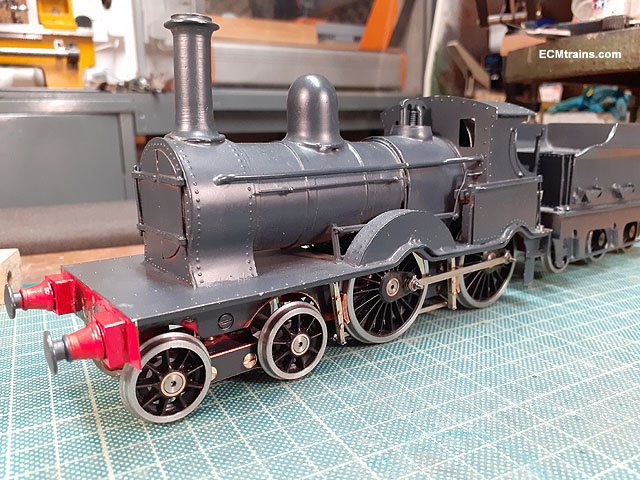
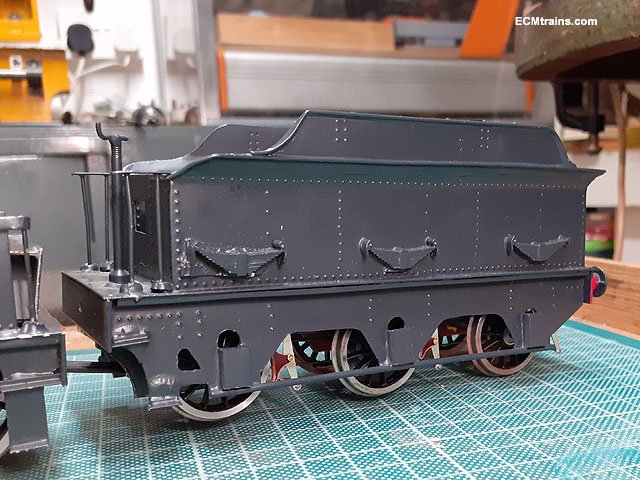
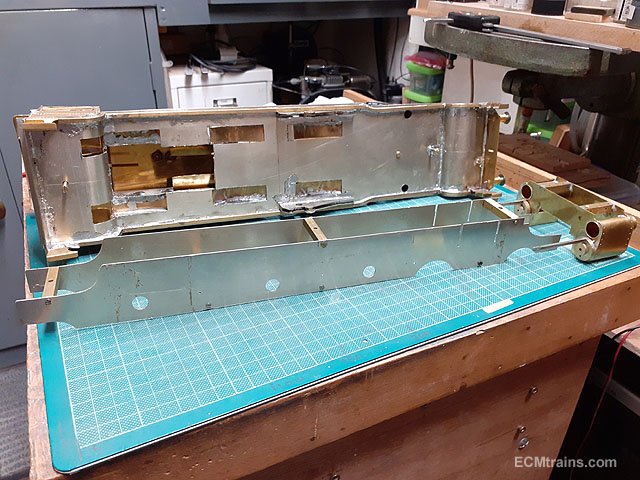
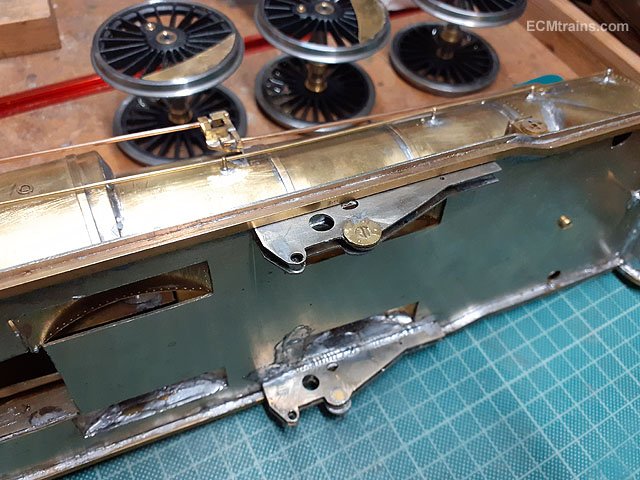
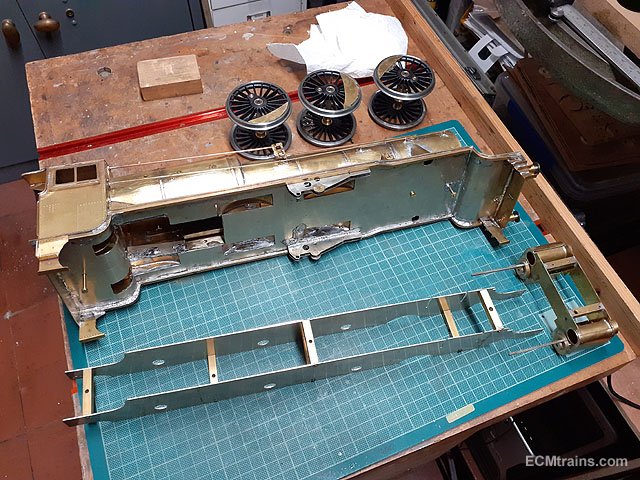
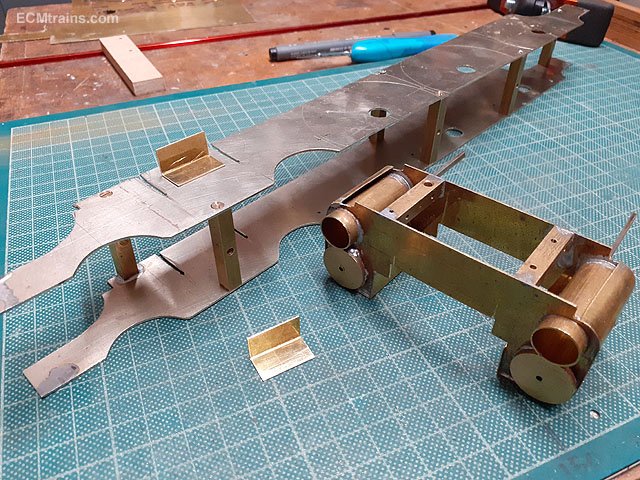
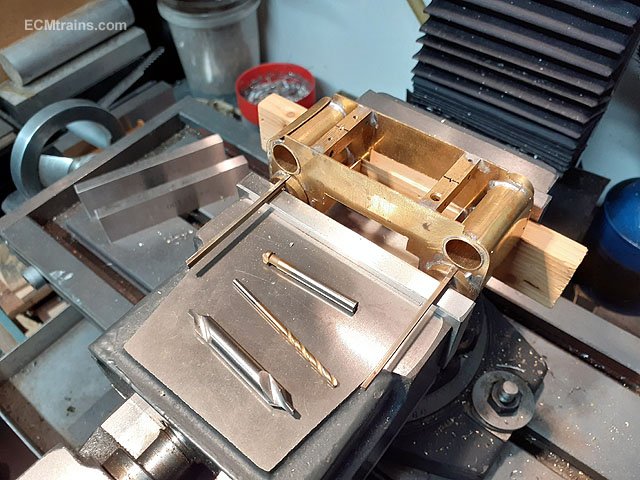
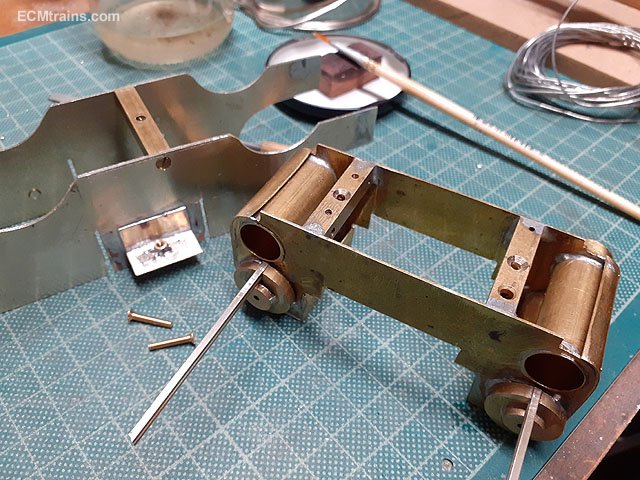
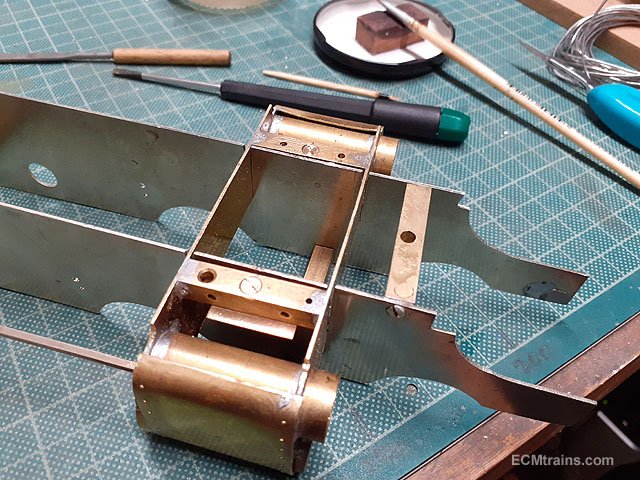
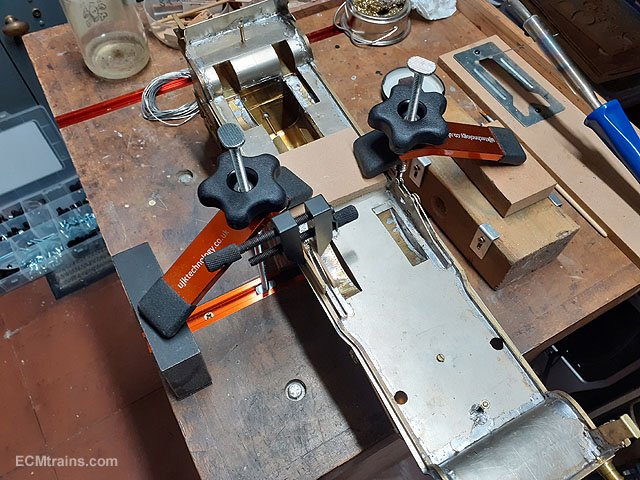
I'm building 4 no Studio Scale Models Six wheeler coach Kits for a client;- All 1st All 3rd Brake 3rd 1st & 2nd Compo - Lav All parts come in the kits except for decals. Bogies are first, it's a link type system to allow the middle axle to float. The bogie parts cut, folded and soldering up with 180deg solder. The little hook on bogie 'A' was given some solder into the folds for a bit of strength. Break gear going on, the cylinders had to be modified to allow for the bogie pivot bolt head. These parts were soldered with 70deg WM solder, first thinning the brass with 180deg solder. Bogie system done. Chassis next, the solebar overlays were thinned with 180deg solder while in the sprue and then cut out. There are two overlays to be soldered on each side. I left the chassis flat for soldering these on, reckoned it was easier this way. Then folded the chassis up with folding bars in the bench vice. Done. After folding up the buffer beams, which there is also a detail overlay for but will go on later, I set to soldering the folds with a hefty fillet, and soldered the fold edge of the axle guards to give support. Little fiddly caps soldered on top of the outer ends of the buffer beams, and the upper step was folded out with a pliers. The lower step was folded up again with the bars and a fillet of solder run along the back of the fold. These will be soldered to the chassis later, also the axle guard tie bars, just to avoid damage as the bodywork progresses! Next the white metal spring castings, again thinning the brass with 180deg, clamping the casting on and soldering with 70deg solder. Done. When checking the gas tank location I found they fouled the break shoes on the middle axle, could not get them to fit- the instructions tells one to cut the shoes off!! I opted for an ECM solution! I decided to make new tanks 2mm shorter, brass tube and aluminium turnings on the lathe made up two masters for moulding. Testing the masters to see if it will work! I cut new shorter 2mm axles from piano wire to replace the pin point ones. The gas tank moulding worked out OK and now its time to fit them, the brass straps were thinned while held in the sprue and the tank mounts were thinned all with 180deg. The straps were removed and a 90 bend was put on one end to solder them to the underside of the chassis. The tanks were then soldered onto their supports with 70deg WM solder and the straps folded down over and soldered to the tanks on the inside, these ends are terminated on the tank inside so that the bogie will fit in. Done, break shoes just about miss and one tank did not sit down correctly! So then if you go back and read all the above again 3 times! it will get you to here;- Bodies next.... Eoin
- 68 replies
-
- 14
-

-

-
@jhb171achill It's generally done with paint, you may be referring to a guy that did an 08 on the Gauge O Guild fb site? if it is that one- it was all done with paint, he painted the body with white undercoat, then highlighted stuff with black and brown, then he painted the blue in a few lighter shades than if new! then he highlighted again, painted a lighter blue again and then used weathering wash. If the green Woolwiches are lined your best option is just to weather on top, otherwise if you try to fade the paint the lining will be lost! maybe you don't mind that- leave the model in the sunlight and over time it should fade- do remember to rotate it! and not to hot a place in the sun- it might melt! Eoin
-
From that experience we have decided to do just posts on the Greystones layout, it's a pity but will cause less fustration Eoin
-
@warb I built 20ft of double track cantenary for a chap, a post about every foot or so, we installed phosphorous bronze overhead wires!! not one has survived- track cleaning, re-tracking derailed stock and people not noticing the wires was the cause. The layout just has the posts now..... Eoin
-
Caldercraft Talacre - Steam Ship Finished.
murrayec replied to Georgeconna's topic in Aviation & Maritime Modelling
Stunning looking George, can I have one? Eoin -
'Hibernia' Dublin & Kingstown Railway 2-2-0 Loco Build Gauge O
murrayec replied to murrayec's topic in ECM Model Trains
@Galteemore the Princess is also on my list! the drawings for it are nearly complete, but the Vauxhall will be before it....... Eoin -
'Hibernia' Dublin & Kingstown Railway 2-2-0 Loco Build Gauge O
murrayec replied to murrayec's topic in ECM Model Trains
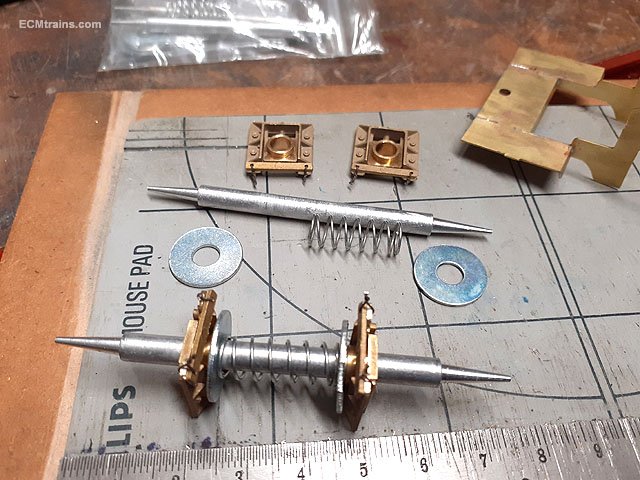
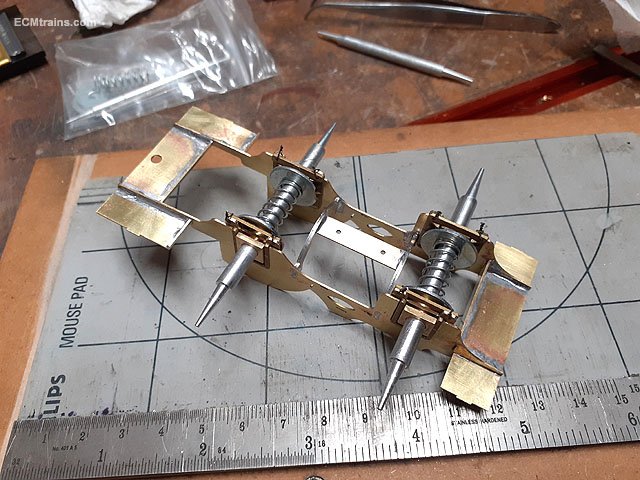
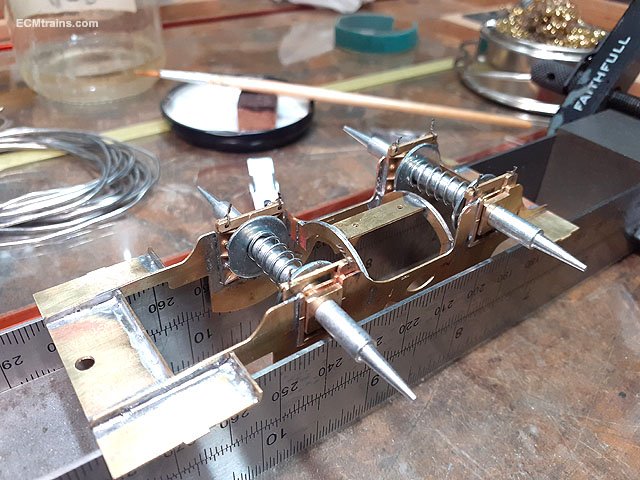
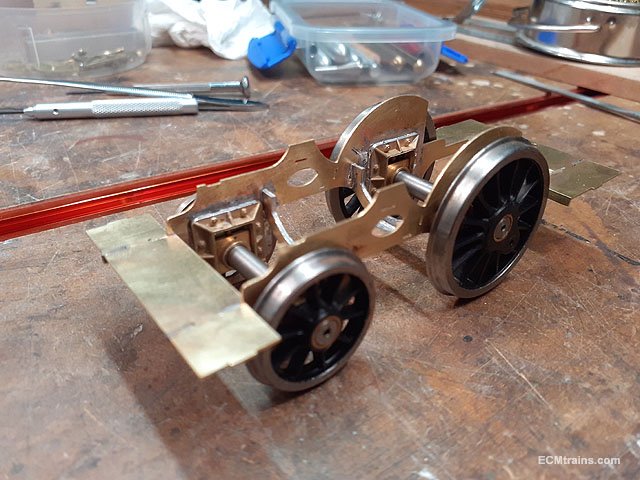
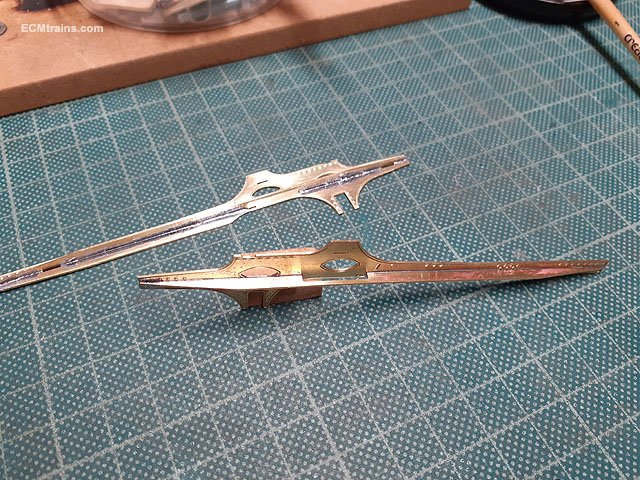
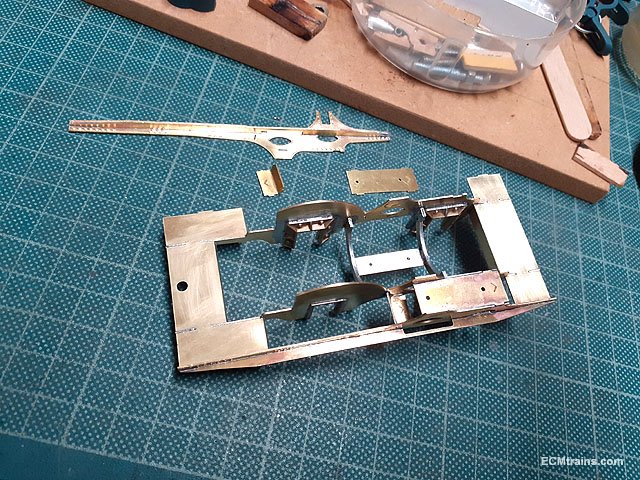
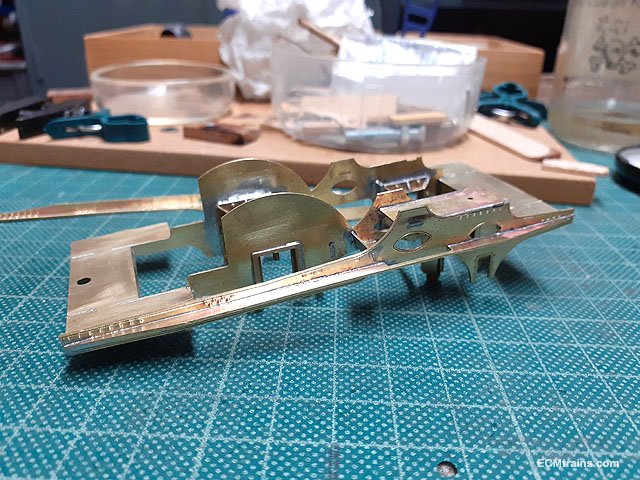
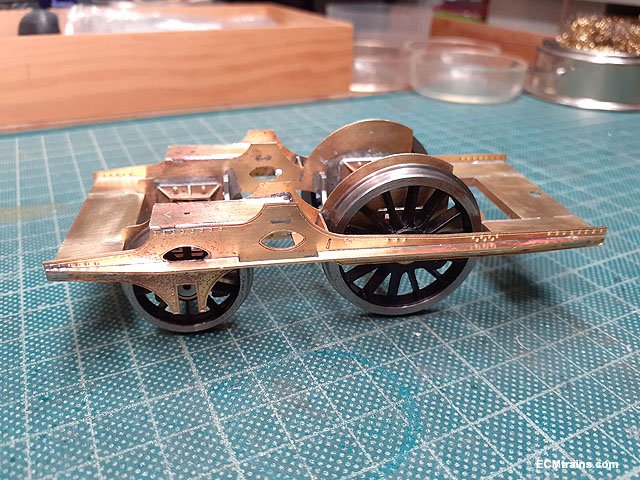
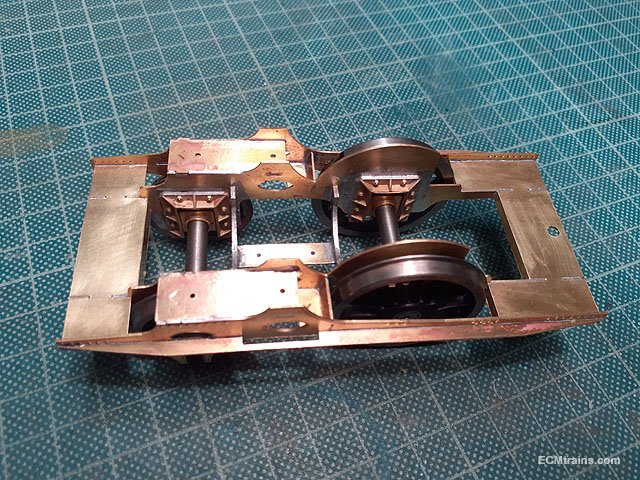
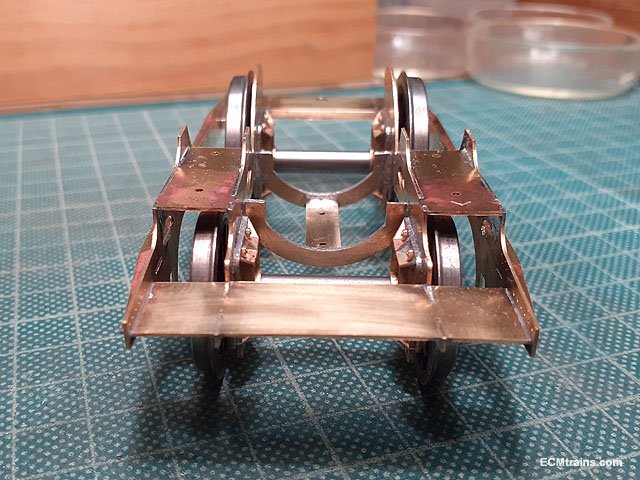
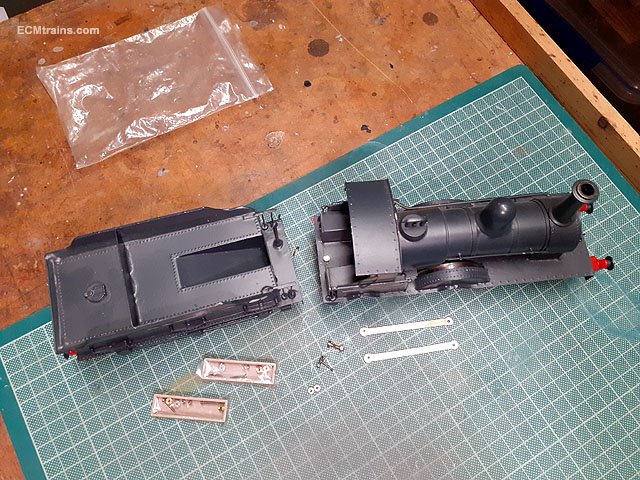
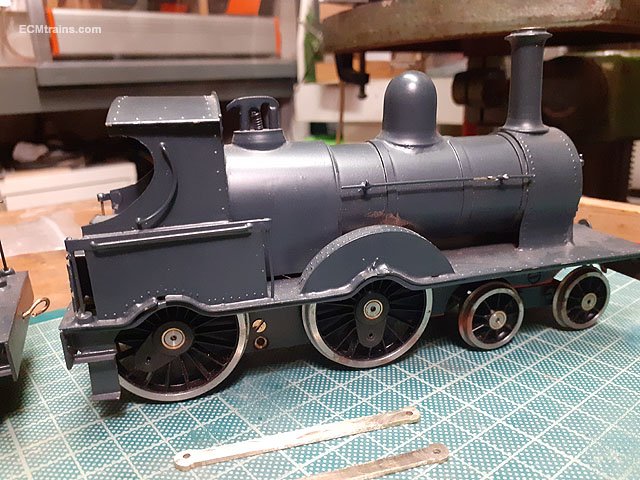
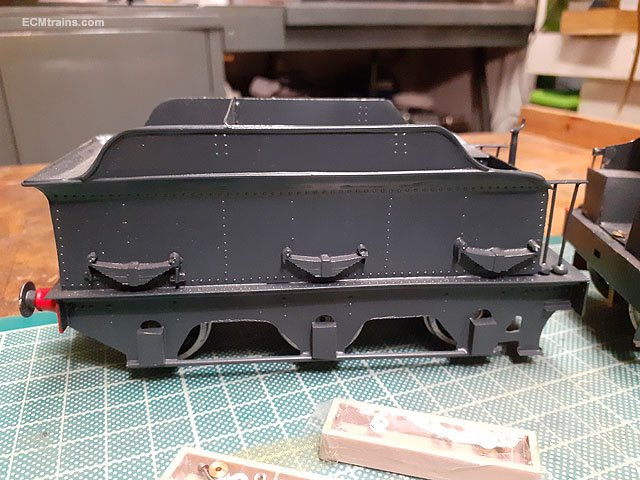
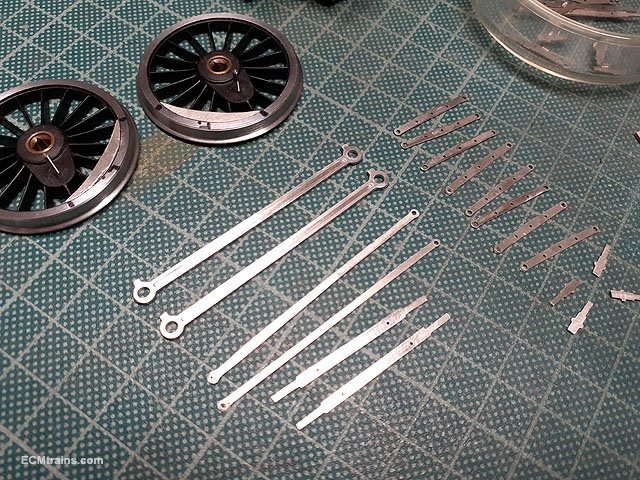
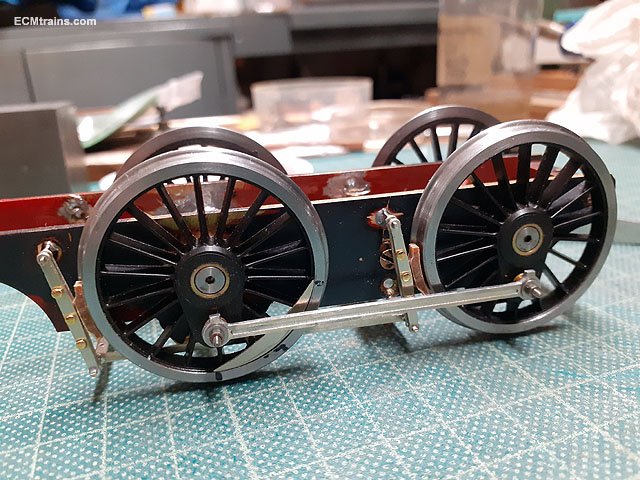
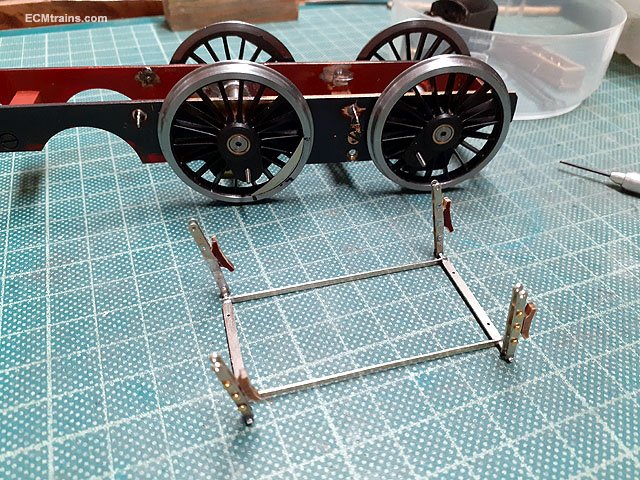
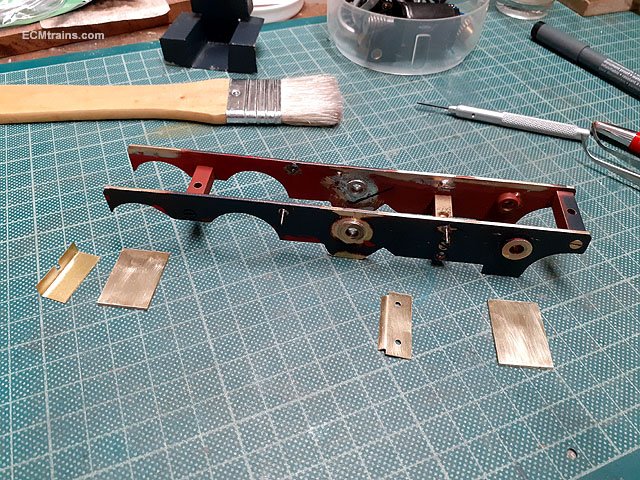
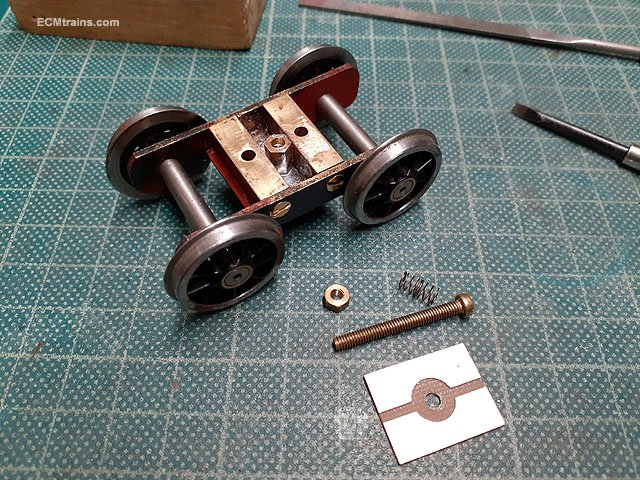
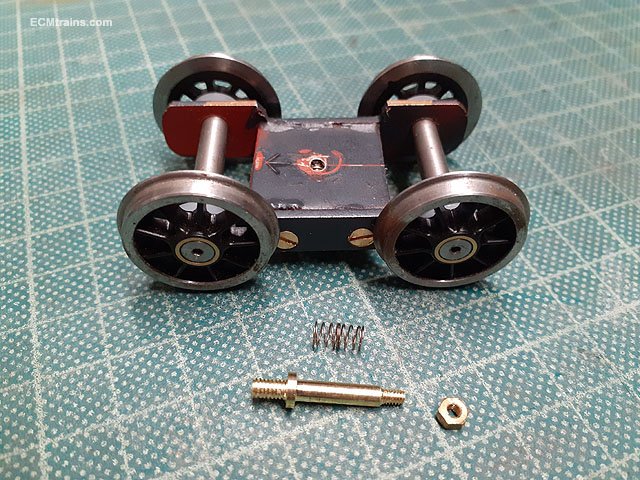
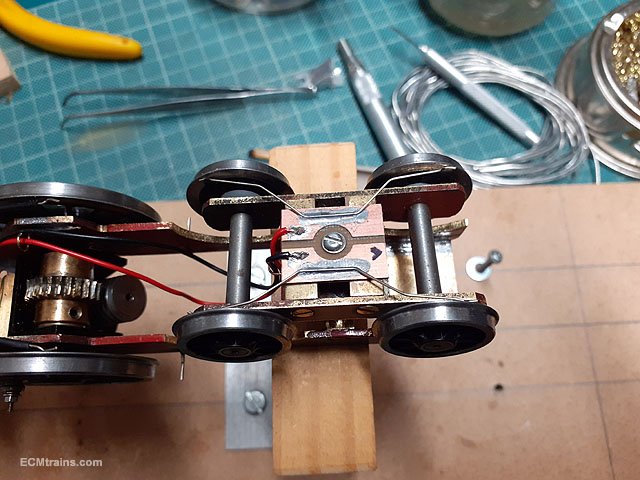
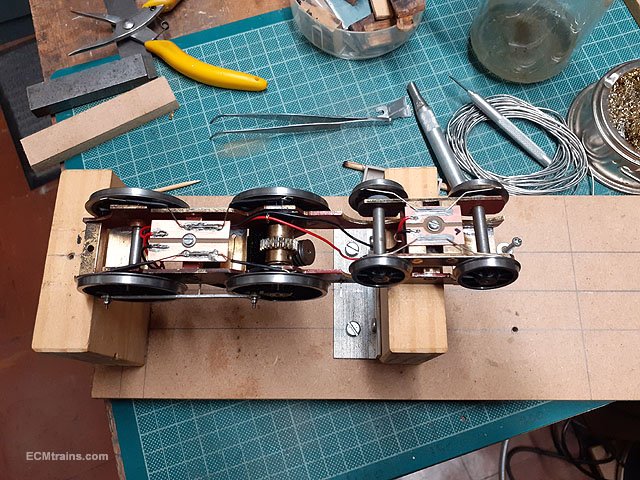
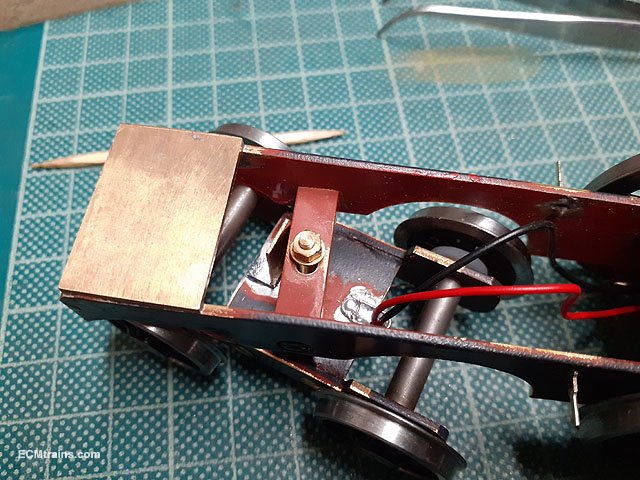
I did a bit on the Hibernia chassis over last weekend. The inner frames were modified to take Slaters cast brass horn-blocks and bearings- as mentioned above the outer frames when on will obstruct the axles so now axles and bearings will drop out the bottom! The frame spacers were folded and soldered, the spacers that go around the motor are made up of two .5mm brass parts sweat soldered together. After checking all tabs & slots fit, a slight bit of fettling was required to get things square, I soldered the main frames together with 180deg solder. Next the horn-blocks were soldered in using my home spun chassis jig to hold them in place tight against the frames. I took a few measurements off the jig to see that all was square and then soldered them in, careful not to solder the keepers or bearings in! All done, and then the wheels were put on to see how level we are- spot on! Preparing the outer frames with the out-riggers! soldered on, again some slight adjustments required but tabs n slots are a great way to keep it all square and to hold the parts together while soldering. One side frame on, the flat plate is the cylinder mount. Done for now. Wheels back on. Eoin
-
I'm sure when the crew are doing the paint touch up they will take this into consideration- the plates are held on by 'Stixall' a silicone type glue n sealer so they can be removed if painting changes are required. Eoin
-
I forgot the plates;- Their on now..... Eoin
-
@Galteemore I used .5mm nickel silver sheet and .6mm NS wire for the hangers and rodding. @Georgeconna Yes, not all had these going by the photos I found, earlier photos of the class don't have them so I assume they re-used other buffers later which needed to be extended??.... Eoin
-
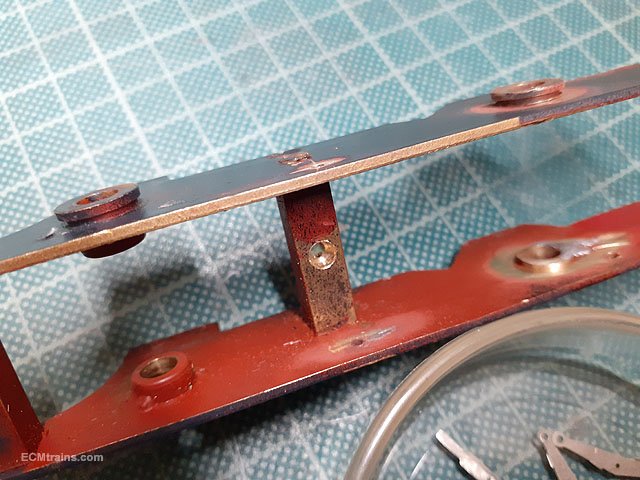
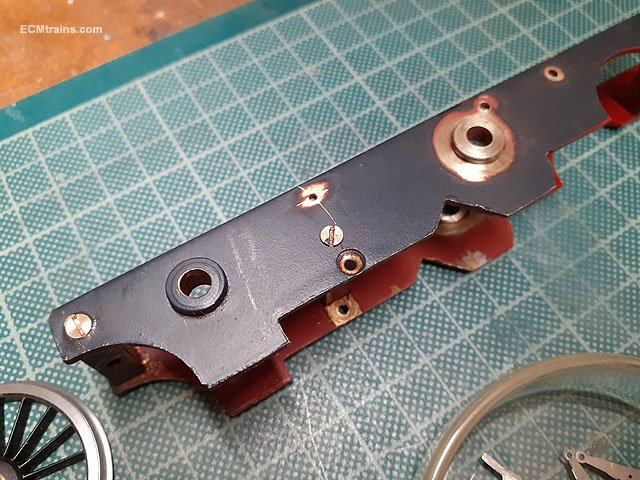
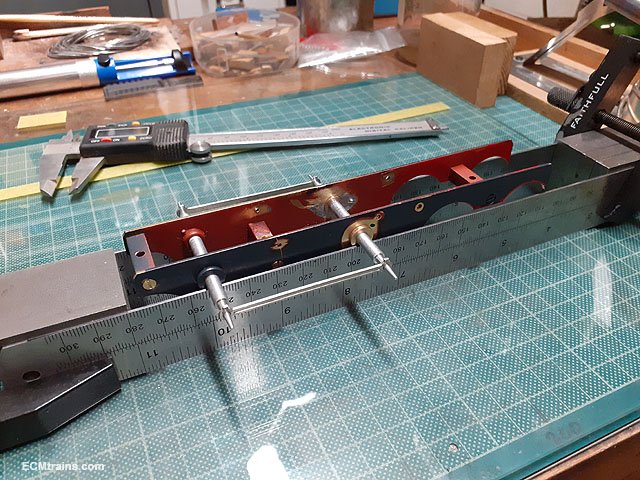
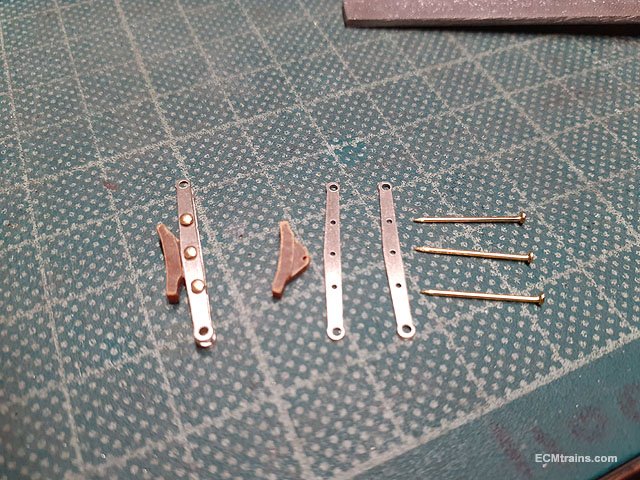
Here is another scratch built model by Mr B Kelly, a D19, one of my faves! it's in my workshop for coupling rods, break gear, electrical pick-ups and a few other bits. As it came. After measuring up, researching a few photos and doing the drawings parts were cut out of .5mm nickel silver- wheel weights, coupling rods, break gear.... The chassis was a little fat, the wheels were locking up when assembled and one axle was slightly out of line, only noticed when fitting the coupling rods- one side would go on but not the other! So that set of bearings needed a bit of adjustment and the other set had a .9mm skim taken off the faces. Some of the chassis screws were cheese head so I replaced them with counter-sunk and holes for the break hanger spigots were drilled in the frames. Jigged up to solder the bearings back in. Loco break gear coming together, these locos had double hangers with the shoe sandwiched between. The shoes are cut from Tufnol and brass .7mm pins were used to assemble. Breaks on. Breaks off. The assembly can be sprung off for painting and removing the wheels. After fitting the coupling rods I noticed they fouled the underside of running board!, so a few 1.2mm brass spacers were prepared and soldered onto the top of the frames. I also made a motor strap to lift the motor up at an angle and save space in the cab. The bogie truck was then tackled- needing a pivot, spring and a bit of side play, also going to get electrical pick-ups installed. A deep hex nut was soldered to the underside to take the pivot bar on top and the pick-up plate on the underside. I also replace the frame spacer screws from cheese-head to counter-sunk and installed a plastic washer behind each wheel. A pivot bar was turned up on the lathe and tapped 8BA to fit into that hex nut in the bogie frame. The pick-ups were then installed on the underside. This is the full pick-up system, diver wheels & bogie. A sideways slot was milled in the frame spacer to give the bogie side-play and a .5mm brass angle plate was soldered onto the bogie front to stop full rotation. The frames also required some mod at the rear wheel arch to allow clearance. Up and running. The tender was next, break hanger holes drilled, and at front- these are parts for the draw bar, the brass to be soldered between the frames and the plastic strip drilled as the draw bar with the little brass bush to allow it pivot on the back of the loco. Breaks going on and draw bar assembly installed. Breaks done. The tender had its mounting bolts broken off, so some repair needed, also spacers are needed to level the tender with the loco- using two blocks of hardwood! Done. Draw bar drilled and installed, this is the body mounting screw, the front end is held with a brass tong soldered to the back of the buffer beam. And its done, going back to its crew for a bit of painting and maybe some coal! Eoin
- 24 replies
-
- 15
-
-
-
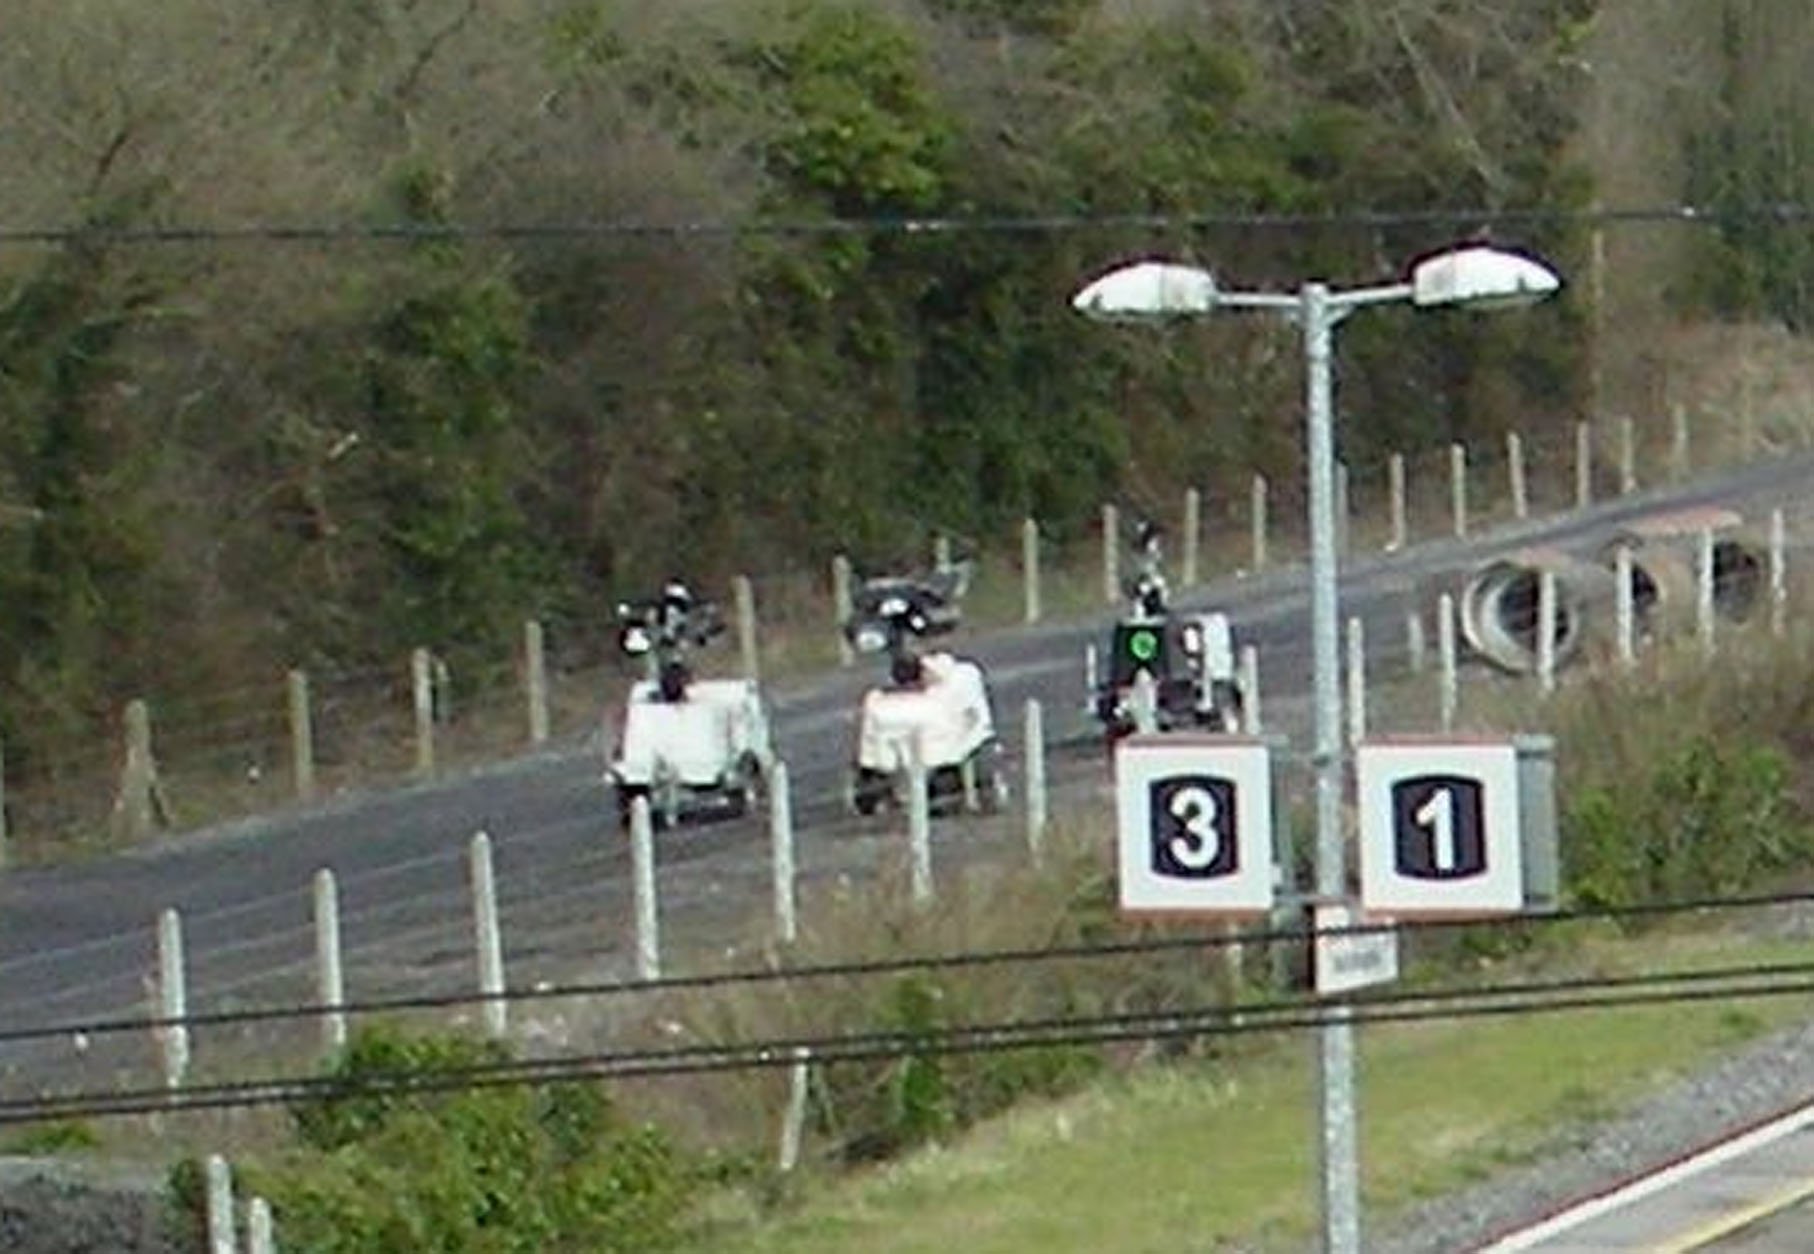
3 robots patrolling the perimeter!! Eoin
-
When were were kids there was a farmer chap in Monkstown down the lane between St Patrick's church and the post office, Michael (johnny) Lawlor was his name, he farmed a few cows n pigs and the place stank to high heaven and so did he. He, his horse (which never had a wash) and a single axle deep cart were a regular feature on the local roads delivering cow-shi to the local ladies who did roses and used his product as fertiliser, he also collected kitchen waste from the ladies for feeding the pigs. Twice in my early teens I welded broken struts to the axle on his cart, the stink I can still remember. When the jobs were done his offer of payment was in cow-shi which I politely passed on to our neighbour who was one of the ladies that did roses. As far as I know he farmed there into the early 80s, the farm is now a town-house development called Alma Park and the area smells a lot better. The series of documentaries by David Shaw Smith 'Hands' is an incredible archive on this subject and many other old time subjects throughout the country;- Eoin
-
I can just see you now- sitting around the billy can slurping the tae and swapping Tufnol jokes those were the days....... Eoin
- 45 replies
-
- 4
-

-
-
- gsr class 551
- j26
- (and 1 more)
-
Just noticed when looking over this thread, after a long time, I describe the material for the break shoes as 'Delrin' it's not! it's Tufnol, a great material for the modeller. Made from wood/paper, it has great structural qualities, easy to be worked and can be machined. Eoin
- 45 replies
-
- 4
-
-

-
- gsr class 551
- j26
- (and 1 more)
-
until
-
The March date for the Train & Model Fair;-
-
@Mike 84C Yes it's quiet at the moment, I did have it down from the top shelf about a week ago to review progress and keep it in my mind! There are to many projects on at the moment, I'm not taking on any new work until current client projects are completed, then I can get back to my stuff- the C is on this list. I could be persuaded to run off a few bogie sides, a chassis plate and maybe a battery box....... Eoin
-
I'm building one of the 'Bat' Kits from that clean-up, it's just on a stad at the moment as I have several projects on the go- to many! Eoin
-
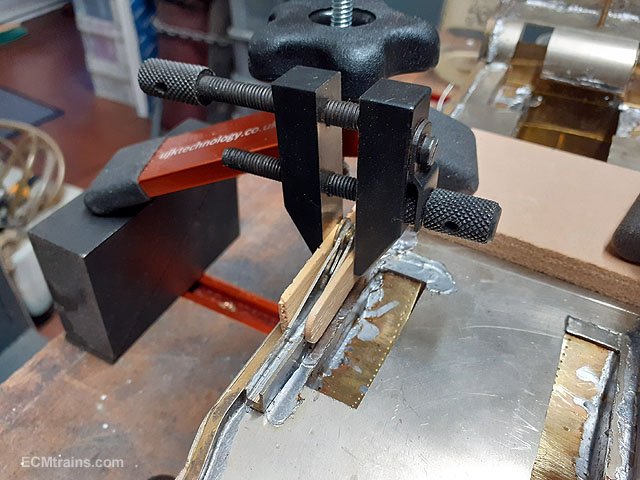
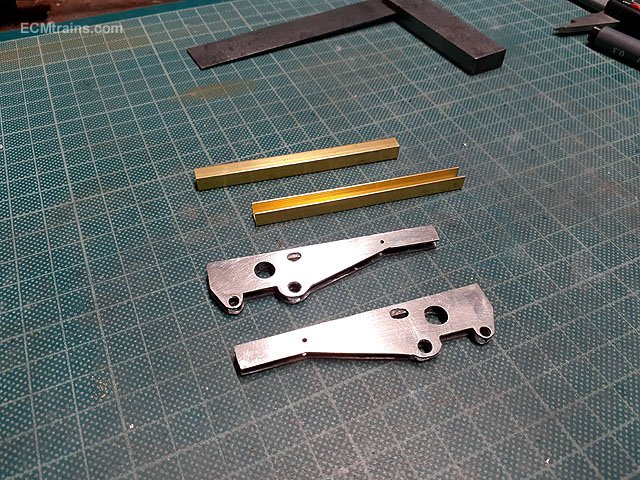
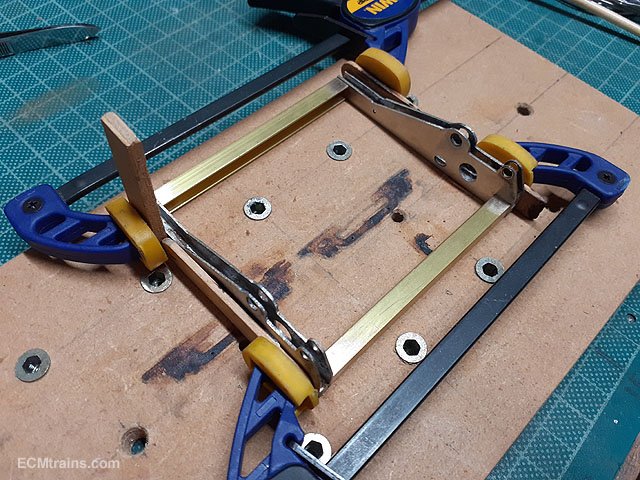
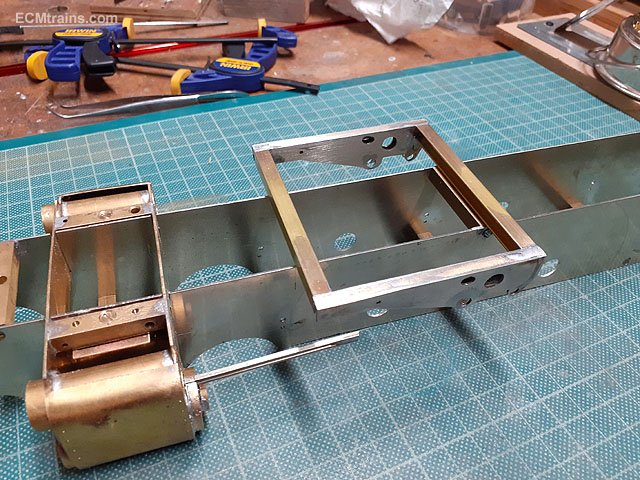
So I eventually got going on this project, after a few contemplation evenings and pencil sketches I set up a drawing and worked out a plan of action. The chassis, cylinders & motion bracket would be tackled first as this will aid in finalising the drawings for the valve motion gear. After stripping down the chassis I decided the cylinders need to be fixed on but, I may need to remove them so a bolt on affair was decided. The motion brackets are soldered to the underside of the body running board! this is not great, I prefer to work on the valve gear on the chassis alone, rather than having the whole loco on the bench and making things unwieldy and difficult, so the plan is to remove them from the body and install then on the chassis. This will make it easier to take the body off in the future as only one rod has to be undone- the oil pump rod, the other way most of the motion gear has to be dissembled and would be a real pain just to access the motor! All asunder. The chassis is a bit bendy, the new motion bracket and its frame will help. Also the counter-sunk screws on the frame spacers are not counter-sunk- so that will be done. Valve cylinders need end plates and a few other things. The motion brackets as is. .5mm brass angle plates were made up to fix the cylinders to chassis with 8BA screws through those frame spacers behind each valve cylinder. Cylinder chassis plates soldered on and the frame spacer screws counter-sunk. Holes about to be drilled and counter-sunk in the cylinder bracket, these holes will be used to spot through to the chassis plate for drilling for the captive nut. Captive nuts soldered on. Done, plates need a bit of trimming later. Removing the motion plates, this is the jig set-up- as both hands are required for the soldering iron and pulling at the parts. Clamp fixed to bracket with wood insulators between so that the clamp doesn't take all the heat, holds the bracket together- as its three pieces soldered to the running board, and something insulated to pull on to save my fingers. Done, the 100 watt iron was used only touching the motion brackets and loads of flux, once one gets the temperature up they came away relatively easy! Brackets cleaned up and two brass bars cut to size for holding the brackets to the chassis. Soldering up. Test fitting the assembly and marking the chassis in prep for cutting the slots in the frames to house it. Thats all for now. Eoin
-
I make me own for the toy DARTs