KMCE
-
Posts
540 -
Joined
-
Last visited
-
Days Won
29
Content Type
Profiles
Forums
Events
Gallery
Blogs
Everything posted by KMCE
-
I hope so, and would go so far as to ask for a provisional spot for the June show?
-
That's turning out to be fine looking loco, and I admire your focus in finishing - I need to get back to my almost finished locos & get them done!
-
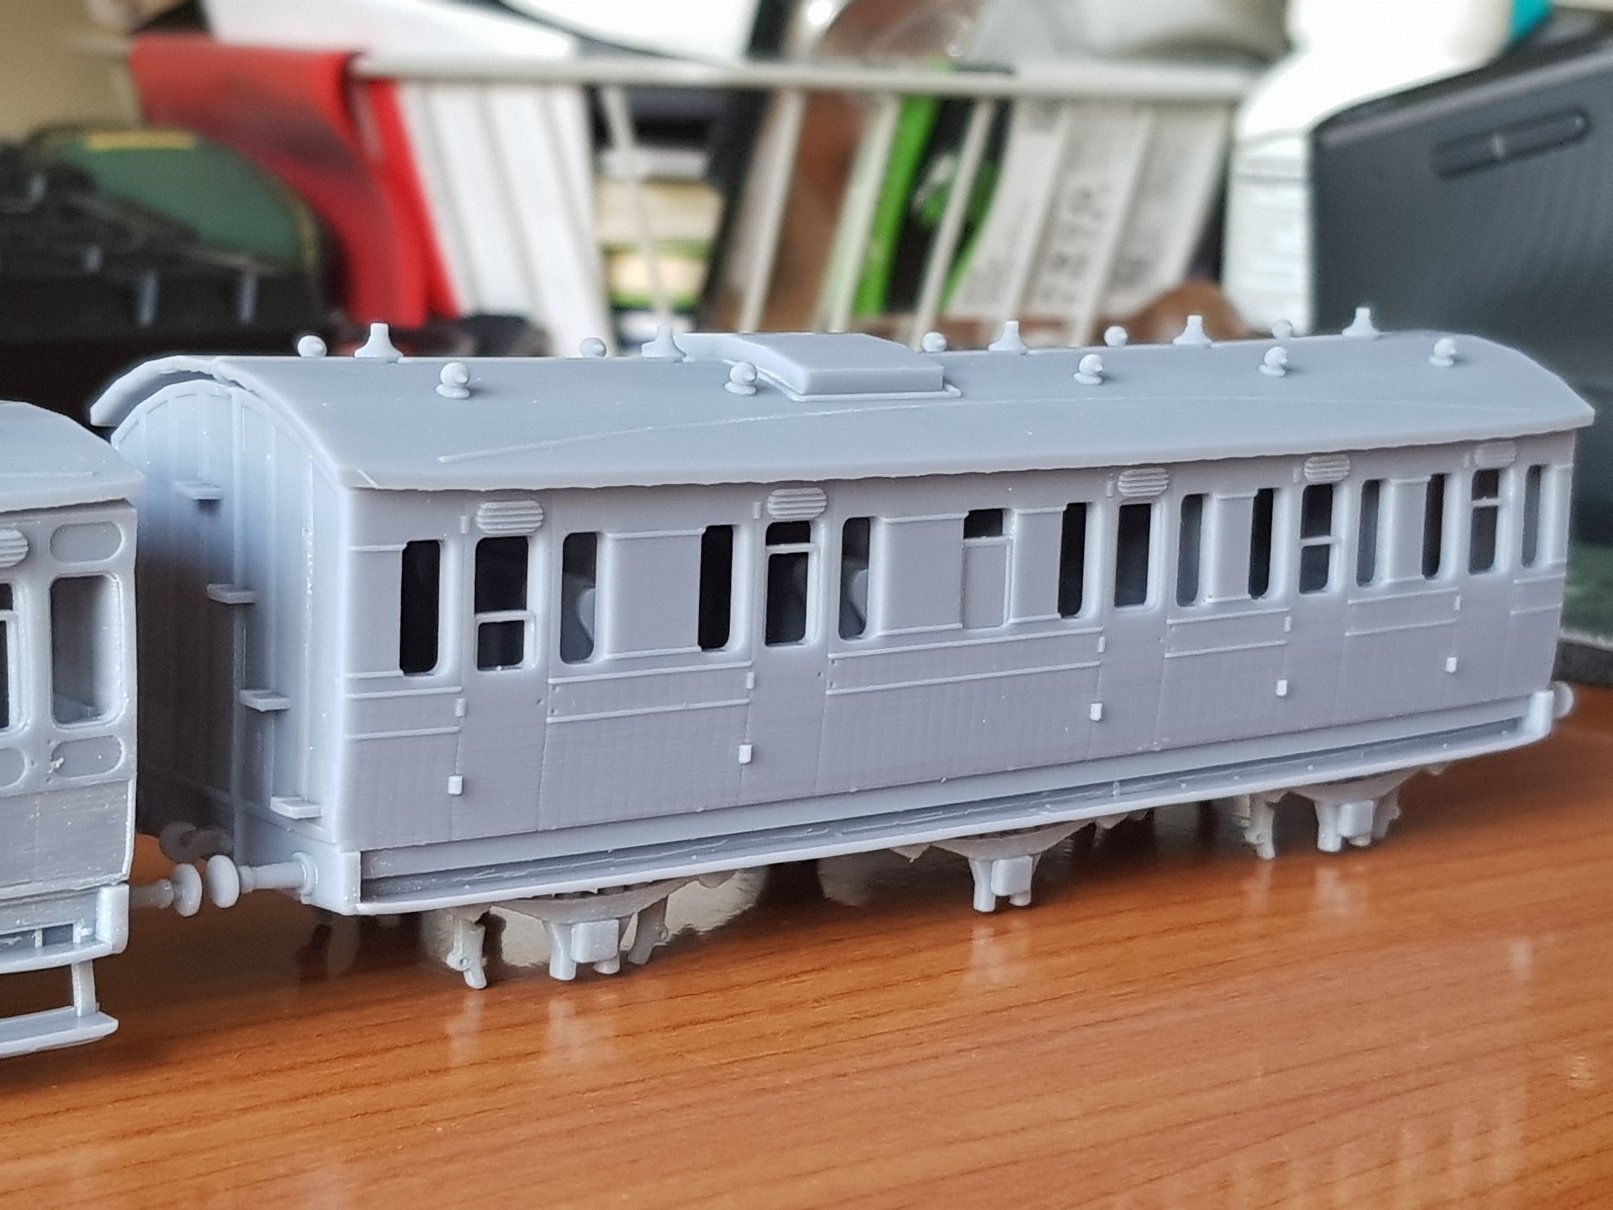
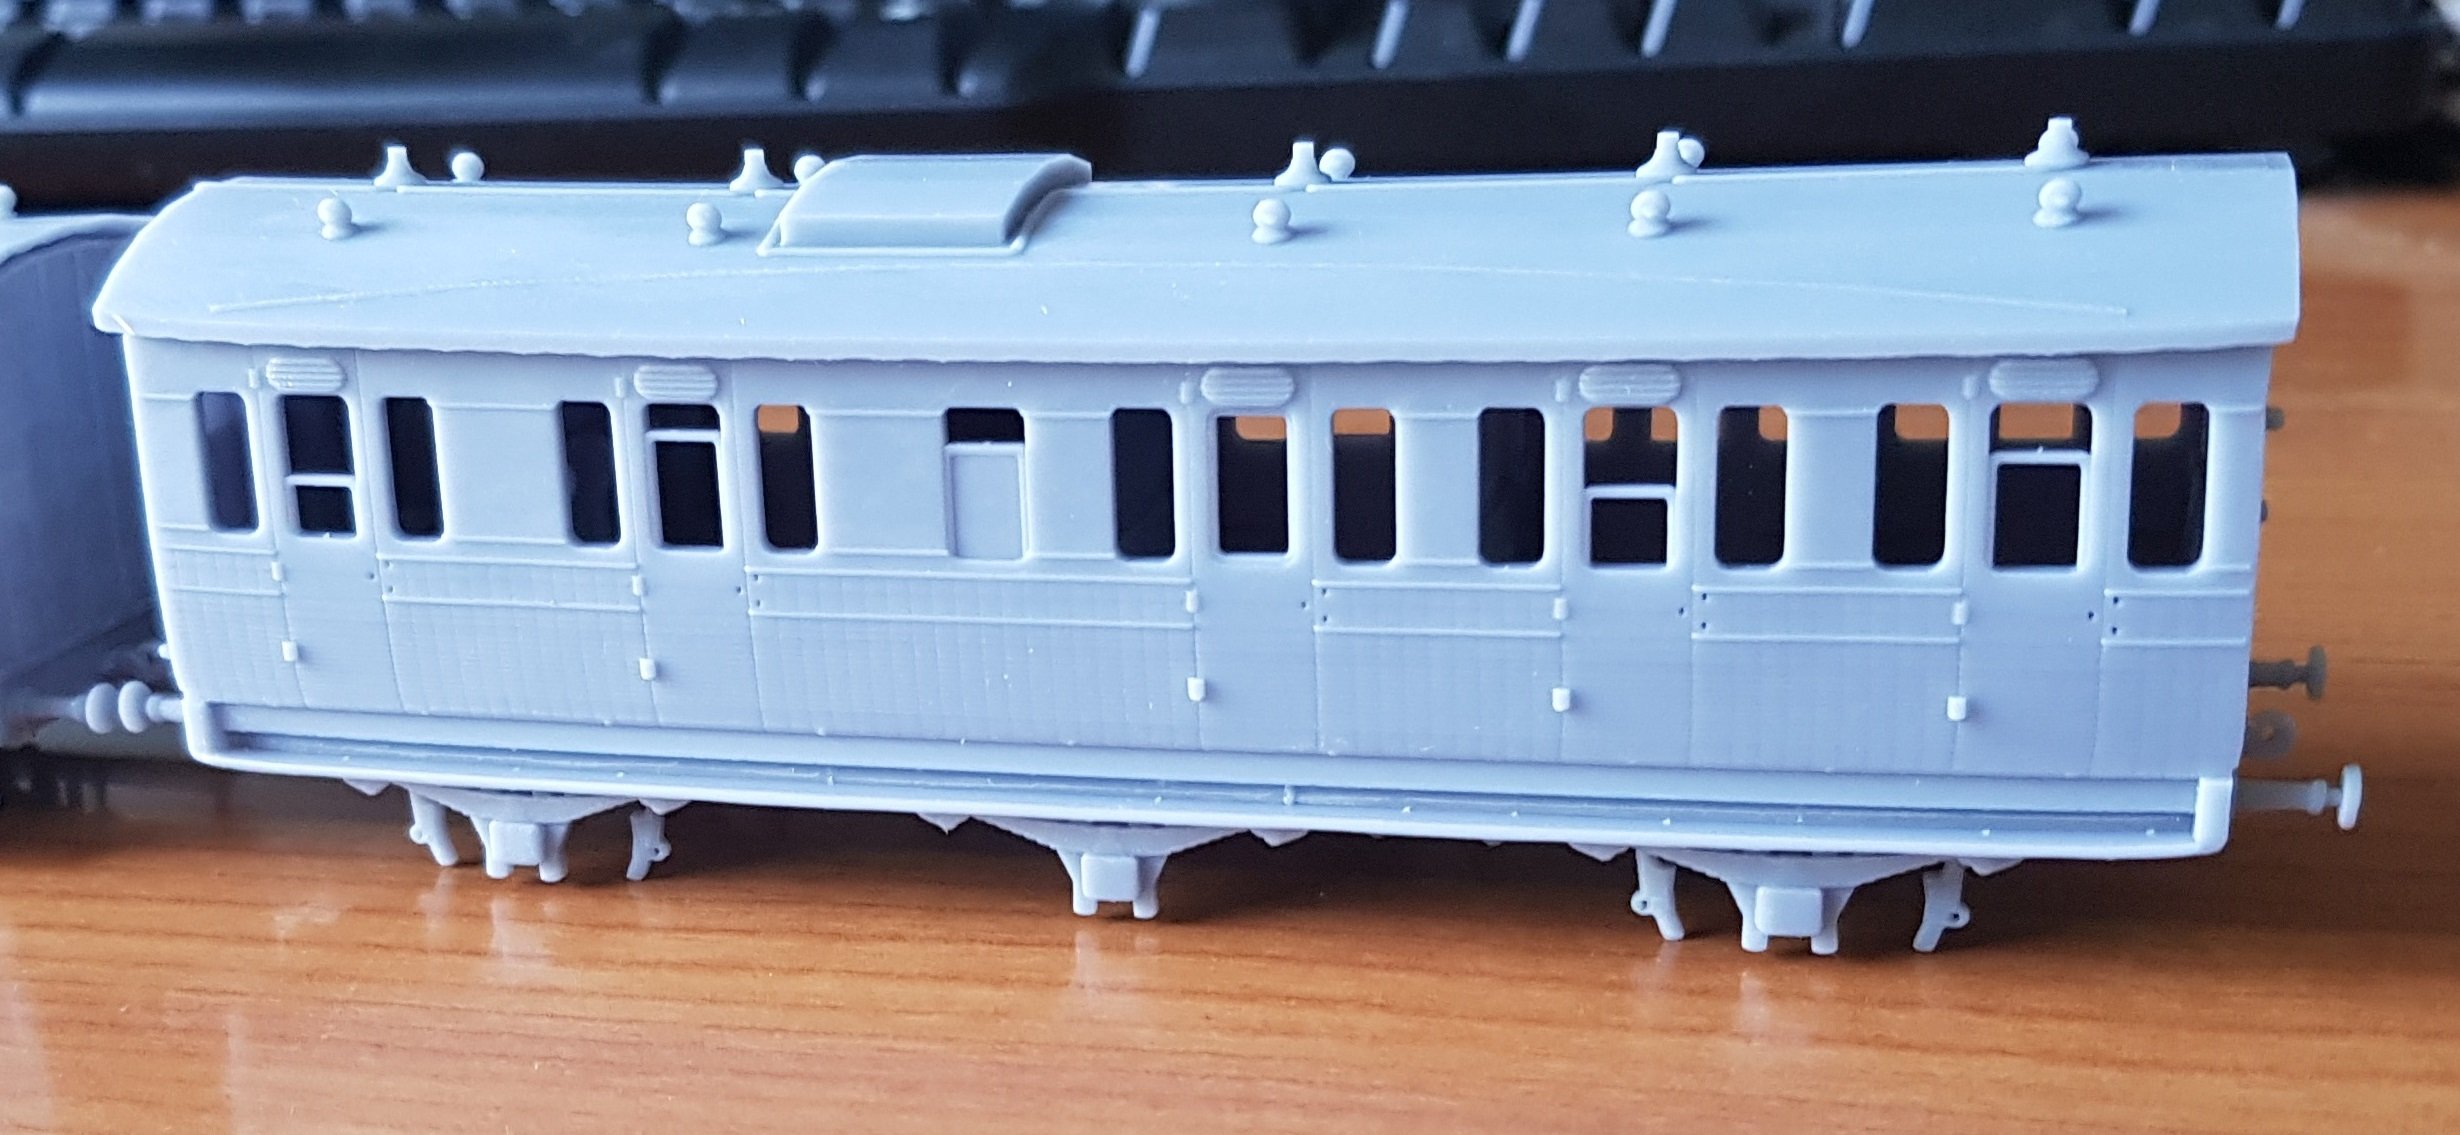
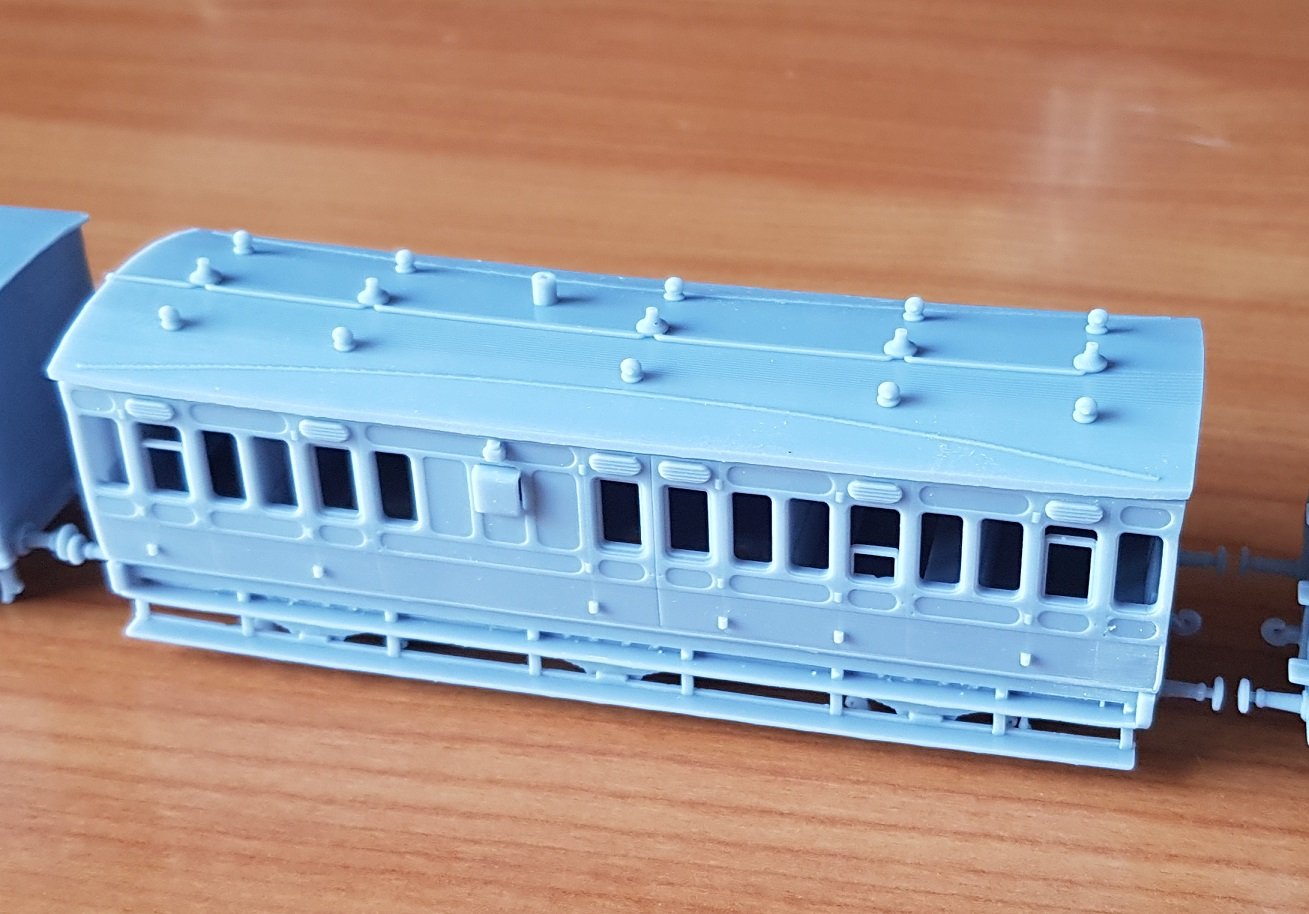
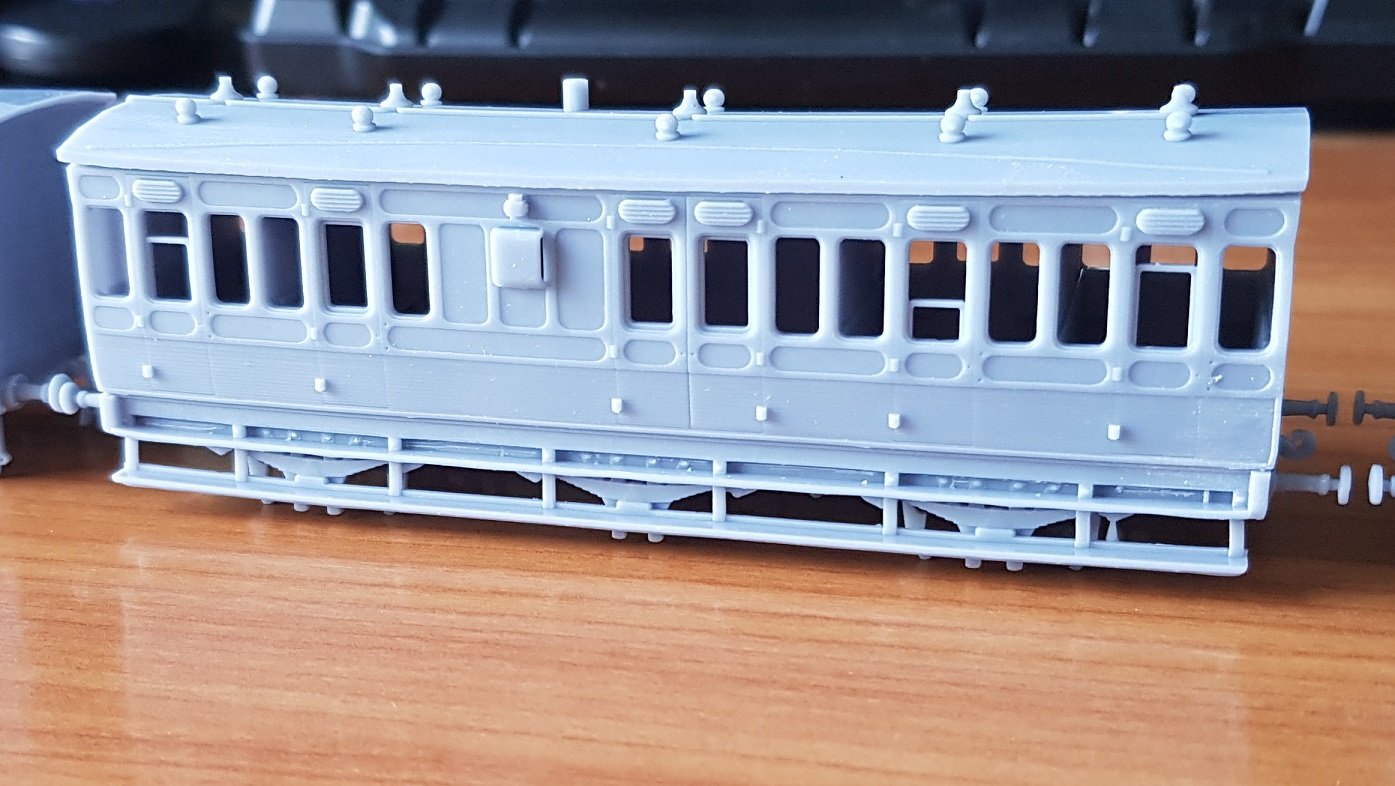
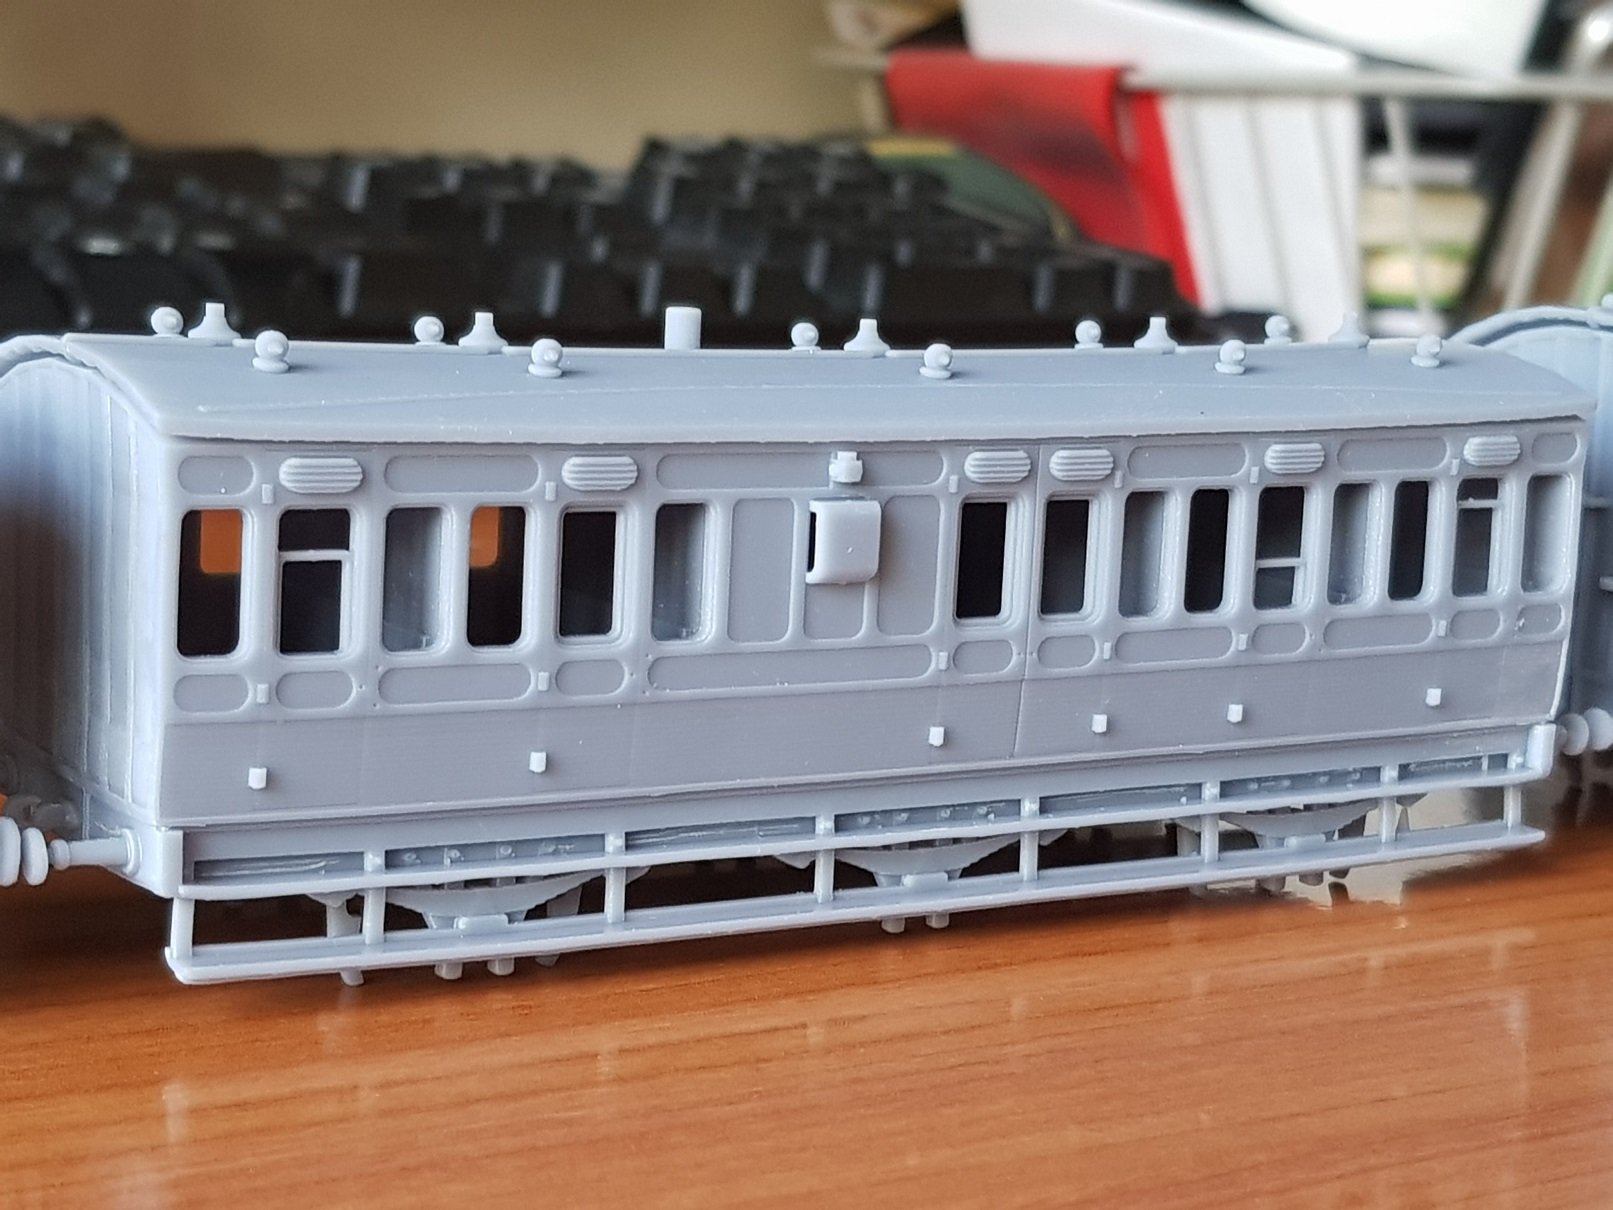
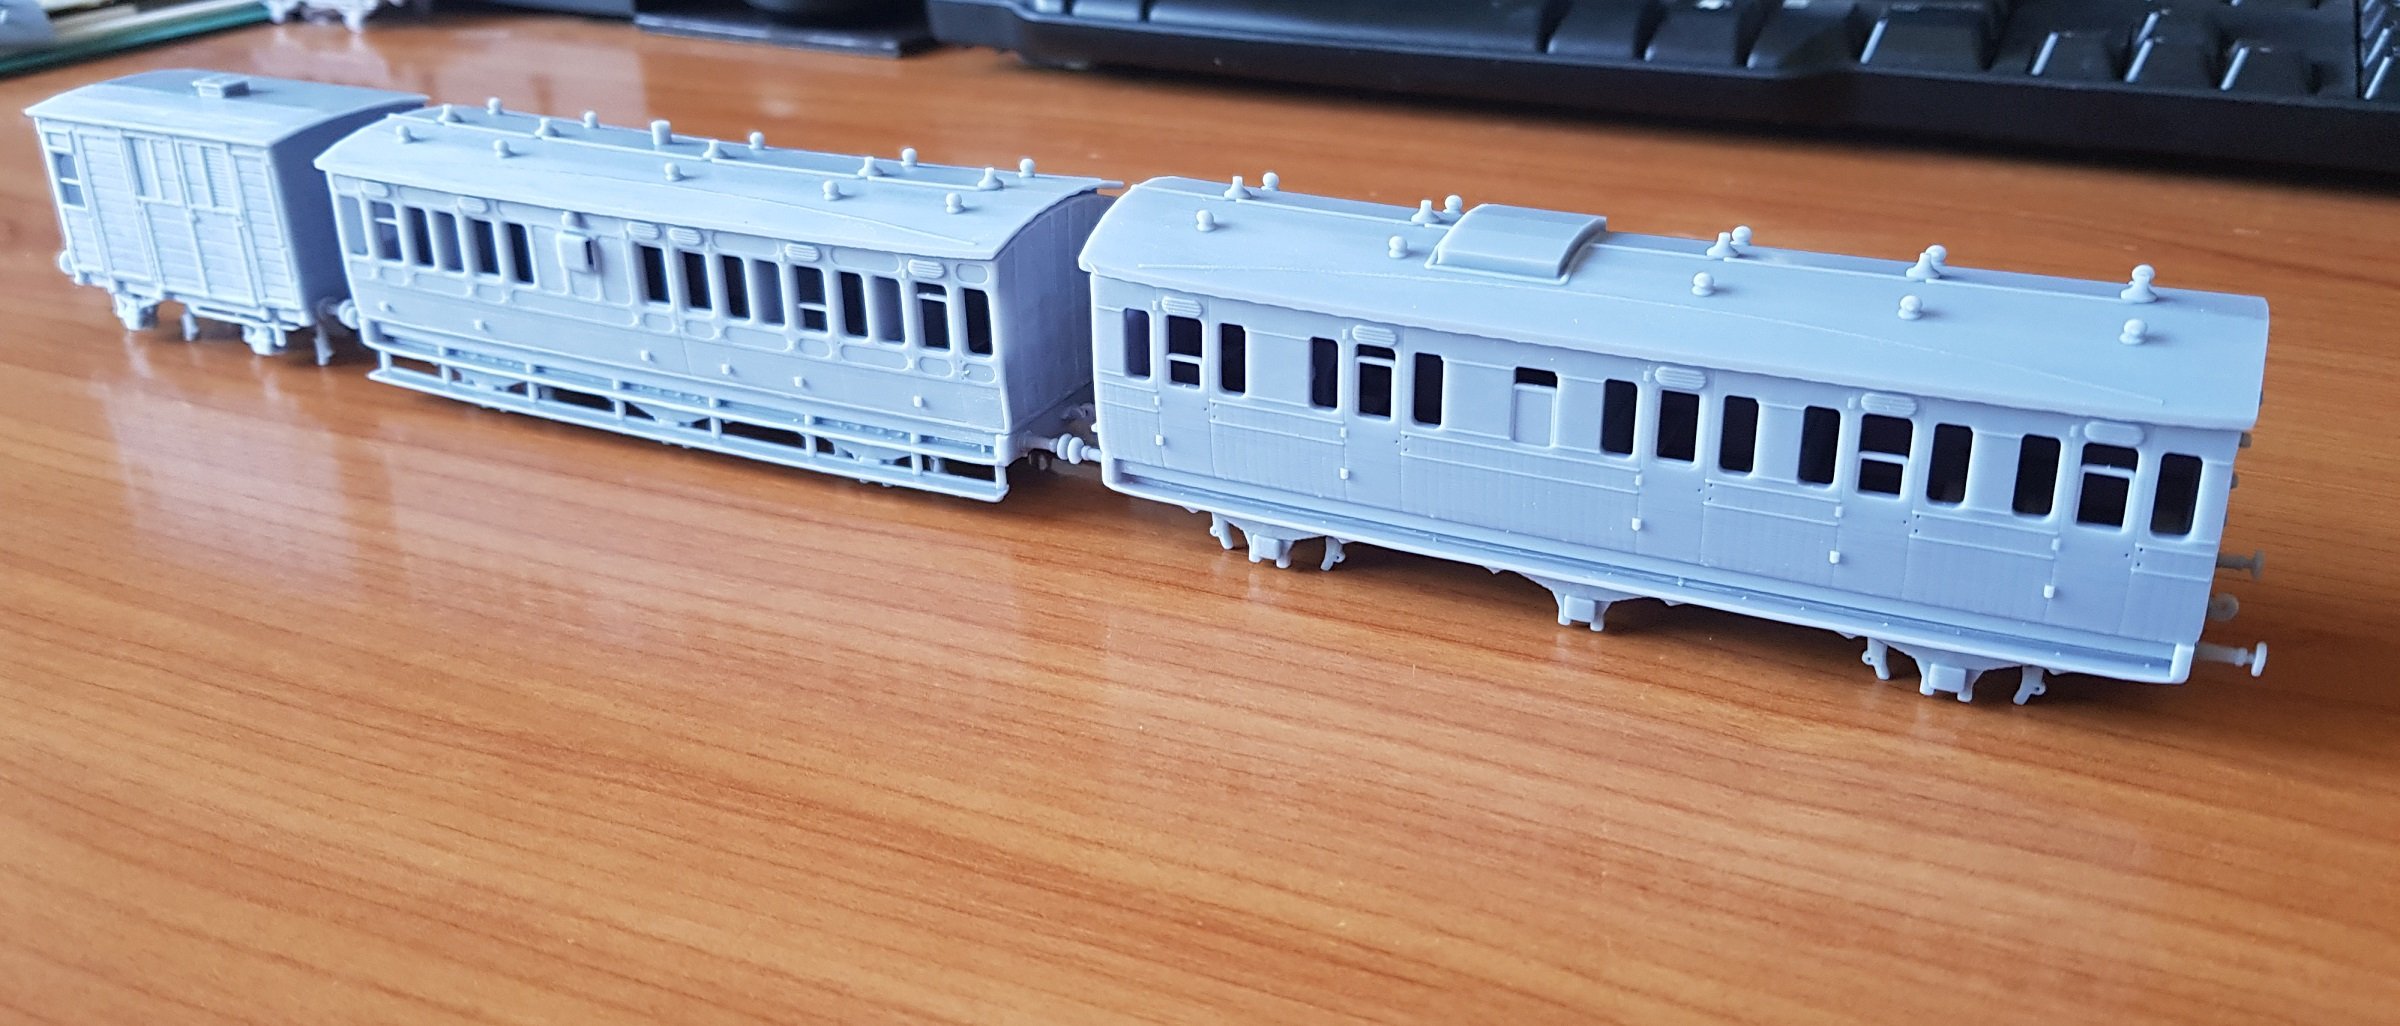
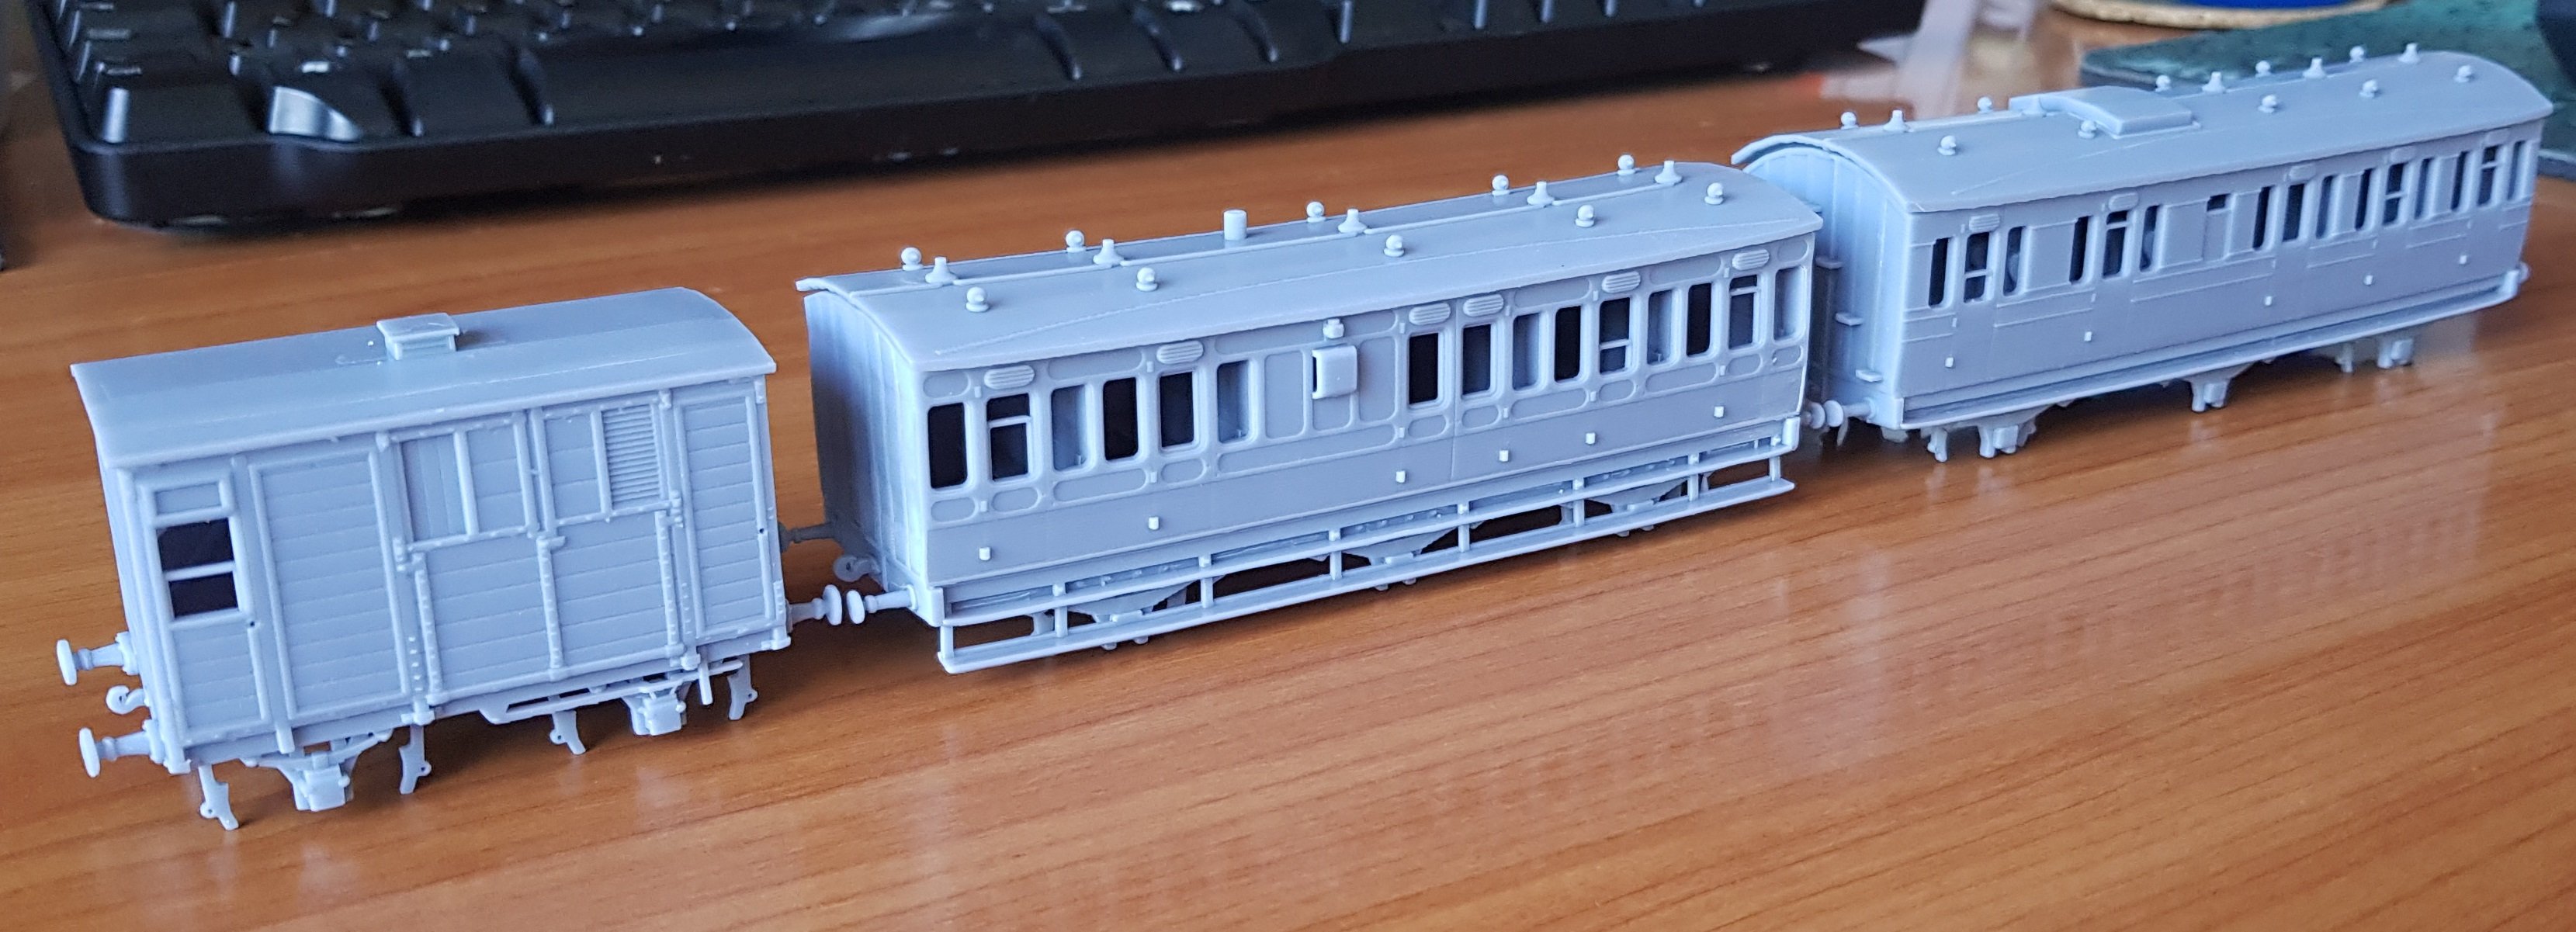
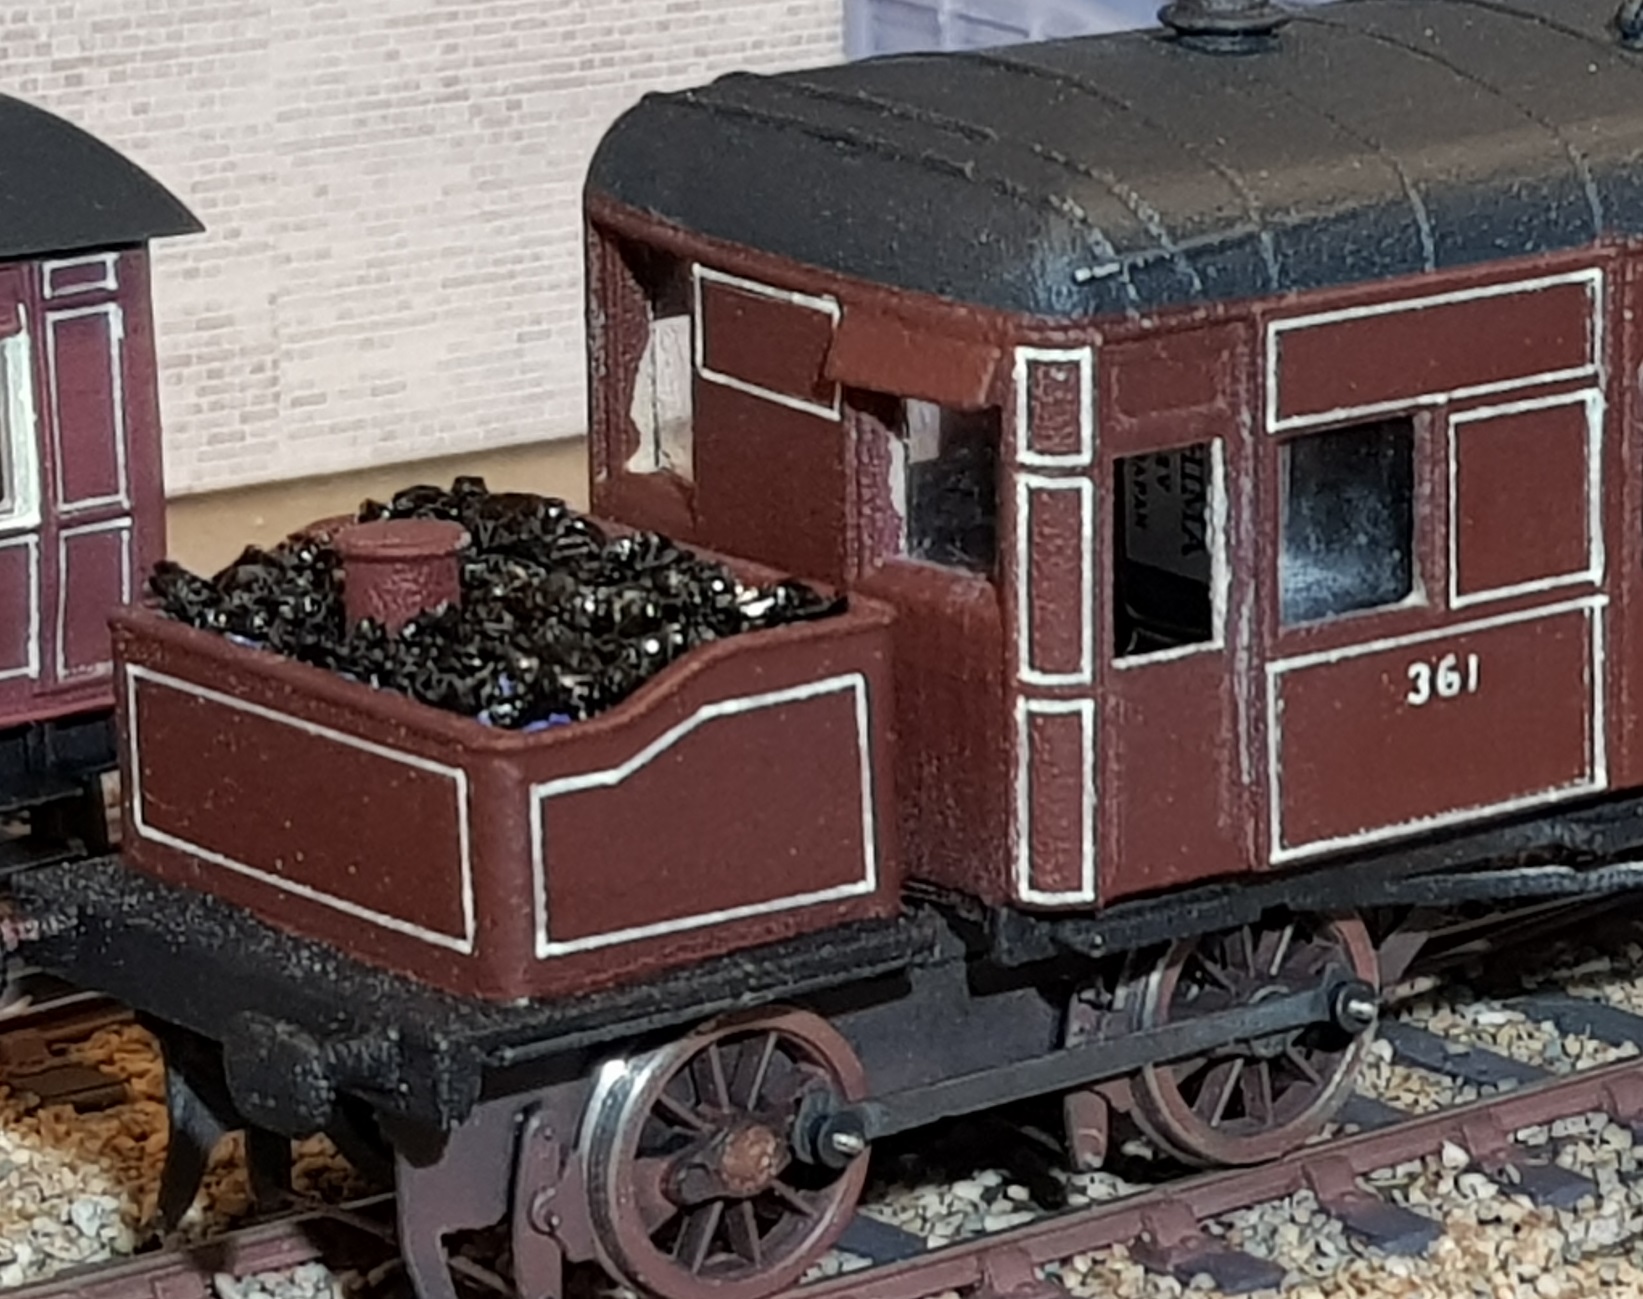
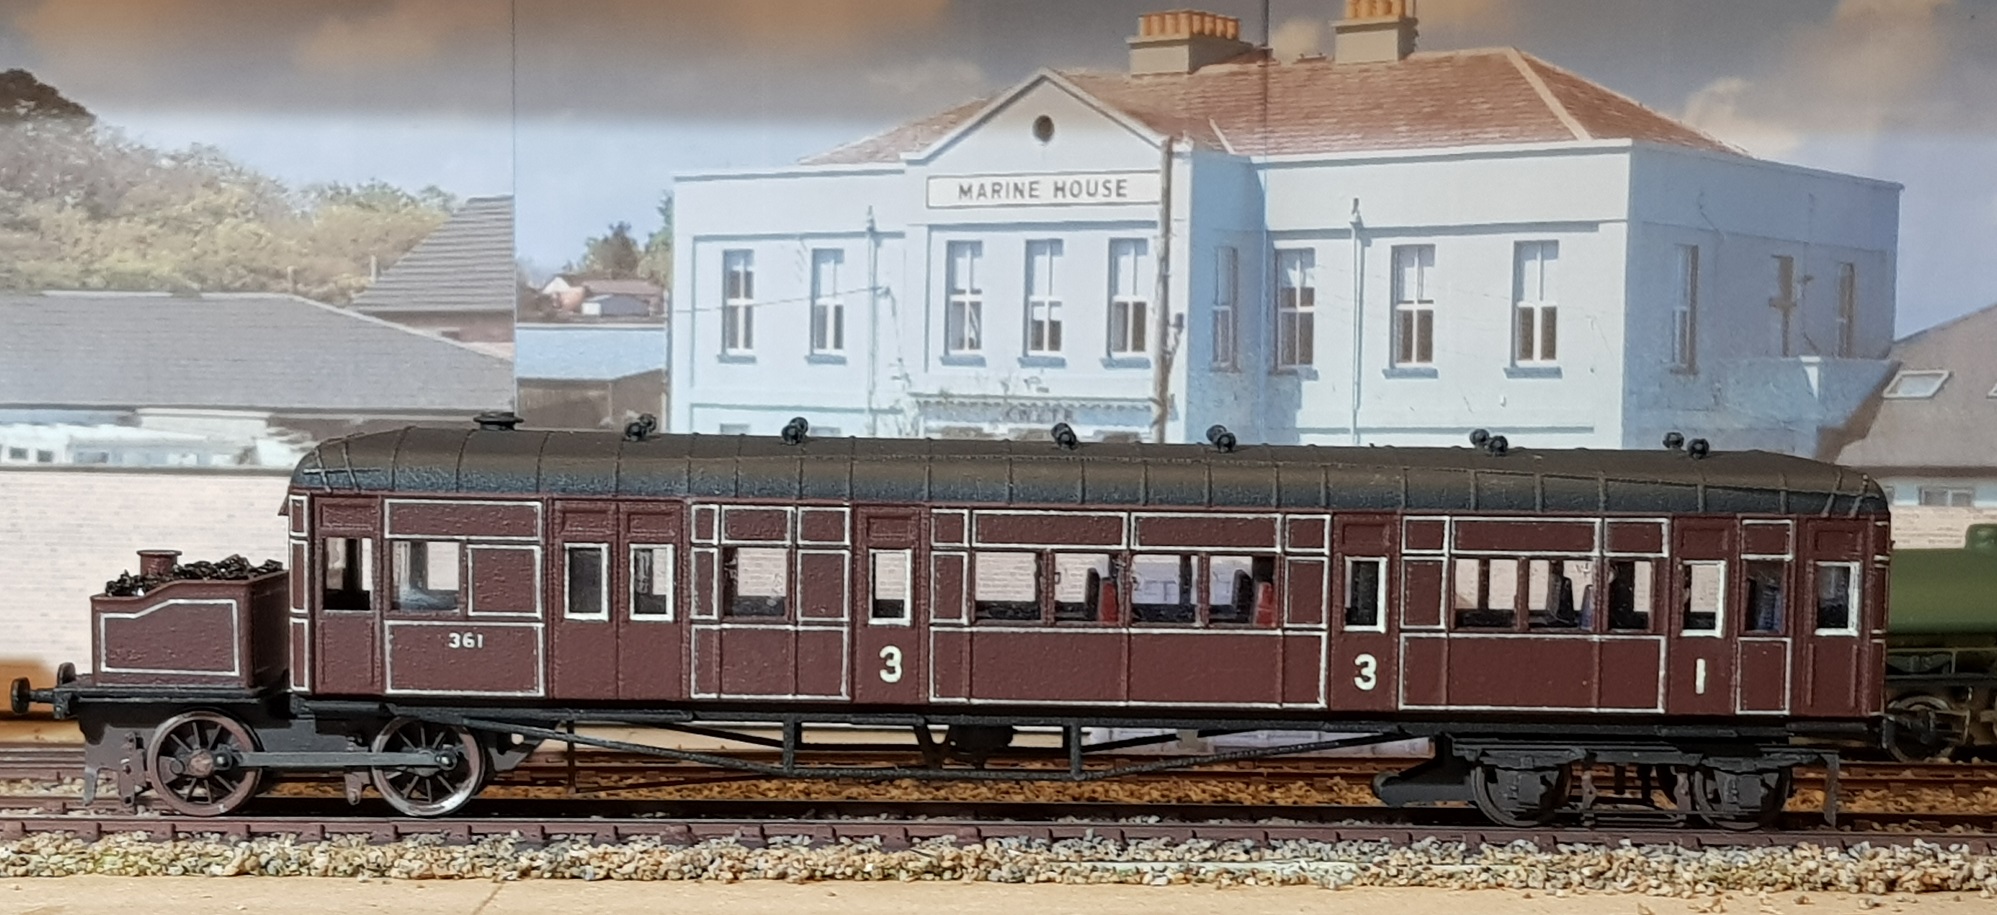
Now that the printer is almost behaving itself again (its taken a whole (1L) bottle of resin and many dumped models to the the settings dialled in correctly), I can finally get some more models printed. I have been working on coaches to add to those I already have. I figured I needed another brake coach and a compo coach would be good also, so straight from the printer and without further ado: First up: 1st / Lav / 3rd built in 1907 at the Grand Canal St. Works as No. 15, converted to all first in 1922 as No.25, and finally re converted to 1st / Lav / 3d in 1936 as No.30 - finally withdrawn in 1949. 33'6" over headstocks with 11' wheel bases And, no, your eyes are not deceiving you, there is a slight bow in the roof. This element is printed separately from the body to allow access to the interior; the net result is that it bows slightly when curing. Most of the bowing has reduced overnight, but the final curve can be encouraged with a hair dryer. This material responds well to gentle heat and can be tweaked to form another shape, which it will hold once cool. This coach is interesting in that it has vertical timber panelling with modest panelling lines along the sides. Roof tank for toilet is a nice touch. So some work to do in providing a brass chassis, adding handrails for the end steps, brake details, door handles and asscoated fixed pulls. Hopefully that should not take too long. Second Up: 2nd Class, built in 1875 at Metropolitan Carriage Works as No. 57 and converted 3rd Brake in 1914 as No. 70, - finally withdrawn in 1926. 31' 0" over headstocks with 9' 6" wheel bases Again same issue with the roof on this one - easily sorted. This is the Mk4 version of this coach as I have had quite a few fails due to resin quality, resin settings & some design flaws, however I think we have got there this time. This one also needs a brass chassis, brake details, door handle and associated pulls before going to the paint shop. And for giggles, a proposed suburban branch train to be seen somewhere down the Shillelagh Branch line - probably stopping at Coat's Bridge!! With a nice tank loco up front we will have the 1st / Lav / 3rd, followed by the 3rd Brake providing the braking power with a horse box tagged on for the gentry - perhaps coming back from the RDS show? After much trial and error (many errors), I'm very pleased at how these have turned out. Looking forward to getting them on the bench to get some running gear underneath and then into the spray shop for painting - well, once energy levels will permit. Anyway, all for now. Ken

- 379 replies
-
- 20
-

-

-
 I would not agree that this is an error - what I have found is that any moving section (turntable, sector plate, or traverser) must be in place, and location holes fixed before any track can be laid. It is quite amazing how much difference there can be in track position from a very small movement off line during the physical installation. Aside from that, this is looking great. Well done. Ken
 -
Bob, as a fellow modeller "under the weather", I can say the modelling, in practice or in book format is something that helps keep me both sane and occupied. I do hope your road to recovery is lined with the same level of care, attention, and good wishes I am receiving. As others have said, your health is everything, so take your time a allow yourself to recover. Best of luck. Ken
-
Ernies Massive Irish 1930's to 2005 Photo Archive
KMCE replied to Glenderg's topic in Photos & Videos of the Prototype
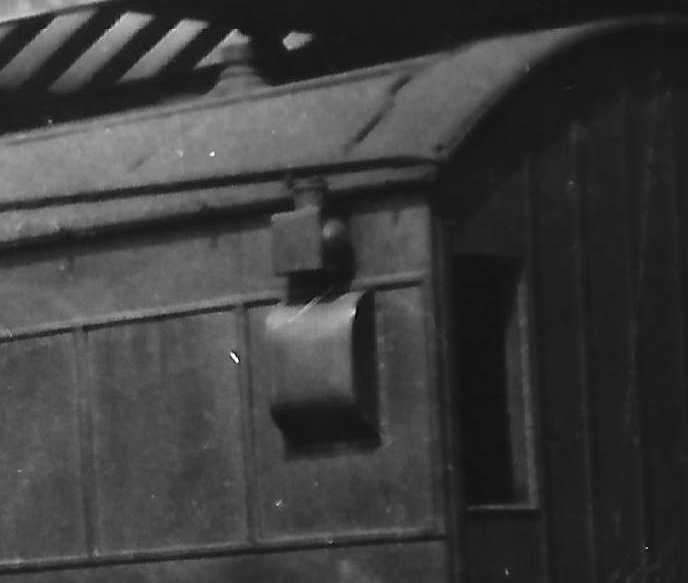
Difficult to put a date on this one, however the bunker/cab has not been modified, so that puts it pre c. 1936. 670 & 674 were modified in 1934 following crash damage with the others being modified later. The coach is a conundrum - from my research thus far I have not seen a D&SER coach with that type of ducket. The only type of ducket I have seen (if the brake coach had duckets - not always) looked similar to this: The D suffix does suggest it is ex D&SER stock. Others may be able to shed more light? Ken
-
One of my pet hates - the thoughts of them put me off finishing the 670 class I have on the bench; those buggers have three steps and are destined to send those with limited patience into apoplexy!!
-
Very nice work - your soldering is always to neat and tidy. Is it the photo angle or does this model sit slightly lower that your 558 - the boiler appears to be pitched lower so the longer chimney does not look so obvious? That's turning into a very nice little locomotive.
-
Signal Cabin / Signal Box Photos
KMCE replied to NIRCLASS80's topic in Photos & Videos of the Prototype
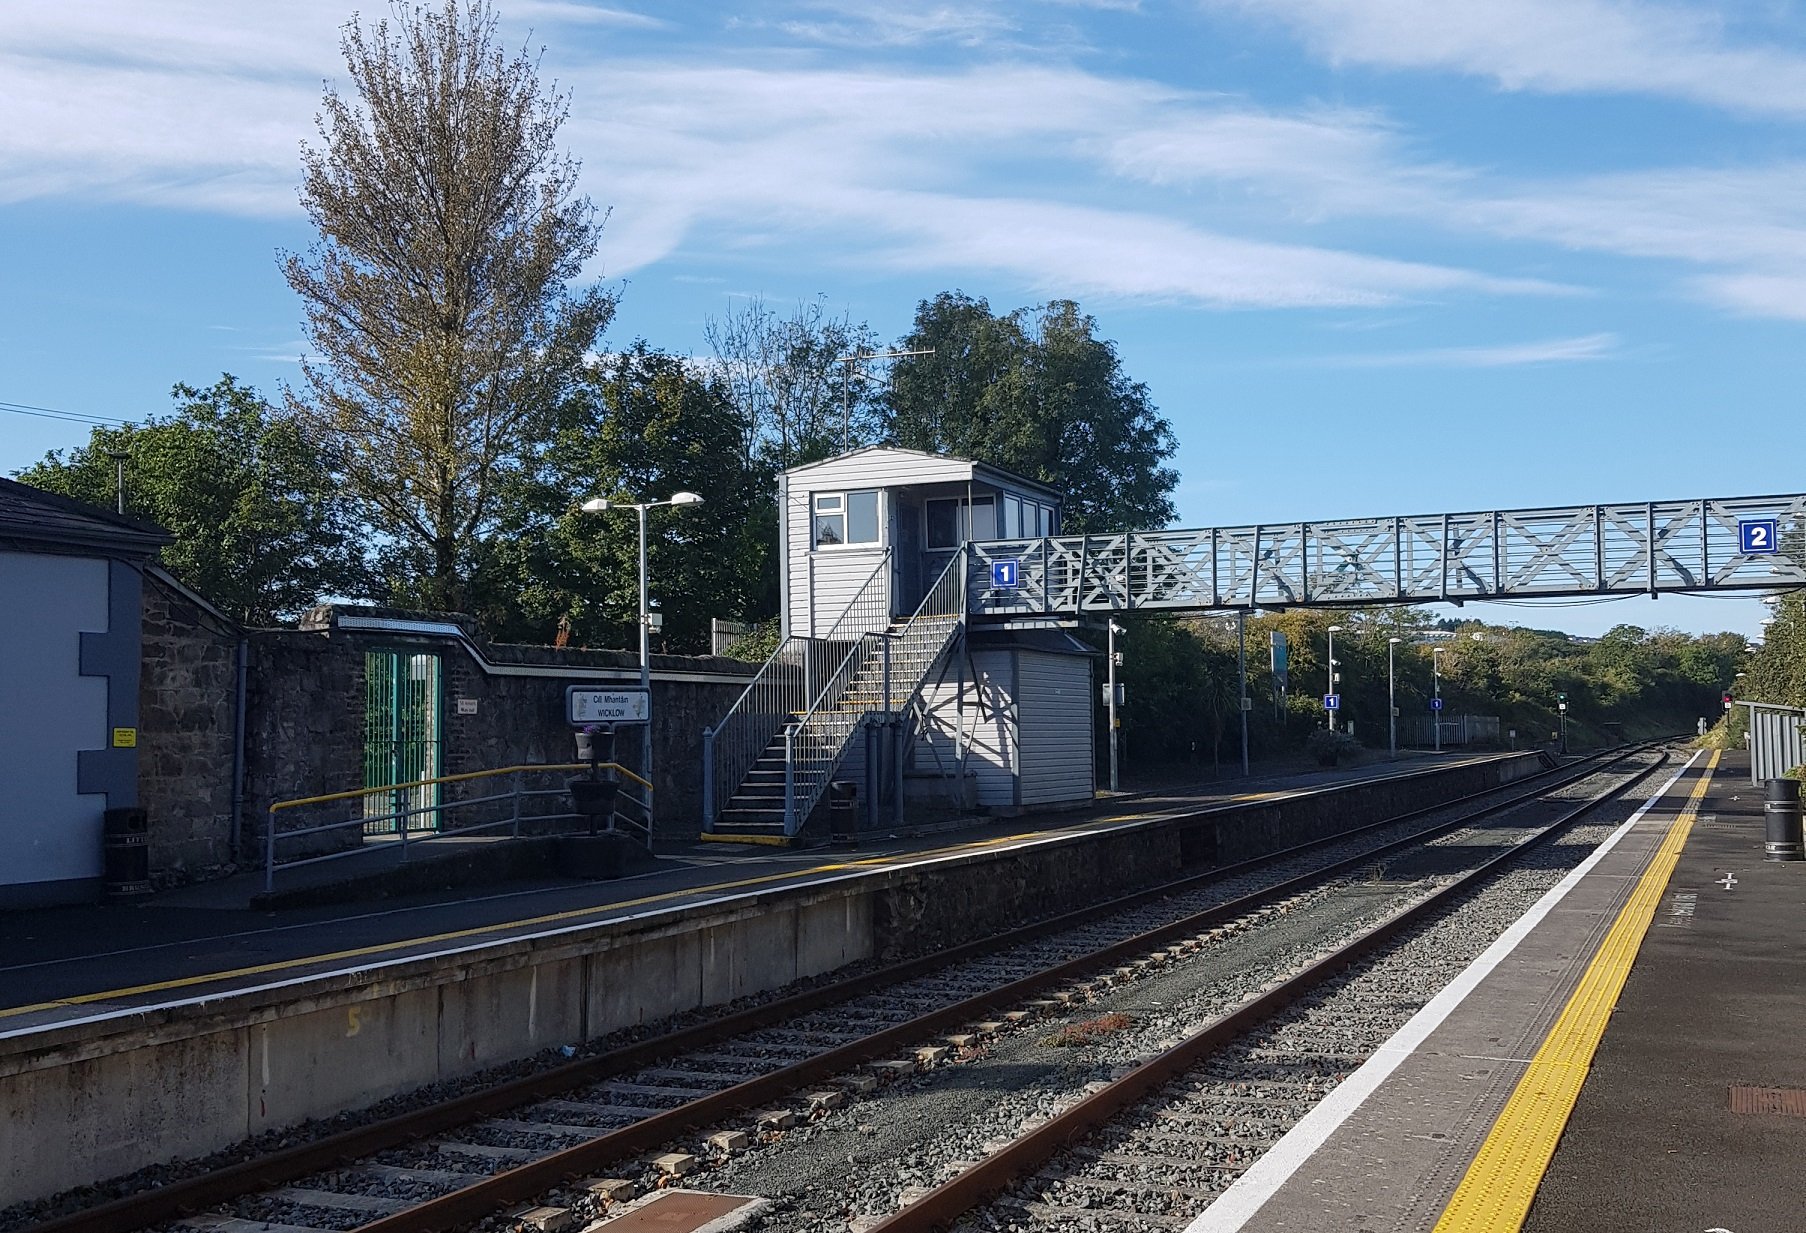
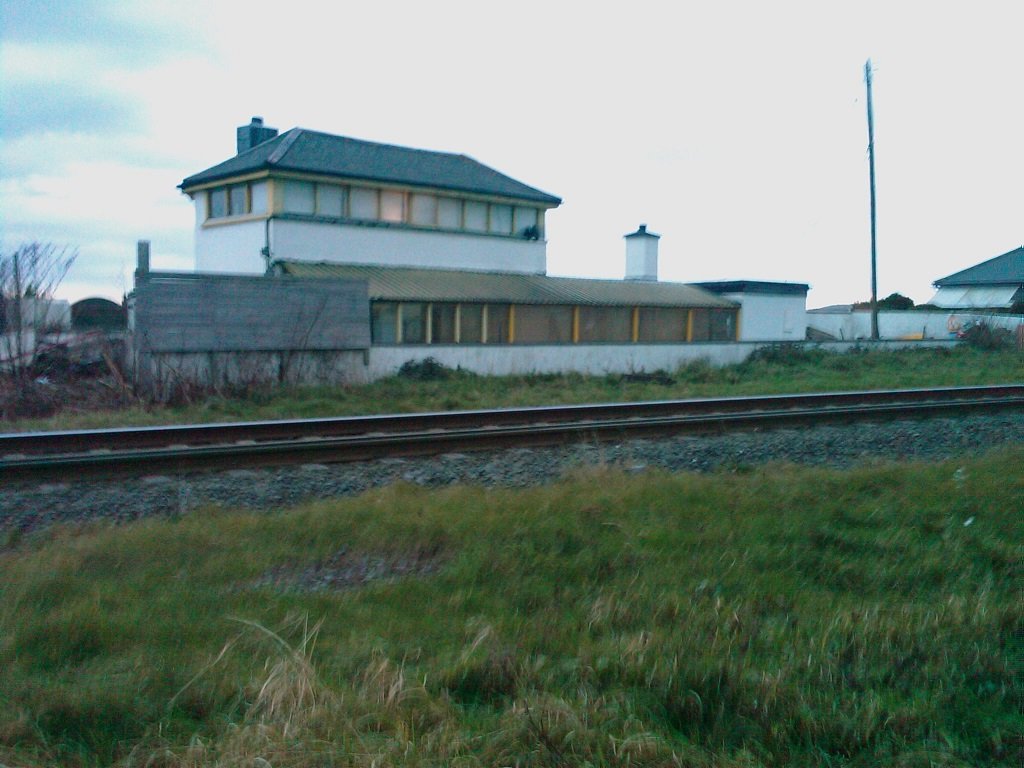
Wicklow Passenger Signal Box - Extant, but unmanned. Wicklow Murrough Junction Signal Box, long unused and now a domestic dwelling.
-
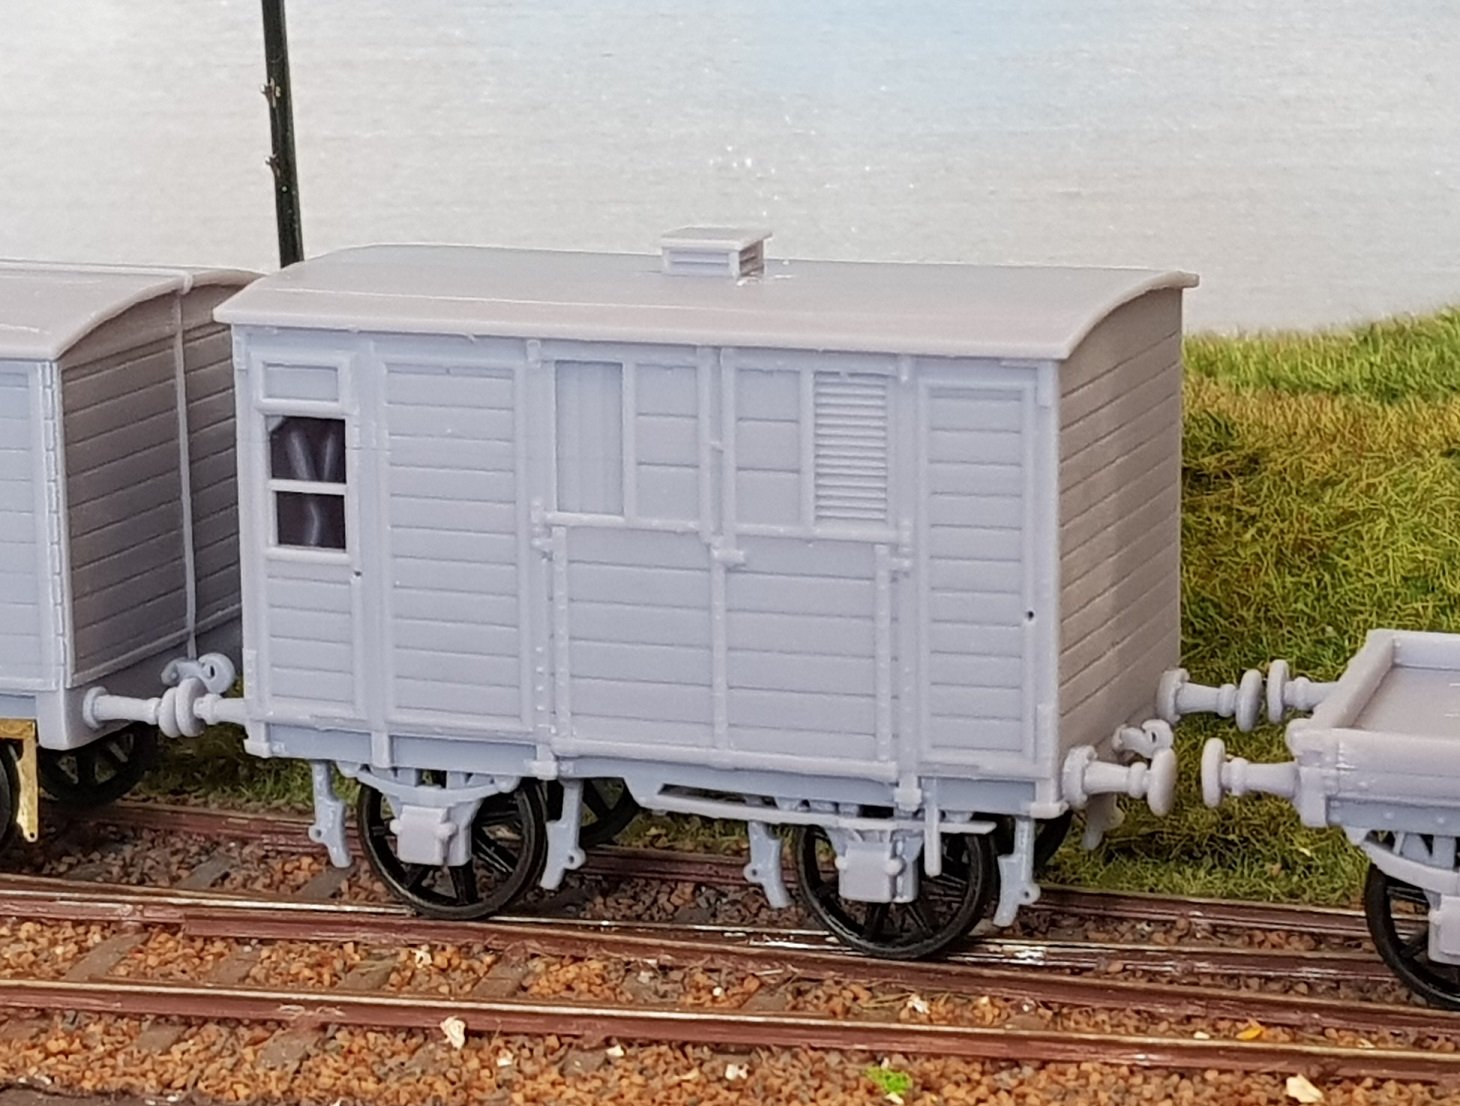
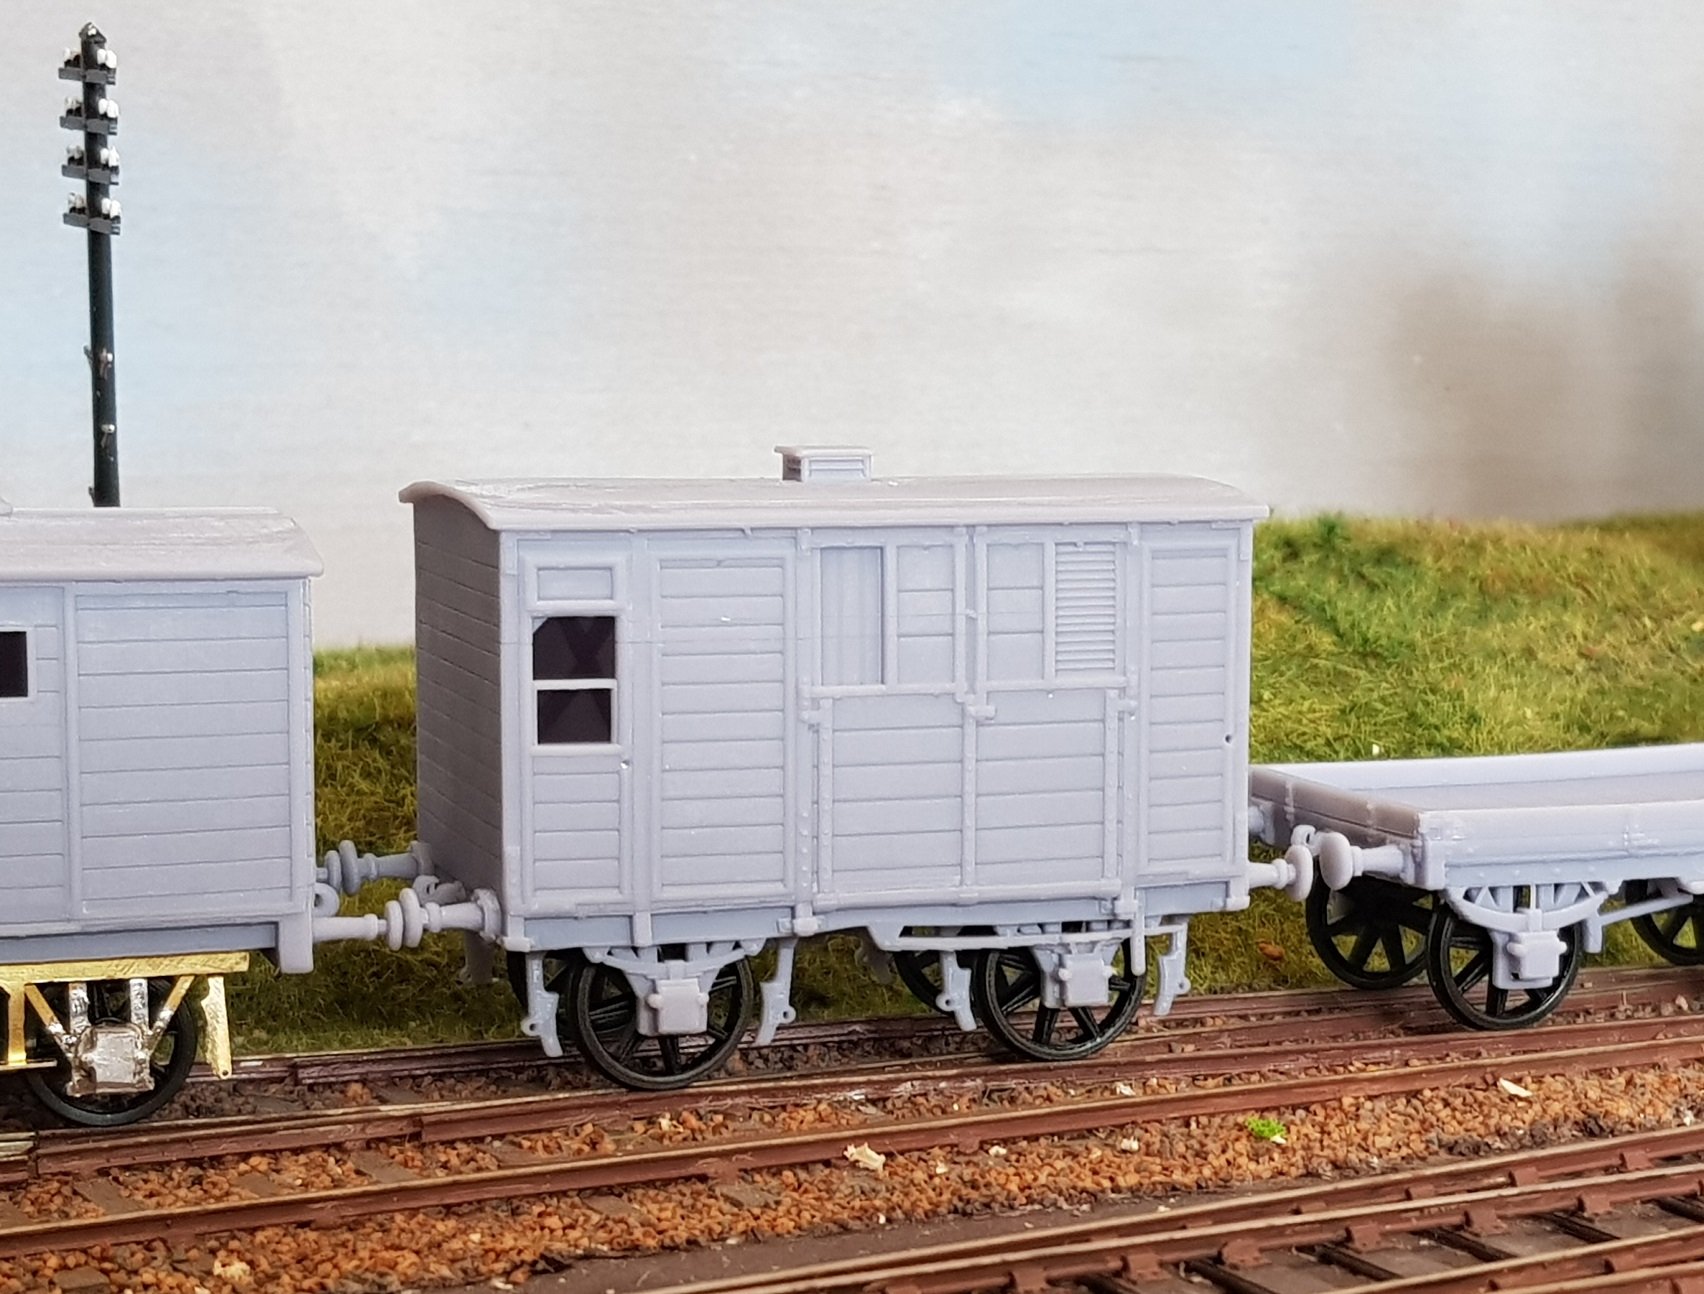
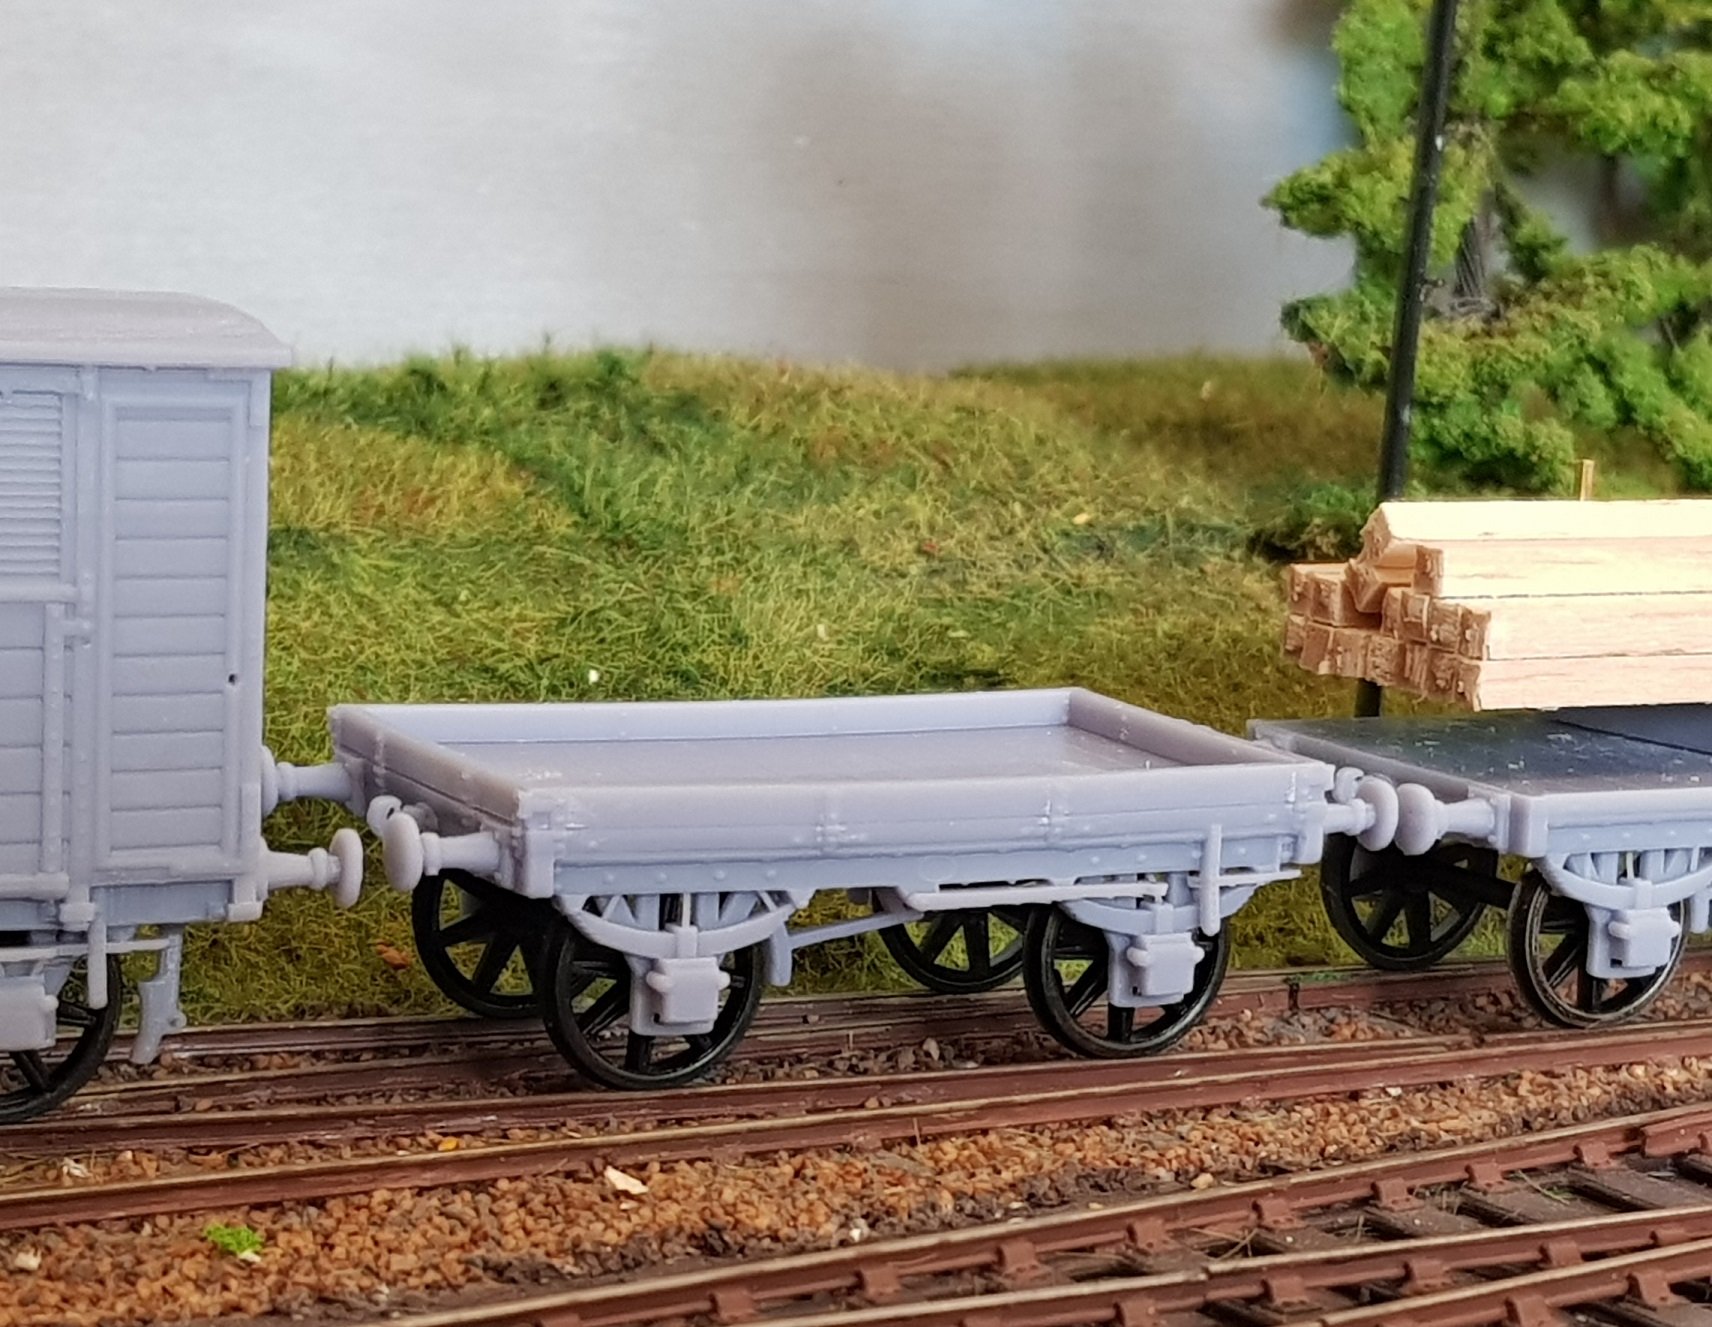
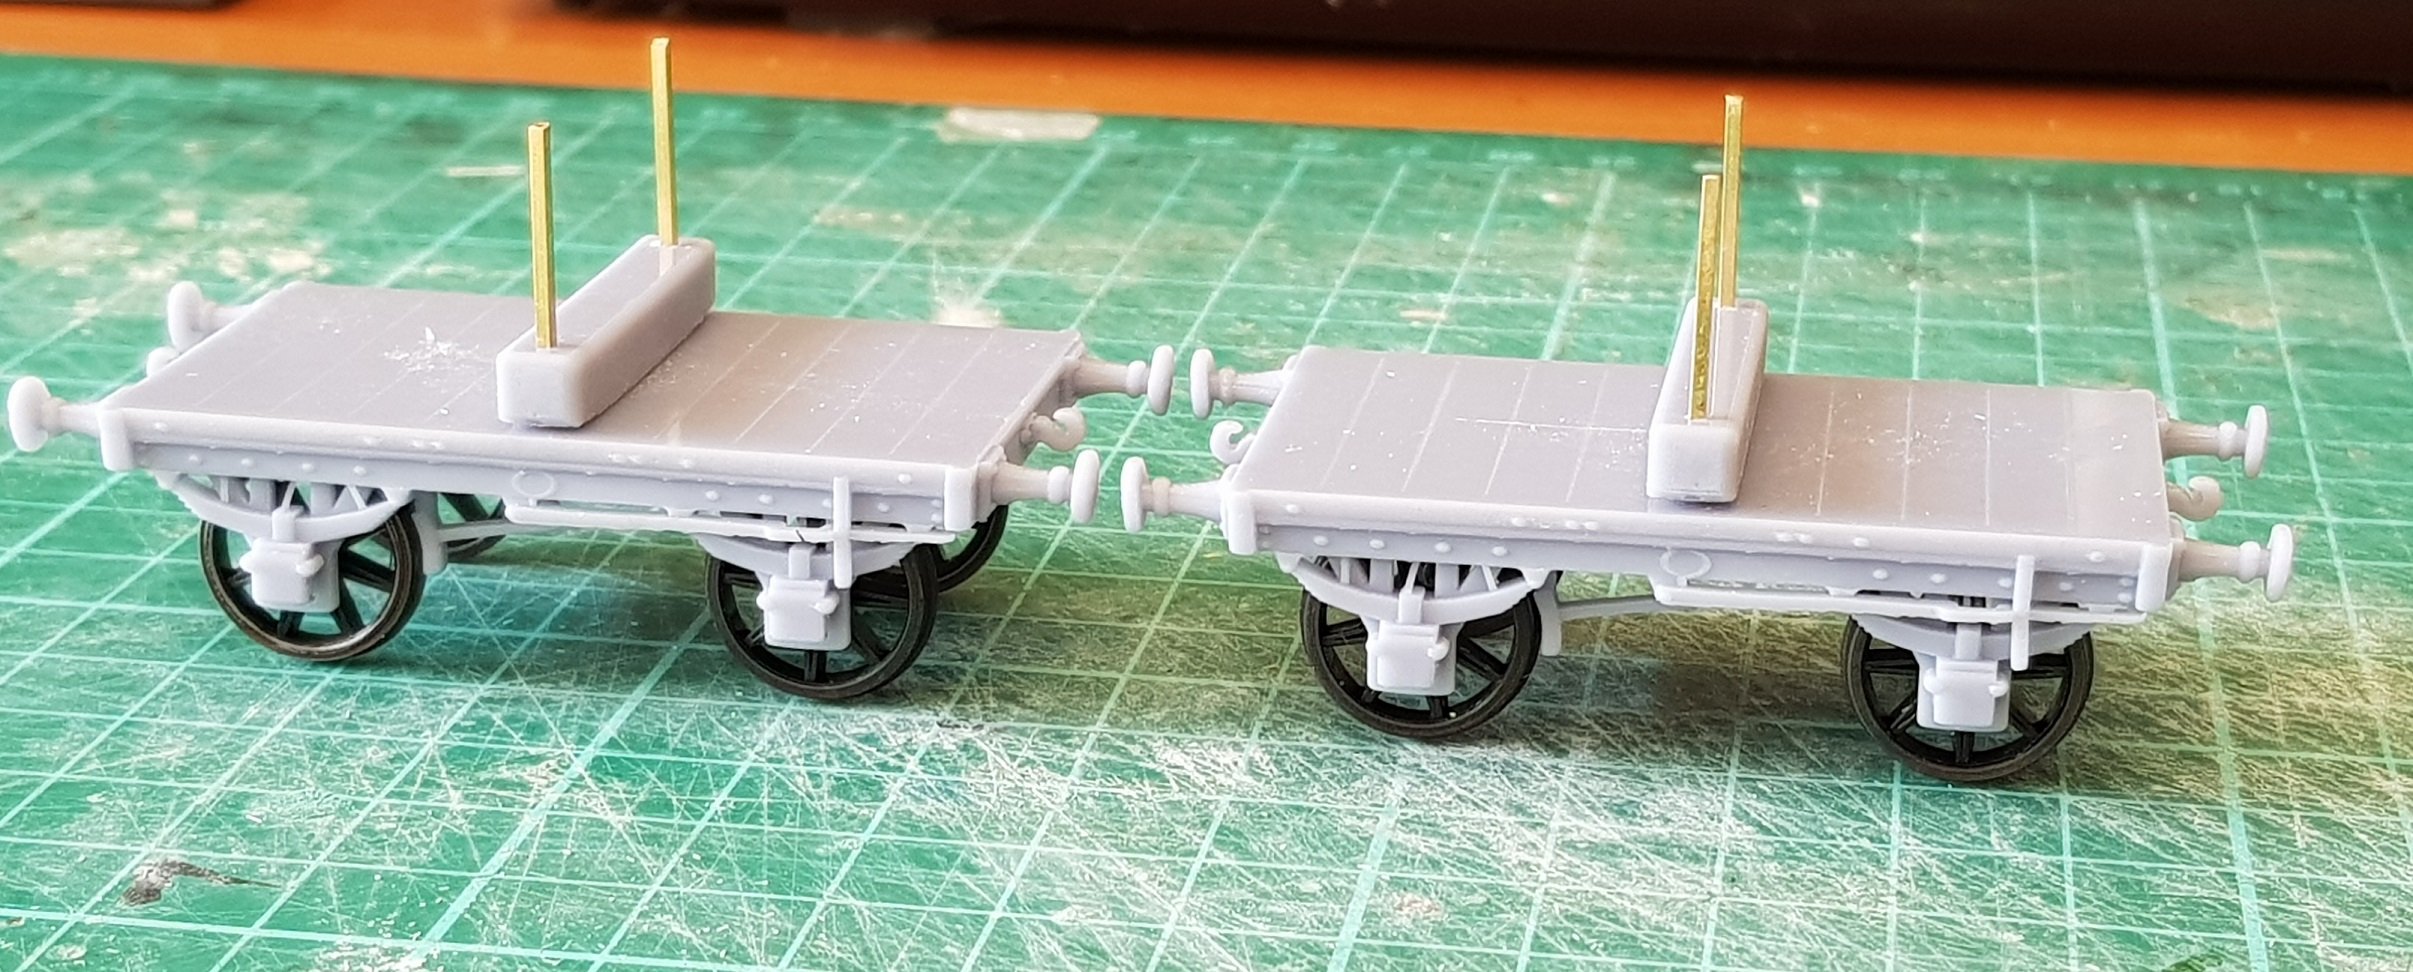
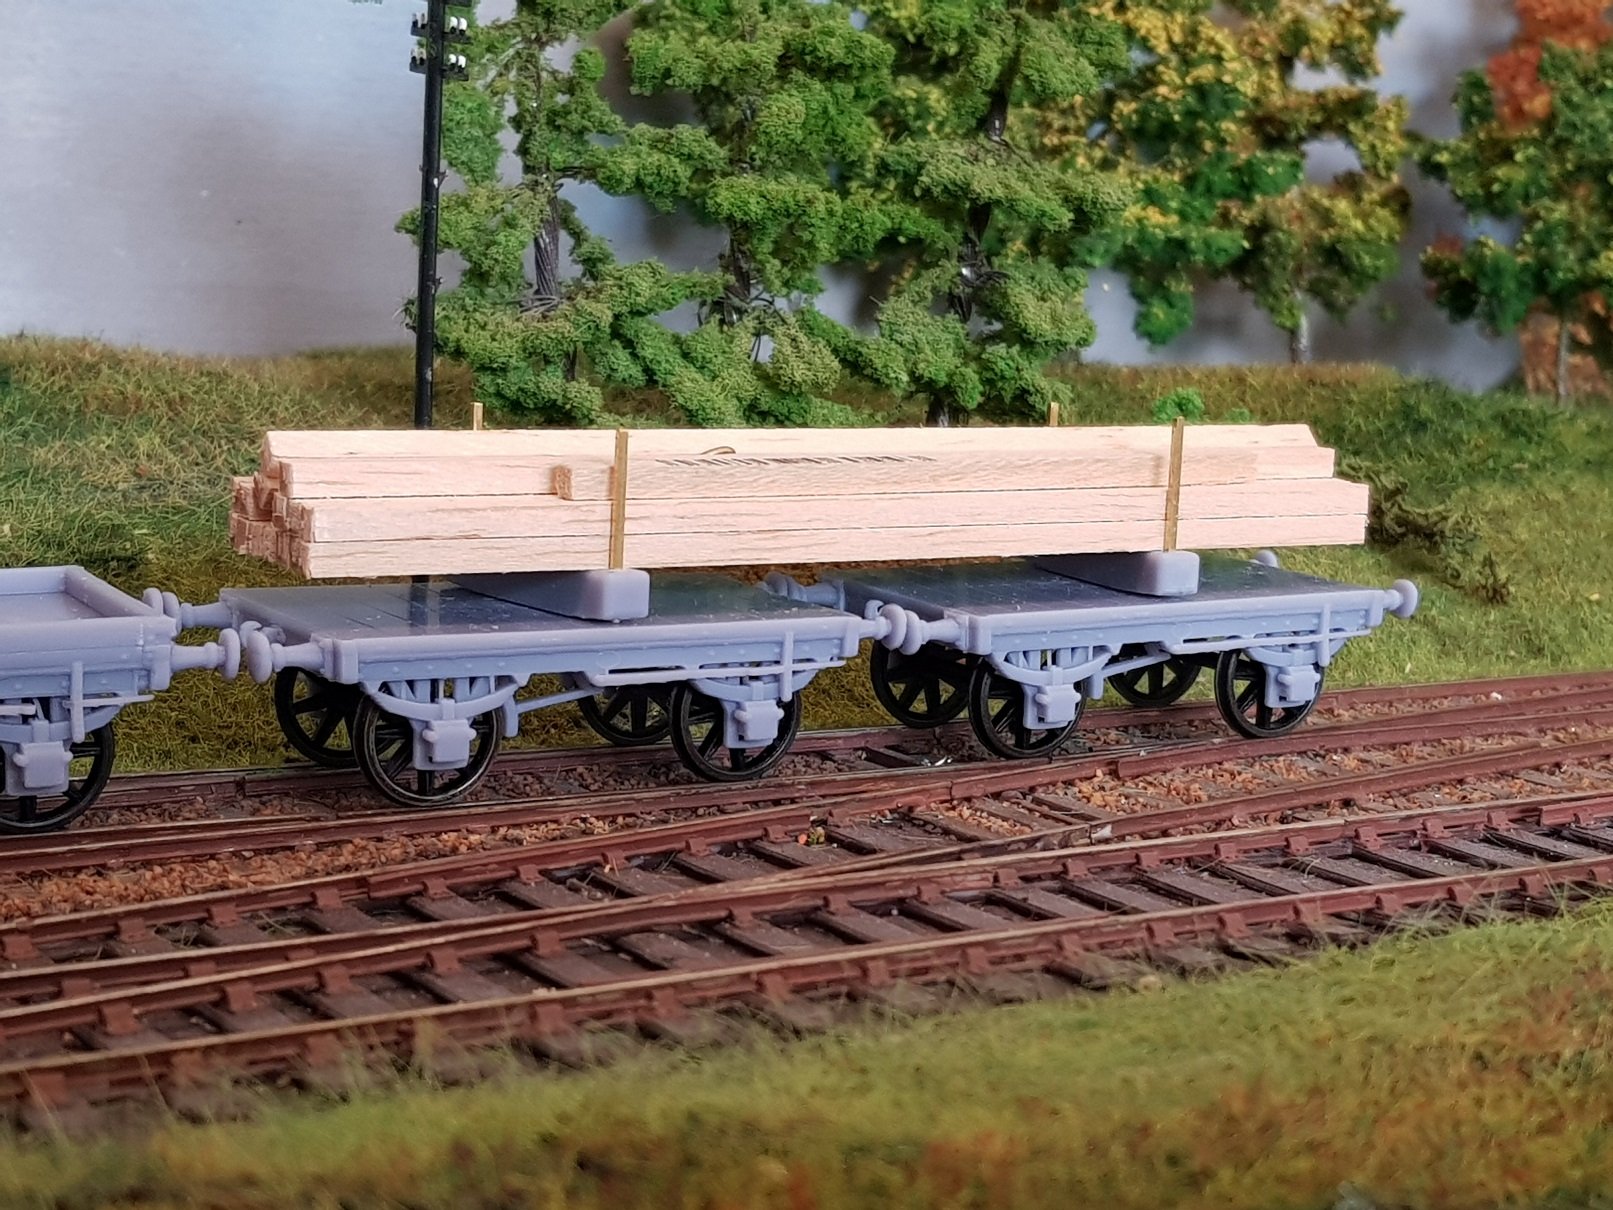
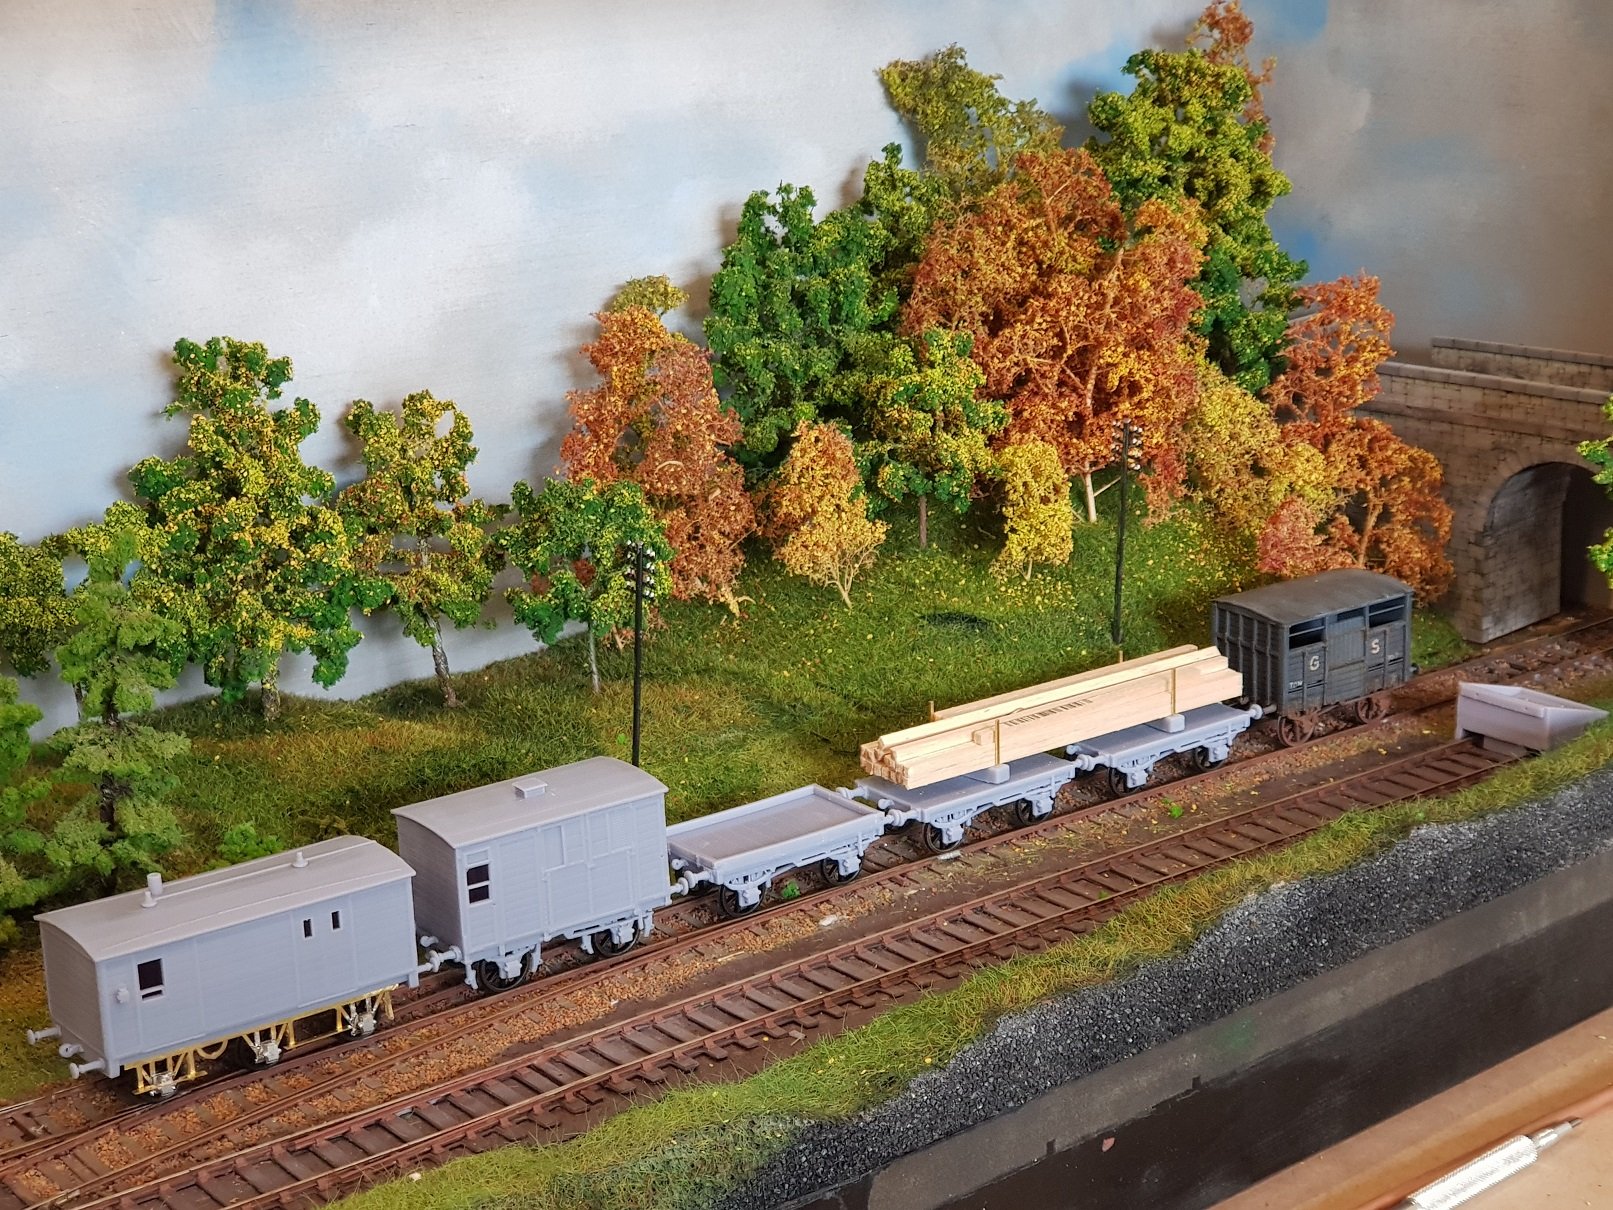
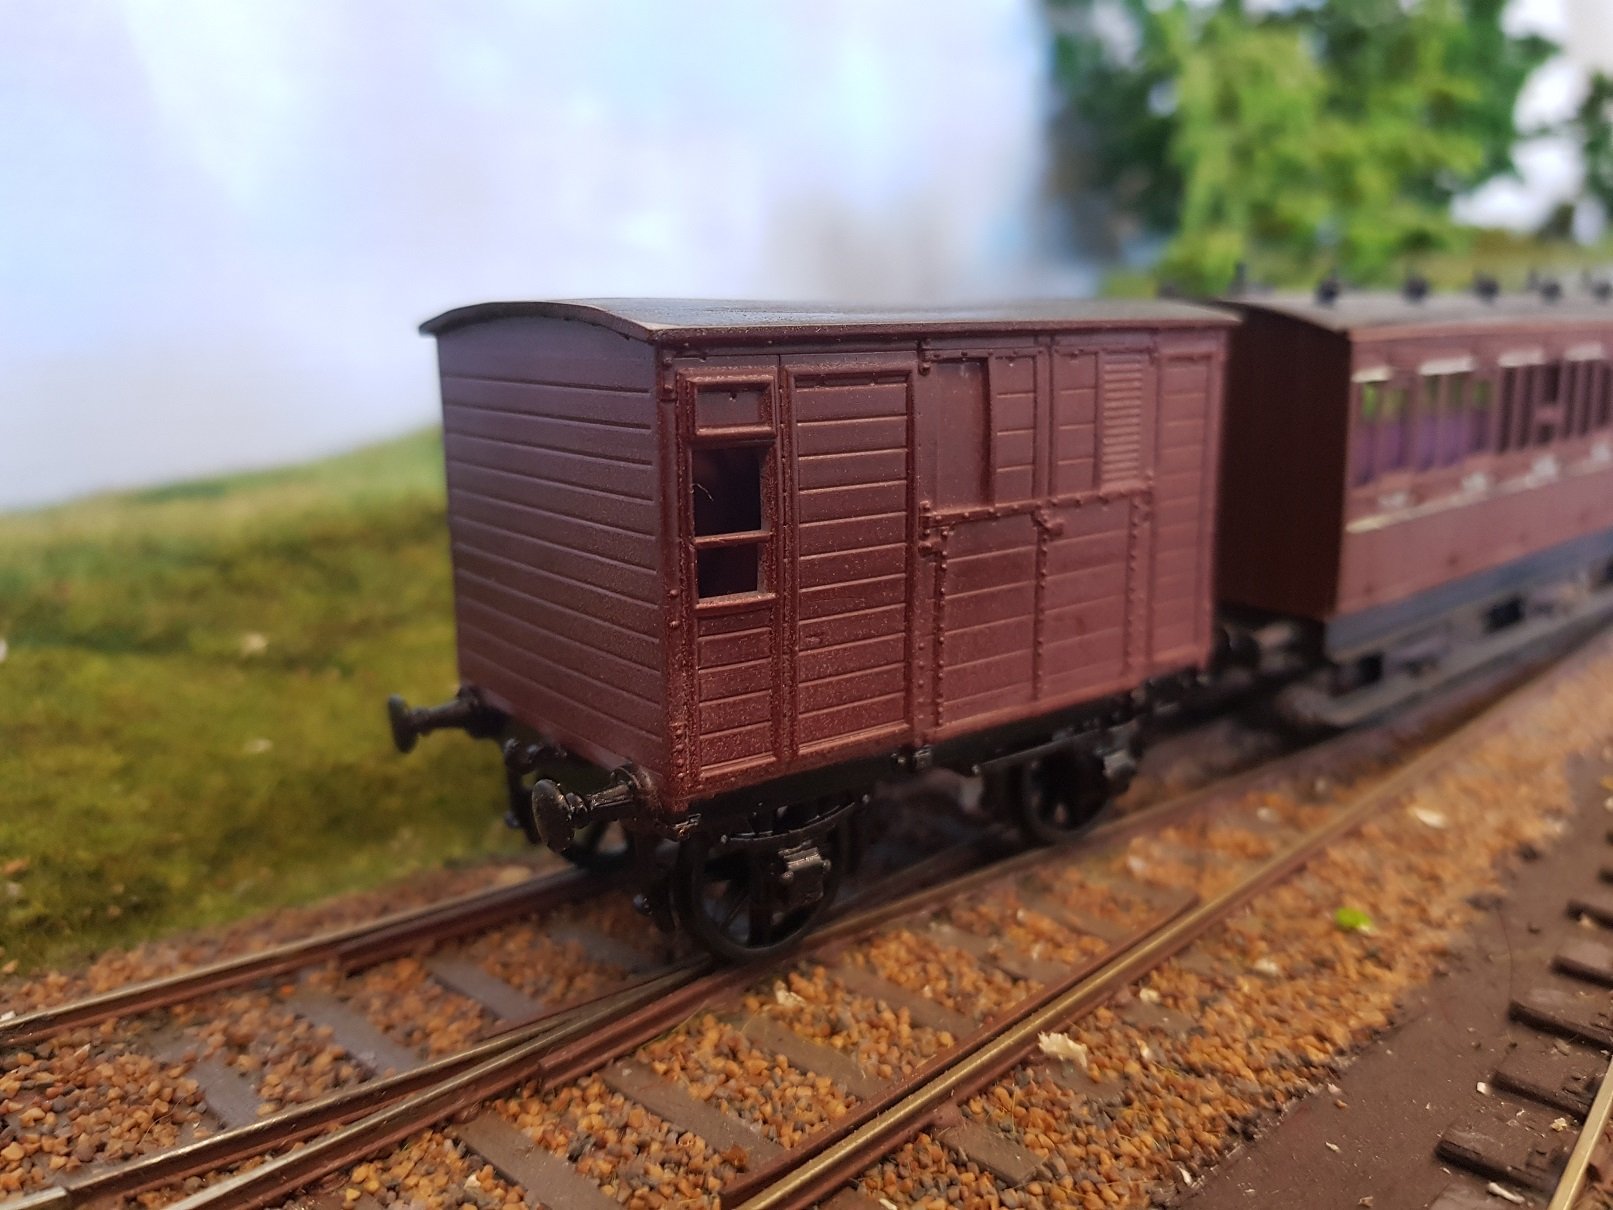
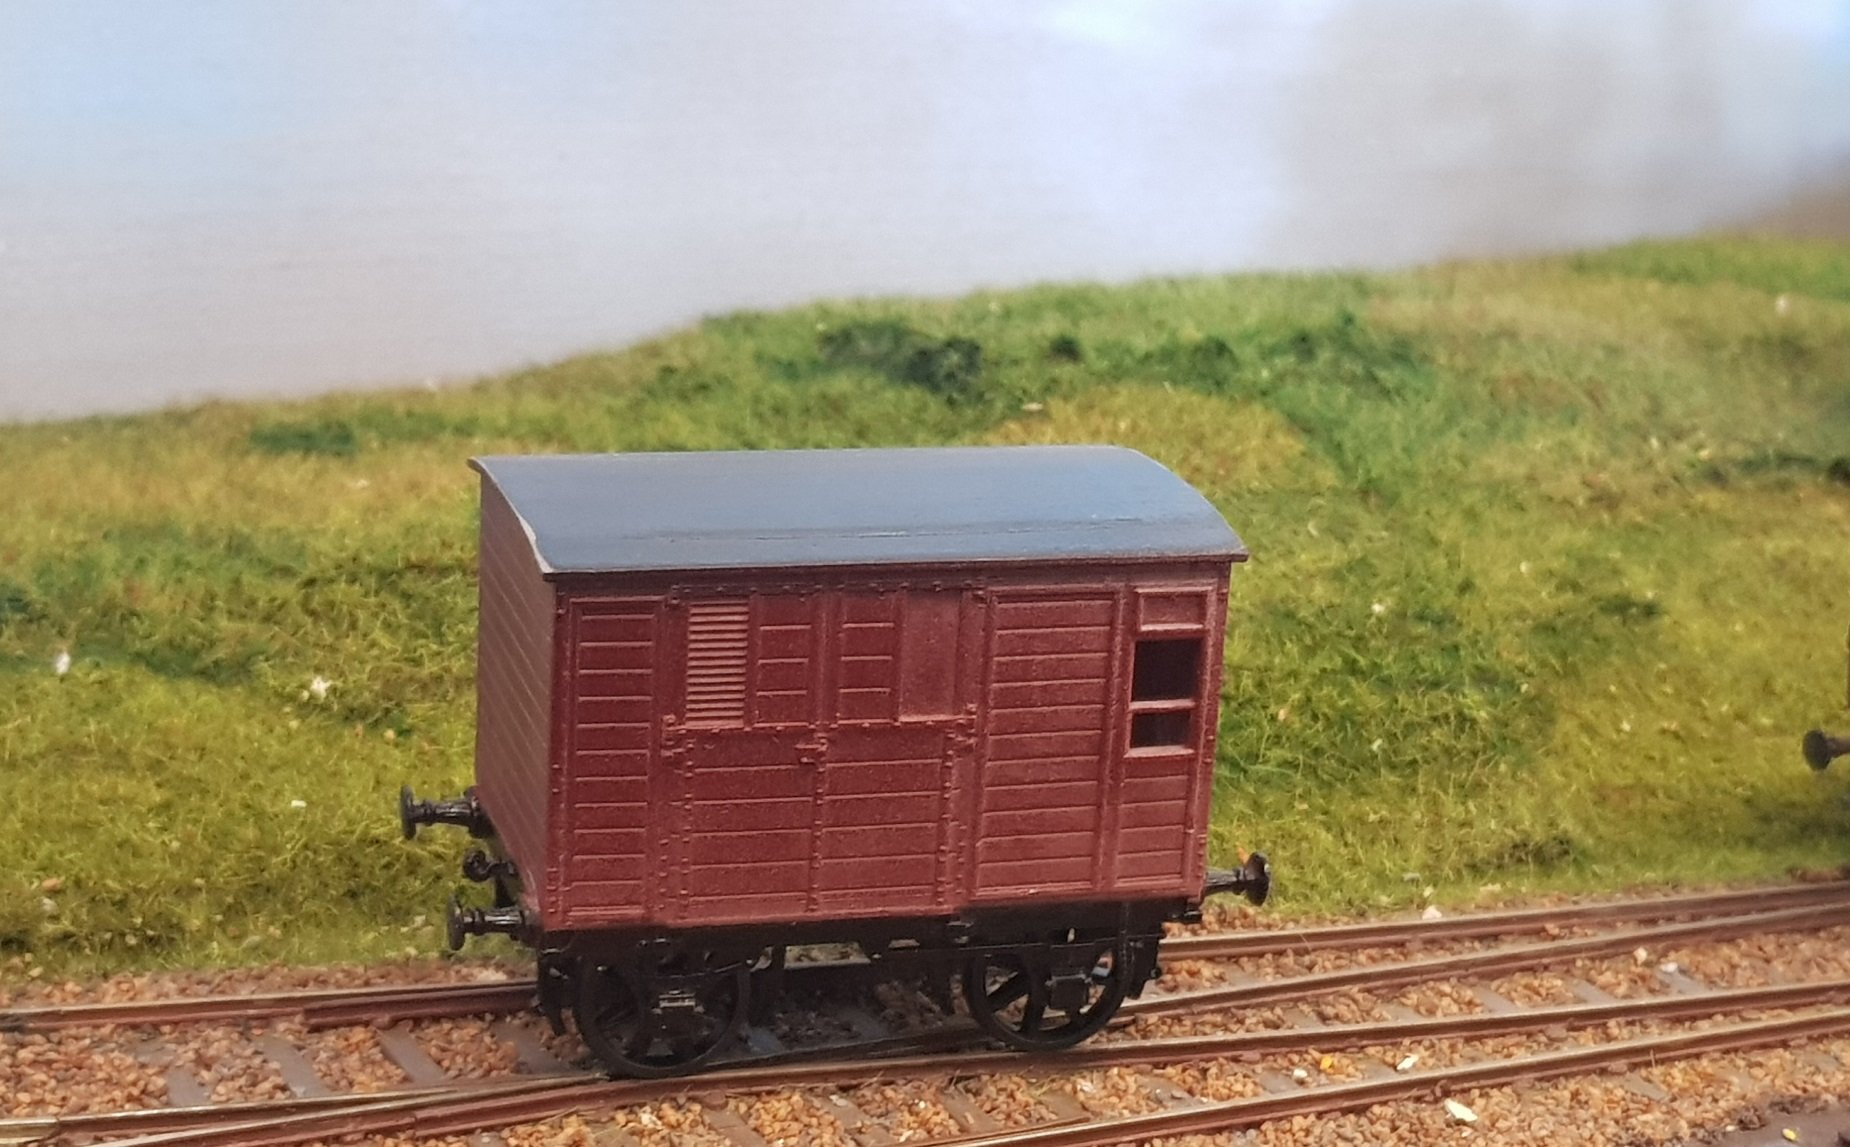
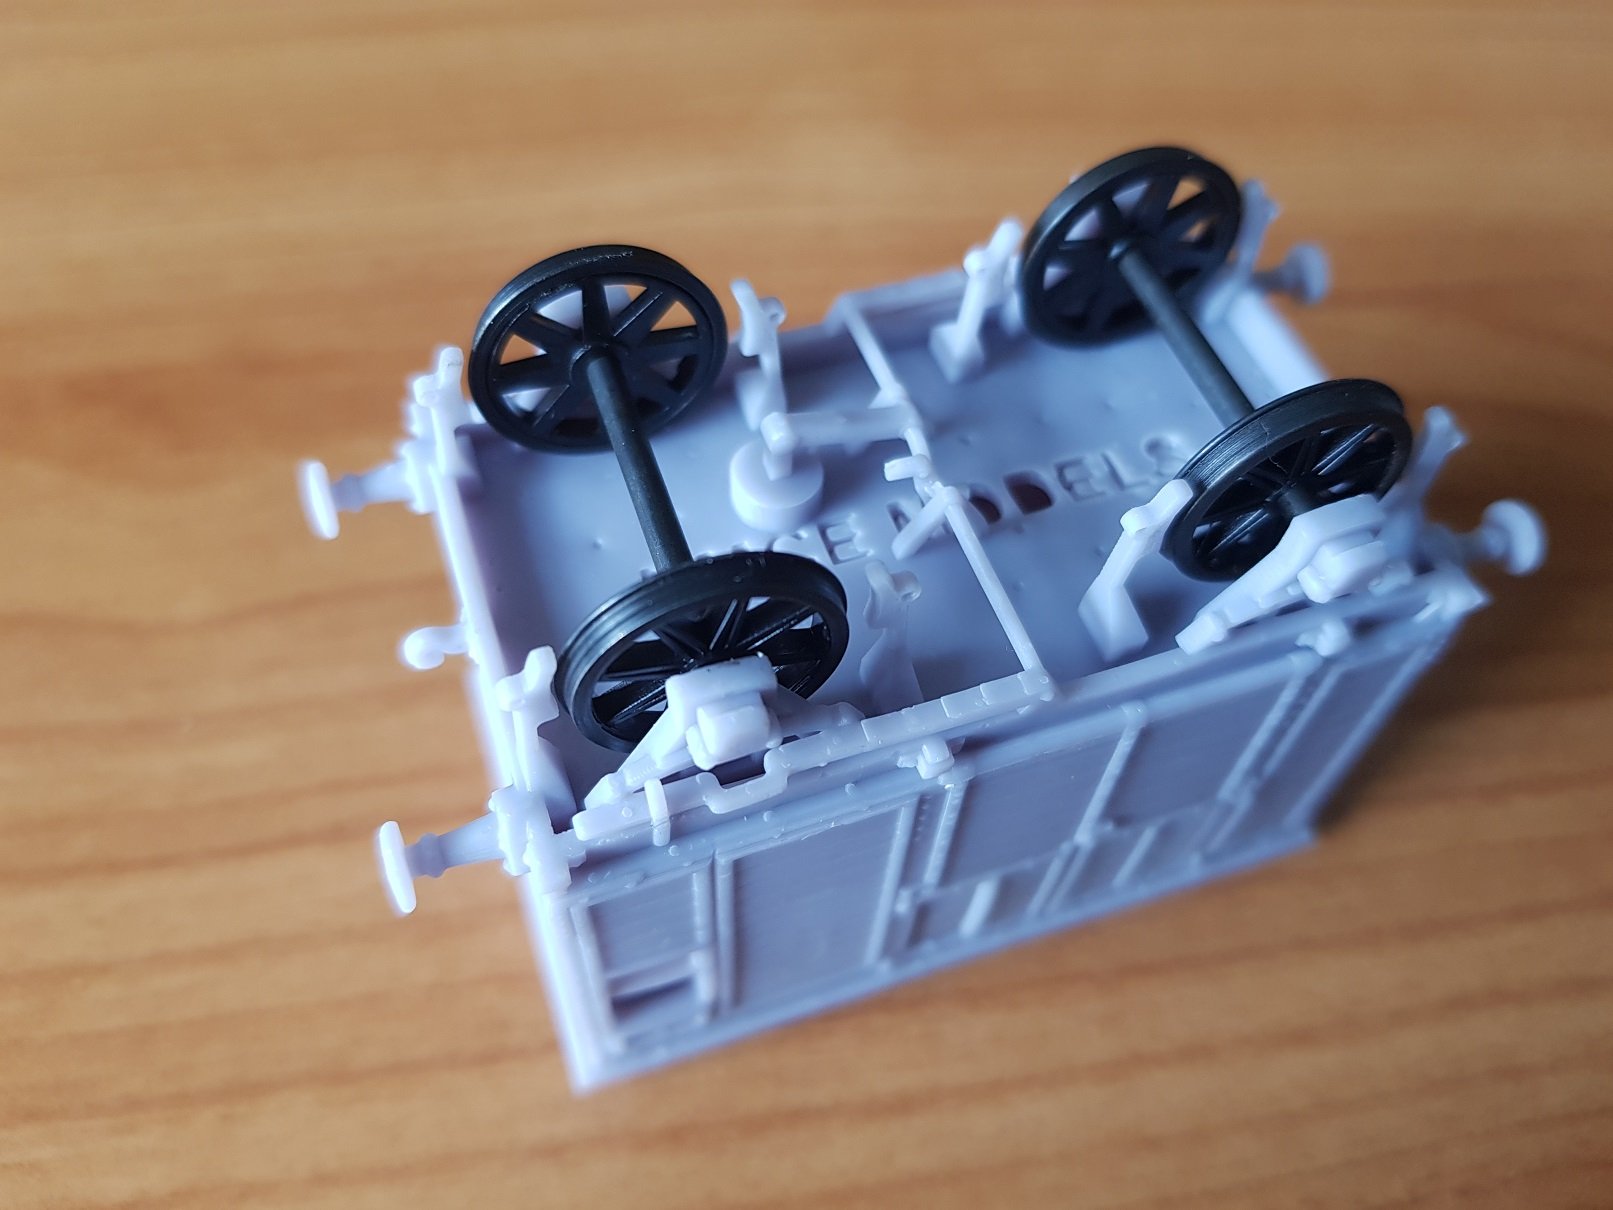
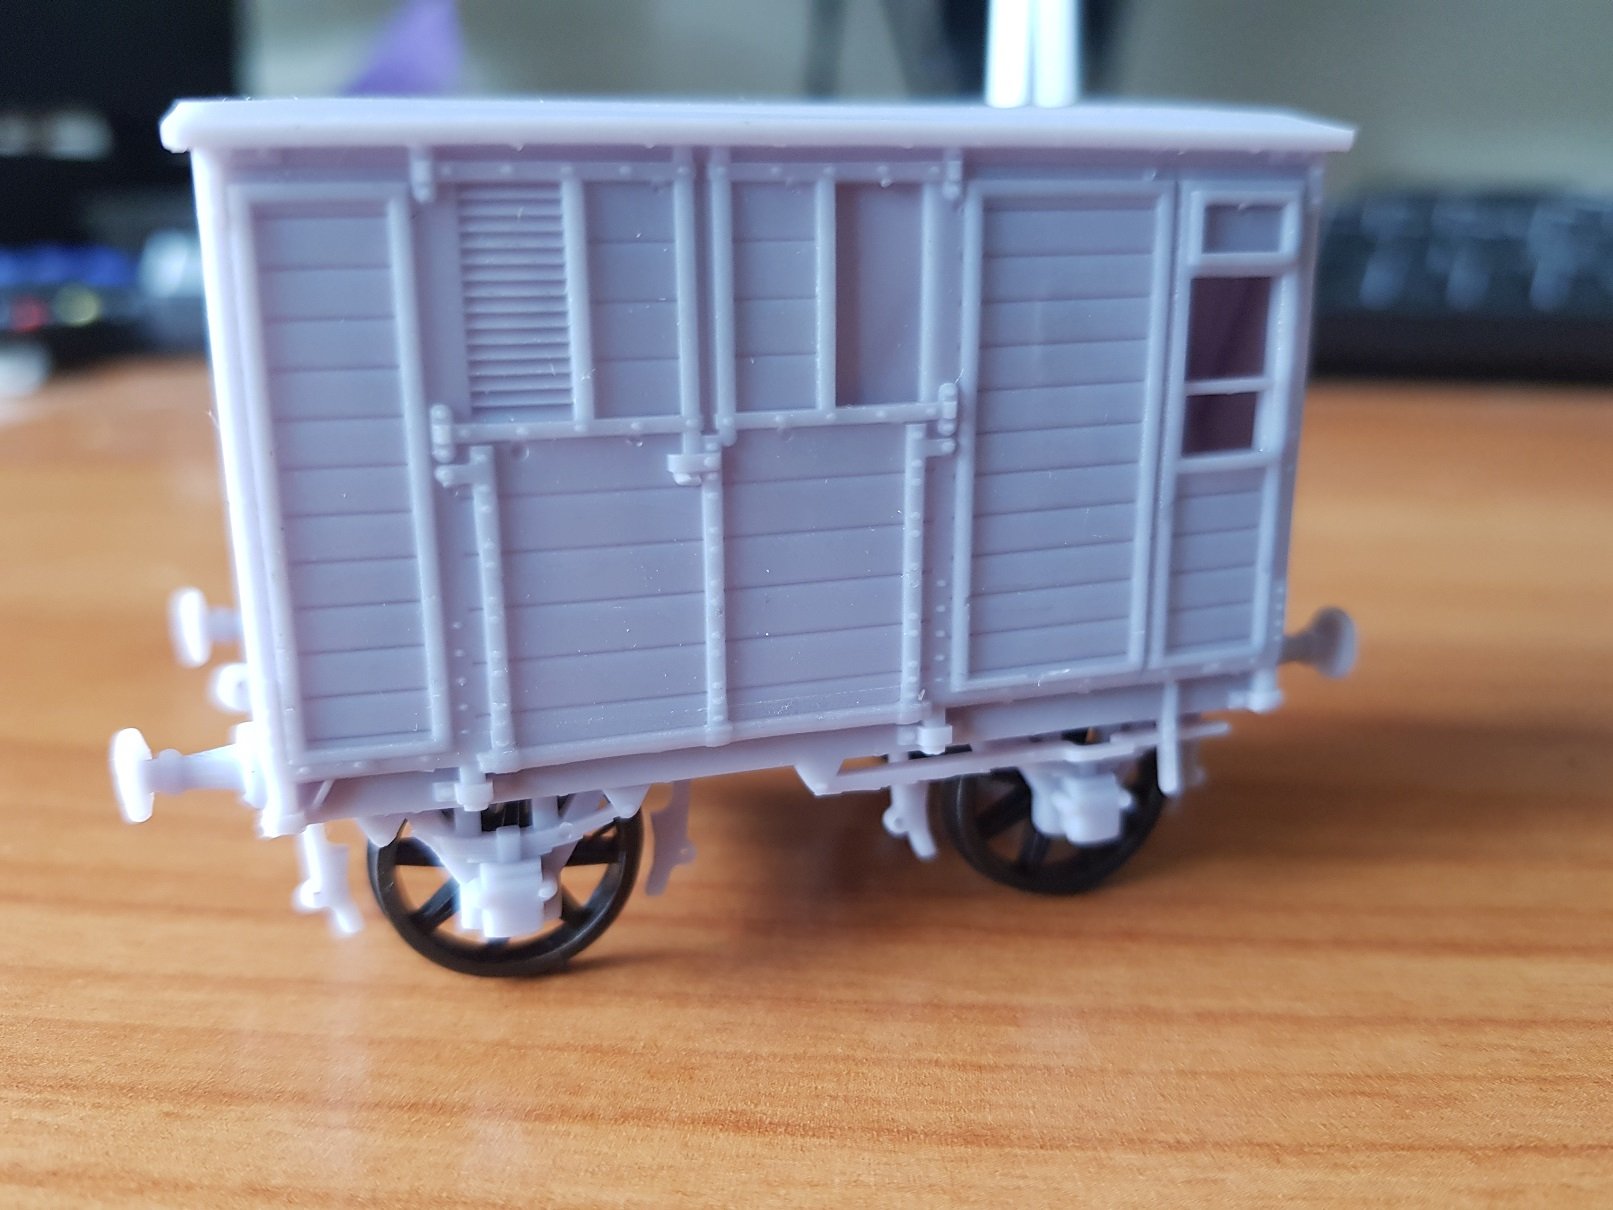
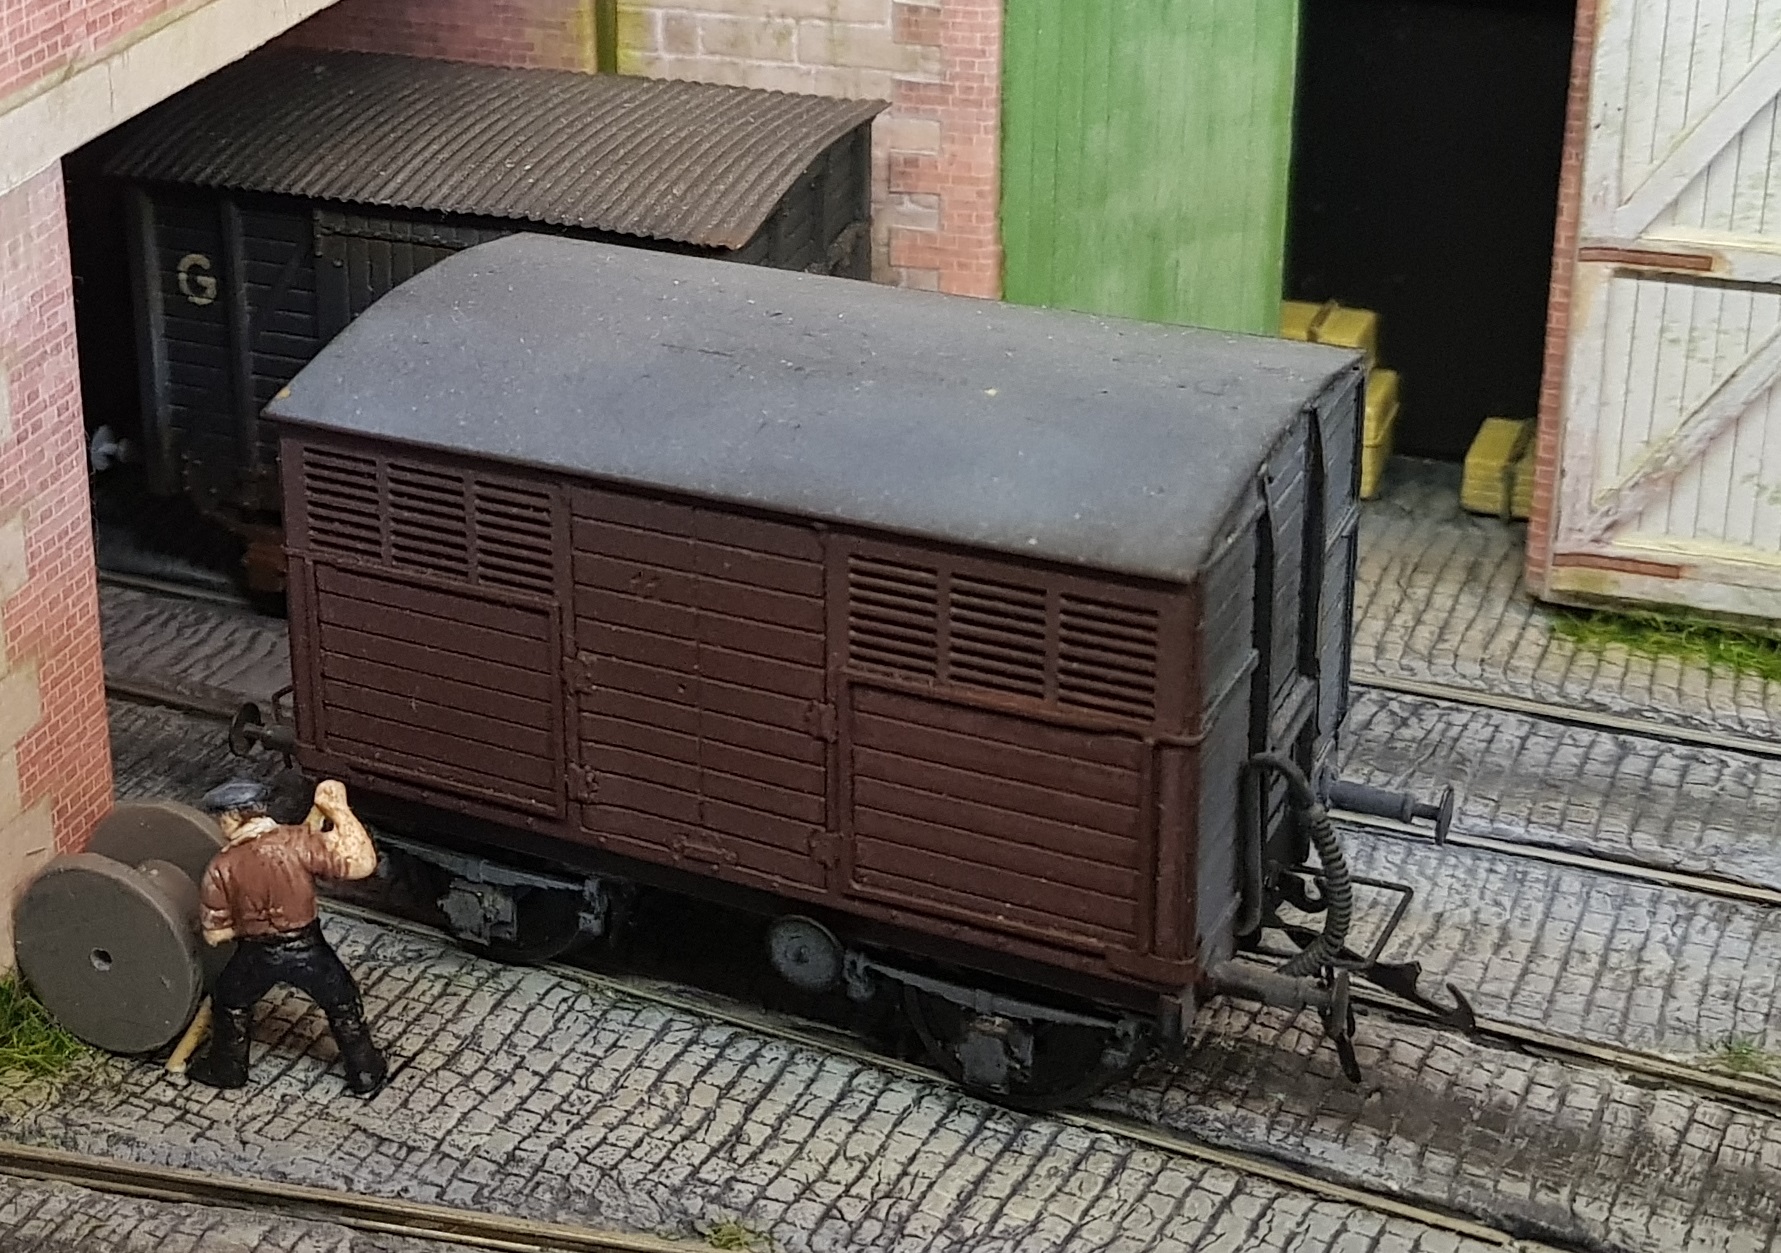
So, the horse box proved to need a little more work than anticipated, but I think we have got it sorted now. Some problems with the printer have cause a backlog, but whilst not quite there, the prints are finally of a quality that can be shown. What was not initially evident was that the Horsebox had a beehive type louvre on the roof - I initially mistook this as a building behind the wagon in the photo I was using, but sight of some other photos, it appears was part of the roof, and in this case is the only roof decoration. Some detailing needed such as door handles, brake linkages, a tidy up and then off to the paint shop. The problems with the printer caused a backlog in output from the wagon works, but now that some semblance of normality has returned, we can build the latest wagons. First up, a basic carriage truck which were used in numbers on the network, but given the simplicity of them, I'm not aware of any definitive photos of a DSER version, so I used some licence to create my own. As simple short wheel base with a single plank siding with drop down hinges on all sides. Simple but needed in the fleet. Slight print error on the brake handle due to a lack of support during printing, easily fixed prior to painting; no real need to print another one just to fix this error. From reading through Shepherd & Beesley book on the DSER it appears timber wagons were in big demand, and while new units were ordered from the UK makers, quite a few were repurposed from mineral wagons. I have no photos of timber wagons from the DSER era, but searches through the HRMS records showed quite a few timber wagons made for other railways across the various networks, and the short wheel version all appear to be bolster wagons to be run in pairs. It seams reasonable that the DSER would do the same, considering they were using repurposed mineral wagons; for me, it makes for a reasonable supposition. So with a little bit of work we get these: Obviously these wagons will be permanently tethered together to run as a pair with a timber load - haven't decided if I will use unfinished logs or go with the machined lengths, I can decide later once painting is complete. So this pent up demand from the workshop has added a few new wagons to the fleet, much to managements relief!! The brake van at the end will need its own write up as it involves multiple materials. It is much needed as I only have one DSER brakevan at present and given the wagon stock has increased, there will be more demand on brakevans to make up trains. More later as time and energy permits. Ken
- 379 replies
-
- 17
-
-
-
Super stuff - a real quality feel to this. Looking good.
-
An area I have been thinking about for a while as the Spratt & Winkle coupling I use are limited in terms of stock direction. All wagons & locos must face the same direction, and running around bunker first does not allow coupling to the rear of the train as their is no hook on the loco. Some time ago, I ordered the Alex Jackson Bending Package from Dart Castings to make a start, but haven't got round to it yet. I was planning to equip the proposed DSER stock with AJ couplings and leave the GSR stock with S&W as there would be too much hassle to convert all wagons & locos; that's the plan anyway.... This may provide the impetus needed to have a go! Well done sir!!
-
Ernies Massive Irish 1930's to 2005 Photo Archive
KMCE replied to Glenderg's topic in Photos & Videos of the Prototype
Looks like a DSER / GSR 455 Class loco, and given the cab window shape and round top boiler, is most likely 457. Cannot comment on the location however. -
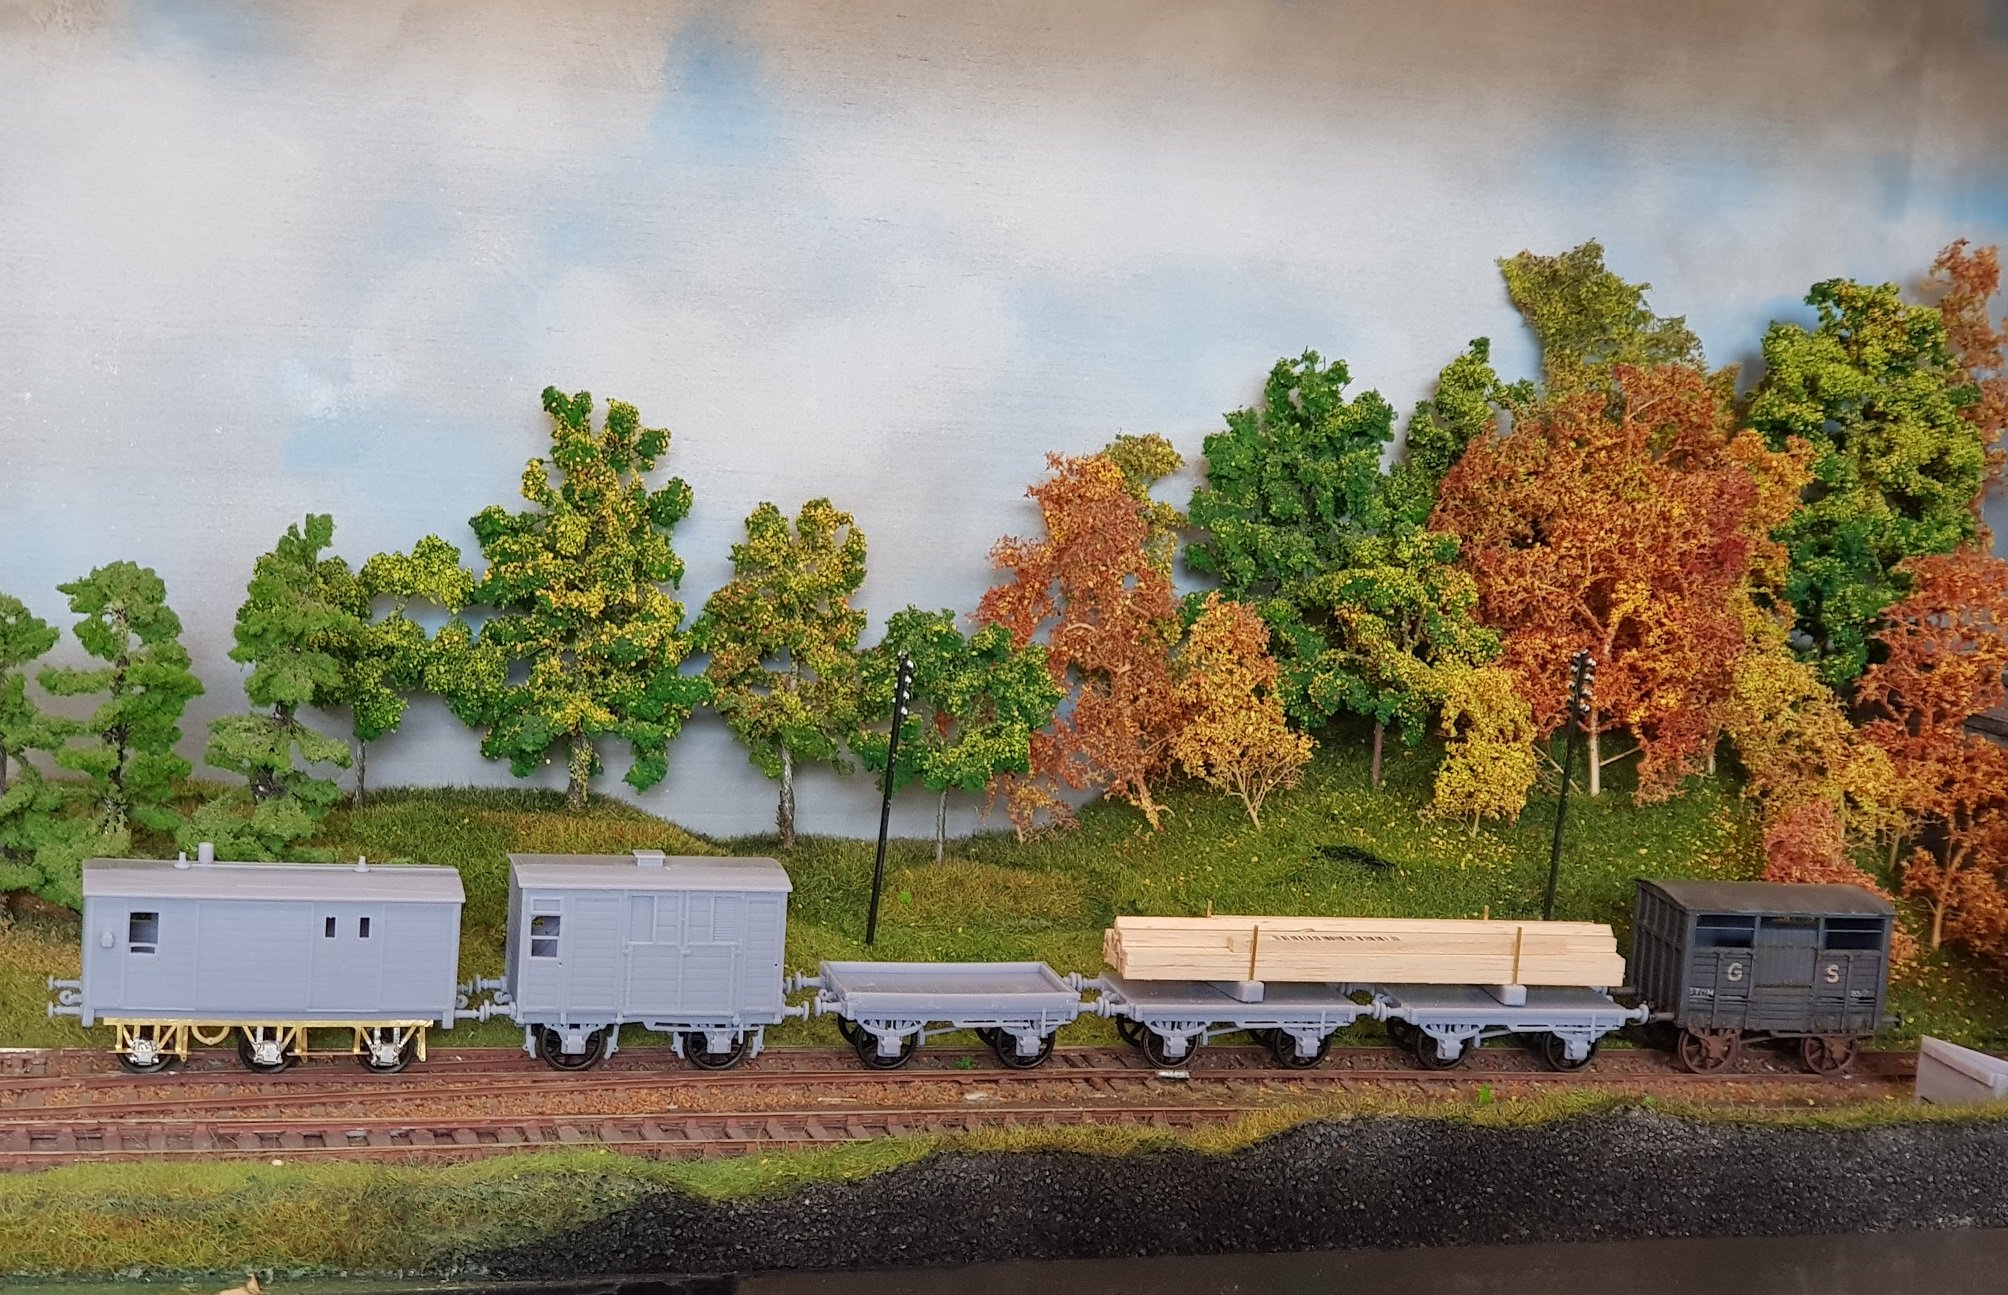
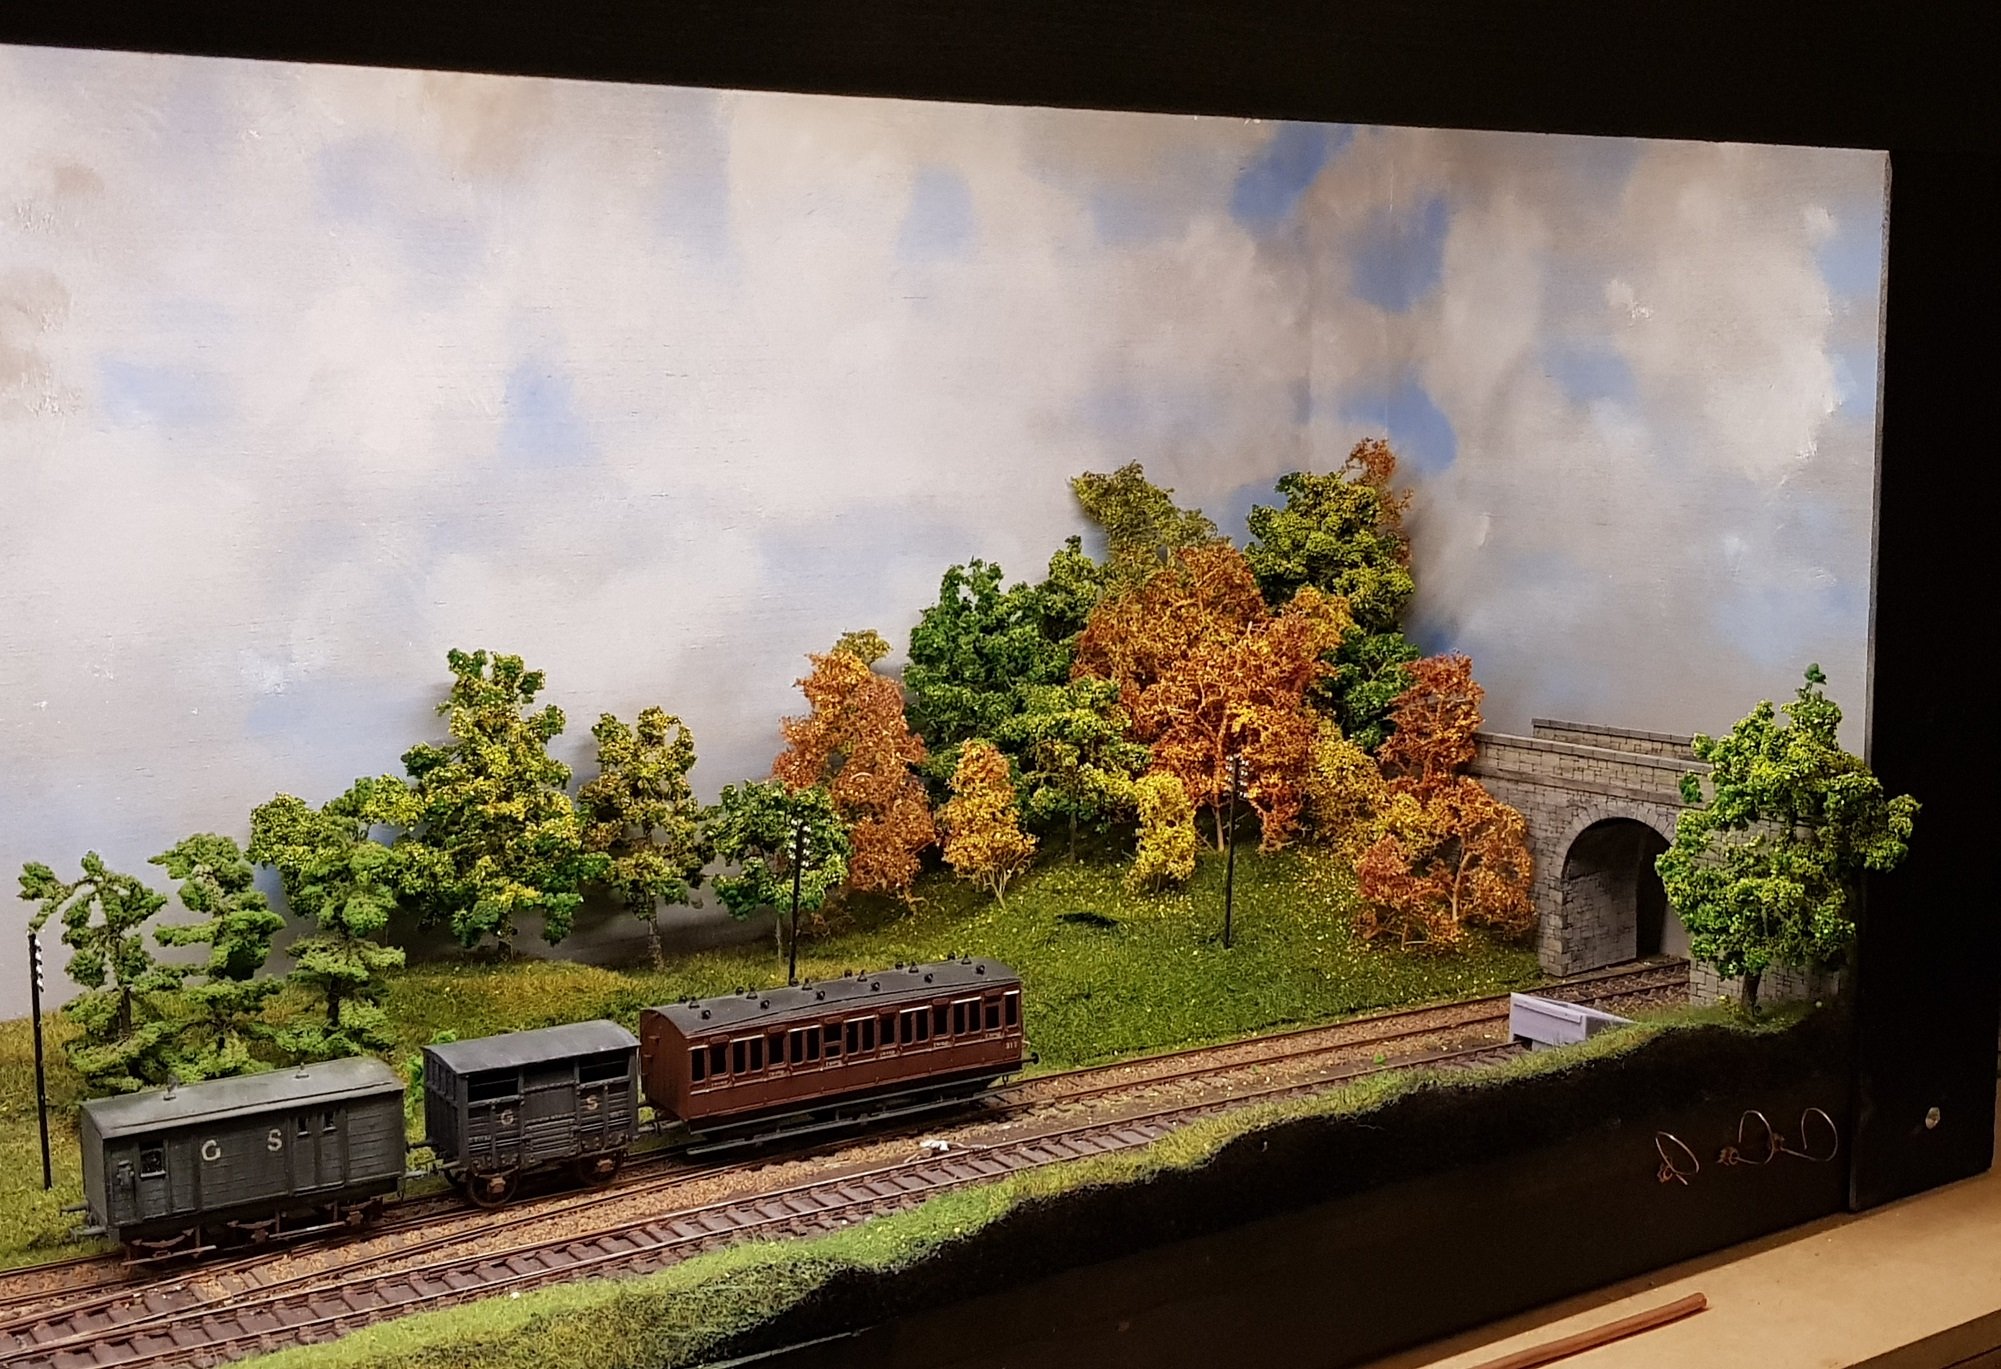
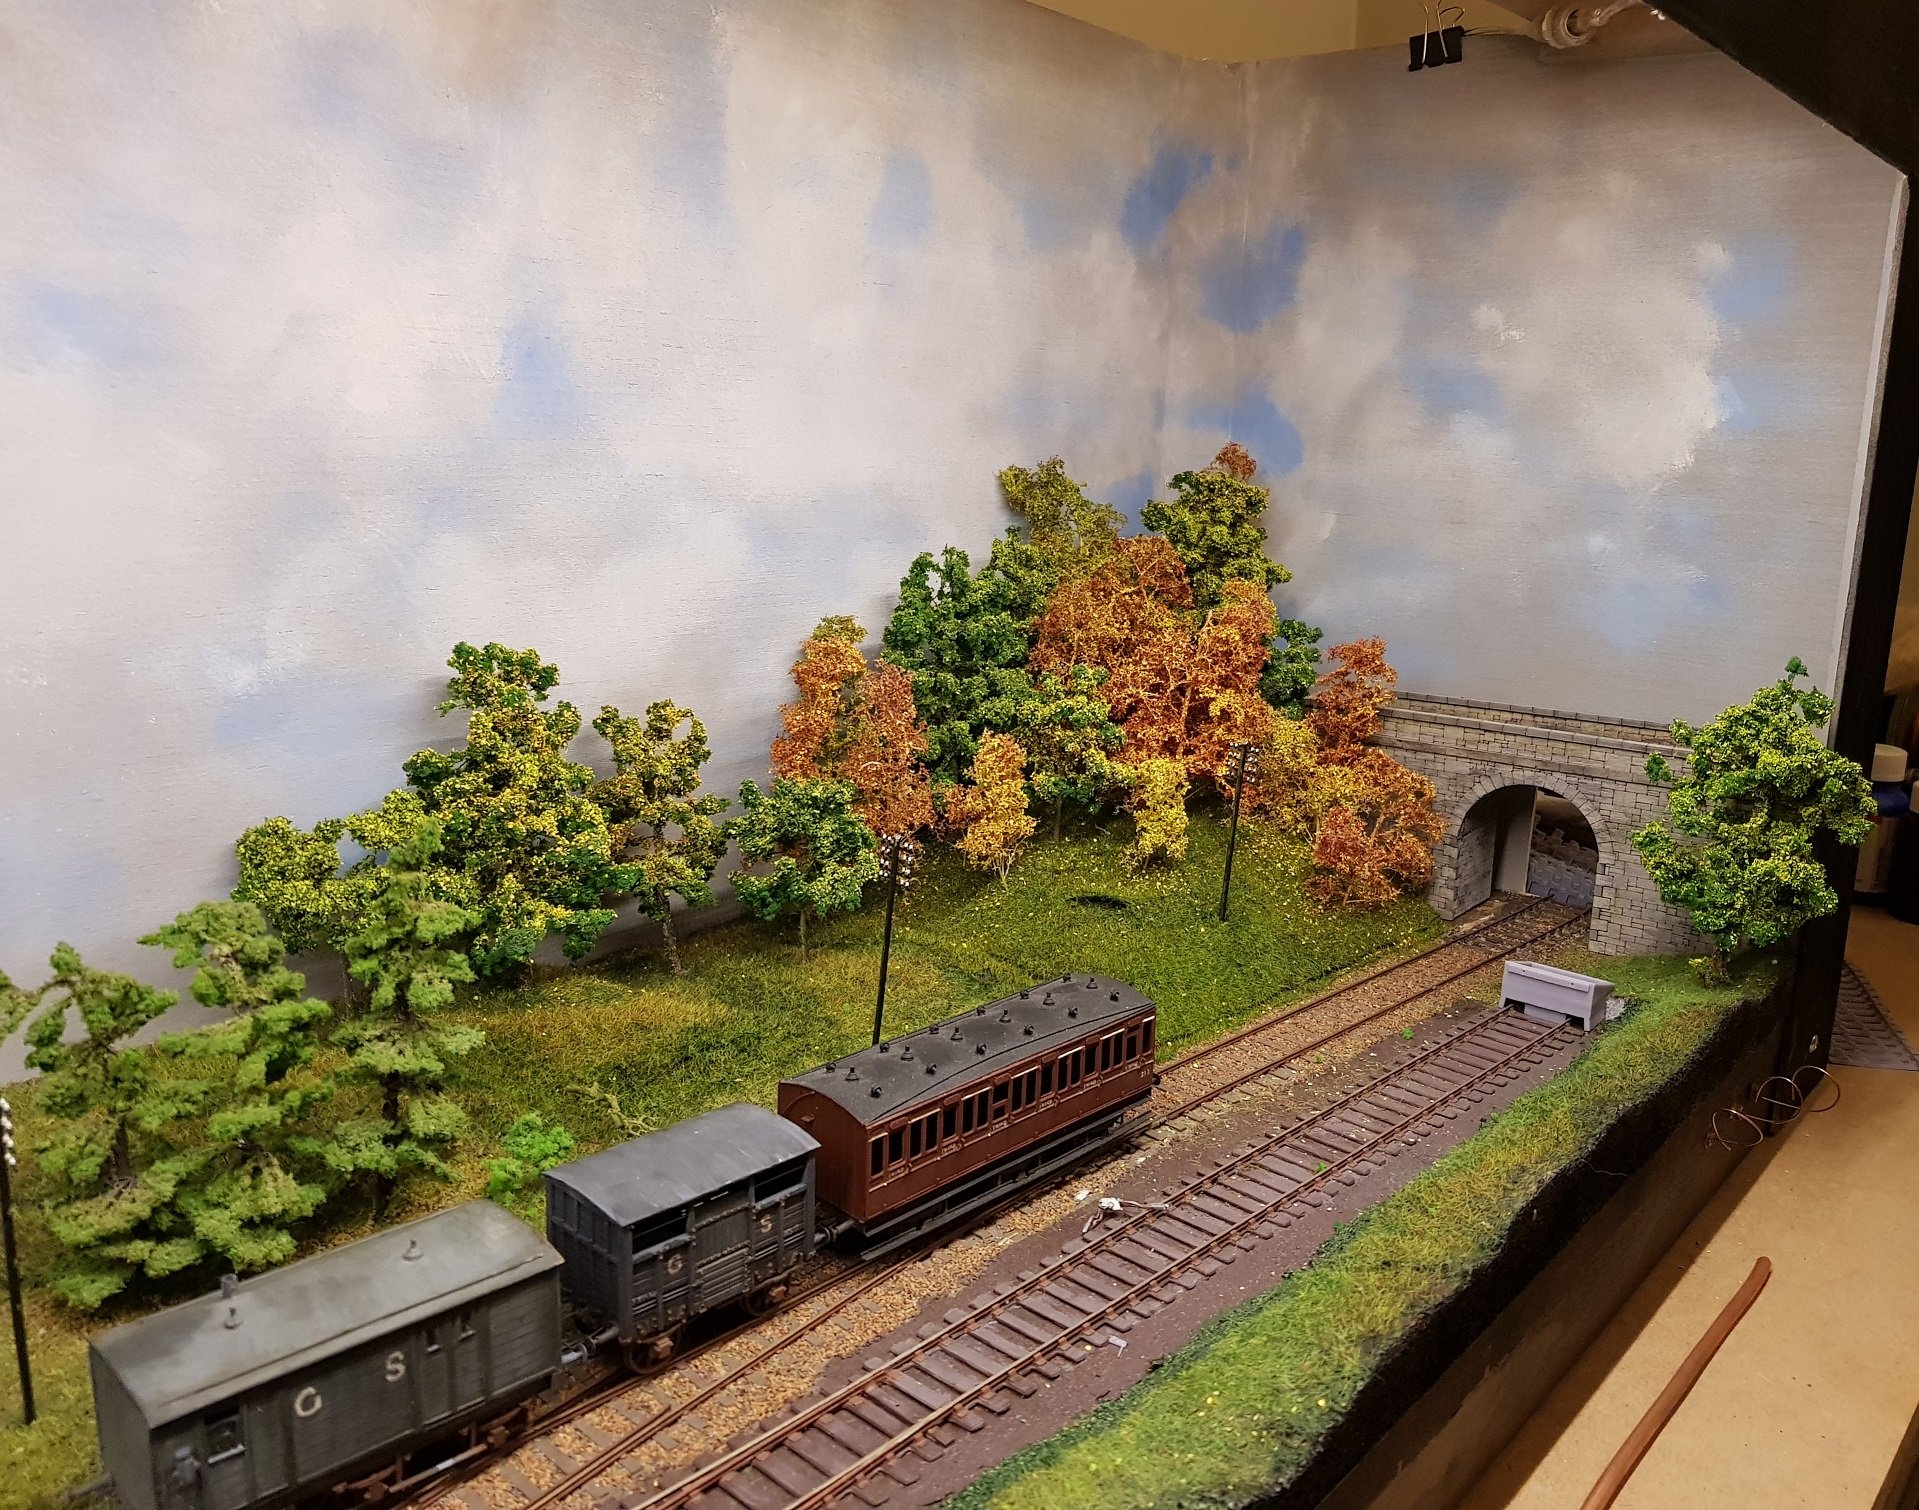
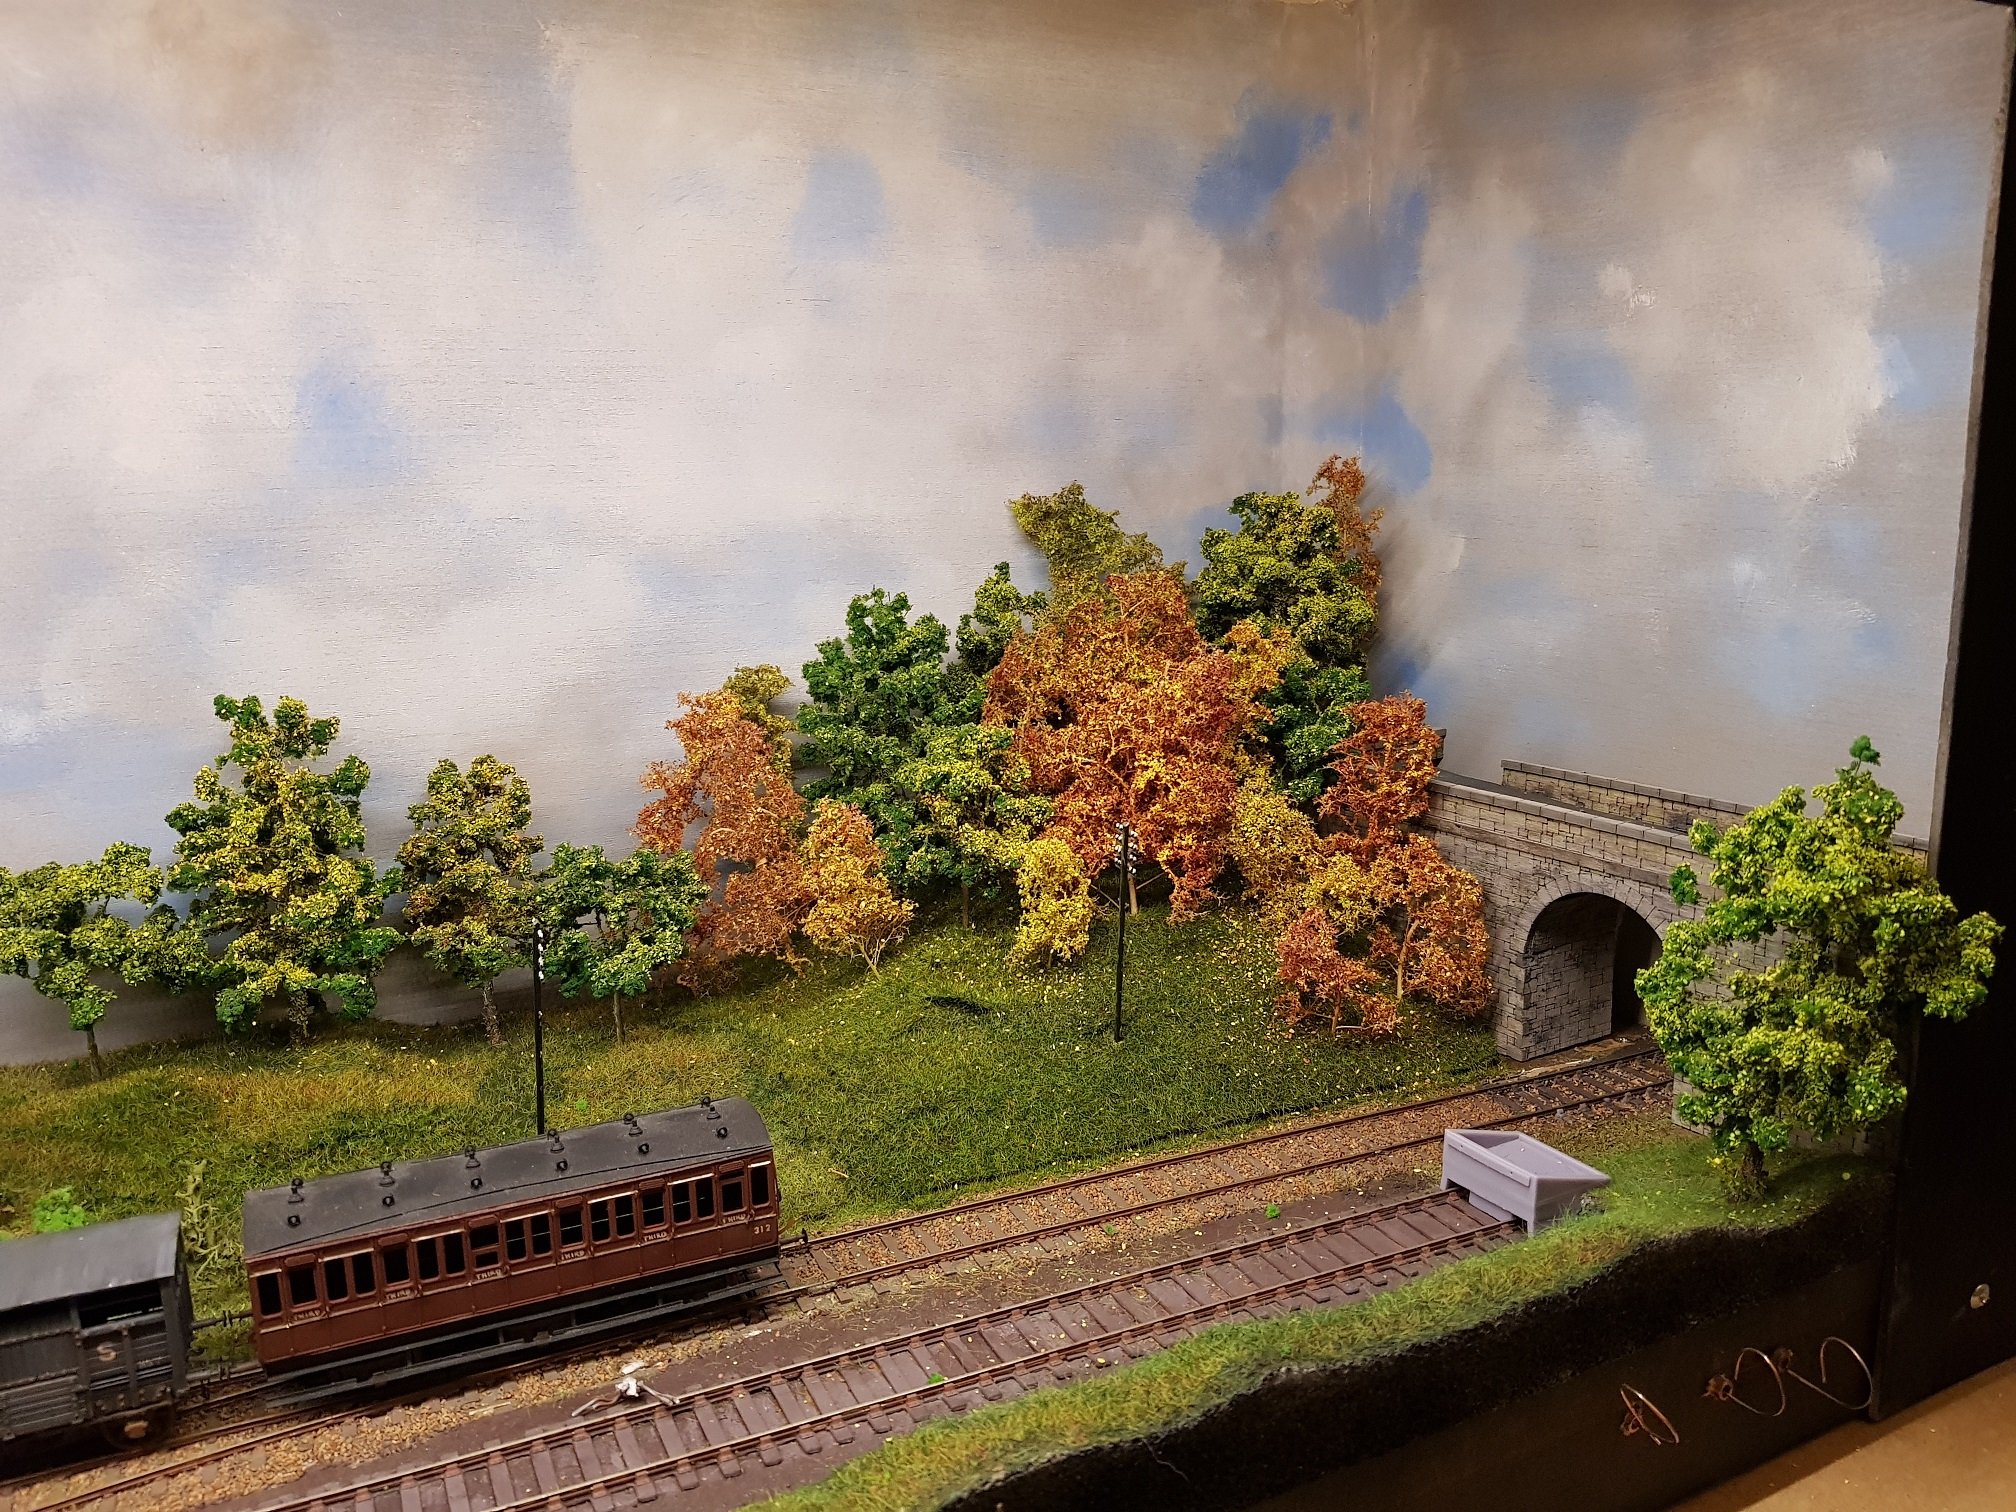
And autumn has arrived to Coats Bridge (albeit a little late, but I have excuses, honest). New over bridge is laser etched & cut to provide a stone like finish - a little bit of paint & a lot of smudging gives a more realistic effect and provides a nice scene block from what will be the traverser area. The layout is called Coats Bridge, so I guess a bridge was kinda essential. Slightly better view of the bridge looking down along the track. I do like the autumnal colours and this was inspired by Glen of the Downs (just south of Bray) which is quite spectacular in autumn and I felt it would lend nice colours and atmosphere to the model. A lot more ground cover required and I do need to re-paint the backscene to allow for the forestry to blend into the distance, but that can be done in time - right now these things are occasional distractions, so I'll get to it in time. All for now. Ken
- 22 replies
-
- 24
-
-
-
Easiest thing in the world to happen, you put the buffer beam on the end of the footplate rather than under it, and you already have a problem. Likewise, recently I ended up with a brake van being c. 3mm too long when compared to the brass built version. Turns out I added the 1.5mm thick ends directly onto the ends of the sides and hey presto too long, but only noticed After I printed it; in my case easily solved, in your case, perhaps a little more elbow grease? Don't worry it happens to all of us at some point or other, it still turning out to be a fine looking model, so keep the head up! Ken
-
Yes, Rugger indeed, very frustrating things to have to go back over, however getting it sorted earlier rather than the weekend before a show is something. Best of luck with the repairs.
-
Looking very nice, and I do like the way the chassis comes together as a single etch. Would be a nice idea for my kits, however as I model in 21mm and most folks want OO-gauge, this would not work; although it could work if I fix on one gauge with the other gauge requiring separation of the parts - that's got me thinking now!! Out of curiosity, how do the slaters wheels work for 32mm or 36.75mm gauge given they are a bolted affair - do you have to select the axle length when ordering? Ken
-
Between various bouts of treatment, I have been doodling with the modelling to help with sanity and keep the mind active. Spurred by another thread on here regarding horse boxes, I re-visited the start I had made on the DSER horse box and made some (very) slow progress on bringing it to a printable state. I also needed to resolve some problems with the printer, which hopefully have been mostly resolved now. Anyway, all of the above allowed me to print a first revision to get a feel for the wagon and identify any errors. As these were to run with coaching stock, the brakes are more involved than a standard wagon, so a bit of work was needed on the underside. Brass wire and cranks need to be added to complete the brakes, but that's for another day. I was curious to see how these would look painted, so a quick dash with some rattle cans, and a bit of sandpaper to take down the gloss on the roof (over did it slightly), but anyway it was to get a feel for how they will look. Detail is still visible, and with a bit of rust weathering they should remain quite clear - brackets and hinge detail on the prototype was quite clear so I was keen to get a good look. Not too bad for a first pass, but there are some errors and details that need to be tidied up. Brake hangers were not quite in line and needed to be adjusted to align properly with the wheels. The detail of the lower hinge / spring on the main horse box door is too light and needs to be beefed up slightly. Holes for door handles needed to be added to make it easier to complete the detailing. So for now, this model will be consigned to the breakers yard. Adjustments noted above have been made, and when time and energy permits I'll run another print. All for now. Ken
- 379 replies
-
- 21
-
-
-
Yes indeed; the woes I had with the Clayton railcar made the process hardly worth the effort, however the cost of the base model (>€100) was too high just to cast it to the bin. Surface finish was very rough which is a great pity as the basic designs are good and deserve better treatment. I wonder does the developer know / care about the poor quality or he earning enough from unsuspecting buyers? Sadly this does affect other suppliers as it can be hard to break down the general perception that all 3D prints are "poor quality"
-
And a very nice kit it is too! Ken
-
Such great atmosphere and detail. I love the upright sleeper detail supporting the platform timbers - nicely done. And, as others have mentioned the easing of the foreground into the backscene is very subtle and lends to the aforementioned atmosphere. Looking forward to seeing this next significant project you mention.
-
I bought one of his models, the Clayton Railcar, which was produced by Shapeways - in fairness, his designs are good but seriously let down by the printing & material used. It took a huge amount of work to bring it to any reasonable standard, whilst applying the 2' rule. The finish is very rough, and the more sanding you do the greater the chance of losing detail, so it's a bit of a compromise. Close up of the finish. View from a more respectful distance!! Ken
-
Thanks Phil, I may give them a try in the future. Ken
-
They better be for that price!!
-
I just ordered from them on Sunday, paid by PayPal without problem. Just got a shipment notification this evening, so not sure what went wrong when you tried to buy. I will say their shipping rates are rather rich - €25 for two packs of scenic scatter!! Don't know if that helps?