Mayner
-
Posts
4,880 -
Joined
-
Last visited
-
Days Won
119
Content Type
Profiles
Forums
Events
Gallery
Everything posted by Mayner
-
The Model Railway Society of Loughrea group standarised during the 1990s on Kadee No 36 couplings for locos coaches and wagons https://www.kadee.com/ho-scale-couplers-c-274_276_284/36-ho-scale-30series-plastic-couplers-with-gearboxes-long-2564-centerset-shank-p-270.htm which worked out very reliable under exhibition conditions. The standard 30 Series dragbox and long center set shank worked out ideal for converted rtr, kit and scratchbuilt stock even a Push Pull set with Lima MK3 Coaches no problems with height adjustment as the bottom edge of the chassis/buffer beam provides a reliable datum for fixing the daftgear box, the coupler includes nylon fixing screws and washers which prevent the box rotating. I fitted the MM 141s with body mount couplings by removing the draft gear box from the bogies and fitting the box to the pilot together with the little filler/piece supplied with the loco, the conversion takes me back to fitting Microtrain couplers to Atlas and Kato N Gauge diesels in the early 1990s before the manufacturers eliminated the coupler slot by switching from bogie to body mounted couplings for N gauge American diesels.
-
The problem seems to have been a shortage of connecting flights from Asia/Middle East to Ireland, we had similar problems with shipments during the Alpha stage of the pandemic. An Post have processed and cleared the shipment through Irish Customs, though they are still show up as "In Transit with Airline" on the NZ Post tracking system.
-
I had a similar experience in an Up Westport behind an 071 during the early 90s (not in the cab) departed Athlone late apparently checked by late running Westbound trains between Portarlington and Athlone but positively took off after crossing the Asahi Liner at Geashill and recovered most of the lost time between Portarlington and Clondalkin presumably he had a clear road ahead with no signal checks and the Up Cork line cleared for 100mph running once through the slack at Portarlington. I travelled a lot by rail during the mid 80s early 90s while home on holidays from the UK, but seldom traveled by rail following my return to Ireland except from Dublin to Bangor for model railway exhibitions and a family weekend in Galway. We traveled on an 071 hauled in Craven coaches on an RPSI Seabreeze to Wexford in 2018 but it turned out to be an endurance test that an enjoyable day out, how one's ideas of what constitutes a good day out changes as we get older.
-
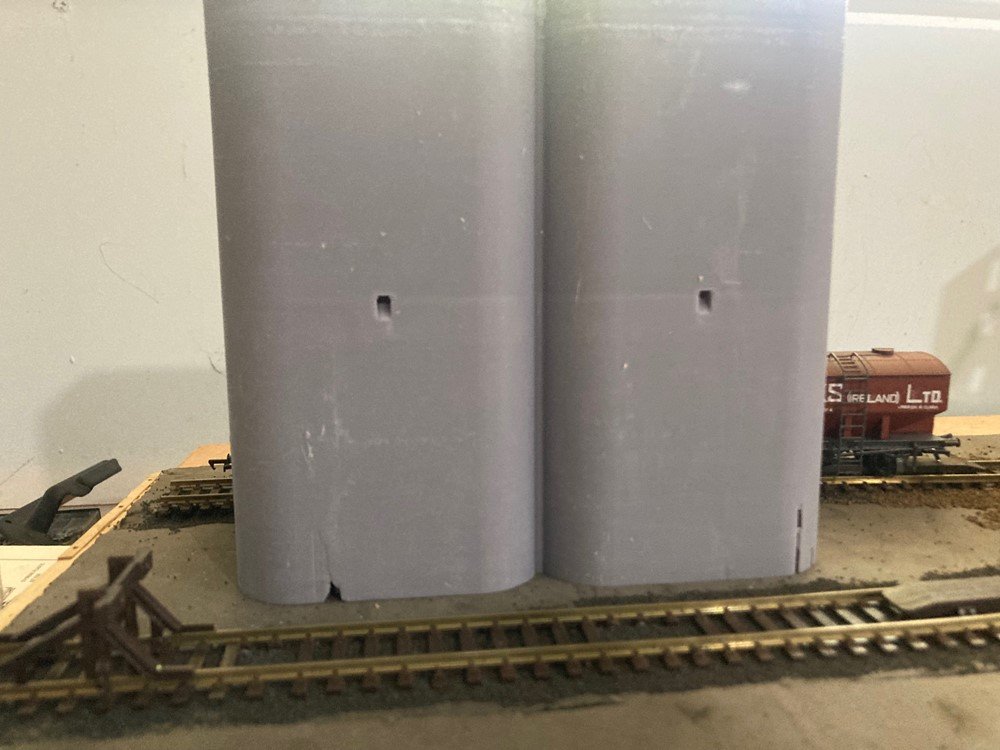
Wow! While it seems strange on the face of it, 3D prints are sometimes machined with a milling machine or a lathe in a similar manner to a metal casting to achieve a precision finish
-
I just received confirmation that a shipment to Irish customers dispatched mid-November/early December arrived in Ireland on 31st December, and that An Post have not yet opened the shipment or began processing the items. NZ Post have advised that they will continue to monitor the shipment.
-
Never checked until today actually! The coupling mount on the wagons are designed around the Bachmann 36-030 straight narrow coupling. As Tom (Ironroad) indicated the 18, 19 or 20 should work. The No17 is too short!
-
The 46 Mile Box de-railment photos is a great illustration of the mixed nature of rolling stock in use during the transition from the wagon load to the Liner Train era with modern and traditional rolling stock running in loose coupled goods trains. CIE had started to introduce "modern" vacuum braked wagons capable of running at 50mph, keg traffic had recenly been palletised with open containers on standard 20T flats and ESSO had introduced redundant tank wagons from the UK to modernise its fleet. There seems to have been an interesting mix of "new" and traditional tank wagons in the train and a CIE truck and 20' container taking part in the recovery operation. https://catalogue.nli.ie/Record/vtls000307729 CIE was still transporting grain to Polloxfen's Mill in GSR bulk grains wagons built in the mid 1930s some of which were still running with the flying snail logo and at least one with the wheel emblem and GSR style solid lettering. The GSR used rust resistant steel in the grain wagons so painting these wagons was a fairly low priority compared to timber and ply bodied wagons. Derailments and runaways seems to have been an accepted part of loose coupled goods operation, there was a mid 1970s newspaper (The Indo?) report of a loose coupled goods dividing and de-railing at it departed a station on the Mayo Line, the driving arriving at the next station without noticing anything until the signal man asked what happened to the rest of his train. (Ballyhaunis-Claremorris?). Apparently an axle broke on a wagon in the middle of the train causing the coupler to break and other wagons to pile up and de-rail behind the wagon with the broken axle meanwhile the driver continues to the next station with the front part of the train not realising what happened. The article included a photo of de-railed H Vans and Pallet Wagons.
-
The Midland route via Inny Junction was very indirect for Dublin-Cavan passenger services and was 'mouldering' away in CIE days after the ending of passenger services. The GNR and CIE focusing on serving Navan, Cavan and possibly Monaghan by direct bus and coach services from Dublin rather than the indirect rail routes via Inny Junction or Dundalk. Although there was a railway mania era proposal for a Dublin-Enniskillen Direct Railway which presumably would have connected with the Londonderry and Enniskillen to provide a direct route from Dublin to the North West the Midland and the companies that formed the GNR would not have wanted another company invading their territory and a Kells Cavan line was never built, though the Dublin and Meath acquired running powers over the Dublin and Belfast Junction and later the GNR between Navan and Kells. Dublin-Navan-Cavan-Monaghan has a certain logic to it a direct route serving reasonably large towns by Irish standards with rail providing a more competitive journey time with Expressway Bus services. Anyway its a nice fantasy with Virgina as the principal through station something of a tourist destination for anglers and reasonable goods traffic in connection with the local dairy and meat processing industries and these days a growing commuter town. The big question is whether the buildings and structures would have followed the Wilkinson's solemn styling found on the Midland and DWWR, the redbrick gingerbread styling found at Bellavary and the Western Branches or GNR Mills era brick building or the more humble building found on the Meath Line
-
971-1013. The wagons originally ran with the ESSO shields similar to the UK wagons, the shields were removed and the redesigned tank supports fitted by the mid 1980s There is a good selection of colour photos of these wagons in the IRRS Photo Archive Wagon Album https://www.flickr.com/photos/irishrailwayarchive/ The IRRS subscription is worth it for access to the photo archive alone.
-

Any bagged freight in 90's to Kildare, Portarlington or Athy?
Mayner replied to murphaph's question in Questions & Answers
Kildare, Portarlington and Athy closed to wagon load and sundries traffic during the 1970s as they were not included in the CIE freight development plan. I think Kildare and Portarlington closed to regular goods traffic late in 1975. Athy goods yard continued to handle goods traffic until the Dublin-Waterford goods went over to Liner operation at some stage during the late 1970s with Carlow and Kilkenny the only intermediate stations handling freight. Goods for Athy appears to have been conveyed in CIE ISO containers on standard 20' skeletal flat wagons rather than H Vans and Corrugated Opens during the its final year of operation. Wagons with side door and half height ISO containers were in the good yard when I travelled to Waterford on a Railrover ticket during my 1977 or 78 summer Holidays! Portarlington continued to handle sugar beet in corrugated opens into the late 1970s possibly early 80s possibly served by Tullamore-Thurles specials which also served Geashill on the Portarlington-Athlone line -
Economics the Irish railways tended to re-paint locos and stock following an overhaul or repair, this was during an era before the idea of subsidising loss making public transport was accepted and CIE was expected to make a profit or at least break even on it road, rail canal and sea operations (Aran Island ferry) Establishing and maintaining a uniform corporate image become irrelevant when a company has a monopoly of rail transport services. The UTA appeared to be more consistent than CIE in applying its corporate image repainting GNR steam locos, railcars and coaching stock, some GNR steam locos were still running in GNR blue on main line passenger services up to the ending of GNR steam operations with the closure of the Derry Road and Newry Warrenpoint branch in 1965. The CIE BUT railcar sets used on the Belfast and Dublin-Rosslare trains in the early 60s had a real rainbow effect with driving cars painted in GNR Blue and Cream and the new CIE Black and Tan scheme and trailer coaches potentially in GNR Mahogany, Blue and Cream, CIE Green and Black and Tan potentially hauling CIE Luggage vans in silver, CIE Green or Black and Tan. The BUT railcars were introduced in 57-8 and would not have become due for overhaul re-painting until the early 1960s, GNR BUT railcar trailer stock would have dated from the 1930-40s and could potentially have run in the two GNR schemes, CIE late 1950s green and black and tan as coaches went through the overhaul and re-painting process during the 1950s and 60s.
-
I was wondering if you were able to get the 2-4-0 go! Better still Broadstone-Belfast and Portrush trains over the Kingscourt-Castleblaney and Armagh . The Midland's plans to extend north from Kingscourt to Armagh and link up with the NCC was blocked by the GNR Carrickmacross branch. I keep going back to Kells-Cavan as a missing link that could have kept Cavan and Monaghan on the map with direct Dublin-Cavan-Monaghan passenger service after the Border Lines closed.
-
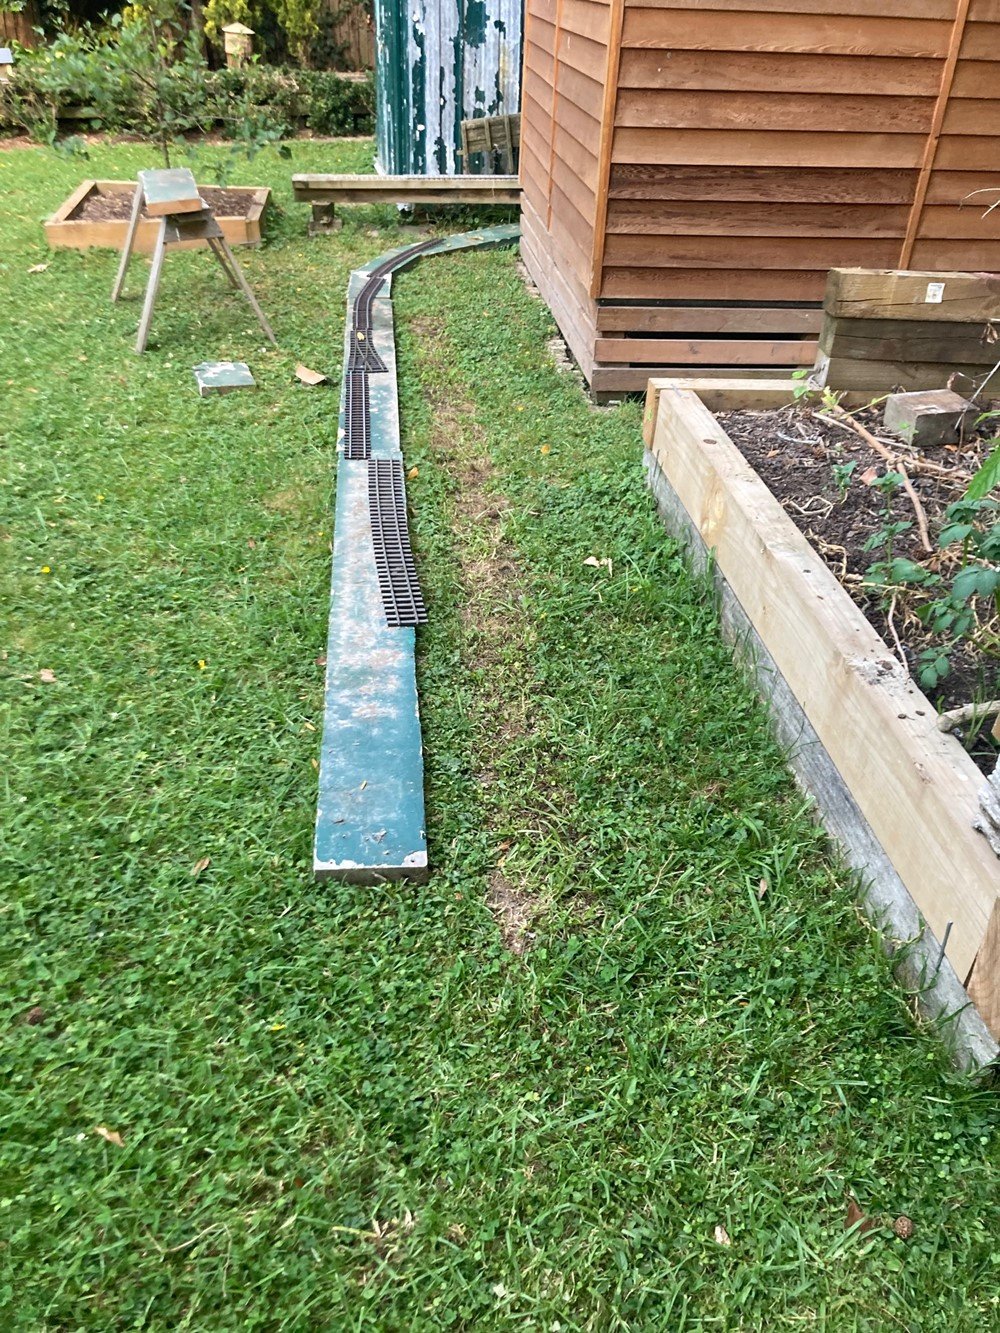
Weather been abnormally hot and sunny over the Christmas/New Year holidays after a cool wet spring, better not complain about the heat. The good weather has been a great incentive to carry out improvements catch up with maintenance on the garden railway which has been neglected with very little maintenance or running during the past 12 months. Next big project is top replace the roller shutter doors on the garage/railway room workshop with something more suitable and fit for purpose.
-
Leslie Nice to see Slieve Donard your GNR passenger and good stock including GNR bulk cement wagons. Just might give me the impetus to complete my models of 174 Carrantouhill and Q Class 132 though both on the heavy side for the Burma Road perhaps a GNR/MGWR joint line from Kells to Cavan and possibly onwards to Enniskillen, Ballyshannon & Donegal Town
-
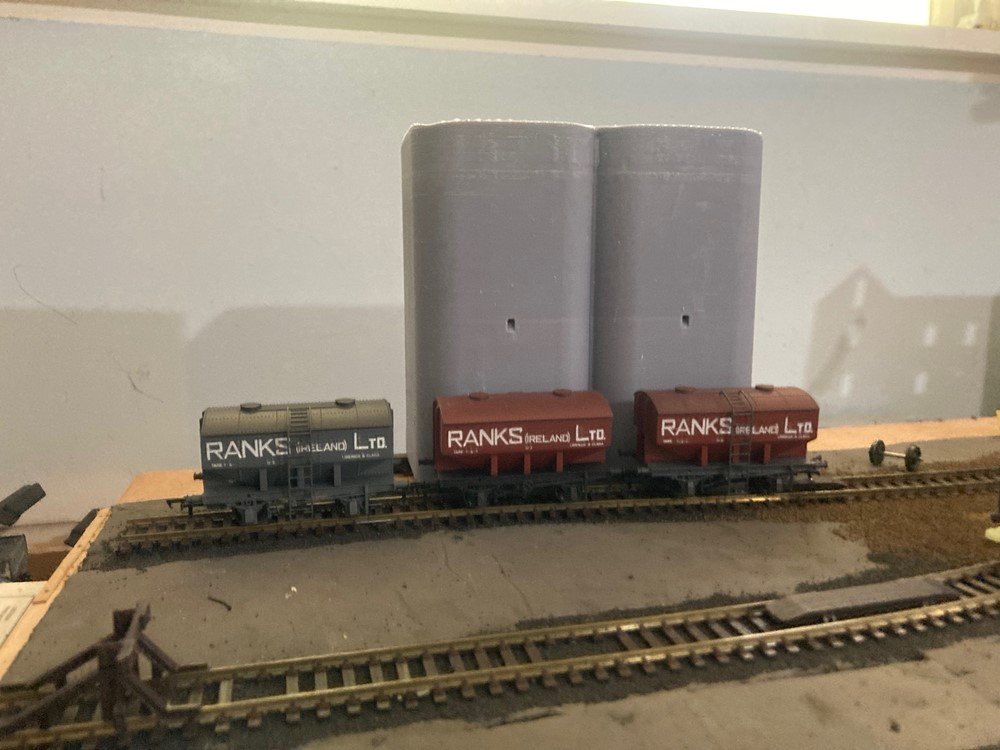
The two tank wagons appear to be different variants of the ESSO tank wagons. The wagon on the left is a re-gauged ESSO UK Class A Tank wagon similar to the Heljan model https://fromemodelcentre.com/heljan-oo-gauge-4-wheel-a-tank-4089-in-esso-grey-with-esso-logo.html, the wagon on the right appears to have the shorter Class B barrel https://www.hattons.co.uk/203072/heljan_1102_4_wheel_b_tank_3328_in_esso_black_with_esso_petroleum_lettering/stockdetail but set up to handle Class A Traffic. The end chevron s were replaced with self adhesive marker strip used on trucks and trailers at some stage during the 1990s most likely to improve visibility to road users on the Alexandra Road Tramway. The tank wagons were shunted on the Tramway using Port and Docks Board Tractors (Big purpose built 4w drive). The laden ESSO oil trains were made up ready for collection by an IE loco late just inside the Port Gates on Alexandra Road.
-
The majority of modern (post 2000) ready to run diesel or steam locos (Irish of British outline) should run reliably out of the box for testing your new layout, beware of second hand pre-2000 Bachmann, Mainline, GMR, Airfix or Lima locos as the mechanical design and material was often of poor quality and does not compare to current standards. Hand built locos like the OO Works U and UG are likely to require some running in (on an oval) of track to allow the motor, gear train and bearings to 'bed in" and achieve reliable running, the mass produced rtr Chinese models with plastic gearing and built in slop tend to be more forgiving and run reasonably well out of the box. An 0-6-0 like the UG should be reliable, 4-4-0s like the OO Works U are more challenging to balance and achieve reliable operation. I assemble 2-4-0s and 4-4-0s with power pick up on the loco and the drawbar arranged to transfer weight from the tender to the loco, this improves reliability and haulage. New irish Lines Article ballasting MGWR 2-4-0.pdf
-
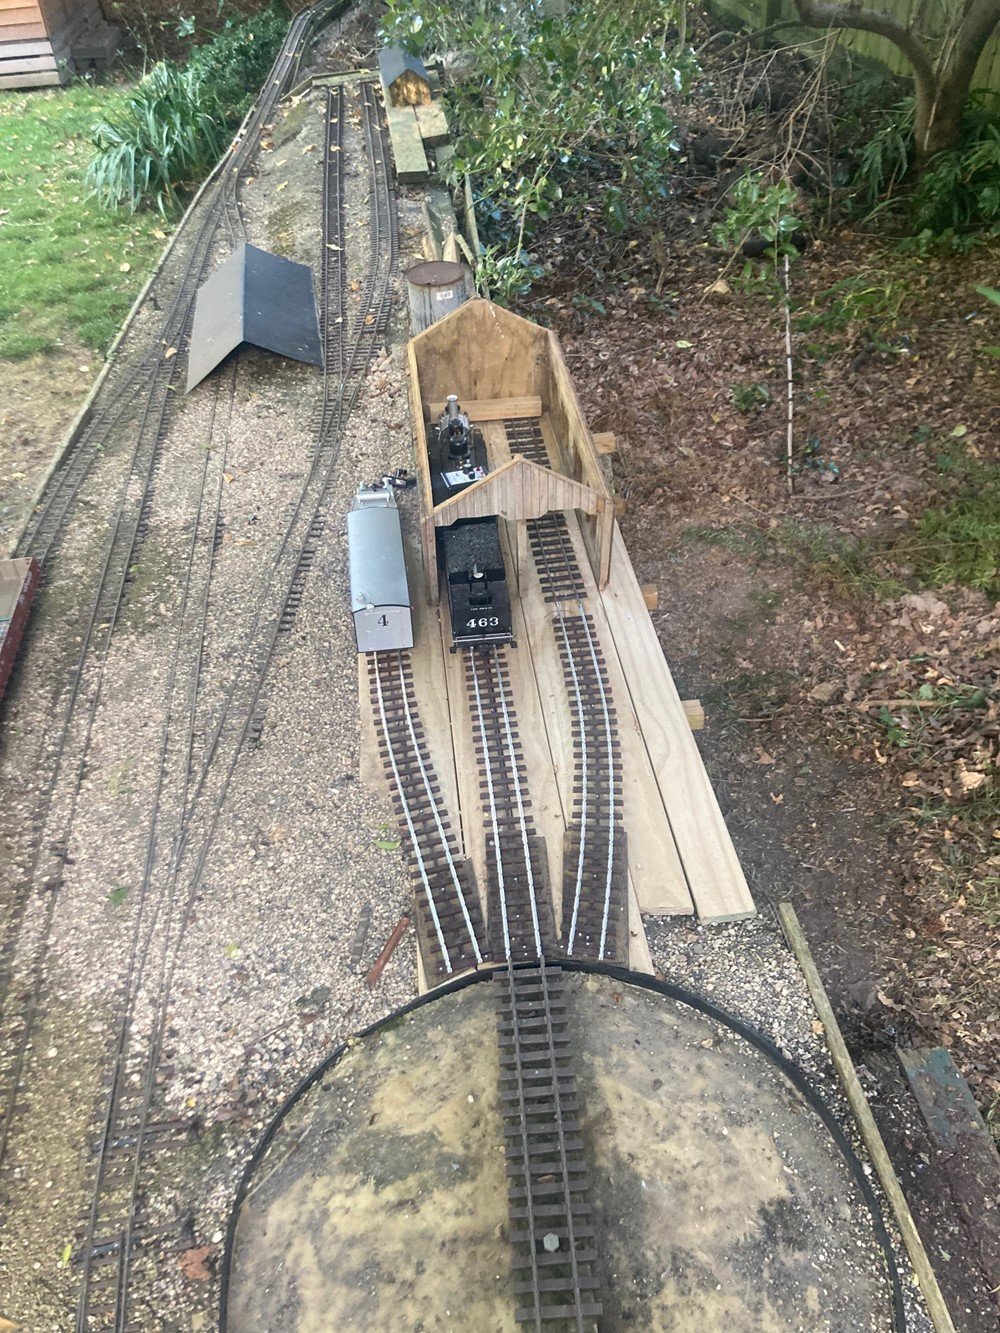
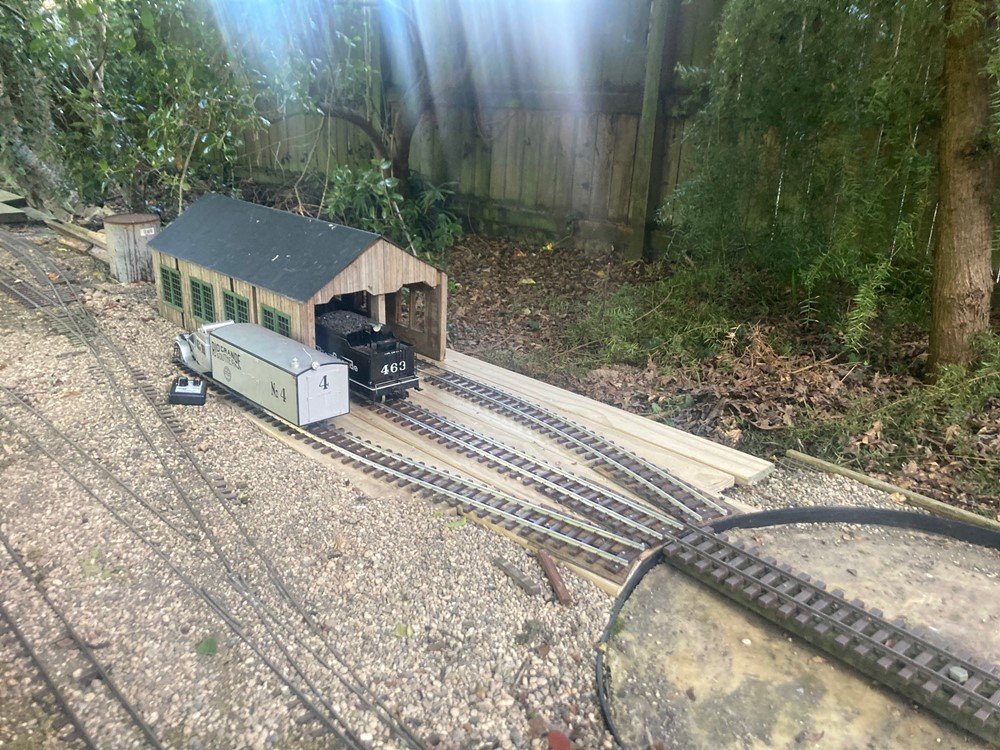
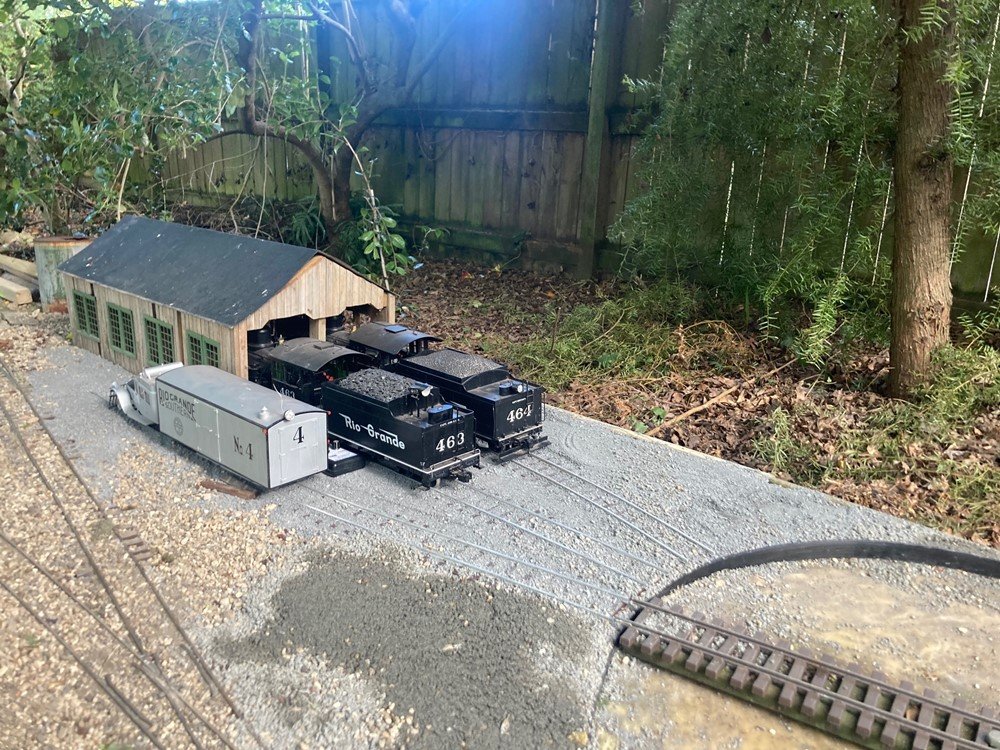
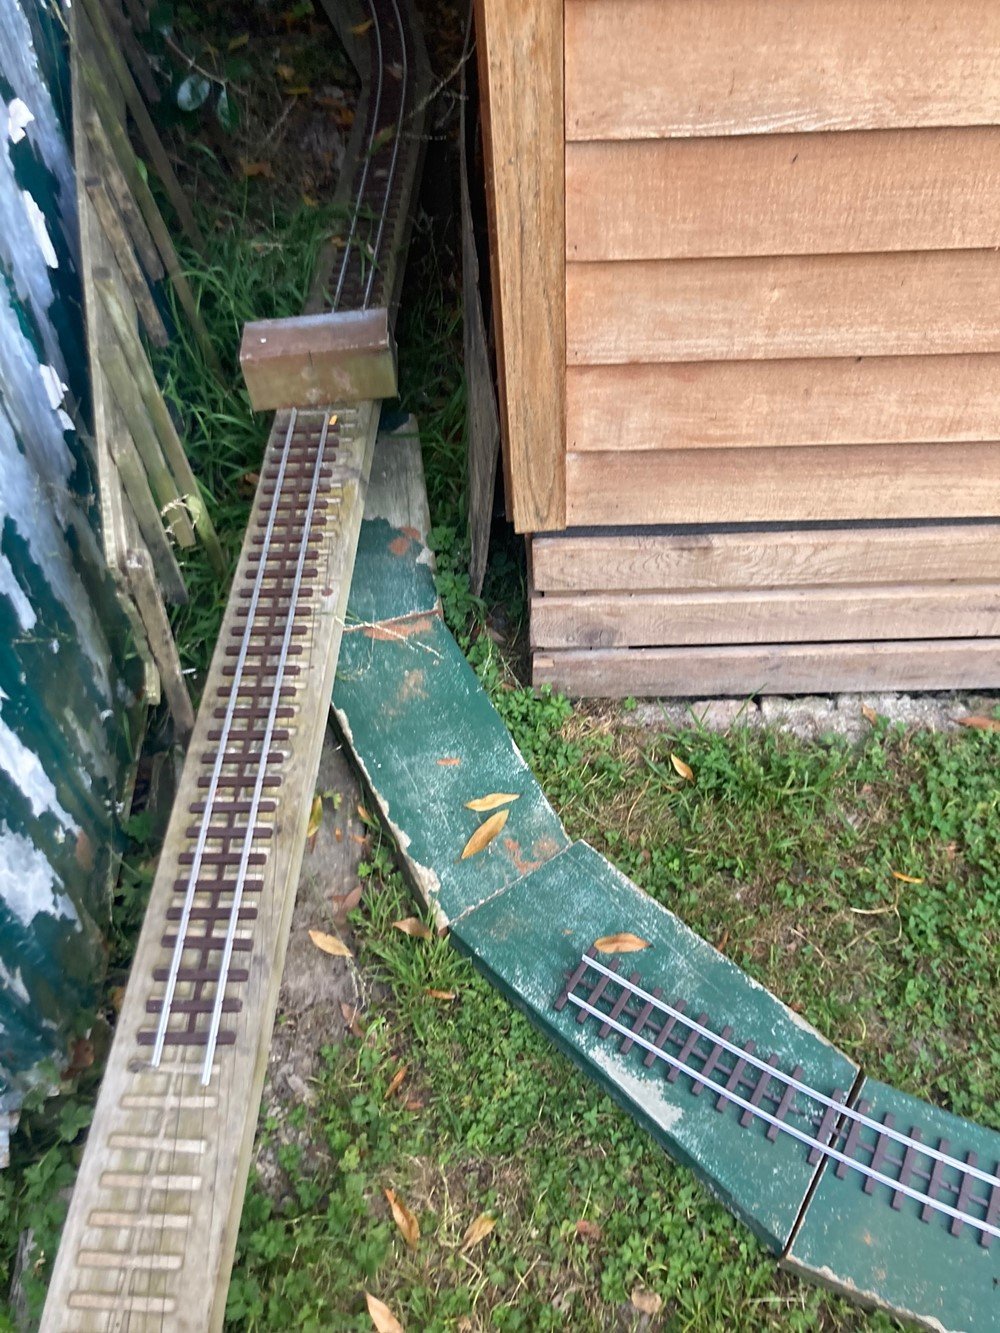
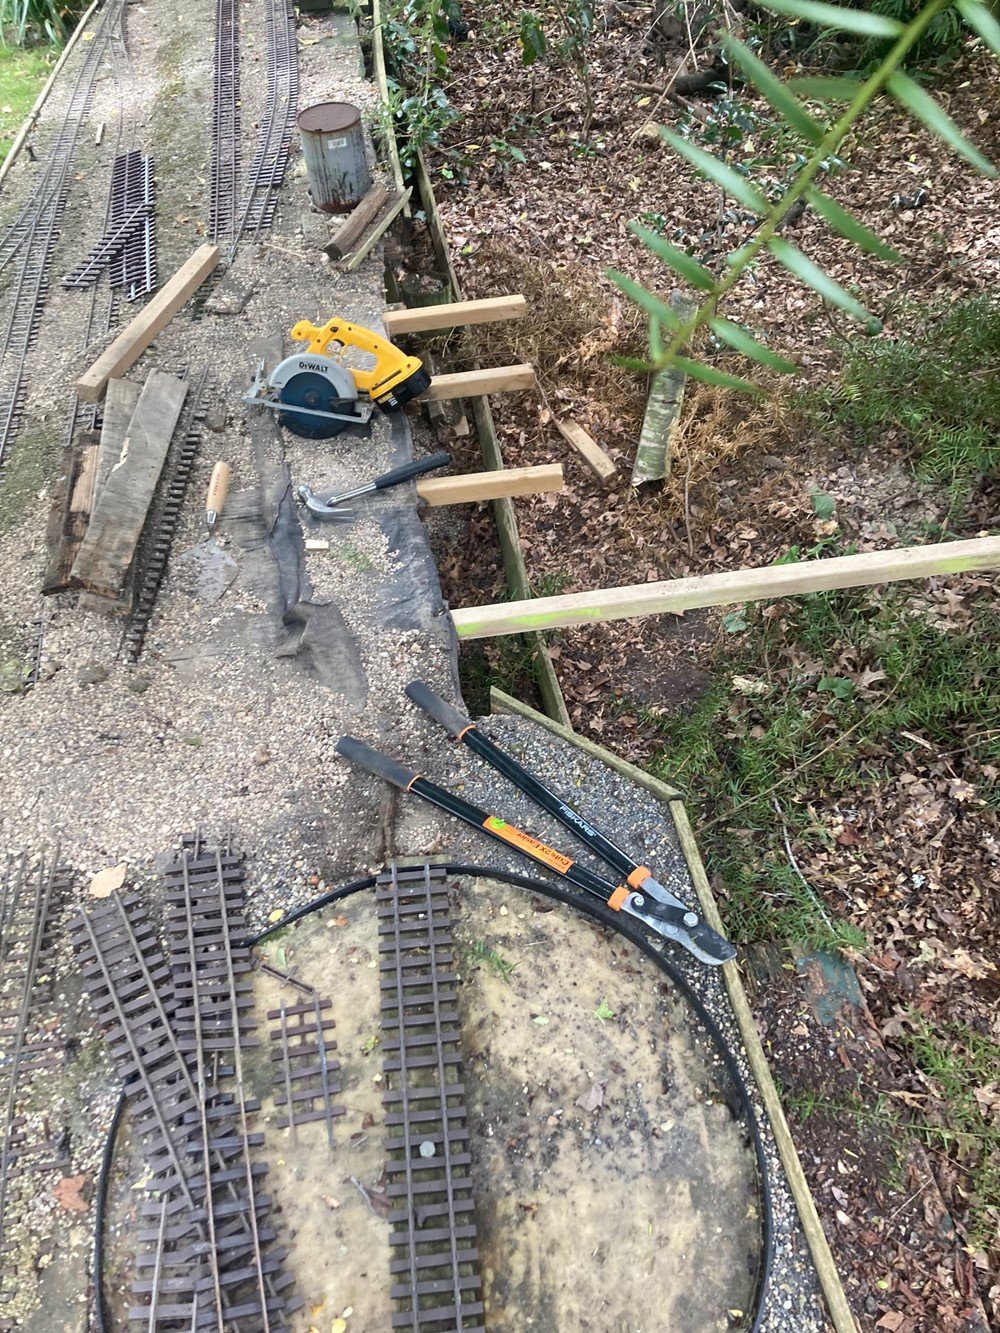
Good progress with my first 2022 modelling project re-modelling the loco depot on the garden railway. I decided to use timber decking for the entire loco yard area rather than my usual combination of weedmat on welded mesh and decking for the track support. The track is a combination of new material with aluminum rail and salvaged material from the old yard. Aluminum rail is cheaper than brass and challenges with power pickup irrelevant as I no longer use track power. I used damp proof course as packing at the turntable end. The K27 "Mudhen" 2-8-2 are too long to fit completely inside the shed useful for accessing the on-off switch at the rear of the tenders The short spur road is useful for parking the "Motors" but may extend at a later date to connect with the yard, I ballasted the yard tracks with quarry screenings locally known as Gap 8 Metal (max. 8mm screen or sieve). The material is drying out the darker areas more recently placed. The material tends to 'set" at once compacted once there is a certain moisture level. I usually seal or glue ballast with concrete bonding agent (Pva) which works effectively for 1-2 years before starting to break down, so the loco yard is pretty much intended as a trial on how the metal performs as loose ballast without a bonding agent. The water tower is a mock up it usually lives beside the main line in the Depot area, I am planning a vertical coal tower to the right of the water tower and some sheds to detail the area. The depot at capacity with 2 K27s for main line freight diagrams and RM4 for the Mail & Passenger Some early survey/location work on the Utah Extension to use up my stock of timber and track. The timber is Rimu a native hardwood salvaged about 10 years ago from a pergola, so little chance of warping and twisting compared to the treated pine roadbed used on the rest of the railway. The Utah Extension is extended to serve a coal mine like the Denver South Park and Pacific Ohio Creek extension which petered out a some coal mines failing to make it to the State Line with Utah let alone the Pacific Ocean. The Extension will be worked by a small 2-8-0 based at Jackson City while the K27s work the freights to an from the RGS and DRGW connection, these days 1 train out and back daily during an operating session unless traffic is extremely busy.

-
The loco looks really well very neat finish though it tends to remind me of Hudswell Clarke rather than Barclay Did you 3D print or scratchbuild from plasticard?
-
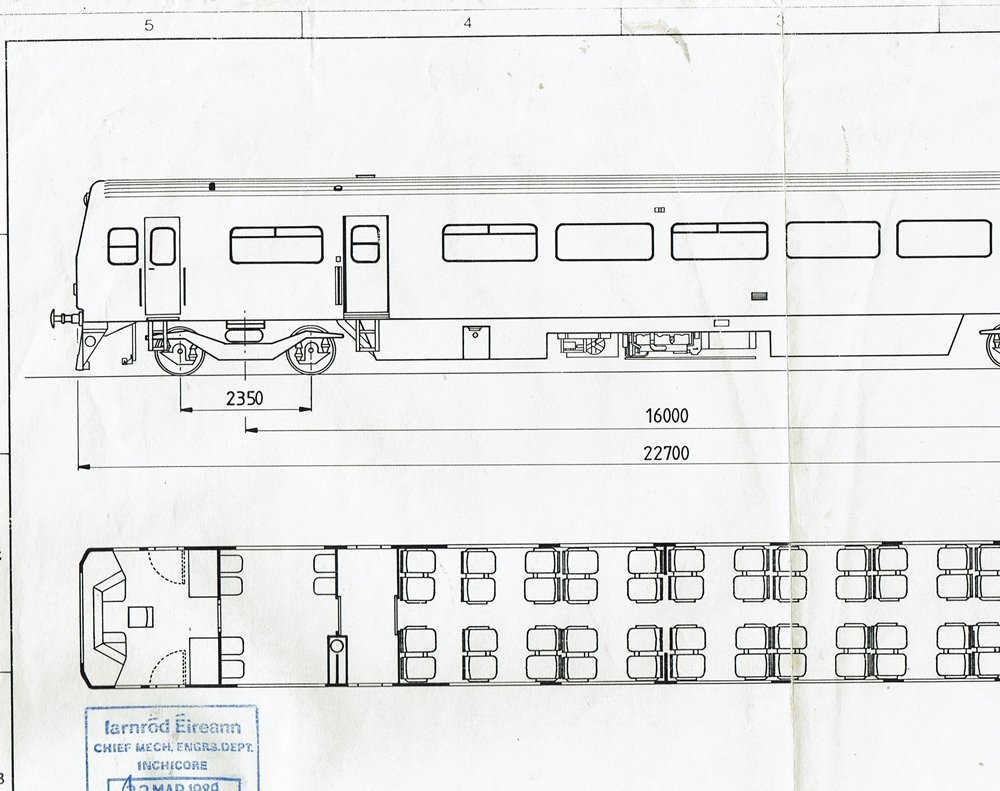
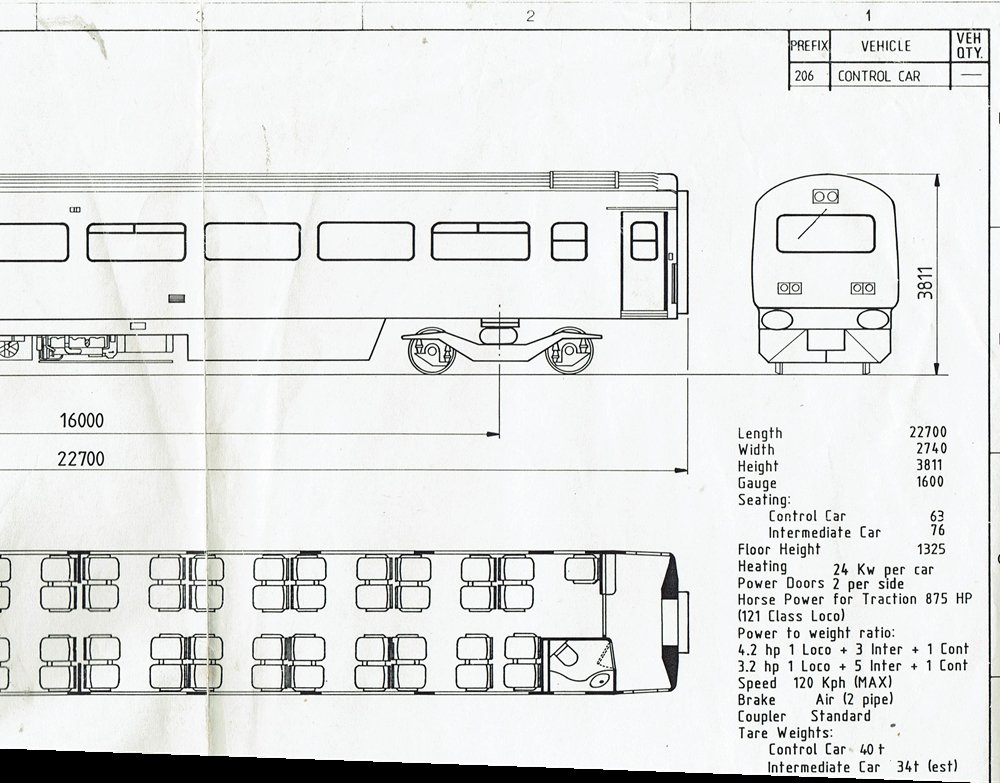
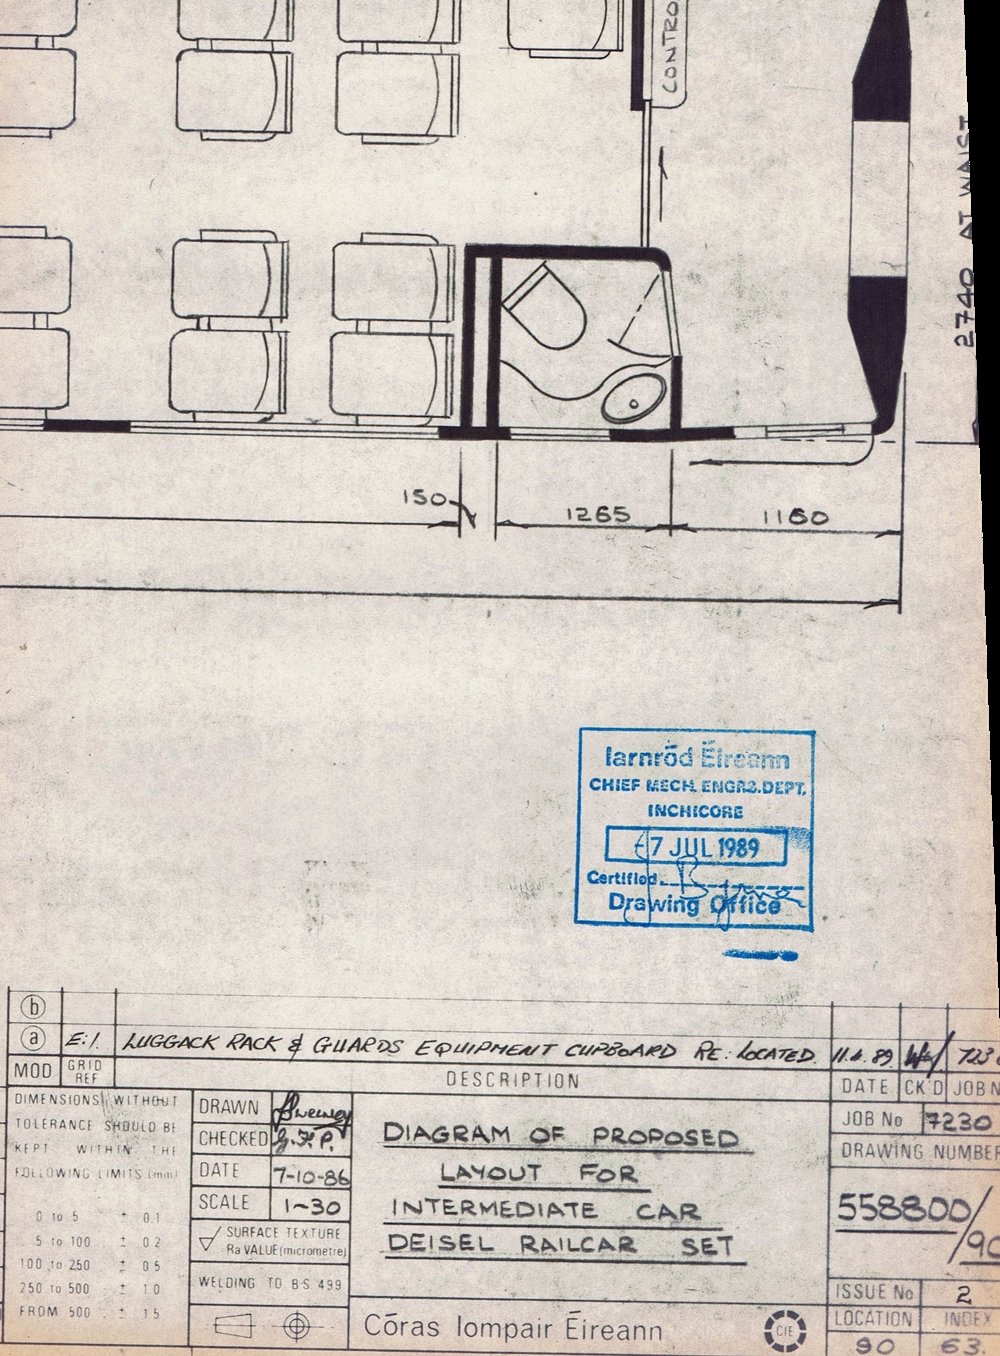
"Push Pull Control Car Layout" The drawing appears to have been literally 'hot off the press" as the revision was approved and CMEs Department released the drawing to me on 22/3/1989 I am not sure if the bogies are a LHB or a BREL design. BREL used similar bogies on contemporary MK3 based EMUs and Sprinter DMUs The original drawing is to 1:75 scale and too large to scan on the home printer. Title caption of CIE diagram of "Intermediate Car for proposed Railcars Set date 17/10/1986 which gives an indication of the time-line of the project. Like the IC125 trains the IE Push Pull sets are a good example of what can be achieved by experienced railway engineers and managers using limited resources when a hi-tech solution is not achievable or affordable. The MK3 Push Pull sets resulted in a big improvement in passenger accommodation replacing the Park Royals on Pearse-Drogheda suburban services while allowing IE to work within its capital budget. The introduction of the MK2AC and International Train allowed IE to strengthen its passenger fleet when capital to buy or build new Intercity rolling stock was unavailable. The MK2AC stock was acquired in a swap with Vic Berry for B201 Class locomotives, the International Train is likely to have been acquired from BREL at a substantially lower price than building a similar train. The big drawback is that an organisation that has been forced to make do and mend for generations tends to loose control when the purse strings are opened.
-
Wagon Numbers 26723-26728 Texaco Siding Tivoli Cork to Limerick. 4 Wagons were introduced in Dark Blue for Class B (heavy oil) and 2 Wagons Class A Traffic in light grey and red. I haven't been able to find a photo of the Class A wagons on line, but there is a photo of a Class A wagon in an IRRS journal from 1972-3. The arrangement of the Class A markings was unusual rather that a silver or dove grey barrel with a horizontal red stripe or red solebars, the upper section of the tank was painted grey and the lower section painted red. Traffic started 1972 ceased by early 1990s when the wagons were re-purposed for Mollasses traffic from Foynes to different destinations. The ESSO tank wagons were simply re-gauged ESSO UK tank wagons some of which initially ran with the ESSO logo. ESSO tank wagon barrels was stored in a compound outside Inchacore works for most of the 1970s, I don't know if these were retained as spares for the ESSO Teo wagons or whether the tanks were used in 2673-26740 CIEs final batch of tank wagons introduced in 1978 which appear to have used redundant 12' wb flat wagon chassis which were also used for the Bagged Cement and Beet Doubles.
-
Nice contrast with the clean steam loco https://catalogue.nli.ie/Record/vtls000304611 working the Dundalk-Cavan-Monaghan goods during the same era. An A Class was rostered to work the Dundalk-Carrickmacross goods between main line duties. Dundalk-Cavan-Monaghan goods appears to have been rostered to steam to avoid tying up a diesel for most of the day and night, the goods was timetabled to depart Dundalk at 04:00 officially returning at 10:50pm. Although one loco was used there must have been a crew change at Cavan or Clones to avoid the driver, fireman and guard going over their time on the road, possibly travelling on "the cushions" on the Cavan Mail Railcar or CIE Bus service.
-
Ernies Massive Irish 1930's to 2005 Photo Archive
Mayner replied to Glenderg's topic in Photos & Videos of the Prototype
Cracking photo, there is a an ex-works Pickering photo of 399 an open wagon with tarp rail and raised ends apparently intended for grain traffic in Ernie Shepherds CBSCR book. Looks like some alterations taking place to the yard. Whitewashed coal stack on the left? -
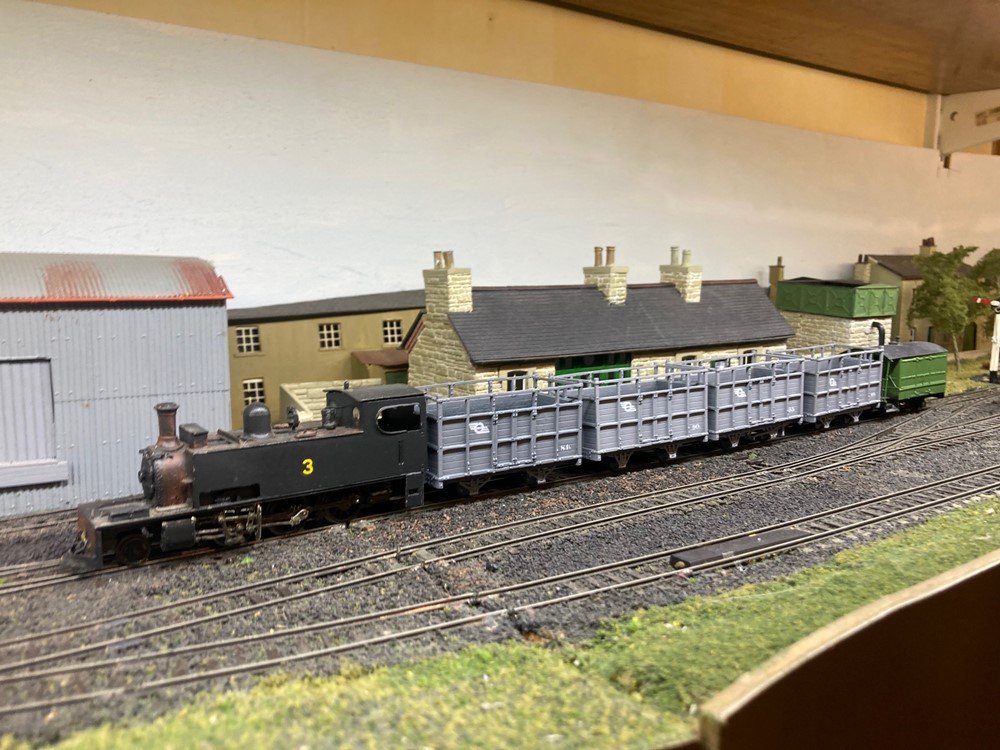
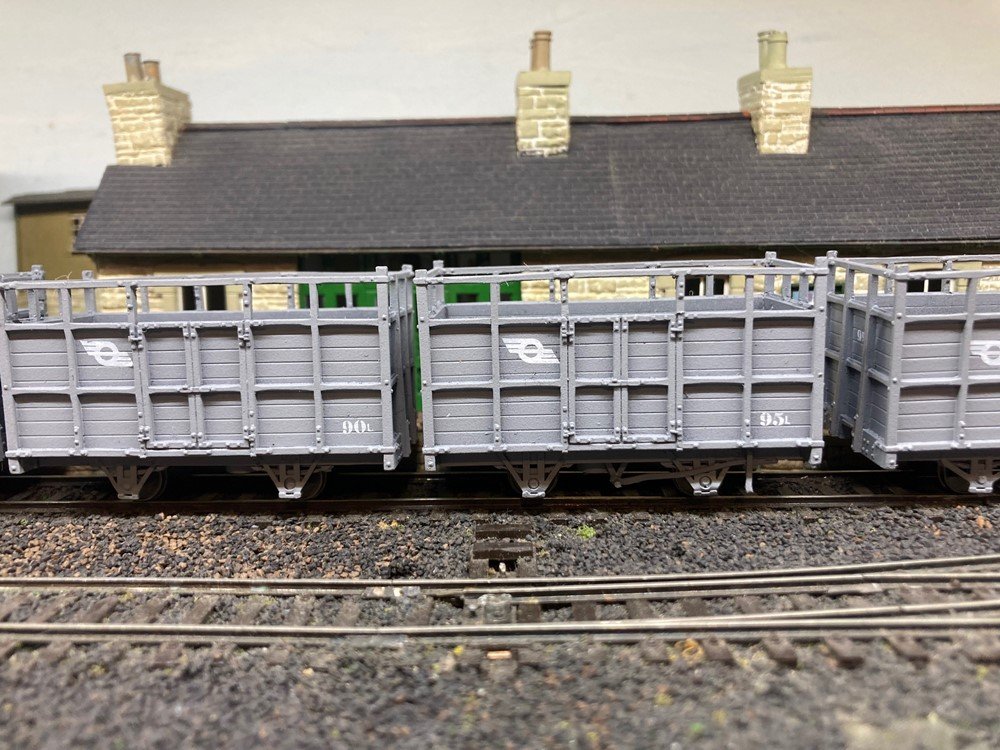
Some modelling projects large and small scale as part of the seasons festivities. Although we have been blessed with the weather we decided to take it easy and enjoy Christmas and the New Year at home. I had been struggling with arthritis and hearing loss for several weeks, this week my symptoms suddenly eased and I have some energy at least for a while thanks to some new medication. Re-building the Loco Yard Jackson City. The loco yard was over due for a re-build the two road Loco shed was too close to the freight yard lead and the shed roads too short to comfortably fit the K27 2-8-2 locos that work the road freights. After lifting the track the 1st step is to install longer bearers or transoms to support the re-configured yard and shed. The baseboard is basically open frame with 100X50 treated joists on timber piles supporting the bearers and wire mesh that supports the 100X25 trackbases and ground cover. All timber is CCA treated, though after 14 years there is some rot in the cut ends of the bearers. The turntable is simply a piece of treated timber that pivots on a coach screw and galvanised washers, the pit is fibre glass resin built up in situ. I decided on a concrete grain elevator for North Wharf based on the Kathryn Farmers Co-Op Elevator on the North Dakota prairie, though I got the shape of the storage bins wrong! This was my longest most ambitious print at 18hrs and we ran into problems with the resin sticking to and pumpturing the PF film during the final stages of the print, fortunately I use a screen protector so there is no permanent damage to the printer. Printing horizontally rather than at an angle produced a good representation of the 'lifts' from the concrete formwork at the expense of a PF film, the object is close to the maximum size that can be printed on the Anycubic Photon X printer. The remaining section of the elevator is a similar size and shape with the addition of a Head House which towers above the elevator. The elevator is similar in height to the Distillery Tower building at the opposite end of the layout to provide vertical balance. I acquired some C&L Cattle and Open wagons in a partial swap for a loco kit, SSM produced custom decals to finish the rake, the wagons are still an unfinished project as I need to order Kadee HOn3 couplers when UPS resume shipping to this part of the World, add weight and possibly replace the wheels as the wagons are quite unstable, though the train makes a pretty picture. 90L & 95L fortunately I have a copy of P J Flannigan's Pan paperback book (one of my favourites) bought around 1970-72 which includes a reasonably comprehensive stock list! 1L, 8L built from Foxrock Models kits and 14L from my own resin casting on a Backwoods Miniatures chassis. We paid a lot of attention to getting the Tare and load information correct, but forgot to specify a size for the panel on the Cattle Wagons The wagons were spray painted in a satin/gloss grey before fitting the decals and finished with Gunze "Mr Super Clear Flat" aerosol https://www.amazon.com/Mr-Super-Clear-Flat-Spray/dp/B000W30PIW as Testors Dullocte is no longer available.
- 392 replies
-
- 13
-

-
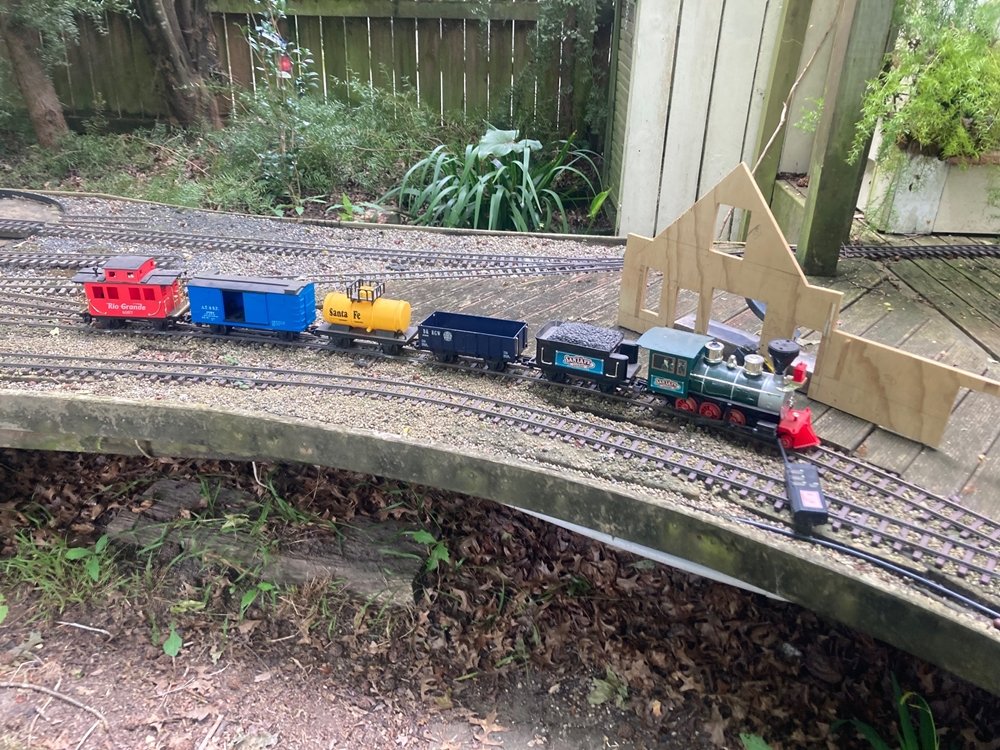
Some of the cheap large scale battery train sets available at the cheaper end of the market are ideal for younger children and surprisingly robust. Similar sets battery sets were available in tinplate during the 1960s, my first set was a steam freight with the battery in the boiler, the second an American diesel streamliner, dismantled/wrecked both tinplate sets but my Lego train was a survivor. My daughter and her friends enjoyed the battery set, but later commandeered my LGB & Bachmann Big Haulier locos and stock. They operated the railway transporting toys and fantasy characters to different destinations on the railway, they had absolutely no interested in watching trains run round and round. Wooden trainsets with Chuggington and Thomas characters have great play value and seem to be mandatory in most American Railroad Museums and Heritage Lines, these days my daughter is not interested unless its got four legs lives in a stable and eats grass but has become a competent sculptor and model maker.
-
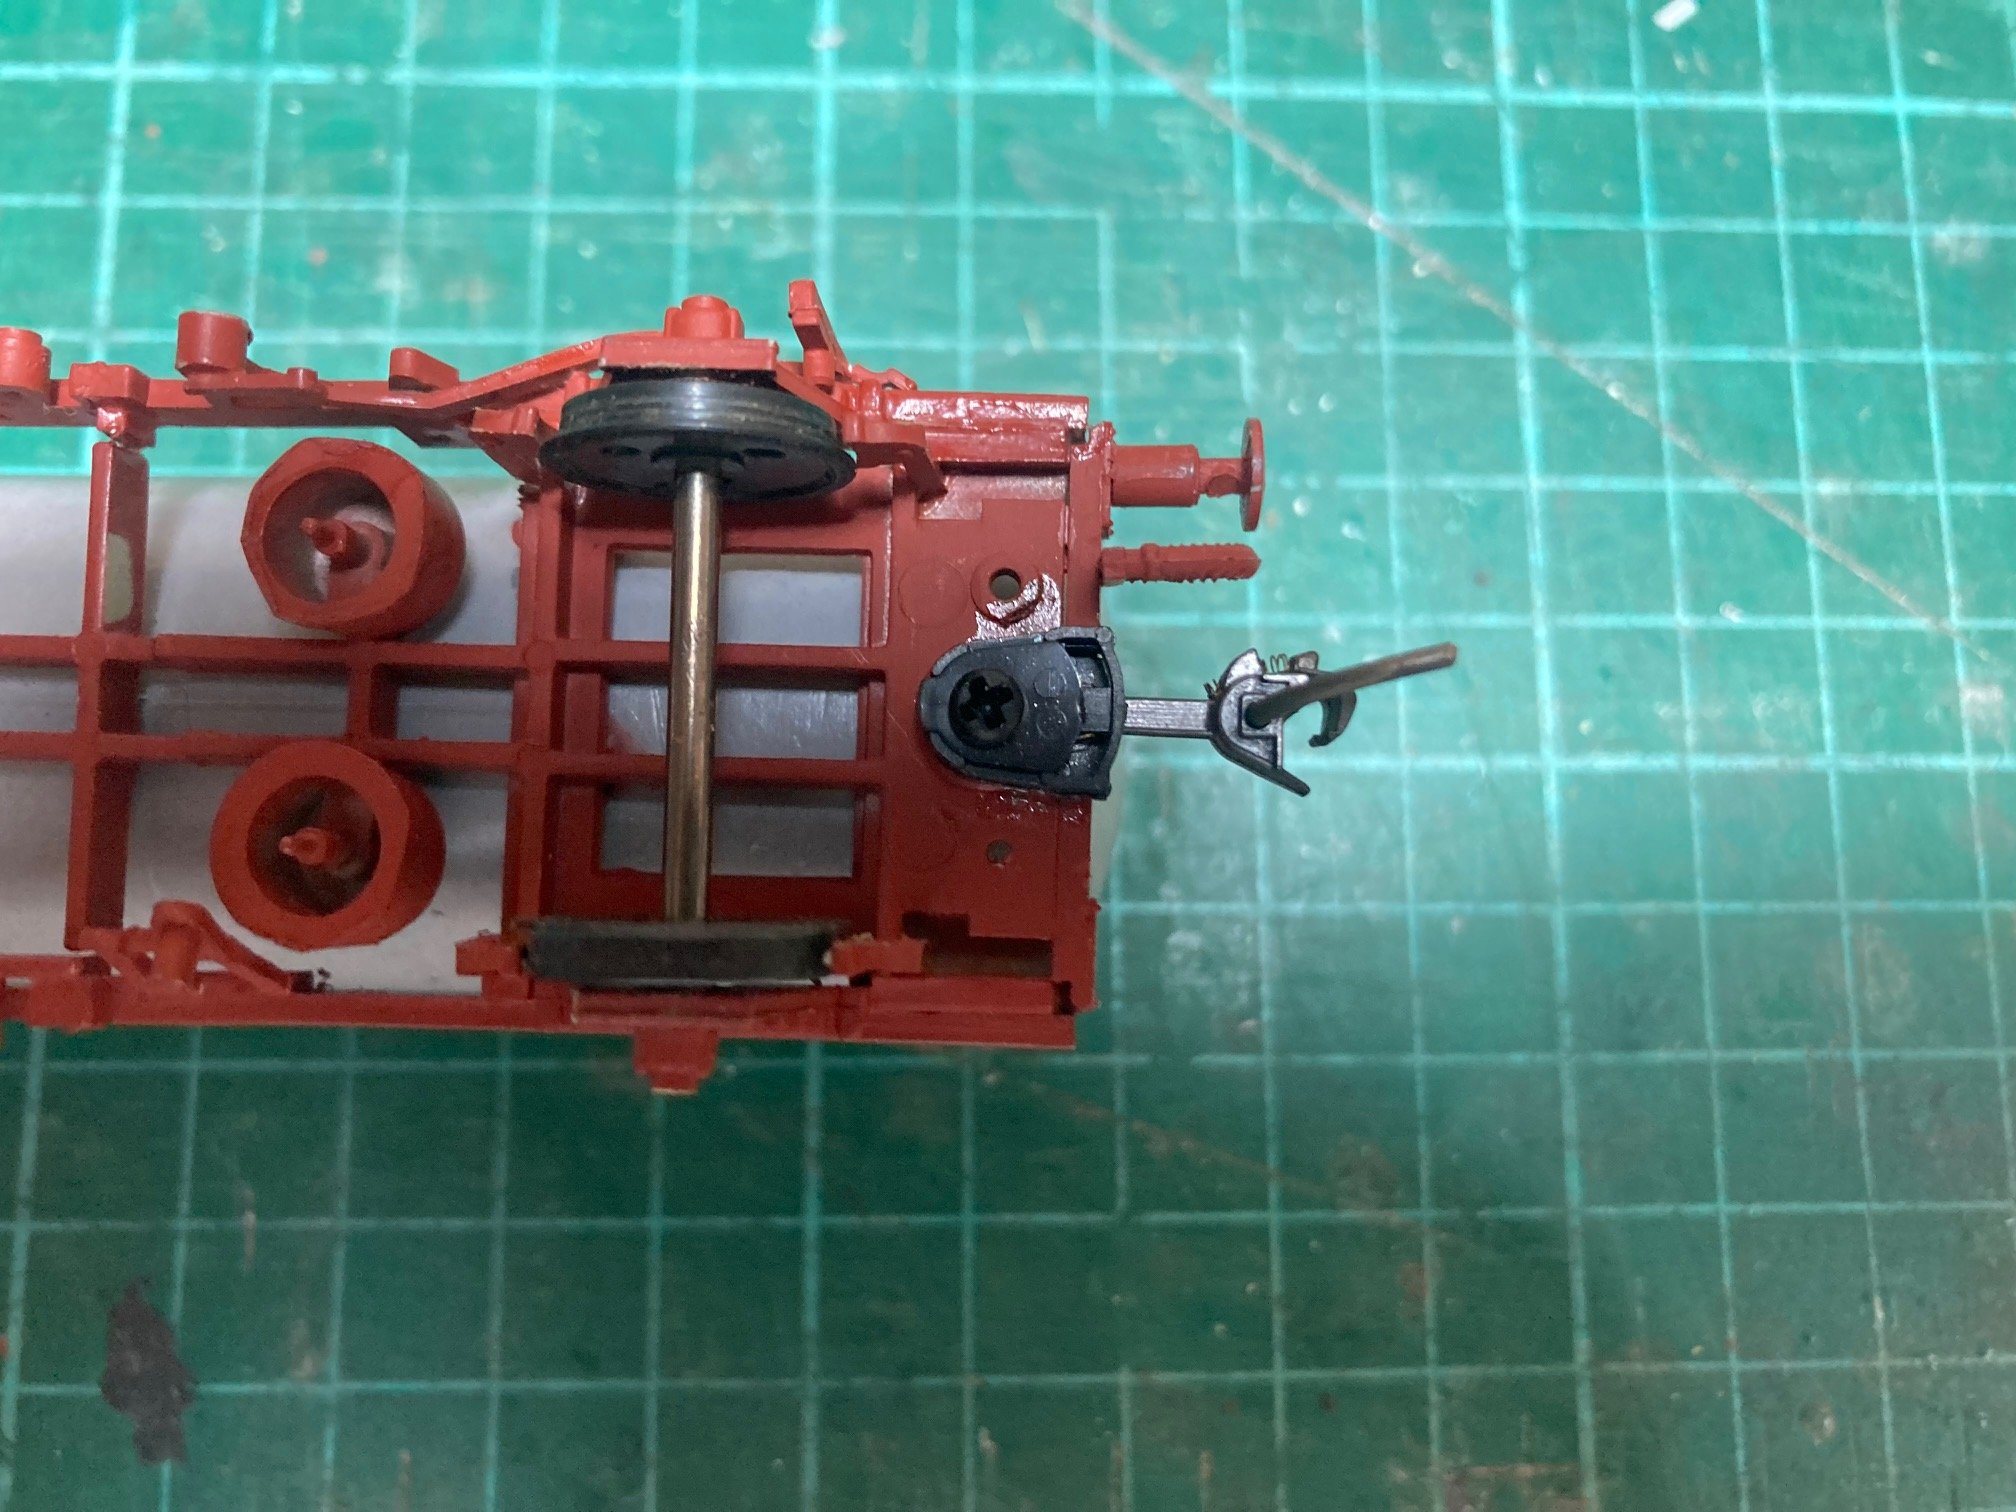
The simplest option is direct fix a Kadee No 5 or No36 Long shank coupler to the model, no messing about with NEM pockets. https://www.kadee.com/ho-scale-couplers-c-274_276_284/36-ho-scale-30series-plastic-couplers-with-gearboxes-long-2564-centerset-shank-p-270.htm We used the No36 coupler as standard for scratch, kit and rtr rolling stock on the Loughrea layout. Kadee No36 coupler direct fixed to a Dapol/Airfix tank wagon assembled about 30 years ago!, the wagon once part of a rake of 10 has been through the wars loosing a buffer at one end and a coupler at the other end