David Holman
-
Posts
4,336 -
Joined
-
Last visited
-
Days Won
117
Content Type
Profiles
Forums
Events
Gallery
Blogs
Store
Community Map
Everything posted by David Holman
-
Excellent stuff, keep posting! One dodge I use a lot on my layouts is a siding going off scene into the fiddle yard. On Belmullet, it is harbour branch, for Fintonagh it leads to a transfer siding for broad gauge, while on Arigna Town it was a branch to the coal mines. The point is that the siding can be anything you want and because it goes off scene, no extra modelling/space is needed, though you have the opportunity to build whatever stock you might want to serve it.
-
Object lessons for us all, add in Ken's similar project and there is much inspiration in these small projects.
-
Excellent ground cover. Presume you used a static grass machine to create the weeds growing through old sleepers and rubbish? Likewise, how do you create the concrete hard standing? Colour and texture look just right.
-
Loco liveries: BCDR & LLSR & MGWR brake van green
David Holman replied to jhb171achill's topic in Irish Models
Remarkable! How long did the Midland vehicles last in these colours? Also, what colour was WL&W freight stock, pre take over by the GSWR? Photos in Ernie Shepherd's book suggest varnished wood with black metalwork, but am guessing that was probably like photographic grey. -
Whatever next?! Having said that Dart Castings have produced a Michael Portillo, in trade mark lurid trousers and a range of scales too, for his railway journeys programmes.
-
With laser scanning and 3D printing, all you need to do is track the lady down and ask her if she is willing to have a model figure made from her. Might be getting on a bit by now though....
-
Indeed! Feel sure a C class will look at home on a Sligo Leitrim layout and never ceases to amaze me on what folk are doing out there.
-
Great work and fine though the modern diesels are, it's lovely to see something different. Will there be some weathering added?
-
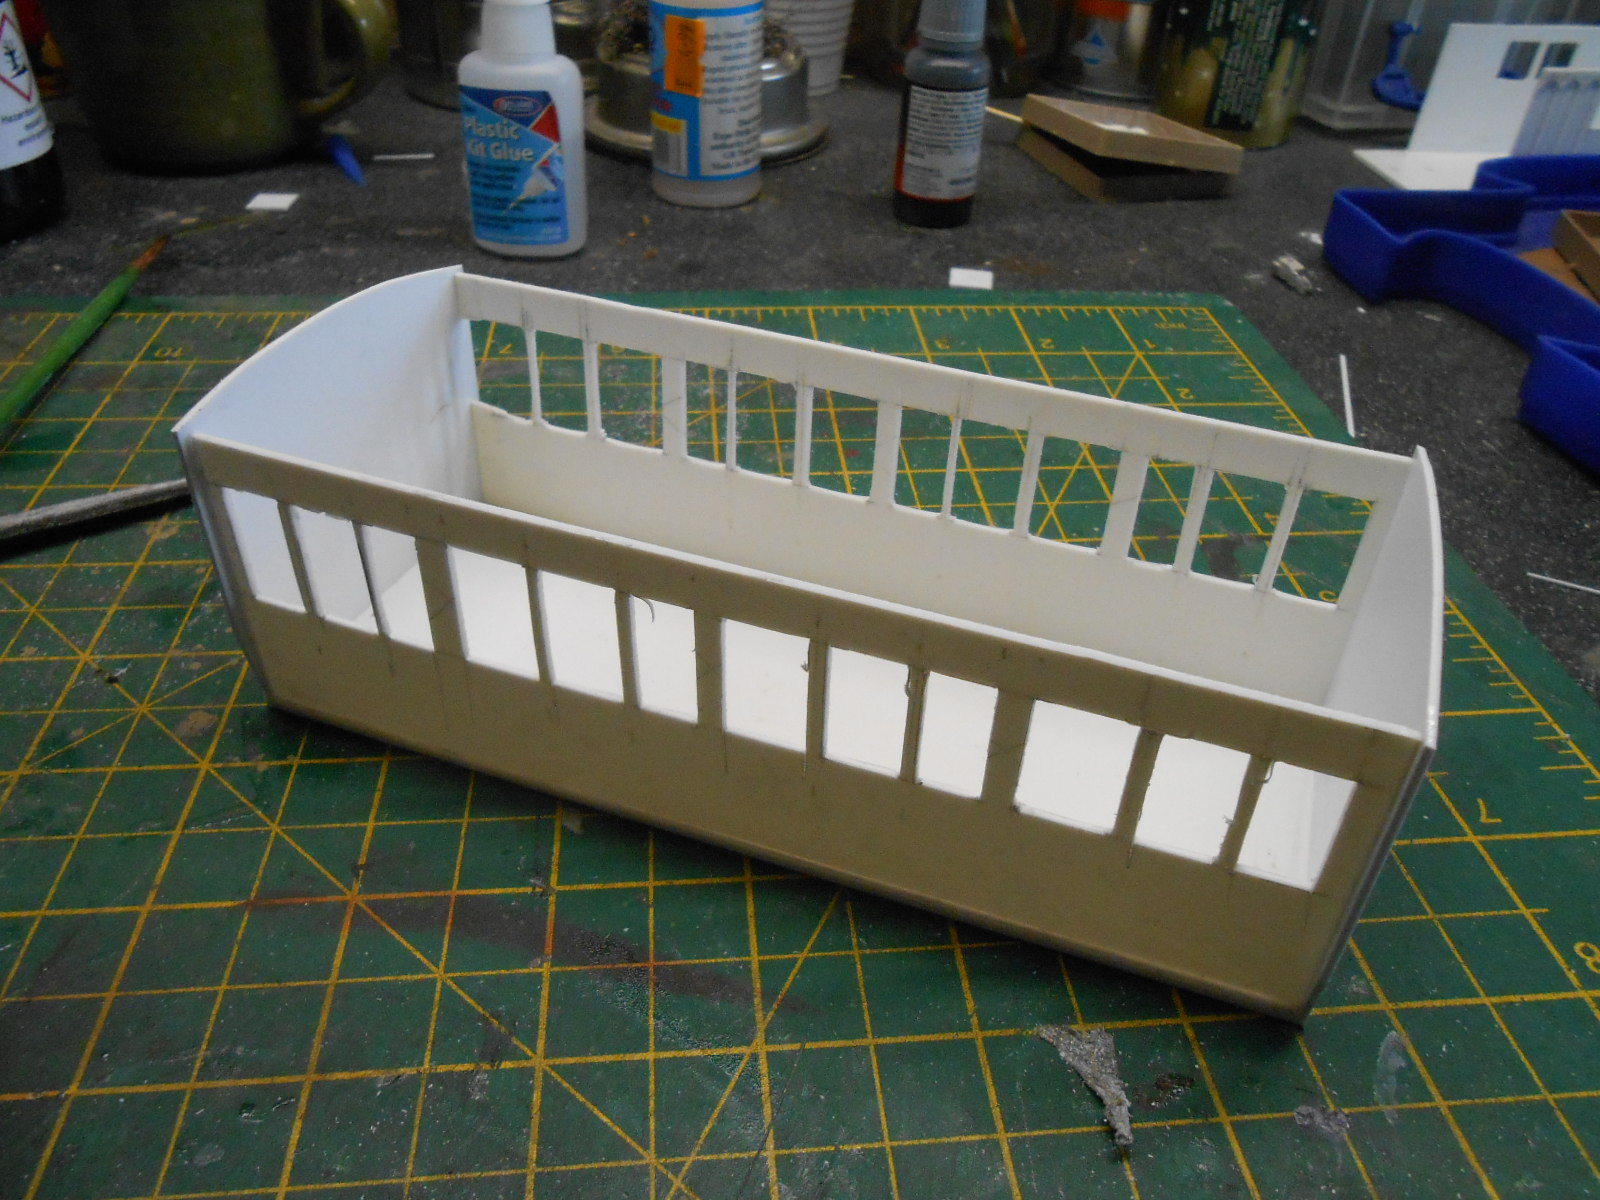
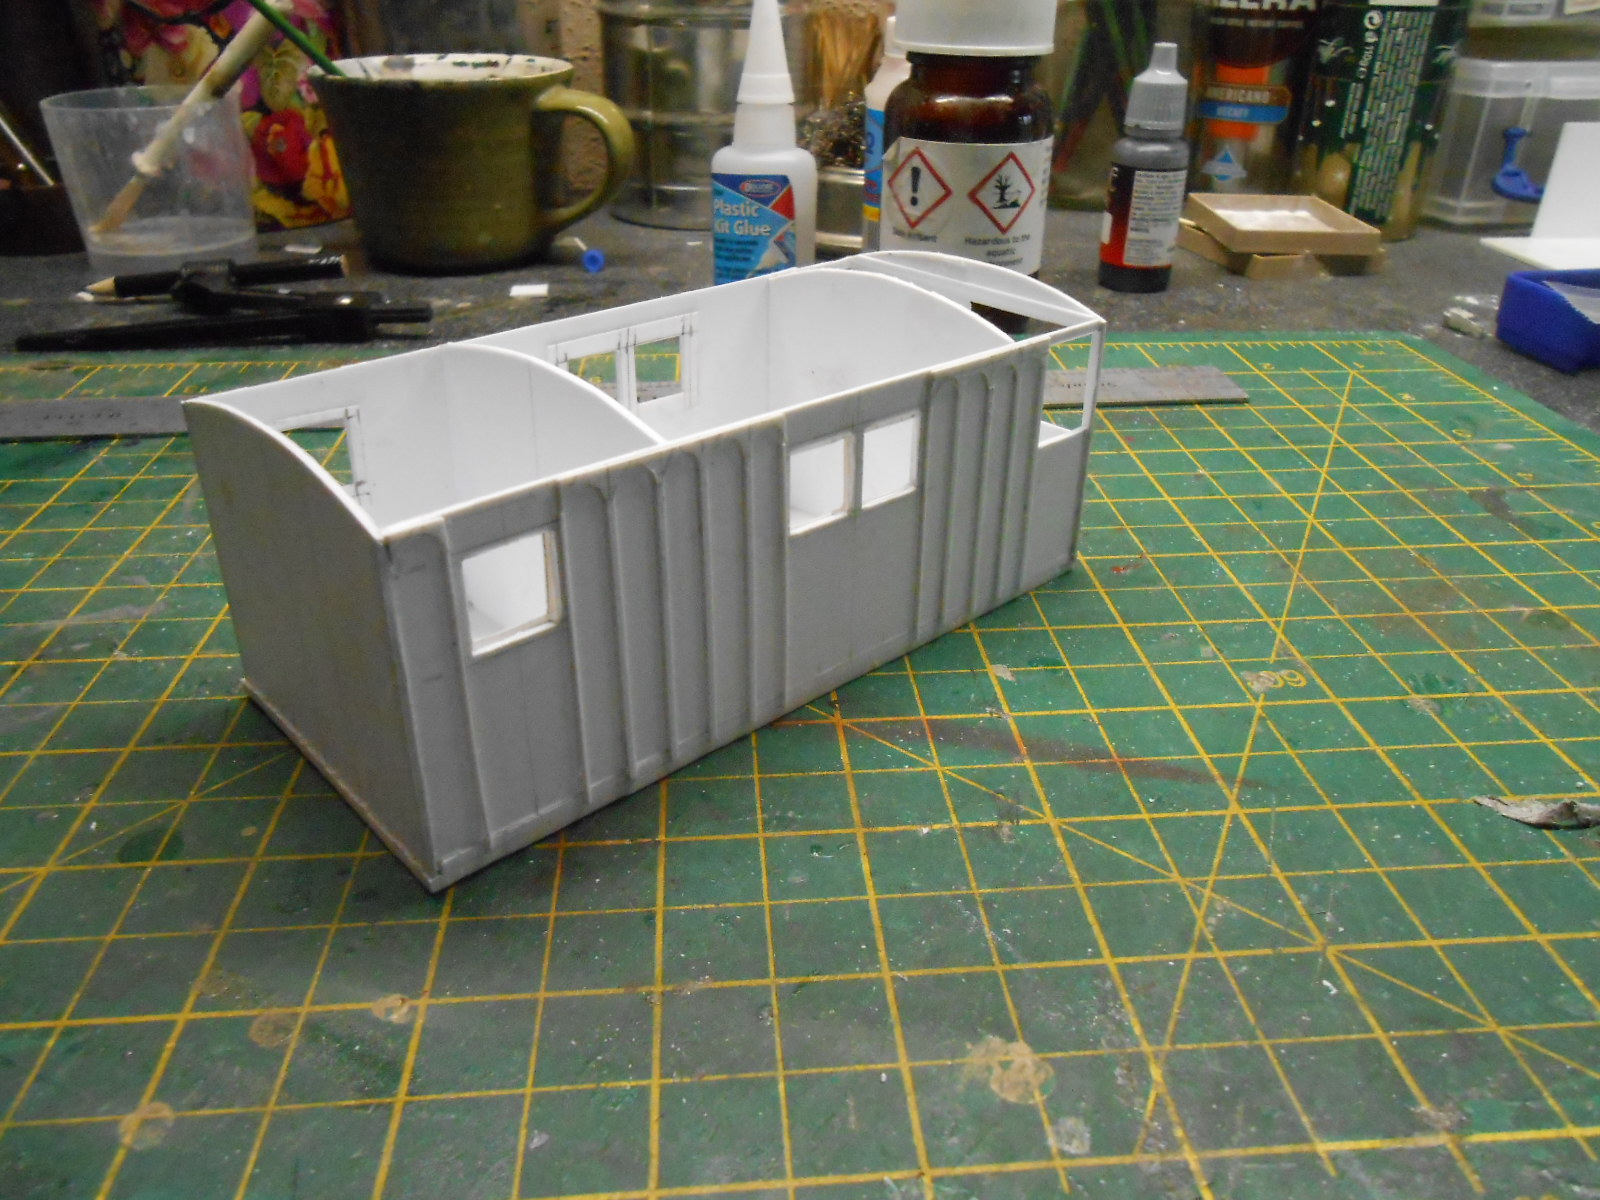
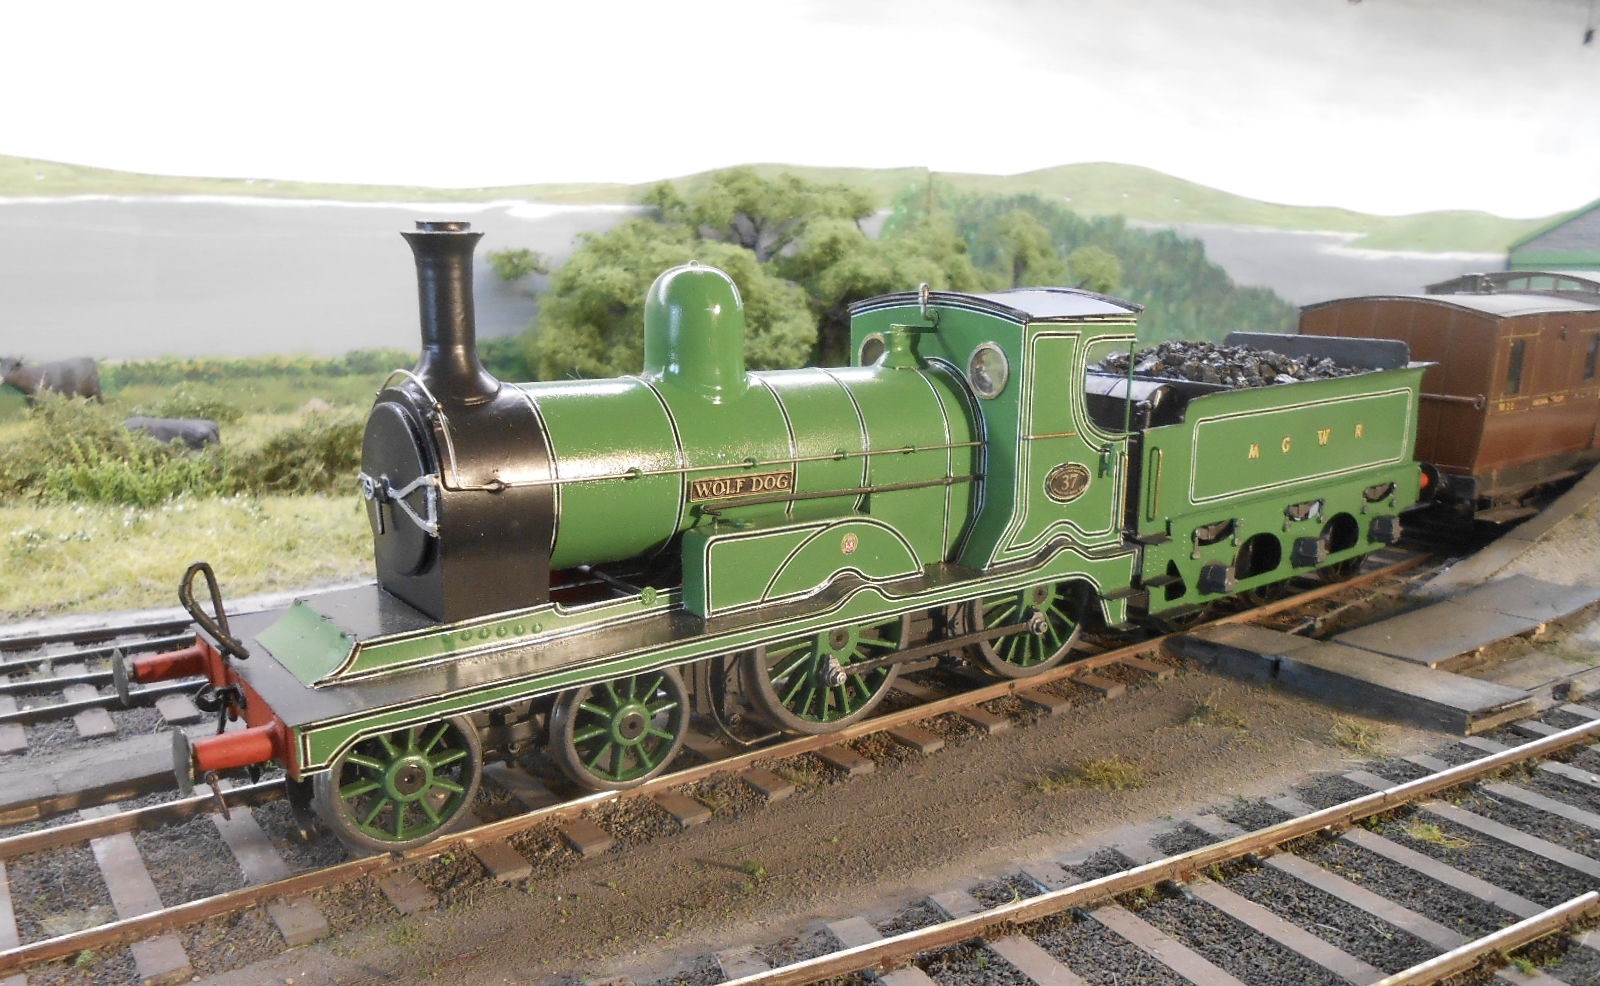
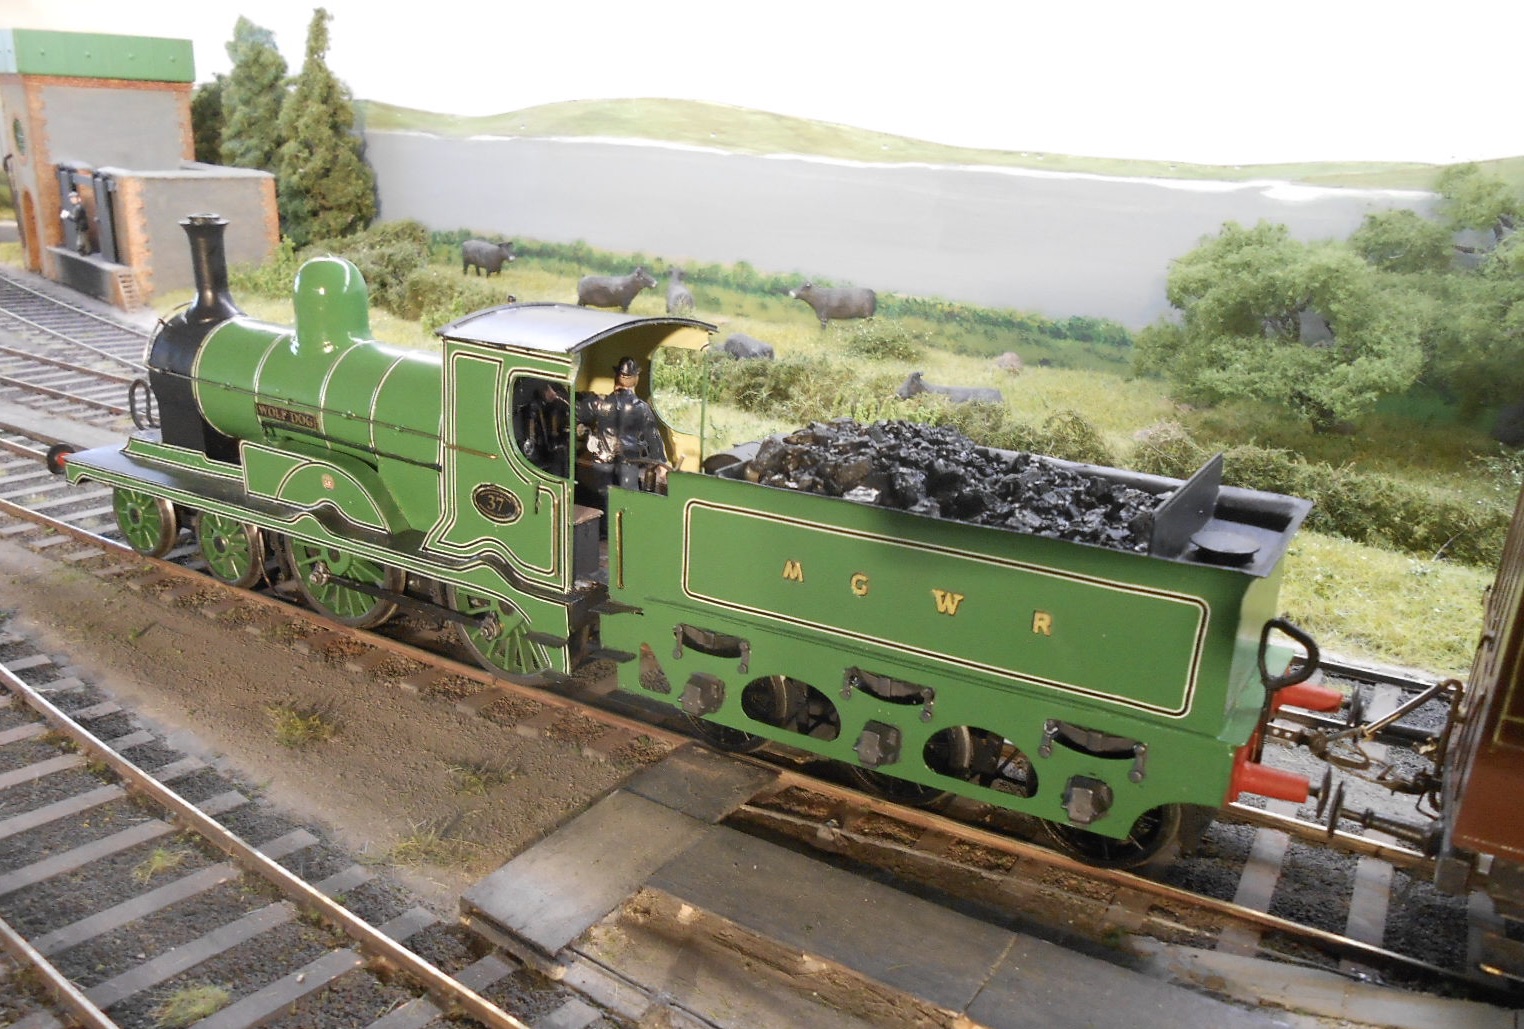
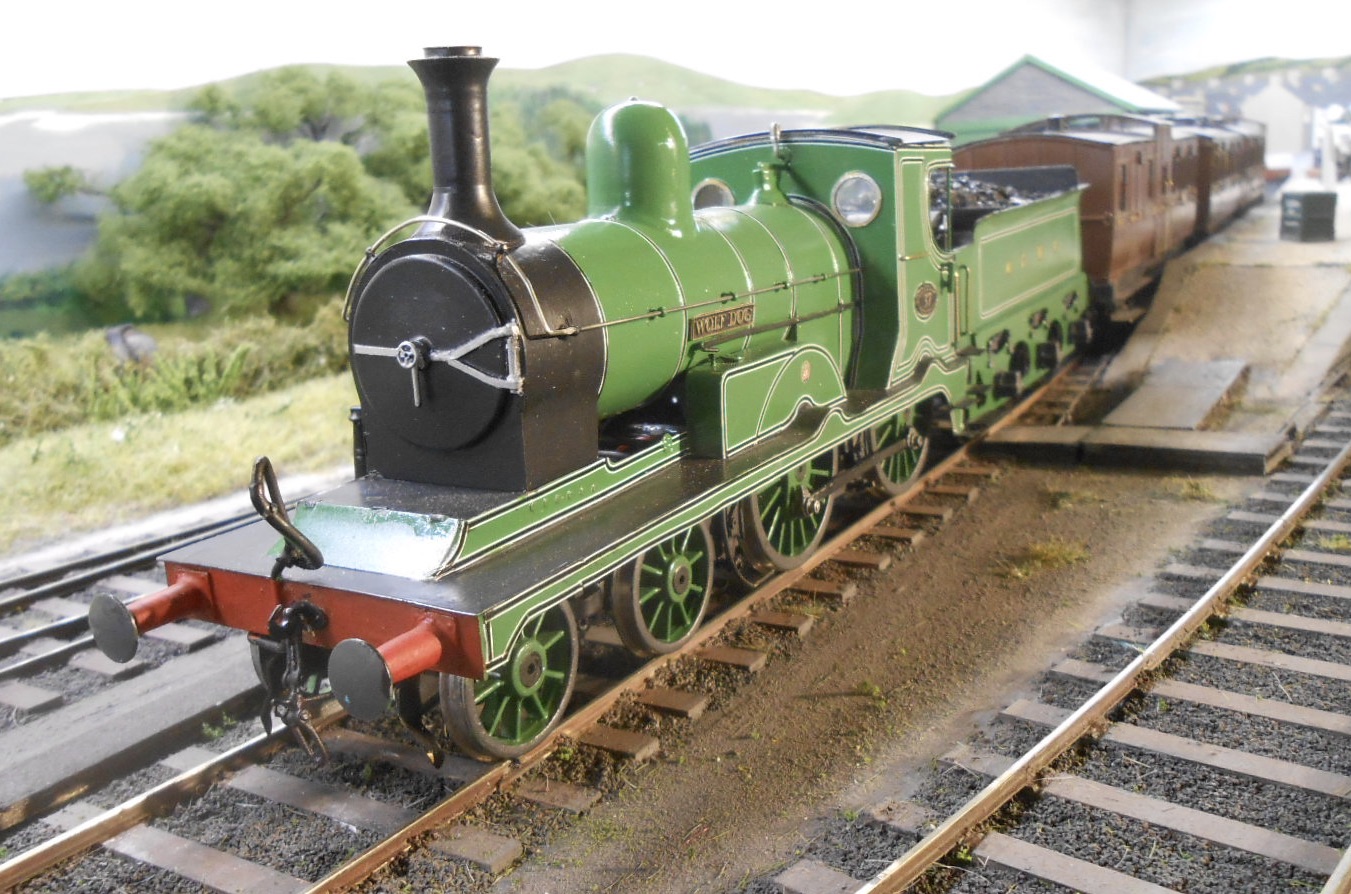
Filling gaps I don't know whether other folk do this, but I often find myself pondering and brooding over the make up of the trains I run on my layouts. For Belmullet in its early 1900s guise, a lot of time has been spent recently on the MGWR Mail Train, which is now finished. There are seven tracks in the fiddle yard and there have been more than a few furrowed brows over the last few months about how I might fill them. Some were fairly easy, such as a Sligo Leitrim freight, hauled by 'Small Tank' Fermanagh. This is made up of SLNCR cattle wagons, or private owner coal wagons from the Arigna mines, so that's three roads done. A fourth road is occupied by a Waterford, Limerick and Western 'Mail Goods', with 0-6-0 Shannon at the head, with a 6w parcels van, 4w carriage truck and horse box from the same company.. However, have only recently realised that I only had two passenger trains, so have decided to turn the Mail Goods into a mixed train, by adding a 4w third class coach - more of which later. The fifth road was originally occupied by my Coey 101 class 0-6-0, but have recently decided to put this loco on freight duty - which is where a few more gaps need filling. Currently, I only have one GSWR van, plus a brake, so a couple more need adding to the stock building list. At least one open topped livestock van, plus an open or two are currently favourite. As for the GSWR passenger, this comprises two six wheelers & have decided I would now like them to be hauled by an F6 2-4-2T. These were really built for the Valencia Harbour line, but [had it been built] the Belmullet route would have been similarly twisty, so an F6 moving north is not out of the question, while Galteemore of course has one on Rosses Point! Alphagraphix do a kit though it will need adapting to its original [oven type] smokebox doors. A couple of fish vans would complete things nicely. So that is six roads covered. The seventh is split in two, with in 1950s guise the railbus at one end and the railcar at the other. For the 1900s, the short [railbus] end will eventually be occupied by 0-4-2T Sprite and its semi permanently attached pay coach. In the longer road, there is room for a short goods train and news that Alphagraphix are due to re-release the E/J26 kit offers the chance of doing a MGWR goods, with the loco in lined green too. I quite like the idea of having each of the independent railway companies operating their own trains & stock. This side of the water, wagons in particular eventually all got mixed up, so that by the 1923 grouping, you could find a variety in most trains. Suspect it was the same in Ireland, so the GSWR freight, hauled by the 101, will have a variety, but the WL&W, MGW and SLNC ones will stay 'independent'. Among the stock I've built, this is not a problem, but having acquired two Richard Chown Dublin & Meath brake vans, I've wondered ever since how to include them. These are the ones in purple lake with salmon pink ends [!]. Richard ran them with Shannon on the Mail Goods, but the Dublin & Meath was taken over by the MGWR, so by 1900 should I suspect, be in brown livery. So, one at least can be repainted as the brake for the MGW freight, plus I have a horse box from the same company. A couple more MGW wagons should complete the line up. So, where does all this lead - and apologies if you are now bored to tears with my ramblings! The latest mini project centres on the WL&WR Mail Goods. In Ernie Shepherd's history, there is a nice picture of a four wheel third class coach which [unlike the parcels van] has plain panelling and doesn't need an awkward lattice cutting out, so can all be done with micro strip. Alongside this, am building a Waterford and Central Ireland Railway brake van. This company was actually in open conflict with the WLW for a while, over access to Waterford station, but later the former took over working its trains for a few years, before the WCIR became independent again. In the end, it was absorbed by the GSWR, so am hoping my model is vaguely plausible. One thing for sure, early brake vans are not easy to find, so this one is a bit of an amalgam of the WCIR and D&M prototypes. However, the rounded tops to the panelling nicely match those of the 4w coach, so fingers crossed! The models very much follow techniques used by David Jenkinson in his book Carriage Modelling Made Easy. Plastic sheet and micro strip make up the bodywork for both, while the spares box seems to have enough white metal castings for W-irons, springs, buffers etc. Deciding how my trains will be made up may cause a bit of head scratching, but if you can make stuff yourself, at least you don't have to wait for a manufacturer to produce one.

-
Excellent work - well done you. There is probably more fun in building modules like this than actually operating them, but as your pictures show, they are great for posing and photographing models. Plus of course, one delvelops new skills in the process and the project gets going pretty quickly too.
-
Diesels, yes, but steam locos more challenging because of splashers and bodywork outside the wheels, meaning a lot of hacking and rebuilding needed. The actual NCC Jinties ad to have their drivers reprofiled to fit inside the splashers when they crossed over the water. An ideal loco for simple conversion would be one where the footplate was clear of the drivers and with inside cylinders and valve gear. Not many of those around, I suspect, with even fewer available as ready to run models...
-
Well ahead of its time. Could be driven from either end and had sliding doors, albeit not mechanical. The railbus meanwhile had Howden-Meredith patent wheels, where the steel, flanged railway tyre was fitted outside the conventional rubber ones, in an effort to improve the ride. Even had pressure sensors that sounded a hooter in the cab if any of them started to go flat. Now a standard feature on most modern cars of course, but Dundalk works thought of it about 90 years ago.
-
Alchemy going on here, methinks! Sounds like you should put all the stuff back in a box for a few days and see what else appears - maybe a motor or two???
-
Agreed! I think most people who build their own stuff are happy to plan ahead and/or wait a bit. That said, Alphagraphix normally only take a week (probably for cheques to clear), while the likes of Eileens Emporium, Roxey Mouldings and Wizard Models turn things around very quickly and you can use credit card or PayPal. Collectively they have certainly helped me through lockdowns, but also very much looking forward to proper shopping again at shows. My local model shop had no microstrip whatsoever when I visited this morning, so an order to Eileens is now required for the next project.
-
Wow, well done Roger. Not before time we might say, especially as I only recently sent the usual 6x second class stamps for the paper version! Given there are a few photos of my models in there, goes without saying am a long time fan of all things Alphagraphix. As Galteemore says, the card kits work well on their own and you can add a whitemetal chassis too, though I prefer to use them as drawings for scratch builds from plastic. Not only can you do West Cork, you can also do most of the Sligo Leitrim as the card kits cover box and cattle wagons, along with most of the coaches AND the railbus, plus many of the railway buildings too. Note though my model of the railbus is made of plastic and nickel silver - indeed would think this is easier than trying to bend card into all those complex shapes. Couldn't have done it without the card kit though and the whole catalogue is a fantastic resource, because there are whitemetal castings for bits and bobs, transfers and all sorts. Arigna Town was largely built from it. The loco kits are great too, because the chassis is a very simple, one piece etch. Solder in the wheel bearings (facing outwards for 5'3), fold up the frame sides and fold down the spacers, then they presto, you have a chassis! On an 0-6-0 I've had wheels and rods on in about an hour - very satisfying. Roger has some clever tricks for dealing with complex shapes like curved footplates and would say that many of the kits are well within the scope of an enthusiastic beginner and likewise the coaches too. Only St Mologa was a bit of a challenge, but even then more because of its tiny size than anything. If there aren't a few more folk (and should be a lot more!) modelling Irish broad gauge in 7mm scale as a result of the catalogue going online, then there is no justice. Come on in - the water is lovely!
-
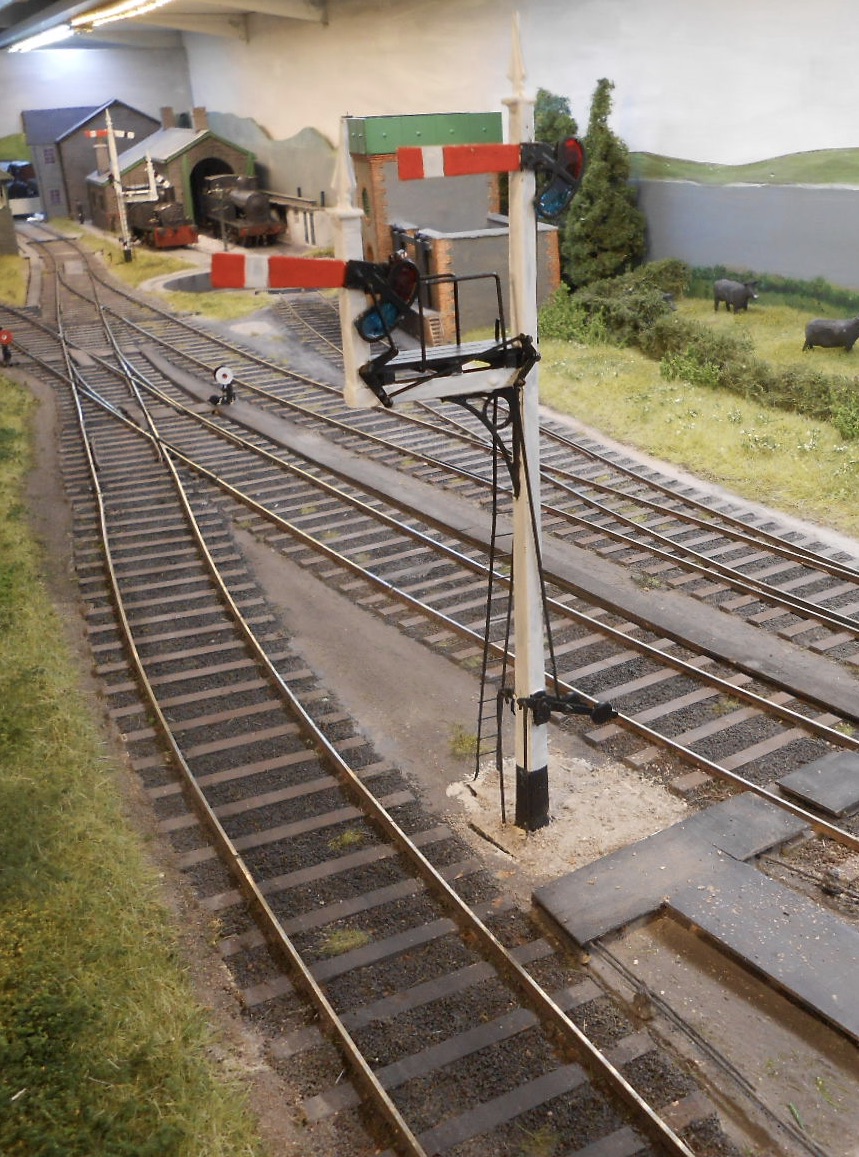
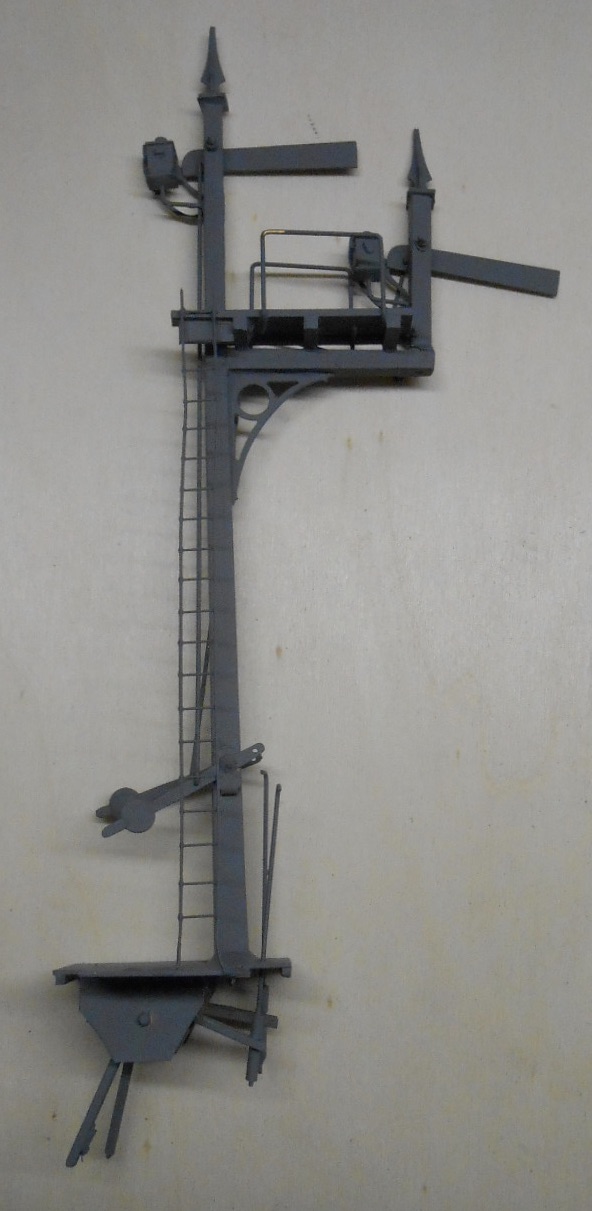
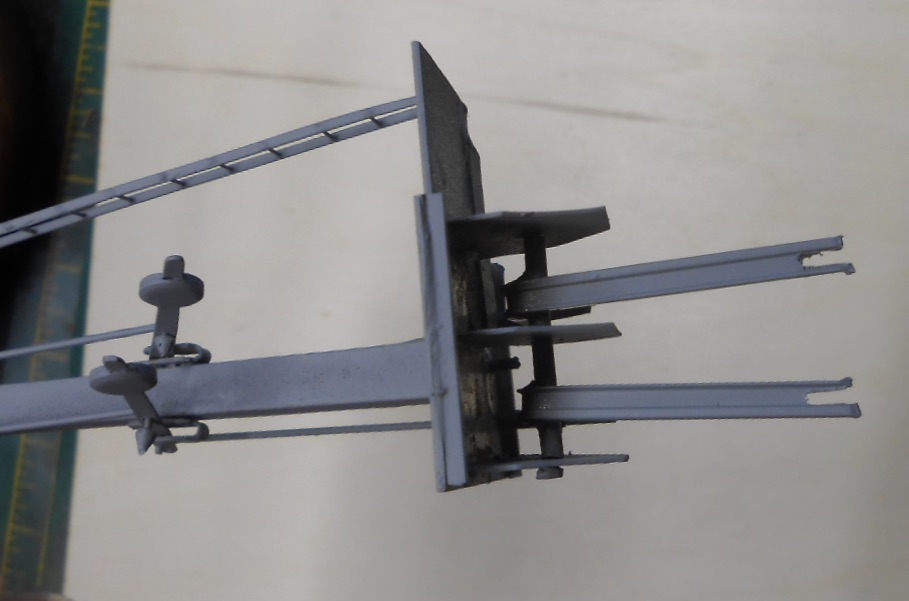
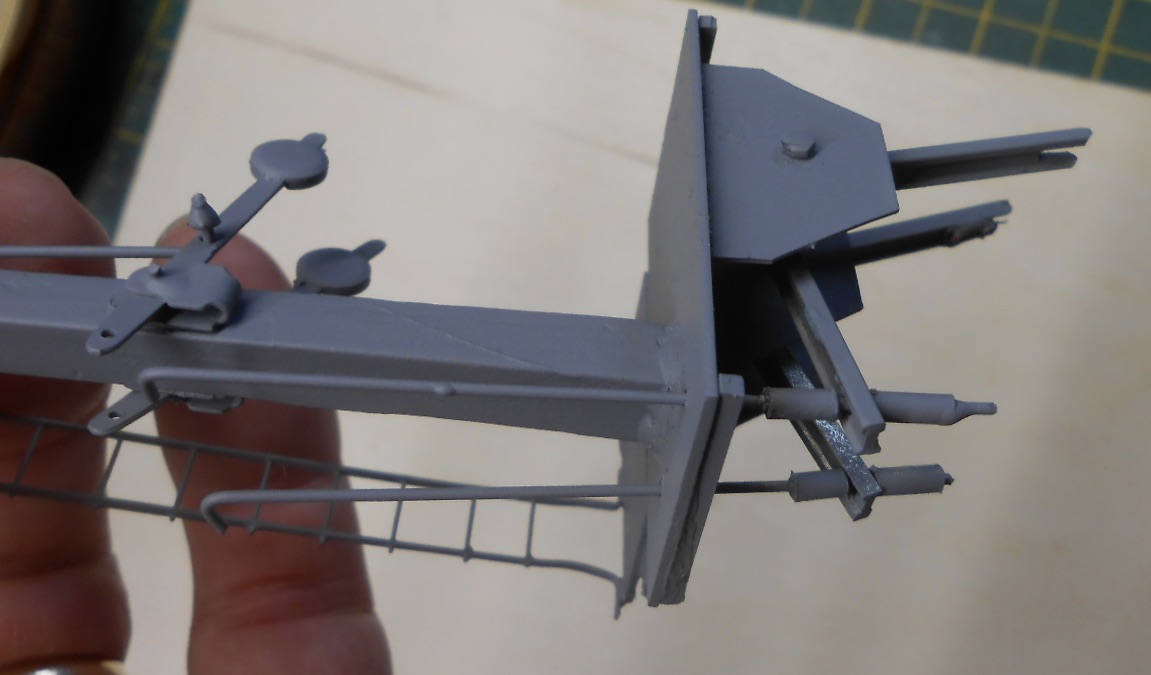
Signals may be fiddly, frustrating things to build [for me anyway], but they are a delight to finish off because they transform with only the minimum of painting. In this case, a coat of matt black from a spray can, then I hand painted the white bits, then added the red and white stripes to the front of the arms with black and white to the rear. Next came red and blue [not green, yellow light from the lamp turns blue green] gels to the spectacles, with some textured cement coloured paint for the base. The operating mechanism is yet to be fixed up, indeed it is something I'll need to psyche myself up for, involving as it does separating the boards and lifting No2 up to get at the underside to fix the servos. However, Belmullet at least now has an almost complete set of signals, though have just noticed that the point to the end loading dock ought to have a ground signal too.
-
Goes without saying that Mayner knows his stuff! One thought to get you started would be doing Phoenix. Worsley do a set of etchings that are pretty much self explanatory and it ought to be possible to source a 4 wheel motor bogie to go underneath it. That way you could have something up and running to go with any stock you make and Phoenix was known to go on short forays along the main line from time to time. Small shunting layouts have been built around less and could always be incorporated into a larger scheme later.
-
Although I've not direct experience of Backwood kits, from what I hear they are quite complex and not cheap either, but then there is a reason for this as Donegal steam locos were fairly complex things too. Outside frames and cranks, outside cylinders, bogie and pony trucks - there are a lot of skills to learn and indeed tools to acquire for anyone wanting to build a model of these locos. That said, the big side tanks will help hiding the motor gearbox. I have built a few Worsley Works items and the thing with them is they are designed as an aid to scratchbuilding. So, as you say, not only no wheels, motor or gears, but no castings or fittings either. What you get are a set of etched and that's it. There are no instructions to help you assemble the model. Would say that trying a couple of wagons is certainly a good way to start. A good way of getting into loco building can be to use/adapt a commercial chassis and scratchbuild the body, which plasticard can be great for. However, not sure if there are any 12mm gauge, outside frames chassis available that might suit. Definitely think you are right to use 12mm track though. Donegal locos are way too big for 9mm. The same applies if you went to 7mm scale. There are chassis that could be used, notably the 08 shunter, which runs beautifully. Then there is 6mm (quarter inch) scale on 18mm track, but suspect I'm now way off piste! However, certainly applaud the idea of wanting to try something more demanding and will certainly look forward to seeing how things develop.
-
Always interesting to see how folk tackle this type of work. Far from my favourite exercise but somewhat essential... The battery tester is a really neat idea.
-
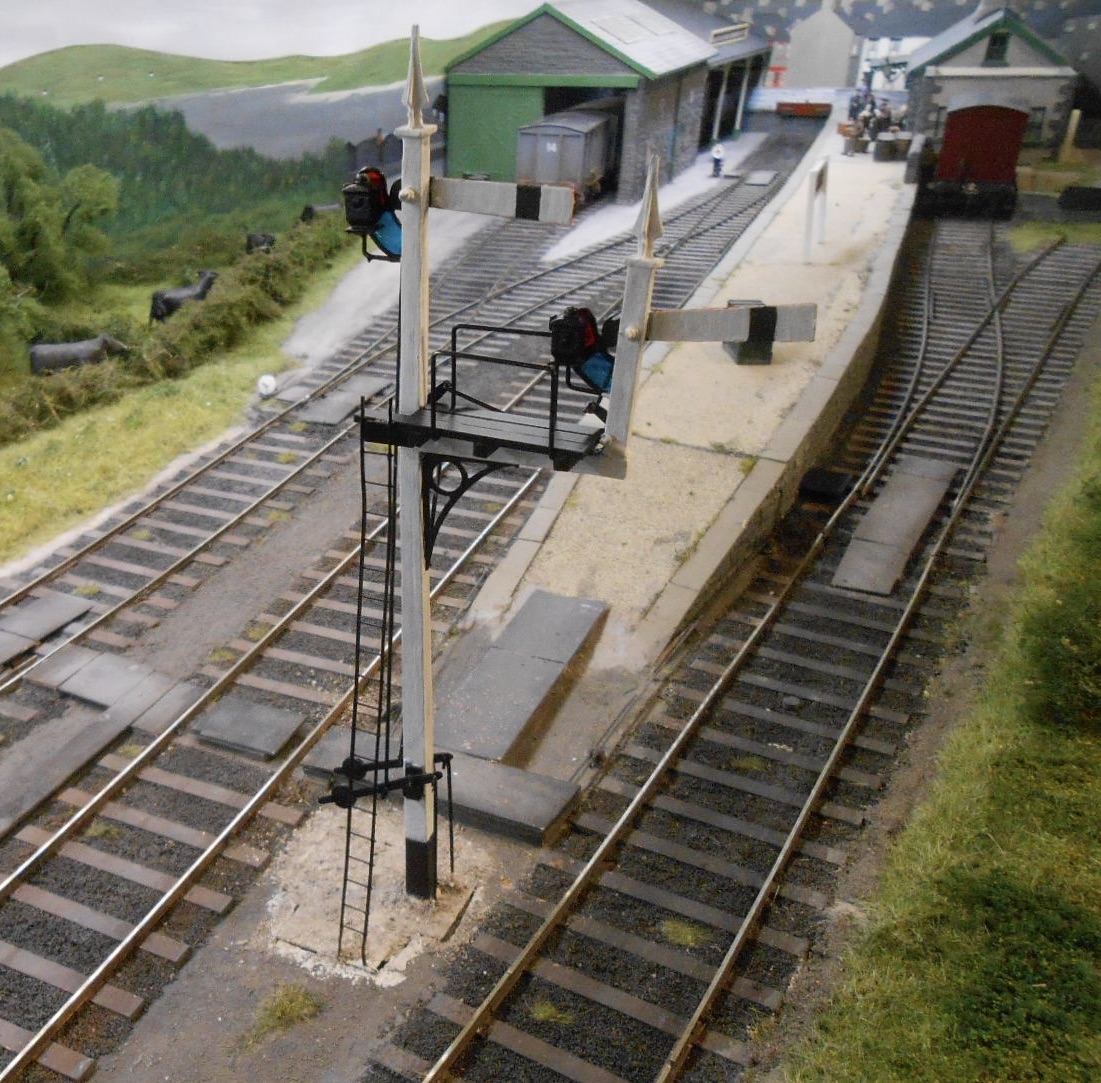
Spent the last few days fettling the signals, so that both balance arms worked correctly, then added the operating mechanism, which goes below the baseboard. Basically, a piece of 0.8mm wire goes from the other end of the balance levers to pivots soldered below the base plate. Another 0.8mm wire will go from each pivot to a small servo, worked by the Megapoints control panel. This arrangement means the signal can be lifted out for transport, maintenance etc. So, cut a hole in the baseboard surface to enable the unit to sit level with the surface, then set about adding the all important details - in this case the platform [and ladder] for someone to climb up and attend the lamps, plus the finials. After that, it was a clean up and quick spray with primer.
-
Reminds me why I went to 7mm scale! Really fine & delicate work.
-
Brookhall Mill - A GNR(I) Micro Layout
David Holman replied to Patrick Davey's topic in Irish Model Layouts
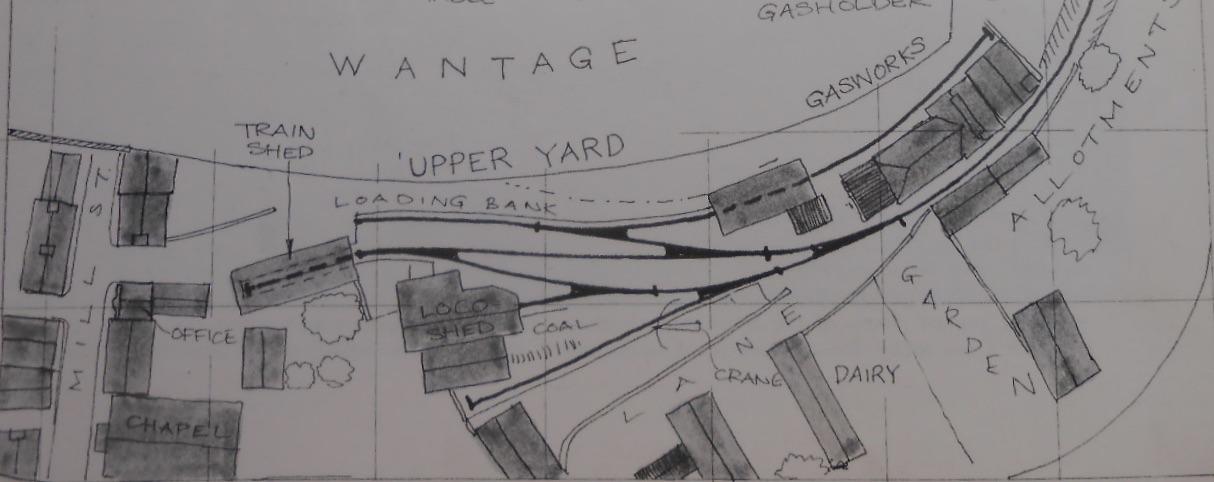
Here are the two plans I mentioned. The one for Wantage is actually a bit more than 4', but the track plan certainly fits in that foot print. Comes from Rice's book on Light Railways. The second is from his book on Urban Layouts. Like all of Rice's stuff, both are full of inspirational ideas.
-
Brookhall Mill - A GNR(I) Micro Layout
David Holman replied to Patrick Davey's topic in Irish Model Layouts
In terms of a prototype for everything, this side of the water, Wantage Town must be one of the smallest footprints of any branch terminus. In 4mm scale, it works out at 1.2m, or four feet in old money. Given this included a covered platform, two loco sheds(!), a loading dock and a kick back siding to the gas works, it was pretty remarkable. Of course, it only ever host four wheel locos, but like anything else could certainly be adapted. My own Fintonagh layout, while 7mm narrow gauge, is only two metres long and the track plan could easily work in 4mm scale. One of the cleverest designs I've seen is by Iain Rice. In 4mm scale, he suggests multiple layout units around 1.2m long and 20-30cm deep. These are arranged on wall brackets, one above the other, fed by a single, cassette type fiddle yard. A train shunts the top layout, exits on to the cassette and is moved down to shunt the next and so on. -
At first, I thought it wouldn't take long to fit the new plates and indeed the first stages were simple - spray black and the once dry sand back to reveal the raised brass figures. After cutting out and filing the edges smooth, the plates were then fixed to double sided tape and could then be stuck on the loco. Nice and easy - however, like the rest of the loco, the cab side number plates were lined in black and white, so out came the Fox transfers sheet again. Unfortunately, I didn't have any of the curves left, apart from some 5'6 diameter circles, meant for driving wheels. Therefore had to do a lot of careful teasing to get these in place around the plates, which was especially difficult on the tighter radii. Once dry, I then used a fine black lining pen to put in the middle line. So, there we are - just about complete now and must say I'm very pleased with the result. Many thanks to everyone who has helped with advice and information, along with all the positive comments which as ever, are very much appreciated.
- 124 replies
-
- 17
-

-

-
Brookhall Mill - A GNR(I) Micro Layout
David Holman replied to Patrick Davey's topic in Irish Model Layouts
Only goes to show how much fun and satisfaction can be had from small projects like this. An example, indeed inspiration, to us all.