David Holman
-
Posts
4,359 -
Joined
-
Last visited
-
Days Won
117
Content Type
Profiles
Forums
Events
Gallery
Blogs
Everything posted by David Holman
-
Thanks folks. Interesting to hear about the frames from Ken. Originally was considering doing the frames to include above the footplate, but decided against, so reassured that the 'traditional' method seems to work better.
-
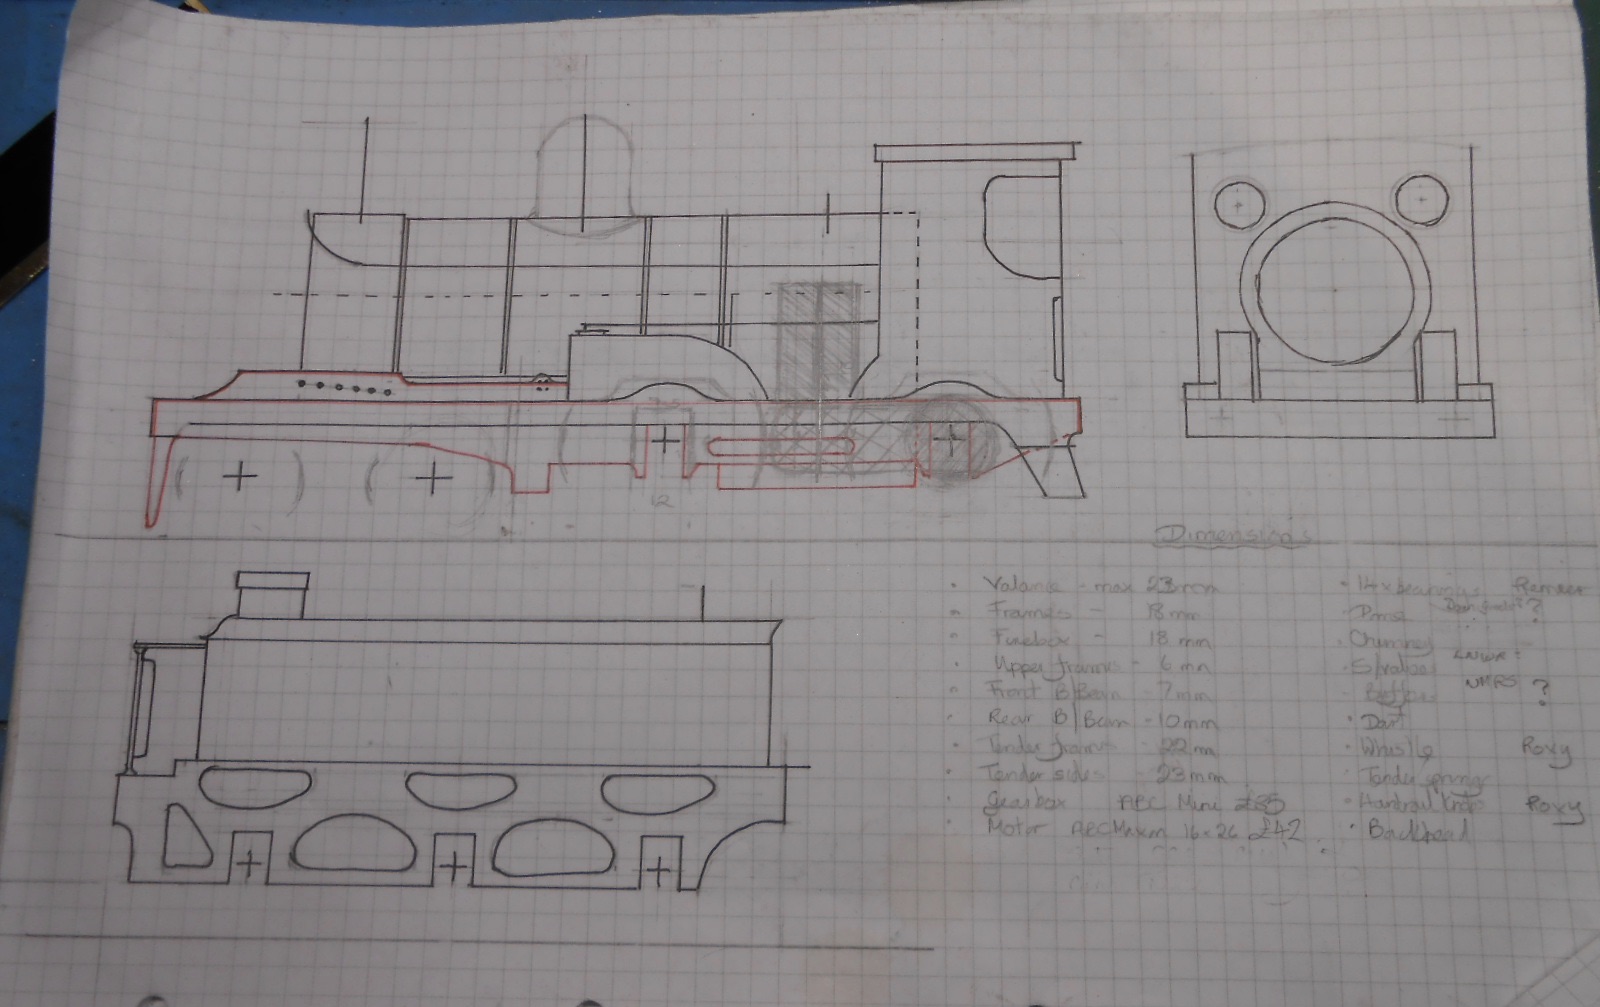
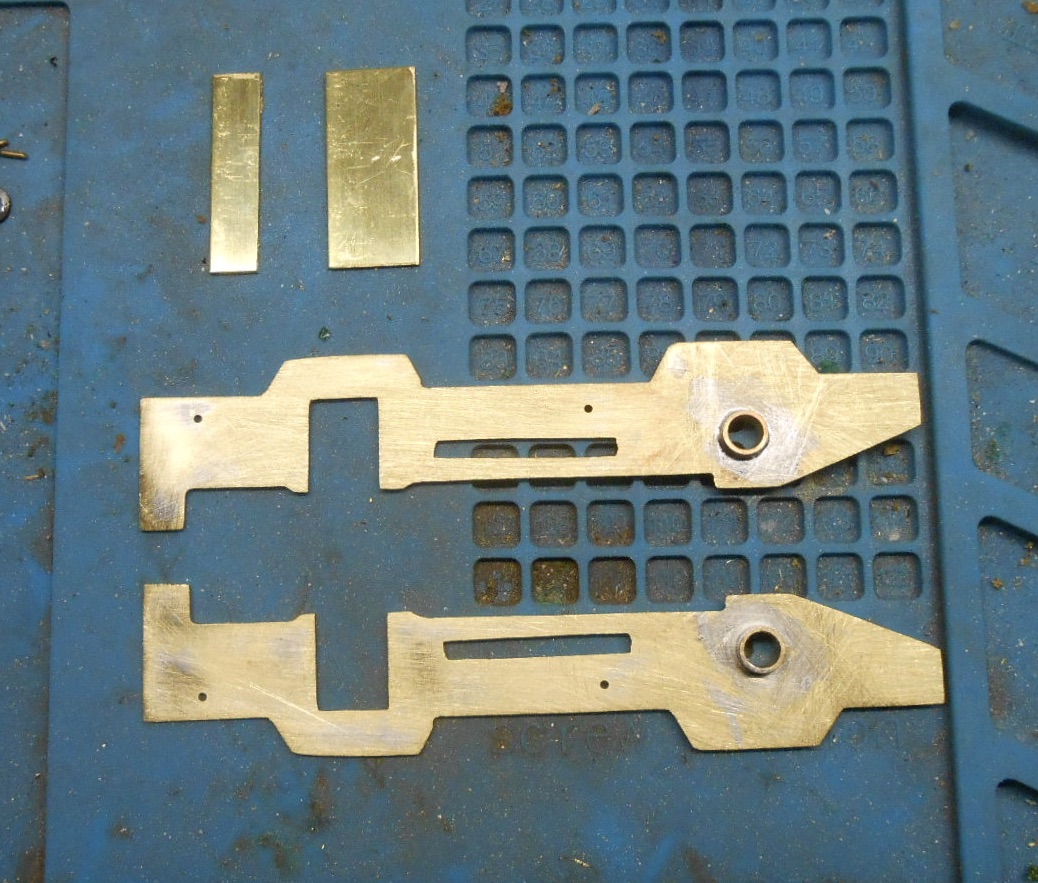
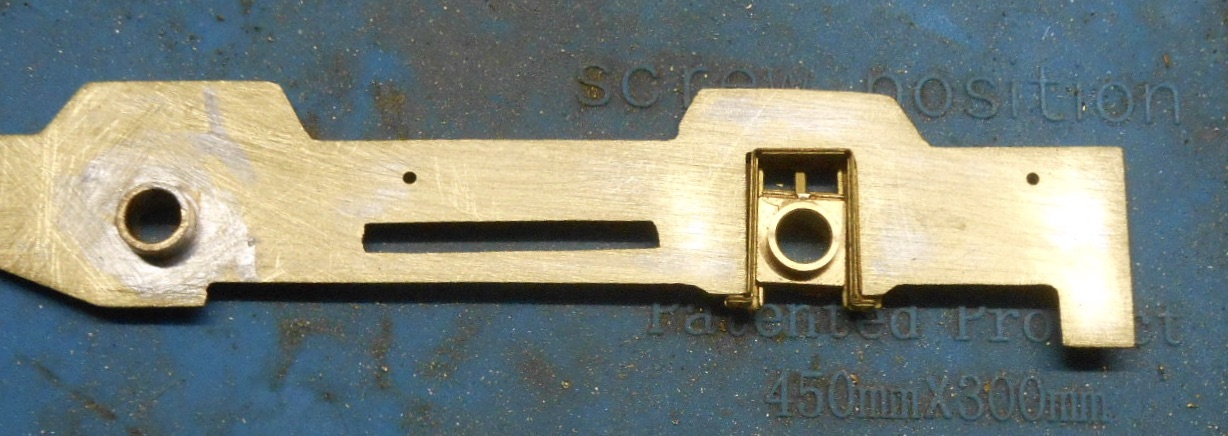
Making a start First of all, many thanks again to everyone who has offered help. The last week or so has been spent poring over drawings and photos, plus having a good read of Geoff Holt's two books on scratch building locomotives, again. As an all round layout builder, I find it can be very useful to remind myself of basic techniques when you start again on something you haven't done for ages. So, the first job was to make an outline drawing of loco and tender. Wheels, chimney, dome etc are not included, as this is all about working out basic things like the frames and, in particular, how to fit a motor and gearbox. Being a small, light weight loco, this hasn't proved easy and is almost certainly going to be expensive. The only thing I can find thus far is an ABC 'Mini', which with one of their 16/26 motors is going to set me back around £120. However, this is a real Rolls Royce of a mechanism, which despite its small size packs quite a punch and has been used in things like a Franco-Crosti 9F 2-10-0 - so should be enough for my three coach mail train, especially as it will leave plenty of room in the firebox for ballast. You can see the unit shaded in on the drawing. Reading Geoff Holt's first book on building the chassis, decided to copy his recommended method, so Wolf Dog will have a fixed rear driving axle, sprung lead drivers and an equalised bogie. Geoff also suggests splitting the frames so that those above the bogie are inside the driving wheel frames to allow a bit of extra side play. The brass strip I've used is about 36 thou, meaning I can overlay a bit of 10thou plastic later to help avoid shorting if the bogie wheels did touch the frames. The choice of thicker material [28thou is the norm in 7mm scale] is partly down to what I had in stock and also because the cut outs for the horn blocks mean there are a couple of areas where the frames could be quite weak. Construction basically involved soldering two strips of brass together, marking out the frames with a scriber and then laboriously fretting them out with a fine saw and the filing to shape. Used one of the etched coupling roads to mark the axles holes and drilled the fixed one out with the pillar drill. Four small bits of metal doesn't seem much for four days sawing, filing and polishing, but I now have my driving wheel frames and a couple of spacers. You can see the cut outs for the Slater's sprung horn blocks, along with their drawing and a second photo of a test fit of one. Scratchbuilding is not something to be rushed!

-
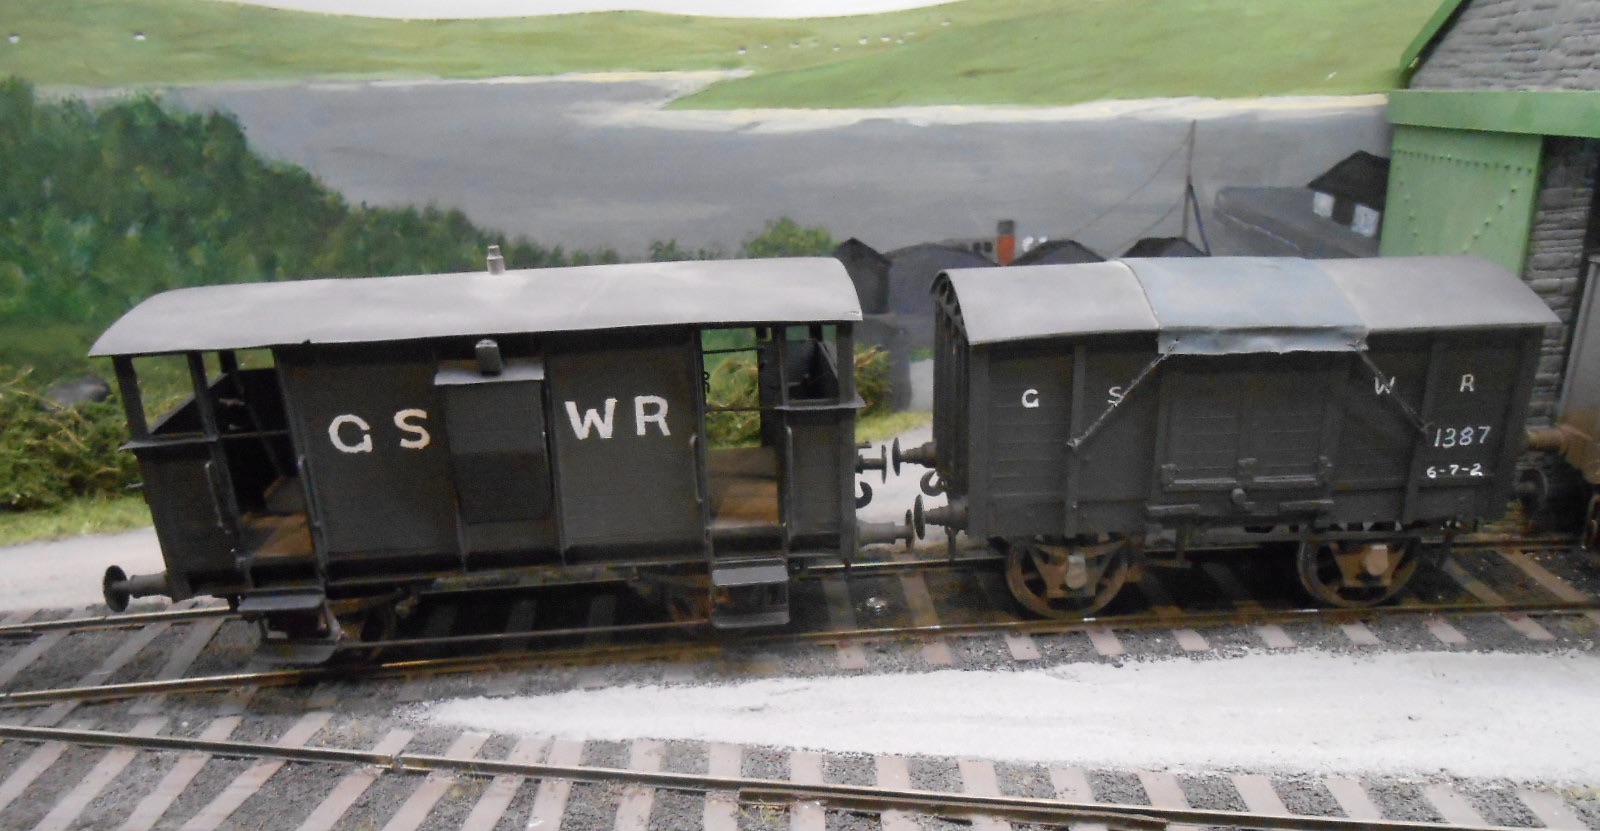
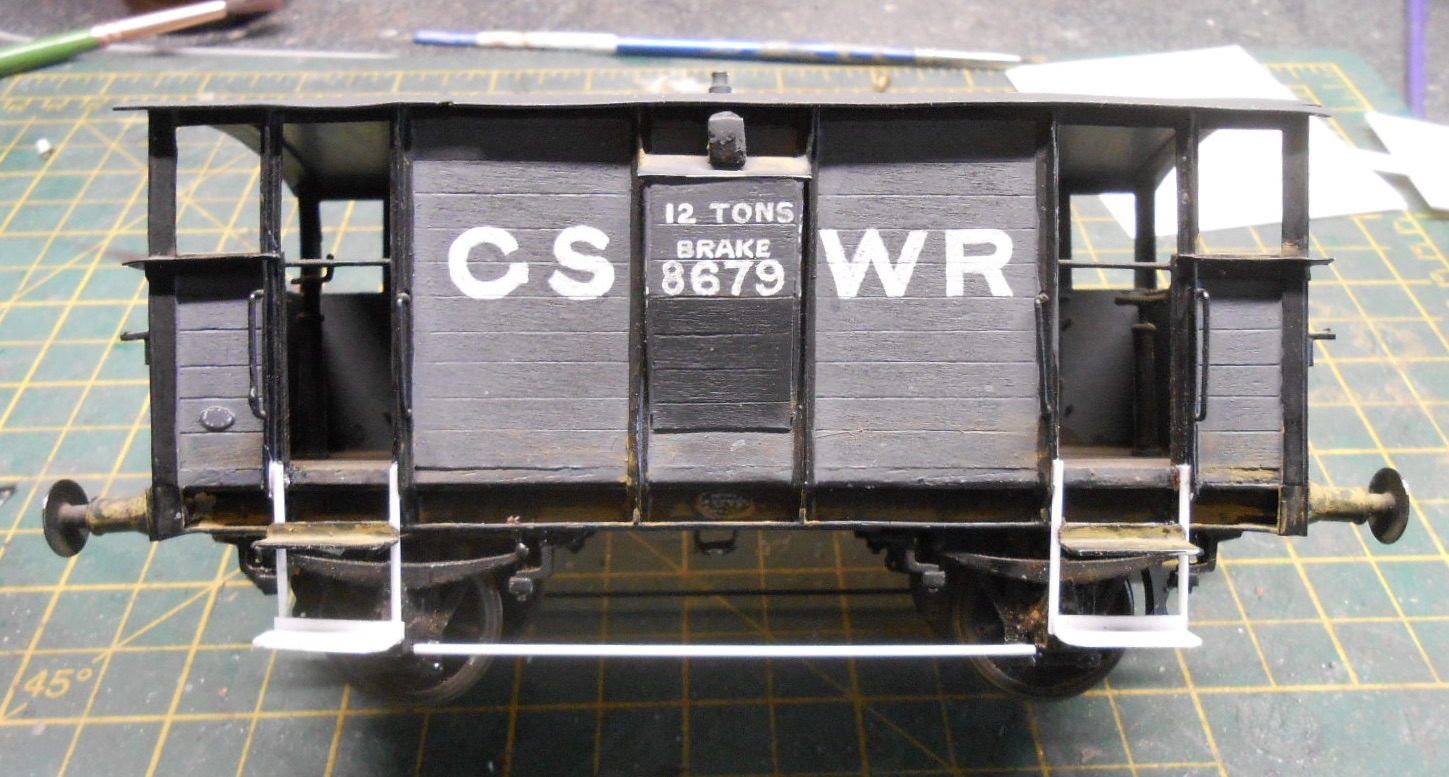
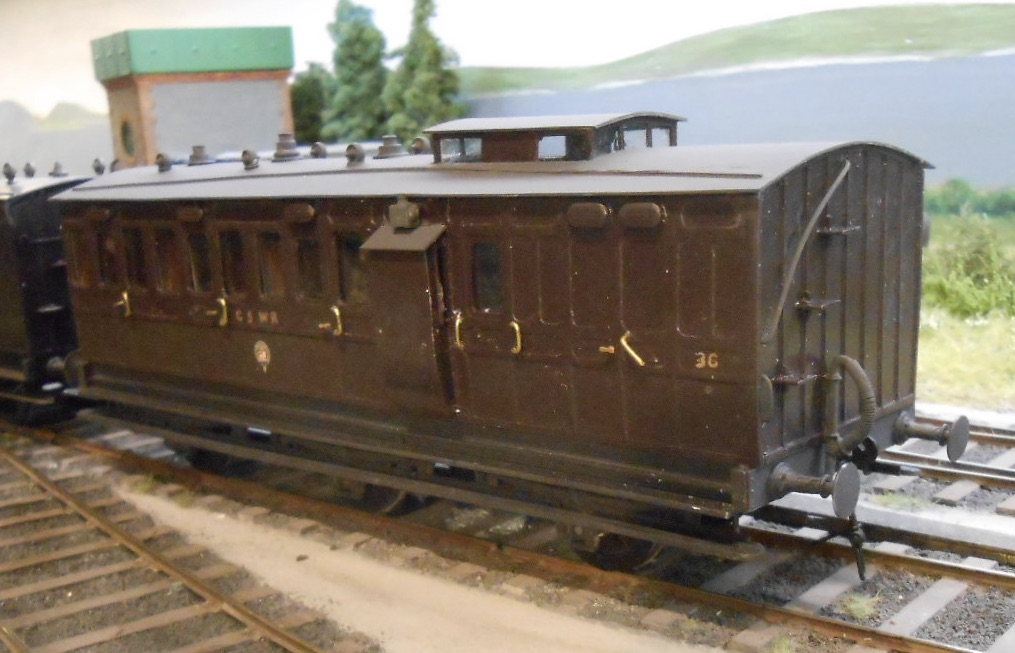
Should have known better Got a PM last week from our resident livery specialist. Not the first time either, but his advice is always very welcome, even [especially] when I get things wrong. To be honest, was rather expecting it, as the GSWR brake and van were not only too light a grey, but the former had its strapping highlighted in black. So, out with something darker, which also necessitated doing the lettering again. Shame in a way to over paint Richard's brake van, but even the maestro got it wrong occasionally. Anyway, many thanks JHB and hopefully this shade looks a bit better!
-
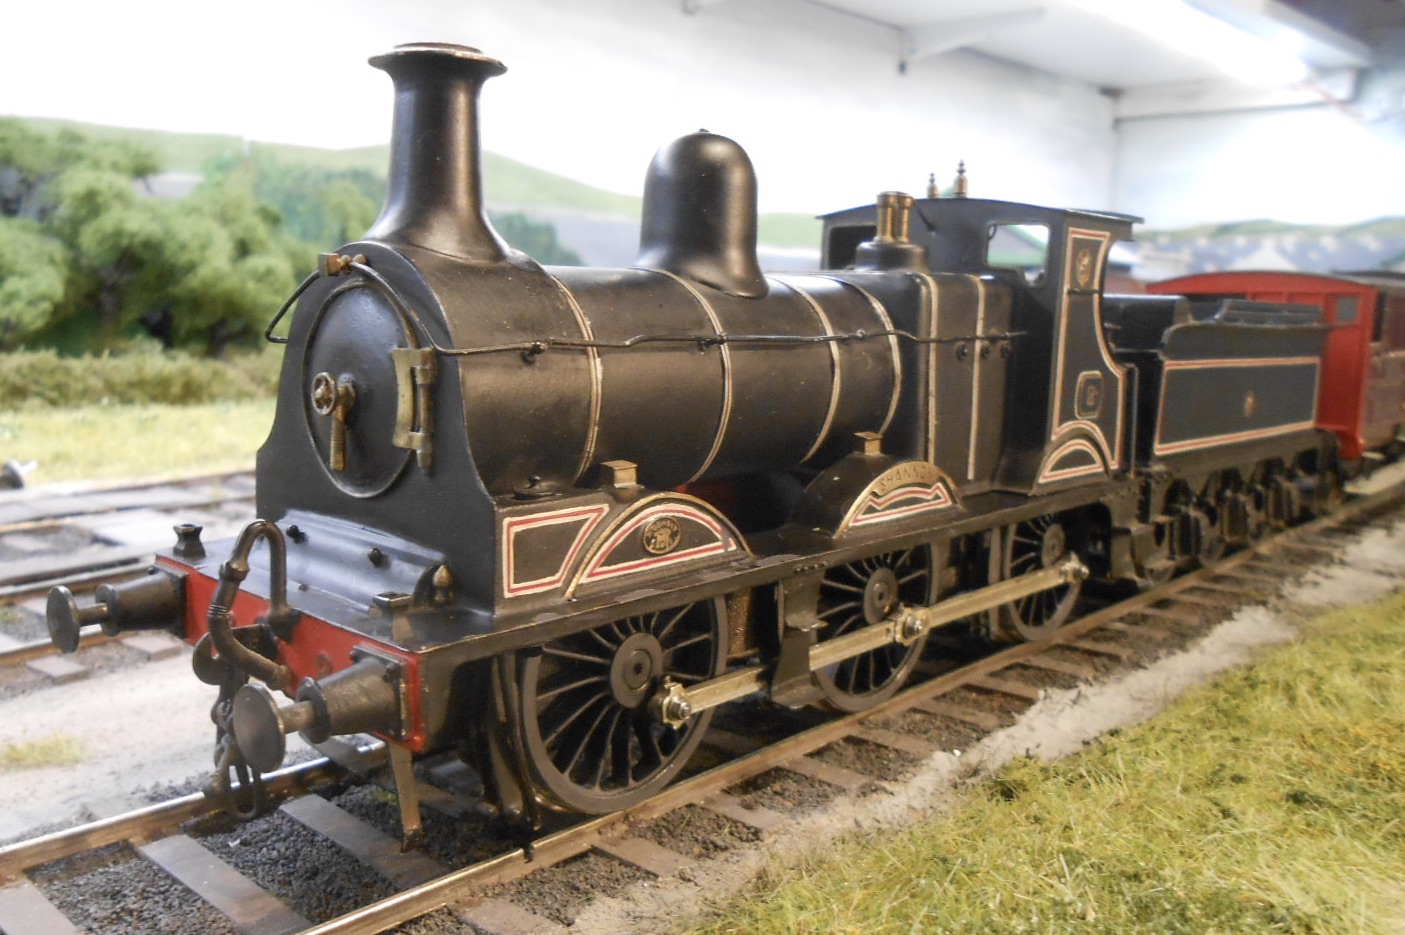
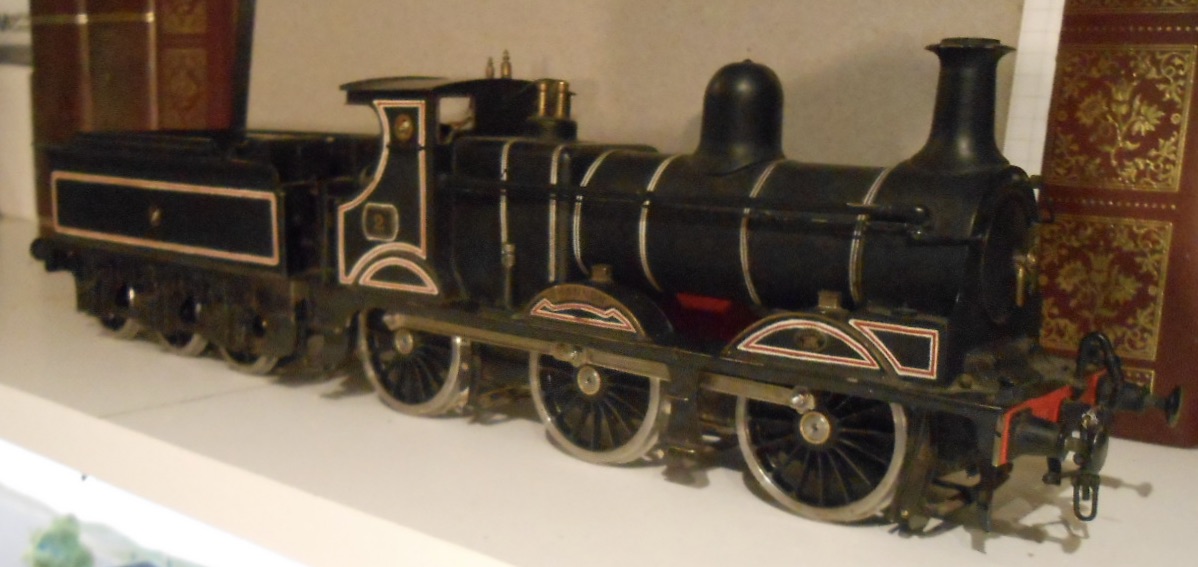
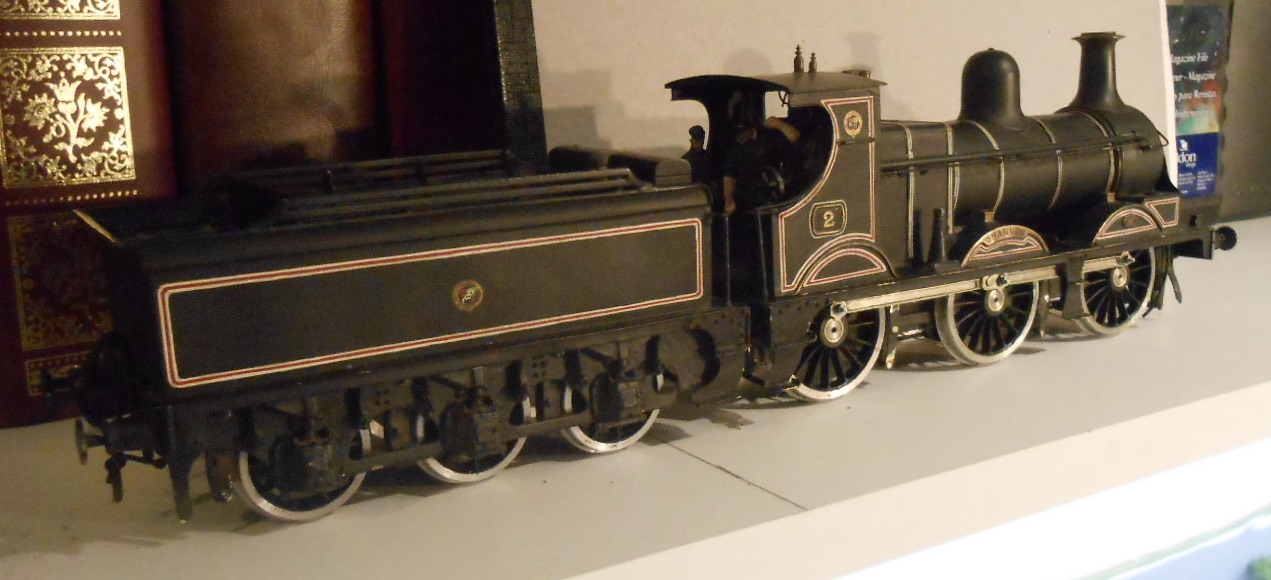
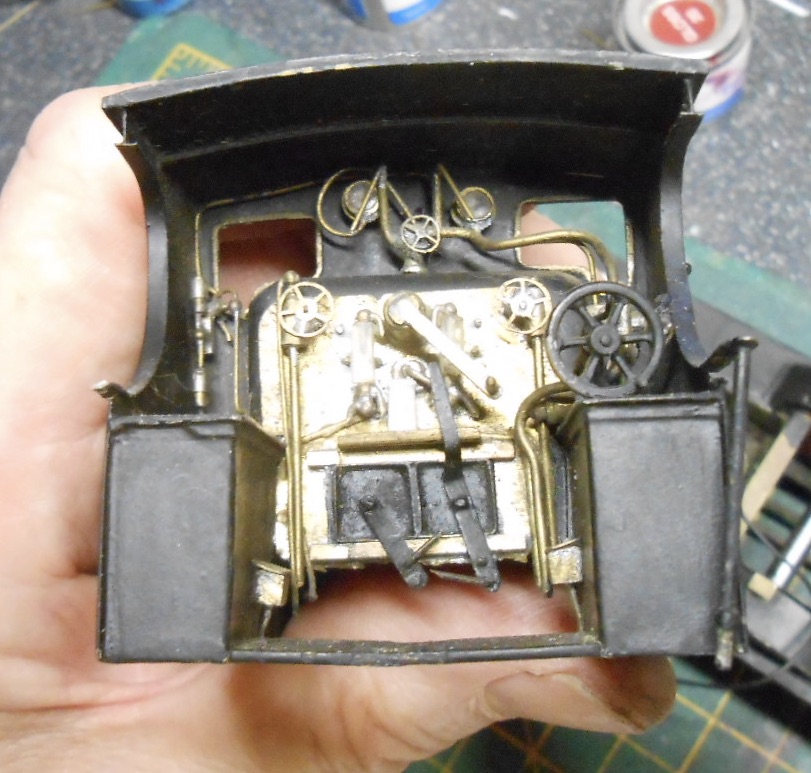
Continues to amaze me that the body of Richard Chown's Shannon is held together with just a single 12ba bolt in the cab floor! The end of the boiler is a push fit into the back of the smokebox and that's it. Not a light engine either.
-
Love the buffer beam! Probably shouldn't mention this but ice lolly sticks a possible alternative, albeit nowhere near as seasoned or close grained. This project is clearly showing the value of challenging yourself and has moved your work up to a new level. Not that there was anything wrong before, I might add! Also shows the value of breaking complex shapes down into simple ones - very much a reminder to self as I pour over that photo of Wolf Dog... Inspiring posts - keep them coming.
-
May have taken a few attempts, but certainly worth it. No hiding place in a close up like that and none needed. Great work!
-
Brookhall Mill - A GNR(I) Micro Layout
David Holman replied to Patrick Davey's topic in Irish Model Layouts
Excellent stuff. Enjoy! -
When warb's been quiet for a while, you know that he's brewing something special again!
-
Eoin may well be right and it is even possible that the crossing vee (frog) is out of alignment. My own track is soldered/handmade and test runs quickly show where crud has been left behind. As for wheel cleaning, locos certainly need this doing on a regular basis. At exhibitions (remember those), at the start of each day, but depending on the atmosphere, two or three times during the day in some places. Therefore, the same applies to home layouts. Rolling stock often gets ignored, because there is a lot more of it, but would suggest that a couple of times a year, assuming regular use, all wheels are cleaned. Not only will running improve, but any dirt on the wheels will not be spread back to the locos. And while I'm here, abrasive cleaners should be avoided like the plague, unless there is hardened paint to remove. They put micro scratches on the rail surface, which encourages sparking which equals dirt. Better to use a solvent like isopropyl alcohol, meths, lighter fluid, potchine(!) etc.
-
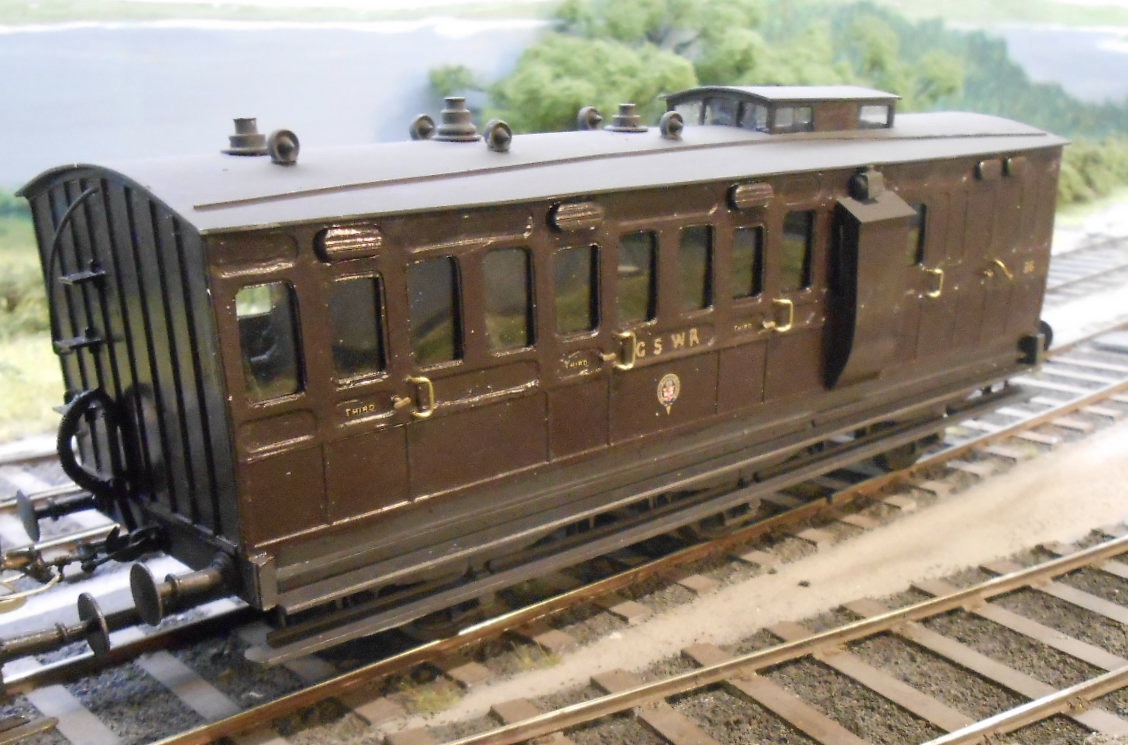
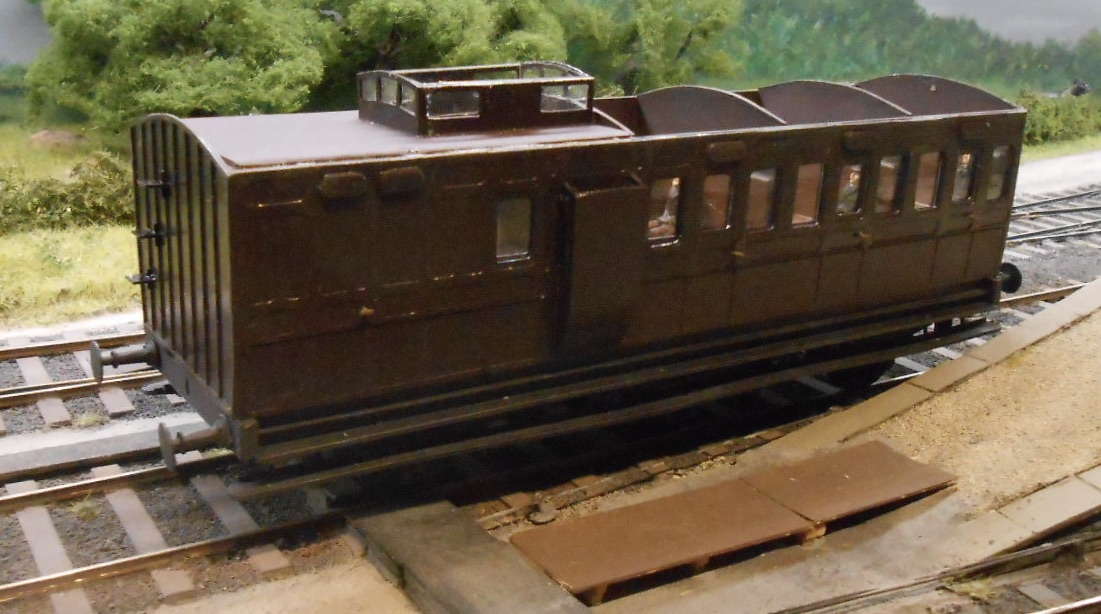
Trying to tie up some loose ends at the moment, one of which is my Castle Rackrent GSWR brake van. A bit tatty when I acquired it, there was a corner missing from the roof, while the steps on one side had broken off. It's interesting exploring someone else's work, especially a master modeller like Richard Chown. The brake van is mostly made of wood, with white metal W irons, but a plasticard roof. Repairing the broken corner was simple enough, with a small triangle of 20thou, supported by a small strip underneath. Replaced the steps with new ones, also made from 20 thou & then tidied up the paint work. Not sure Richard was terribly into weathering, though back in the day, a coat of 'dirty thinners' tended to suffice. On the GSWR brake, whatever shade this started as has faded to strange yellow green, so mostly painted that out & then did my usual thing with a light dusting of weathering powders. Richard used Alex Jackson couplings, but I am using a mixture of three links and Dinghams, so for now have added the former. Back in September, I built a pair of GSWR vans, but only one of which got painted. The other was intended for my 1900s period, so has been painted in their dark grey, with white lettering [dipping pen] & lightly weathered. The loco is my Timoleague and Courtmacsherry Tramway loco, St Mologa [patron saint of beekeepers], now masquerading as Belmullet's harbour branch shunter. Interestingly, in the latest GOGuild Gazette, someone has rebuilt one of these Alphagraphix kits into one of the Bideford, Westward Ho! and Appledore railway 2-4-2T tram engines.
-
Not sure even Iain Rice has drawn a double slip on a narrow gauge layout, though to be fair, he prefers singles!
-
Good to hear from you Paul and great news that you are returning to the fold - not that you ever left, of course. Kilbrandon was certainly one of my favourites, while if I was starting again, then S gauge would be a strong favourite. Apart from anything else, the simple notion of a track gauge of 63/64ths of an inch has a curious appeal too. Will certainly look forward to developments.
-
Correct, David on most counts! Start with a coat of white emulsion, but I add some acrylic grey, blue, purple (in very small amounts) to create the sky. Once dry, then draw on the scene in pencil and then use acrylics for the main areas. Finer work is put on using felt pens of various thickness. Crayons and pencil shading gets used too. I try to keep the palette muted, with ever lighter shades into the distance, but still find that difficult and often have to tone things down further. There was an interesting article by John Birkett-Smith in MJR a year or so ago on backscenes, where he overlaps different layers for buildings and scenery which seems to work well. I've always leaned heavily on John Ahern's little book on model buildings, which has a useful section on blending 3D into 2D. Hope that helps!
-
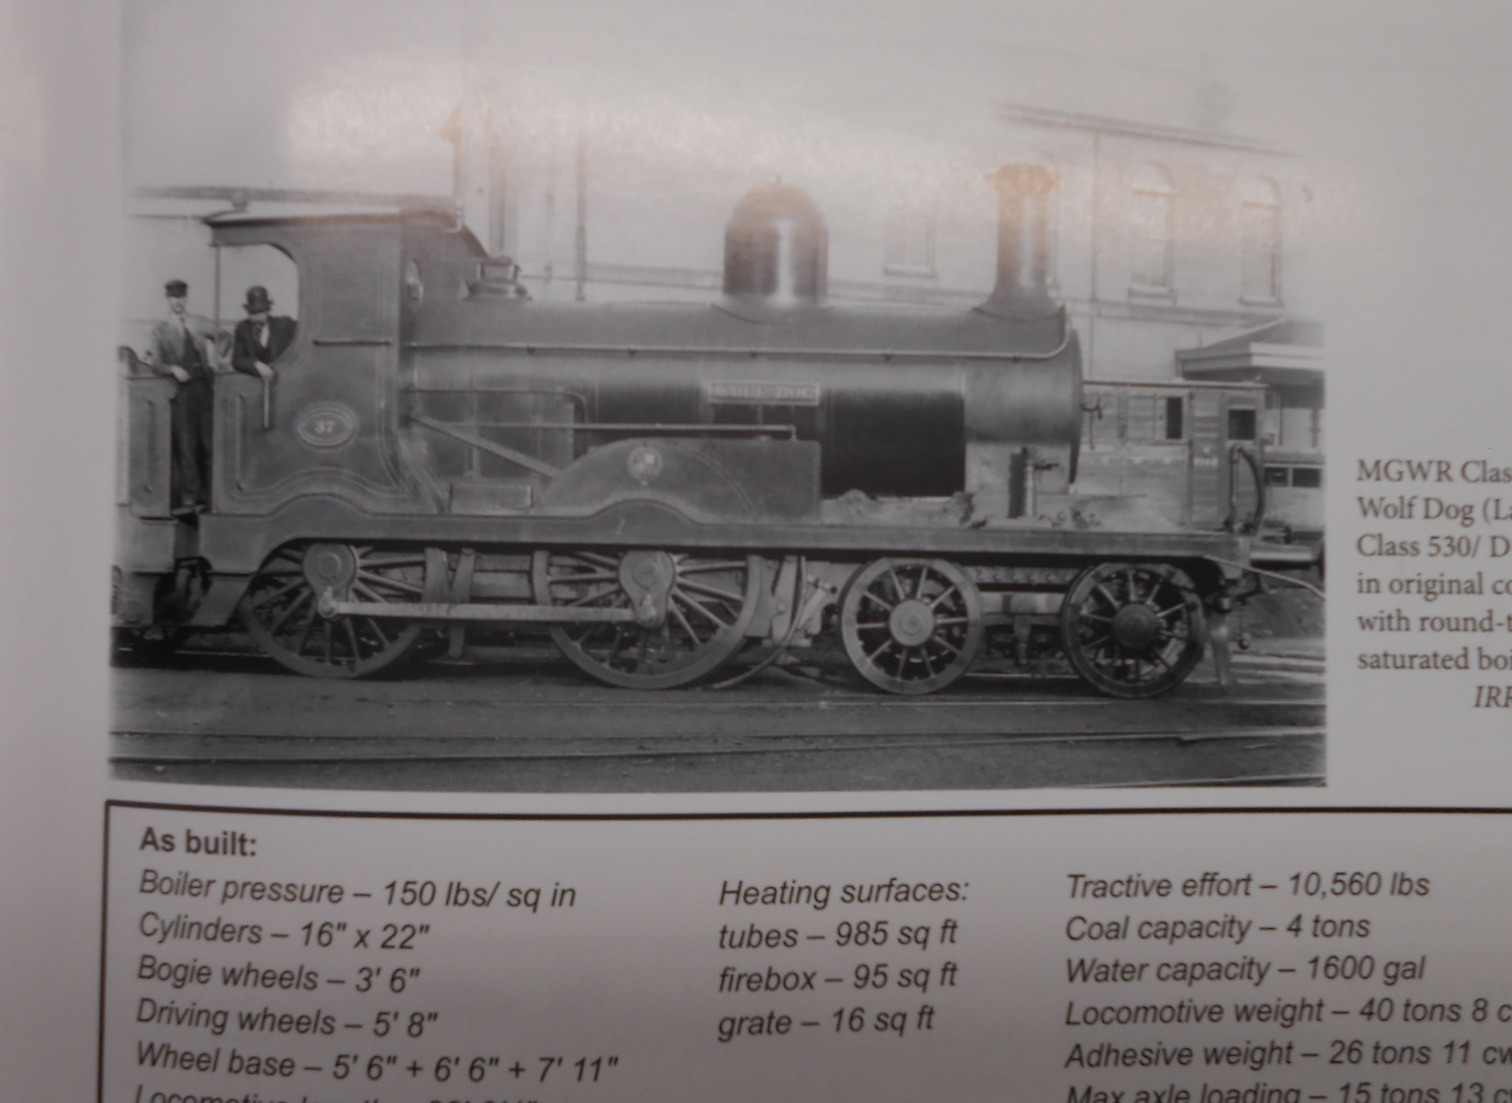
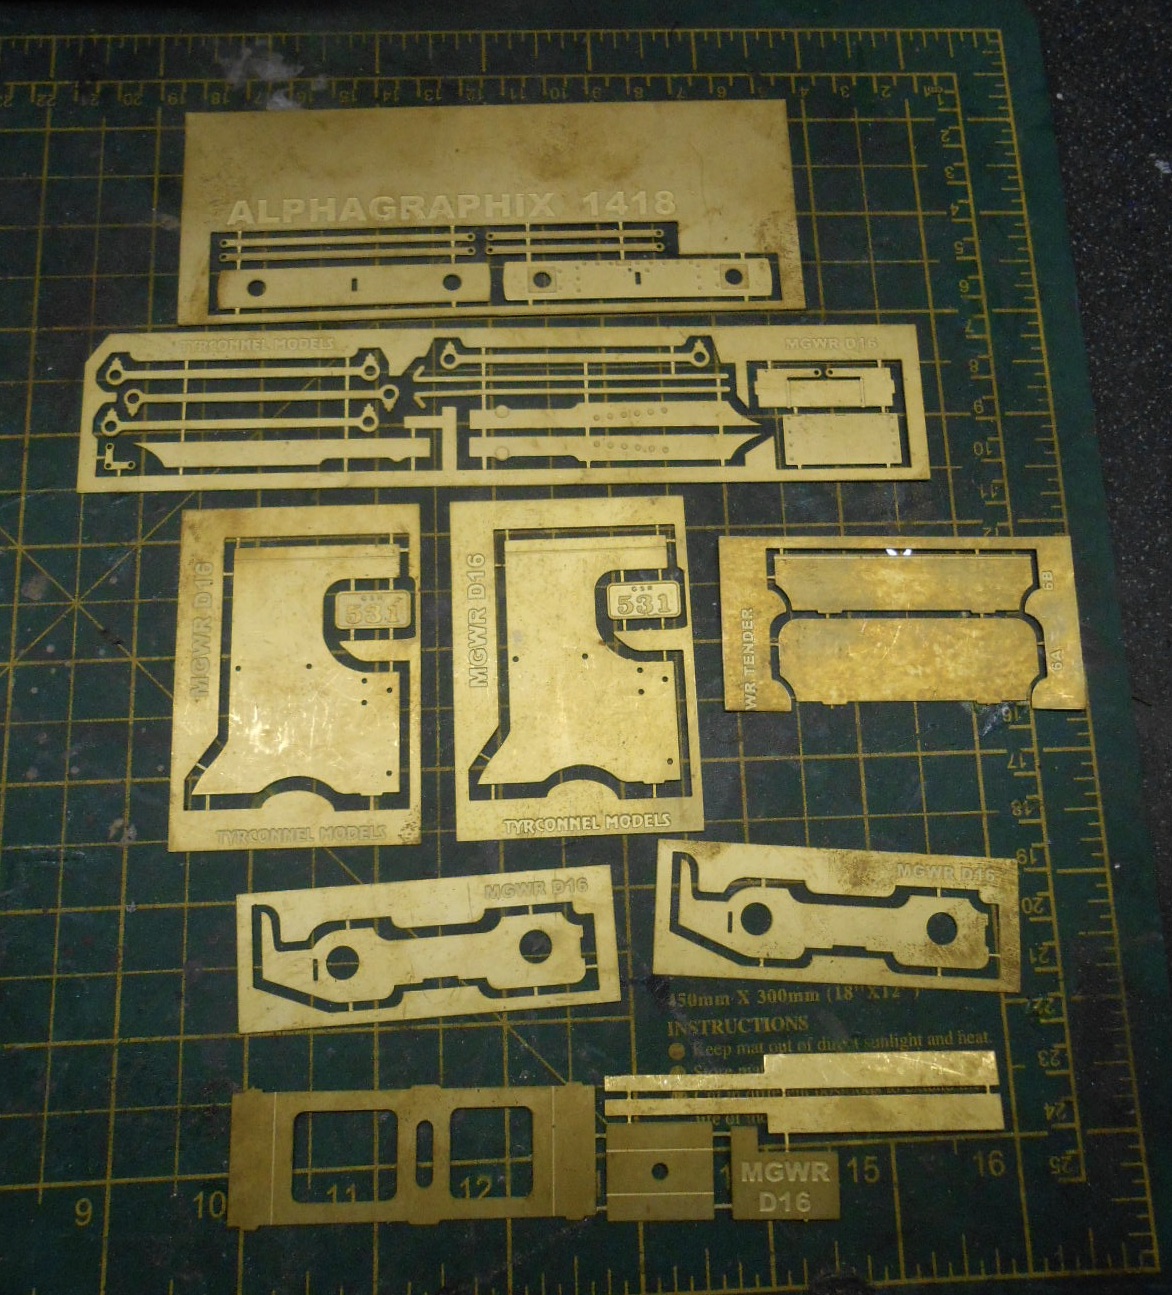
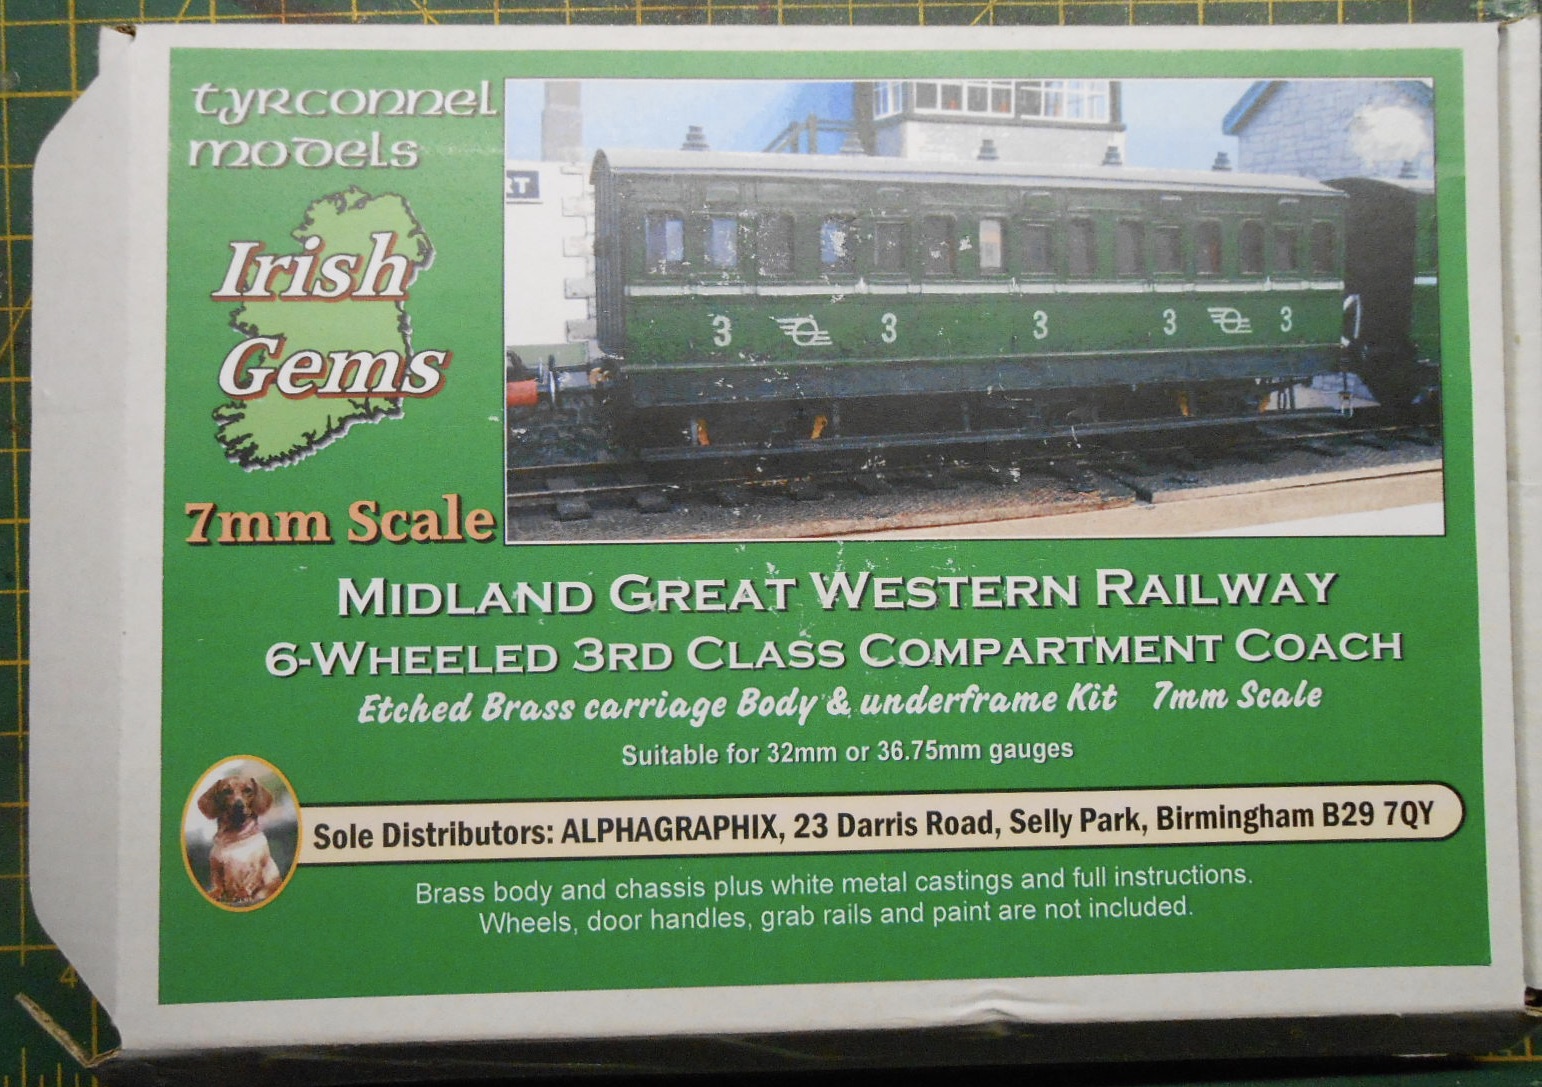
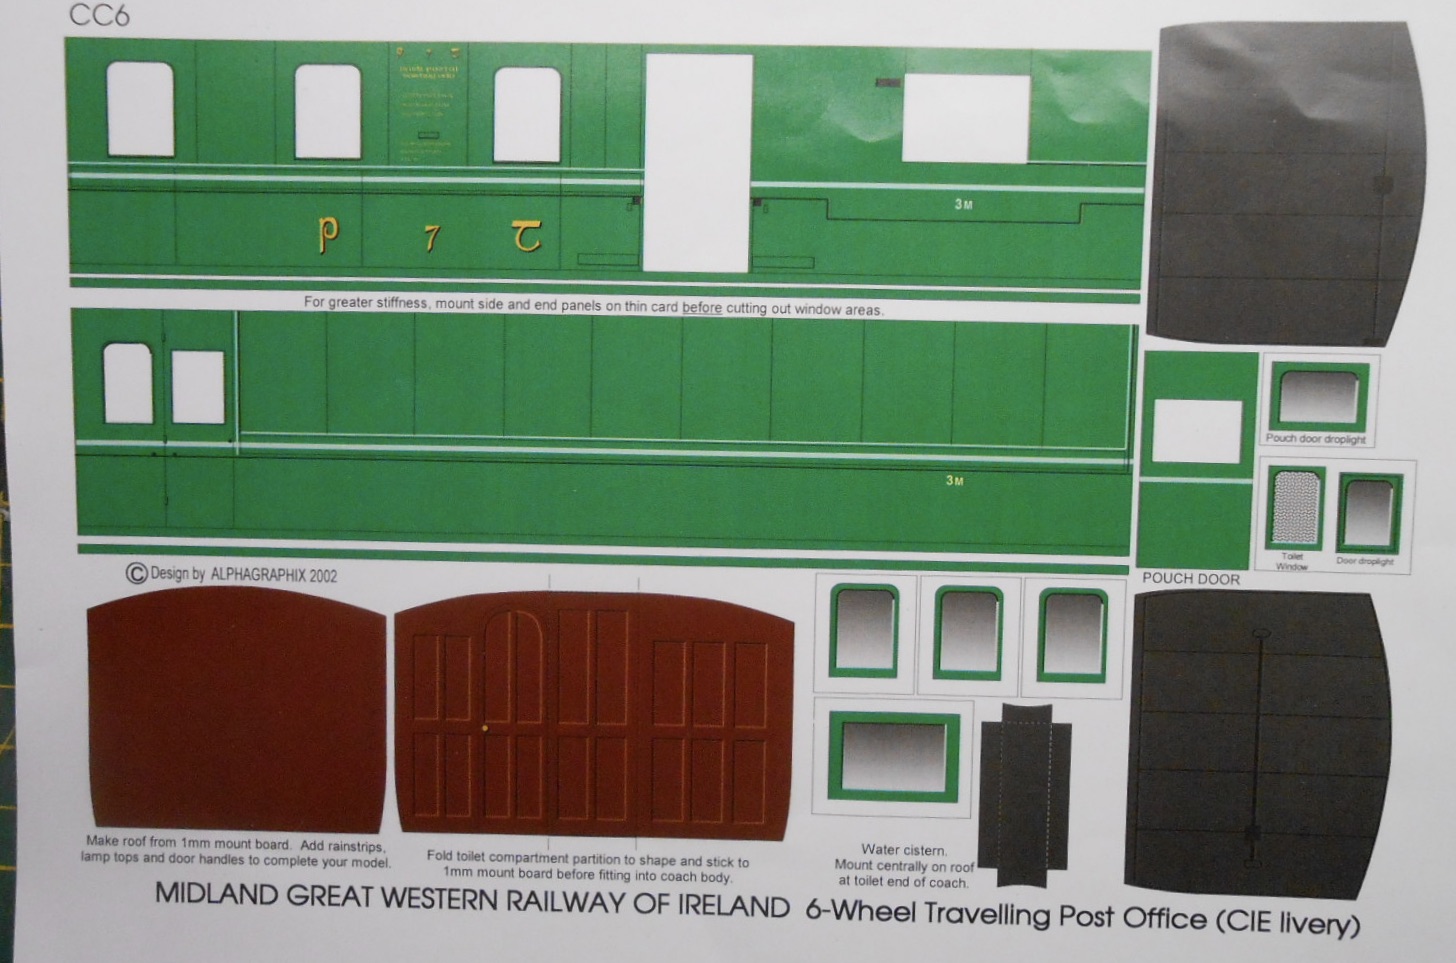
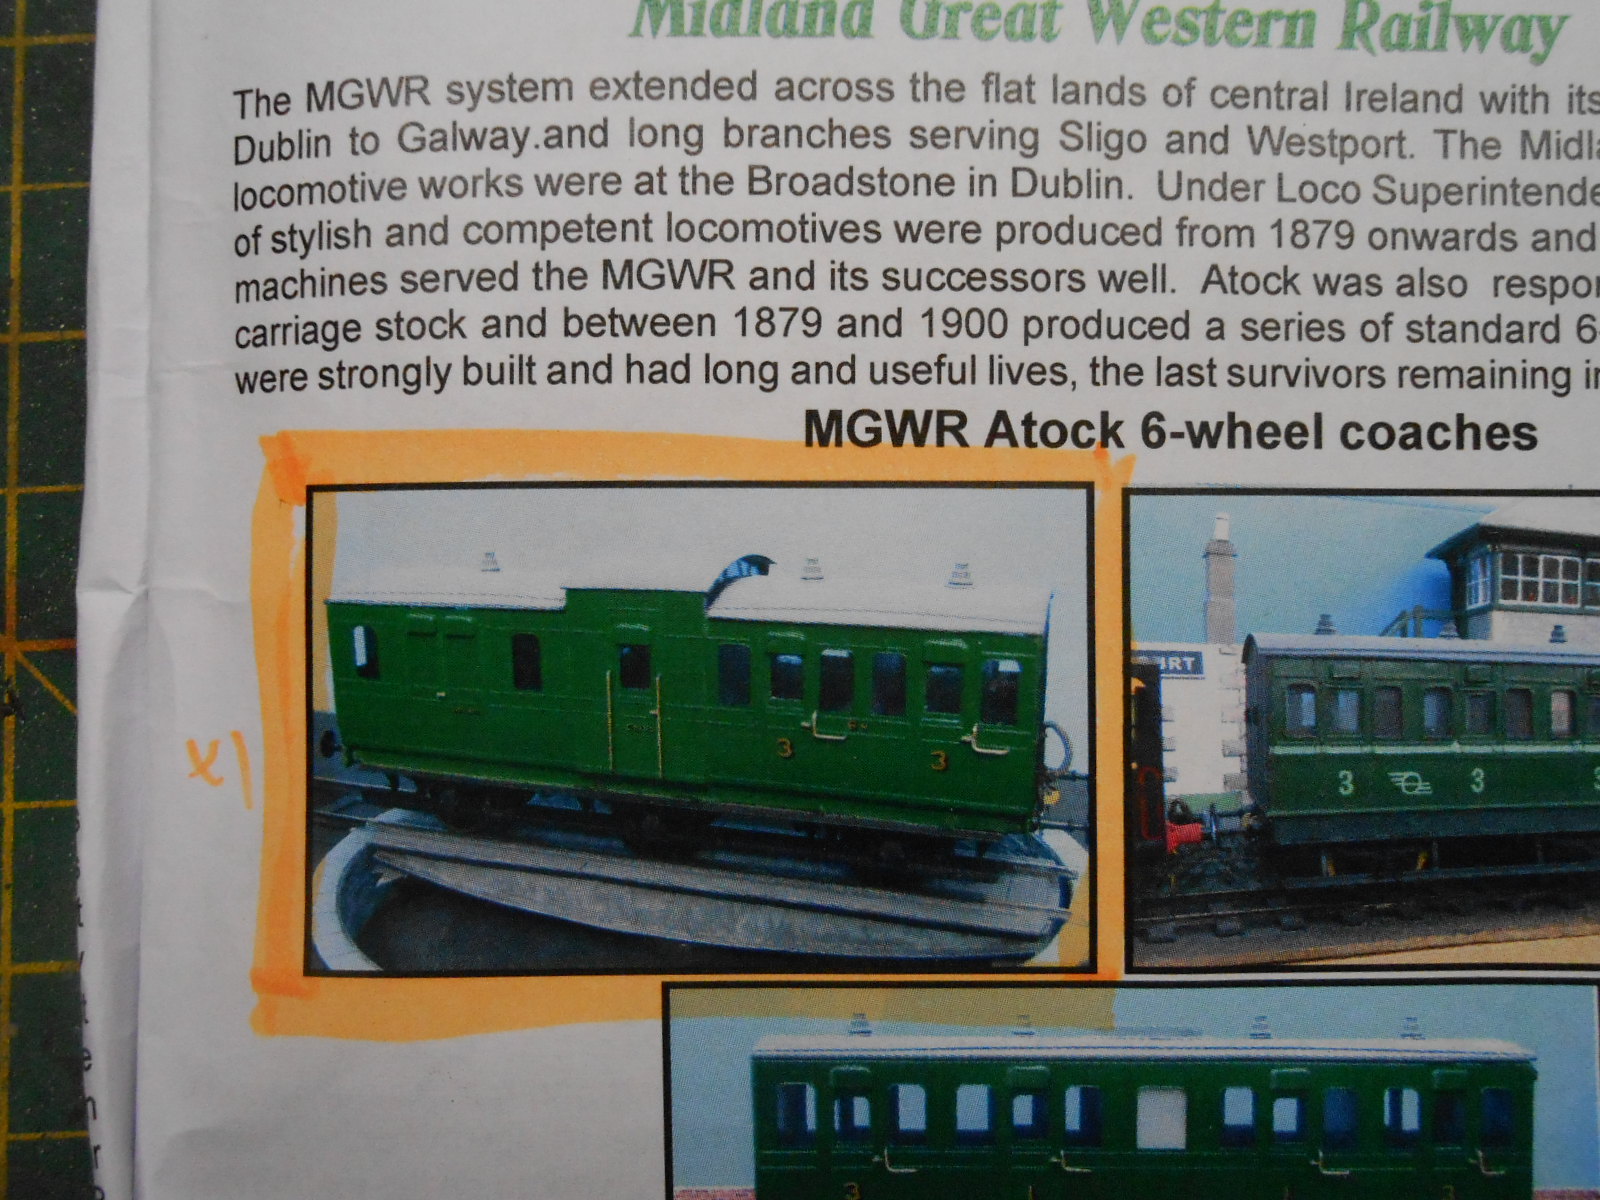
Those who have been following my Belmullet and Workshop threads will know I am moving my modelling back to the early 1900s. These will still continue, but am about to embark on a new, long term project, to build a Midland Great Western mail train. This will comprise the D16 4-4-0 'Wolf Dog' and three six wheel carriages - a TPO, a brake third and a third. I already have an Alphagraphix etched kit for the third, plus a card kit for the TPO from the same source. May need to scratch build the brake, although it too is in the Alphagraphix catalogue, but not available at the moment. The D16 will be scratchbuilt, though [somewhat mysteriously] Roger Cromblehome did kindly give me some etches, clearly labelled for a D16, which makes me wonder if a kit might be available one day? Whatever. The purpose of this new thread is hopefully to both chart progress and draw together ideas, research, answers to questions etc in one place, rather than pose separate questions in that thread. There are some very knowledgeable people out there, who have been extremely kind and helpful in the past, so am hoping you can do it again!. Please! So what have I got thus far? Well, it all started with Jonathan Beaumont's excellent book - Rails to Achill. In it is a fantastic photo of Wolf Dog - a handsome 4-4-0 of simple lines, although the GSR locomotive 'bible' strongly suggest its capabilities did not live up to its name. Nevertheless, it was love at first sight. It carried a livery of bright, lined green, which must have looked wonderful and though no colour photos exist, there is a print of a painting in the Lord O'Neill's album, which shows a D16 hauling a train of brown six wheelers. Put the two together and I've been smitten ever since... First jobs will be to produce some 7mm scale drawings of the loco and tender. Jonathan's book has a nice outline drawing of both in 4mm scale, which is a start, but if anyone can point me to anything more detailed, then please let me know. Cab, especially backhead, details will be especially useful. As you can see from the photos below, I've got etches for the cab sides, bogie, coupling roads and a couple of other pieces, though am tempted to follow my usual path and start with a set of profile milled rods from Precision Models. One thing's for sure - this will not be a quick project, but will aim to report as things develop.
-
The layout is Gilestown and Ballyharry, by Michael Martin. It is in the 'through the railway room door' series. Mostly diesels in the photos but some intriguing hints of steam loco conversions in the stocklists. Adams Radial to SLNCR small tank, for example.
-
A touch of the Blarney in this month's Modeller. Firstly a full page advert for the A class diesel, which looks stunning, then a review of the splendid 121, which notes that it can be regauged to 21mm. In a full page advert from Lightmoor Press is a new album from Michael Whitehouse (son of the great Patrick) on Irish railways. The standard of the previous one was stunning, so this is definitely on my list. We also have an Irish layout article! Only had a quick skim, but we'll worth a look.
-
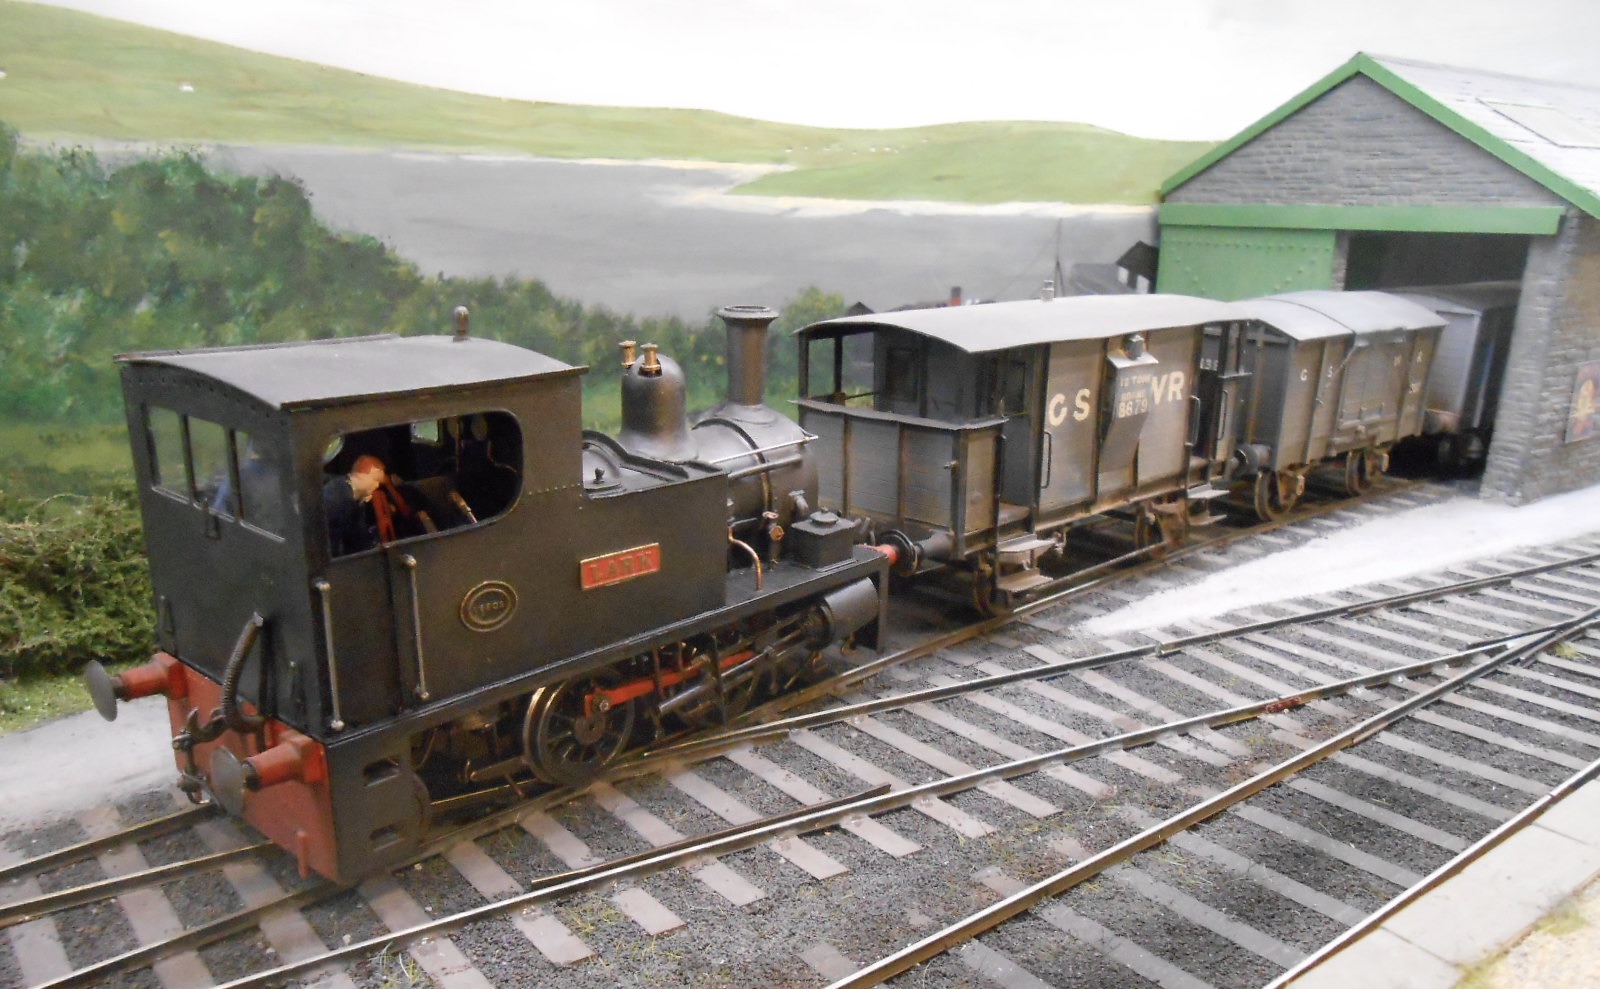
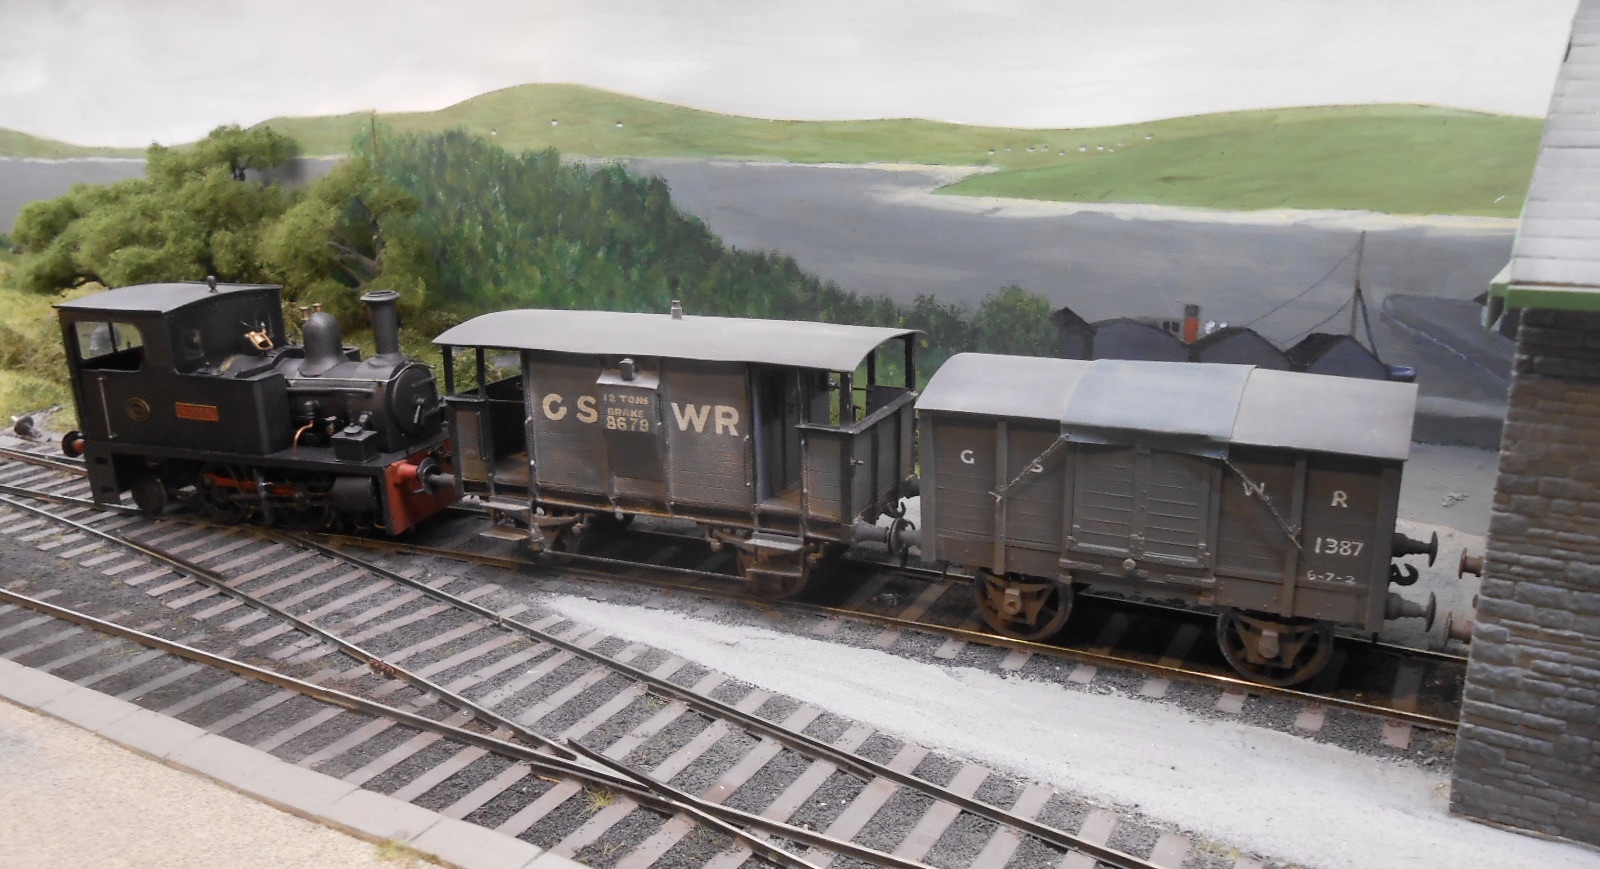
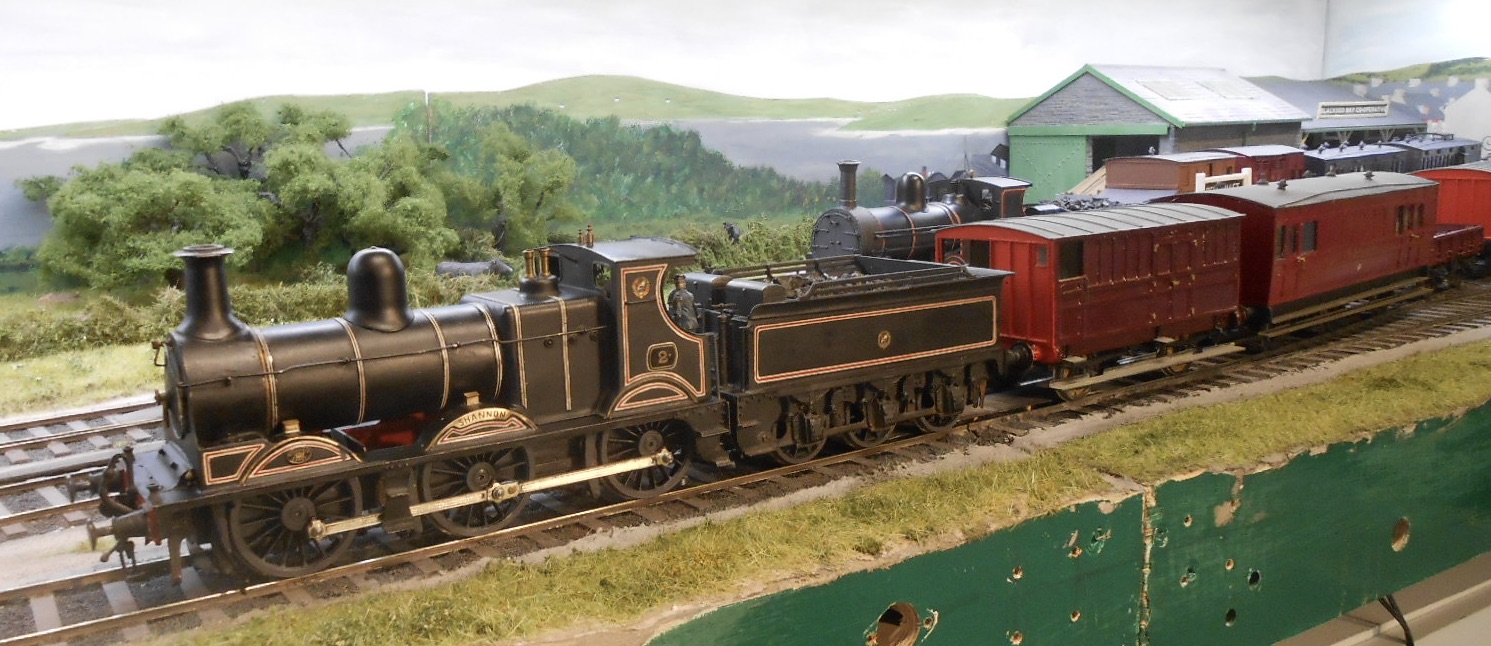
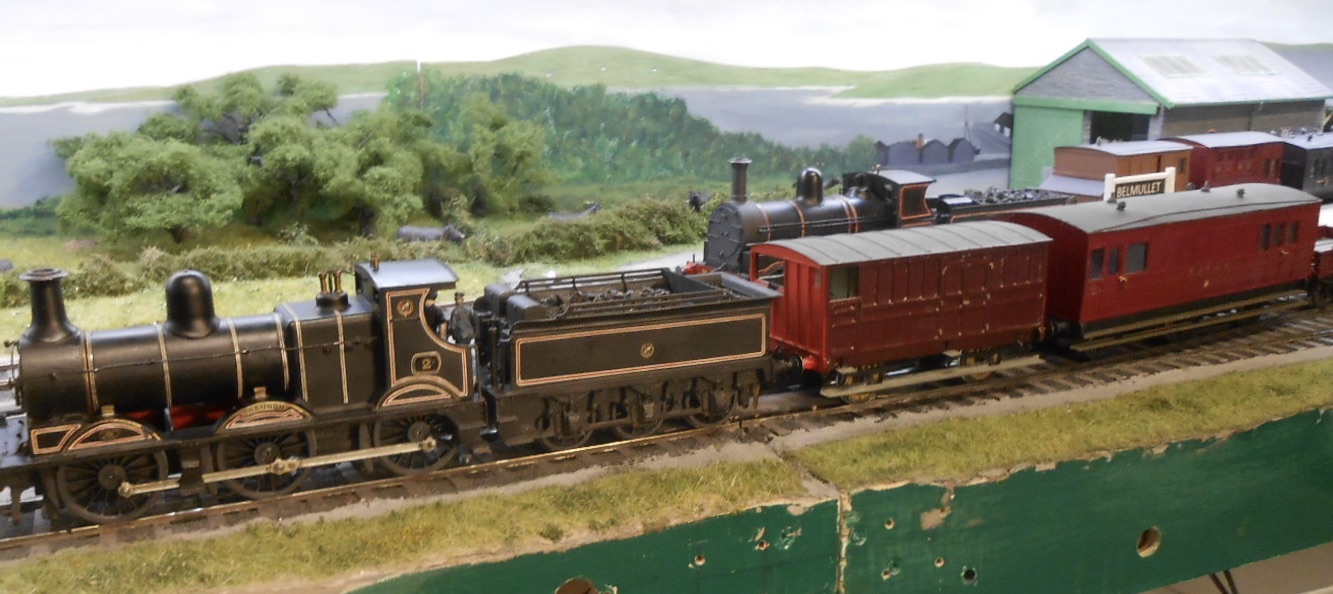
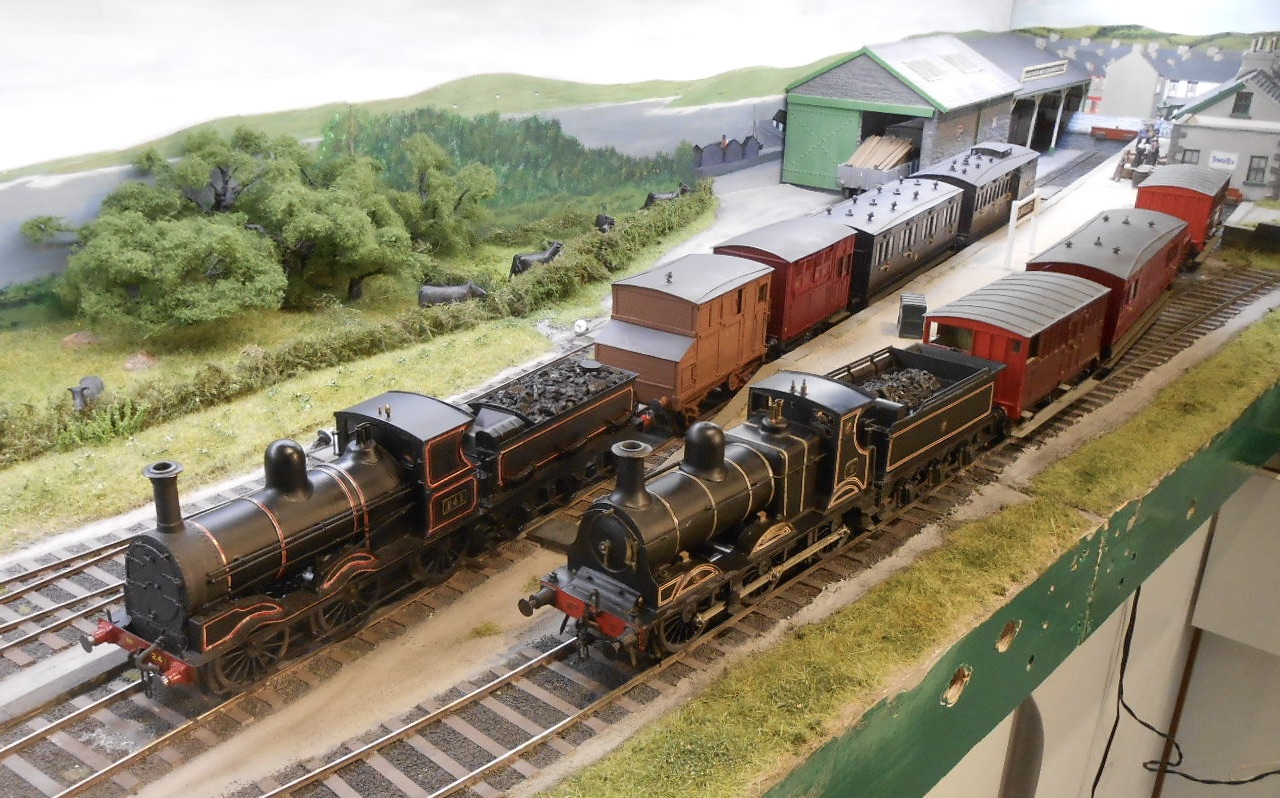
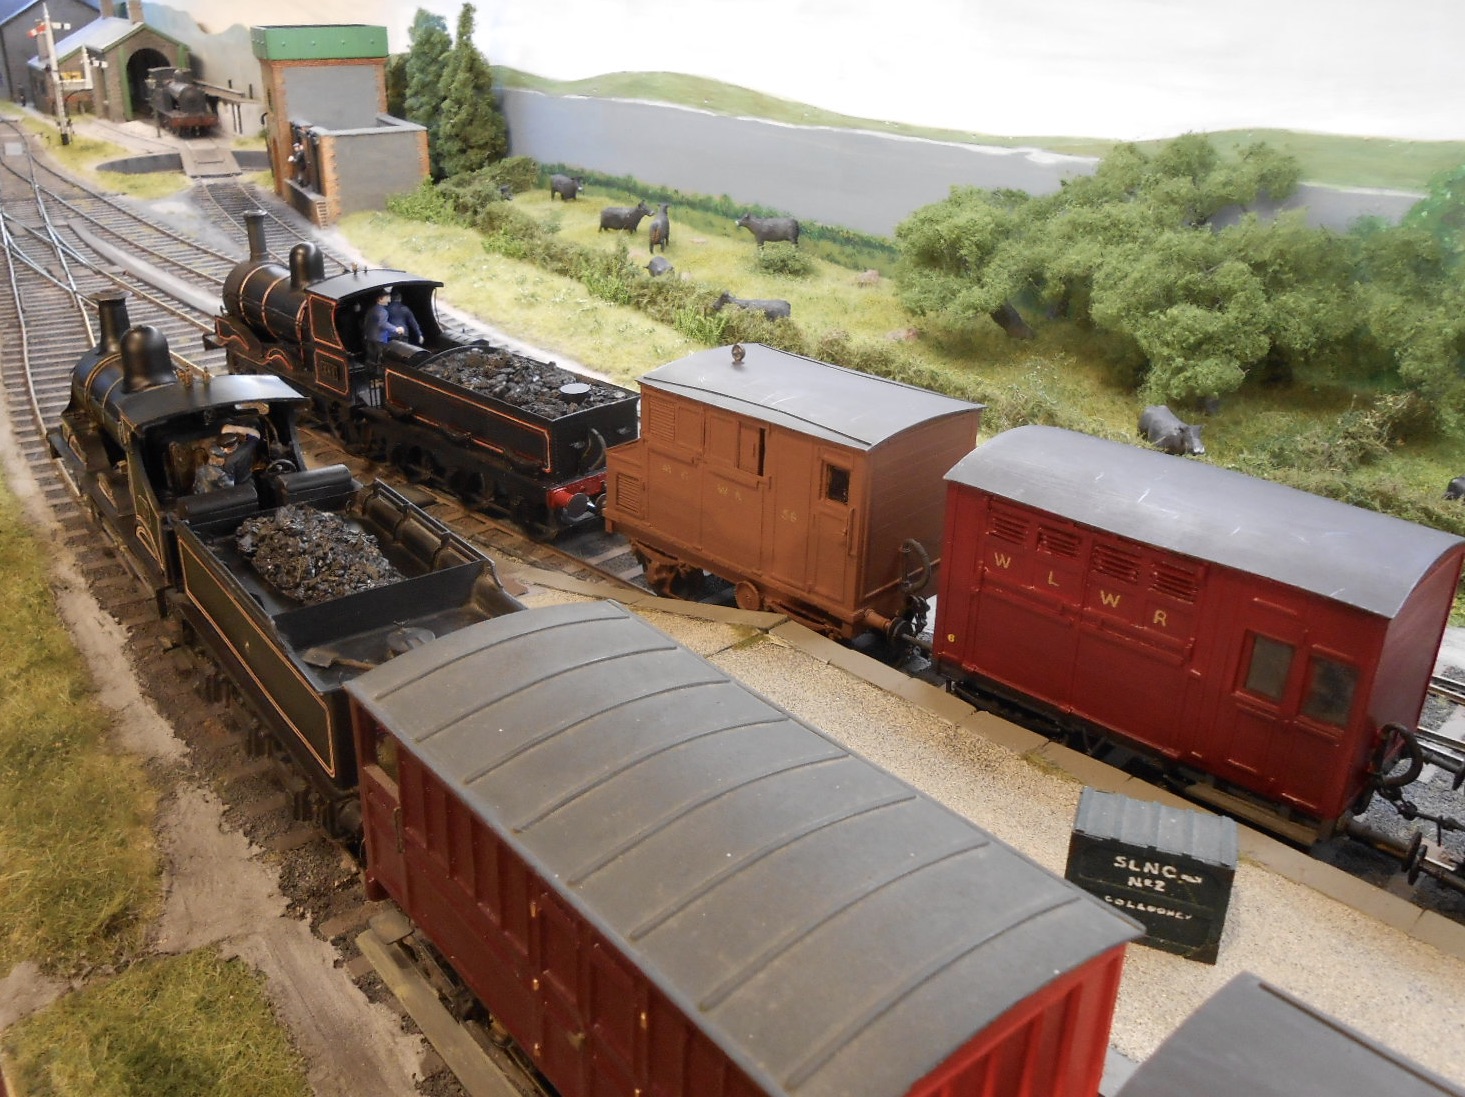
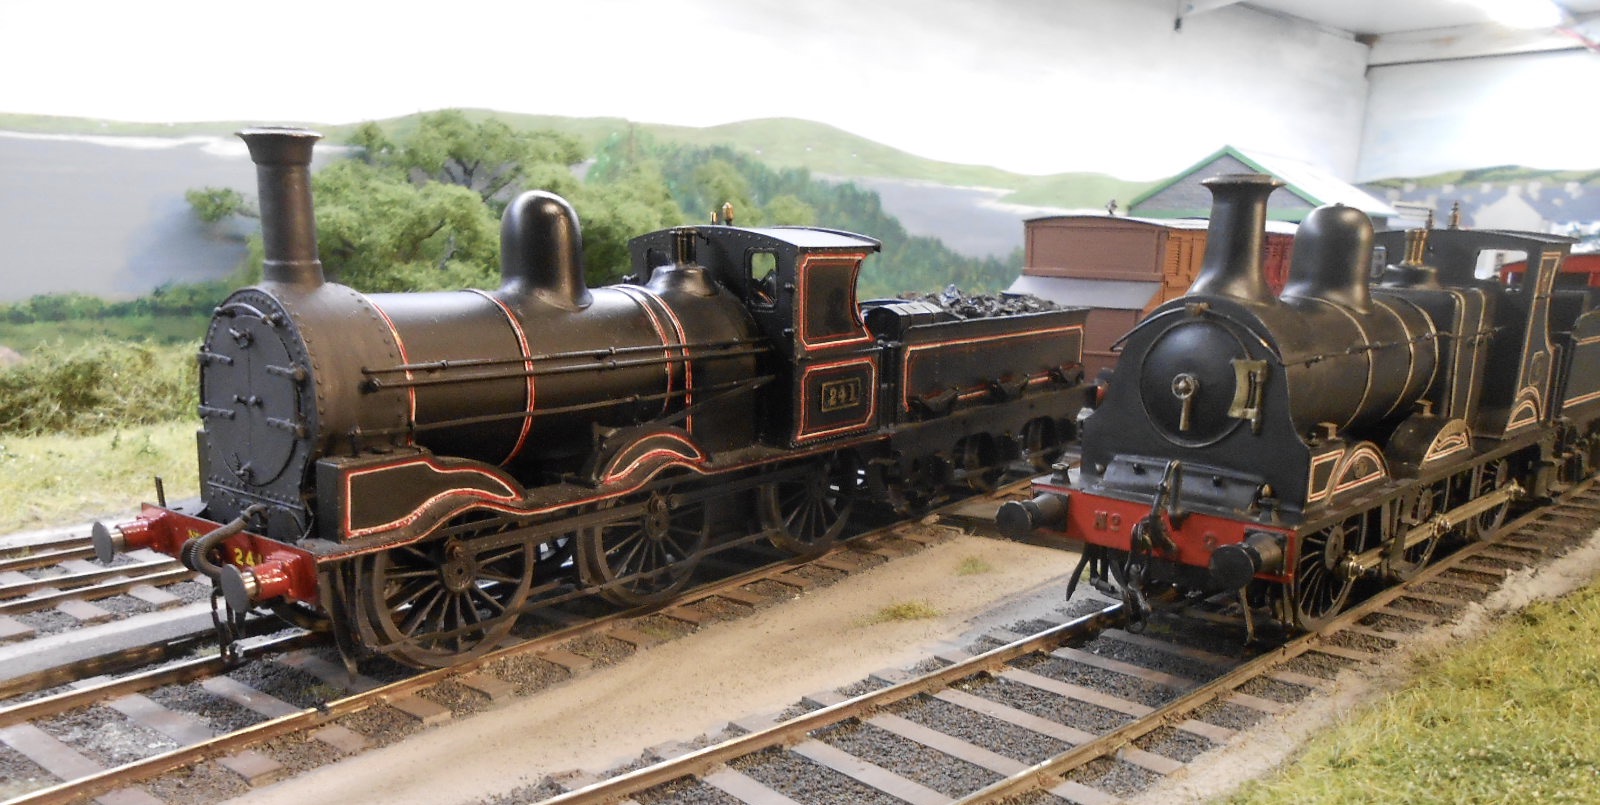
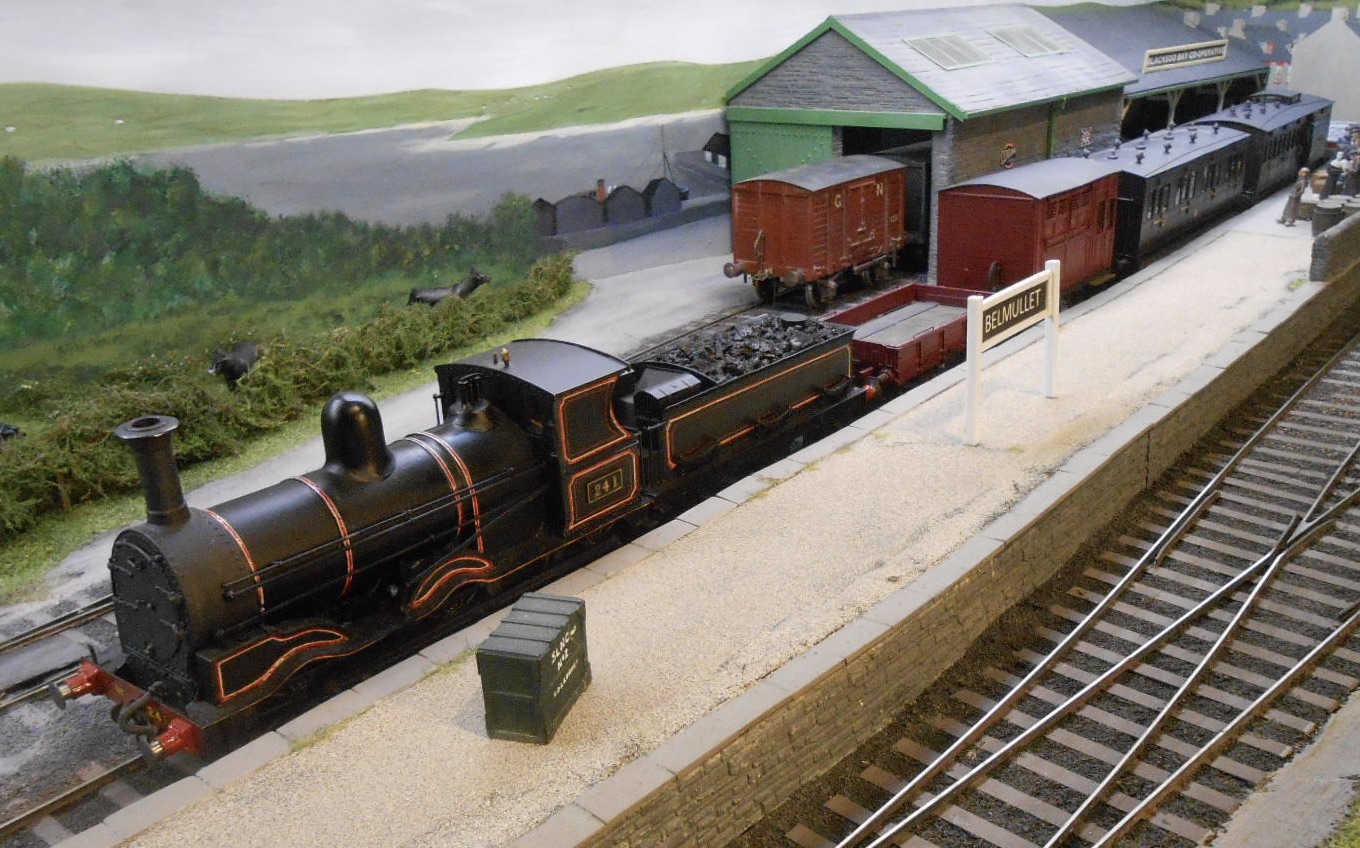
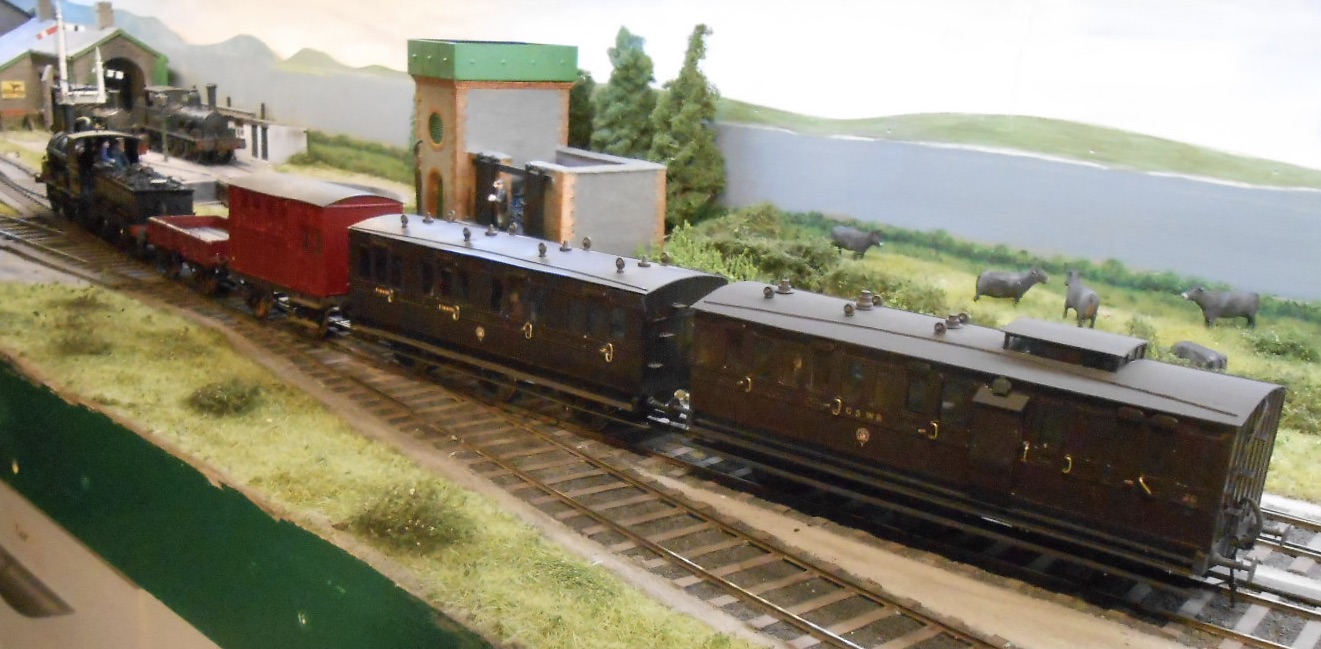
Back to the 1900s Recent work on the GSWR Brake 3rd, plus new wheels for WL&WR 0-6-0 Shannon have all been about moving Belmullet backwards about 50 years to the early 1900s. A few liberties are being taken, because my 101 0-6-0, being a later Coey engine, wasn't built until 1903, while the WL&WR had already been taken over/absorbed by the GSWR by then. However, it always took time for locos and stock to be repainted, so hopefully what I'm doing isn't too outrageous, although a railway to Belmullet never existed anyway of course. Anyway, Shannon now has its new wheels and the bodywork has been given a further bit of TLC, touching up paint chips here and there, plus a bit more work with T-cut to freshen up the rest. Still needs balance weights to be added to the wheels, while have just noticed one of the handrails need straightening - is any model ever really finished? However, was keen to pose and operate the two new trains to herald the move back in time. Shannon's train is very much a nod to creator Richard Chown, being what he called a 'Mail Goods'. This featured on his Castle Rackrent system and as well as Shannon, I also have his two Dublin and Meath brake vans. Quite why he built even one of these is anybody's guess, but he was often drawn to obscure prototypes and with their salmon pink ends, these vans are certainly that. The rest of the train comprises my own scratchbuilt models of a WL&WR full brake, plus a carriage truck from the same company. On Castle Rackrent, photos show a carriage truck on the Mail Goods, sporting what looks like a horse drawn pantechnicon - there's a word for you! These days we call it a removal van. My fiddle yard is 43 inches long, but Shannon's train is only 39 inches - hence not enough room for another wagon. The WL&WR did have a couple of six wheel carriage trucks, but at just over 9 inches long, there is not enough room for one of these. At the moment anyway! The 101's train has previously been described as a private excursion, though with a six wheel first, brake third and two horse boxes, probably works as an ordinary service train too. However, 101 0-6-0s rarely ventured this far north or west, so a 'special' probably makes more sense. The two trains are shown with Shannon waiting in the bay, ready to depart east, then south for Limerick with mail and parcels, while the 101 leaves first for [eventually] Dublin or Cork. Suspect the coaches will be added to another train somewhere further on.
- 179 replies
-
- 17
-

-

-
Quite right too - it works beautifully.
-
LAYOUT SKETCHES, DRAUGHTS, PLANS
David Holman replied to burnthebox's question in Questions & Answers
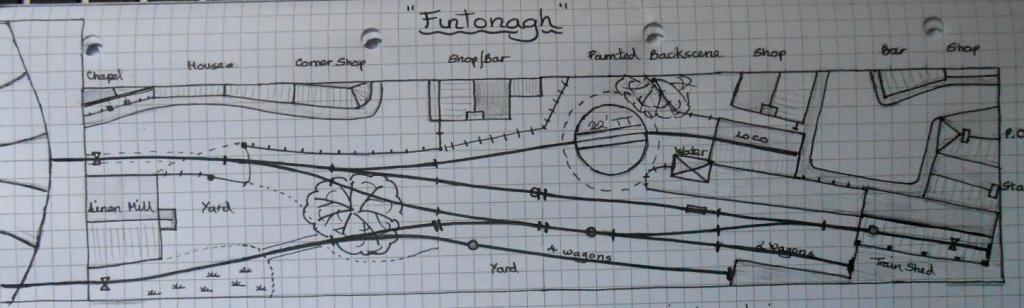
Below is my plan of Fintonagh. 7mm scale, 21mm gauge. You can find it in the layouts section under Clogher Valley Project.
-
Evocative scenes - actually looks like it is raining. Presume that is the lighting, but certainly works. Indeed, can recall very few layouts that portray a dull wet day and fewer still that manage it as successfully as this.
-
If you haven't already, check out Ballyconnell Road. It's 3mmFS, but certainly shows what can be done with a circle and displays fantastic modelling. Runs beautifully too. Another thought is that, in going for a circle, by planning ahead a bit, you can always add straight(ish) sections at a later date. Either way, will certainly look forward to seeing the project develop.
-
Nearly there with the brake third. Grab handles and hand rails [0.8mm brass wire] the main task, then it was a case of finishing off the roof. I raided my dwindling parts boxes for fittings, but Sod's Law has meant that I only have five torpedo vents, when I need six, and while I found three lamp tops, they were of two different styles. Got ahead of myself then and painted the roof, but forgot to add the rain strips. Needed a second coat though, so not far off now. The photos show the third with its intended train. This comprises an Alphagraphix/Tyrconnel 6w first [brass kit], along with a WL&W horse box and carriage truck - both scratchbuilt. The idea is that this is a private excursion carrying a well to do group [in the first], together with servants and luggage [in the brake third], plus horses and a [yet to be built] carriage. Both the latter can be shunted/unloaded in the cattle/unloading docks. Meanwhile, as before while waiting for paint/glue to dry, carried on playing around with rebuilding Shannon. The loco has had pick ups fitted and runs fairly well, though I think the coupling rods still need easing a little. The RG4 gearbox is proving a little noisy, so may yet replace it with a Mashima type unit from Precision - especially as RG4s do not like feedback control anyway. As for the tender, having stripped everything out last time, I decided to make a new set of inside frames from plastic sheet, rather than spend ages fretting sides and spacers from brass. Not as radical as you might think, as I've used brass bearings, but certainly a lot quicker. As you can see from the photos, the inside frames are pretty much hidden. It runs well enough, so fingers crossed!
-
A single coach is a lot of work (I should know!), so a three car unit is a major project and not surprised it is taking a while. Looking good though, so certainly worth the effort.
-
The Hastings line, six car units, we're similarly characterful, especially when doubled into a 12 car set packing 2000hp. Those class80 units should make an ideal lockdown project.
-
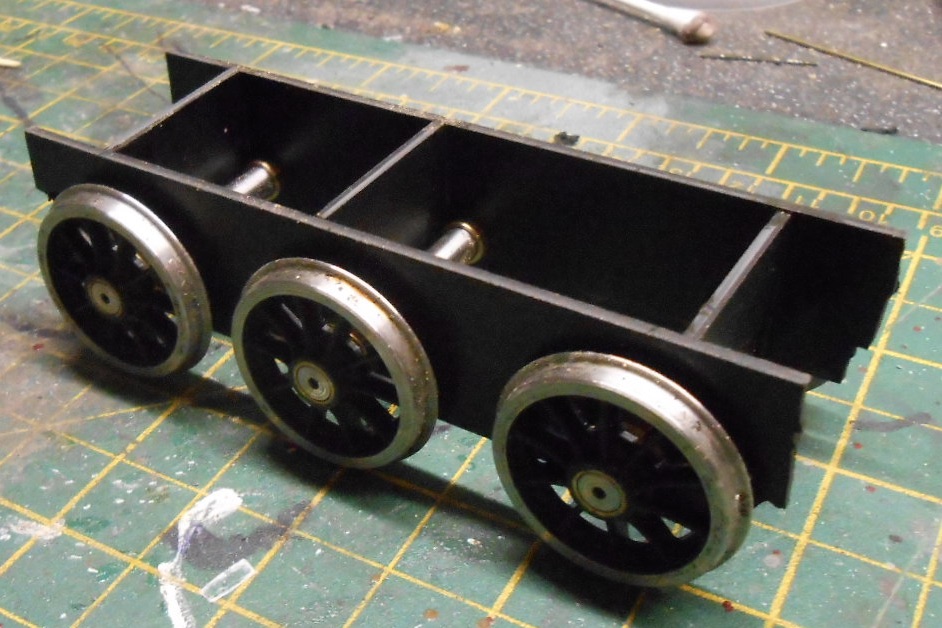
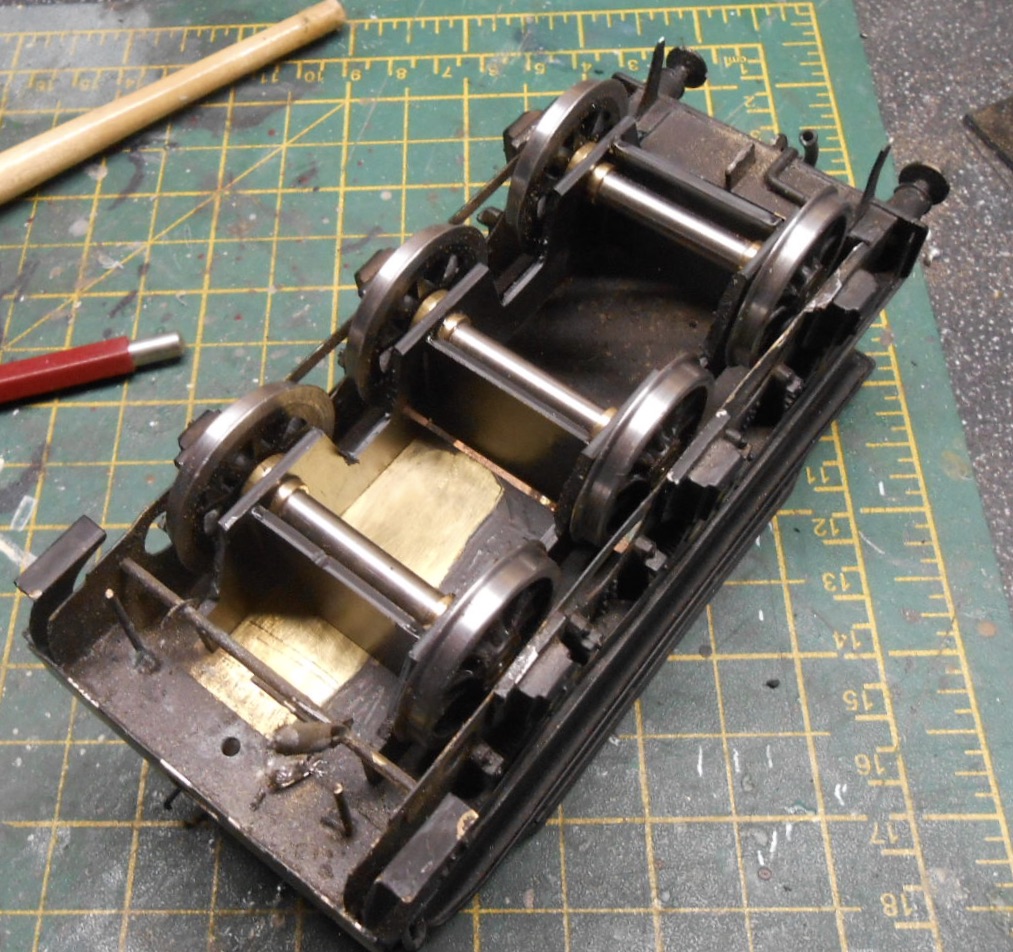
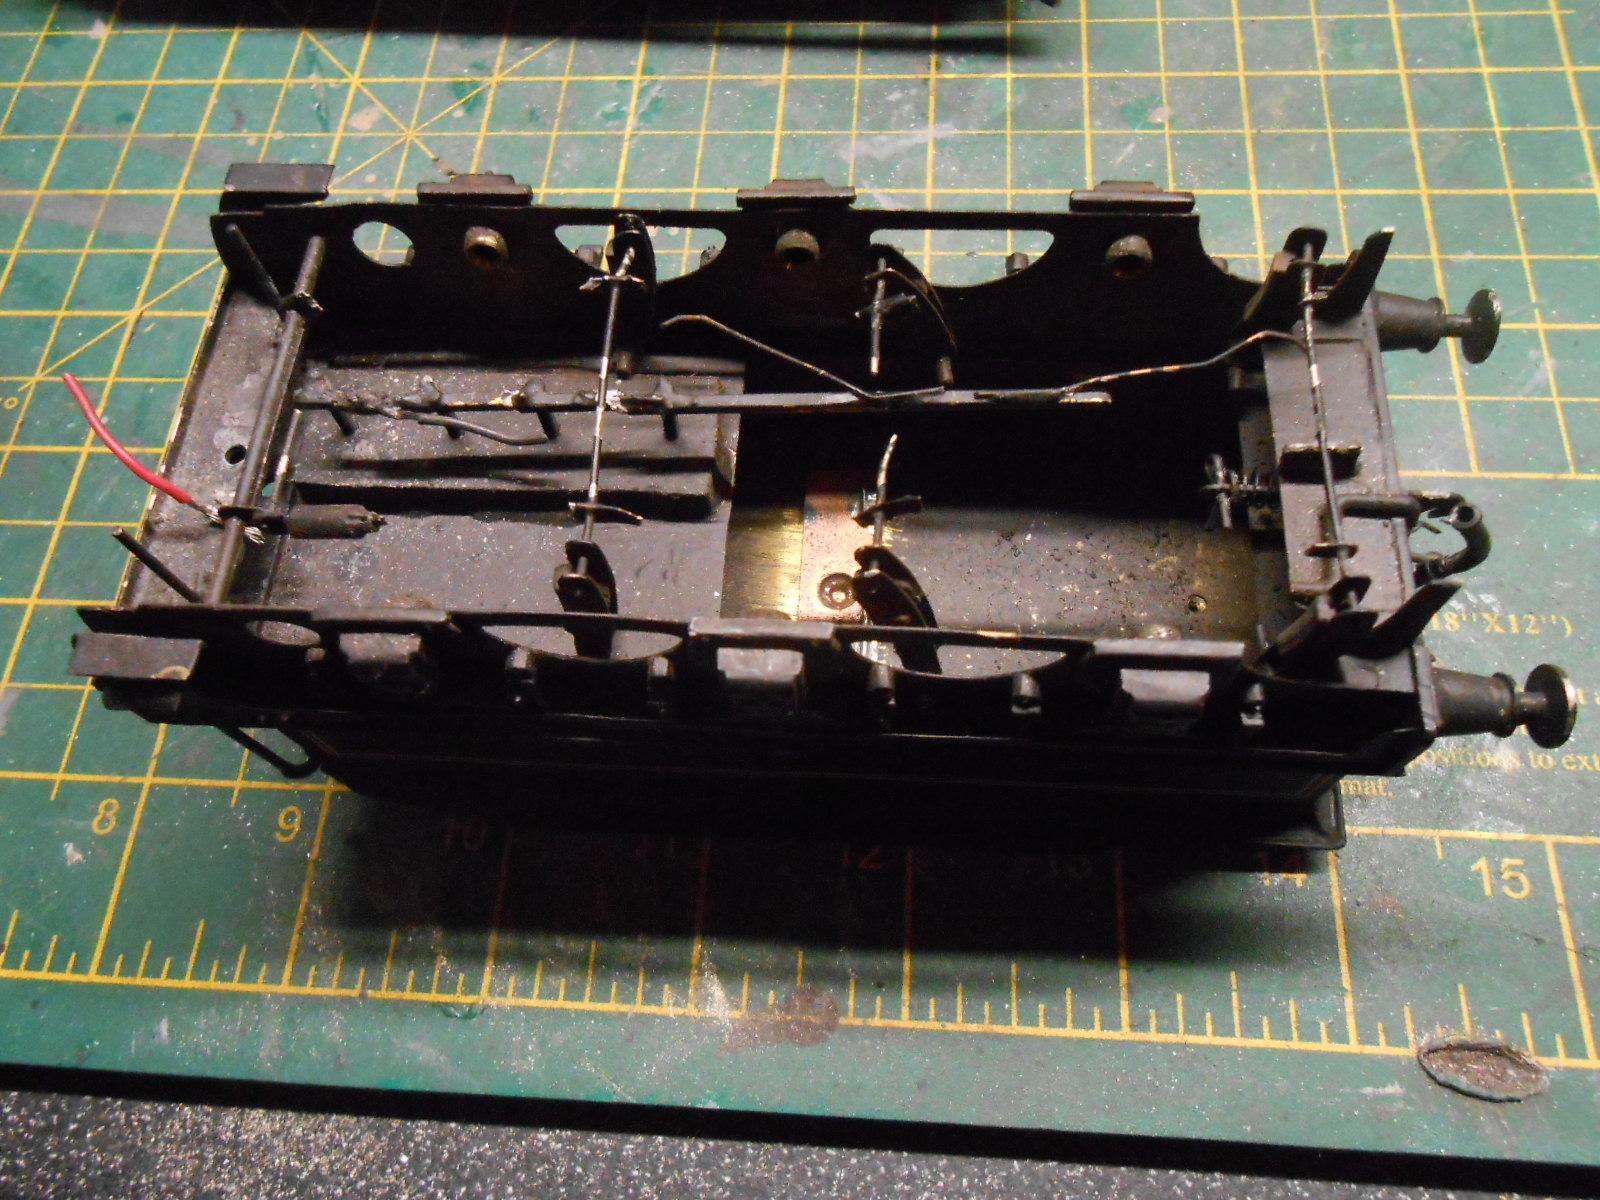
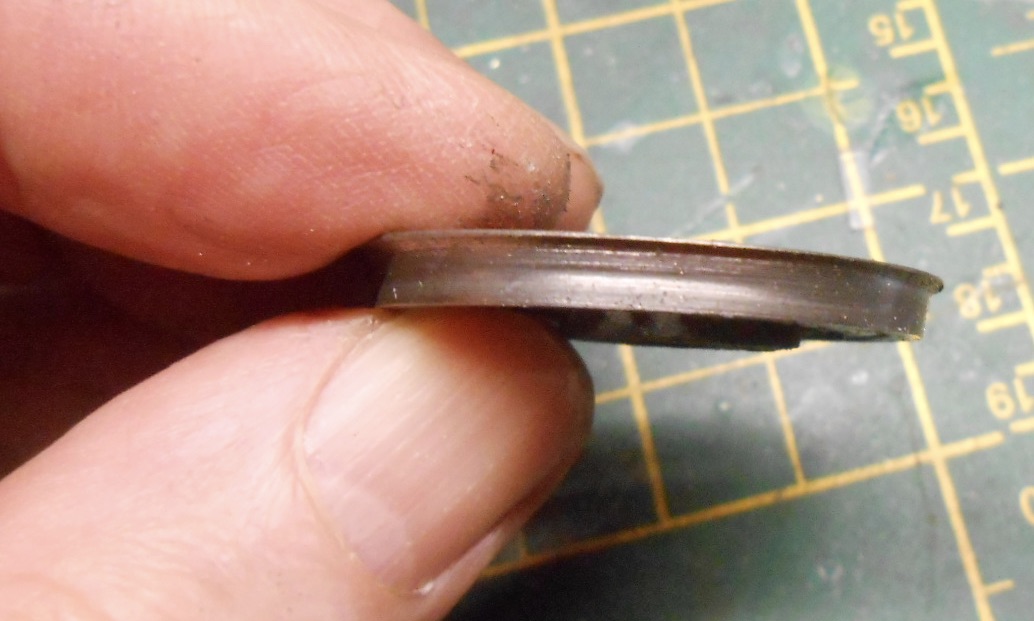
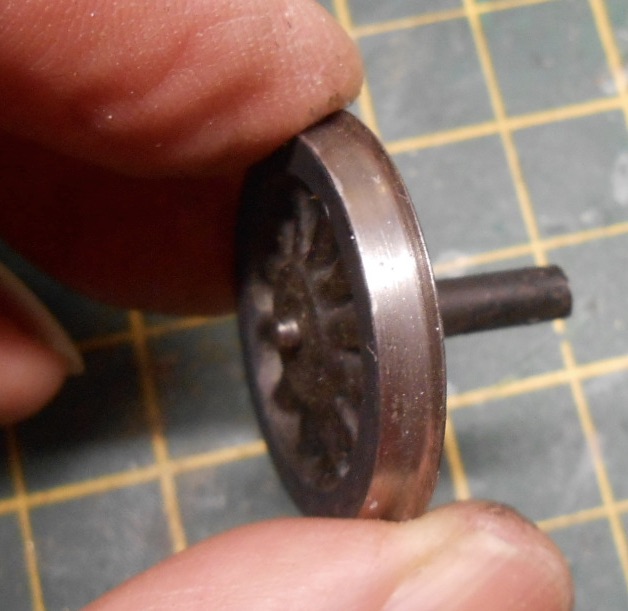
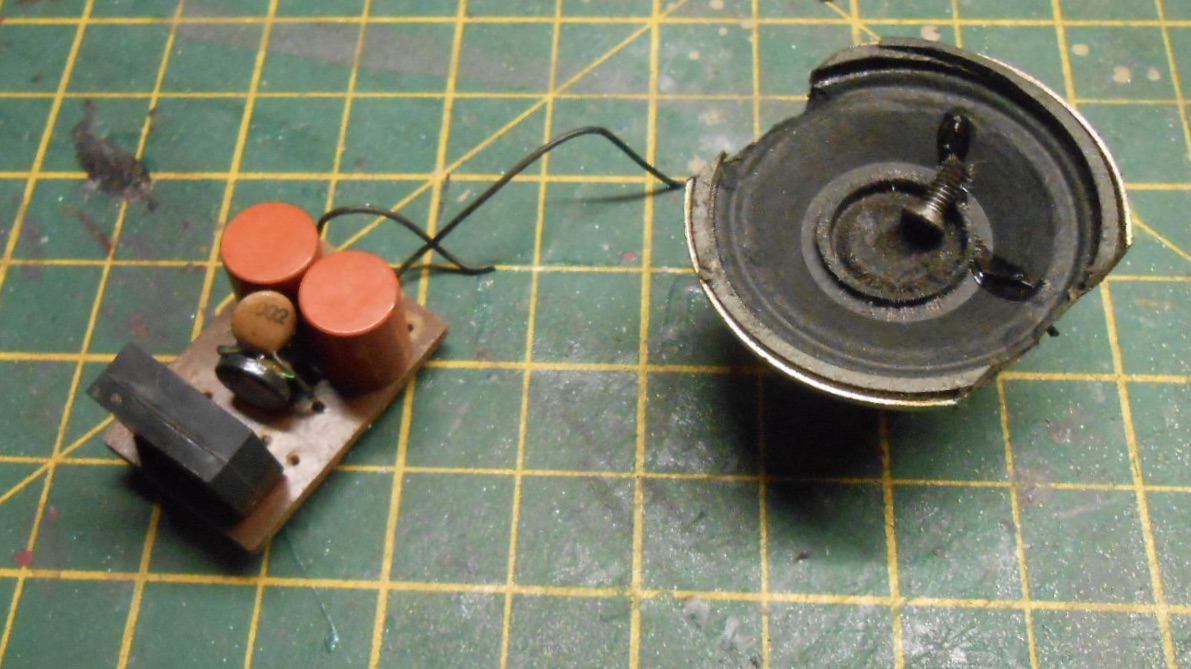
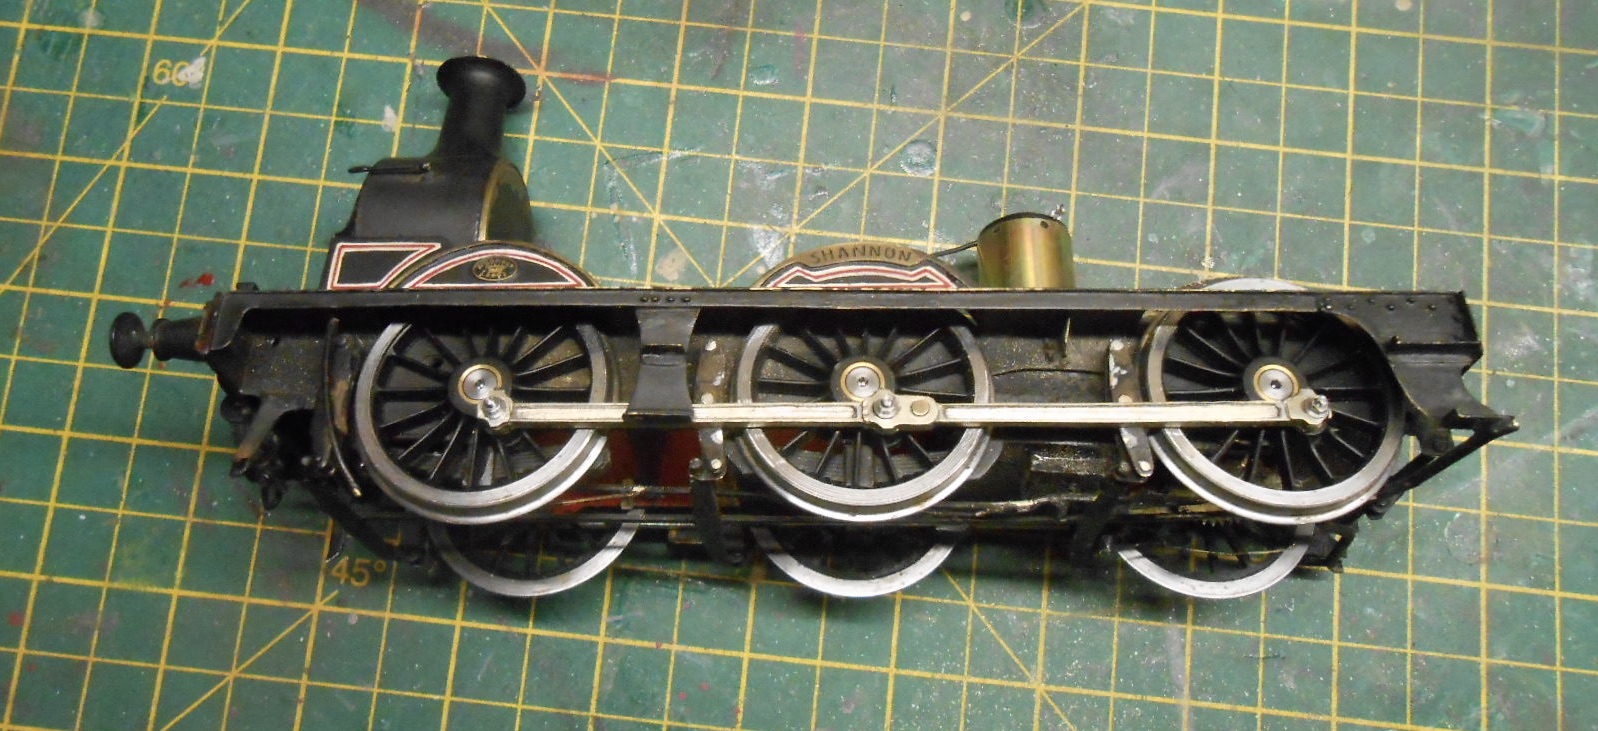
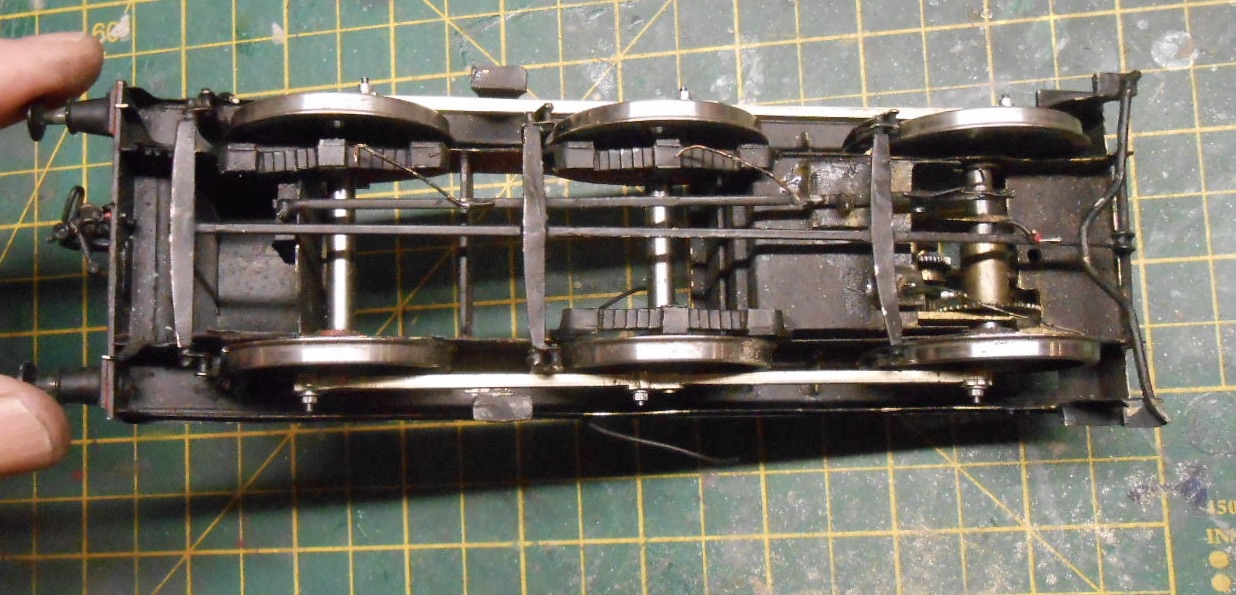
Things still going slowly with the Brake Third, but it has been given two coats of dark lake, with the door handles and glazing going in as well, along with the birdcage lookout and some passengers. Just occasionally, I remember to plan ahead, so the sides were built with spaces for 20thou perspex to be slid in. While waiting for the paint to dry, I busied myself with the 101 adding tender pickups and wiring these to the loco. Much to my surprise, the loco runs really well. However, another 0-6-0, Richard Chown's Shannon, has been having some attention. The model is approaching 50 years old and while the body work has stood the test of time, the same can't be said for the chassis. The driving wheels are so worn that there is a clear rut in the treads, while the centre drivers had a 2mm wobble. Shannon nevertheless still ran ok, probably helped by the fact the the centre wheels are flangeless. The tender wheels were similarly worn, this time the problems was more about the flanges, which had worn to a razor edge. The latter probably because the tender had considerable extra weight thanks to a speaker and electrics for an old Pacific Fast Mail sound system. The lead and middle drivers came off ok - am guessing they are Walsall wheels and have a Romford style centre nut which requires a screwdriver with a slot cut in the blade to undo it. The rear drivers were much more of a problem, being fixed with a slotted bolt/screw, which refused to budge, so I had to resort to brute force in the form of a slitting disc in the Dremel to cut the wheels off. The motor/gearbox is an adapted Portescap RG4 and despite running many actual miles, still seems ok. So an order was sent off to Slaters for new driving and tender wheels, along with six broad gauge axles. Cost me over £150, which is why buying an 0 gauge loco kit is only half what you eventually pay. The tender wheels had been fitted inside the body, so the only way to get them out was the Dremel again, cutting the axles in half. The plan is to build a new set of inside frames for the tender, though haven't yet decided how this will be fixed in place. Meanwhile, the loco wheels were reasonably simple to replace, the main work being adapting the coupling rods, which had to have their bosses drilled out to accept the Slater's crankpin bearings. Better that the holes needed enlarging than making bushes had they been already too big, methinks. Found that I needed to thin down the rod slightly, to take the nuts and washers which hold them in place. Assembling everything again then showed that the old wheels had thicker centres than the new ones, which meant the rods were fouling the brake gear. In the photos, you can see this in the shiny spots where I've had to file some areas down. Thus far, its been a really interesting exercise and [fingers crossed] Shannon still runs as well as her maker intended and should be good for a few more years now. Working on it has felt like a bit of archeology at times & it's certainly been a privilege to see how Richard approached building what is still a lovely model.