David Holman
-
Posts
4,359 -
Joined
-
Last visited
-
Days Won
117
Content Type
Profiles
Forums
Events
Gallery
Blogs
Everything posted by David Holman
-
The turntable is hand cranked, exhibition visitors are never sure whether the squeak is from the mechanism or my arm. I tell kids it is hamster powered. And finally, for now, Sir Henry departs with the mixed train. The incoming one was of course a goods, as the coach was at the rear, behind unfitted wagons.
- 179 replies
-
- 11
-

-

-
So, here is Sir Henry and as you've probably noticed, the film is in monochrome, to match the photographs of the day. Everything is scratch built. Sir Henry a near 200 hour labour of love in nickel silver. The coach is plasticard on cut down Slater's bogies and the wagons likewise plastic and micro strip. Next we see Henry running to the turntable
-
Not quite the 7.20 from Enniskillen, as it would have been very dark by the time it got to Belmullet. However, will try to show Sir Henry with SLNCR bogie brake number nine and a couple of wagons. First though, while I was cleaning Henry's wheels, took the opportunity to show the inside motion in action. It is a kit of castings from Laurie Griffin. Not cheap [nearly £100!], but a joy to put together and certainly fills the space below what is quite a high pitched boiler. Not sure I can add more than one video at a time, or indeed edit them together, hence others to follow. DSCN3851.aviDSCN3851.avi
-
The whole scene just hangs together really well. May well be that limiting the amount of track means there is a nice balance to things. Less important if your main focus is operation, but essential when trying to compose a 3D picture. Nice too, to see the layout from varying angles, a bit like a sculpture, where you can turn it round, whereas a painting can only be seen from one side. Works for me anyway!
-
Galteemore is right, think about what you like, but also consider the restrictions. A 6' dia circle means 30" curves. Ok when viewed from the inside. Less so from out. Geometry means storage siding space will be limited. Terminus to fiddle yard is great for operation, though this is mainly shunting and train lengths will be no more than 2 '6 if the Iain Rice rule is applied. Everything is a compromise. Whatever you decide, feel sure we will enjoy the outcome. The current layout shows you have a talent for scenics and presentation, so will look forward to a new project that sees those skills develop further.
-
Here you are, though I used lower resolution video, so its a bit grainy. Hazlewood was my first SLNCR loco, made from a North Star kt, still available from Studio Scale Models. The wagons are all scratch built. DSCN3820.avi
-
Thanks Eoin, exactly the sort of advice I needed. Hand tools it is then!
-
Interesting. It was the scroll saw, not the table saw I'd been thinking about. Very different beasts, to say the least. The basic Proxxon scroll saw is only about £110, whereas the band saw is three times that. The sort of work I tend to do is lightweight and intermittent, dependant on where the muse takes me(!)
-
Or small horses?
-
And here's railcar 2b departing...
- 179 replies
-
- 14
-
-
This weekend, Belmullet was due to make its exhibition debut at the Uckfield Show, however that is now not happening, like so many others. Hence thought I'd try and post a few pictures and some video footage over the next few days. Video is a first for me. This short film is done using my cheap Nikon Coolpix camera, on which I do all my other modelling pictures. Must admit that trying to follow a train with the camera, while also driving it at the same time is not easy! Hadn't realised it was such a long process uploading to Youtube either. Anyway, here is Railcar B arriving at the station. Suggest you turn the sound down [or off] as the model definitely doesn't make that noise in reality and is actually very quiet too - especially in exhibition conditions.
- 179 replies
-
- 14
-
-

-
Thank you sir!
-
Feel sure there must be something on this somewhere, but can't find it. Would like to post some video footage of my layout, but the files are too big to upload. How do others do this please?
-
How splendid! The article in RM very much caught my eye and was hoping somebody would have a go in 21mm. Now we know why you've got stiff fingers from working with card, Ken. Great work, good fun and a lovely example of what can be done in a small space
-
The comment about traditional methods made me smile, especially when I realised that David Jenkinson's book on carriage modelling came out in 1996 - I still thought it was cutting edge! The fact is though, that things really have moved on since then & I occasionally find myself drawn to the idea of learning CAD, especially when I see what Mayner and others are doing now. Gordon Gravett recently sent me pictures of a French, metre gauge Corpet-Louvet 0-6-0T that he's built from his own etchings. Looks fabulous, of course and when the man himself says it runs really well too, then it must be quite something. Not being the biggest fan of using a coping saw and fine blades, am wondering if one of those Proxxon saw tables might be the answer for cutting thin brass or nickel silver?
-
Only 10 thou, Ken. Nice and easy, but gets ever harder as you go up. 20 thou is ok too, but above that score and snap is ever more preferable. My wife often says my hands are softer than hers - a thinly veiled jibe that I don't do manual labour!
-
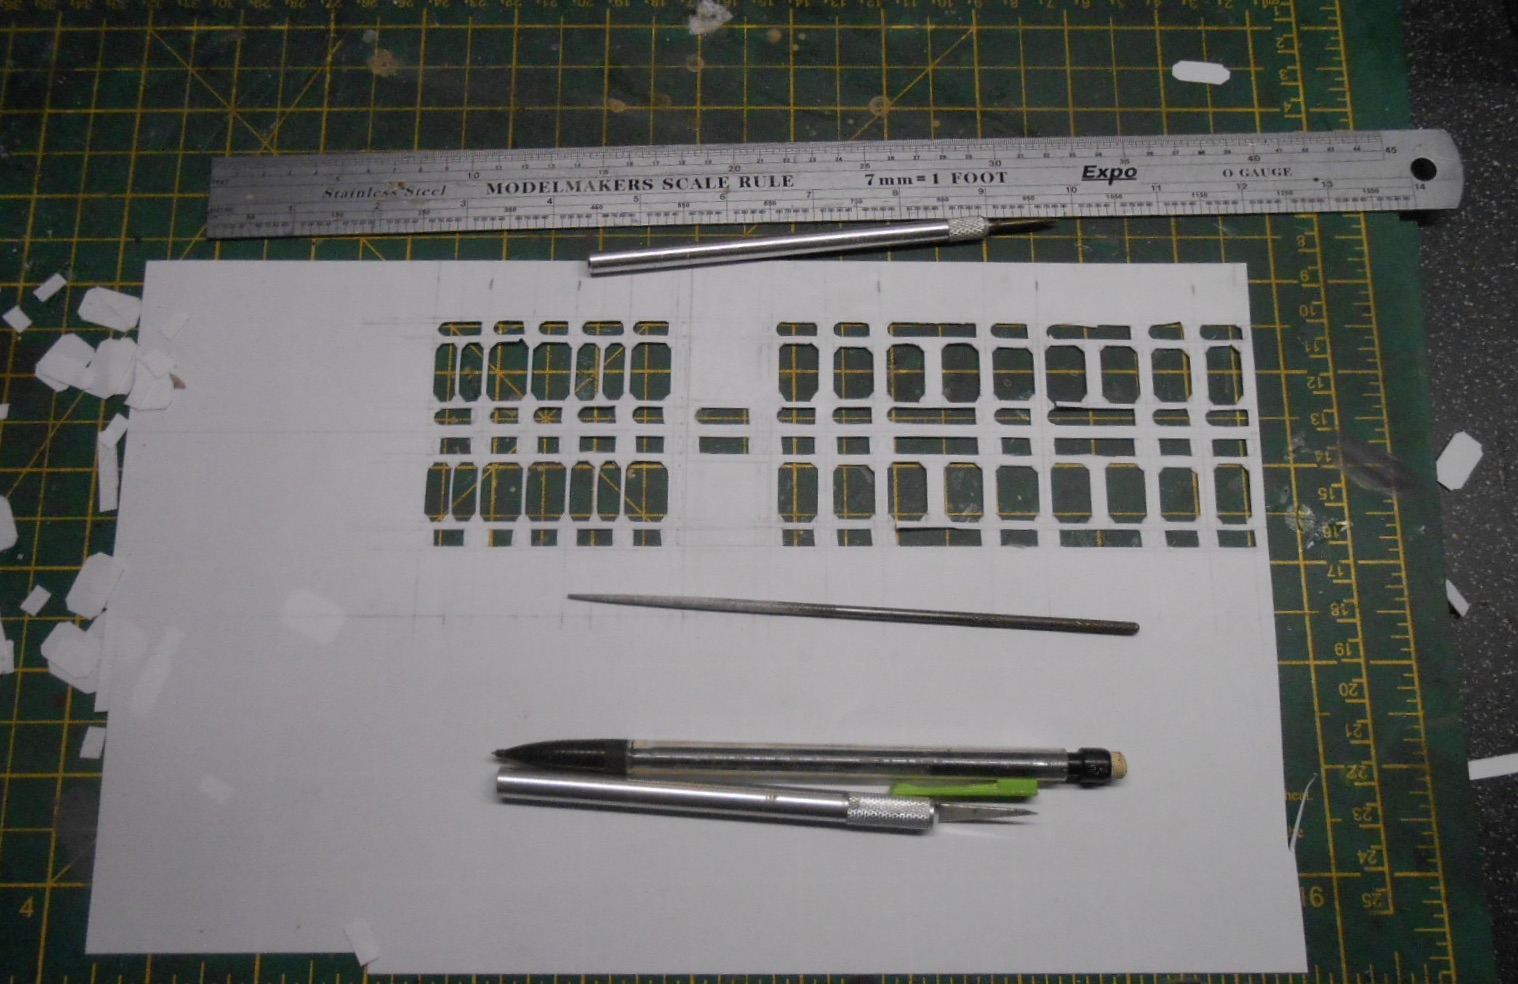
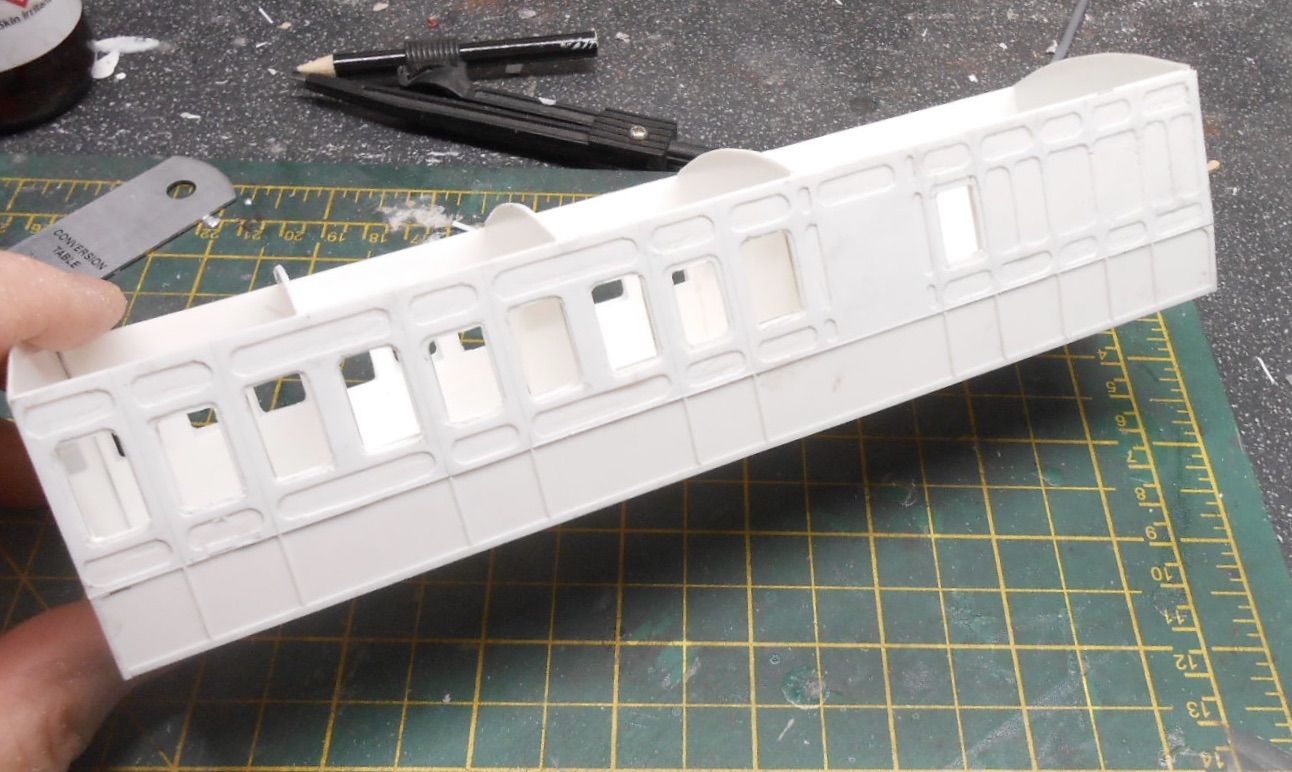
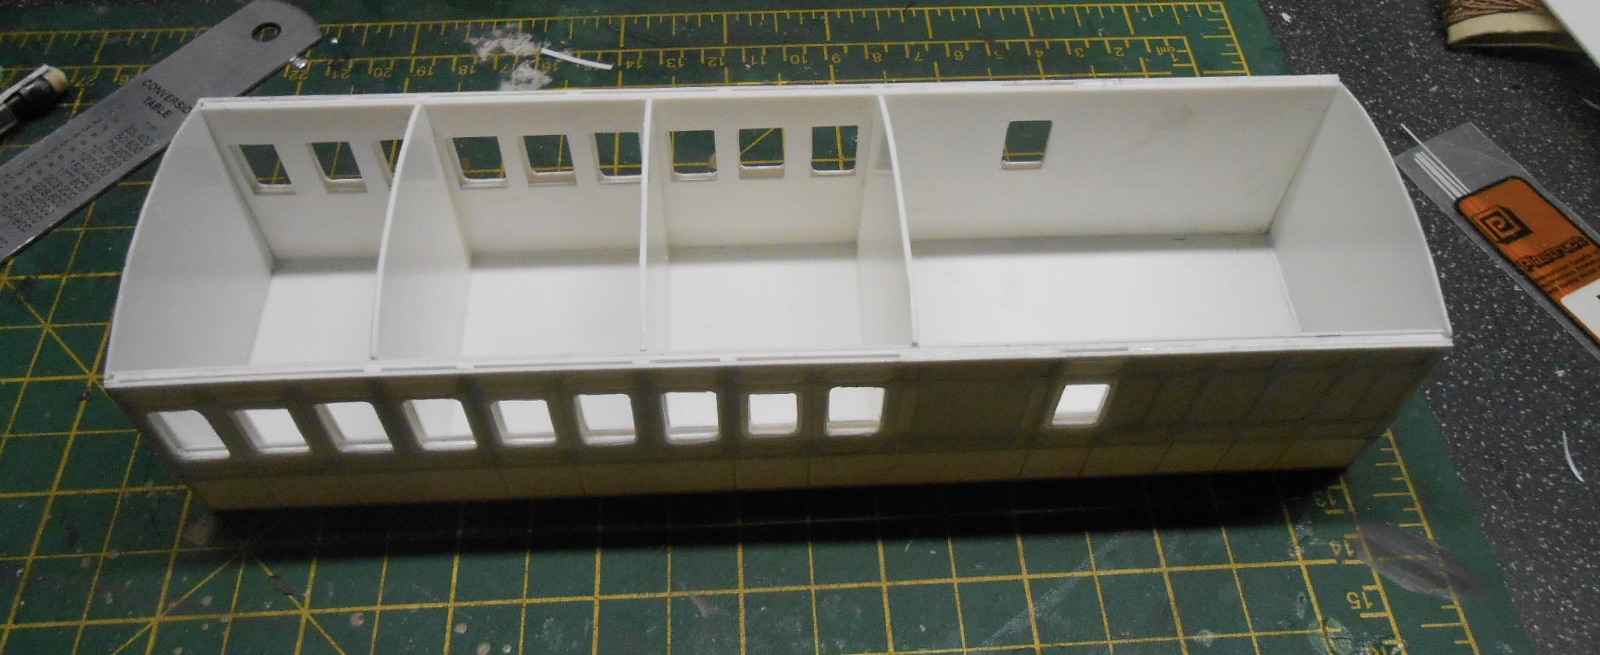
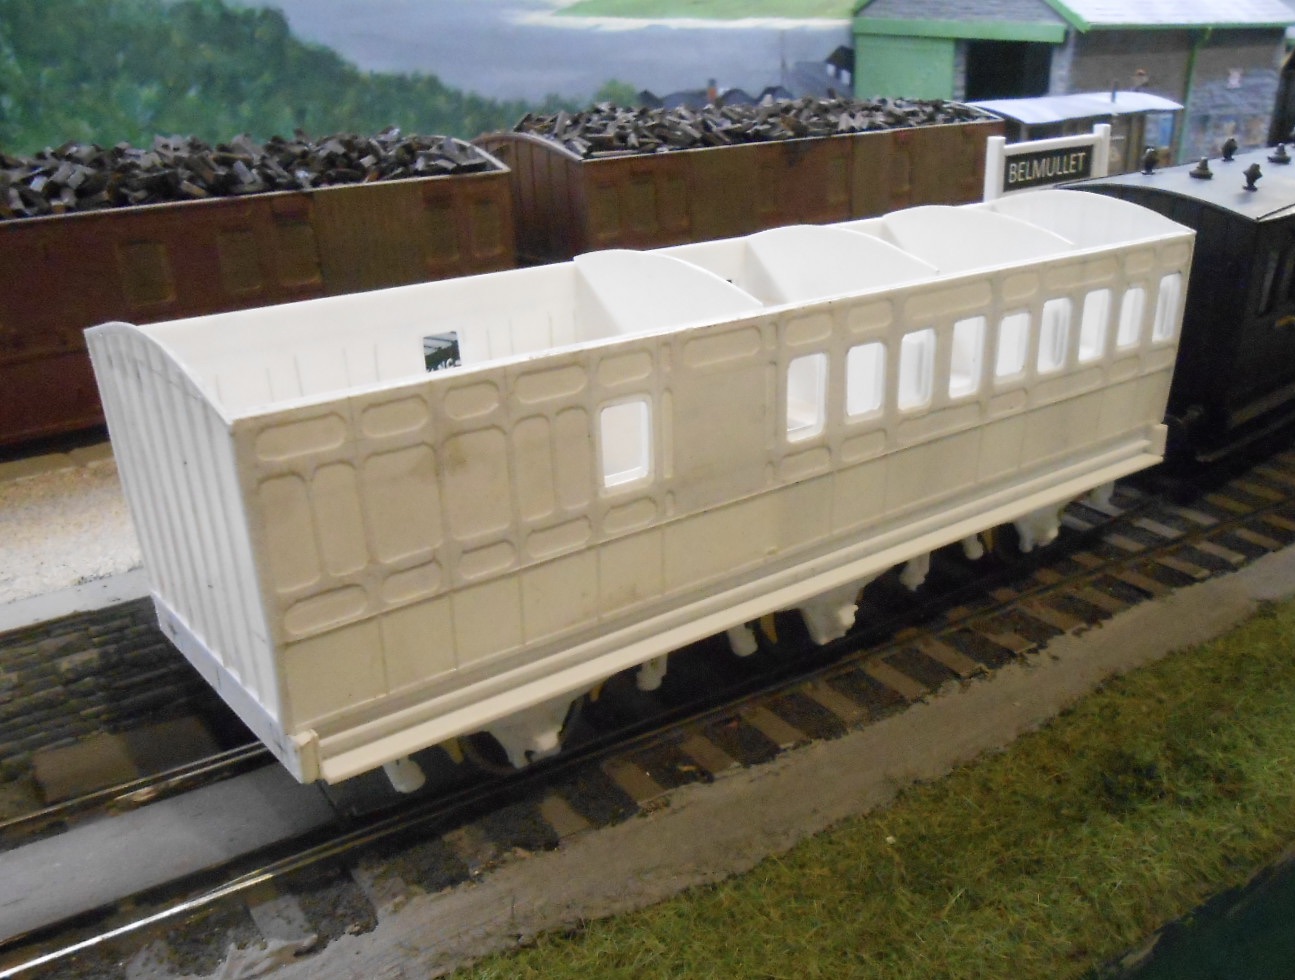
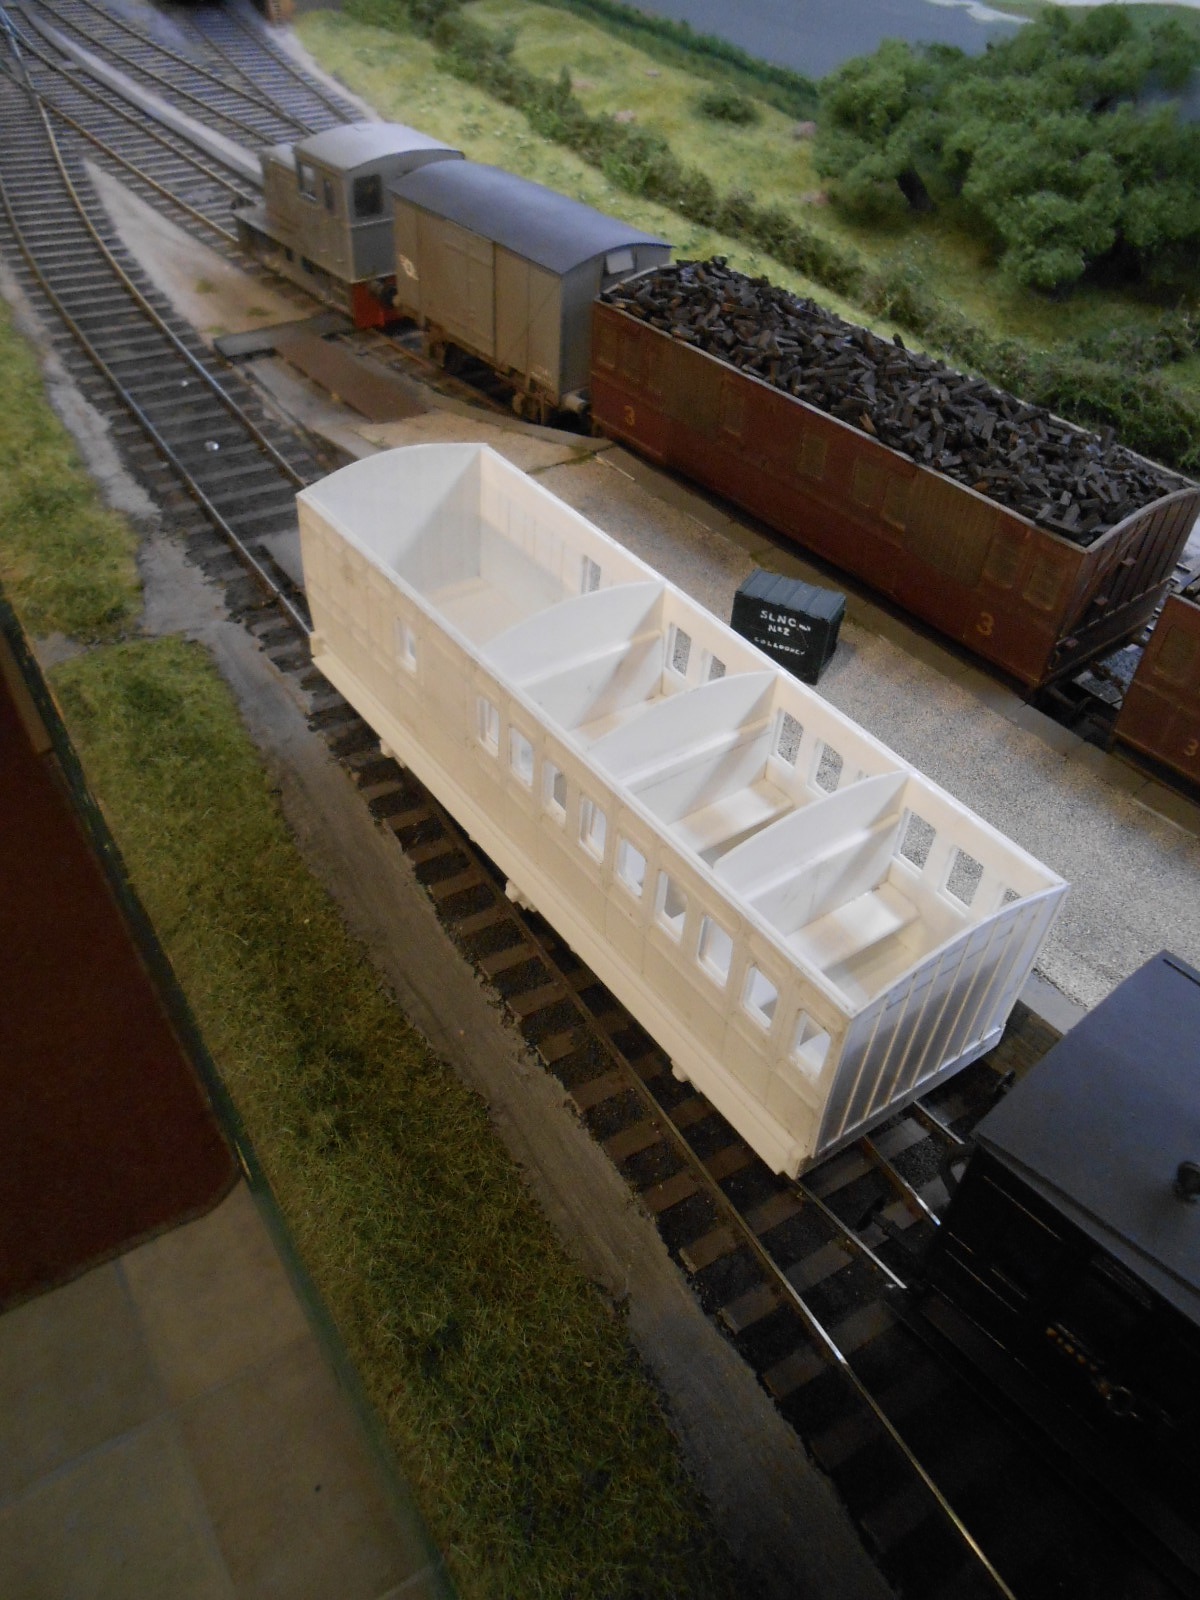
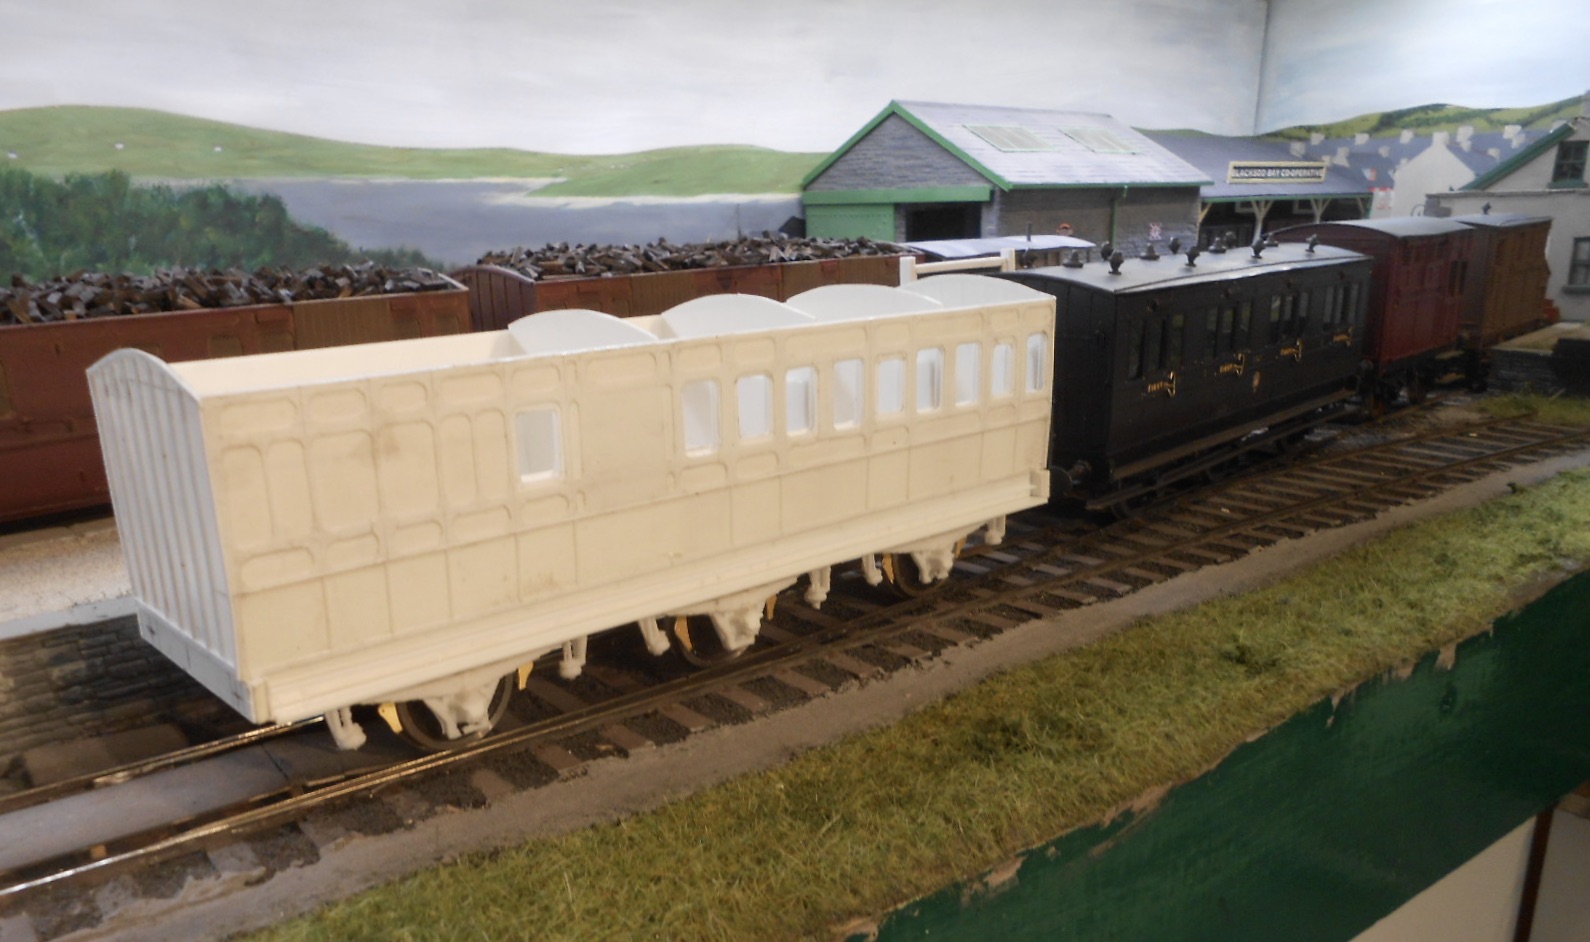
A new direction My 1950s fiddle yard has been full for some time. There are seven tracks, which if you include the railcar and railbus separately means eight trains. A few photos of these will appear in the Layouts section shortly. However, to extend interest in stock building, Belmullet will also feature an early 1900s period, so that is what I am moving towards now. First up is a train for my 101 [J15] 0-6-0. The loco was built last year, but still needs its tender pickups wired to the loco, plus some weight to improve its haulage ability. Its train is deemed to be a 'private special', comprising a six wheel first [for the wealthy] and a brake third for the servants and luggage. Two horse boxes bring up the rear. The first and horse boxes have been around for a while so thought that the brake third would be a good idea to complete the consist. The coach in question is based on the GS&WR one which graces the cover of Desmond Coakham's book on broad gauge coaches. It is being made from plastic sheet. The most difficult bit has been the marking out and subsequent cutting out of the panelling. This was done on a sheet of 10 thou. The worst part was filing all the rounded corners of the panelling - the MGWR makes life so much easier by having square corners meaning you can just use micro strip. This lattice/doilly was then stuck to a piece of 20thou to form each side and in turn, these were further built up to create a space for glazing to be added after painting. The two sides took about a week in all to do, but progress since then has been fairly quick, adding ends, floor, partitions and seating, along with the usual flexible six wheel under frame and springs/axle boxes. Ordered some Markits buffers from Roxey Mouldings this afternoon. Photos hopefully show progress thus far.

-
Neat work and the models are YOURS, not simply taken from a box - though there are many wonderful and worthy things out there. Making your own does help broaden horizons if the right thing isn't available and can be very satisfying.
-
Got to be pleased with all of these. Fine work indeed!
-
Don't forget to check out the Bantry Town 1950s thread in the layouts section, currently on page two. They haven't posted much recently, but there is plenty to inspire there.
-
A stunner, but then considering who are behind it, not surprised! A delight to see a big Irish engine in 7mm scale.
-
Works for me. Matches those colour photos really well.
-
Ex works locos are one thing, but careful weathering like this brings them alive for me. A lily is gilded...
-
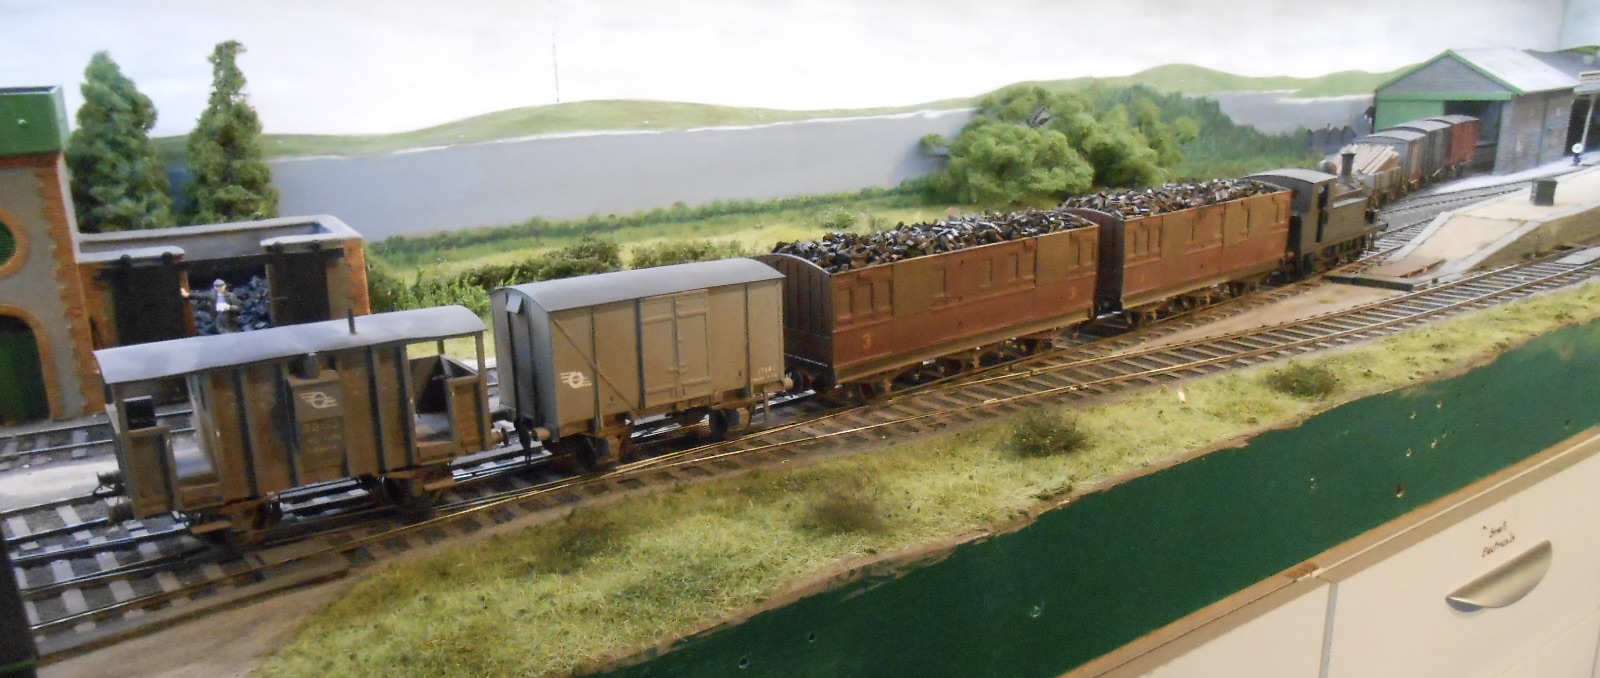
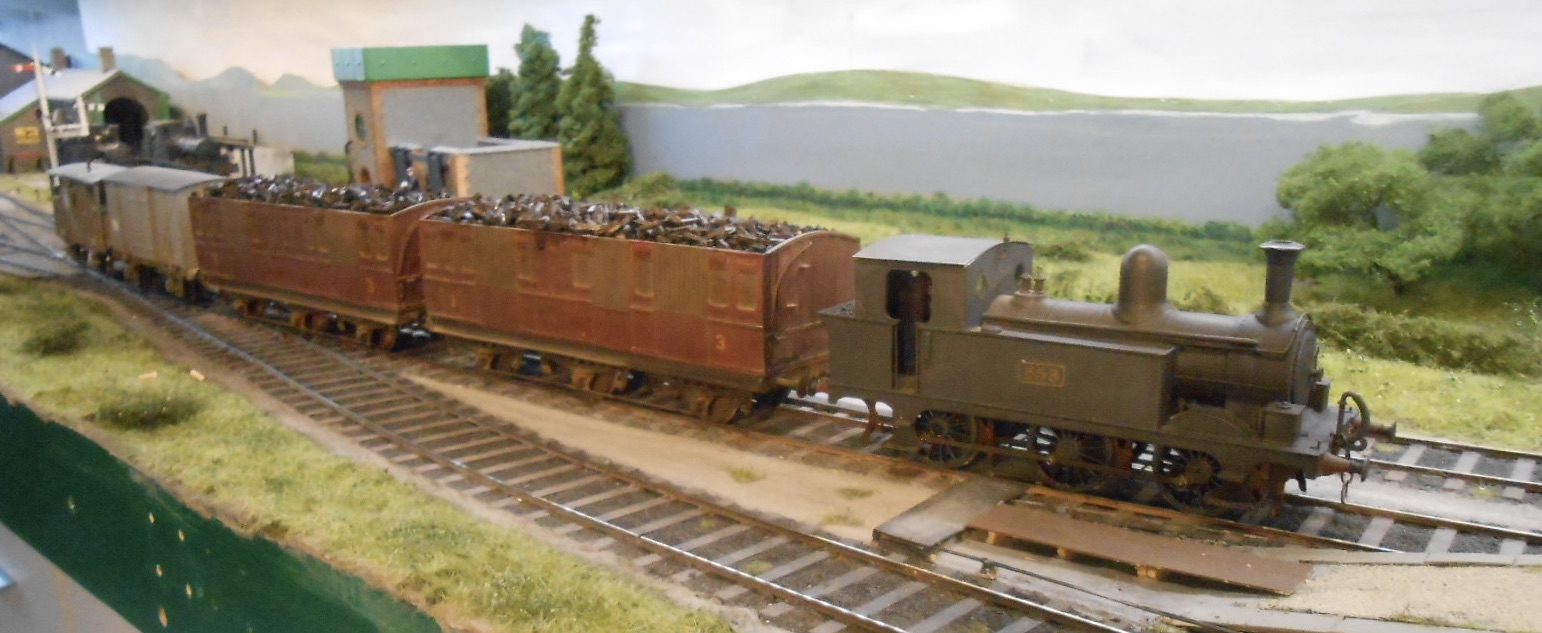
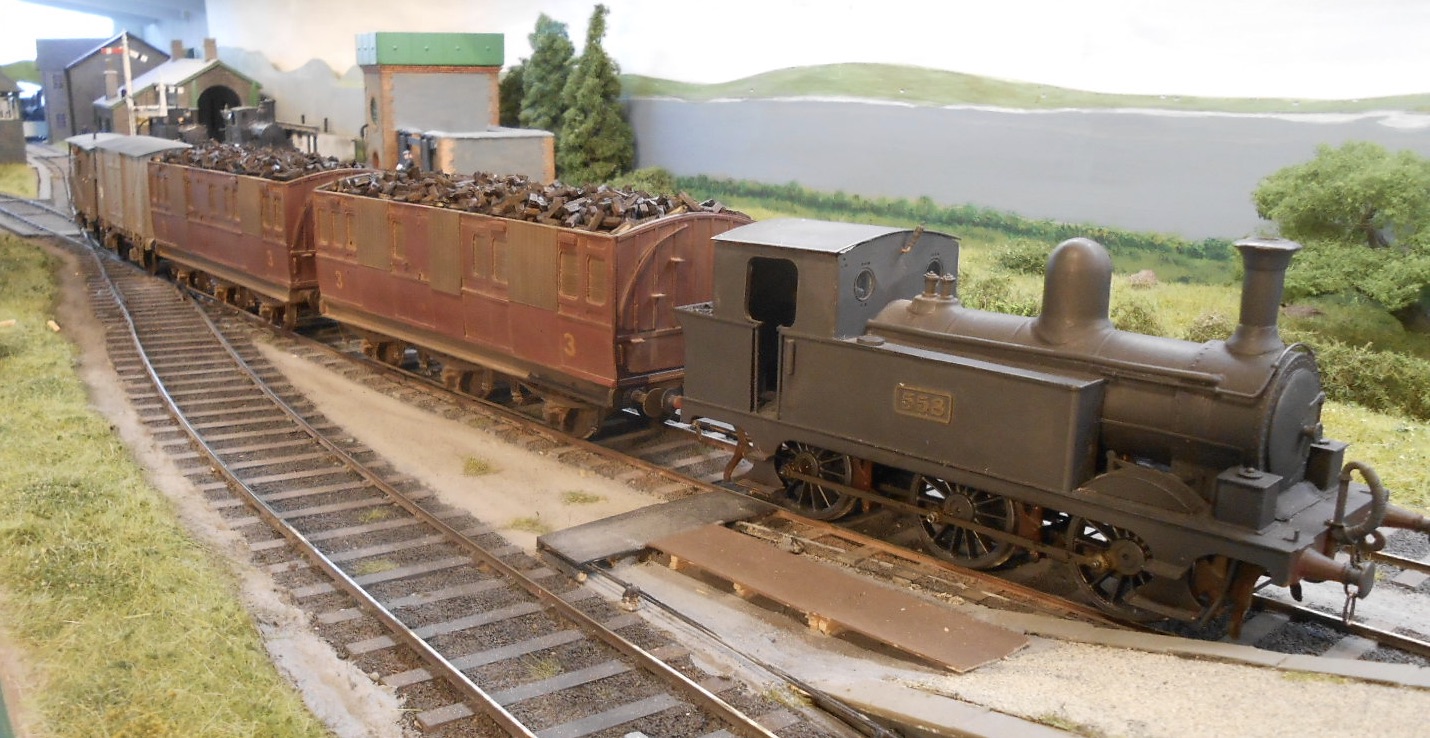
After a couple of days drying out, finally dared to pose the turf vans on the layout, though before doing so, added a wash of dilute 'track colour' to the loads to tone them down a little and make them less black. Let me know if more needs doing in this department, please. The vans are currently paired up with the H van and ex GSWR brake, though may swap the H for something different later. However, with the J26 up front, it makes for a neat little train. The idea is that the vans will be shunted by my Deutz 'G' class diesel down the harbour siding to the distillery, swapping with some sheeted opens. Am now close to completing the stock requirements for my 1950s phase of Belmullet, so hopefully attention will turn to something rather more colourful [and cleaner!] in future, as work turns towards building up a fleet for early 1900s operation.