David Holman
-
Posts
4,359 -
Joined
-
Last visited
-
Days Won
117
Content Type
Profiles
Forums
Events
Gallery
Blogs
Everything posted by David Holman
-
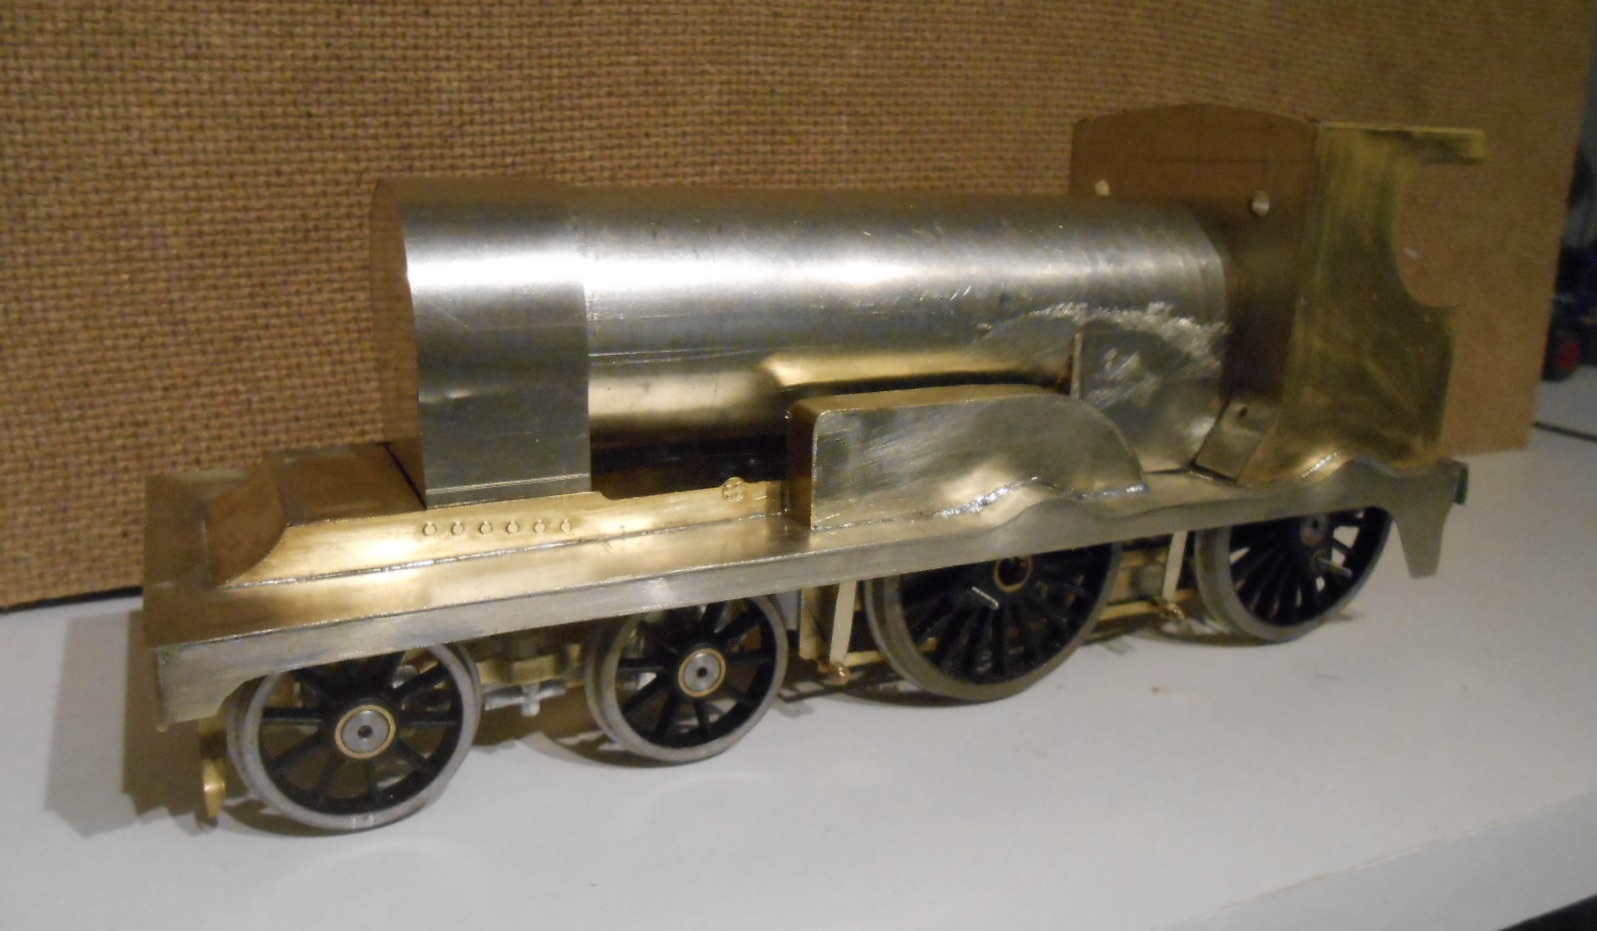
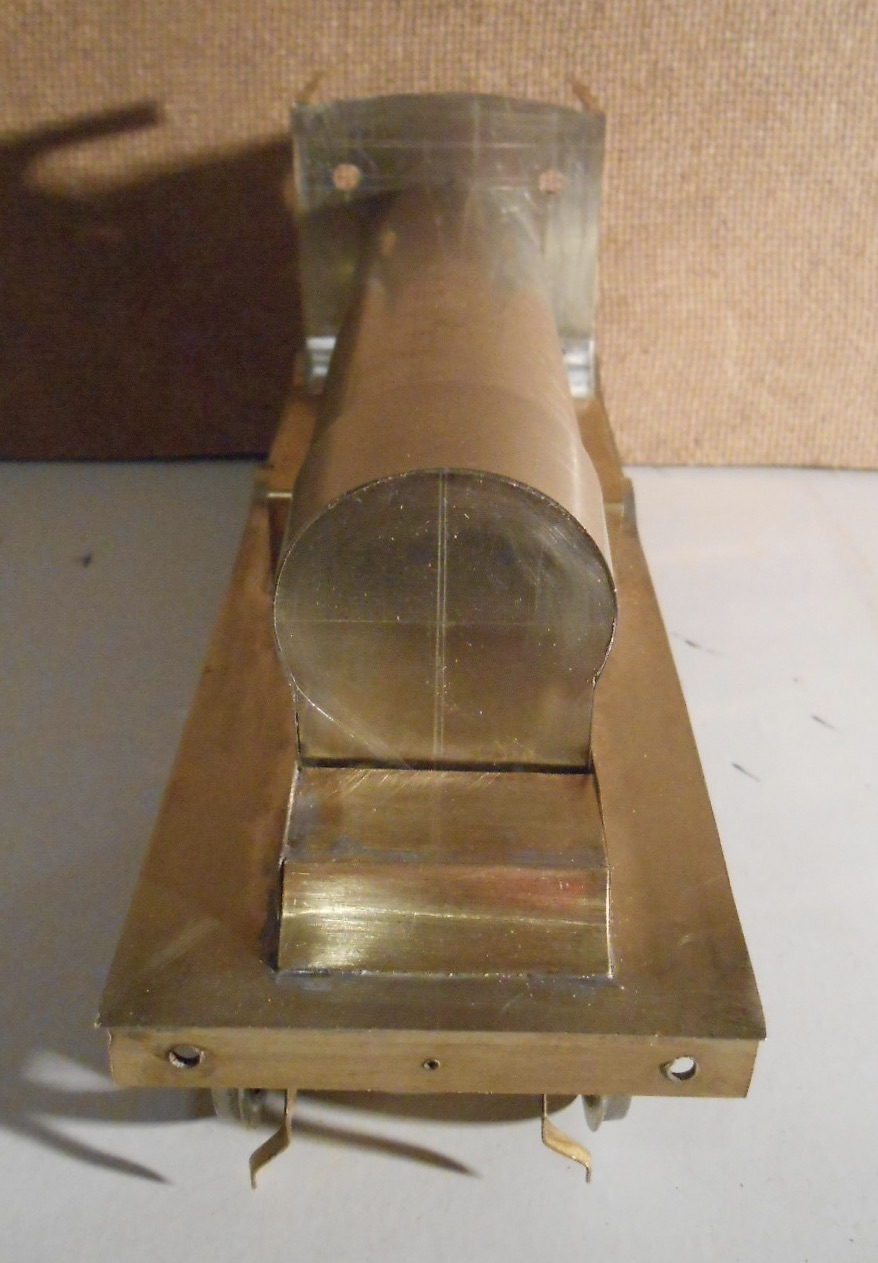
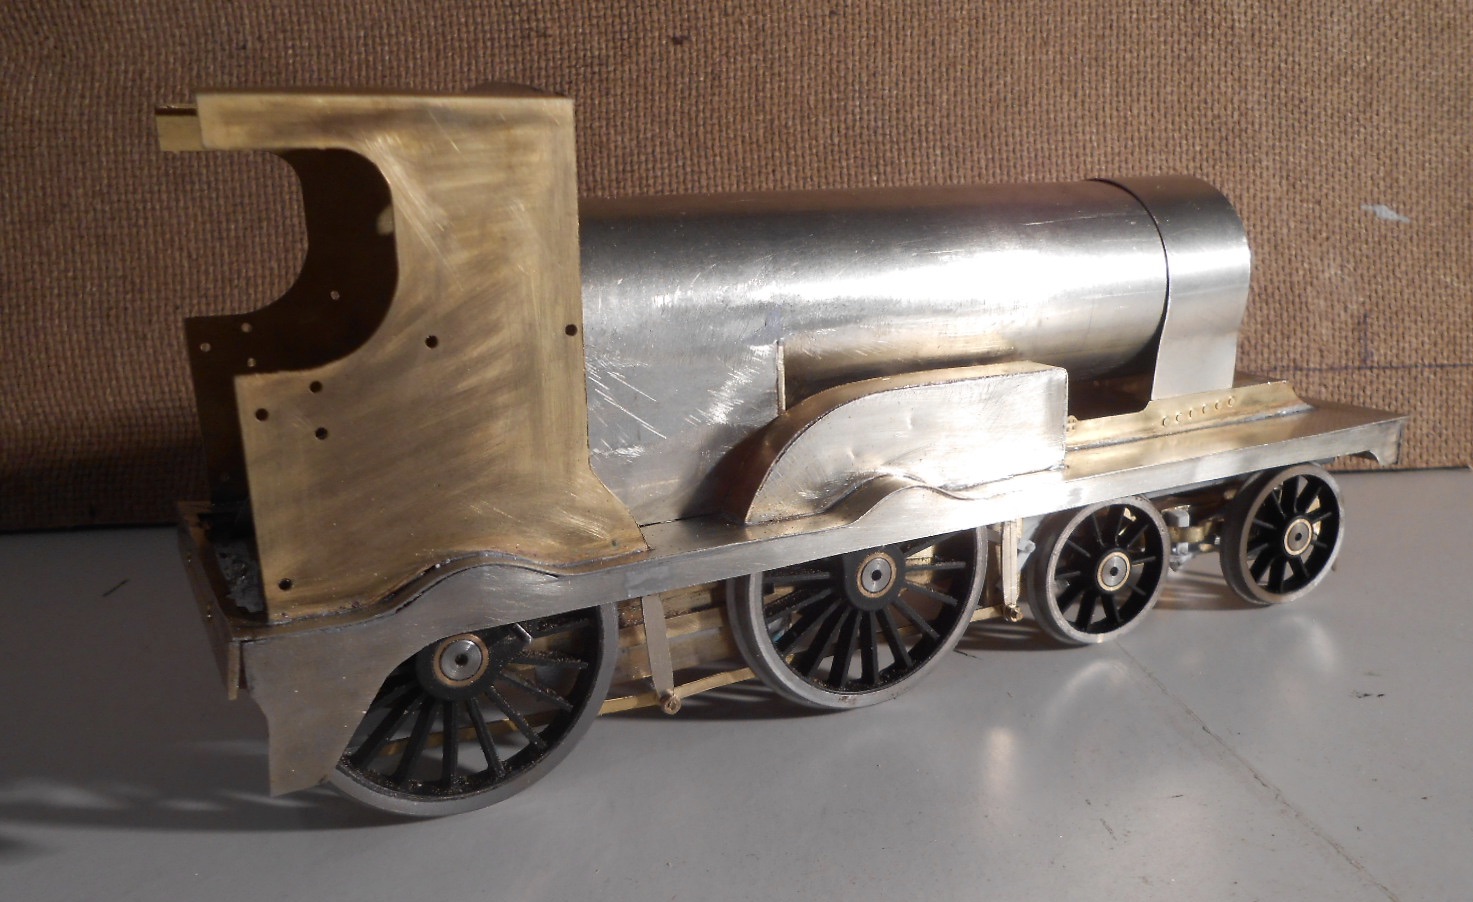
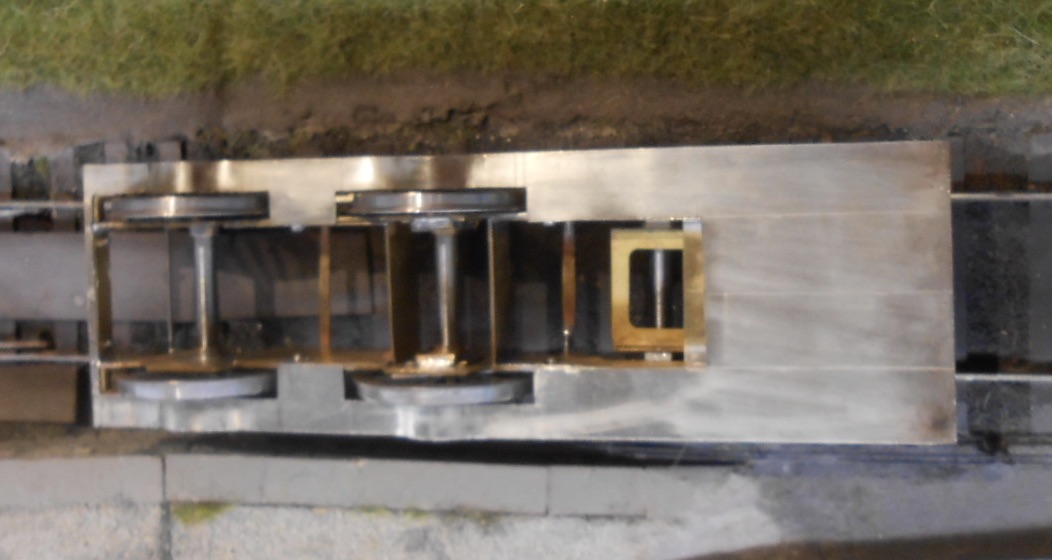
The last week has been spent making the boiler/smokebox/firebox combination and [just as important] trying to make sure this unit will sit properly on the locomotive. First up, it was time to acquaint myself with my model railway club's rolling bars. They are from GW Models and like their rivet punch are an extremely robust construction of mild steel. Picked them up from our club president, a lovely 90 year old man, still an active modeller who knows more about how steam locomotives work than most. Got some useful advice from him, plus there are a couple of pages in Geoff Holt's books too. Basically, there are Allen key headed screws at each end of the rollers and it is simply a case of feeding in your piece of flat sheet and then wind the handle. The more you tighten the screws, the tighter the radius produced, so with light pressure you can easily roll coach or van roofs, but crank things up and you soon get a tube. I had problems getting the sheet to curve properly either side of the seam, but it wasn't too difficult tweaking things later. I used 15thou nickel silver for the boiler. The other key pieces are the formers, which I cut and filed from 18thou. There is one circular piece for the front of the boiler, with a second profiled to the shape of the firebox, to go at the other end. I had to cut a slot, a scale 4'3 from the back of the boiler [and half way up the side], so I could then straighten the nickel silver to the shape of the firebox. I piece of brass strip then fills the slot to make the firebox front. The third former was shaped to the profile of the smokebox and a 10thou strip of nickel silver rolled and formed to go over the end of the boiler. So far, so good? Well, no... Trying the assembly on the footplate showed the firebox was too wide to fit between the splashers and somehow, I'd created a 'flat' on the smokebox front. Rude words? You bet! Ended up spending an hour or so measuring everything & discovered that I'd made the boiler diameter too big - only a scale two inches, but enough to throw the whole thing out, so the was no option but to make another boiler and smokebox, along with filing a bit off the splashers. The boiler is currently fixed to the cab front with a 10ba nut and bolt; I'm considering bolting the base of the smokebox to the footplate, in the hope of making painting [and especially lining], easier. Earlier in this little saga, managed to roll the first boiler the wrong way [despite studying and marking everything carefully [more rude words] and came pretty damn close to doing it with the mark two version as well, but consulted the missus [who can work such things out far better than me], thereby saving a possible meltdown.! Fingers crossed, the basic shape of the loco is complete, so what follows is all about the detailing. Plenty of challenges ahead mind, not least signature items like chimney, dome and buffers - commercial items of which I have thus far been unable to source. If I had a lathe [and more importantly, knew how to use it], then it would be less of a problem. We do have one at the club, but Kent and Medway are a proverbial plague pit at the moment, so can't see me getting down there any time soon. Still, there are plenty of other things to look at, so the next job will be making a list of what needs doing. Plus there is also the tender of course. Thank goodness for model railways in these challenging times!

-
Fine work indeed.
-
Remarkable what keeps turning up.
-
So much better than tension locks!
-
Living as I do in Kent, find it extraordinary that trucking firms are happy to drive across England and Wales, rather than ferry goods straight to Ireland. It's the same for stuff that goes to the north of England and Scotland, rather than use ports up there. The result is that Kent is braced to become a lorry park from January, with even schools told to expect disruption because of traffic problems. Yet we have a rail tunnel and container trains could significantly reduce long distance lorry trips everywhere. So while it would be great for the local economy of Rosslare - and a post Brexit container port may well be essential if lorry freight through England and Wales becomes less practical - surely the sensible approach would be to plan for more rail based container traffic? But then, when has politics ever been sensible?! Nevertheless, the prospect of a boom in loco hauled freight is certainly attractive to most of us ferro-equinologists, methinks!
-
Great to see the latest progress!
-
My 7mm G has a wheelbase of 8'6 Angus. Built from the Worsley etches, though adapted them to make mine one of the early versions. Reported the build on my workshop thread a couple of years ago.
-
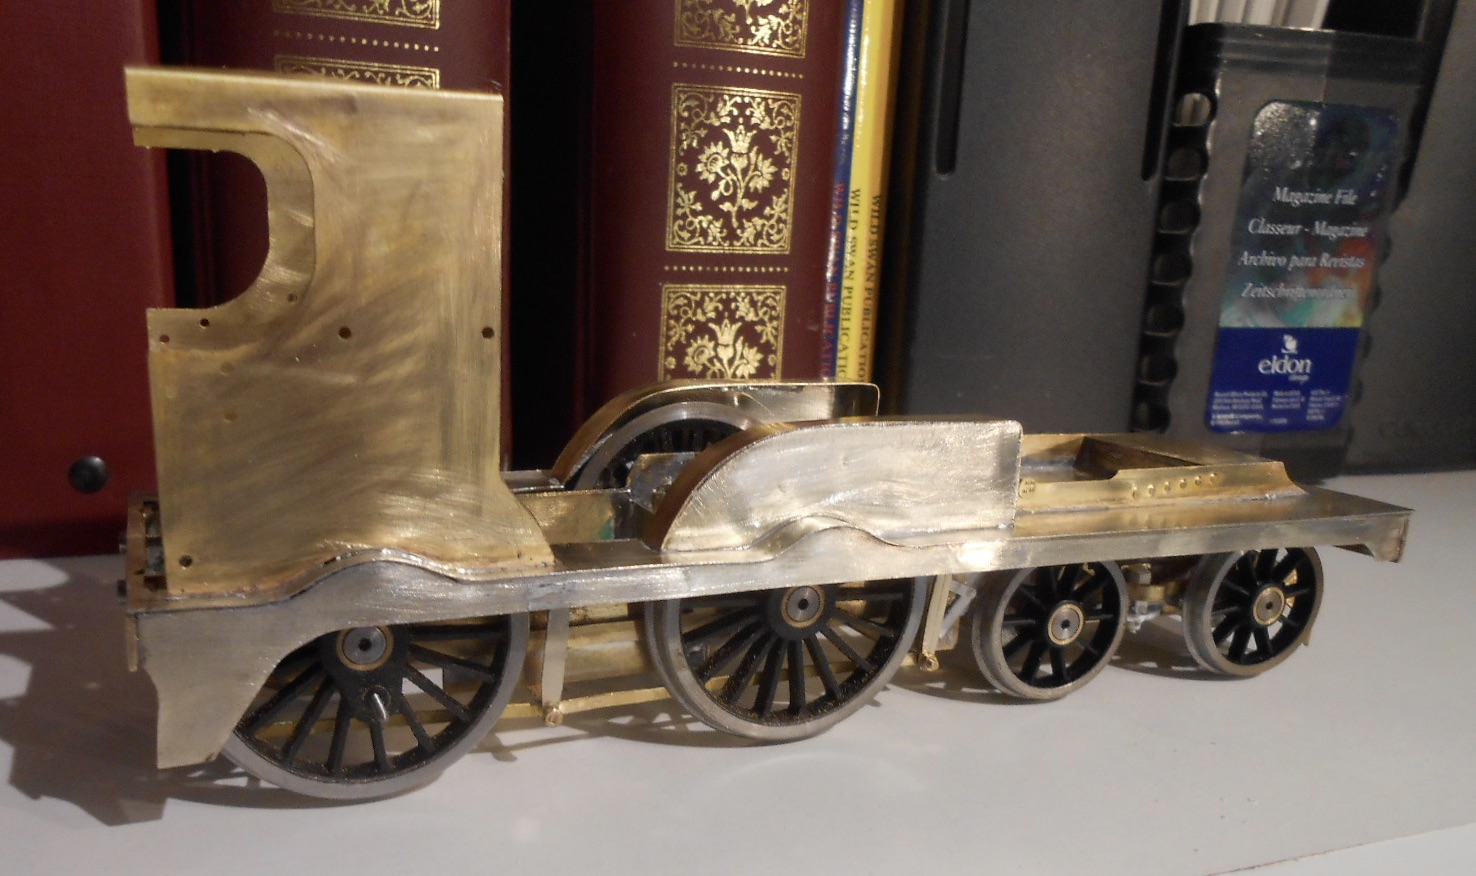
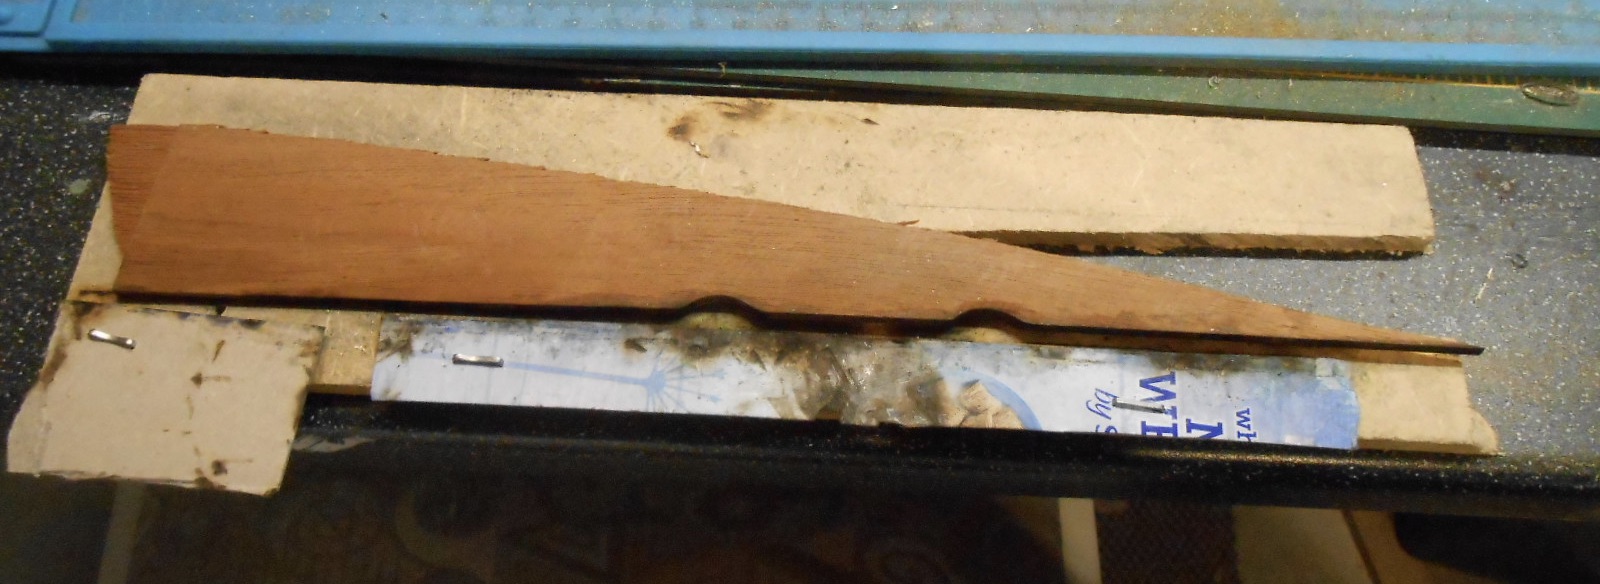
More progress, less swearing! The next step was the splashers over the front drivers. A case of more cutting and filing for the two sides, [18thou NS], with 10 thou brass for the tops. The latter is easily cut with a pair of strong scissors with little distortion - much better than using a fret saw. As with the coupling rod splashers on the footplate, I made a simple jig from a piece of hardwood to support the top while soldering on the sides. Used 240 degree solder for this, so that my general purpose 145 solder could be used to solder the finished articles to the footplate. Once again, am grateful to Roger for some more Alphagraphix bits and pieces - in this case to 'top' frames [above the footplate] and the cab sides. Unfortunately, the latter were both for the same side, so the etched bend line which acts as the roof support had to be bent the other way on one of them. As have said before, it would be interesting to know how far Roger got before deciding not to progress with a kit for the D16. The cab sides also needed a bit of fettling, as there were no cut outs on the bottom to fit over the coupling rod splashers, though it didn't take too long to file these to shape. The etched holes for the various handrails look way too big for the usual 0.8mm wire used for these things in 7mm scale, but have decided it was easier to use them as is, with some filler later, rather than cut two new sides. Time will tell... The fiddly bit has been the cab front. I soldered the sides in place, then did some more careful measuring in order to cut out a piece of 18thou nickel silver. This was made harder because the front curves outwards to make part of the splasher over the rear pair of drivers. All in all pretty awkward & am wondering if I should have used thinner sheet metal as forming these curves hasn't gone too well, so will be needing some more filler. Also needed to mark where the exact centre of the boiler will be, so I can use a bolt to align the latter accurately, with the same idea at the smokebox end. The cab spectacle windows are only partially drilled out at the moment , while I need to buy some brass tube of the right diameter to make the surround. Speaking of tubes, the next step will be the boiler. The Chatham Club has a set of rolling bars, so hope to pick those up tomorrow.
-
May have been 16 years in the making, but worth the wait, for sure.
-
One of my previous layouts was based on a fictional roadside tramway, so built one of the Connoisseur GER tram engine kits which also came with a set of 'Toby' nameplates. Couldn't resist fitting them and even bought the book, so I could draw Toby's face on two squares of card. Stuck them on with bluetak, in case I offended the purists, but needn't have worried, Tony proved a real hit at exhibitions and not just with the children.
-
Now come on Noel, surely Thomas is an 0-6-0T!
-
Thanks Ken. Know what you mean - am going to have to either file a slot in the plate, or thin down the coupling. There's always a compromise somewhere, it seems.
-
Impressive scene.
- 486 replies
-
- 1
-

-
- ballyercall
- layout
- (and 1 more)
-
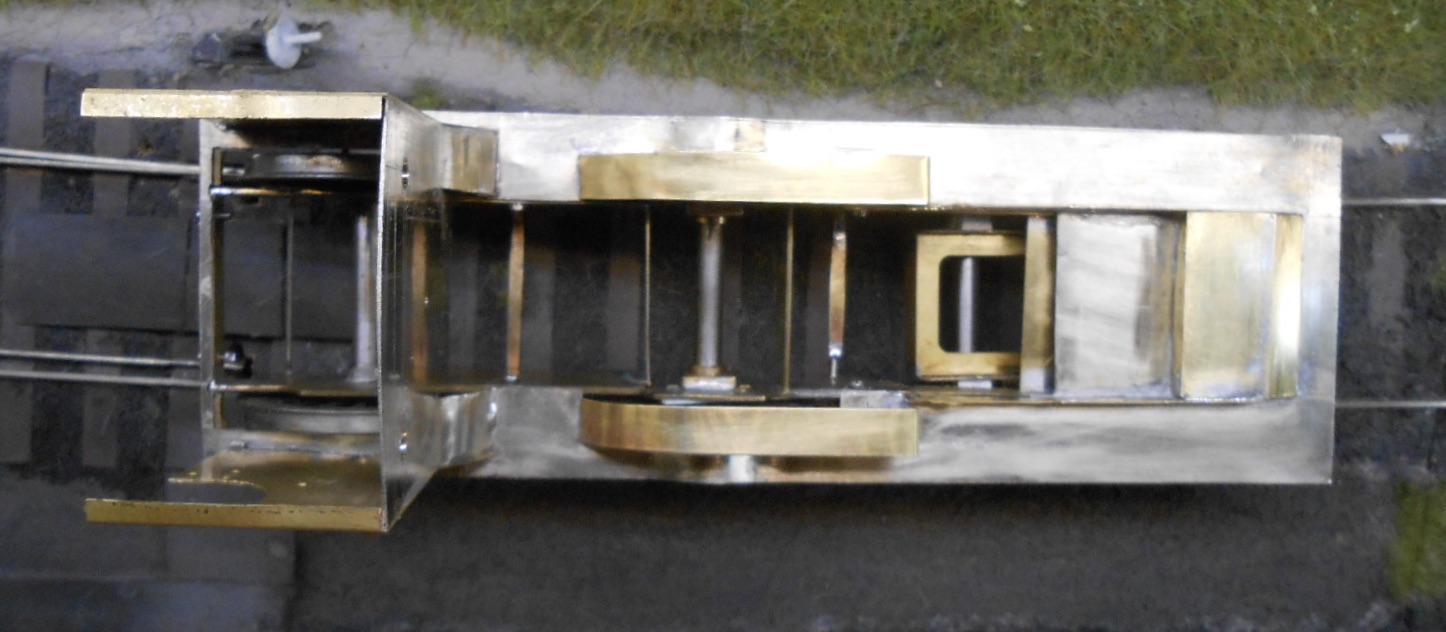
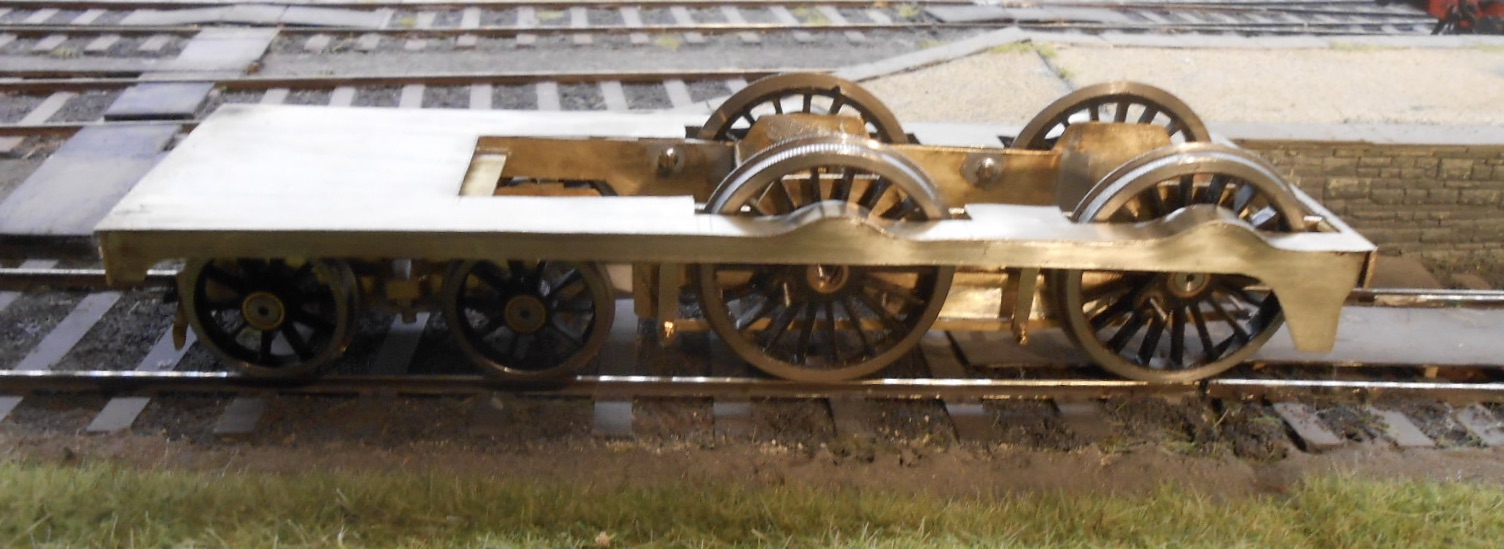
[Lots] of rude words Thought the footplate and valences would be a challenge and I was right, though I didn't really help myself. Never mind 'measure twice, cut once', the moral is really just 'measure, measure, measure... Started by soldering two strips of nickel silver together for the valences, after which came the laborious task of marking and then cutting out with a fine bladed fret saw, followed by carefully filing to shape. The footplate was done the same way, but to follow the curves of the valances, it needed a lot of trial and error to work out the dimensions and I eventually resorted to a piece of thread. The footplate is 10thou nickel silver, the valances are 18thou. So far, so good and the initial soldering went ok too. Taking a tip from Geoff Holt's book, I made a template/jig of the valance curves from a thin piece of hardwood, then clamped this to a piece of MDF and the workbench. A strip of cereal packet card was stapled on as well, so as to ensure the footplate has a small overhang. Indeed, it was all going far too well, but when I tried the footplate against the chassis, it became clear that all was not as it should be. The cut outs on the footplate top needed a fair bit of adjustment, while I also discovered that the spacers on the frames weren't consistent in their width. Hence a profusion of bad language followed by having to dismantle parts of the chassis and file everything down to the correct dimensions. Geoff Holt has a novel way of joining the chassis to the loco body, which involves the front of the former fitting into a slot behind the buffer beam, then the rear of the chassis is bolted to the drag beam with two 10BA bolts. This avoids using nuts and bolts under the footplate, but required a bit of thought, not least to ensure that everything lines up properly before drilling the bolt holes. Needless to say, what I now have is the mark two version. On top of all this, I also discovered that cutting the front frames to the prototypical shape meant the bogie wouldn't sit properly, so have hard to carve a chunk off them. Fingers crossed, am hoping I've now got these issues solved and can now move on to things like splashers and foot steps while I psyche myself for the boiler and smokebox.
-
Who Are The Box-Shifters And Why Are They So Bad?
David Holman replied to DJ Dangerous's topic in General Chat
Wouldn't be without Eileen's Emporium for basic materials. My last order of sheet metal, nuts and bolts, wire and so on couldn't be got locally (at least not from a single supplier), even without lockdown. The service is excellent and they are good value too. -
Vans nominally easier than opens, because no interior detail required. You just have to be careful with how ends and sides mate up. The main issue is if the casting is too thick (because too much resin was poured into the mould), so best to avoid overflowing or a meniscus, or you end up having to do a lot of filing. One option is to mitre the corners, but I've found that just filing down the outer edges of the ends (to make a simple rebate) works well enough. Vans with lots of strapping give extra thickness to the ends to make this work. Also, have found that thicker, slower setting cyano is better for assembly - quicker than 5 minute expoxy, so less time sitting holding the pieces while it sets!
-
IRRS Online Film show 22/1/20 on You Tube
David Holman replied to Georgeconna's topic in General Chat
Wonderful! -
Inadvertently made the frames a bit tight - thought that a scale 4'3 would leave plenty of leeway, but had to file the fixed bearings down to only 1mm. Geoff Holts books crank the frames inwards at the buffer beam ends, but with 6' radius points on Belmullet am fairly confident things should be ok.
-
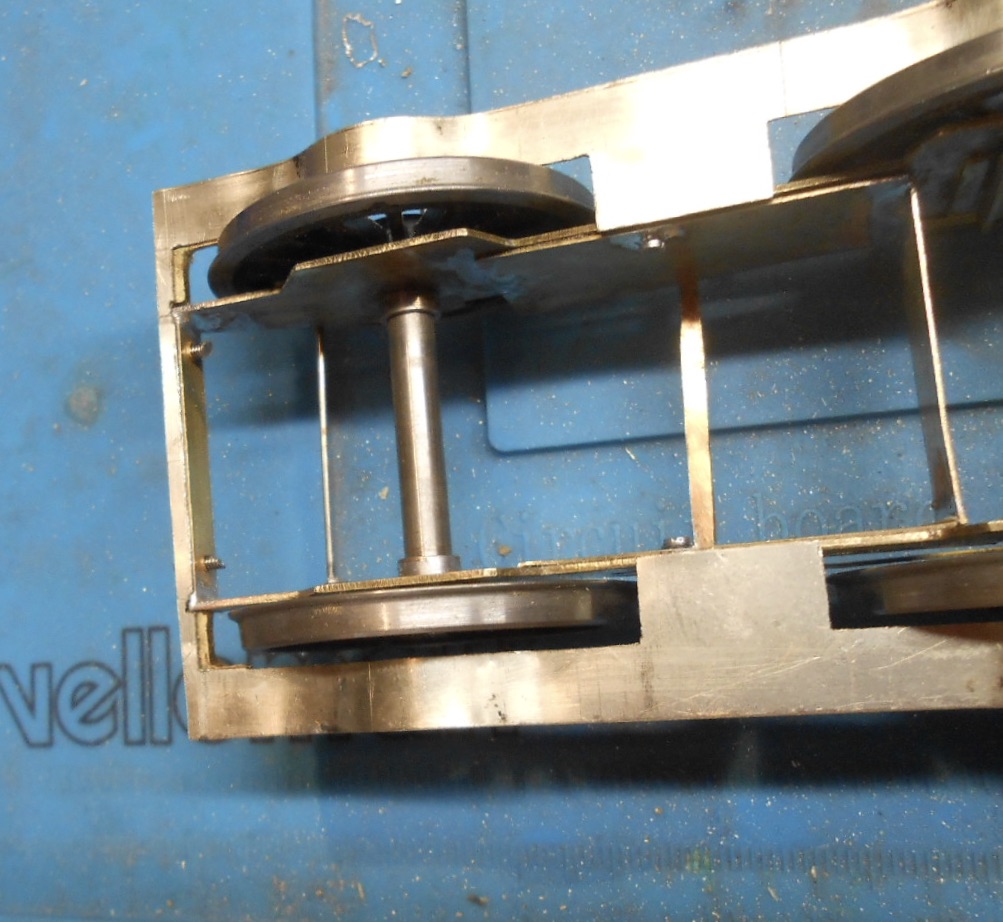
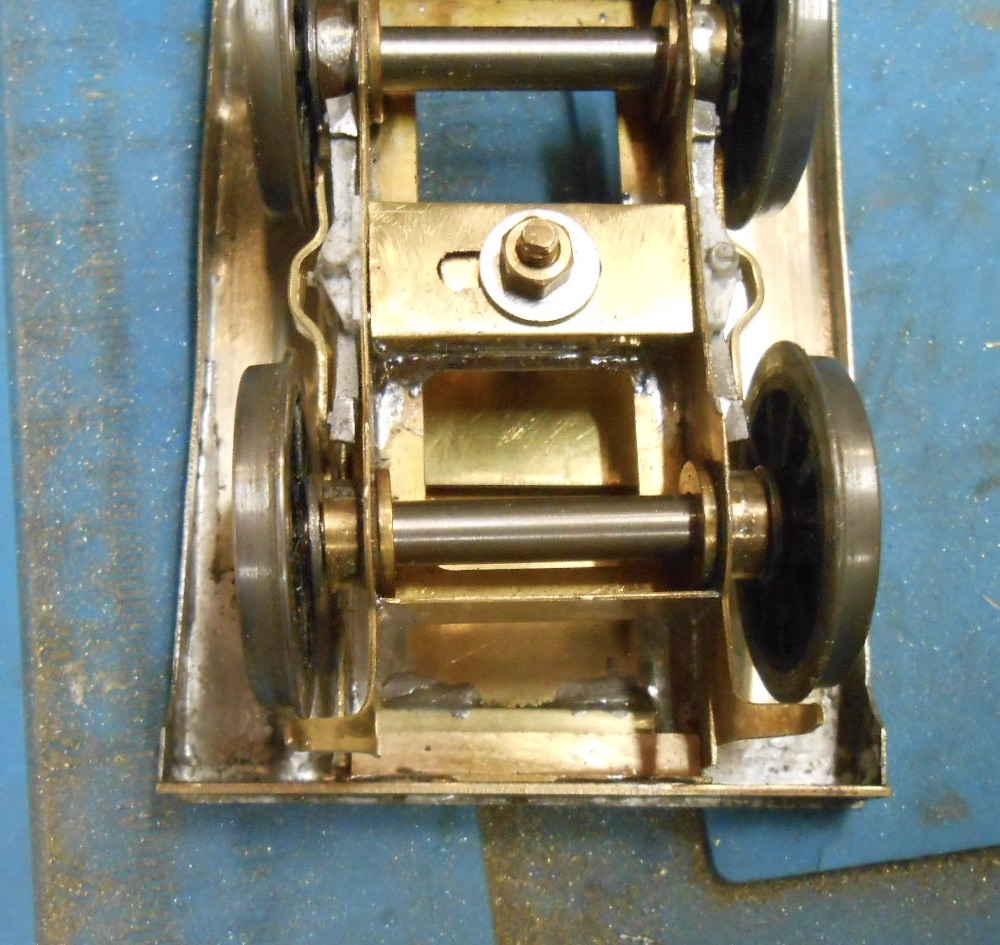
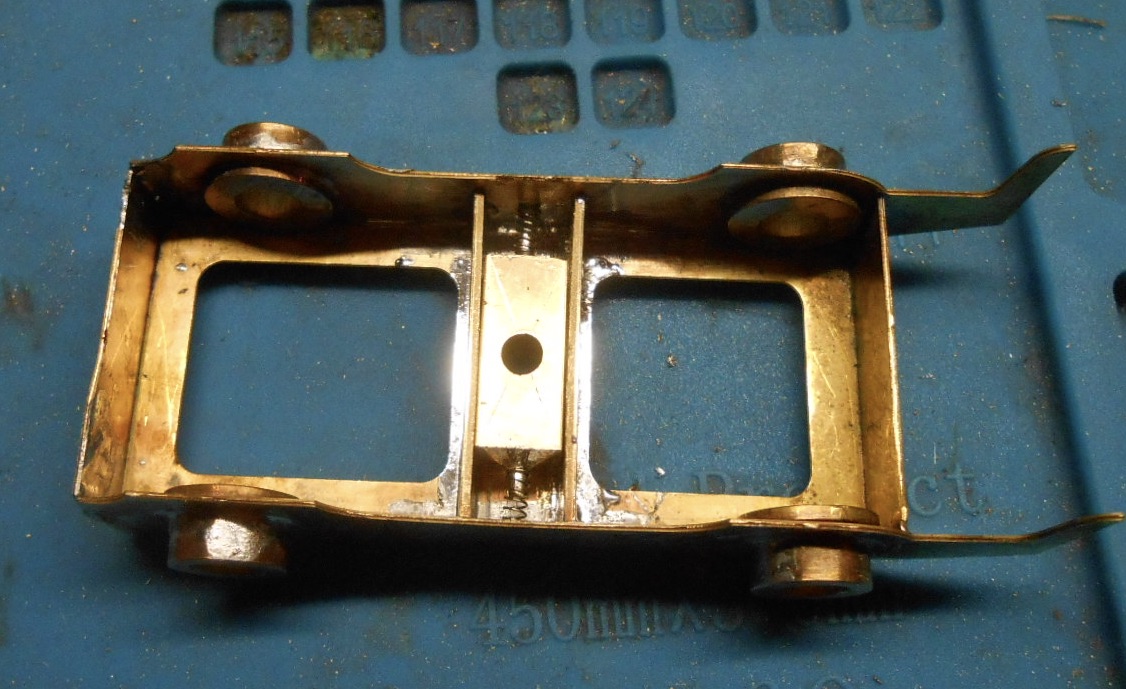
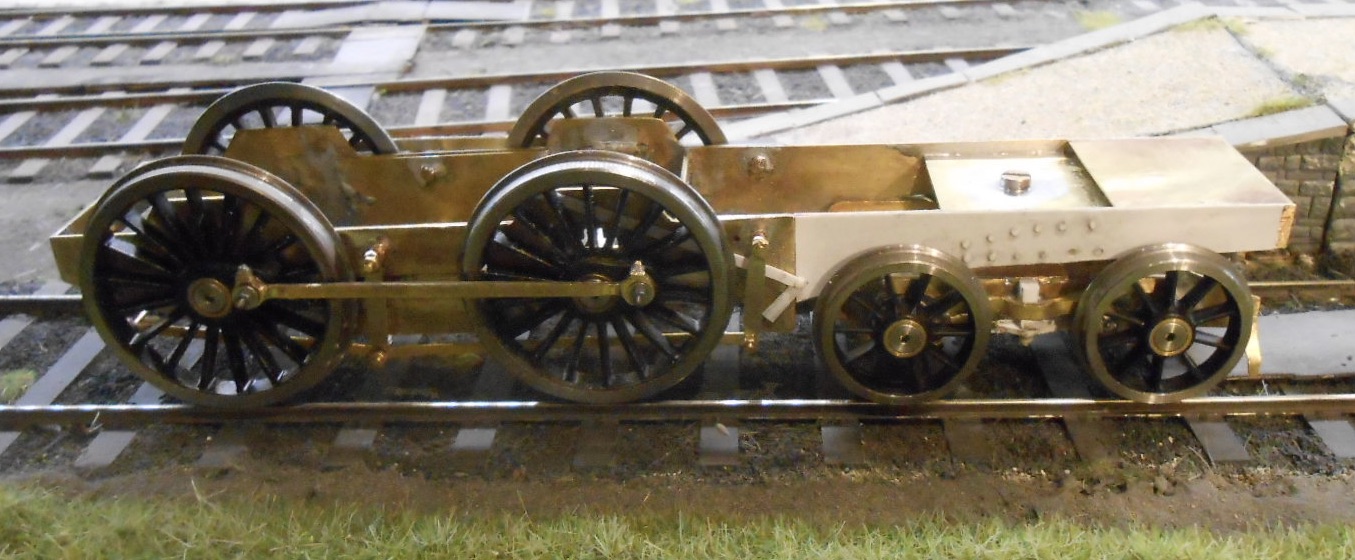
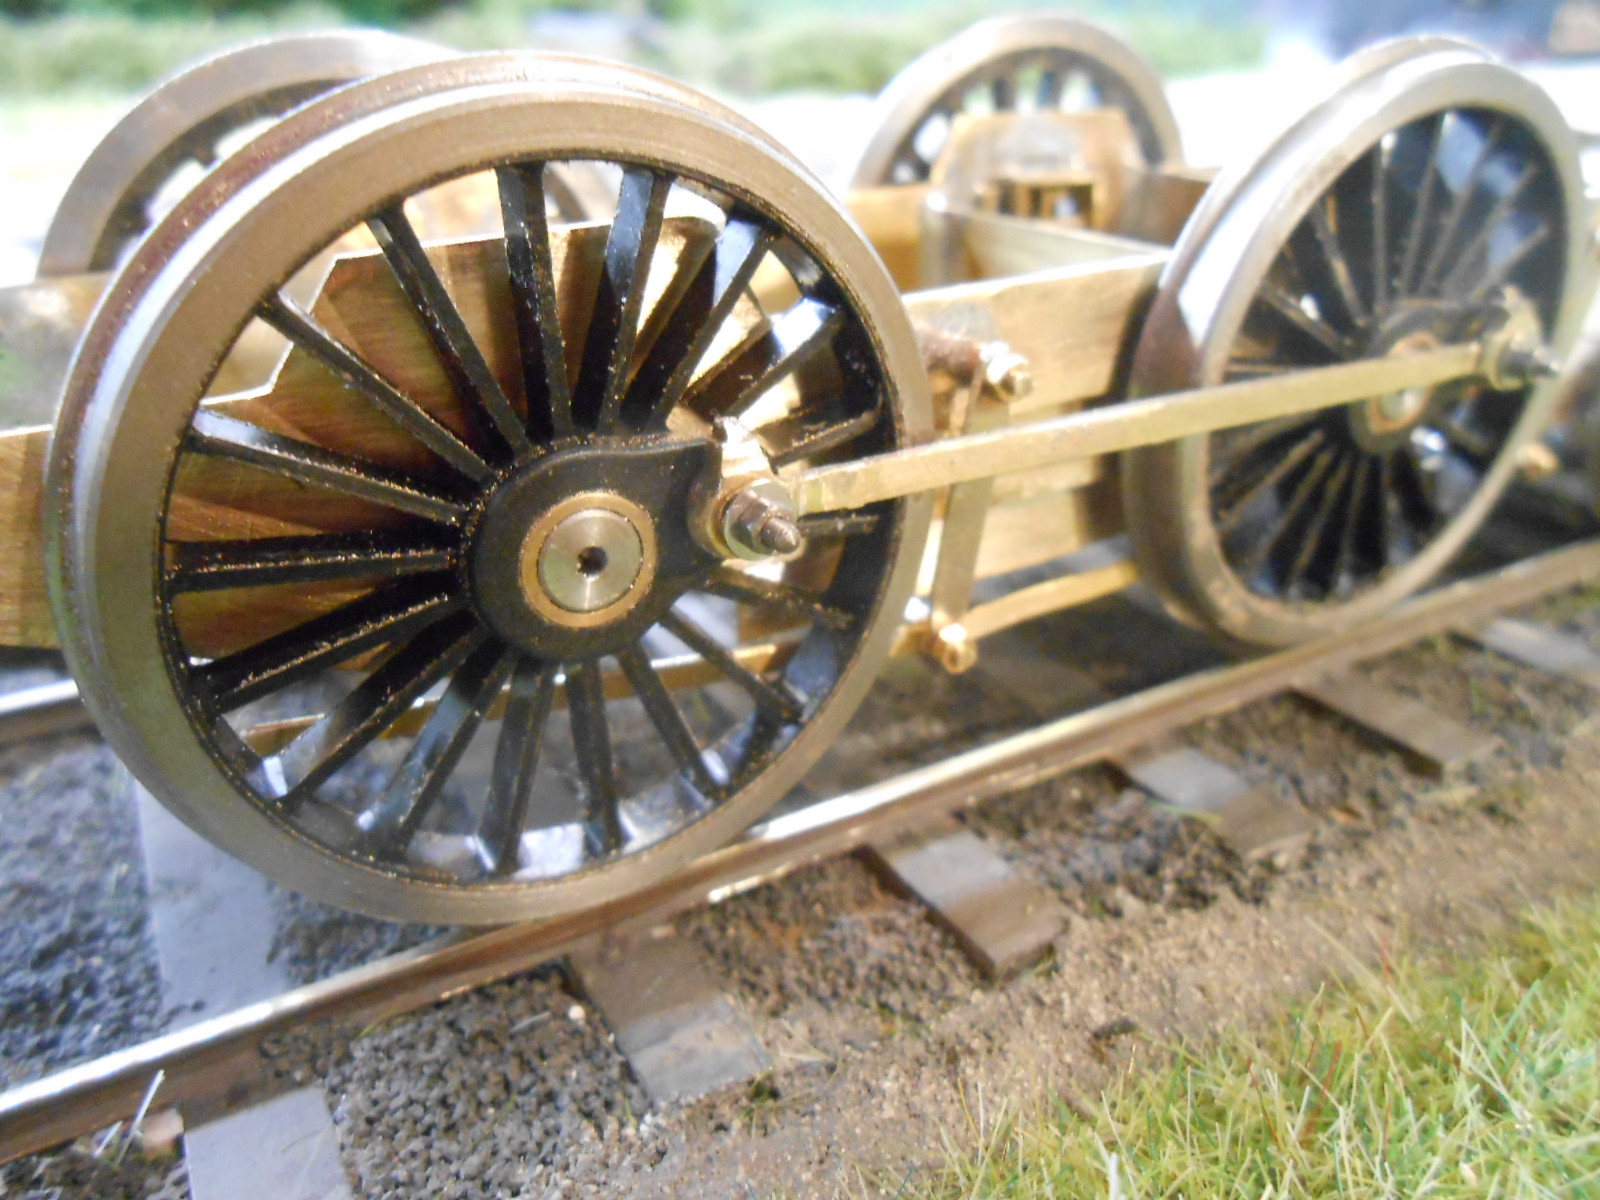
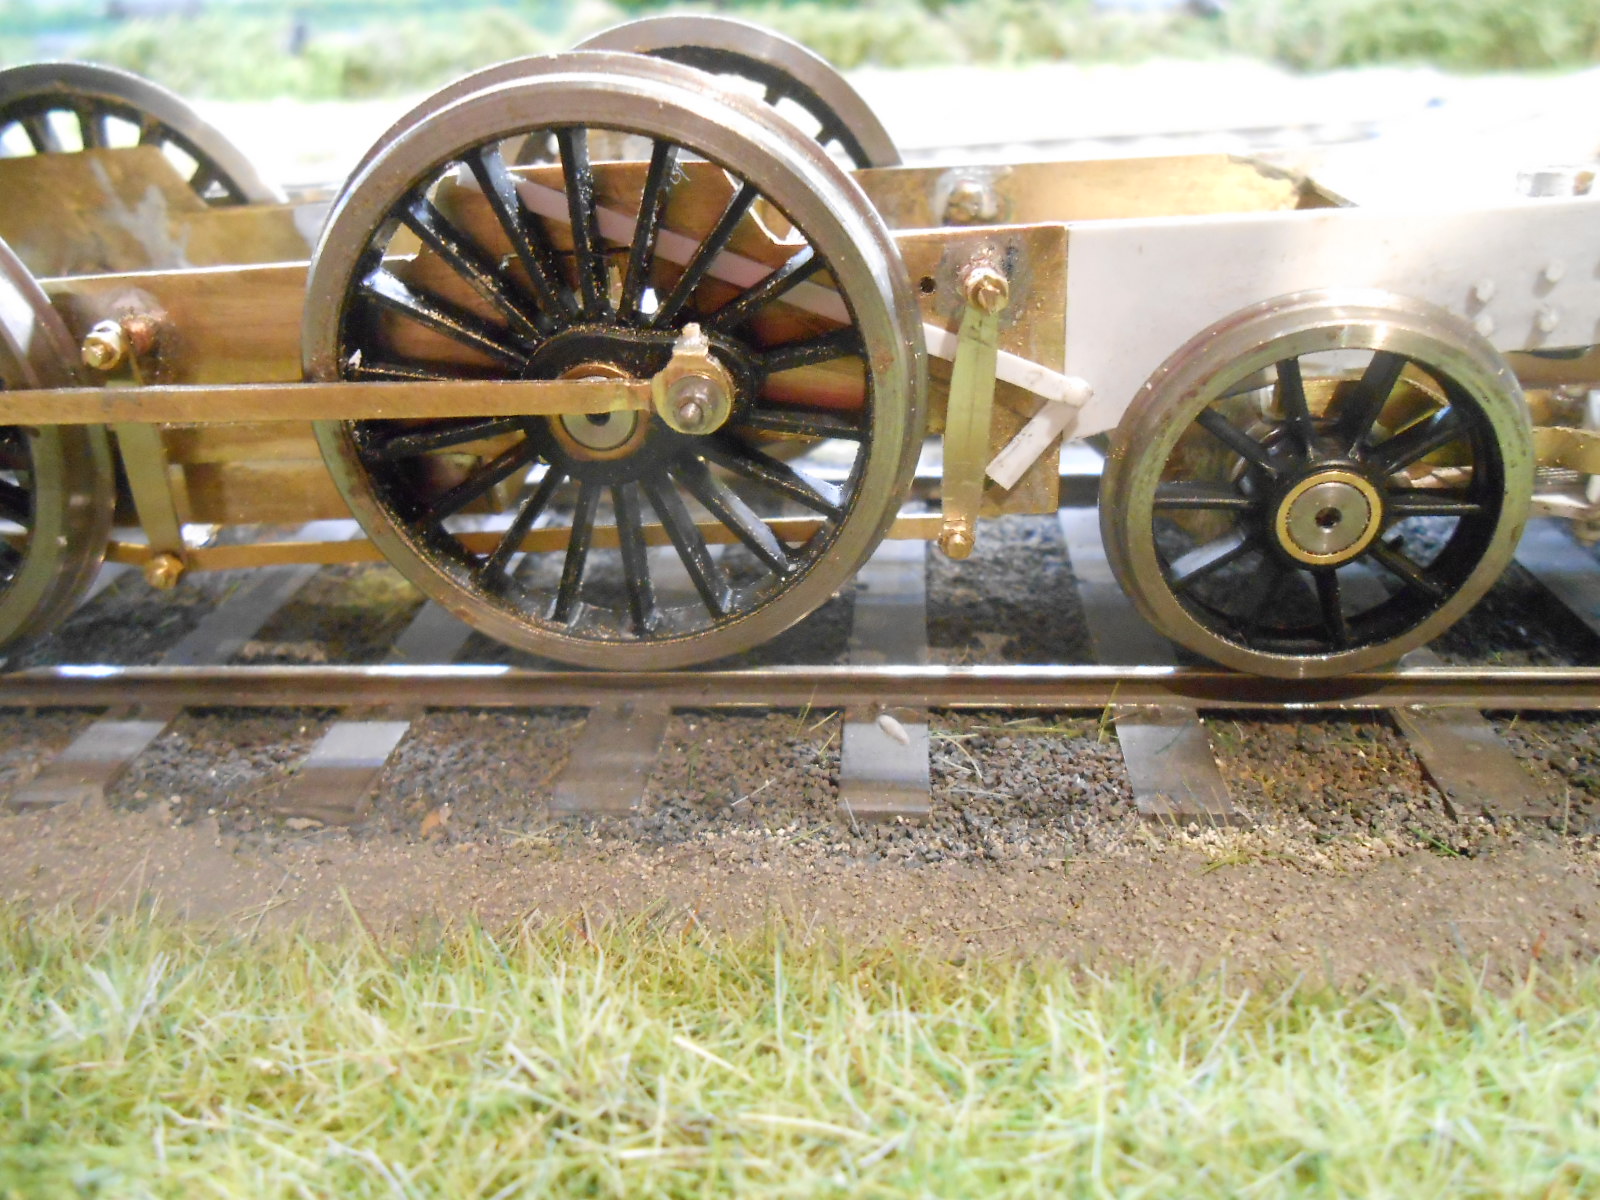
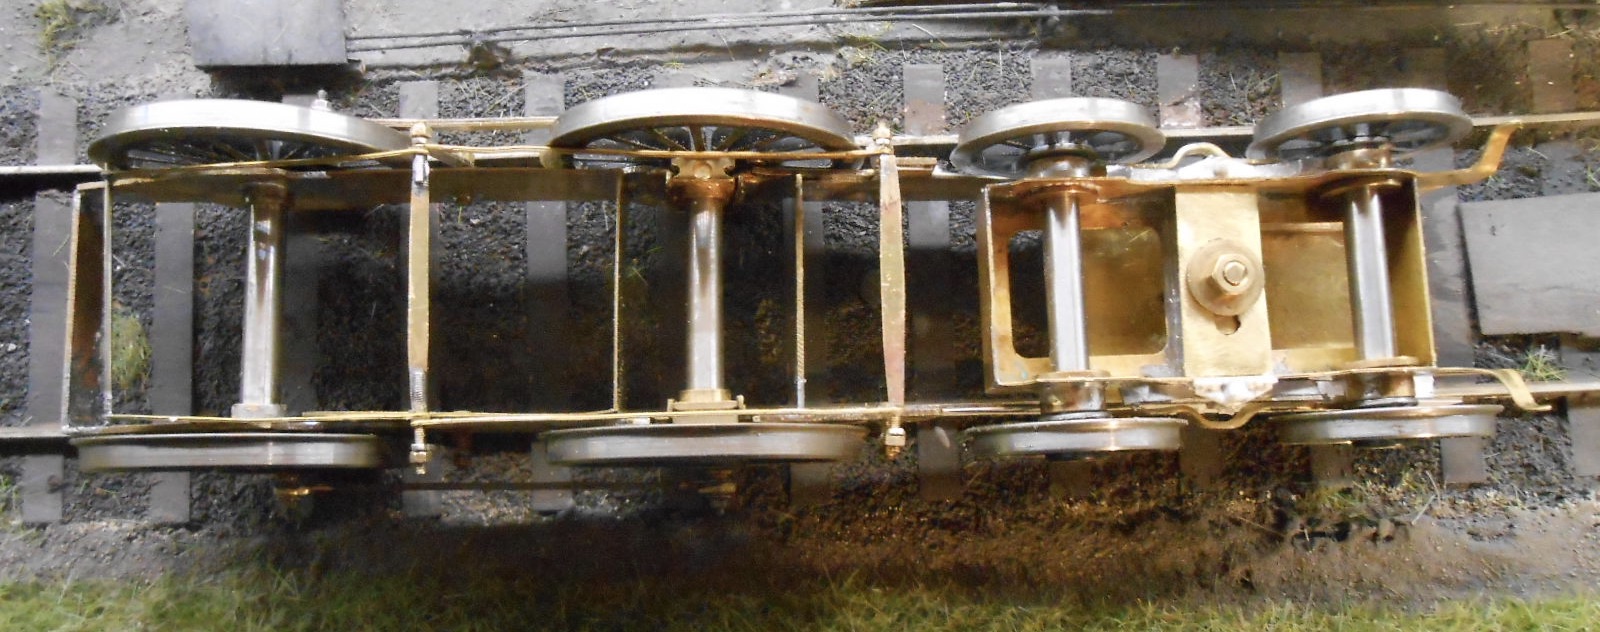
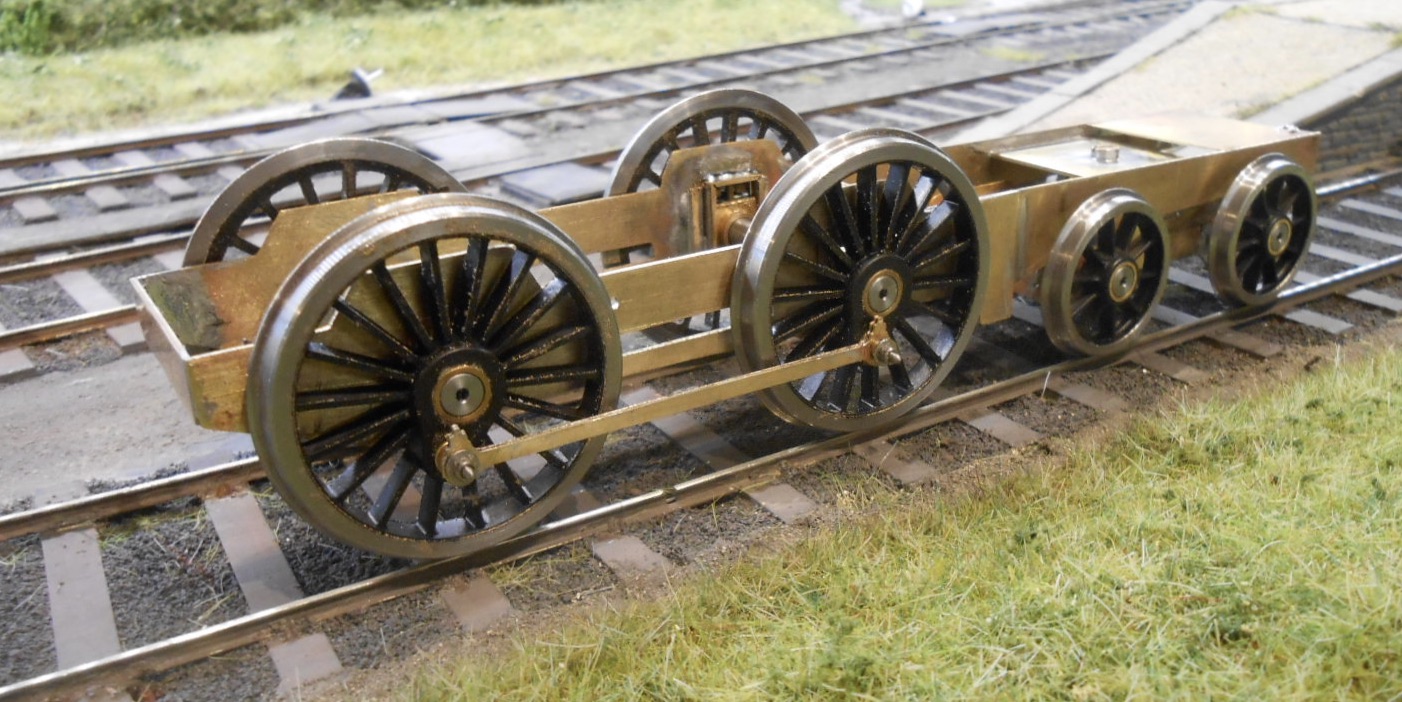
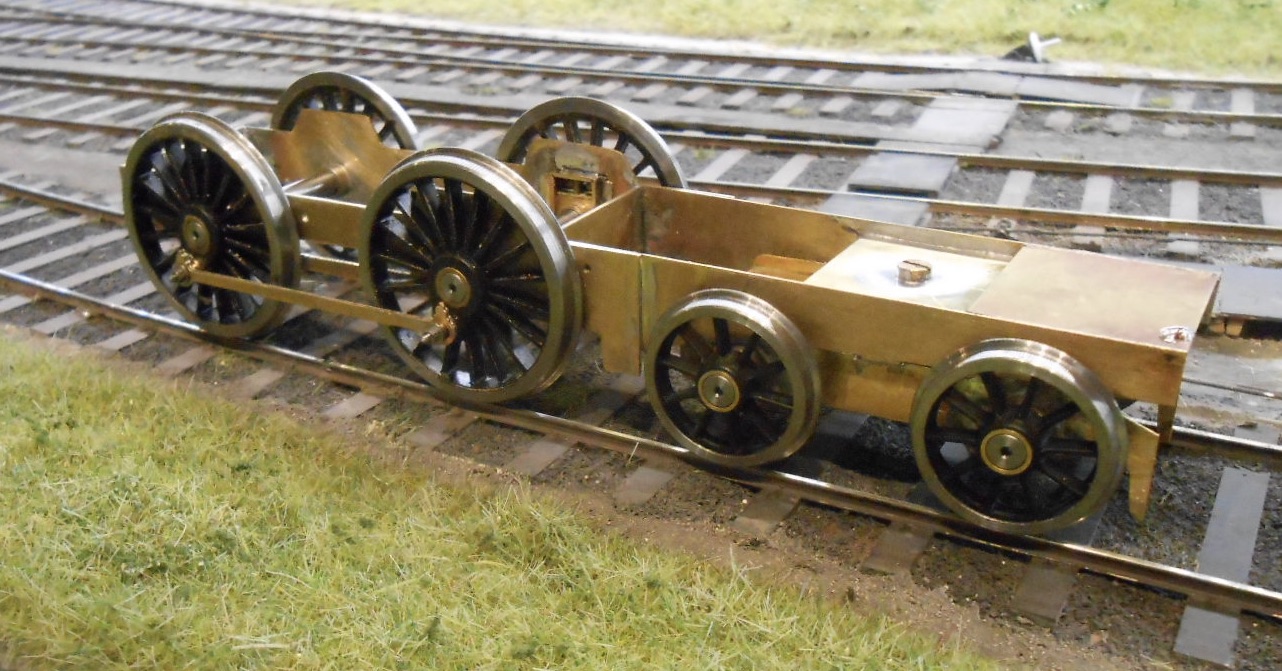
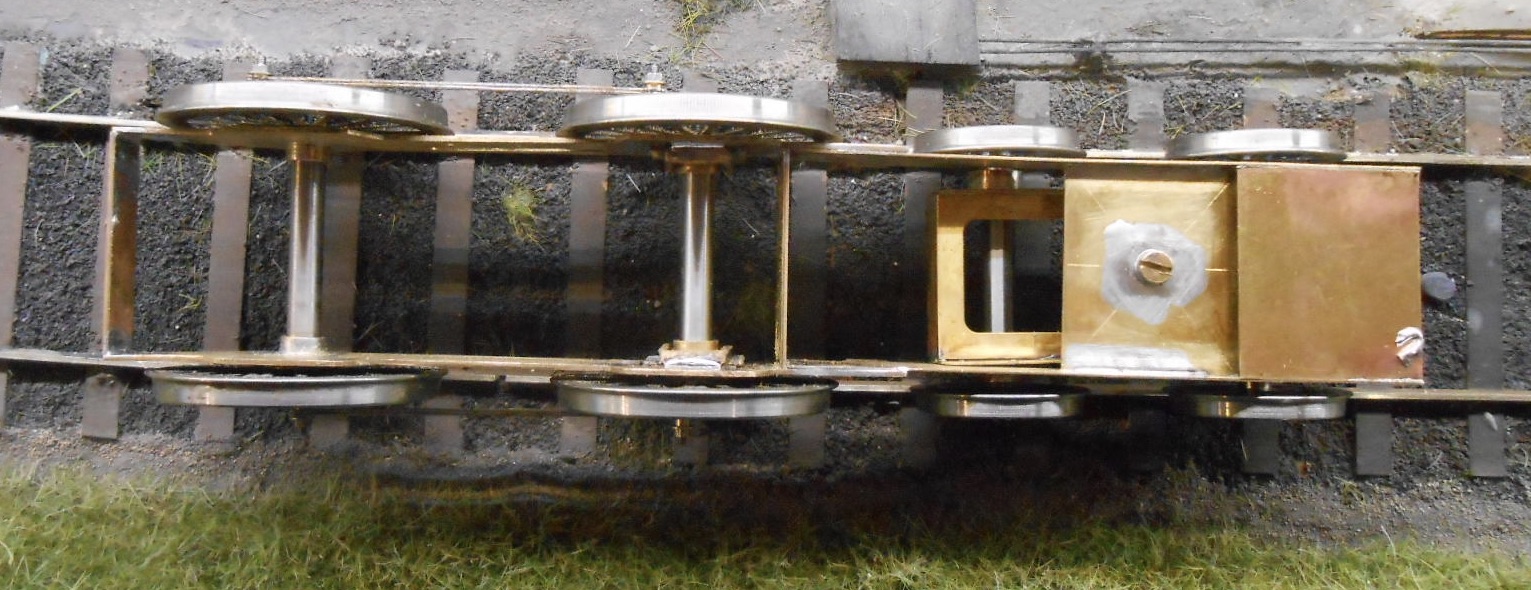
Chassis complete [ish] Awaiting the motor and gearbox, but the loco chassis is reasonably complete. Latest work has focussed on the following areas: Bogie - made an equalised unit similar to the ones on my Sligo tanks. A block of 6mm square brass was drilled through the middle to slot on to the 6BA bolt which acts as the pivot. The brass block then had 1.2mm holes drilled in each end to take short pieces of brass wire, over which are slipped two small coil springs [same as the ones used on the hornblocks]. The brass block is then encased in the centre of the bogie by a bottom plate with a slot in it, same as the top plate. A large spring, the same as used for couplings, gos over the 6BA bolt and then a nut and two washers hold the whole thing in place under the frames. Turning the nut adjusts the height of the ride against the drivers. The splendid photo of Wolf Dog in Rails to Achill shows some nice detail on the bogie - essentially the springs and equalising beams. These are dummy on the model, but were made from a mixture of brass strip and plastic, glued in place, with white metal springs chopped out of some wagon W-irons. Brakes - had to make up four brake hangers from brass sheet and these were drilled each end to slide on to 12BA bolts. The top bolts are soldered into the frames, while the bottom ones are soldered on to spacers made from more flat sheet. Using bolts mean I can eventually fit the brakes in place with 12BA nuts. The actual brake blocks will be glued in place later and be cut from plastic sheet, which will reduce the risk of any shorting. Was pleased to find that on the frets that Roger gave me were the four brake rods - a real bonus as cutting these from sheet would have been a right pain! Coupling rod bosses - the etched rods looked a bit light weight, so I soldered squares of 28 thou brass to each end, filed them to shape and then drilled through for the bearings again, so they now look much more substantial, as per the real thing. Behind the front brakes on one side is what appears to the the regulator rod, so made this from some plastic strip. It goes behind the front driver and space is tight here, so again plastic was important to avoid any shorting. Finally, made up an overlay of 10 thou plastic sheet to go on the frames above the bogie. Another piece of insulation, this time with some large rivets [made from 1mm rod] welded on, though I see in the photo that one of them has gone walkabout! So, decent progress. However the next step is probably the biggest challenge as it involves making the valences and running plate. It would be so much easier if the latter was straight and flat, but it's not, so will have to go very carefully.
-
They ain't pretty, but they make fine models!
-
Scratchbuilding panelled coaches in brass will be a bit of a nightmare and even flush sided ones will require a huge amount of cutting out, so much easier to do in plastic, though etched brass kits do much of the hard work. In 7mm scale, I've built at least 20 coaches, both bogie and six wheelers, panelled and flush, etched kits and scratchbuilt in plastic. At shows (remember those?), I occasionally ask people to spot the difference and the fact is that from normal viewing distances, you can't tell once models are painted. Thus far, haven't had any issues with warping and some models go back over 20 years. As others have said, more a case of choosing what you are comfortable with, but the late, great David Jenkinson always made his coaches from plastic sheet and he built hundreds, in both 7mm and 10mm scale, which is good enough for me.
-
Used Templot 'Irish EM' points plans at 3' radius. Actually 20.2mm, so blew them up to 21mm on the copier. The b2b on Fintonagh is 19mm, with not a lot of leeway before problems start. Make my own axles from 2mm brass wire as I use Kadees and didn't want the uncoupling magnets grabbing steel ones. The Branchlines bogie coaches are probably the main limit to minimum radius, but can go round tighter curves of the pivot points are moved in a bit.
-
Had mine (a basic roller gauge) made by a friend at the Chatham club, but had it done for Code 83 fb rail, which Peco sell. Might be worth considering this route as CVR track was fairly lightweight and it's no more trouble to make than code 100. The Ragstone kit goes together nicely, likewise the coaches, even though the design must be over 30 years old now. Great to see someone else doing 7mms scale, 21mms gauge, so will look forward to seeing how things progress.
-
Love seeing how these conversions come together.
-
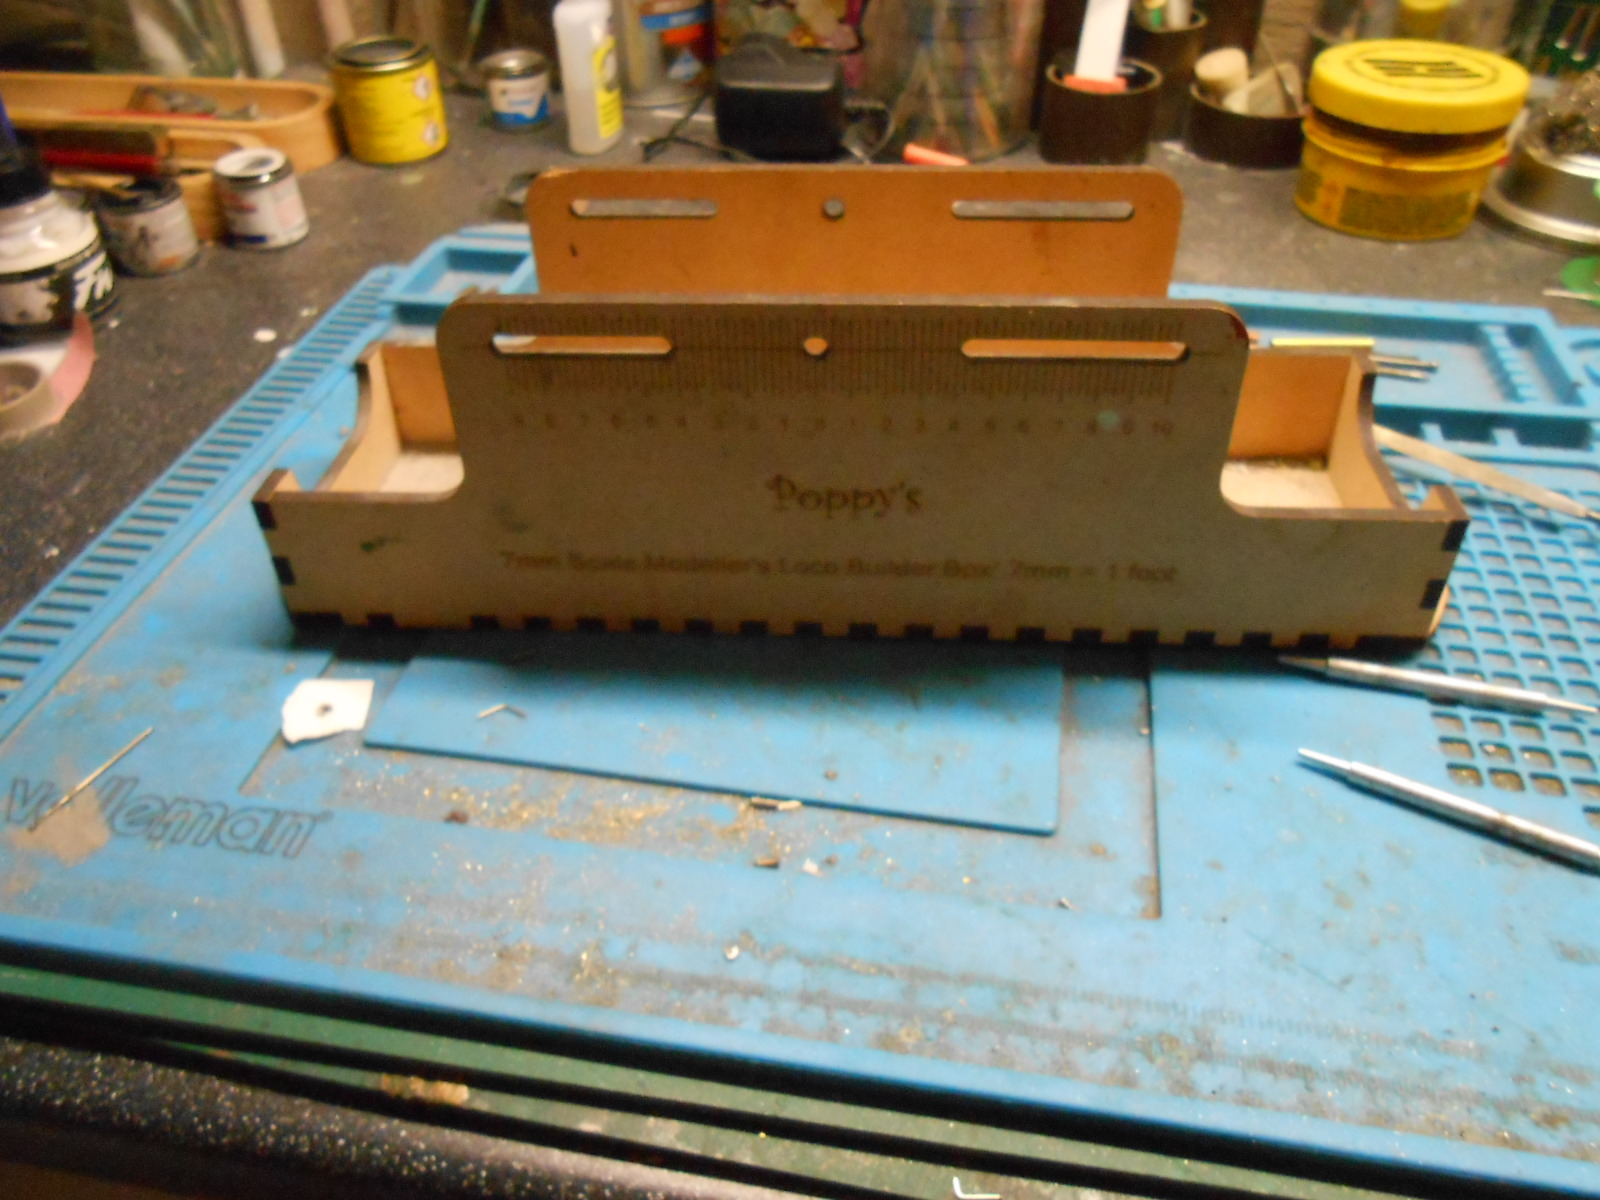
Progress! Well, a little anyway, but no matter how many locomotives I build, there is always something intrinsically satisfying in creating a working chassis. Everything else after that is just 'cosmetic'! OK, still requires a lot of work, but it is really nice to know that the model is going to work well. Getting there has been 'interesting' shall we say. The extended frames above the bogie were a straightforward bit of cutting and filing, while soldering everything together with the frame spacers went reasonably well. The main issue was ensuring everything was square and level, but apart from a bit of tweaking, everything seems to sit nicely. However, the horn blocks proved a right pain - though it must be said it was my own fault in not reading the instructions carefully enough and when combined with my latent ability to assemble anything that is 'handed' back to front, resulted in three hours of bad language yesterday afternoon, culminating in me thinking for a while that the frame spacers I'd made were too wide and the chassis would need dismantling. I'd already had to file down the fixed, 'tophat' bearings, as the new driving wheels were very tight. The hornblocks were likewise fouling the other pair of drivers so it was a case of either leaving things alone for a bit, or chucking the whole lot in the bin! Fortunately, sanity prevailed and this morning saw where I'd gone wrong. Reversing the hornblocks provided the necessary clearances and though the frame cut outs needed enlarging a little, this time everything went together nicely. I'd used the Poppy's Woodtech jig to assemble the frames, but went old school for the hornblocks by just using my tapered, extended axles to align them. The coupling rods go over the ends and then hair grips hold the hornblocks in place while they are soldered to the frames. So, with mounting excitement, it was then a case of adding the wheels and coupling rods to check everything rolled smoothly, which it did! Big sigh of relief, hurry in from the workshop to show the missus [usual underwhelmed response, but hey, I know how important this bit is] and celebrate with a cuppa. There now followed a small bonus as Roger Cromblehome [Alphagraphix] kindly gave me a handful of etches, which included bogie side frames and spacers, so it was only half an hour's work to put these together. The frames include a slot to enable some side play to be included, so once some new materials arrive from Eileen's Emporium, that will be the next step.