David Holman
-
Posts
4,359 -
Joined
-
Last visited
-
Days Won
117
Content Type
Profiles
Forums
Events
Gallery
Blogs
Everything posted by David Holman
-
Made pig's ear out of Provincial brake van.
David Holman replied to minister_for_hardship's question in Questions & Answers
Is the chassis twisted? If so, might be able to tweak it a little, otherwise, consider adding a rocking axle (compensation unit) that end. -
Beautifully made. All those complex roof lines will have needed some serious geometry to cut out, while the fit is pretty much perfect. Top job.
-
Sligo, Leitrim and Northern Counties Railway
David Holman replied to Colin R's topic in General Chat
Another issue in these challenging times would be the B word. If any part of the SLNCR were to be restored, then inevitably it could only be in N Ireland, or the Republic, but not cross the border, you'd think. Another thought - what about a Suir Valley type project? A miniature version on 2' gauge, with scaled down locos and stock. Dare I say a far better plaything for multi-millionaires than blowing six figure sums annually on lower league football clubs as seems to happen over here. However, ain't going to happen. -
More witchcraft - and a model to grace Bolton's Siding any day. Go on Rich, you know you want to and plenty here want you to as well! Salivating already.
-
Sligo, Leitrim and Northern Counties Railway
David Holman replied to Colin R's topic in General Chat
Easy (ish) to do in 7mm scale. The Alphagraphix catalogue has card kits of coaches, wagons and buildings that are cheap enough to use as drawings, plus whitemetal wagon chassis and brass underframes for the 6w coaches. The SSM kit of the small tanks is an absolute gem, being designed by Adrian Rowlands of Northstar Models. However, with two SLNCR layouts in 7mm scale, maybe the subject is close to being overdone? A lovely railway, with plenty more options yet, methinks! -
Yup, always well ahead of themselves .
-
Features in this month's RM. Also a nice review of those iconic beer keg wagons. Get mine on line these days, but in the shops from Thursday. The magazine, not the beer kegs... Irish railways featuring more often in the model press at the moment, which can only be a good thing.
- 6 replies
-
- 12
-

-
The 5p coin does it every time - though the wagons have far more detail.
-
2mmFS always welcome in my book, whatever the gauge, even if a rare mix of watch making and witchcraft! Bet there aren't many 5'3 layouts in this scale - trust you have seen the latest MRJ?
-
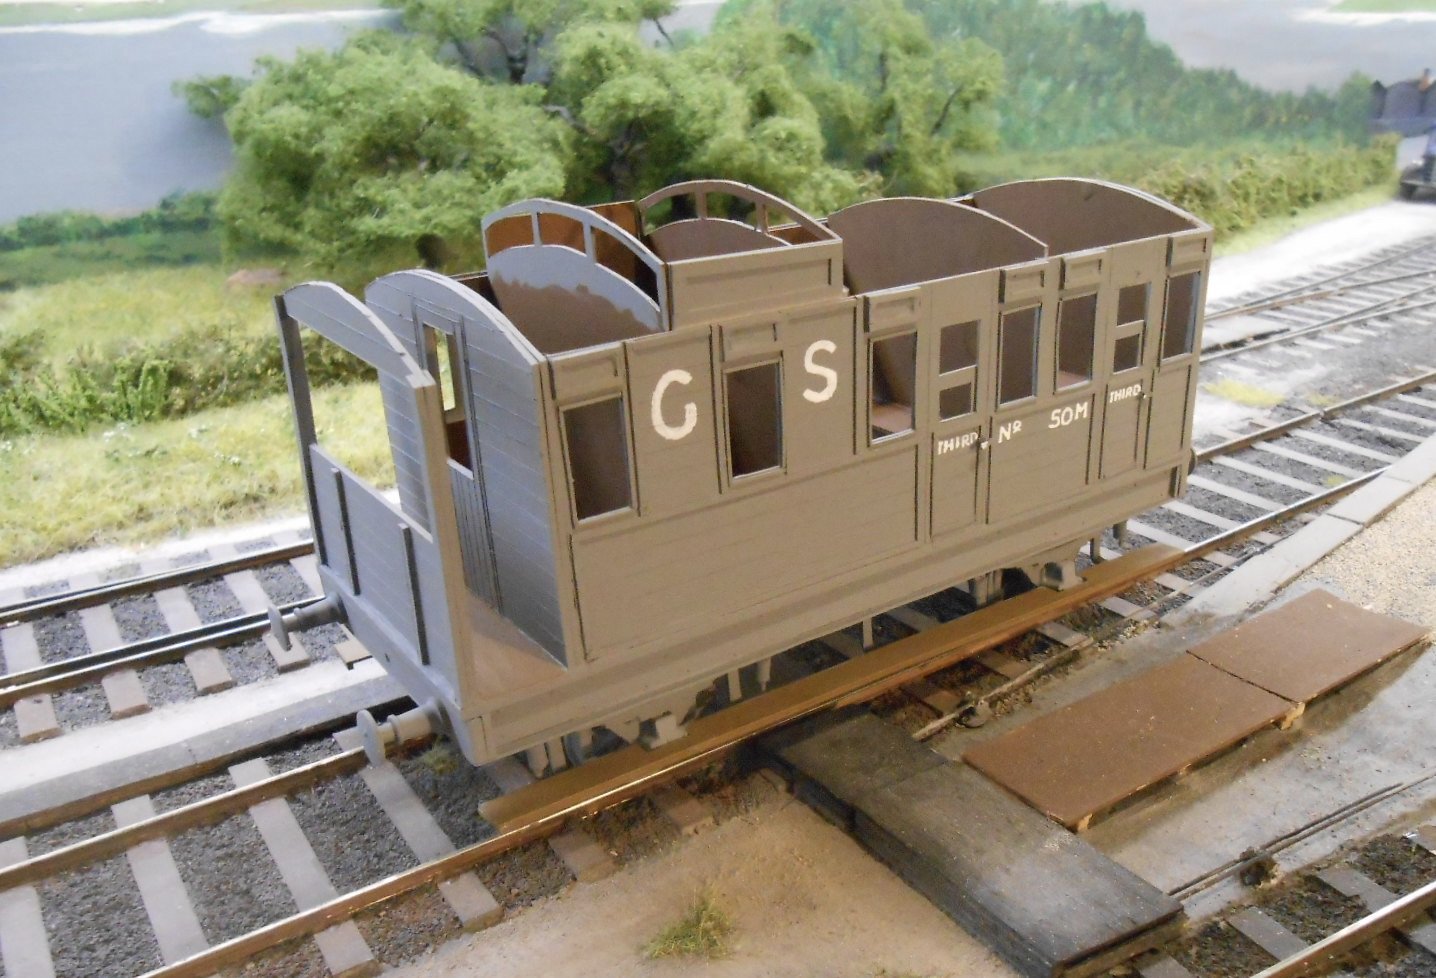
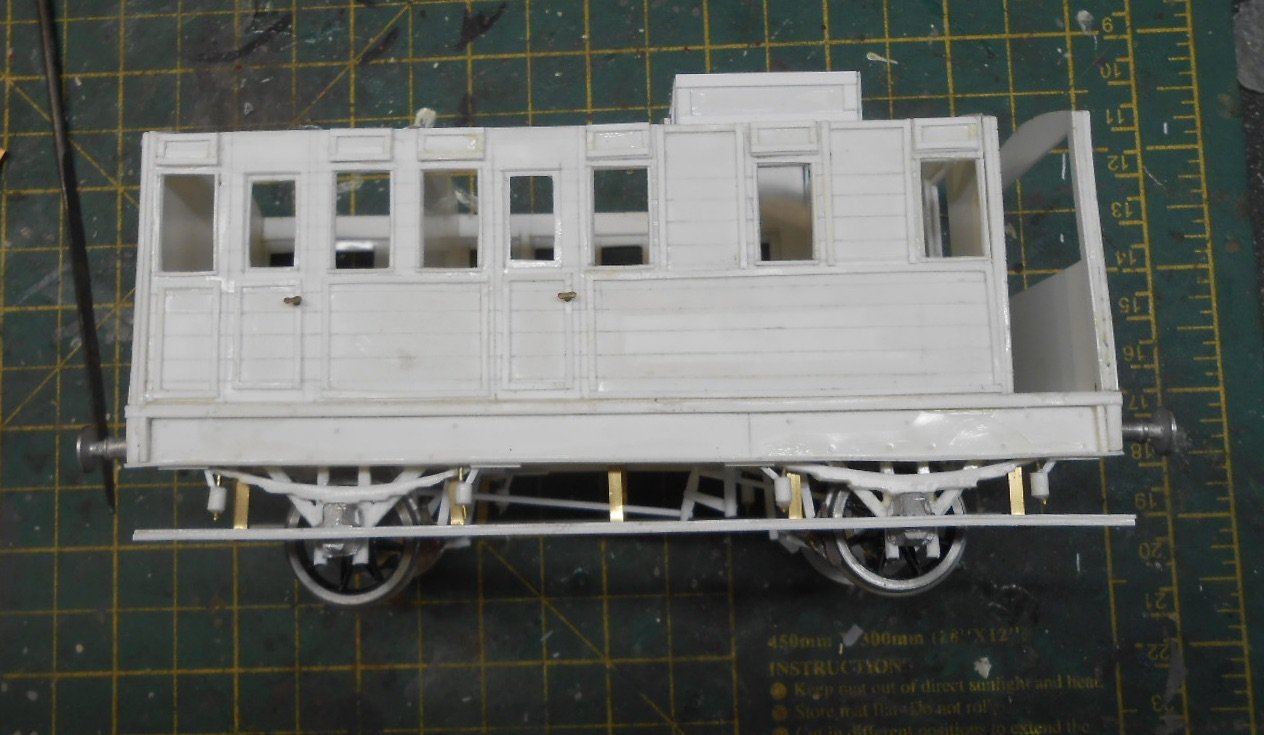
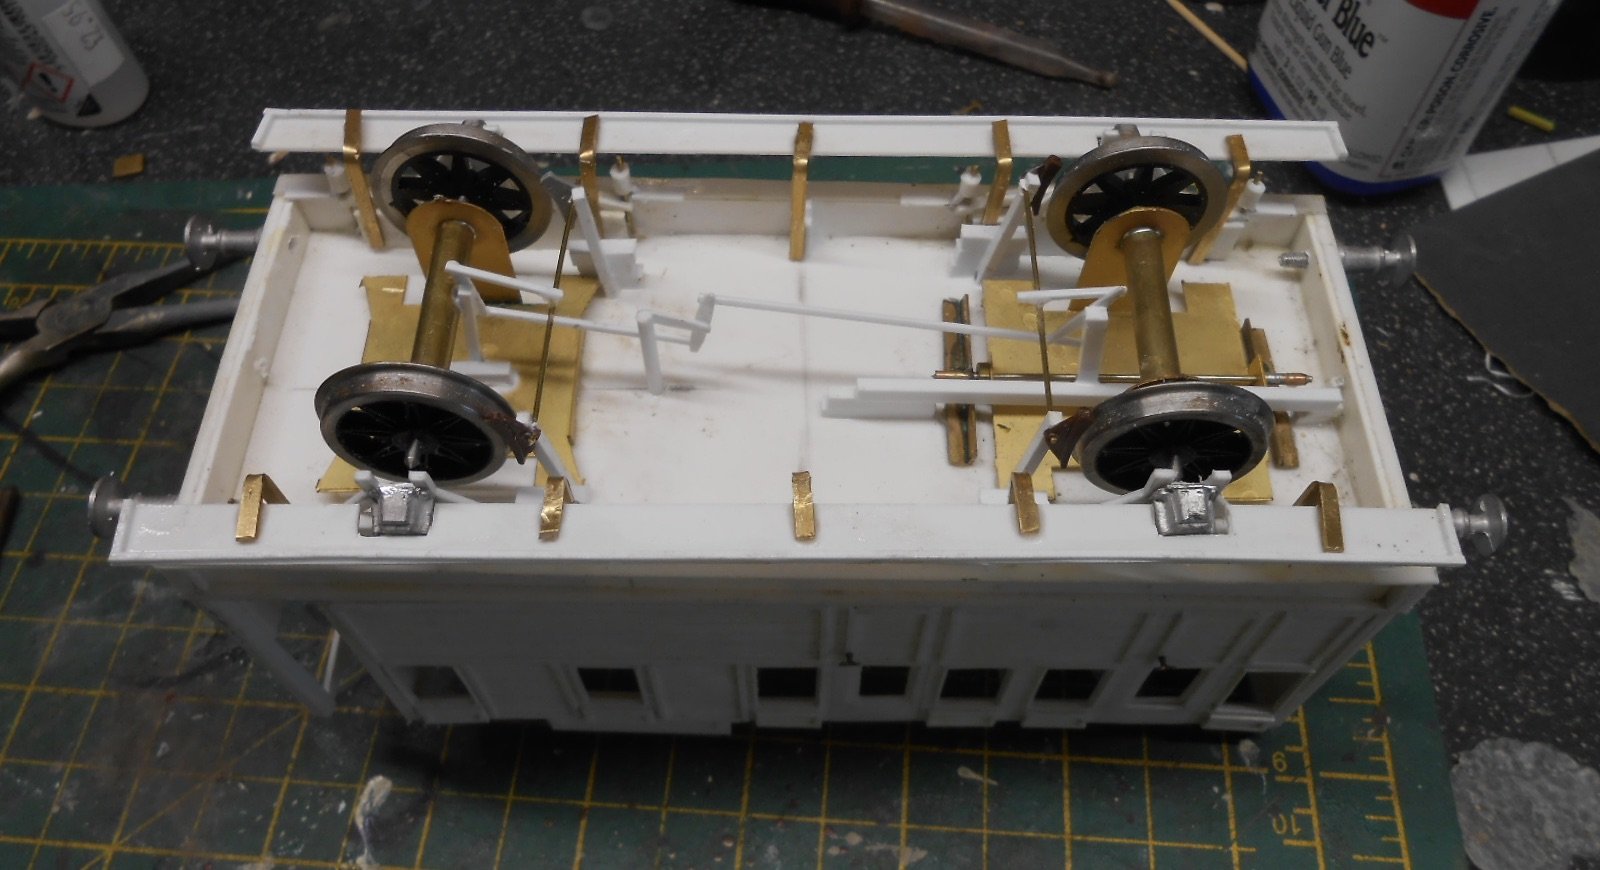
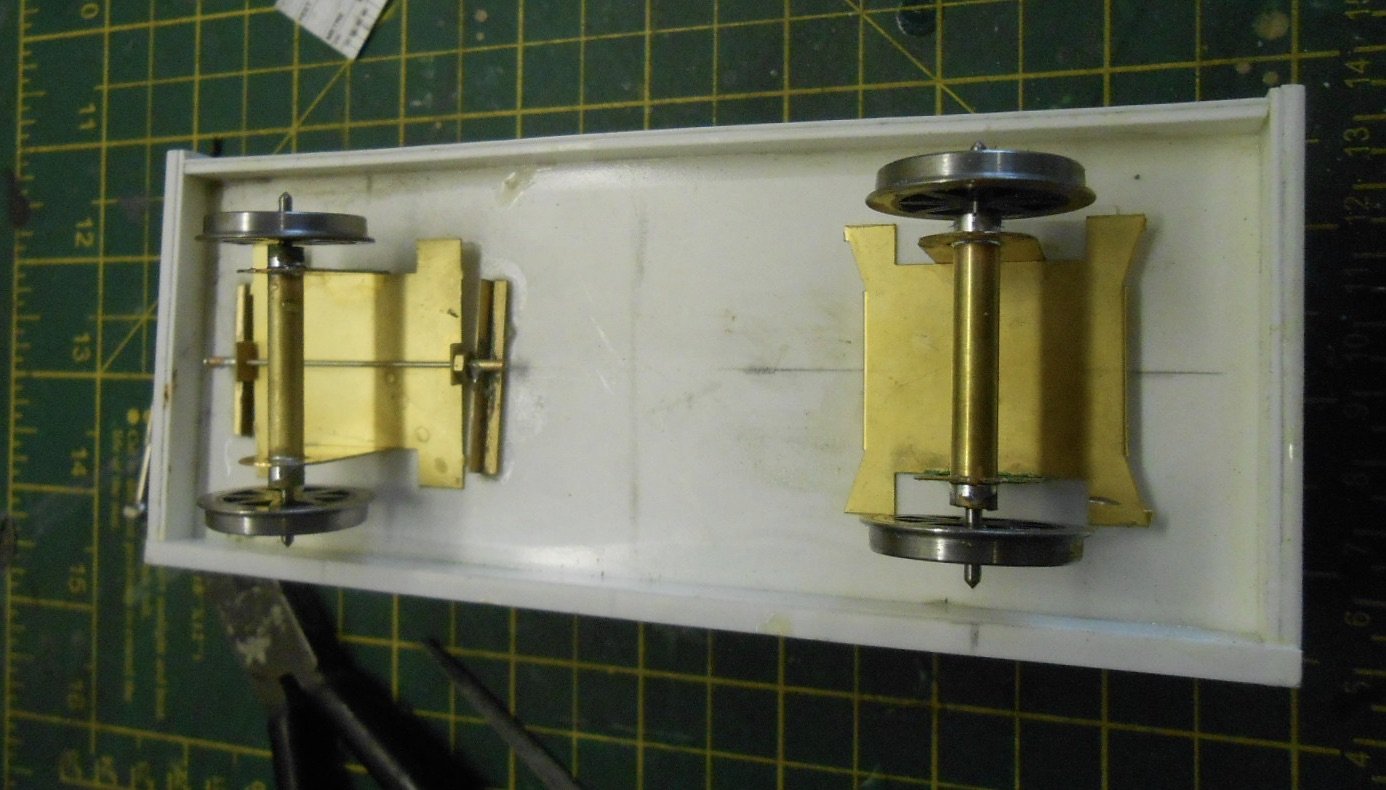
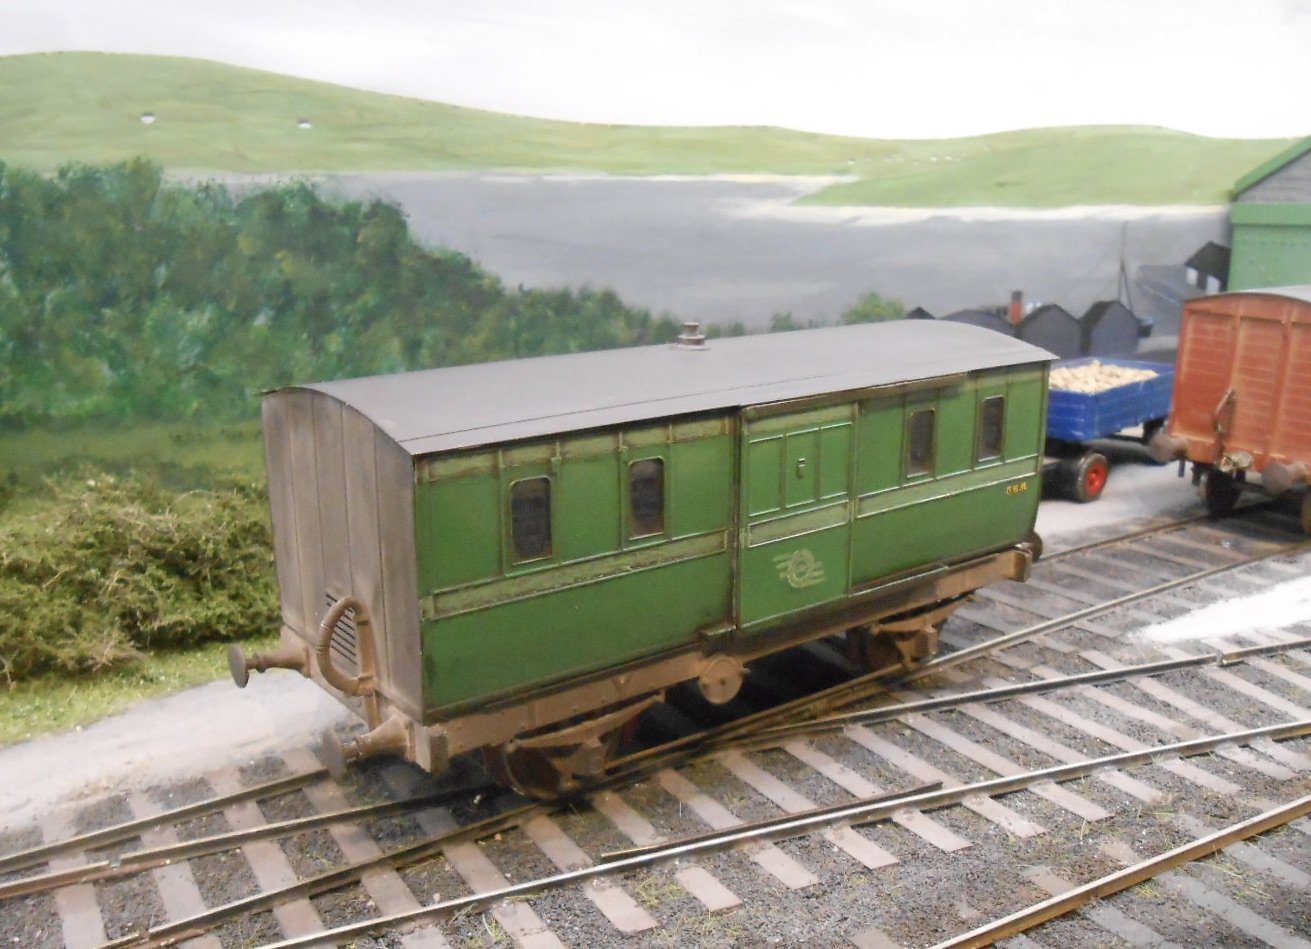
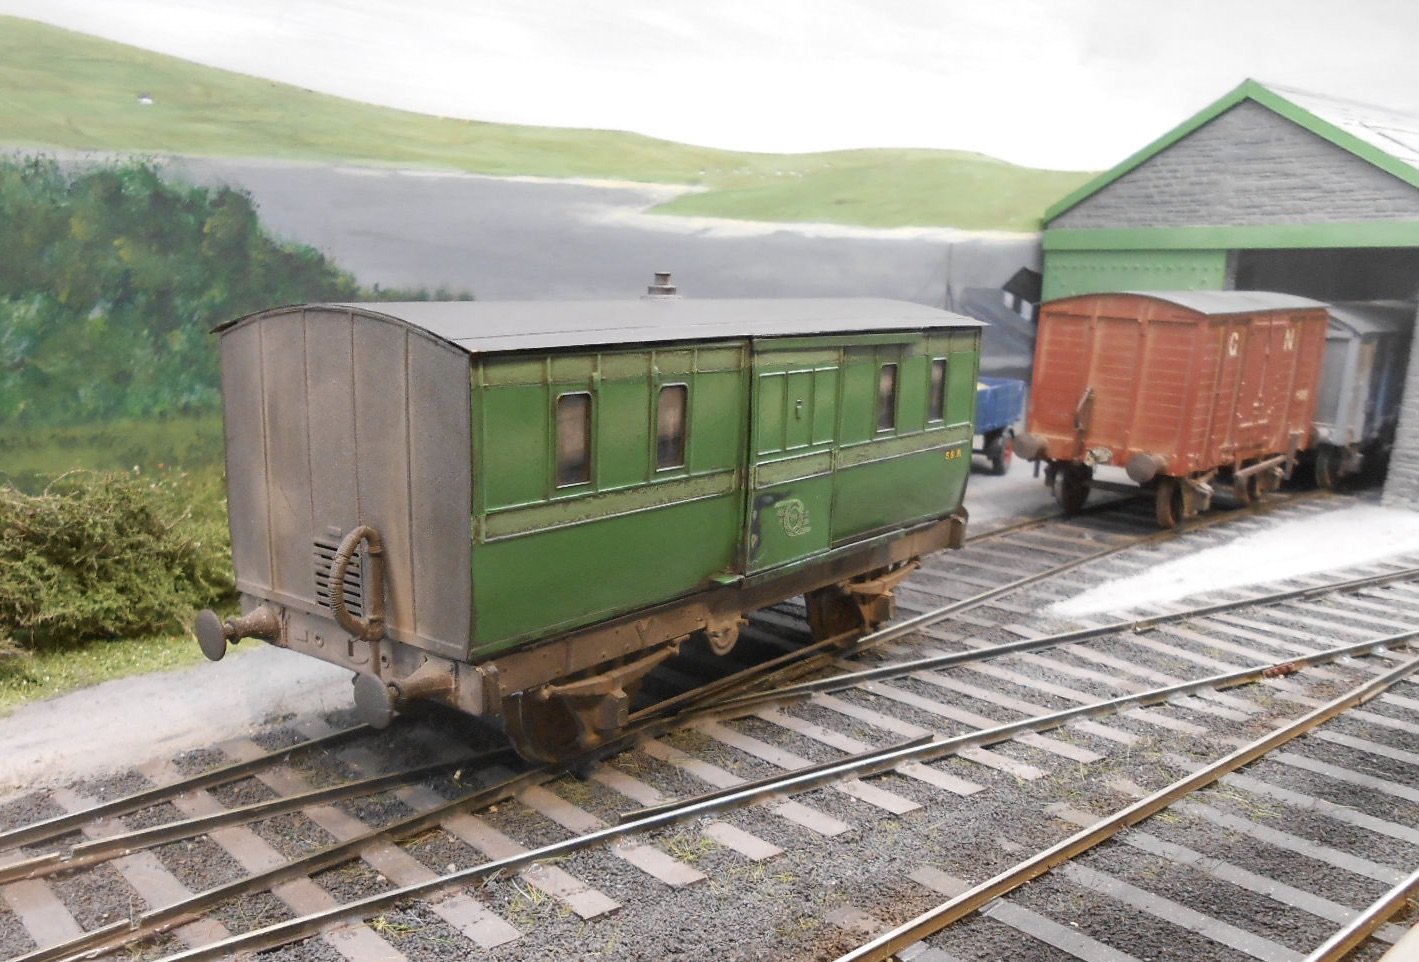
After a month or so, have been able to get back to the MGWR 'Glasshouse' brake van. With a 12'6 chassis, it seemed appropriate to make it compensated on the model. Digging through my spares boxes, I was pleased to find what appeared to be several units, though one of them turned out to be for a 6w coach: I think they came from Richard Chown's estate. Either way, it was a simple job to set them up, though the 3'1 wagon wheels seem rather small, albeit correct. The rest of the chassis proved quite challenging: My spares box proved fruitless in terms of W-irons with suitably sized springs, so I had to cobble them together by chopping off the springs from some standard white metal castings and substituting springs made from plastic. Sadly, they don't have individual leaves on them, but hopefully this will eventually not notice under a coat of grime. I also needed to make up 8 spring hangers from wire and plastic rod/strip. A bit crude, but the previous comments apply here too. Then there was the brake gear! No problem re brake shoes, which I fixed to some 60 thou square strip, but the linkage proved interesting and it took a while to work it out from the drawing I had. Once again, it is mostly representational and certainly more chunky than the prototype, but will be partially hidden behind the footboards, so hopefully passes muster with the obligatory heavy weathering. Buffers are white metal castings and then it was time for the paint shop. Halfords rattle can primer is the base colour, then hand lettered using a dipping pen and white ink. However, whether the prototype ever wore GSR livery is debatable. Mr jhbachill thinks these vans would not have survived for long after the closure of the western branch lines they were built for. However, my Belmullet branch is assumed to have lasted into the 1950s, so at least one might have been kept for this line. Hence, the dark MGWR livery has been replaced with grey, though is now at least 15-20 years since a repaint, so will get a fair bit of weathering.

- 29 replies
-
- 11
-

-
-
Freelance Mixed Gauge - Handbuilt Trackwork
David Holman replied to RichL's topic in Irish Model Layouts
Remarkable! -
This edition edited by Jerry Clifford, so no surprise that there is a 2mm scale bias. All very interesting of course, but highlight has to be an article by Mick Rawlings (of Ballyconnell Road). Titled Kitchen Table Modelling, he takes us through how he built his 3mmFS U class 4-4-0, complete with working inside valve gear. Had the great pleasure of operating BR last year with Mick and while he insists his locos are essentially quite simple, like all such things, they are actually on a higher plane, both in looks and operation. MRJ rarely ventures outside Great Britain, so good to see Mick's work included. And quite right too.
-
Still think it is alchemy!
-
As 'ongoing thingy' stuff goes, it certainly needs adding to the list!
-
Just started reading this and was wondering why I hadn't seen it before, then noticed the dates... Also, a reminder to self that need to pay more attention to the Irish Models thread, as I tend to focus on Layouts and Workshop. Anyway... ... what a fine project and fantastic model you have here, Ken. Not just great work, but a clear understanding of what are, to me, the dark arts of compensation. Wouldn't know what scale it was from the photos - proof of the quality of your workmanship. Just wonderful.
-
Cut my modelling teeth by doing freelance scratchbuilding and model bashing in 0n16.5 Taught me loads, great fun and very economical. Good on you Sean.
-
Thanks for your kind remarks - both before and after. Sometimes one gets the realisation that something simply hasn't worked and needs addressing. In this case the solution was simple and a lot less time consuming that stripping down and repainting, so most of the credit goes to Martyn Welch and his wonderful book 'The Art of Weathering'.
-
Freelance Mixed Gauge - Handbuilt Trackwork
David Holman replied to RichL's topic in Irish Model Layouts
Ambis Engineering do some neat prototypical tie bars, though must confess have no idea how they work. In the past have simply used another copper clad sleeper as the tie bar and [mostly] hidden it with planking/boarding. Yes the switch rail solder joints can break occasionally, but are easy to repair. On Belmullet have followed what Gordon Gravett used on Pempoul, using 0.8mm dropper wires from the point blades, through holes in the baseboard to short pieces of brass tube soldered to a copper clad sleeper set on edge immediately under the baseboard. The brass tube is meant to reduce stress on the solder joint. A bit fiddly to set up, but seems ok thus far. Am using servos to move the tie bars, work from a Megapoints control panel -
Absolutely!
-
If anybody is doing these in 7mm scale, put me down for one of each!
-
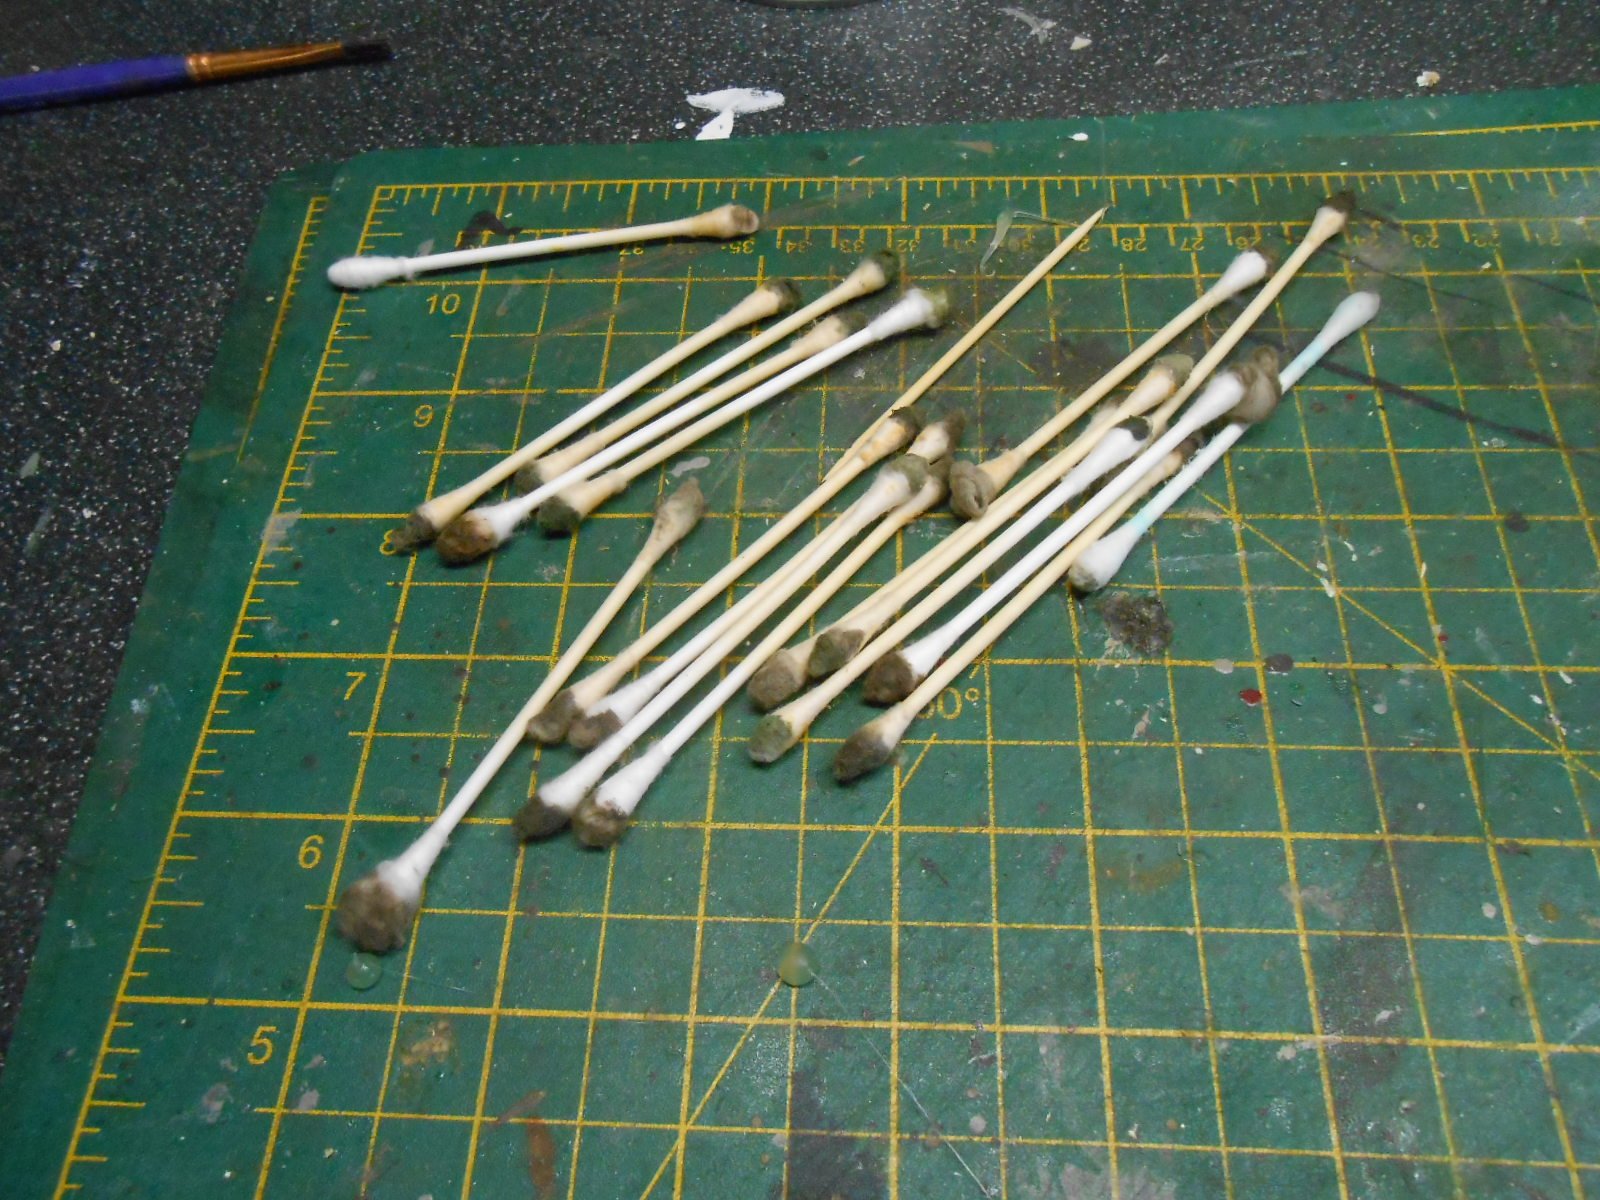
Back to modelling at last After what seemed like an age doing various household chores, along with a refresh of the workshop, I was rather hoping that the MGWR 'hearse' van might have improved in my absence. Sometimes this can work - you put aside a model you're not happy with, but when you look at it again several days/weeks/months later, it turns out to be not so bad. Unfortunately in this case it was more like how wrong can you be. Indeed, when I dug the van out again, the weathering job I'd done on it looked truly 'orrible. So, what to do. First thought was to buy some paint stripper and start again, but then I remembered one of Martyn Welch's techniques for using T-cut. This automotive paint restorer has many uses and last time I got it out was to work on cleaning up Richard Chown's 'Shannon'. This time, it came in very useful in removing the 'muck spreader' effect I'd used when being way too heavy handed with the weathering. The process is fairly simple and actually quite therapeutic. Dip a cotton bud in the T-cut and then gently work away at the paint surface. Depending on how much needs removing, this may need several goes, but one aspect of rubbing away the grime is that deposits are left in all the nooks and crannies, along any beading etc - just as would happen in the carriage cleaning crew had a go at it. Fingers crossed, it now looks like an old and well worn van, where the under frame hasn't had a clean in decades, but the body panels have had a bit of a rub down from time to time, albeit none too enthusiastically. I can recommend T-cut for other paint jobs too. For example it can get rid of the 'orange peel' effect from being over enthusiastic with the airbrush and can also help reduce/remove paint 'sagging' too. Well worth keeping a bottle handy, plus plenty of cotton buds too!
-
Mark Clark - Locos n Stuff - does 3D printed models and parts to a very high standard. A Chatham Club member, have seen his work first hand and the finish is very good indeed. His website is Locosnstuff.com and well worth a look.
-
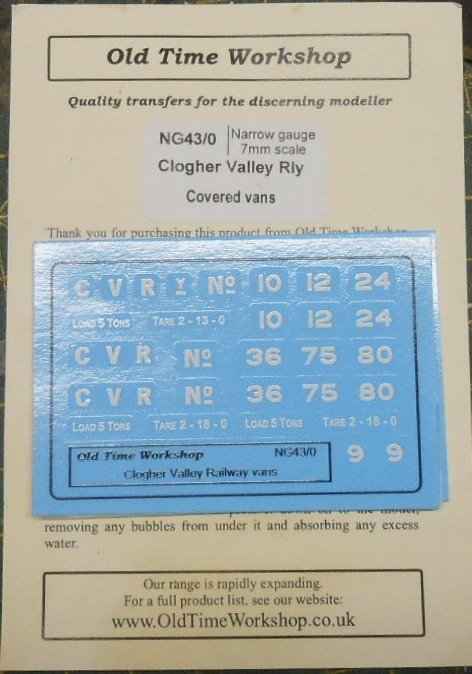
Just received some new waterslide transfers from Old Time Workshop. Met proprietor Simon Thomas in an earlier era [ie at a model show] & he was keen to broaden his range to include CVR wagon decals. Each pack costs £6.40 and in that you get enough for six wagons. Does 4mm scale, 00n3 too, including West Clare. Haven't applied them yet, but they certainly seem very nice.
-
Freelance Mixed Gauge - Handbuilt Trackwork
David Holman replied to RichL's topic in Irish Model Layouts
Very impressive! Don't know how the comparison works in 4mm scale, but in 7mm, handmade track is certainly no cheaper than ready made, as the cost of materials is high. Substituting card or ply sleepers helps though. At the risk of digressing, scratch building per se is not necessarily a cheap option either. Take, for example a 7mm scale wagon. Wheels around £10, cast buffers £5, W irons, couplings and brake gear the same. Hence £25 on bits before you even start on the body. Given Dapol RTR wagons start at as little as £30, it can make you wonder - but then as someone said earlier, for those of us who enjoy making things, that is the whole point of the exercise. The photo above says it all. Break a project down into small steps and suddenly it is not so complicated, though suspect there might be a bit of brain ache in working out where all the insulation gaps go! -
Freelance Mixed Gauge - Handbuilt Trackwork
David Holman replied to RichL's topic in Irish Model Layouts
C&L do point kits and also prefabricated vees and blades. The kits comprise everything you need to build a point using just plastic solvent. Stick sleepers to the plan, slide the chairs on to the rail, fix the chairs to the sleepers with Daywat or similar and Robert is your father's brother. Only available for bull head rail, but they do the correct slide chairs and so on. A 21mm gauge is all you need to change to 5'3 as sleeper lengths are the same. Can be built in an hour or so once you've got the hang of it and if you buy the components rather than the kits, then you can configure any formation you like. Built several for a 7mm project and they really work well. Include complex stuff like single and double slips too.