David Holman
-
Posts
4,359 -
Joined
-
Last visited
-
Days Won
117
Content Type
Profiles
Forums
Events
Gallery
Blogs
Everything posted by David Holman
-
Just SO useful!
-
Nothing wrong with the camera, they look great. Must be fantastic in reality!
-
Well, can only say I made a bit of a pig's ear of the paint job. The model looks alright-ish from the statutory couple of feet away, but enlarge the picture and it is eminently clear that the eau de nil stripes are pretty horrible. Did my best to tidy things up this morning, then this afternoon got out the compressor, air brush and spray booth. I used the standard weathering mix of equal parts matt black, gunmetal and bauxite, but things continue to go awry with this van and the first pass looked like it had been attacked with a muck spreader. Faced with the choice of stripping it all off back to bare metal, or making the model even dirtier, I chose the latter on the basis that I could still do the former! So here is 56M, a long time away from the paint shop and just as long from seeing a cleaner's cloth. Based it on the state of many a BR parcels van, whether it passes muster for the far west of County Mayo, I'll leave to others to decide. Then had a go at the J19 because when I tried to put a coat of matt varnish over then weathering powders the rattle can seemed to simply blow all the dusting away. Fortunately, made a better job of the loco than the van & it has also been highlighted with a light dusting of powders on top of the weathering mix.

-
Nice one. Well done Tony.
-
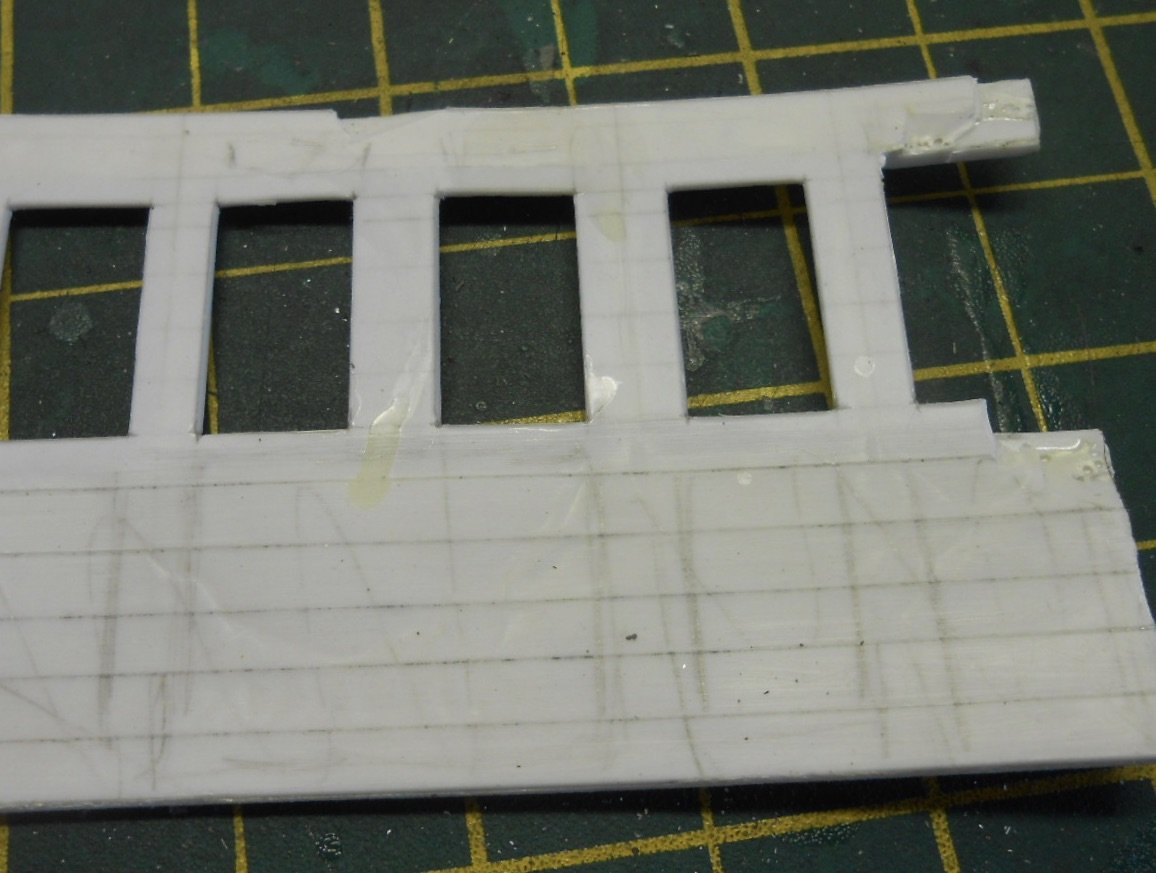
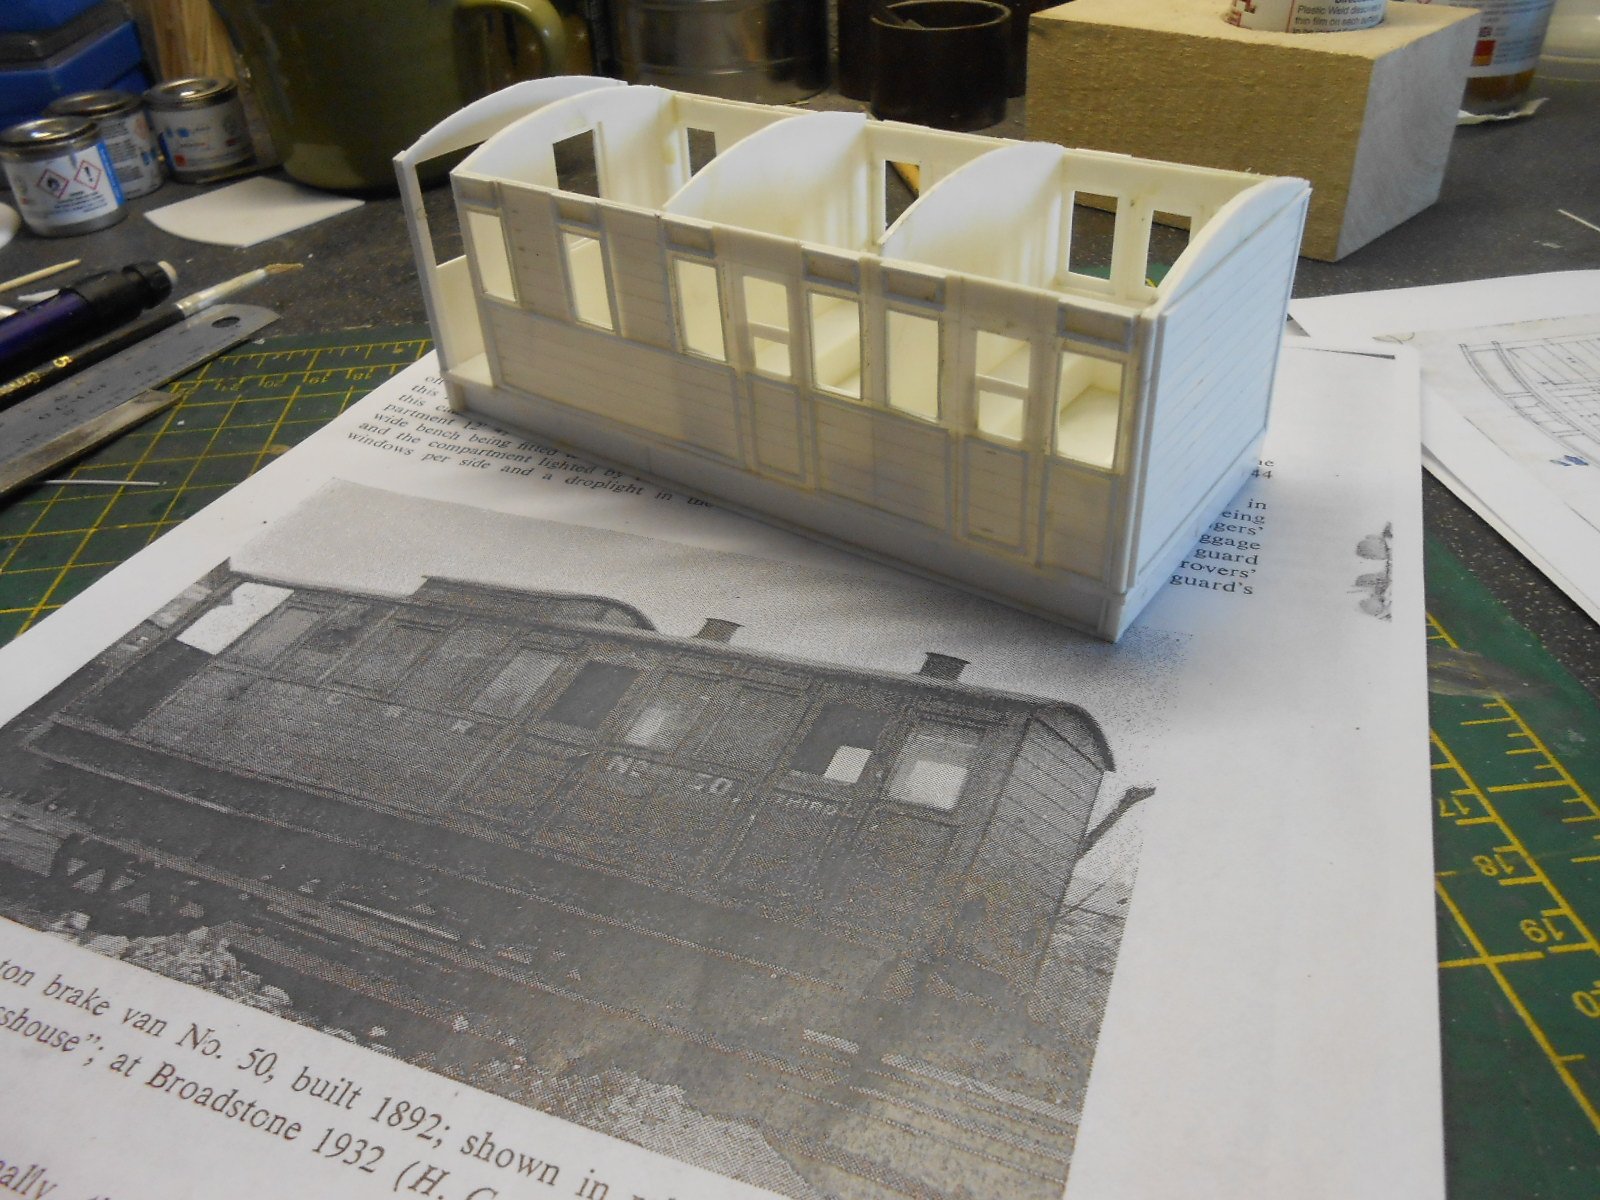
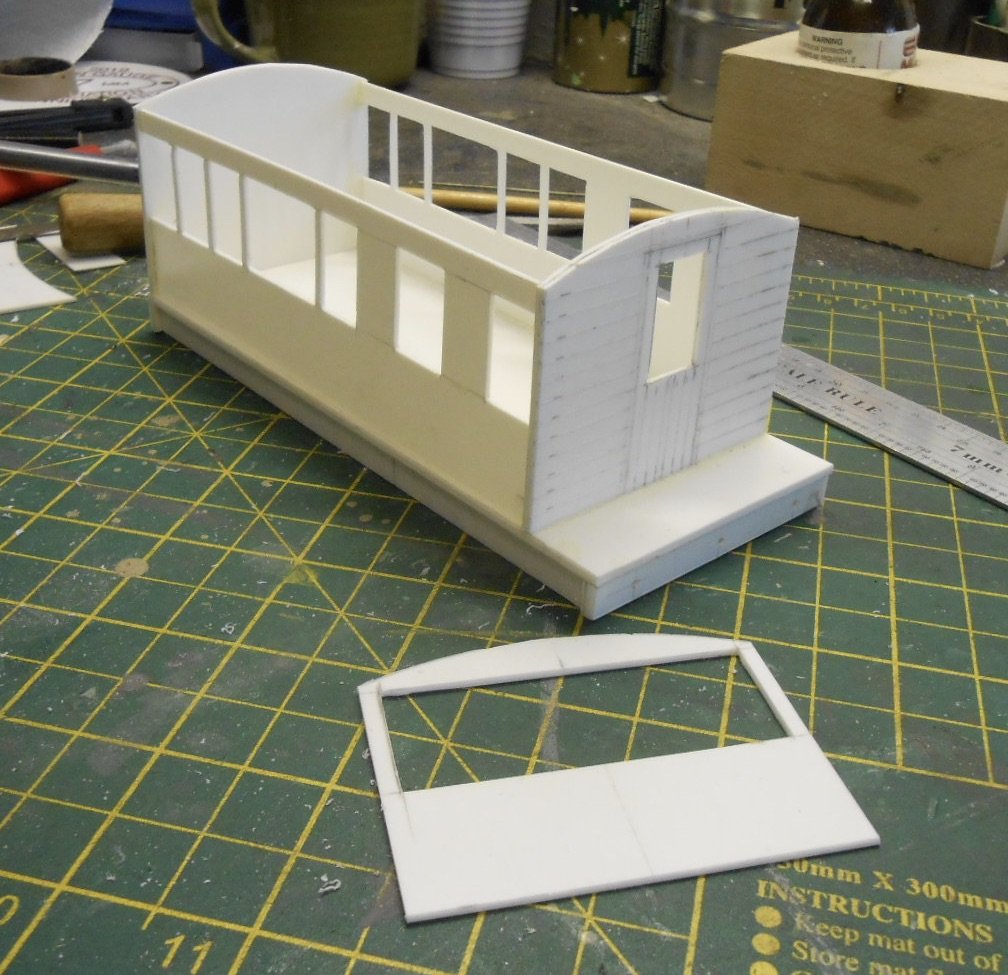
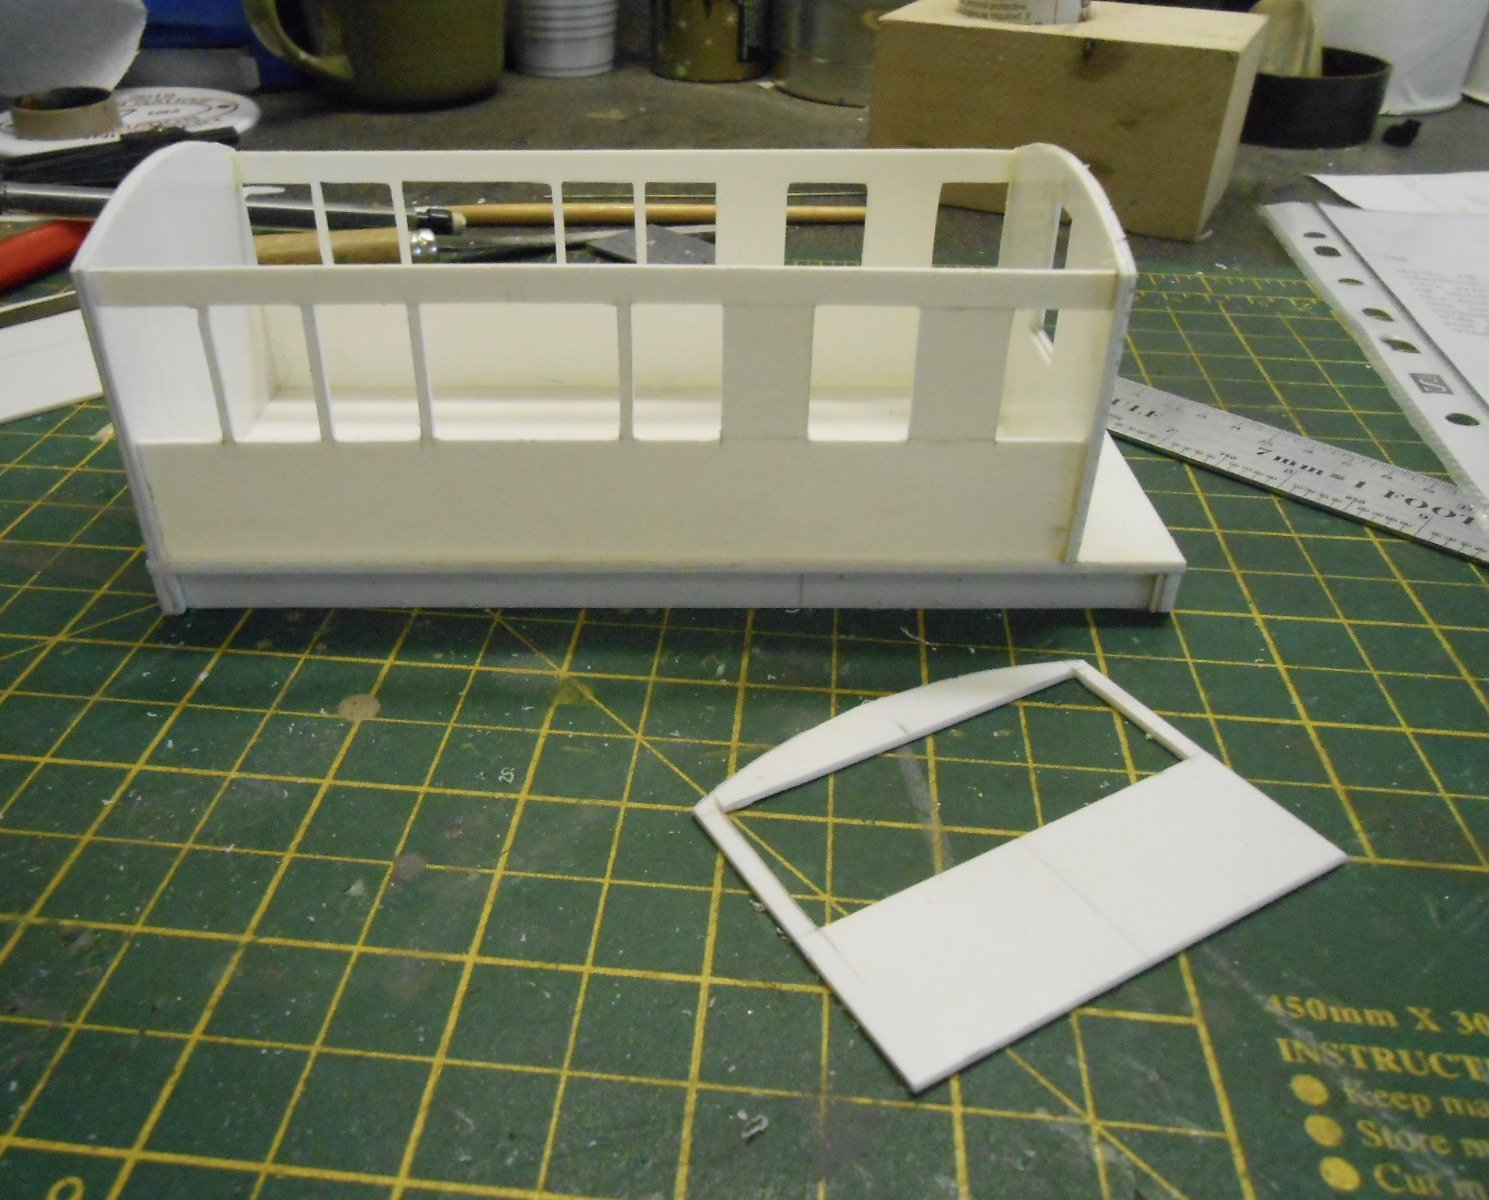
Progress with the 'Glasshouse' has been far from smooth too - literally in fact: I was was way too liberal with the solvent when adding the outer side to the core. The former is only 20thou, so hands up those of you who have plastic sheet warped and melted from the inside - I really ought to know better! Needless to say, an order for some Limonene is well overdue... So, a new side had to be made and then it was a case of getting busy with the microstrip. I've used 40 x 20 thou for the main beading on the sides and 20x20 round the windows. Internally, the partitions should help support the roof, while the seats are very basic benches - I'm assuming that comfort was in short supply in these vehicles.
-
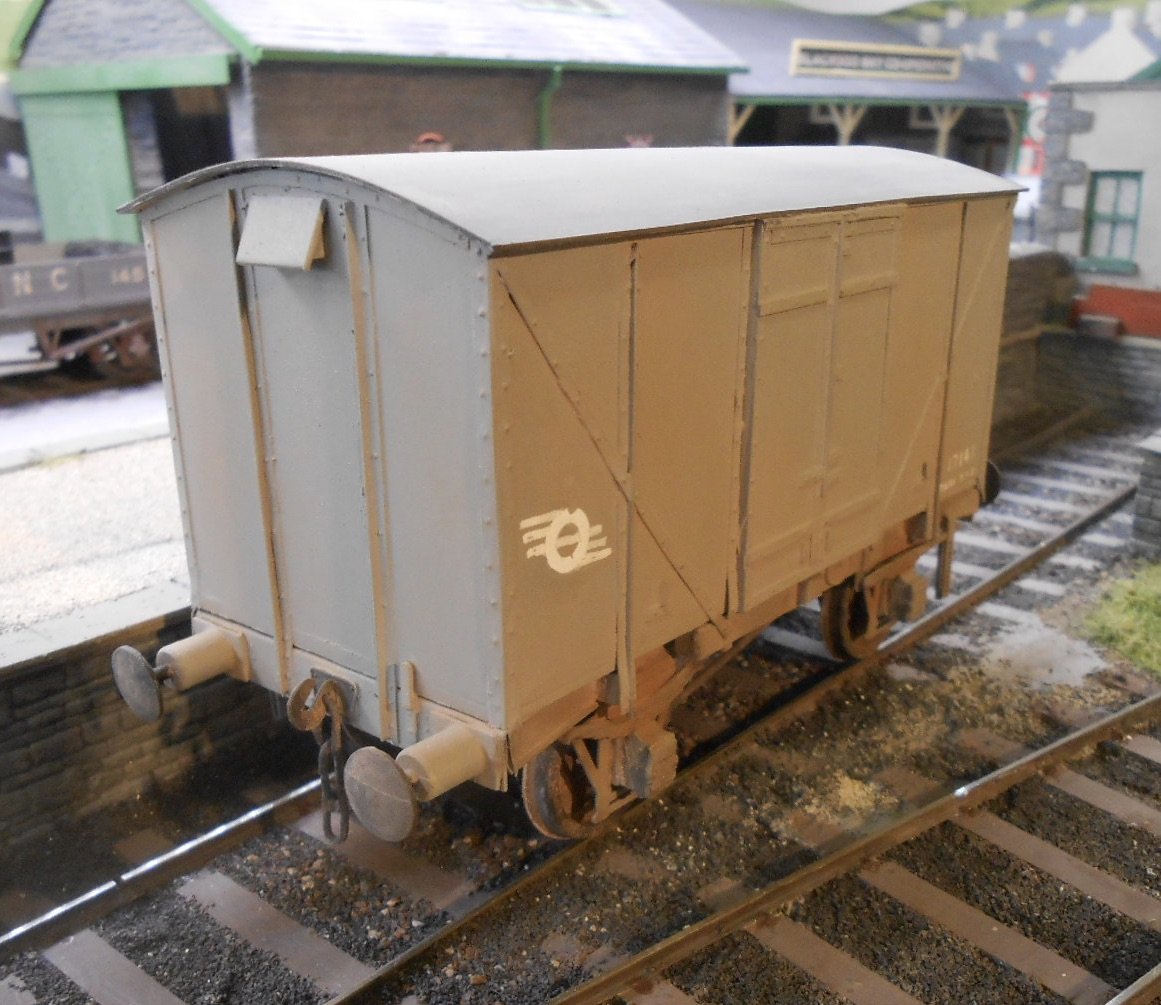
More haste, less speed So much for progress! The last week seems to have been spent correcting mistakes. In the case of the 4w van, only noticed the error when I started masking the body for the eau de nil stripes. Turns out I had the sliding doors set about 2mm low, hence had to unsolder the doors and reposition them. Didn't take too long, but then other problems followed, namely the Halfords rattle can I bought was metallic paint AND the wrong shade. Of course, only realised this AFTER I had used it... If anyone wants a barely used can of metallic Rover British Racing Green, let me know. Eventually, did a Galteemore, by using two different shades I already had, though before anyone questions the shade, the van is going to get the full weathering treatment, so what you see in the photo will soon be covered in a layer of grime, representing a vehicle that is ten years out of the paint shop with little in the way of any cleaning since.
-
Walker Diesel Class F - ECMbuild in 4mm for OOn3
David Holman replied to murrayec's topic in Irish Models
Class - pure and simple. Beautiful work.- 136 replies
-
- 1
-

-
- class f
- west clare
- (and 1 more)
-
Very impressive.
-
Personally, I'd stick to one of Glenderg's plans. Especially like the second one, but then have always preferred the 'less is more' approach to track as it leaves better scope for scenics. Keeping things simple means you will have a layout up and running in less time too. Treat it as part of the learning process. It is unlikely to be your 'forever' layout, though it might be possible to incorporate it into something larger at a later date. A good trick with layout design is to avoid track running parallel to the edge of the baseboad, while having the main run going diagonally across the boards increases the length of run slightly too. Try sketching it out on your board, or a piece of wallpaper.
-
Excellent benchwork, will make a fine foundation. Looks like you are using set track - fine, but it significantly reduces the 'flow' of Glenderg's fine track plan. Well worth considering, to avoid too many straight lines. Only a very small amount of extra work, but the result will be far more realistic.
-
High quality workmanship! My 0-6-0 feels like a piece of cake by comparison, while getting all the pieces to sit together and look right is quite a task in itself. Reminds of the the Wrightlines Baldwin 4-6-0T (0n16.5) I built years ago. It was mostly white metal, so was assembled in sections, but when brought together everything was at odds with the next piece. Fortunately, the sum of the parts was greater than the whole, plus the Baldwin's were prototypically wonky anyway. The Jeep however, already has a real presence.
-
MGWR 12 ton Glasshouse Brake Another new project already! I seem to have got into a bit of a groove at the moment, while the downturn in the weather has made the workshop more habitable of late. Many thanks to those who have offered advice on the prototype & I've managed to produce a basic line drawing from photos and sketches. The model is being built from plastic sheet and strip, with white metal fittings, following ideas in the late David Jenkinson's book, 'Carriage Modelling Made Easy'. Basically, you make an inner shell from 40 thou plastic sheet [with larger holes for glazing], then overlay the detail with 20 thou, which is much easier to work with. A couple of pictures show initial progress.
-
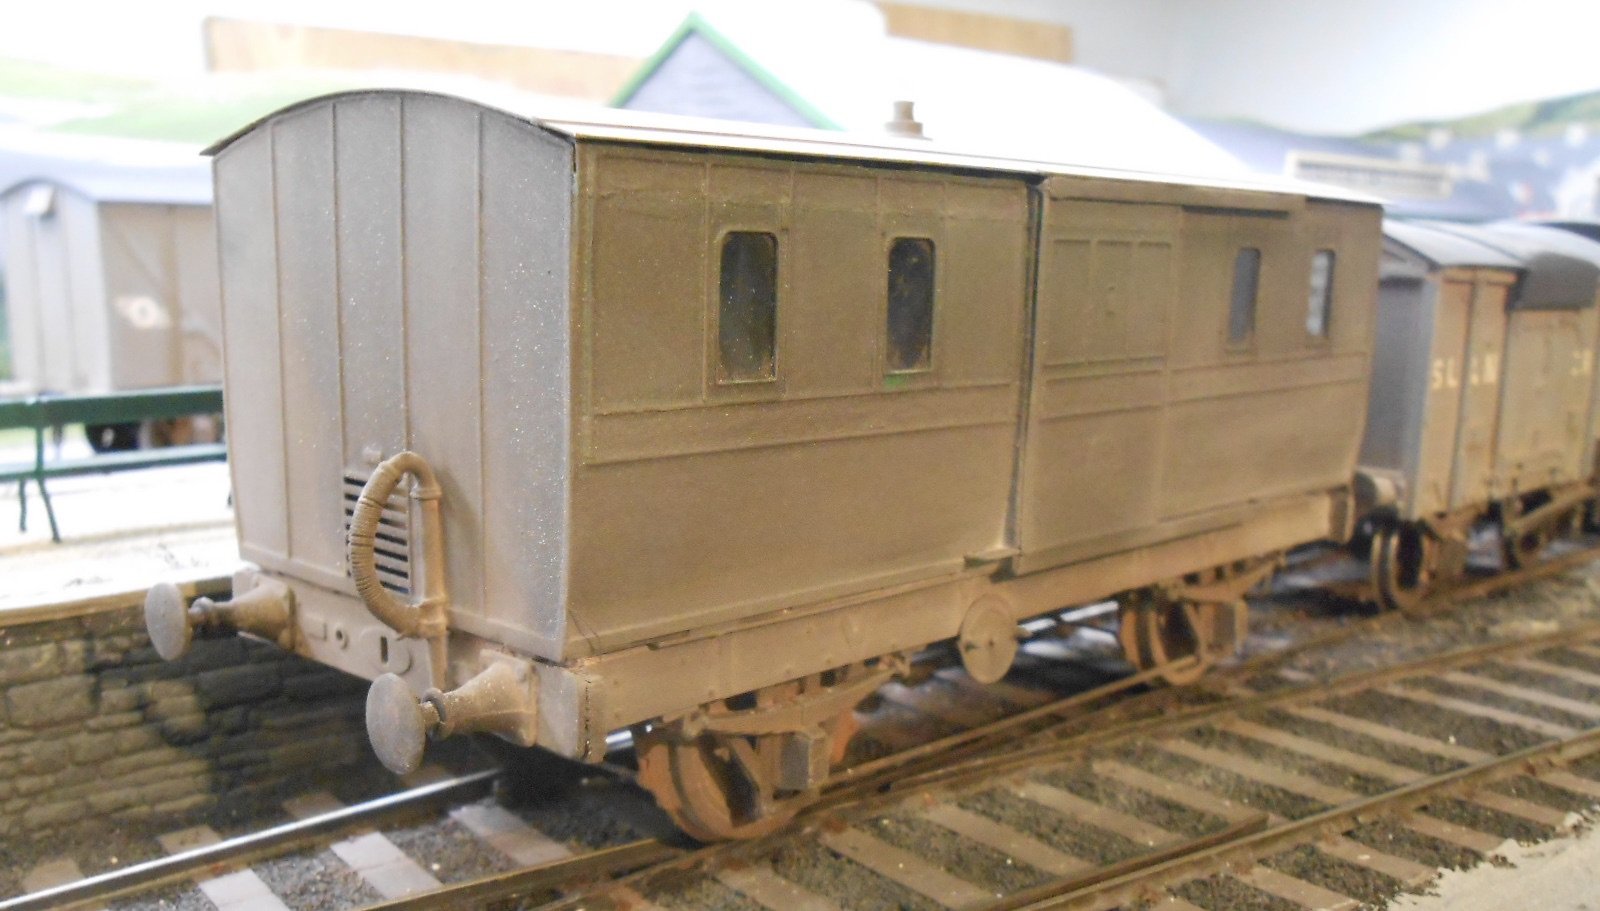
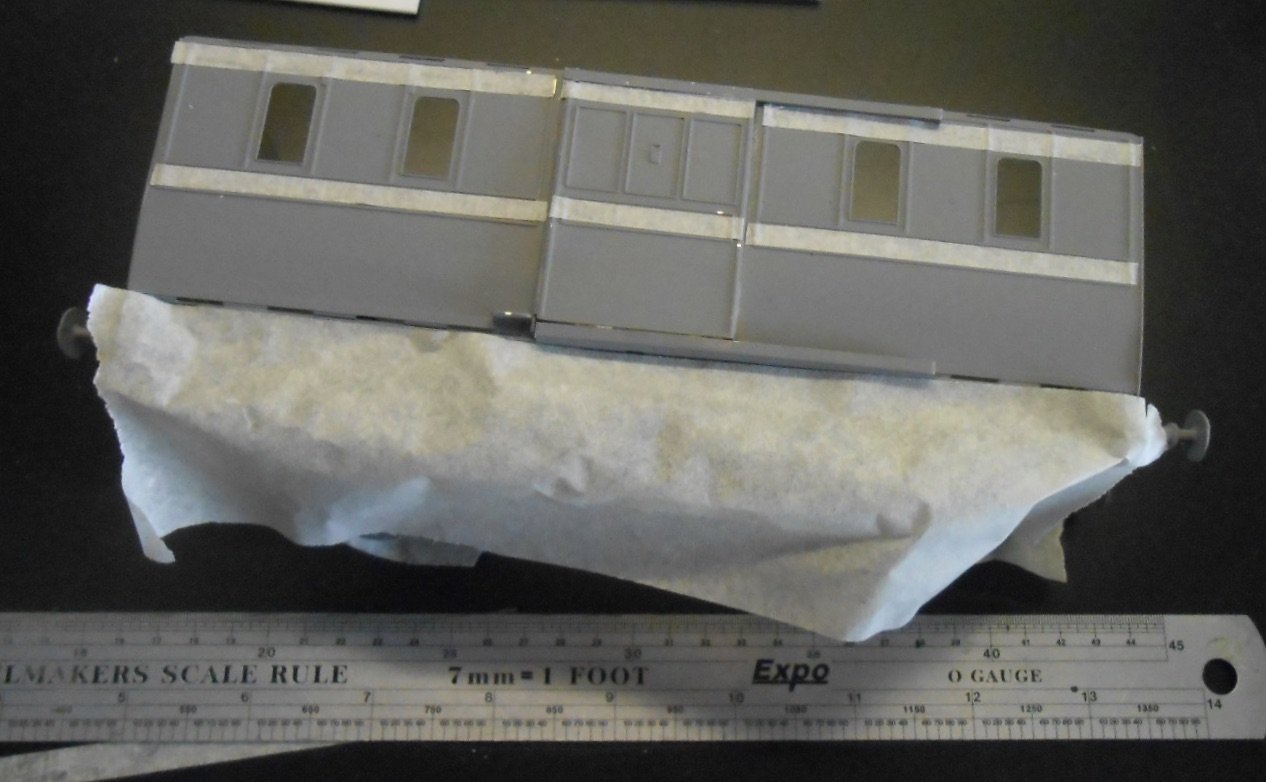
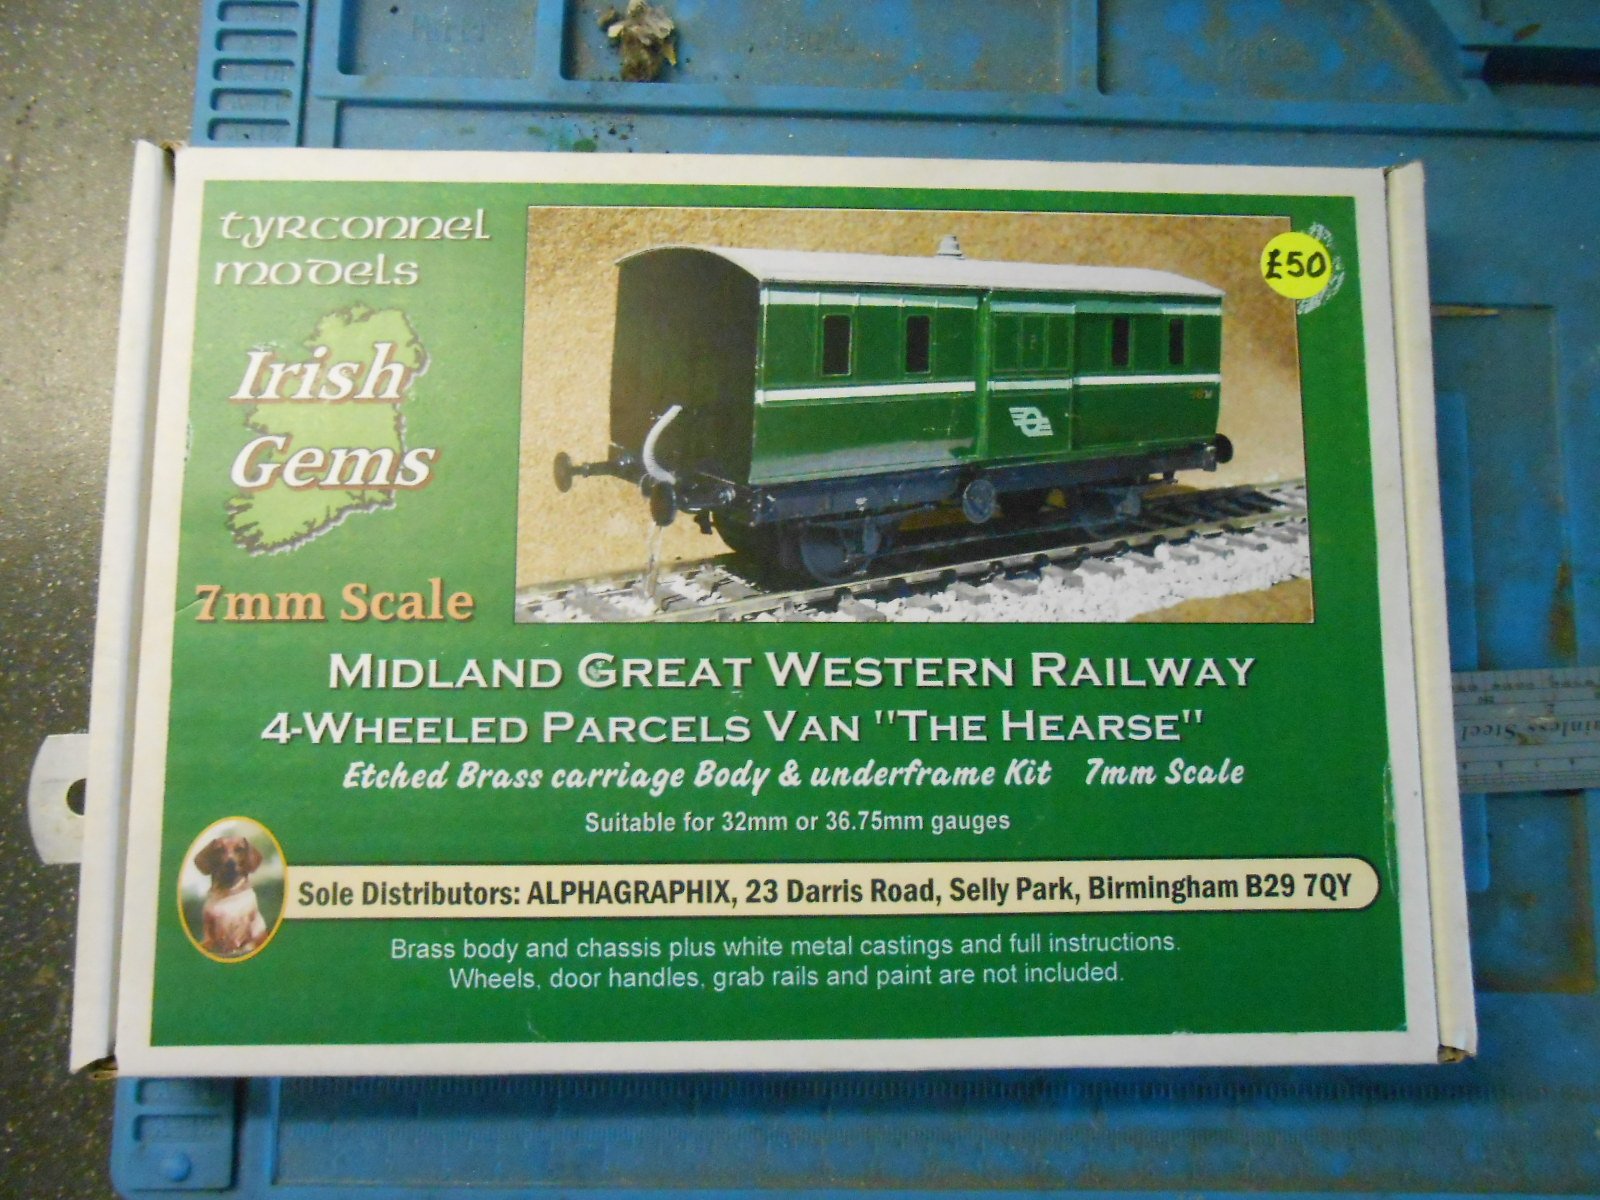
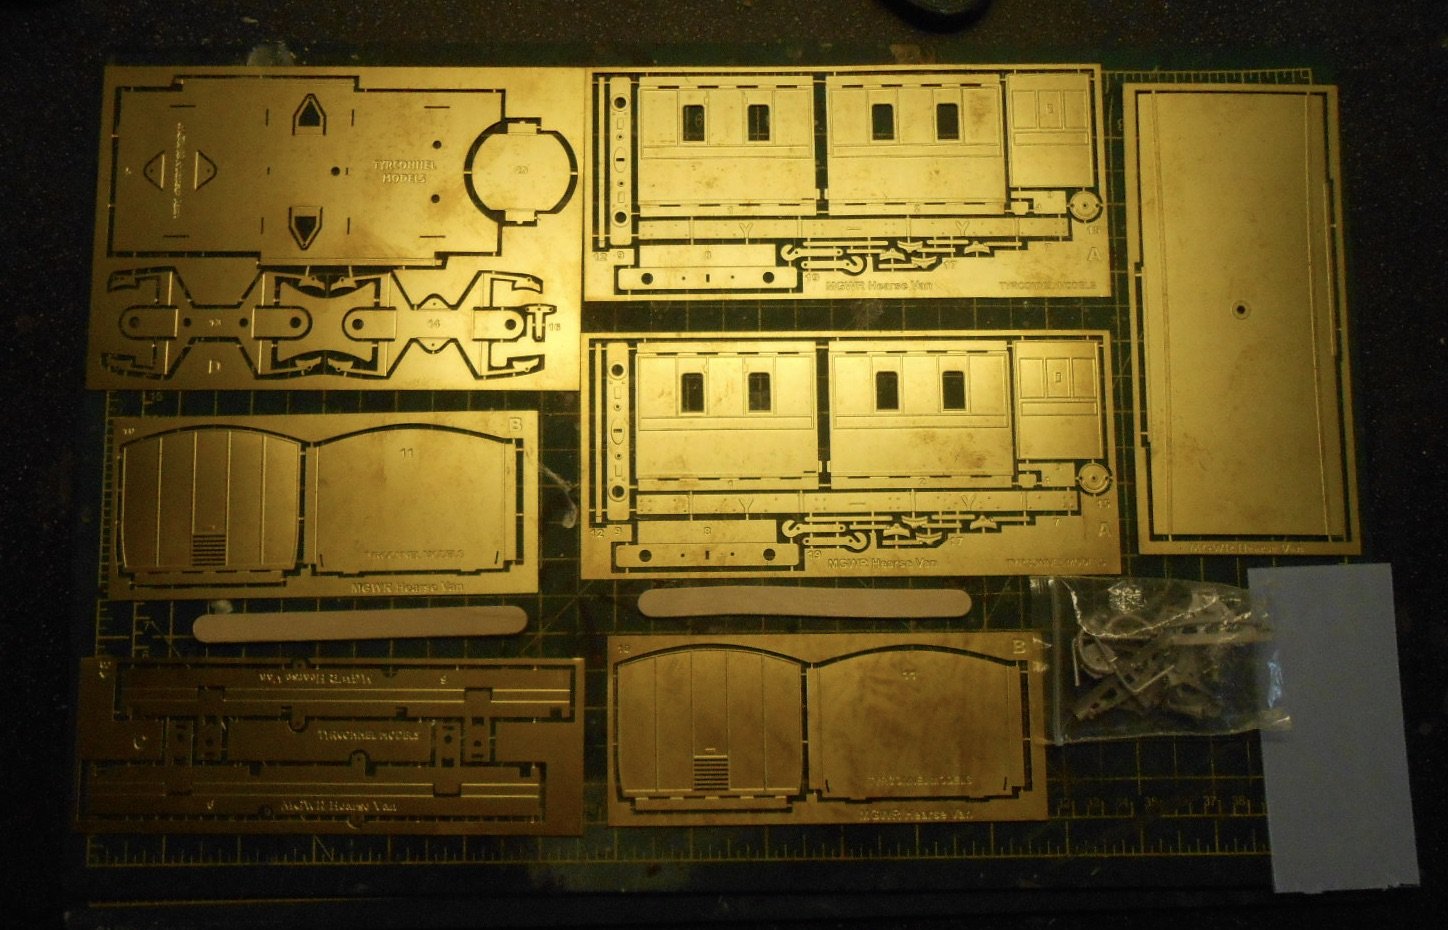
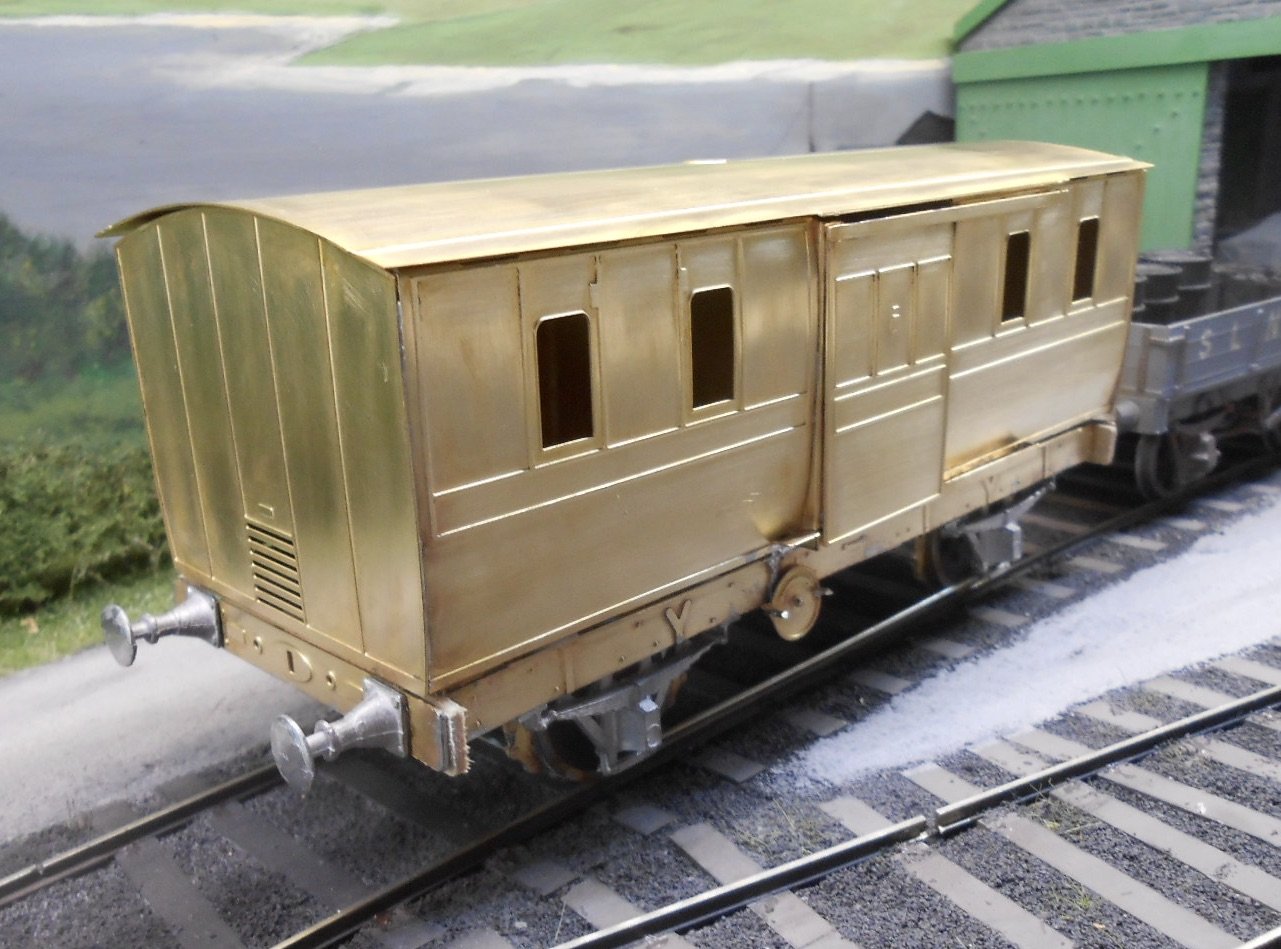
Back to the H and something new Thanks to those who recommended the Archer's transfer rivets, which eventually arrived the other day. The first picture shows what you get - a small sheet, but plenty packed in there. Time wise, I don't think they will be any quicker than a rivet press, but if you need to retro fit rivets, or put them on thicker material, then I'd say they beat cutting 0.5mm cubes and floating them on with solvent any day. You'd be hard pressed to see them on my H, but they are there on the brass chassis. After that, it was a quick clean up, then spray with rattle can primer, followed by Humbrol 64 brush painted on. Lettering is mostly by hand, using white ink and a dipping pen, though the circle in the flying snail is a 'zero' from a methfix transfer sheet that I found in my box. The fact that some of the transfers have a 'Home of 0 Gauge' sticker on them gives some idea of their age, but [mostly] they still work ok. The van has been finished off with a dilute weathering mix [Humbrol gunmetal, bauxite and matt black] on the chassis and weathering powders on the body. I like the look of the H vans, and if anything as utilitarian can be described as handsome, then they are in my book. So, on to something new, which am sure Galteemore will recognise. It is a Tyrconnel etched brass kit of the MGWR 4 wheel hearse van. This is a very nice little kit, though as the other David found, the etches for the sole bar channel demand care and I was glad I read his postings before I started! Solebars apart, it only took a couple of sessions to build the kit, but am sure that painting and weathering are going to take longer. However, for those of you like bright shiny brass, a picture of progress thus far is included.The ice lolly sticks, by the way [see the parts photo], are for thickening up the buffer beams!
-
Thanks George, and indeed everyone. Just checked and only started the model on 29th May, so has taken just a month. What with lockdown and the domestic authority going easy on decorating and chores (did most of that stuff early on), probably averaged at least a couple of hours a day, say 70 hours overall. Not bad for a tender engine and very much down to it being a well thought out and interesting kit to build.
-
Tasty! Am sure I won't be the only one salivating over these!
-
Simple, but so very effective. Just goes to show you don't need masses of track to produce convincing scenes, though a large fiddle yard is useful to keep a parade of trains like these going!
-
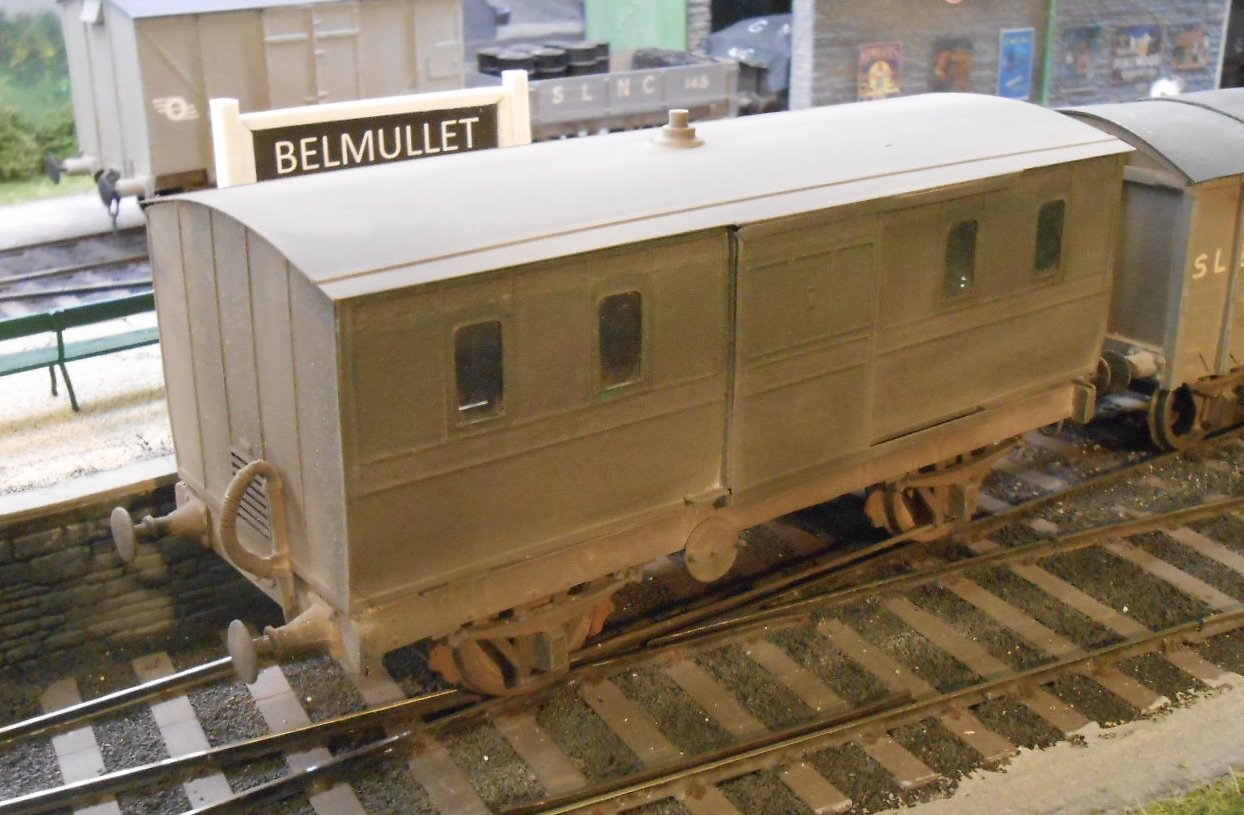
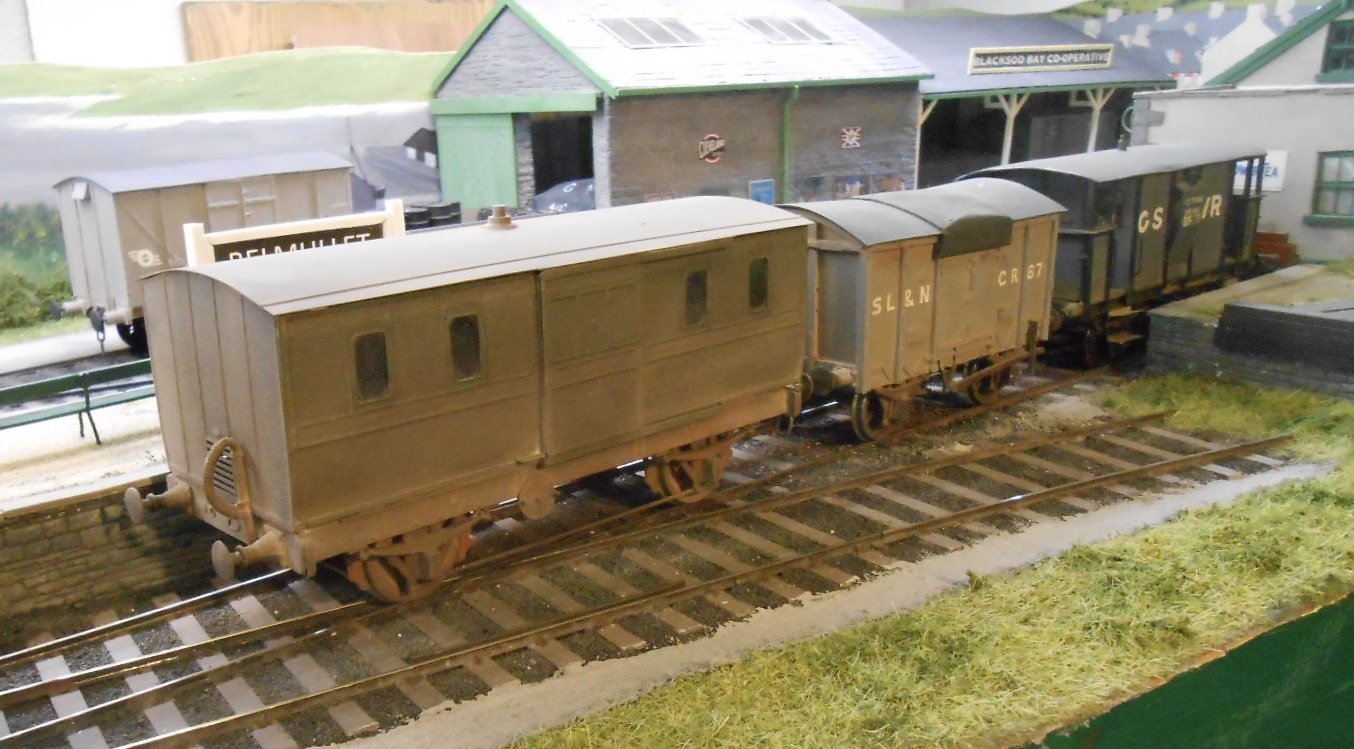
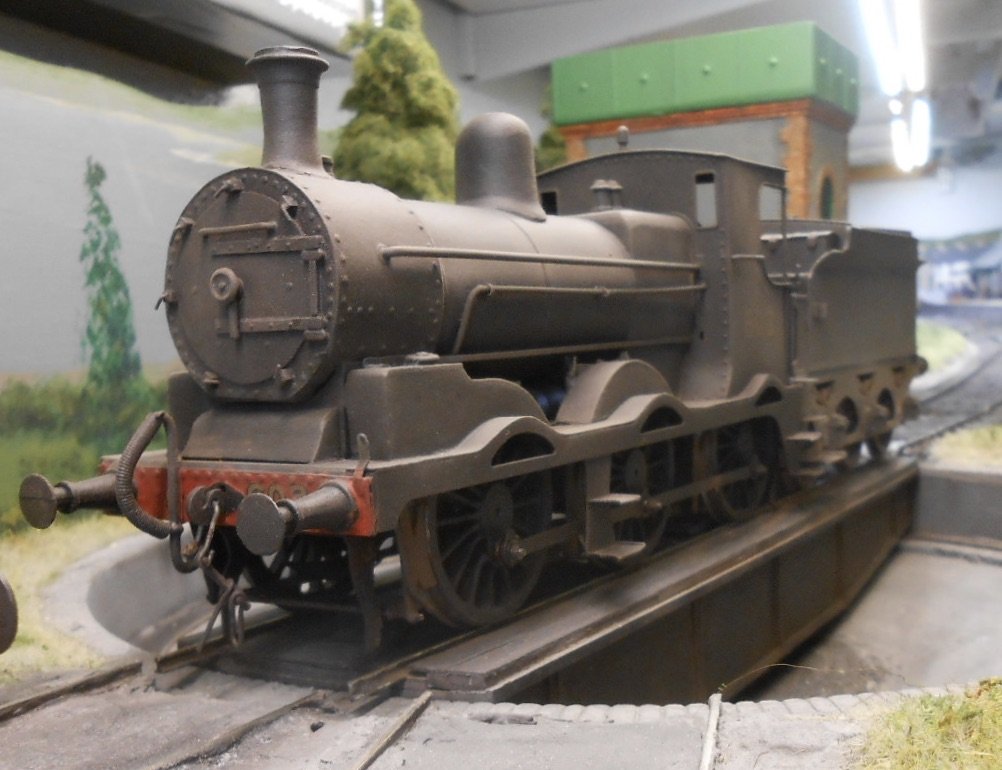
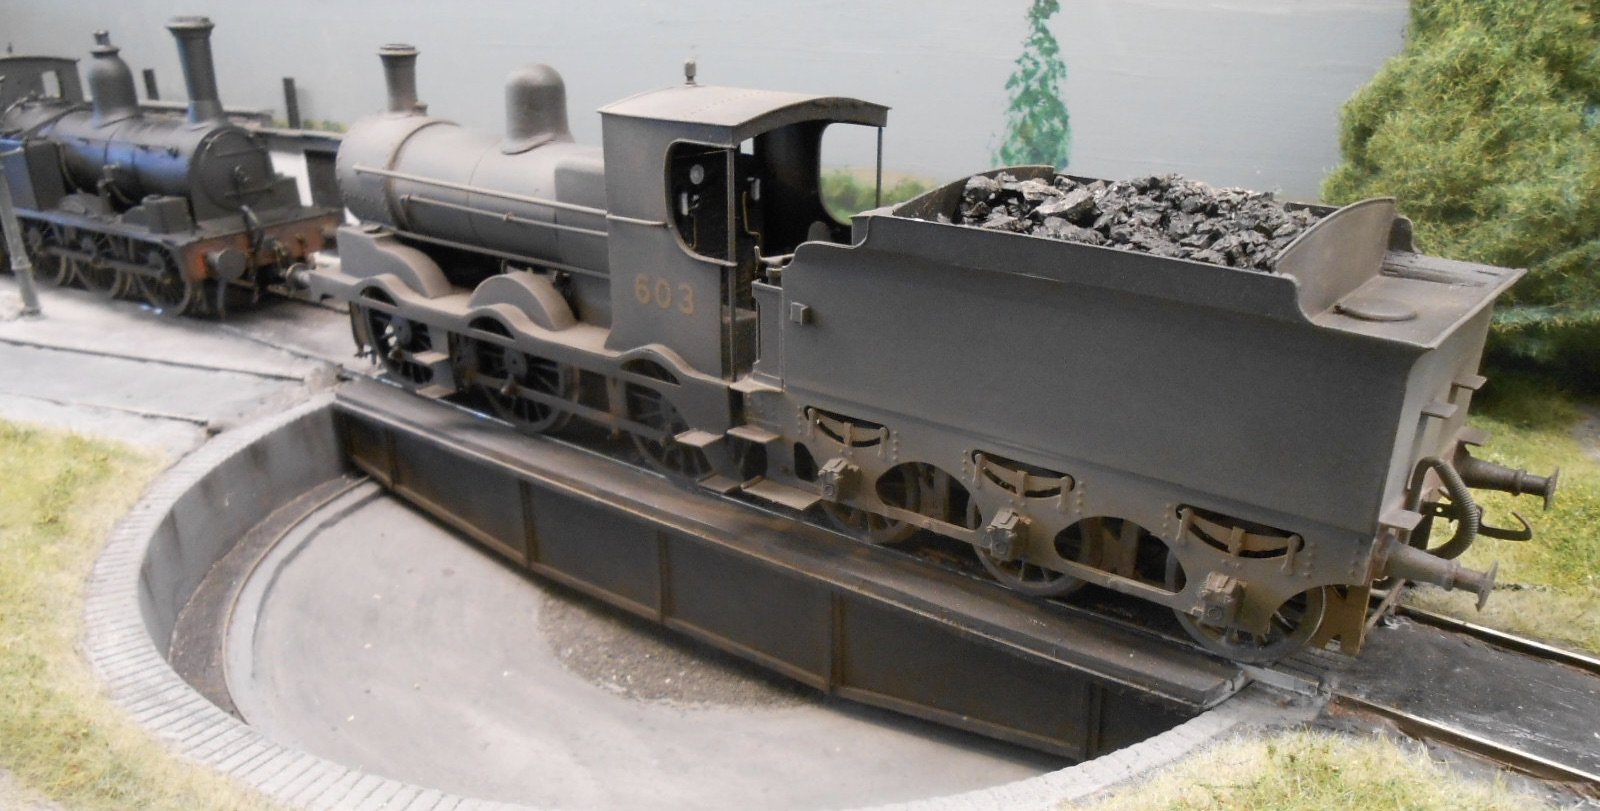
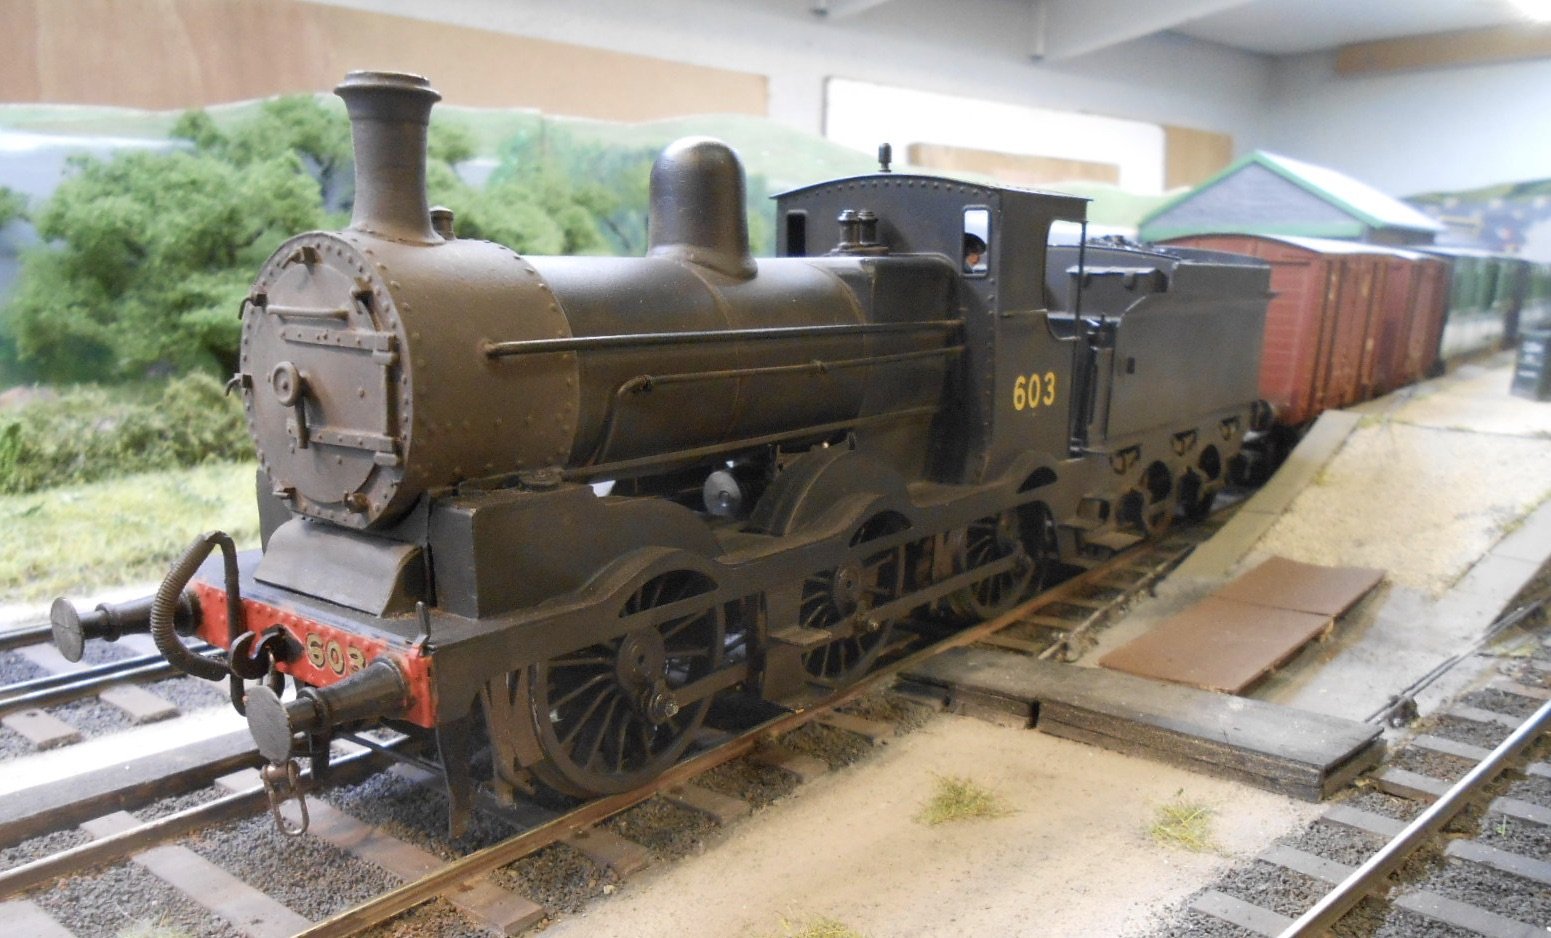
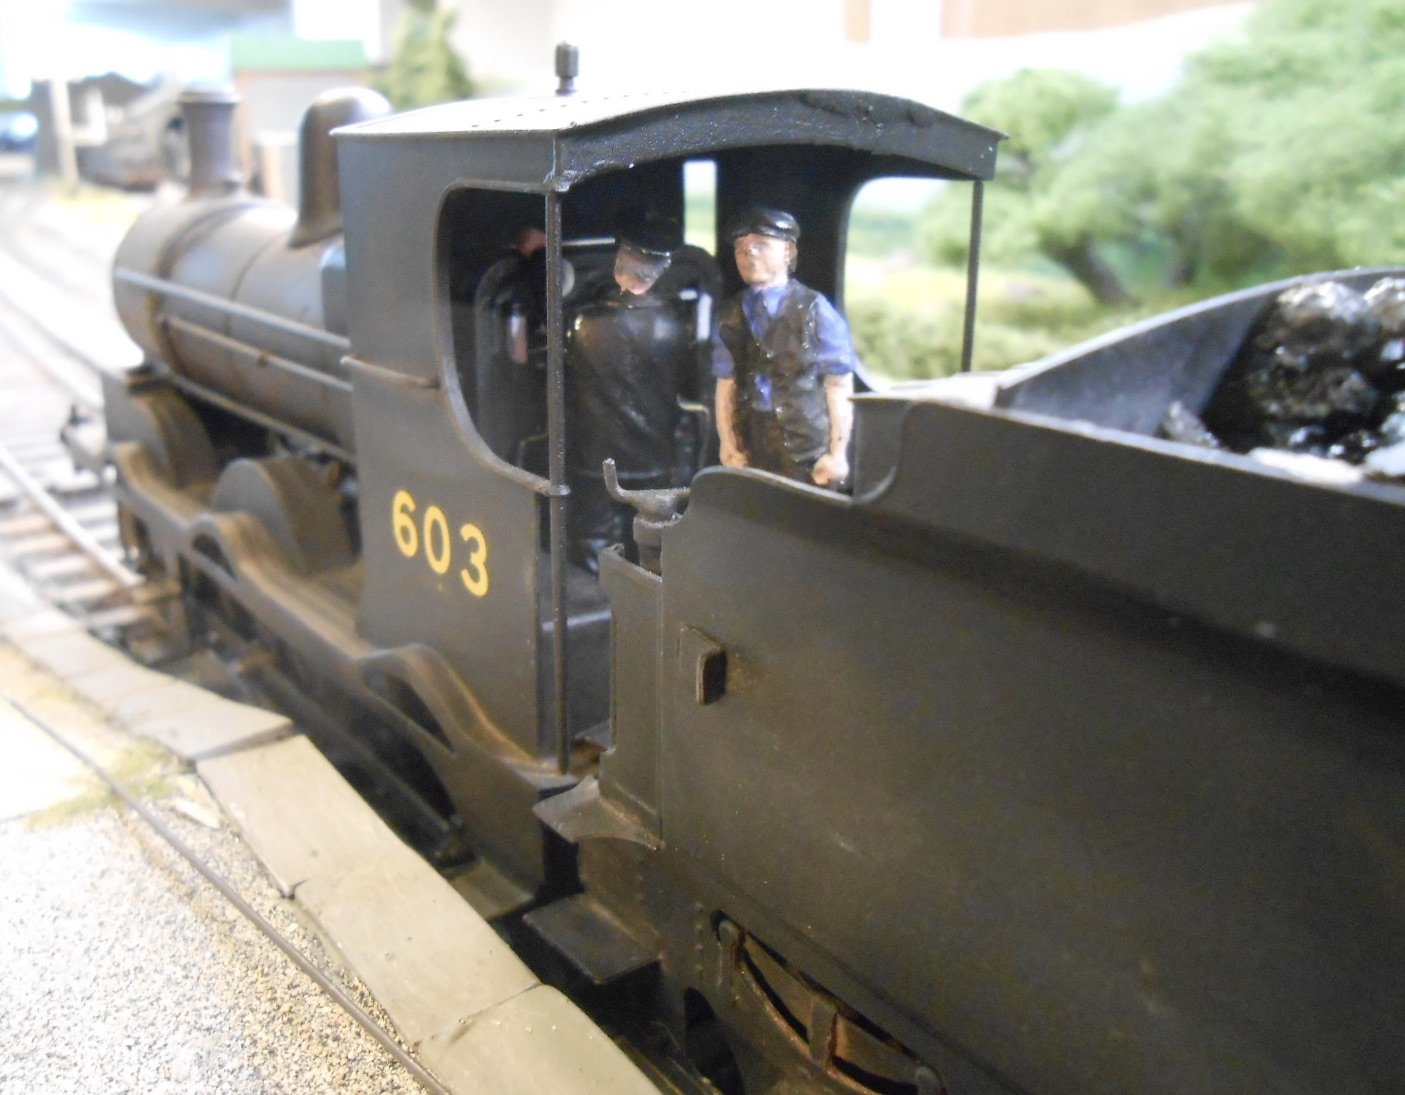
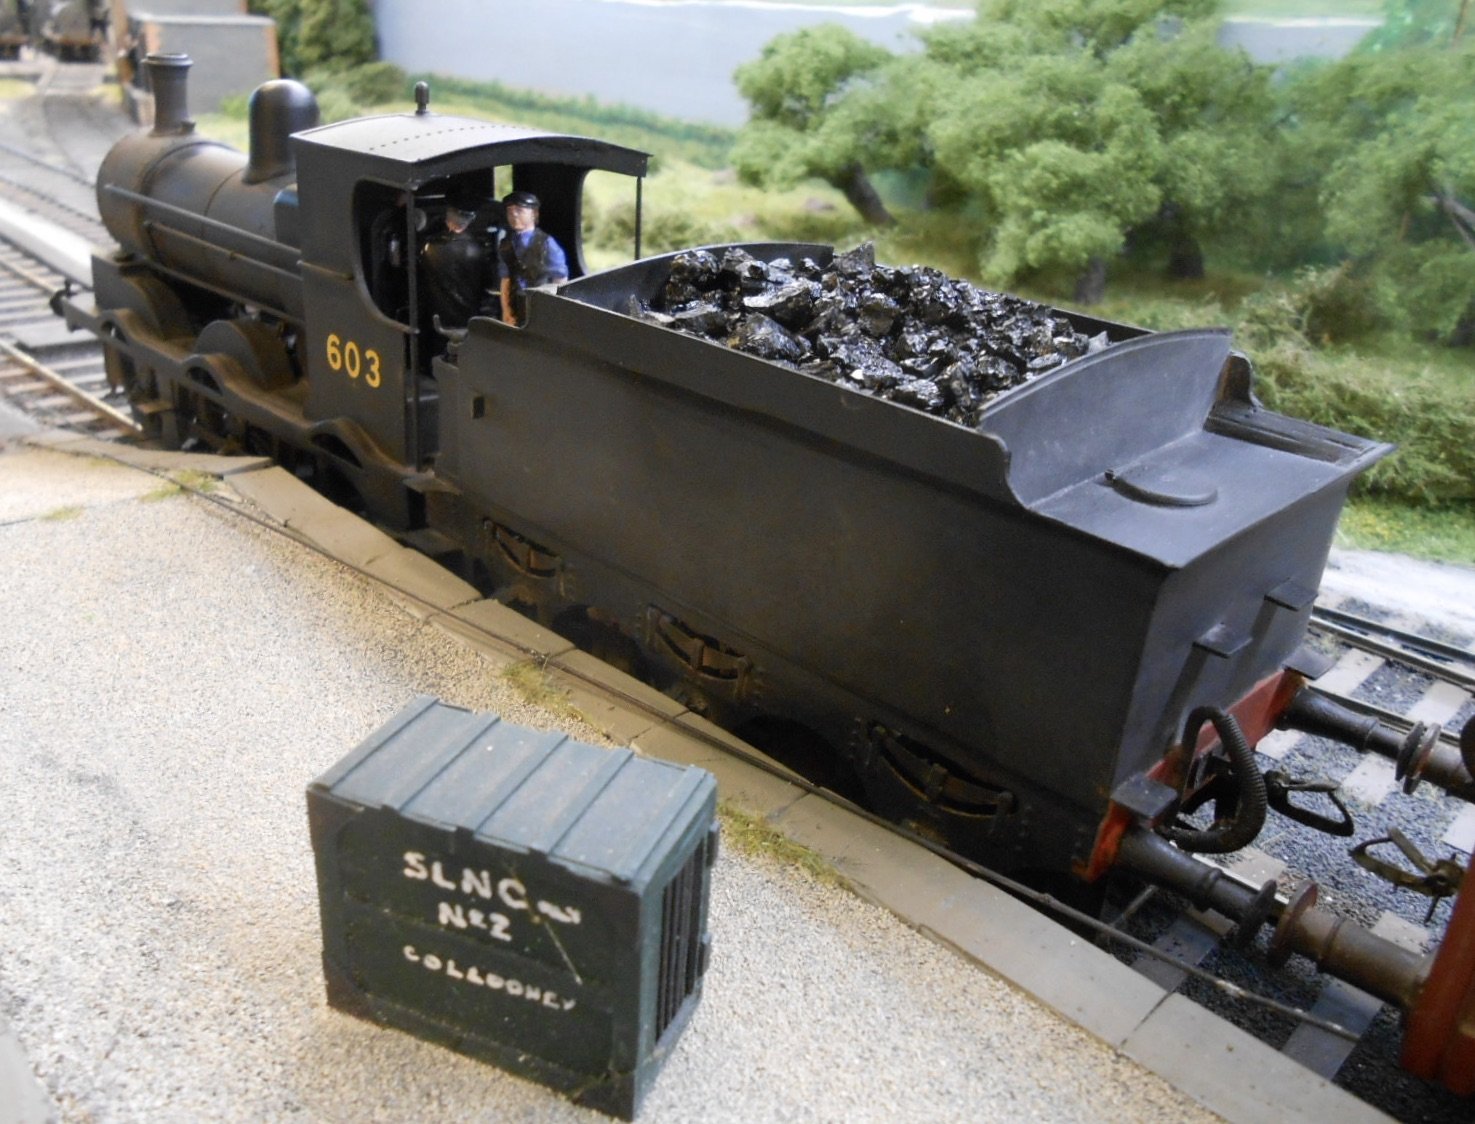
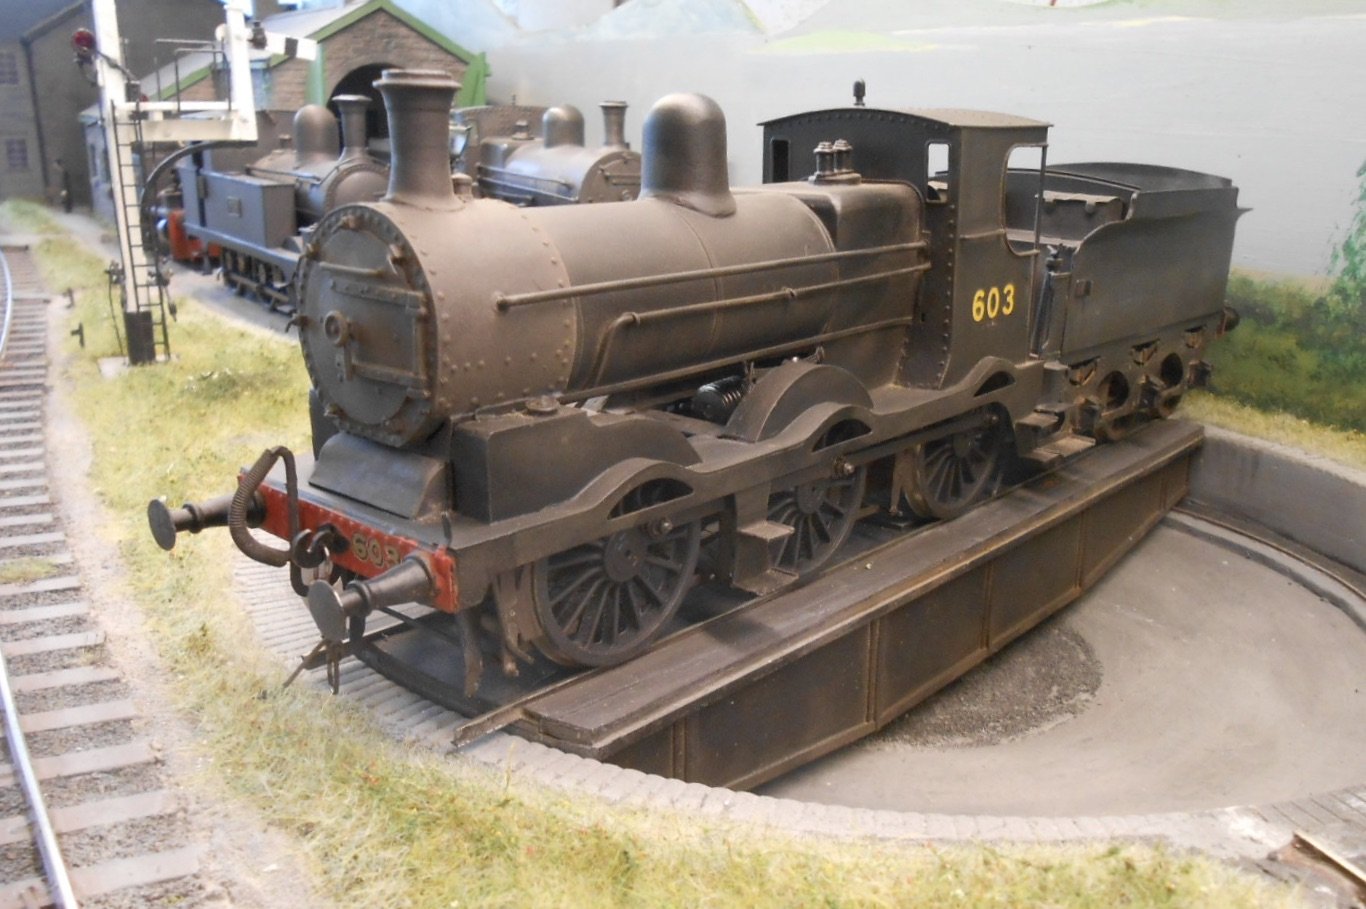
Nearly there The J19 is almost finished, with just a few things like cab window glazing and wiring the tender pickups to the motor. It will also need some lead weights in the boiler and some running in. Was tempted to give it a heavy weathering job, but the in the colour photos I have, it seems fairly clean, if a bit dusty in some areas. Hence has mainly been worked on with weathering powders. The numbers are HMRS pressfix from their LSWR/SR sheet, while the coal continues to be that from a couple of lumps I liberated from a traction engine rally many years ago! As I've hinted at elsewhere, 603 needs a train and given that it has to be for my 1950s period, am thinking that some sort of mixed might be fun. I have a kit of the MGWR 'hearse' van, which later got used for fish traffic, so will add some 'semis' to that [as they seemed to also be used for fish]. Bringing up the rear will be a MGWR 'glasshouse' brake van. As you can see in the Questions section, one was used on the Achill branch, so my theory is it got used on a 'mixed fish' train to Westport. Tenuous at best, but there you go. The final picture attempts to show three of Mr Atcock's finest on shed at Belmullet.
-
Proper boys' toys - though girls can play too, of course!
-
Fascinating, thanks JB. Especially pleased to hear that at least one van worked on the Achill branch. In my fiction for Belmullet, not only does the SLNCR and WL&WR combine to build a line west from Ballina, but the MGW also decided to get in on the act by building one of the lines suggested in your book, north from Achill. Therefore, I have a tenuous excuse for a mixed train from Belmullet to Westport, carrying fish and other stuff, with the MGW 4w hearse at one end and the glasshouse brake at the other, with of course some 'semis' in between. It's my railway...
-
Thank you! Some interesting details there - though I think it is the six wheel, 20ton version, but very useful nonetheless. The dimensions on the drawing I have are quite difficult to read, so these should help. What I've done so far is to use a standard dimension, in this case the 6'3 between buffer centres, to rescale it on the printer/copier. Turns out the body is 9' wide, though maybe the 9'7 quoted is over the extremities?
-
Nice!
-
Am interested in building one of these. Have a drawing, which according to the wheels, seems 7mm scale. However, the dimensions in this article suggest otherwise, particularly with width, which you can see is given as 9'7" - generous, even by Irish standards. Also, cannot find any info on how long they lasted, though clearly at least up to 1932. Likewise, they seem a little camera shy. Essentially, am thinking that one of these, as part of a fish train (using the MGW hearse van), would make a nice consist for my new J19 to pull. 1950s period, would that be appropriate? Thanks as ever.
-
That looks an interesting bit of kit - tell us more!
-
You say it may not be perfect David, but it has the look - that almost indefinable something of proportion and colour which says it is right. Placed in the setting of Rosses Point, which also has all these qualities, then it all adds up to very fine modelling! Already looking forward to seeing what comes next.