Mayner
-
Posts
4,875 -
Joined
-
Last visited
-
Days Won
119
Content Type
Profiles
Forums
Events
Gallery
Everything posted by Mayner
-
The problem may have arisen as a result of changes in the characteristics of the mineral after the mine near Kingscourt Station was closed and the gypsum was sourced from another mine. As far as I recall the gypsum railed from Kingscourt and gypsum plasters were originally a red-brown in colour, changing to a mid-dark grey during the 1990s. Grey gypsum may have a tendency to stick more in the wagons than the brown, grey gypsum plasters tended to take considerably longer to dry out than the brown. What does this all this mean for the modeller? I suppose alternative brown and grey wagon loads, though Kingscourt-Platin gypsum traffic was transported in corrugated and wooden bodied open wagons until a hopper discharge was commissioned at Platin c 1976-7.
-
There are a number of 1950s colour photos of C&L section locos in both volumes of "Irish Railways in Colour" from steam to diesel Tom Ferris Midland Publishing. The overall impression is of reasonably clean locos with badly worn paintwork with burnt smokeboxes & chimneys, towards the end locos would have been in a mechanically run down condition as heavy overhauls of C&L section engines at Inchacore appear to have ceased in the early 1950s. There is a black and white photo of a recently repainted 12L under overhaul at Ballinamore in 1956 and 6T appears to have been re-painted in black at Inchacore before transfer to the C&L for the final coal rush in 1957-8. The narrow gauge engines would have been worked hard (often by Broad Gauge crews) during the periodic coal rushes, the combination of hard work, poor quality coal and minimal maintenance would have contributed to the woebegone appearance of the loco fleet during the final years of operation.
-
Happy New Year! I had a positive start to 2020 dusting off Keadue and running a train.
-
Rough or agricultural does not exactly describe the replacement sides 6:00-
-
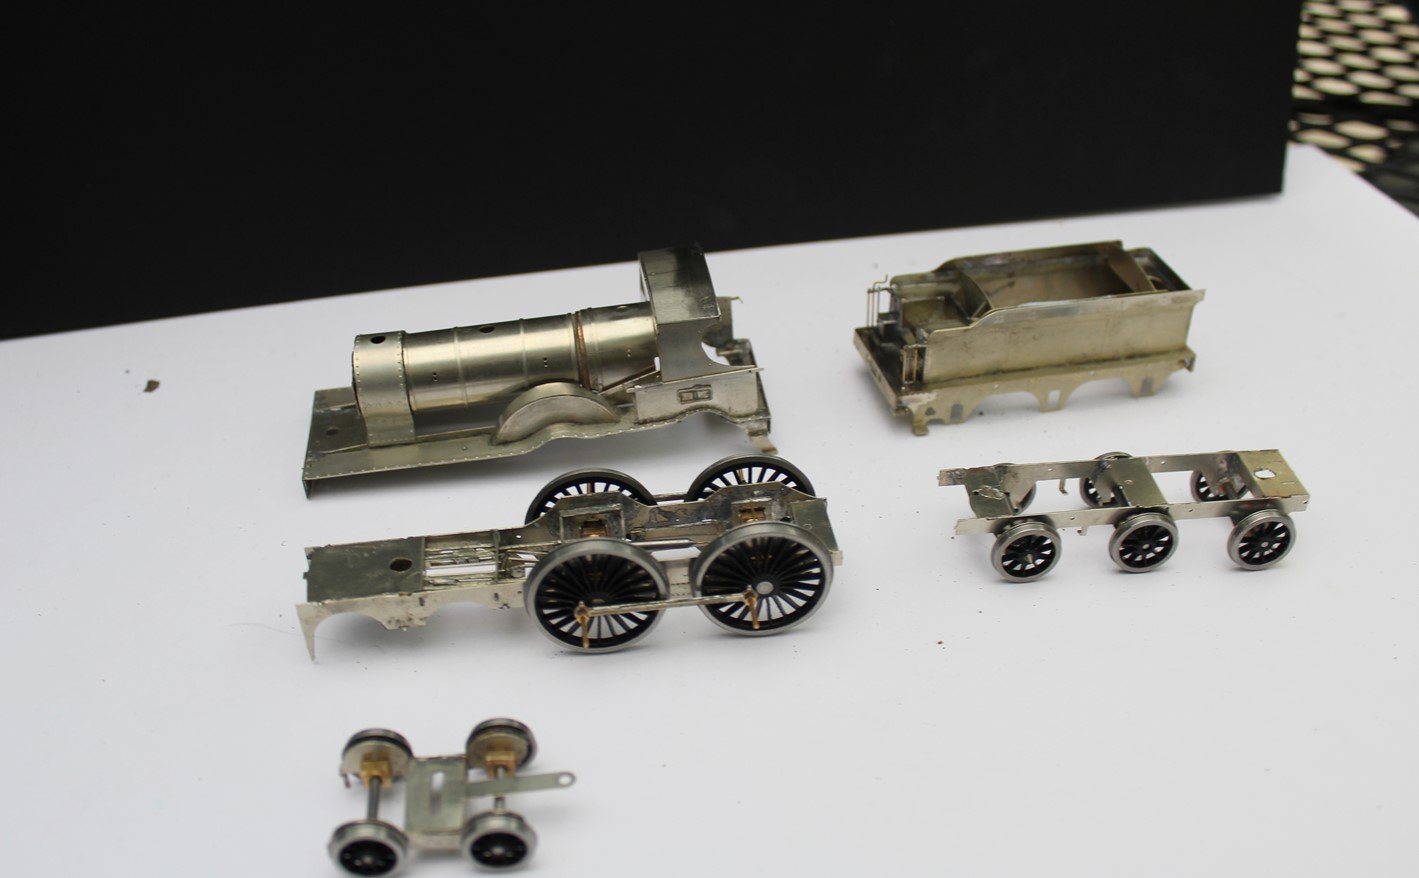
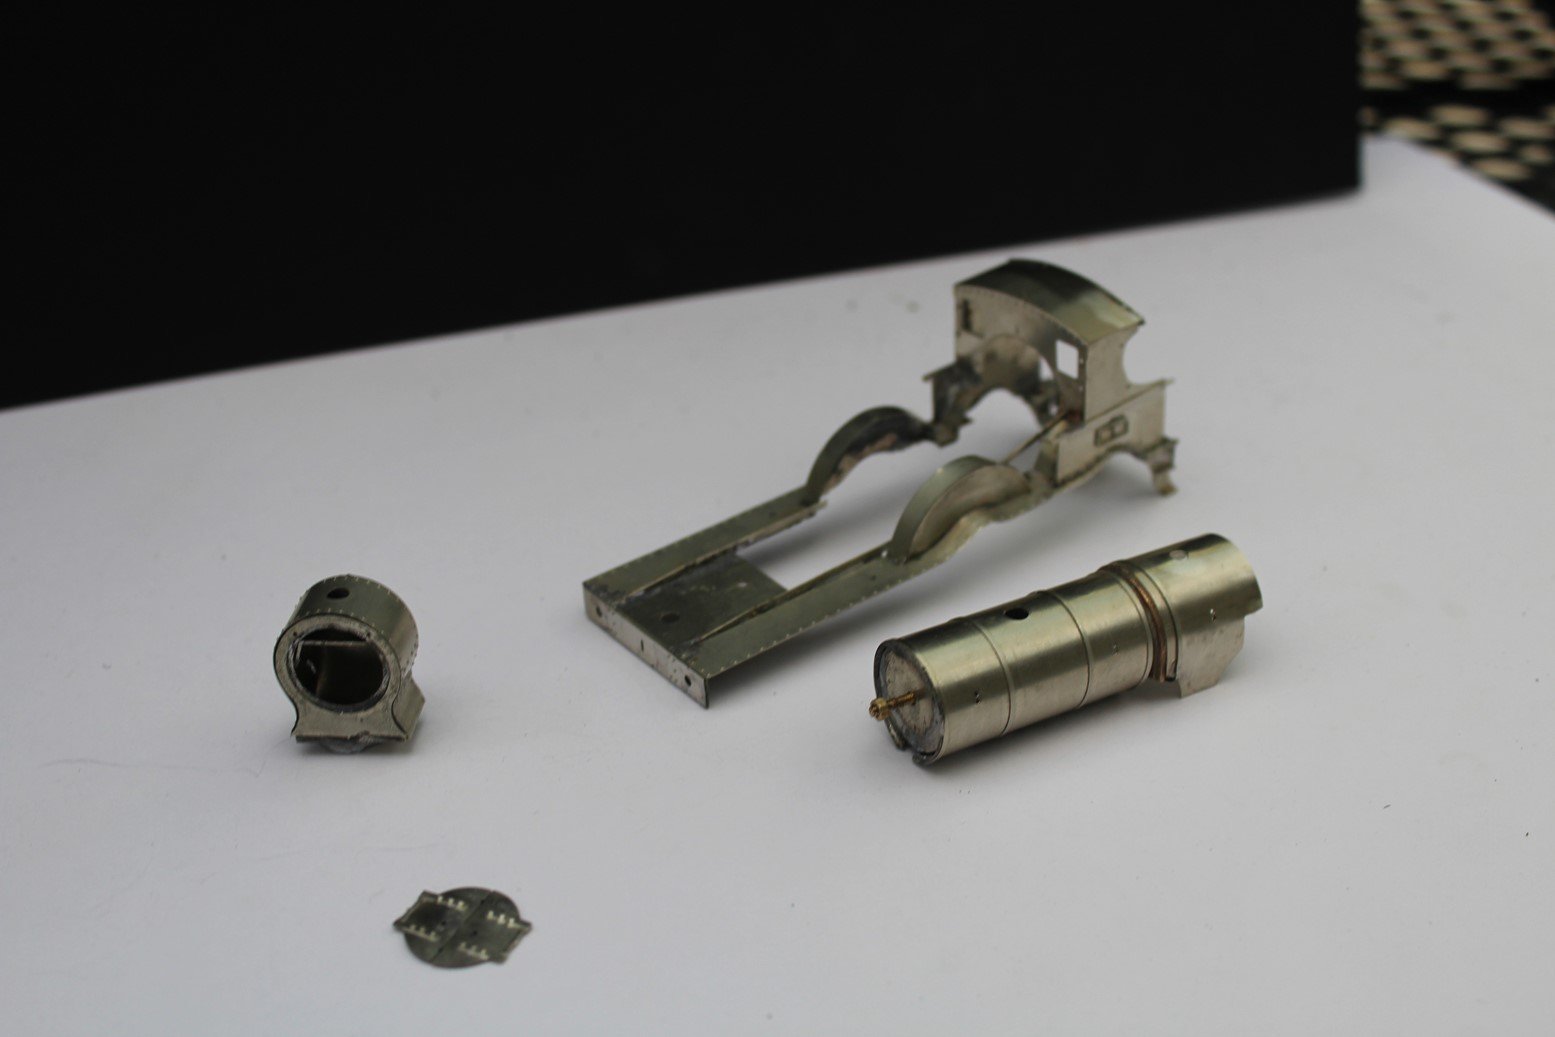
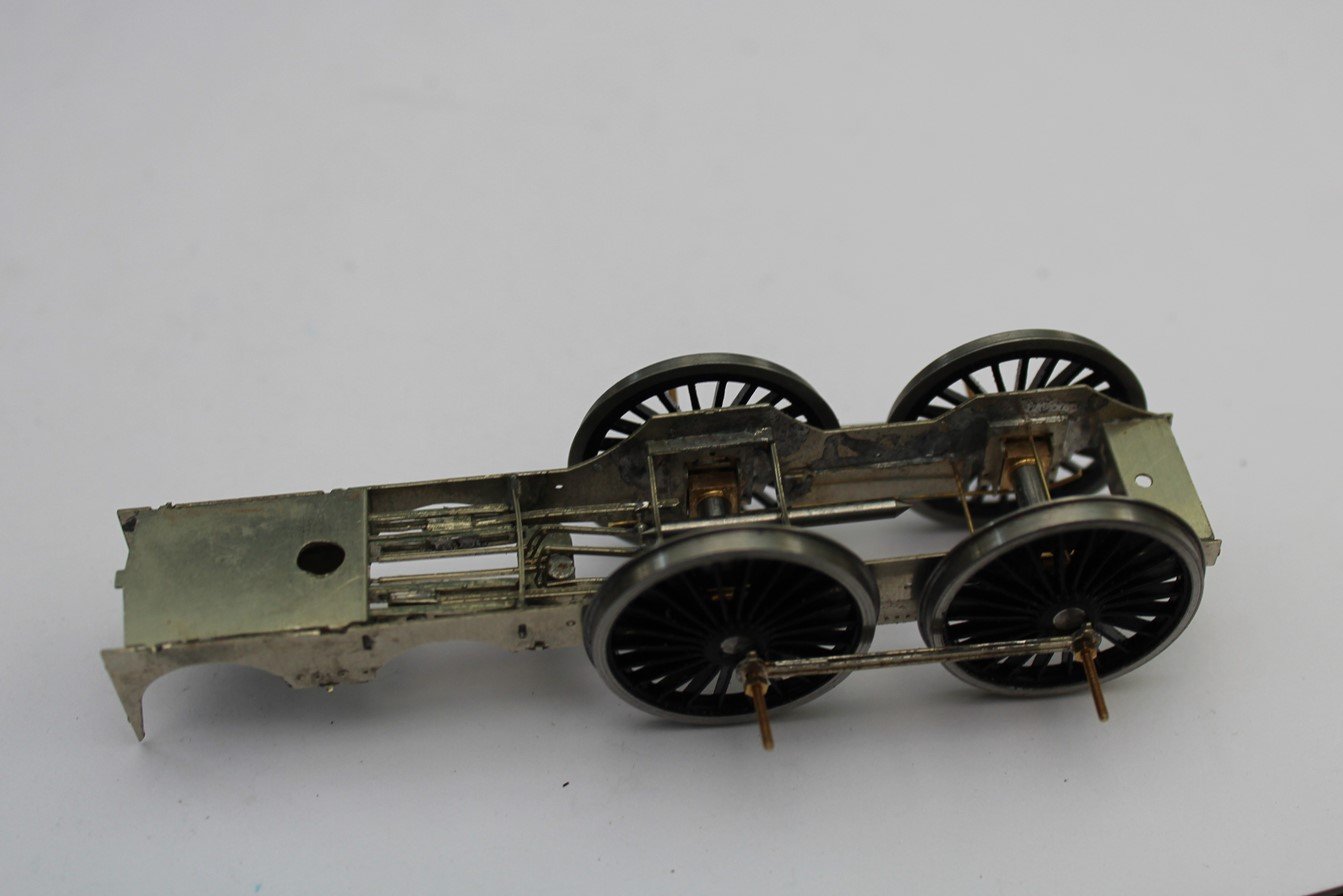
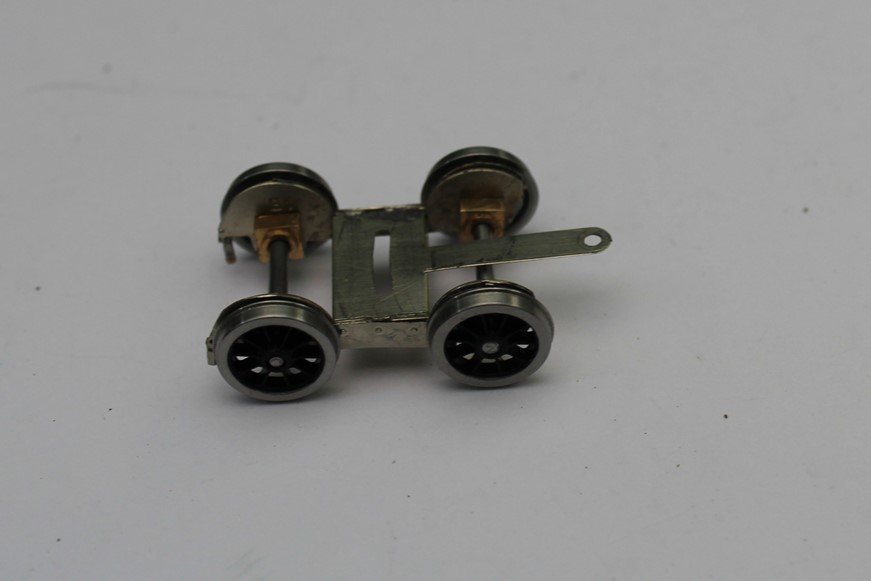
One of last years New Year resolutions was to focus on clearing my existing backlog of projects before starting any new modelling projects which seems to have backfired with much the same list of my own projects on the go 12 months later. One exception was the test build of the 52 Class 4-4-0 over the Christmas, basically a final check to identify any modifications required to the tooling before releasing the production version. Major sub-assemblies, loco body, loco chassis & bogie, tender chassis and SSM J15 tender. This loco is modelled on GSWR No 1 running in late GSWR/early GSR condition with 3 ring raised round topped boiler as a racing machine with short cab roof. Loco body sub assemblies. The footplate running board assembly is similar in concept to the SSM J15 & S7 LNER D16 https://www.rmweb.co.uk/community/index.php?/topic/147957-7mm-lner-d163-two-years-down-and-nothing-to-show/ and is surprisingly strong once the splashers and cab side sheets were soldered in place. The kit is designed to be assembled with a raised firebox, the flange between the boiler and firebox is a lost wax casting from a 3D printed master. Boiler smokebox assembly is a bayonet fit to the cab at the firebox end the smokebox bolts to the running board. Some adjustments are required to the smokebox, boiler and firebox wrappers for the production tooling. Funnily enough no major corrections are required to the footplate/valence sub assemblies. Loco chassis. I assembled this particular loco to run on 21mm gauge track with a compensated chassis using High Level hornblocks and Gibson wheels, turning the axles from 1/8" silver steel, I have used a 2mm wagon axle as a temporary pivot for the leading rocking axle. Inside valve gear is based on a Beyer Peacock 101 Class GA and likely to be similar to that fitted to contemporary GSWR classes. No significant issues were identified with the chassis though I need to open up the clearance hole for the bolt that secures the smokebox to the running plate. The bogie is simple enough the pivot arrangement is recommended in John Ahearn's "Miniature Locomotive Construction" and Guy William's "4mm Engine" and minimise the risk of shorting against the frames compared with the usual swing link arrangement. Wheels are again Gibson axles 2mm silver steel with the ends polished off in the Unimat SL Tender Chassis. I designed a tender chassis with floating leading and center axle on the "Sharman free bogie" principal for use with the kit for improved traction compared to a conventional tender chassis, the kit includes the longer extended coal plates which appears in some photos of 52 & 60 Class locos with this form of tender. I may at some stage produce a fret for the 2500 Gal tender introduced for use with the 52 Class and later used with smaller GSWR locos on long haul passenger and freight duties. Again the chassis securing holes need to be enlarged on the tender. Next stage will be to set up the motor and gearbox and pick up system before assembling the loco and tender brake gear, I usually use an underslung gearbox arrangement with a vertical motor in express passenger locomotives which may be challenging in a 52 Class!

-

CIE Laminate Coaches - Worsley Works - ECMbuild in 4mm
Mayner replied to murrayec's topic in Irish Models
The interior wall linings add a lot to the coaches, do you cut them out by hand or use a profile cutter? -
Excellent looking model, the high standard of detailing really lifts the model to another level almost 7mm or gauge 1 standard of realism. You could always do an ex-works version, there is a nice photo of what looks like a freshly repainted 12L under repair in Ballinamore erecting shop in 1956 in the Pan paper back version of P J Flanagan's C&L book.
-
One of the end bulkheads on the Back-to-Back fertiliser swap bodies was adjustable for securing the load, the side panels were removable by forklift for loading-unloading. The bagged cement wagons had an adjustable internal bulkhead at one end to prevent load shift. Longitudinal movement is a significant issue when transporting palletised freight by rail and can contribute to de railments http://kiwirailfreight.co.nz/media/2719/section_20_palletised_freight.pdf CIE published operating instructions for the Pallet Cement including a nice isometric drawing of a wagon in the "Weekly Circular" when the wagons were introduced in the late 70s similar instructions were issued for handling containers with forklift pockets when the Sligo Line went over to Liner Train operation around the same time. It may be worth while looking through the "Weekly Circulars" in the IRRS Library or Archive for operating instructions when new wagons were introduced that involved changes to the freight handling system, there may be instructions for the Back to Backs and different types of Keg pallet.
-
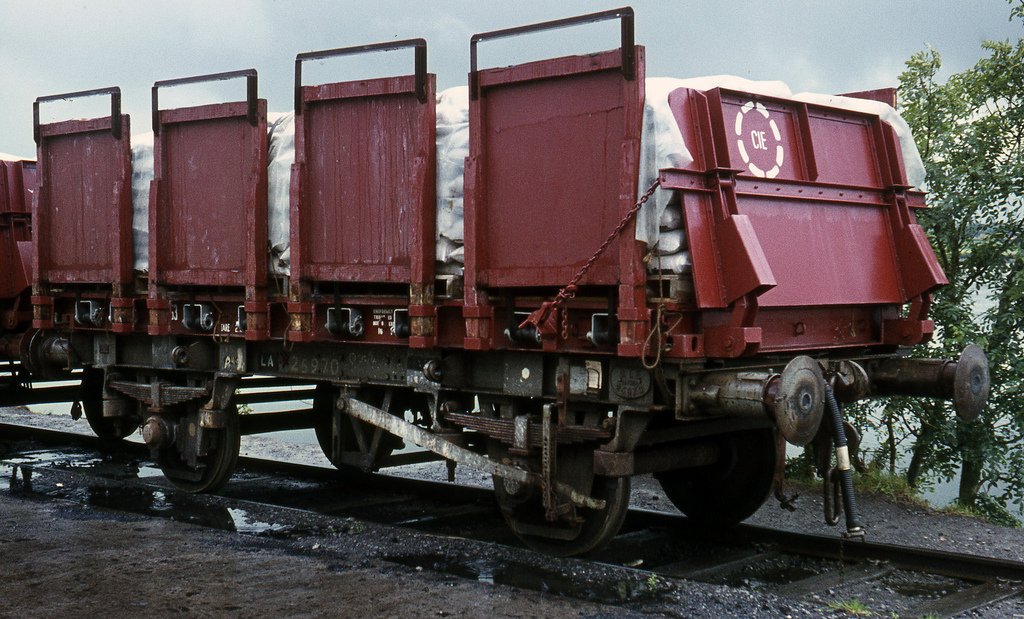
Basically "lift off" decks and open containers that were used for lift on lift off unit load traffic between the Lancashire Ports and Ireland before ISO containers were introduced in Ireland and the UK during the late 1960. http://www.trucknetuk.com/phpBB/viewtopic.php?t=65122 The original 20 Ton flat wagons and keg containers were introduced before the ISO standard for container lifting points and twistlocks was adapted in the UK & Ireland. The wagons were fitted with fold down stanchions and tie-down's to secure the load. The containers were originally designed to be stacked using the V shaped framework on the side of the wagon. The "Back to Back" Fertiliser flats/swap bodies introduced in the late 1960s were fitted with ISO twistlocks, body was wider/longer than the wagon chassis and the adjustable bulkhead could potentially pinch a shunter while uncoupling/coupling up. The Back to Backs were basically treated as fertiliser wagons running in fixed formation block trains sometimes with bogie wagons or individual wagon loads until replaced by the bogie wagons in the mid-1970s. The MK1 keg flats and wagons were originally stored out of use in Gort & Roscrea until the early 1980s, the redundant Back to Back swap bodies and other redundant containers were stored for many years in East Wall Yard near the gantry sidings.
-
I would not get too carried away with Chinese or other national stereotypes, most countries have their own unique way of doing business and a high proportion of businesses (manufacturing, contracting and services) East and West have successfully used subcontractors and specialist suppliers for many years. I am not convinced that bringing manufacture "nearer to home" to the UK will result in a better job, in my experience (30 years project and quality management UK & Ireland) poor quality and contractors/supplier abusing the system can be as significant a problem in the UK and Ireland as overseas. UK & Irish contractors and suppliers sometimes were not adverse to farming out work to subcontractors without telling the client or dropping everything for a major client with very deep pockets. One of the unsung benefits of Chinese manufacture in OO has been the near universal adaptation of NMRA RP25 110 wheel standards, resulting in improved running and a high level of compatibility between different manufacturers, in contrast to the days when the major British (Outline) manufacturers including GMR/(Airfix/Mainline), Hornby, Lima all used different track and wheel standards. IRMs & Accurascale's success in producing ground breaking models is likely to be a high level of business acumen in particular a preparedness to work with their Chinese suppliers (using the Chinese manufacturing knowledge and experience) to achieve their mutual objectives rather than attempting to impose pre-conceived ideas.
-
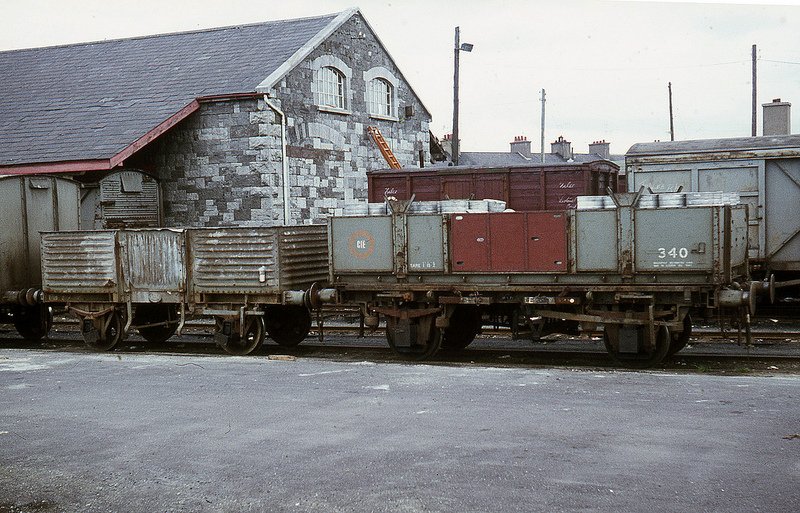
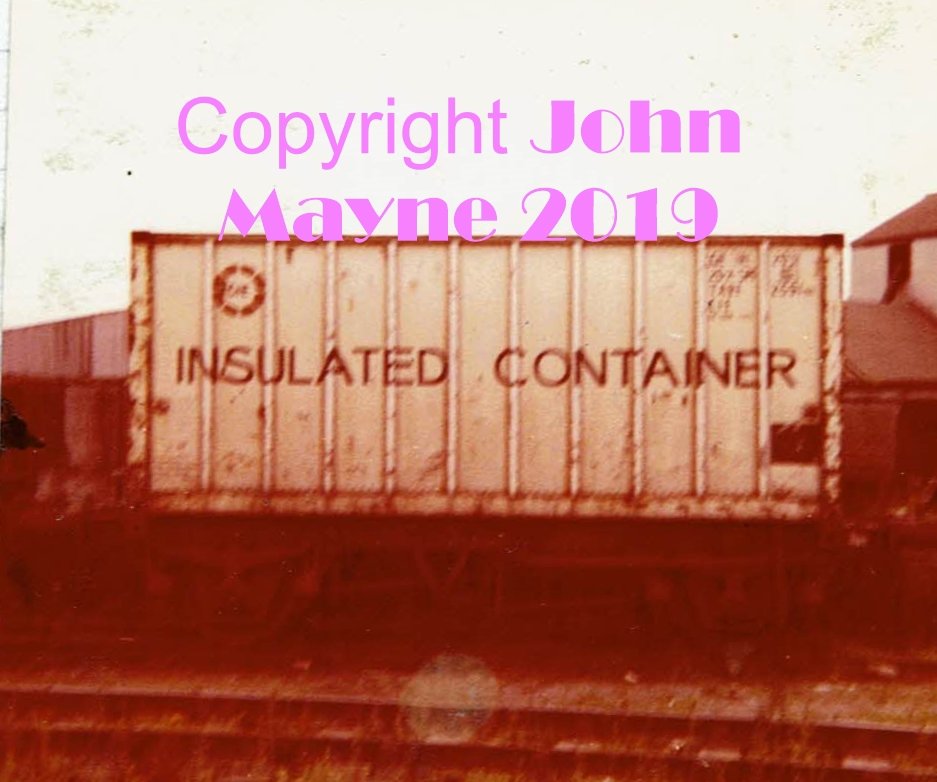
Two from the vaults early CIE ISO equipment. MK1 20' Keg swap body/Lancashire Flat on 27101-27278 20'-12'wb skeletal flat wagon North Kerry Yard Tralee Aug 78? These swap bodies were used for keg traffic for approx 10 years from the late 1960s until replaced by 2.0m keg pallets designed for use with the 47'6' bogie flats. CIE Insulated Container (8') on 27301-27767 22'6" 14' wb skeletal flat wagon North Kerry Yard Tralee. CIE acquired a small number of Insulated Containers (possibly less than 10) during the late 1960s, the Heuston-Tralee was the last long distance goods service to go over to Liner Train operation in the late 70s. At the time of the visit goods trains were being made up in the North Kerry Yard as Edward Street Yard was being modified for Liner Train operation.
-
Open containers/swap bodies. There is a photo of a southbound B&I Liner with a similar consist passing Cabra Bank complete with brake van in June 1972 in Irish Railway Pictorial "Rails Around Dublin" Donal Murray ISBN 1 857 80 144X During the late 60s CIE built a number of different types of swap bodies for use with the newly introduced 4w flat wagons, some of the swap bodies including Keg & Back to Back Fertiliser were wider than the standard ISO 20'X8' container footprint and overhung the sides and ends of the wagon underframe. The open swap bodies on the Cork-Dublin B&I Liner are likely to have been designed for some short lived traffic, possibly bagged moss peat from Coolnamona to Dublin Port. Its possible that the train was marshaled with alternate open and box containers to reduce the risk of a (human) shunter being pinched between two open containers during coupling up or un-coupling.
-
My order of 42' flats arrived this morning shipped half way around the World from the UK within 10 days, a pretty good shipping service by any standard. I could not resist this little set up not having a OO or broad gauge layout. Perhaps I can push the wheels in. The 20' containers are C Rail
-
N-Drive Productions appear to have re-released the Cavan & Leitrim passenger brake and ex T&D bogie van 22L, with the County Donegal Oldbury coach set to follow for £115. Its planned to re-release the Dongeal Railcars and Phoenix with rtr 009 chassis and loco kits as etches and castings. ndriveproductions@yahoo.com N-Drive press release Nov 2019 New Irish Lines.
-
Bell & B&I containers would have been used primarily for traffic between Ireland, the UK and Europe, with containers from the major shipping lines used for deep sea traffic from further afield. Bell Liner trains carried predominantly Bell containers as Bell was primarily competing with the larger British and European owned lines that served Dublin & Belfast Ports. European shipping lines containers such as P&O, NedLloyd, Hapag Lloyd and Maersk would have become more prominent as the railway focused on deep sea container traffic as the Irish manufacturing economy expanded during the Celtic Tiger era of the 1990s. While European shipping lines predominated in Ireland, containers owned by Far Eastern Lines (Evergreen & Mitsui OSK Lines) regularly appeared on Irish Liner trains.The alligator logo was a distinctive feature of MOL containers during the 1980s and 1990s https://www.hobbydb.com/marketplaces/hobbydb/subjects/mol-mitsui-o-s-k-lines-shipping-company. Hopefully C-Rail will be tempted to add a MOL container to its range. There was major consolidation/amalgamations of shipping companies from the 1990s with 10 Container Lines currently accounting for the majority of Worlds container shipments. Consolidation in Europe was significant with Maersk Line forming the Worlds largest container shipping company having absorbed the majority of lines that served Ireland including Royal P&O NedLloyd, Sealand & Hamburg Süd, P&O having previously amalgamated with NedLloyd in 2007. Like American box cars 'fallen flag" containers including P&O, Ned Lloyd and Maersk Sealand and the odd Bell container continued to fly their old herald under new ownership. The make up of deep sea container trains largely depend on particular traffic flows between a port and railhead, 20' dry and reefer containers are often used for relatively dense traffic such as meat or dairy products for export in pastoral countries such as Ireland and New Zealand, 40' containers consumer imports from the Far East and high value manufactured exports (cigarettes from Dundalk, synthetic fibre from Asahi Killala) or raw material used in the manufacturing process. A Cork or Limerick-Waterford Bell Liner was likely to convey a higher proportion of 20' containers from food processing plants in Munster compared to a Waterford-Dublin liner which was more likely to be transporting import traffic, like American boxcars there was a likelyhood of containers returning empty in one direction as its not practicable to arrange a backload.
-
On the model railway front Frateschi produce a wide range of rtr South American locos and stock including Alco, GE and GM export diesels https://en.wikipedia.org/wiki/Frateschi The narrow gauge lines in Central and South America tended to follow American rather than British or European practice, the Bachmann Big Haulier (G gauge) and On30 ranges are a good starting point for a Central or South American layout, several of the steam locos including the 4-4-0s, Baldwin 2-8-0 are based on locos supplied to railways in Central and South America.
-
Jonathan Allen's feature on the Keg trains includes a number of photos of the keg containers/swapbodies introduced in conjunction with the 47'6" flats in the late 1970s https://www.flickr.com/photos/64433281@N07/32352084940/in/photolist-8DnoUq-RhQTHW-2ahWmFQ-R5YFfJ-2c2mX9o-2arjFqG-2d9iN6s-oVDn3r-2and6p1-9wzXgn-2hFiC4z-2hEAccZ/
-
The containers/swap bodies used by CIE/IE to transport palletised keg traffic went through at least three distinct phases of development since the late 1960s. The IRM Guinness Keg Liner appears to be based on the final phase with the introduction of caged pallets (that carried kegs three tiers high) that were introduced in the 1990s. Keg traffic was initially palletised in the late 1960s using 20' open containers/swap bodies which carried kegs in two tiers high running on recently introduced 12' wheelbase flat wagons. This system was replaced in the late 1970s by shorter 9'? swap bodies used in conjunction with the 47'6" flats, these swap bodies were set up with removable slatted sides like a brewery lorry and fitted with forklift pockets presumably to minimise handling during shipment from the brewery to the local pub or hotel. The caged pallet system featured in the IRM model and SSM keg cage appears to have been introduced in the late 80s/early 90s , when IE closed many of the smaller freight yards and rationalised rail traffic to a small number of hub locations such as Athlone, Claremorris, Galway, Longford and Sligo on the Midland, closing Mullingar, Boyle, Roscommon, Ballinasloe to keg traffic. The conversion of 14' wheelbase flat wagons to carry keg traffic appears to have been a 1990s development to make better use of these wagons and free up more bogie wagons for container traffic. The conversion of the 62'9" wagons (used on the Cork & Galway Liners) to carry timber in the mid 1990s would have resulted in a shortage of bogie wagons despite the ending of Sundries and mail traffic in 1993.
-
1st wagon in cut appears to be a 3 plank possibly East Downshire with cupboard doors second a standard GNR open. Nice scene of a bygone era with kids playing with the traffic.
-
There have been a number of significant de-railments in the UK and Ireland where passenger trains ran into cattle and other livestock on the track. While CIE GM locos and Push-pull driving trailers were fitted with pilots or cow catchers from their introduction, the absence of a pilot or "object deflector" on a push pull driving trainer contributed to the fatal 1984 Polmont accident in the UK https://en.wikipedia.org/wiki/Pilot_(locomotive) During the late 80s/early 90s a passenger train on the Mayo Line make up of MK2AC stock ran into a herd of cattle near Donamon, the herd was apparently being driven along the line between accommodation crossings by the farmer. Although the train was not de-railed the collision resulted in significant damage to the coaches which were out of service for approximately 12 months awaiting budget approval to complete the repairs.
-
The weekend's wet and windy weather seems to have been a World wide phenomenon. New Zealand's South island effectively cut in two with main road and rail-links severed by flooding https://www.stuff.co.nz/timaru-herald/news/118057658/kiwirail-track-suffers-significant-flood-damage, high winds on Sunday brought down a large section of a mature tree above the main yard on my garden railway fortunately without causing too much damage, harming anyone and the fortunately the tree surgeons fees are largely covered by insurance.
- 1 reply
-
- 1
-

-
G.W. Biggs & Co Ltd oil distributors in West Cork since 1904 http://www.biggsoil.ie/about-us they just may have information on the trucks used in the 1950s Bedford trucks had a good reputation in Ireland (at least my father as a fitter and a one time haulier my father preferred Bedford to other makes!). The Bedford S and normal control Leyland Comet were fairly common at least in Dublin into the mid-60s. Its possible Ford may have been preferred in Cork to Bedford or other marques https://www.irishexaminer.com/ireland/memories-of-ford-check-out-some-historic-readers-pictures-and-the-stories-behind-them-447450.html.
-
In a strange way not so new in terms of technology at -all the gantry crane arrangement used for continuously supplying sleepers and taking away old rails appears to be based on the Bretland Track Re-laying machine developed by the MGWR in the 1920s. The arrangement of the gantry crane (Conveyor) running on rails on the material wagons to feed the re-laying machine is pure Bretland, the Bretland system was licensed to Morris Tracklayers in the UK who built a tracklaying machine that was used on the LNER & BR (E) up to the 1960s. In away these track-relaying machines were ahead of their time as the preparation work prior to the relay and lining and leveling to achieve line speed had to be done manually by vast armies of men until suitable machinery was developed from the 1950s onwards.
-
Jeremy Clements wrote an interesting article (may 2011 New Irish Lines) on the challenges of maintaining the loco fleet on the 7mm Fry Model Railway. Interestingly it was found necessary to re-build the diesel fleet from a single motor driving all axles to a two motor arrangement driving a single (inward) axle on each bogie. Two powered axles on a single loco were found to be adequate as the 7mm layout was basically flat. The focus was ease of maintenance allowing a complete motor/gearbox/wheel set assembly to be quickly swapped out for maintenance or replacement without having to remove a bogie or dismantle the loco. This would be difficult to achieve in OO perhaps a minimum stock of 3 times the number of locos necessary to run the sequence to cover maintenance and repairs! The new Fry Model Railway could always consider the experience learned at Pendon in operating the Dartmoor layout since 1955 in particular Guy William's experience in building an maintaining 4mm steam outline locos.
-
That's an interesting one, it looks like two passenger trains possibly connecting at Palace East although the Bagnalstown-Palace East line lost its regular passenger service in the 1930s. The train at the branch platform appears to have an IRRS headboard, the train on the main line appears to be worked by a 333 or D4 Class 4-4-0 which normally worked main line passenger rather than branch line services in South East Eastern and Waterford Region. Its possible that the train on the main line is a special or has been strengthened for that particular working, North Wexford passenger trains appear to have been normally worked by the smaller 52 & 60 Class 4-4-0s until replaced by J15s and ultimately B141 during the final months of operation.