David Holman
-
Posts
4,359 -
Joined
-
Last visited
-
Days Won
117
Content Type
Profiles
Forums
Events
Gallery
Everything posted by David Holman
-
Well, that looks rather good. Full of character and dare I say a hint of the preserved 'Bellerophon' about it. The polished brass between boiler and smokebox is a nice touch too.
-
Not sure which is more challenging, a beast like the 800, or the dainty D17, hiding behind. Either way, both coming on well and great to see some kit building going on.
-
Worked well for me. The 'stupendous' smell should real sulphorus, by the way. My Amazon tablet is a fine thing (not least very cheap and cheerful), but the spell checker has a very strange grip on reality!
-
I've use Woodlands Scenics ' fine ash' ballast on Arigna/Belmullet and Fintonagh. It is aimed at N gauge but works fine in 7mm scale and should do ok in 4mm scale too. When we had a multi fuel heater and back boiler for our central heating, there was a ready supply of real ash ballast, which worked well when sieved, though gave off a terrible stupendous smell when fixed with the usual on a glue mix. Chinchilla dust is very fine and would work well, but it needs painting as it is a pale beige sort of colour.
-
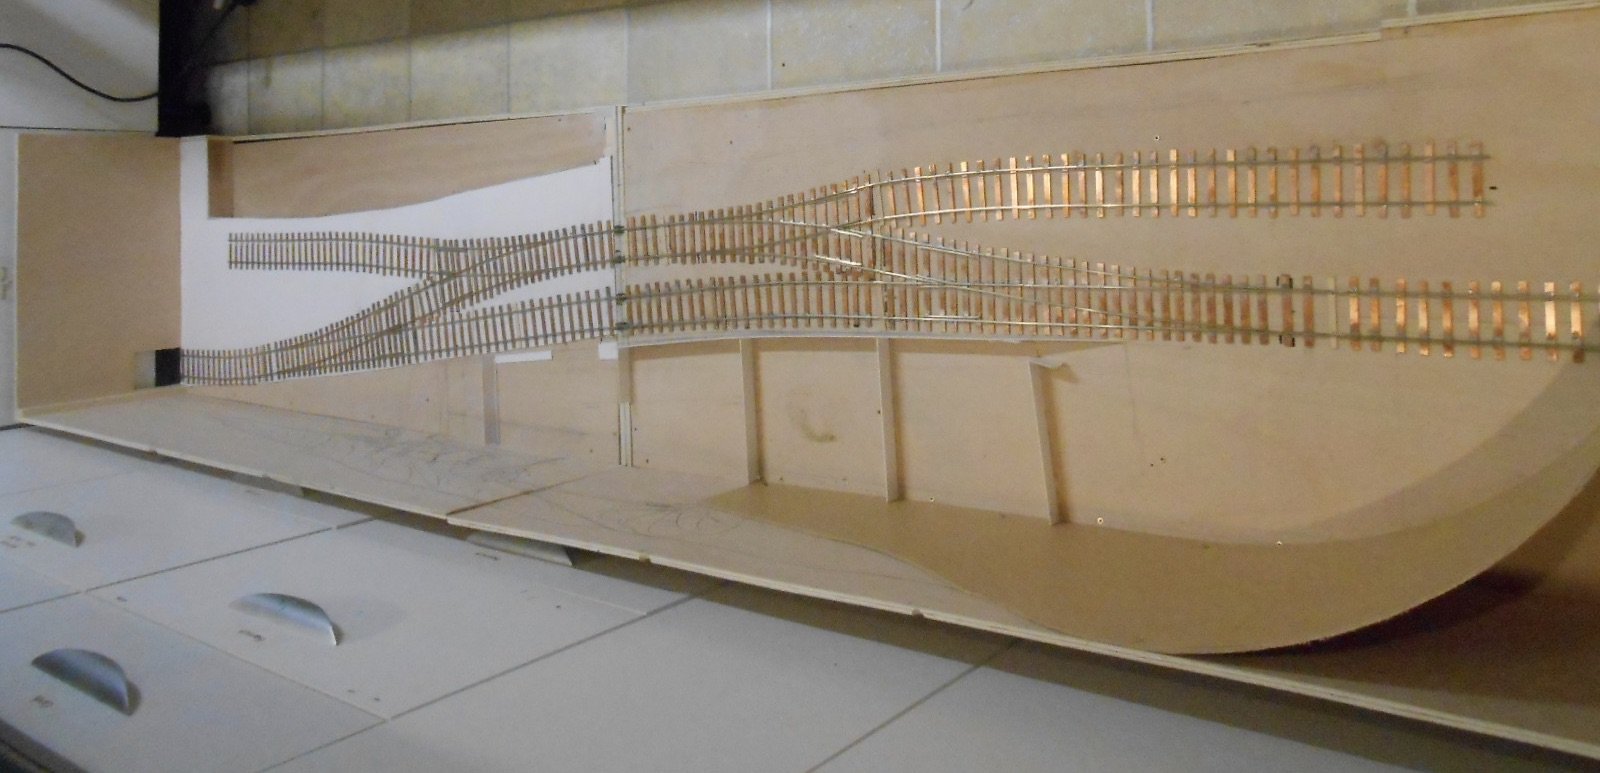
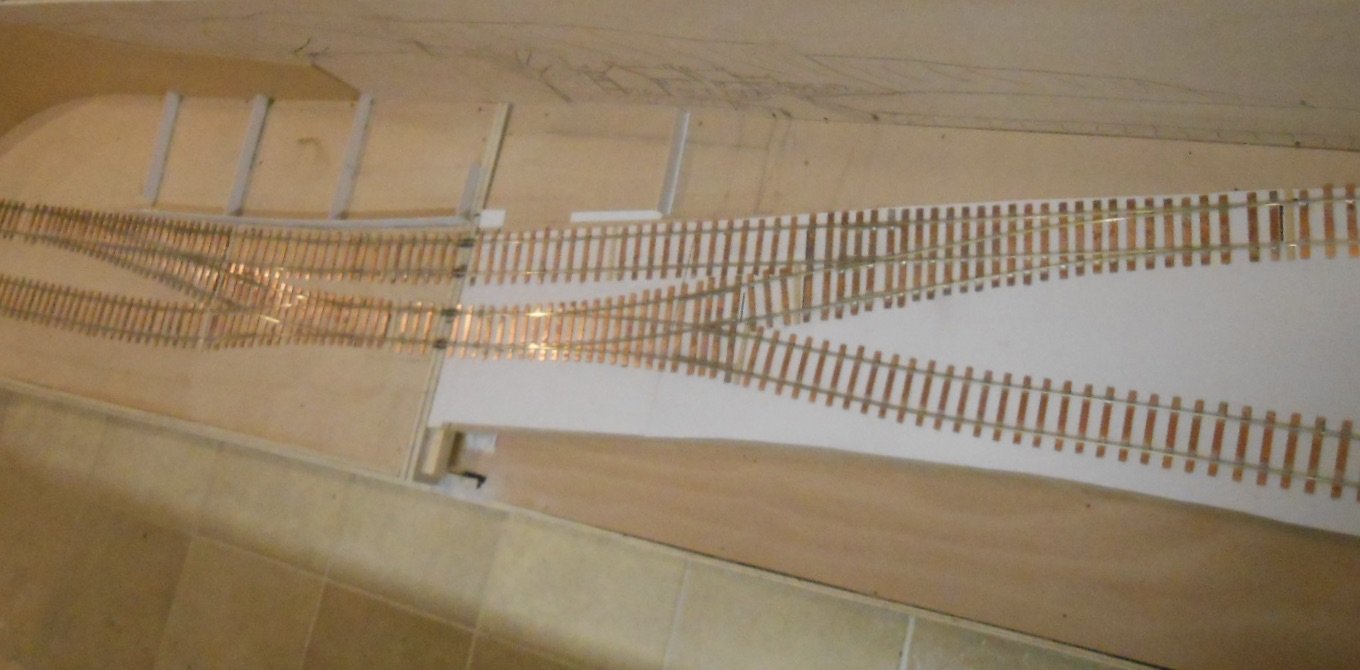
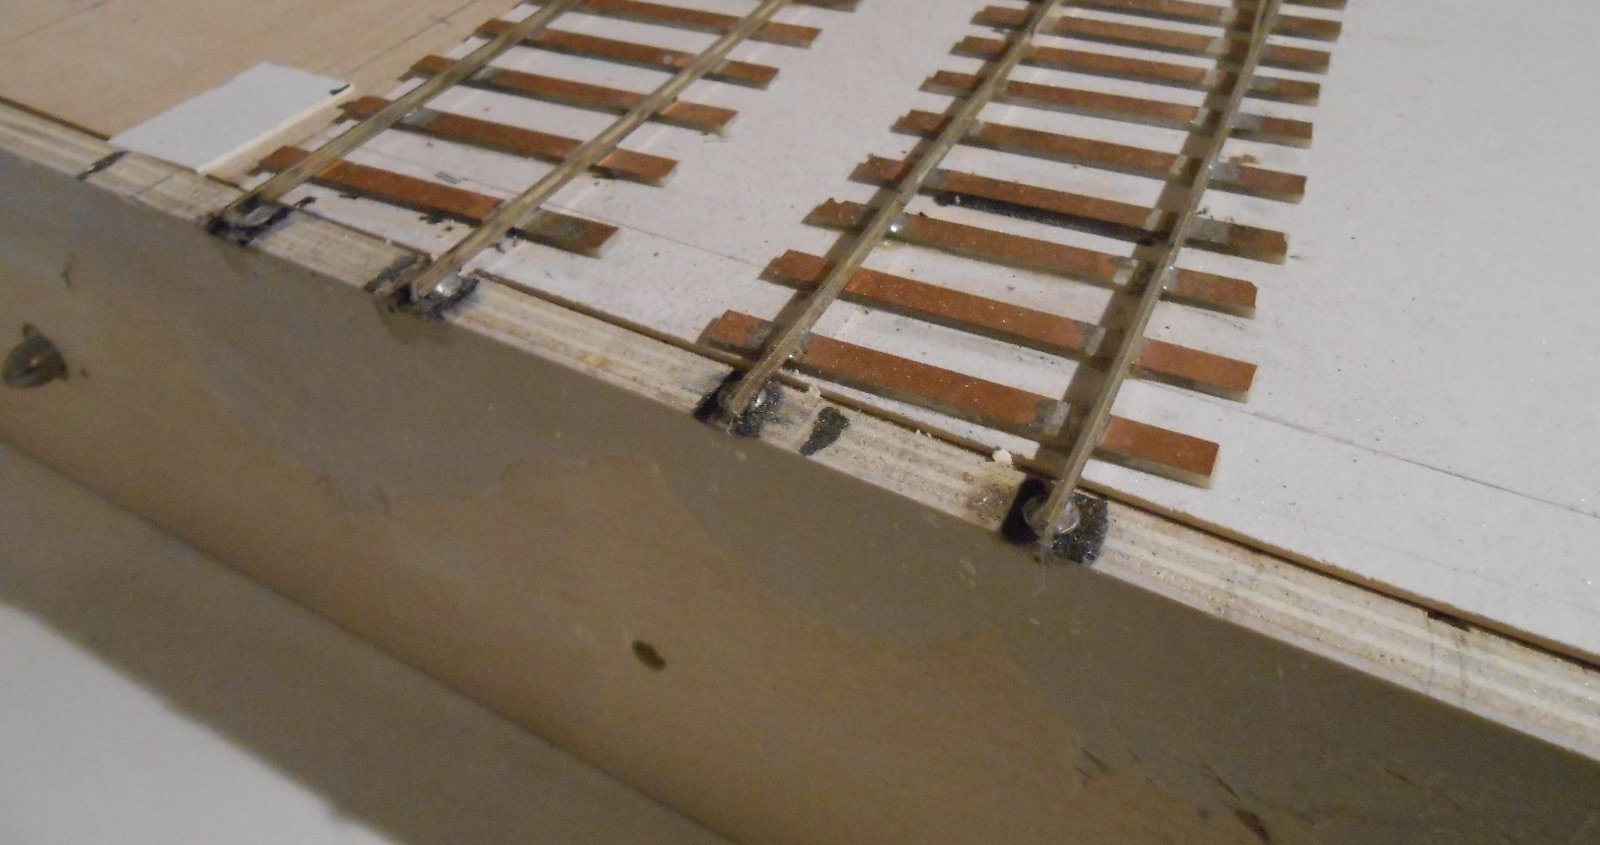
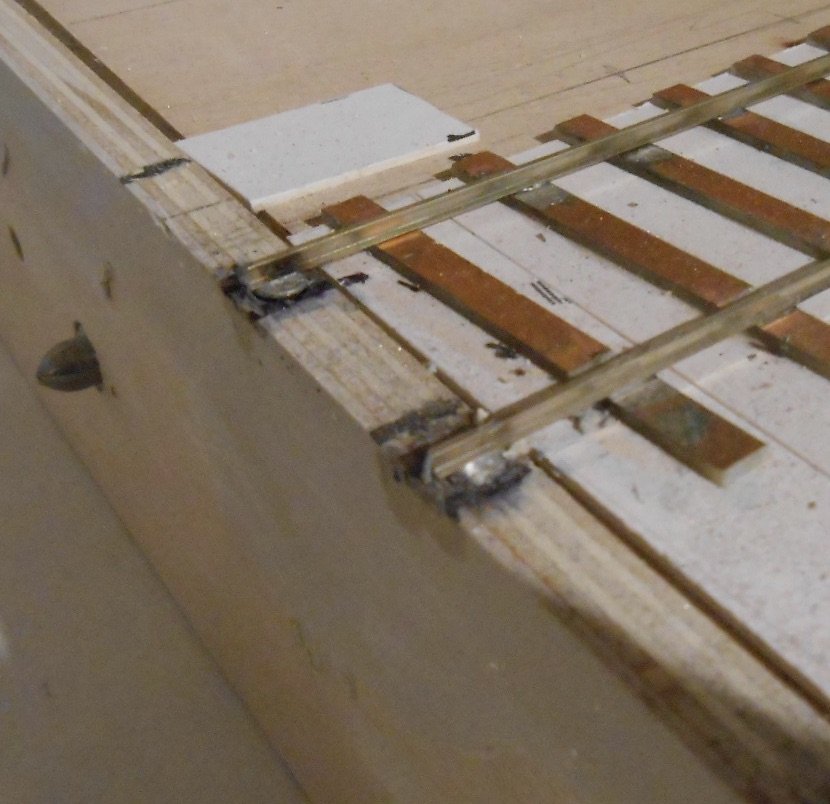
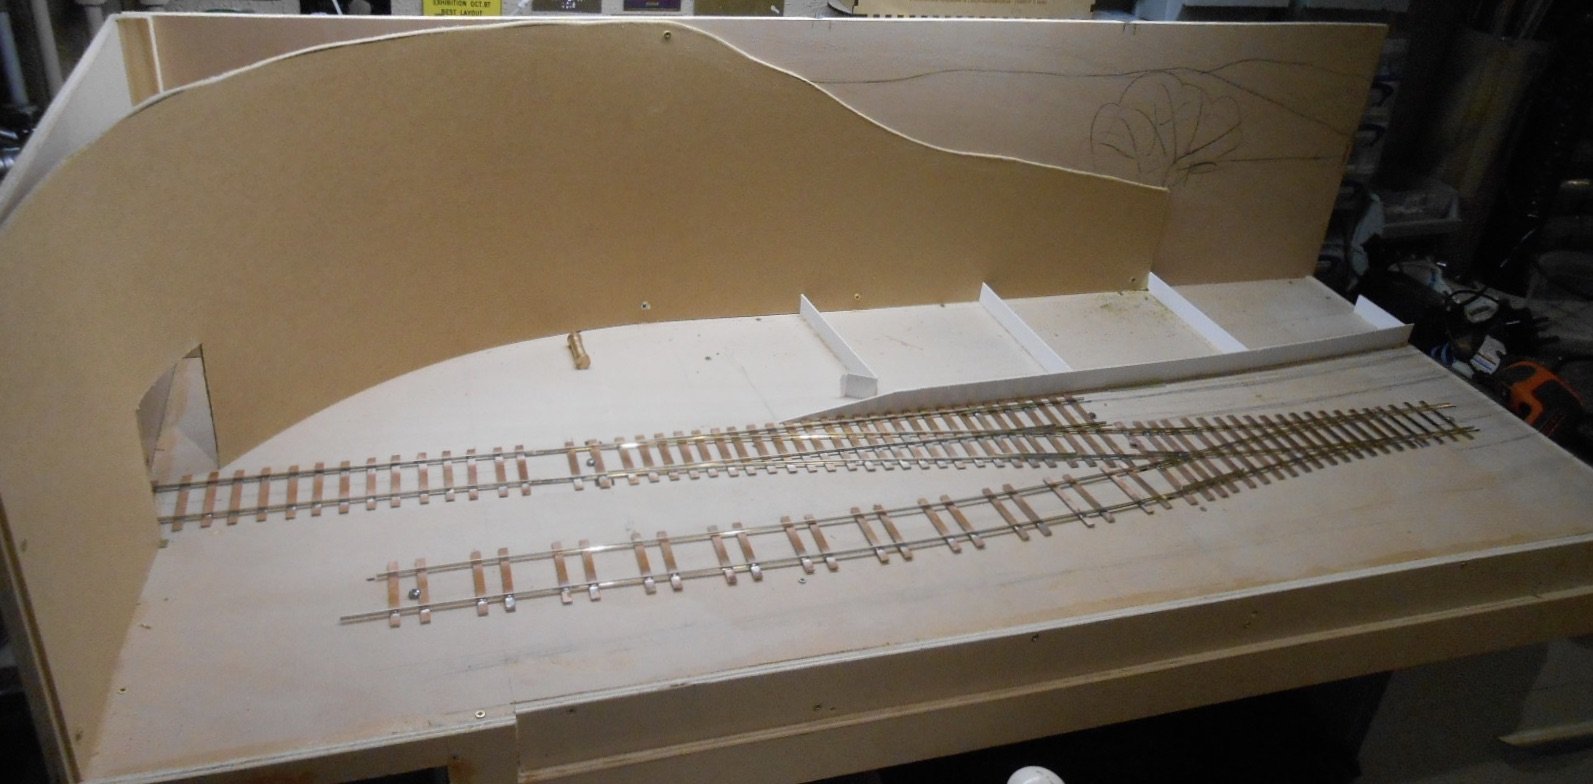
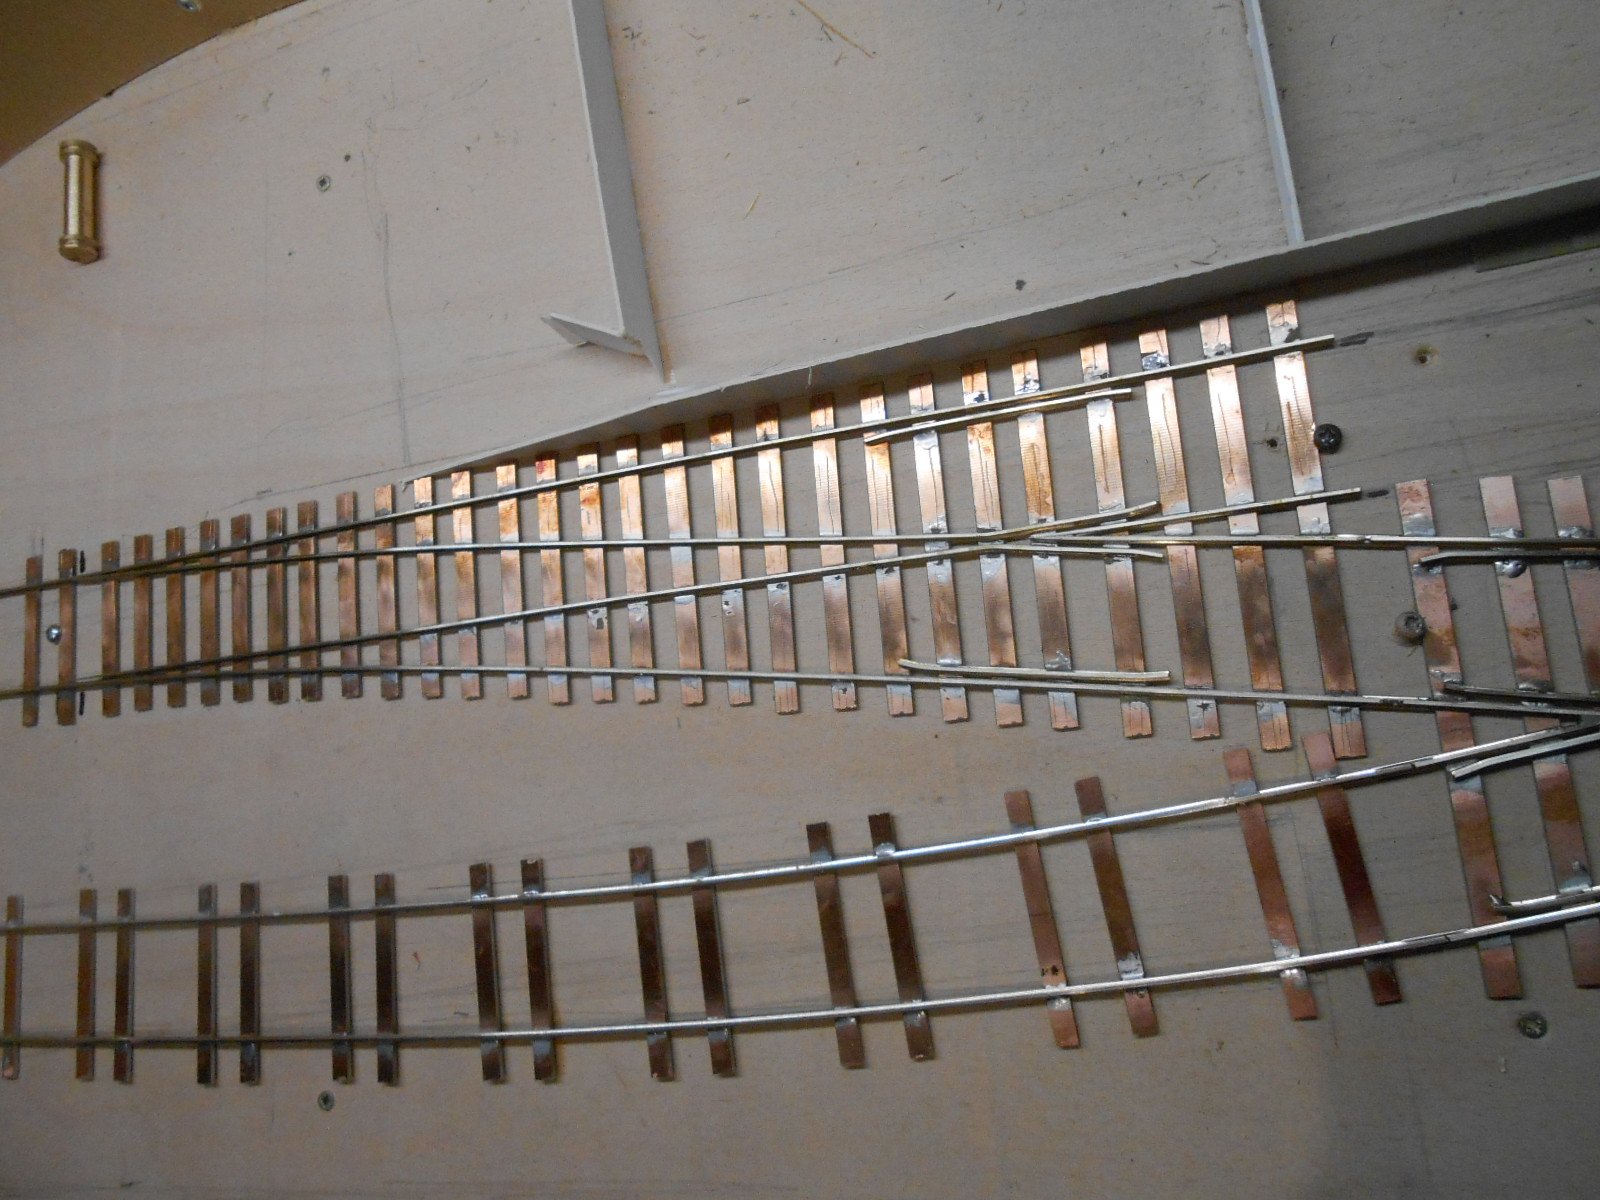
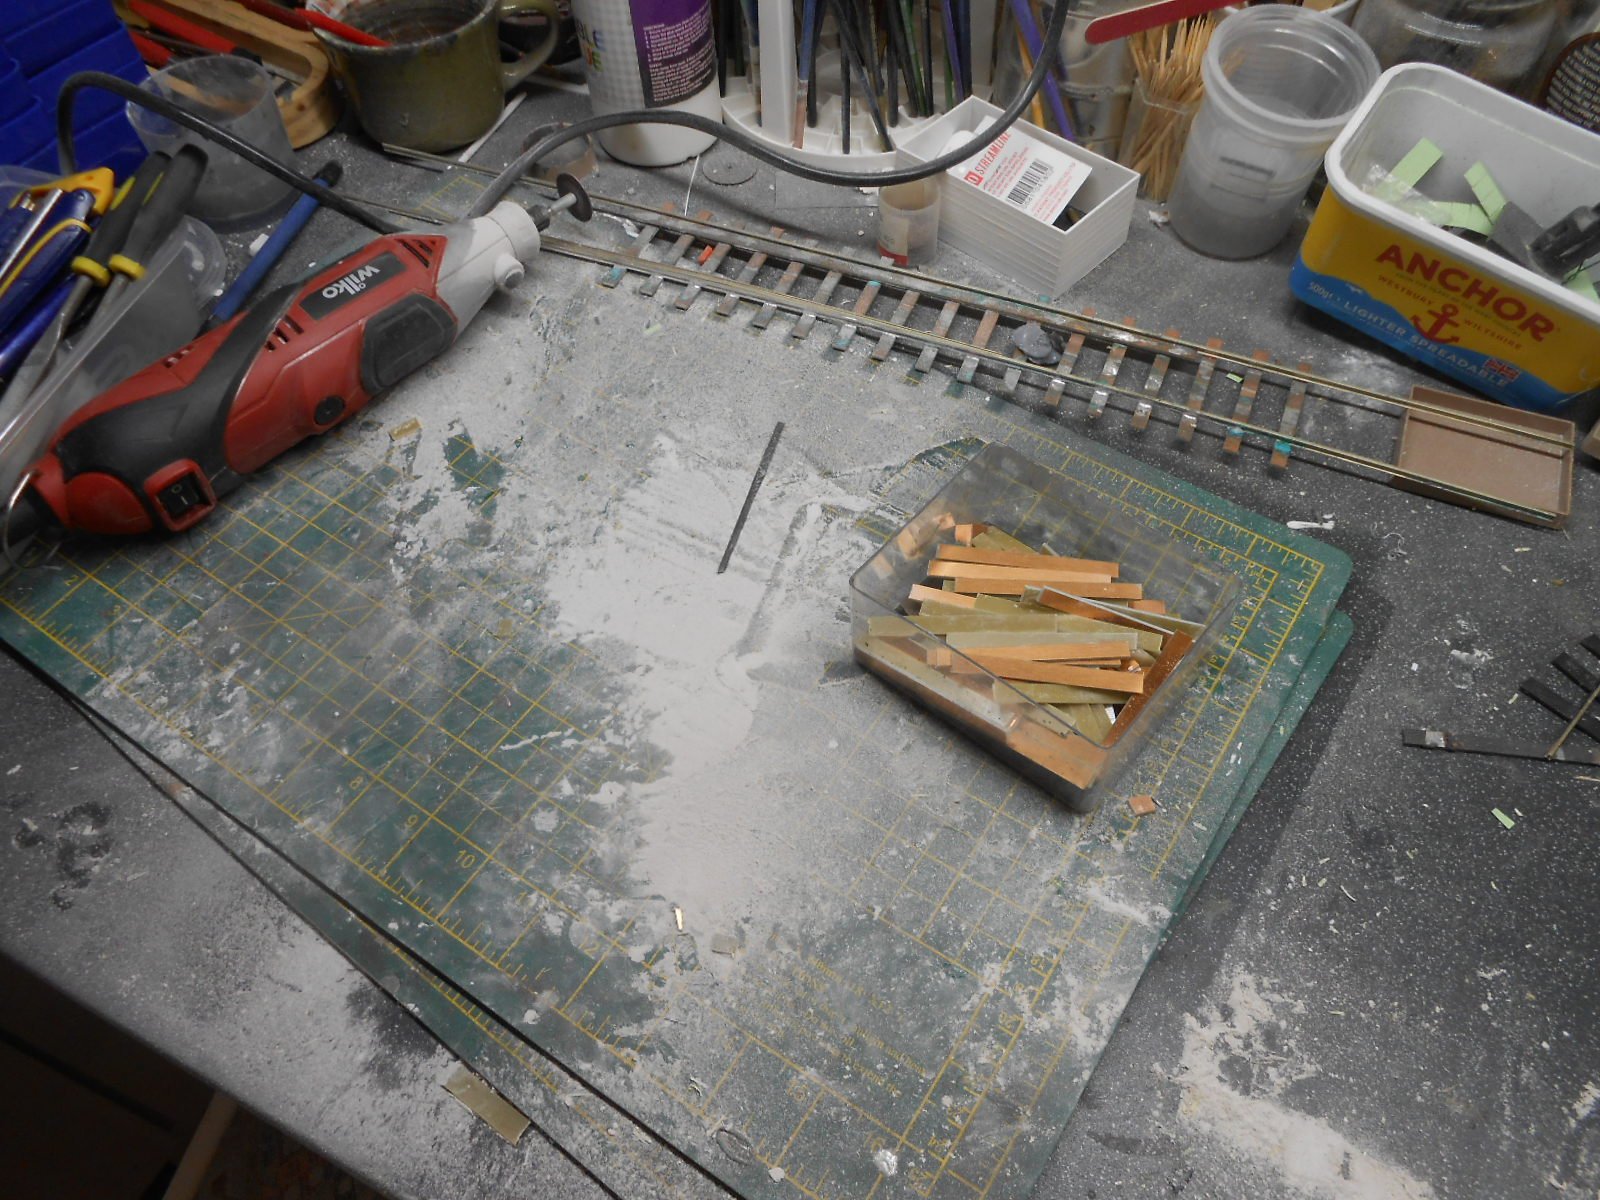
Track laying [mostly] completed today, though the crane track is still to be done and, apart from running a couple of wagons through the points, nothing has been tested yet. I started modelling in EM gauge, progressing through 0n16.5 to 7mm standard gauge and now Irish 5'3 and 3'. Over a dozen different layouts only two have used Peco ready made track, so I ought to know what I'm doing by now, but the trouble is that several years often elapse between building my own, so some of the techniques have to be relearned! As previously mentioned, the basics are fairly simple. You make up a length of 'half track' in a jig, fix that down and then solder the second rail in place using one or more roller gauges. No 'flexitrack' here & mores the pity... Points might seem harder, but in fact you can build one in an hour or two and what's more tailor it to fit your chosen location, rather than relying set formations. This has certainly helped in the restricted space I have available. The main jobs when building a point, once you have set out the sleepers on your plan, using double sided tape, are as follows: Lay one of the 'stock' rails, then make the Vee. These are a bit more trouble with flat bottomed rail, but is essentially just a case of filing two short lengths of rail and soldering them together. Roller gauges are then used to solder the Vee in place and then the second stock rail is added The long switch blades come next and these need a fair bit of filing and shaping. I find it helps to file a small nick in the base of the rail before bending it to go next to the Vee, while alignment at this point really is critical. I use a piece of aluminium strip [about 1.8mm thick] to set the gap at what is called the 'crossing' [or frog] and also to ensure the route through this section is nice and straight. Especially on the Y points, I also find it helpful to file away the foot of the stock rails where the thin end of the blades touch, as this ensures wheels follow the route nice and smoothly. The main task today has been laying the track over the baseboard join. With only one of these on the scenic section and only two tracks involved, there is no excuse for errors here! I used my usual method of countersinking cross headed screws in the end boards, then laying the track across the join and soldering it to the screws, before cutting the rails to separate the boards. A lot of cleaning up followed, to get rid of the flux & then came the slightly tedious job of cutting the insulation gaps in all the sleepers. So, ready to start on the wiring now and then it will be a case of cross everything when it comes to testing to ensure all my stock will run on the new layout. Logic says it should be ok, but experience suggests otherwise!

-
Sounds fascinating - if only I knew what you were talking about!
-
Lovely stuff!
-
Sounds great to me! The concept is just that little bit different, yet eminently achievable. As I discovered with Fintonagh, you don't need a huge space to create a layout that is interesting to operate, while Iain Rice and Chris Nevard, the gurus of cameo layouts have long proved how much enjoyment can be had in modelling a small space really well. Already clear I am not alone in looking forward to seeing this one develop.
-
My own thoughts are these are not toys, so are being bought by grown ups. Likely as not on a budget, but not exactly pocket money. As niche items, they are not going to sell in the thousands, so the prices will inevitably be higher. You only have to look around to see how much rtr models cost now - the new Bachmann double Fairlie is well over £200, for an 009 loco, for example. Indeed, not sure that adult railway modelling has ever been cheap, although the quality of what is available these days is exponentially better than 20-30 or more years ago, which means ever greater value.
-
The band round the dome makes a real difference. The alternative would be either to not worry about printing the dome in situ, but print a separate one, or even use a casting. Traditional model making creates a lot of hybrids and while I can see the attraction of solving problems via CAD, sometimes there are advantages to a bit of mix and match. As for having inside cylinders, the main reason narrow gauge locos have outside ones is lack of space between the frames. Clogher Valley 0-4-2Ts had 13.5 inch diameter cylinders, so when you add on the thickness of their casing, along with the thickness of the frames and that leaves little, if any space to fit everything. Outside cylinders are not too difficult to fit, at least as long as the valve gear is hidden inside the frames.
-
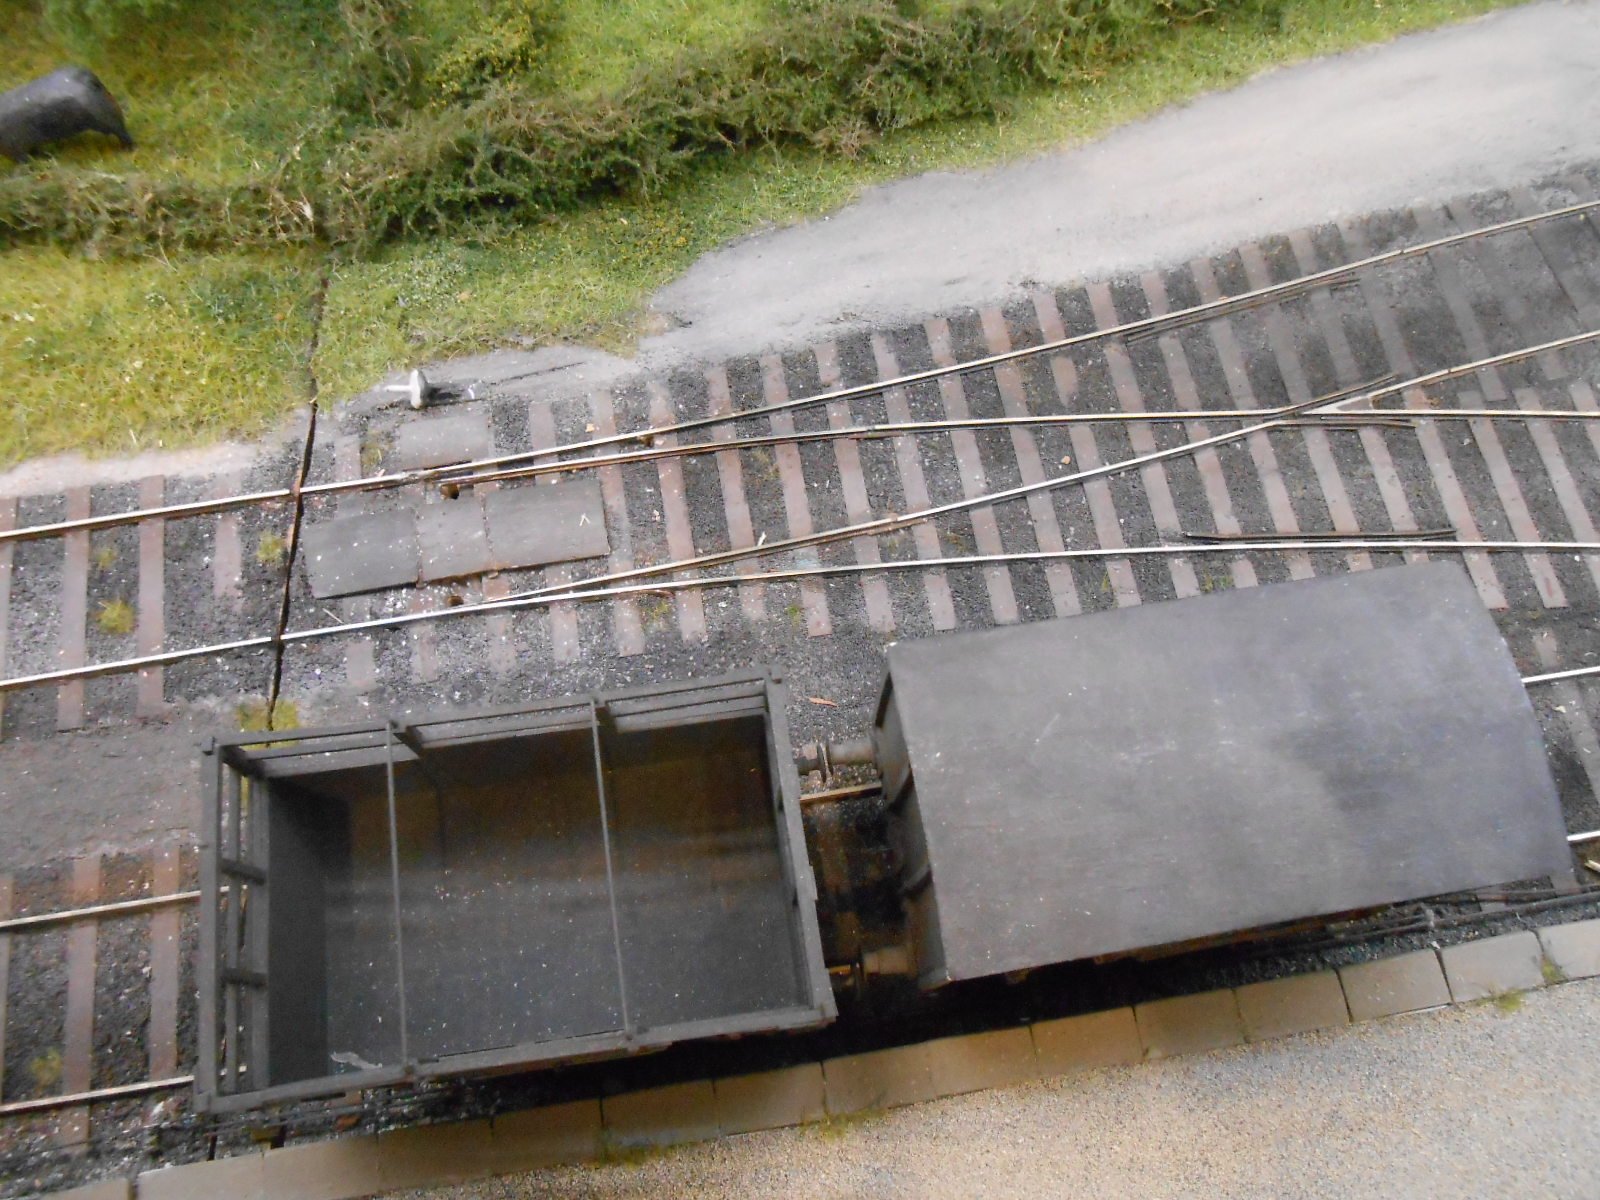
Models, photography and especially some high quality modelling. The track work is so well laid and weathered (that ballasting is sublime!), you barely notice it is narrow gauge, while the way those wagons are snaking into the loop is really nice too. Ground cover is subtle, and it all makes for a beautifully observed scene.
- 469 replies
-
- 4
-

-

-

-
- ballyercall
- layout
- (and 1 more)
-
Maybe the chimney and dome need to be a bit 'fatter', rather than taller? Overall, looks rather good though.
-
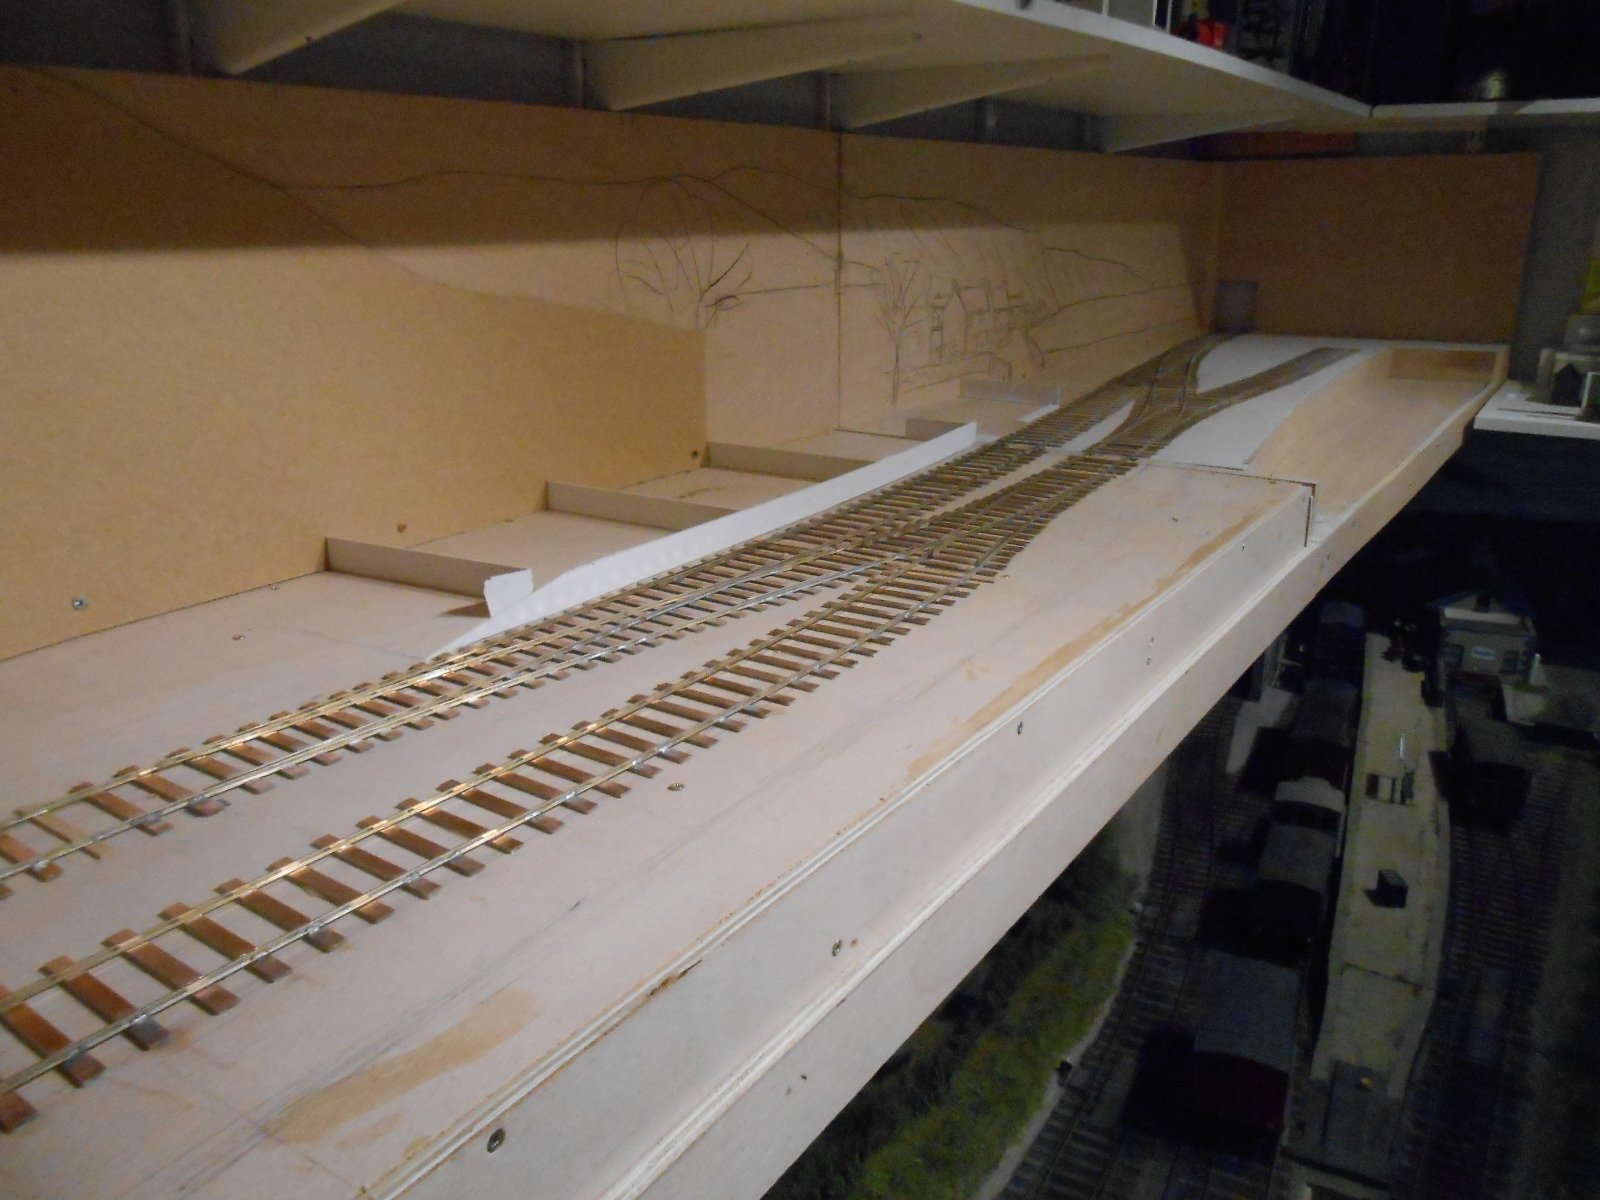
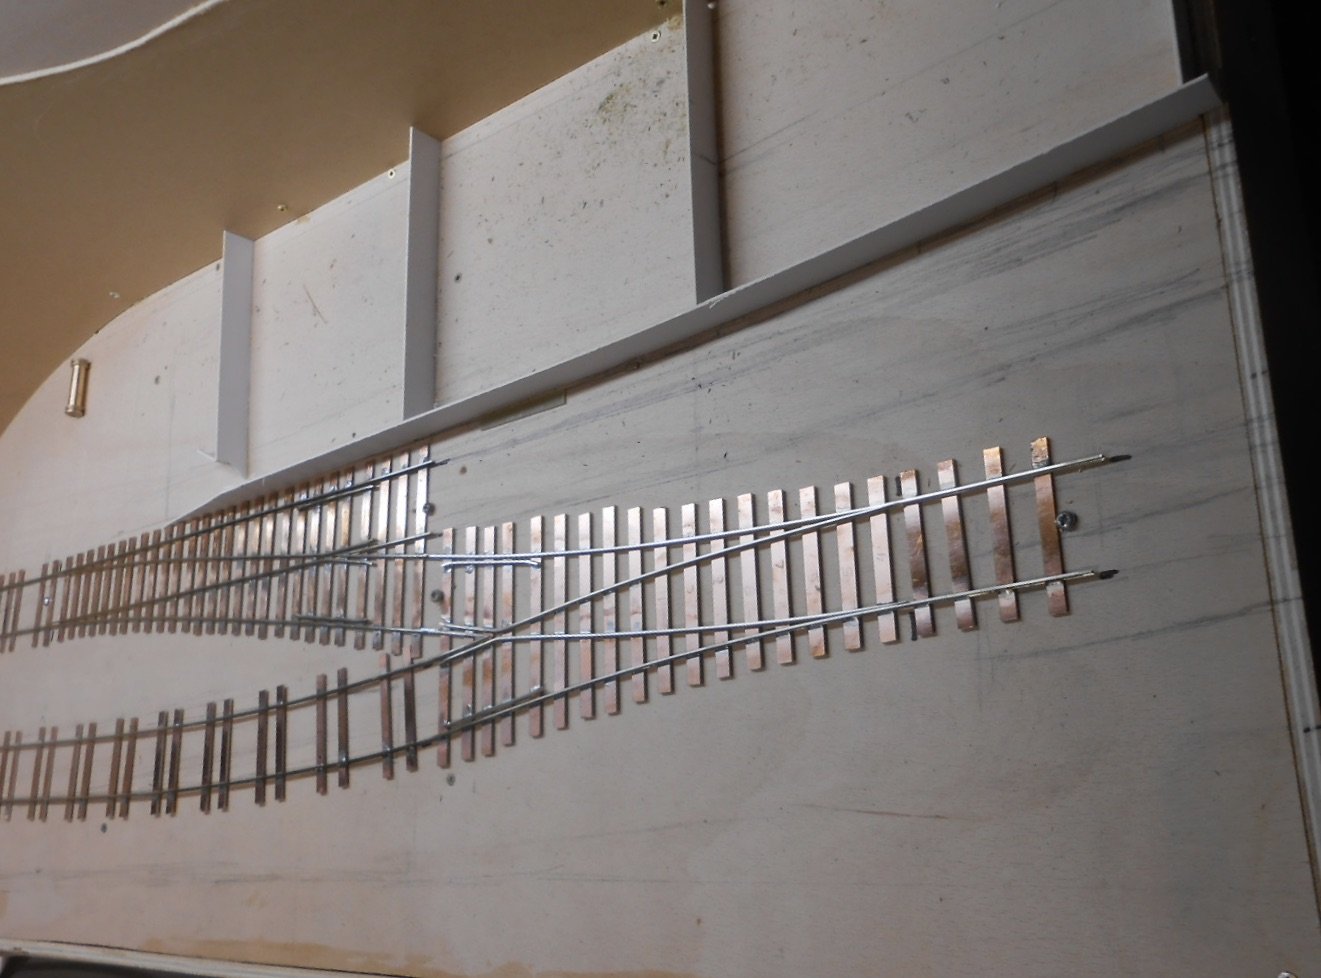
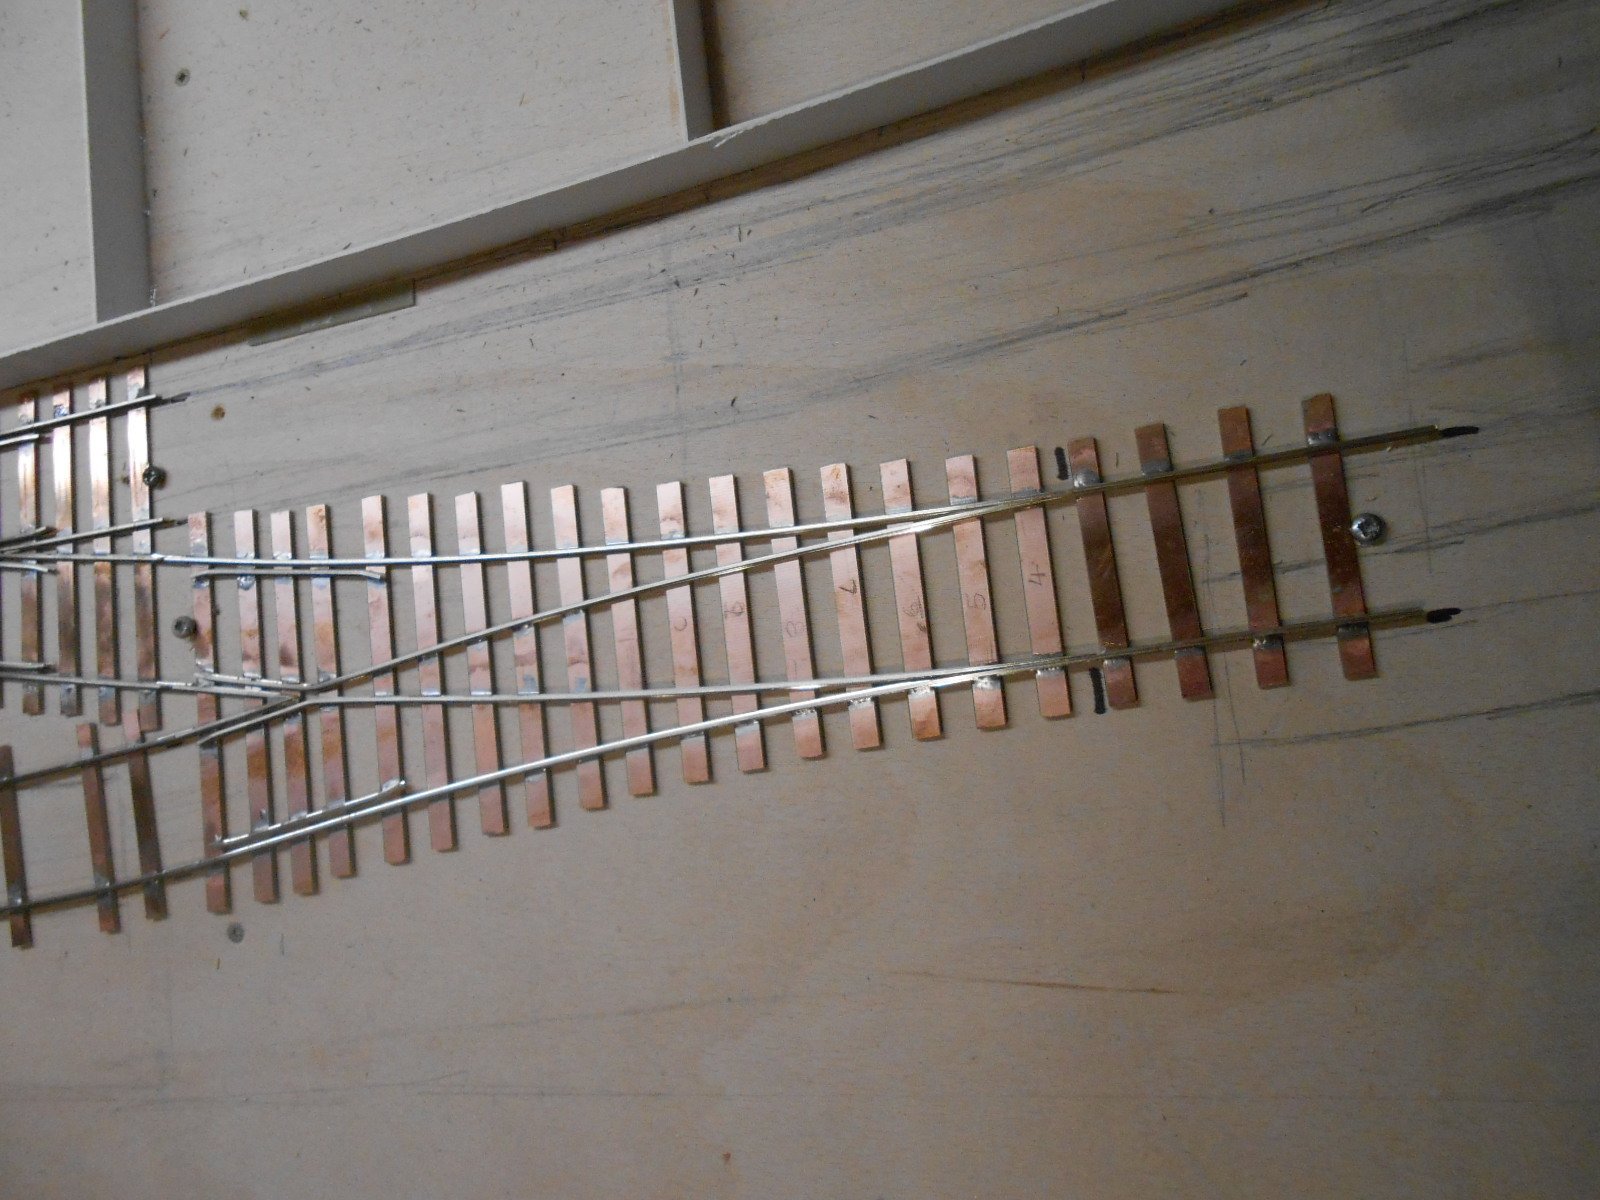
Track laying It's been a while since I did any track building - indeed, without looking up dates, it was when I started on Fintonagh. That was 21mm, code 83 flat-bottomed rail and though the principles are the same, that is not to say I am an expert and it all comes naturally! Things went ok at first - you lay one of the stock rails, then make the 'Vee'. This means filing two pieces of rail and soldering them together. I used 240 degree solder for this, so that I can use 144 solder to fix the rails to the sleepers. So far, so good, however in trying to add the other rails, I quickly discovered I'd made a right Horlicks of the roller gauge, so there was no alternative, but to turn a new one... The other pieces are the two switch blades and two check rails. The latter are very important in ensuring stock goes in the right direction! Since then, I've managed to complete a right hand point and a Y point, along with two pieces of plain track, as can be seen from the photos. The latter has a few spaces for economy & I'll be using card or plywood sleepers here, though the left hand siding is going to have some sort of inset track anyway. At the moment, track is just held down with screws. I am toying with some ideas to distress the copper clad sleepers a bit - thus far this has involved scoring longitudinal marks in the surfaces to represent cracks, but I also want to do something with some of the ends, as well as adding fixing spikes. It's nice to have got started at last.
-
That, is a very fine looking train.
-
Relying on rtr chassis certainly limits what you can do, which is a shame given the amount of skill and practice required to produce a 3D printed loco body. It might sound scary, but with excellent motor gear boxes available from the likes of High Level, Branchlines and Roxey, scratchbuilding a chassis means it is always possible to hide the motor. Worth considering having a go at making frames from plasticard, but with brass bearings, especially as ready milled coupling rod sets will be available for many varieties of wheel base. There again, a bit of freelancing can not only still be good fun, but also helps develop the skills for more advanced work later.
-
Assuming this is a semi freelance job, why not consider a 4-6-2T? That should give space in the cab.
-
Code 75 definitely worthwhile. Hard enough to hide 5'3 in 16.5mm gauge, but recent projects show that finer track, carefully weathered and ballasted can be very effective.
-
Looking good and especially like the concepts, with tracks well spaced out, as per country branches in Ireland. Like the idea of drawing up timetables too - these things all help in developing interest in how the layout can be operated, stock to acquire and so on. From such things, come the all important atmosphere of a layout.
-
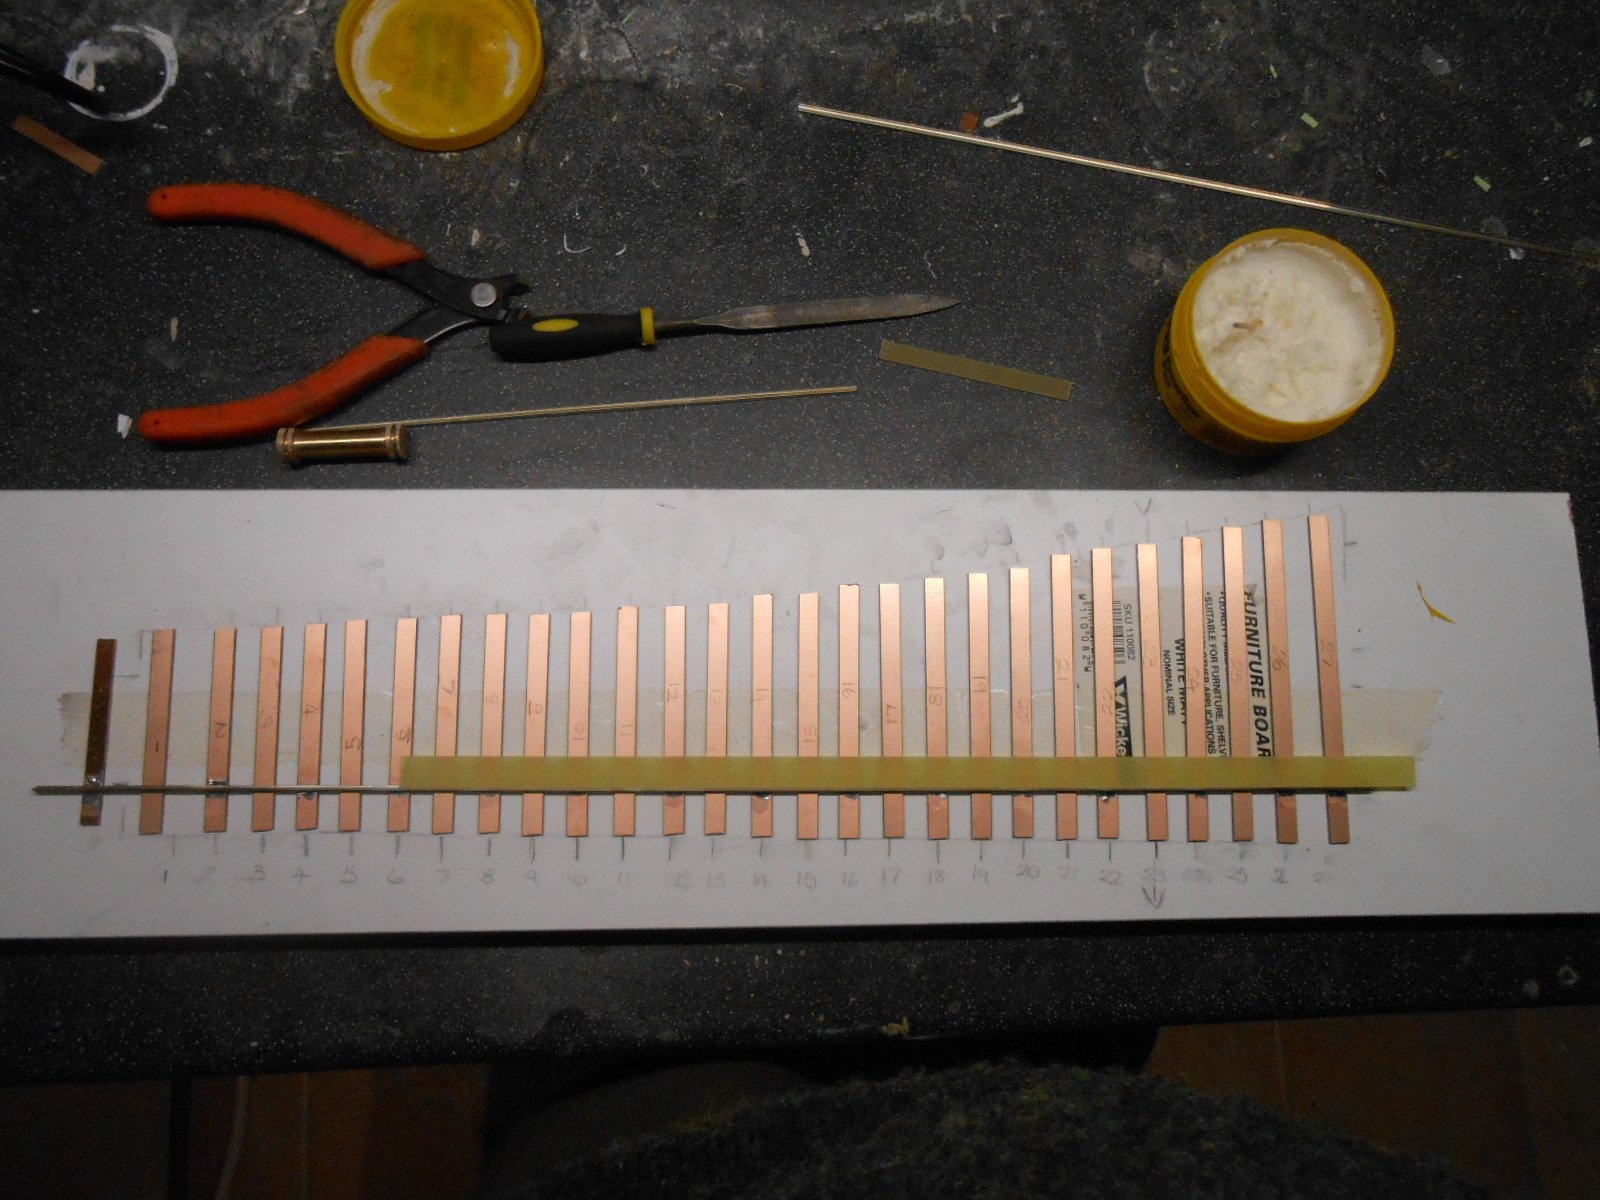
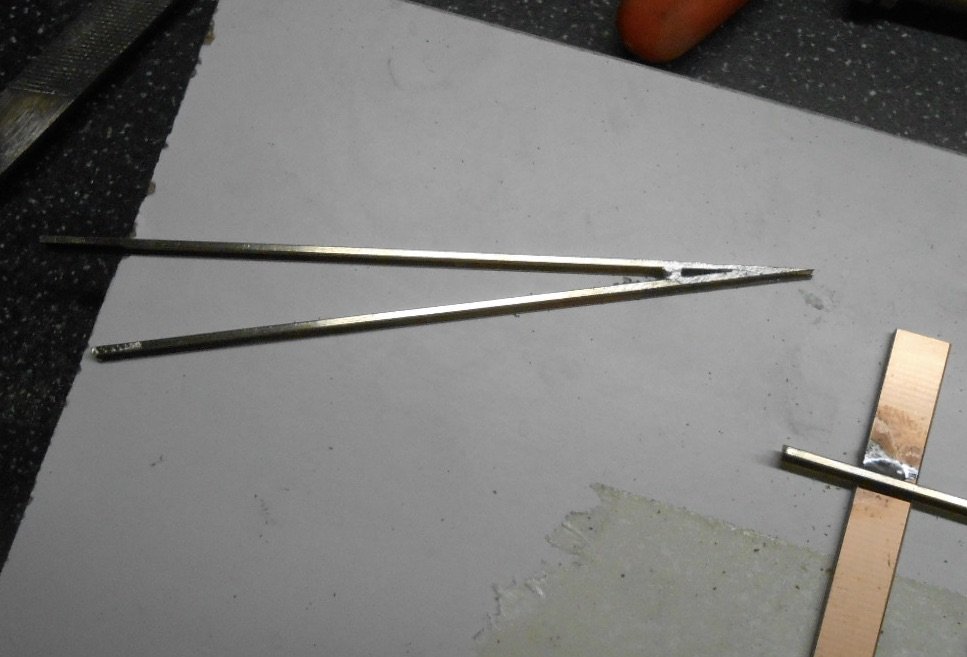
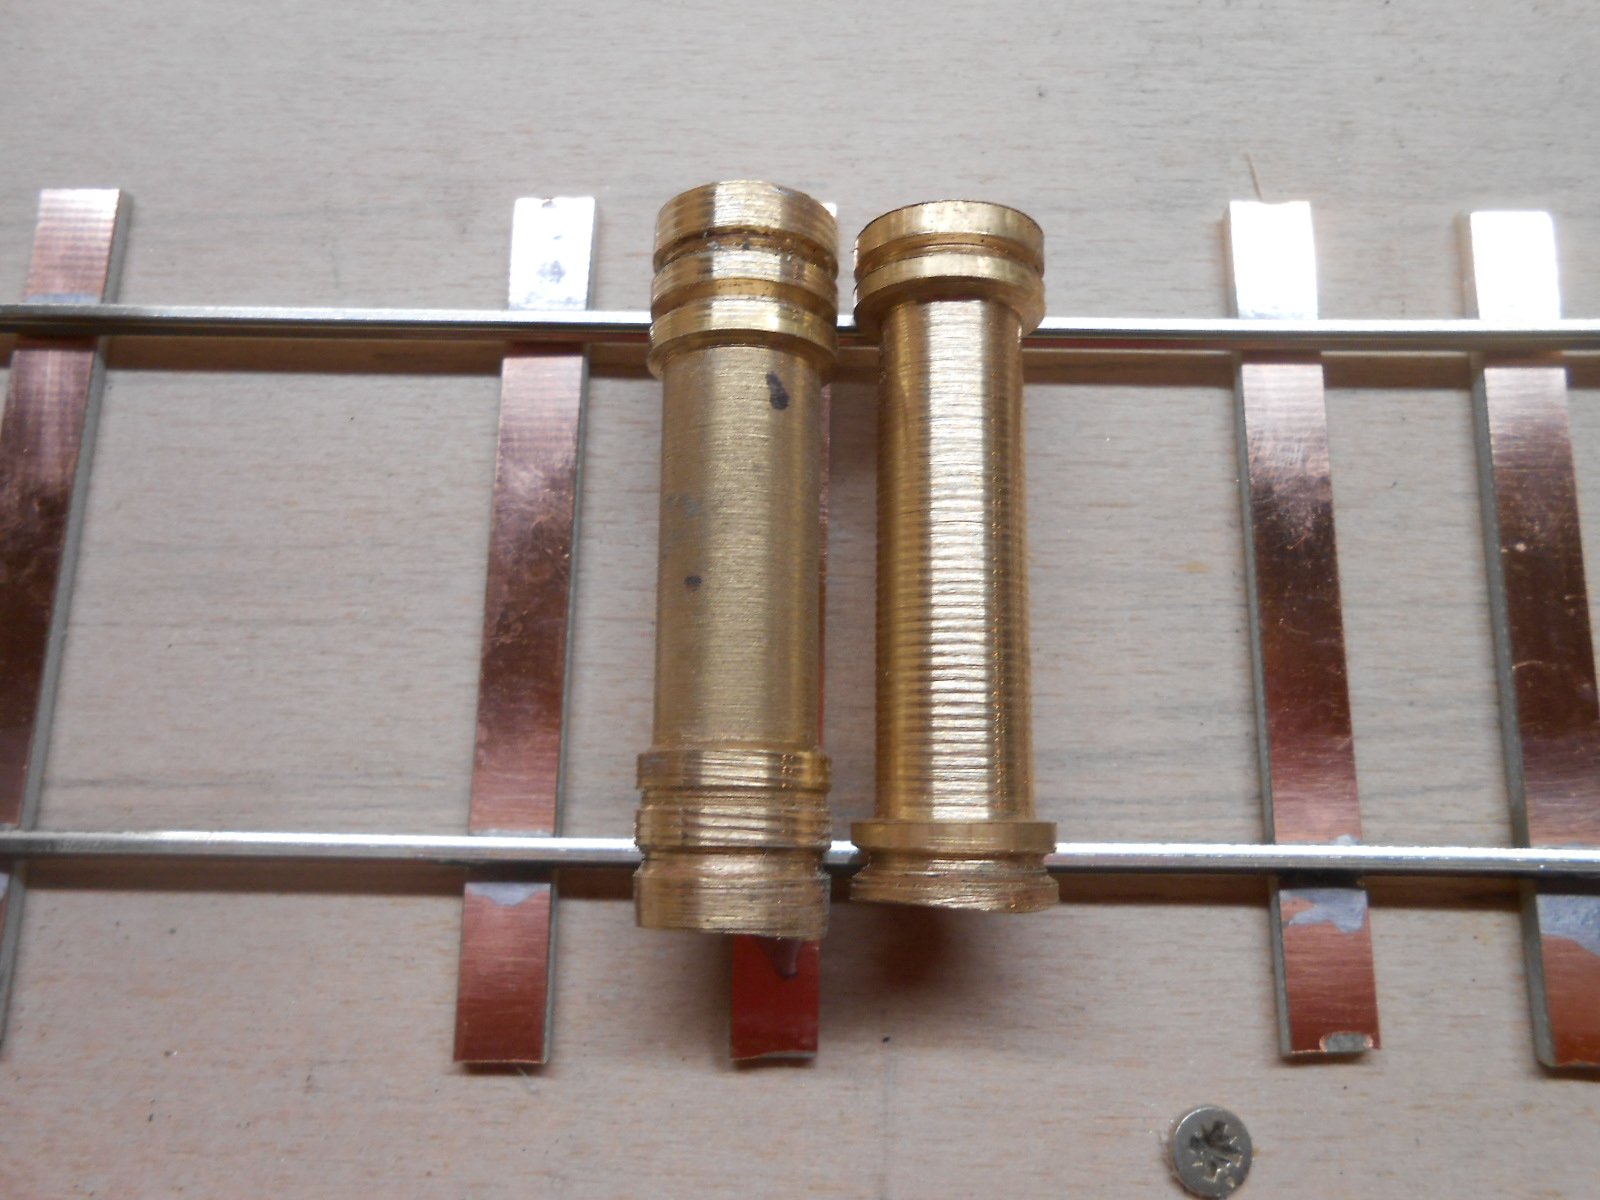
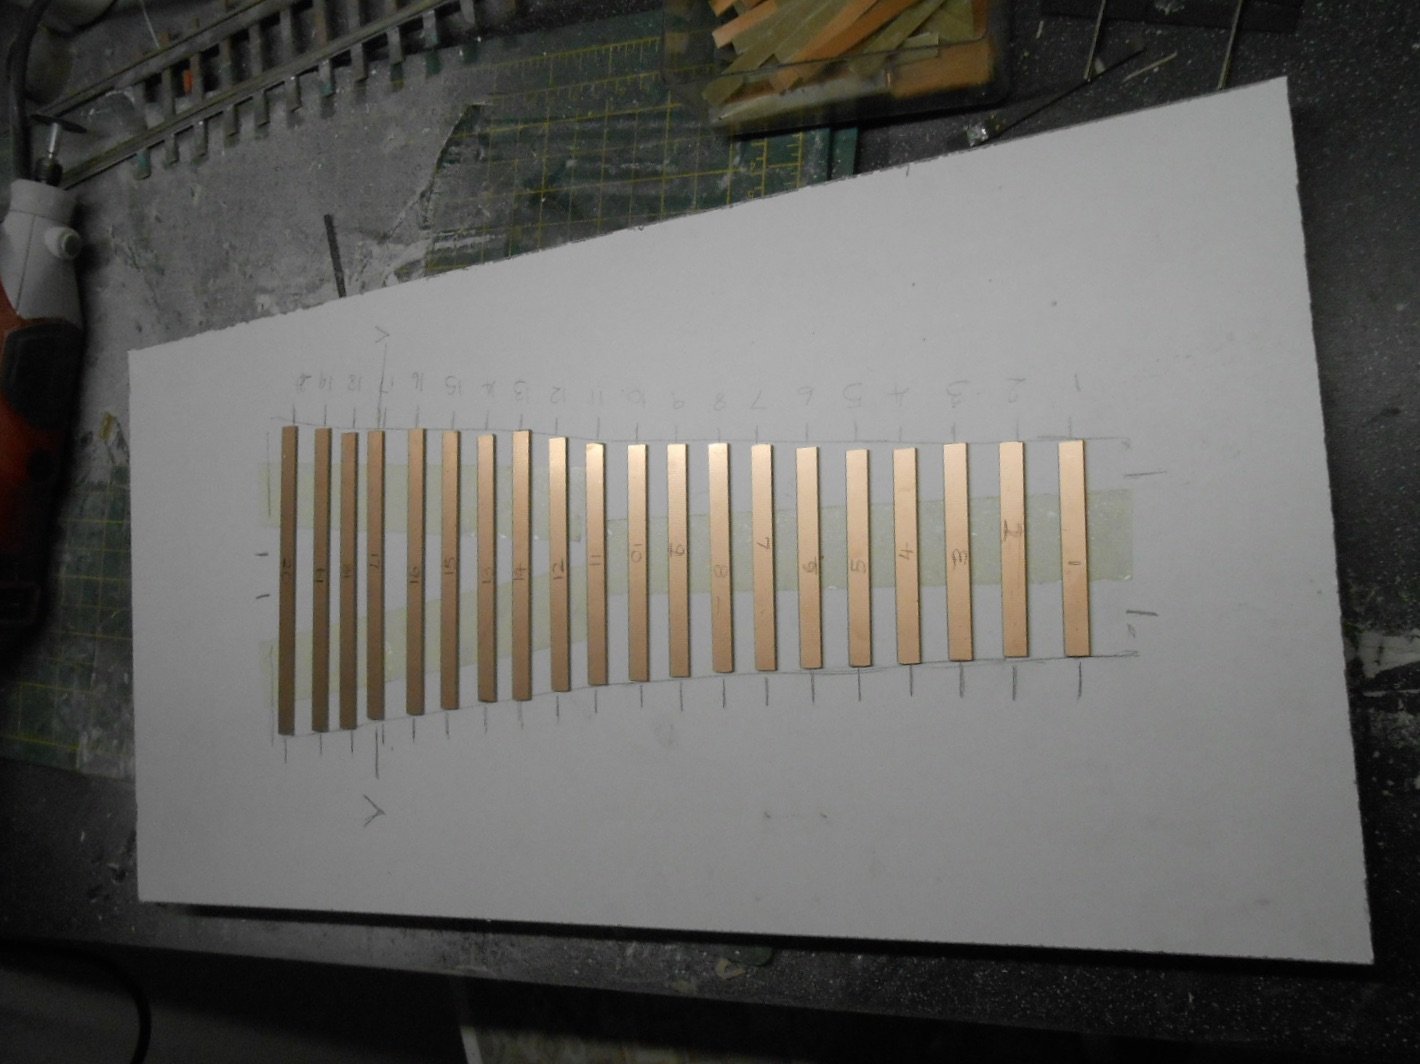
Several good things happened today - the latest MRJ arrived, my first dental check up in over two years resulted in no treatment needed [much to my surprise, though I didn't get a sticker] and, at last, my track building materials have arrived! I ordered code 100 flat bottomed rail [same as Arigna Town & Belmullet] to create light weight track [Code 124 is more usual for 7mm scale], plus 6mm & 7mm wide copper clad strip for the sleepers. The 7mm is for the point timbers & the 6mm for plain track. I couldn't find any scale 9 foot lengths, so had to buy packs of 18" long strip and cut these up into 63mm lengths with a slitting disk in the Dremel. The photos show what a mess this made, and the jig I built for Arigna Town to make scale 60' lengths of plain track. Essentially, you fill up the spaces with the sleepers and solder one rail in place. This half track is then laid in situ, curving as required and held with double sided tape, so the second rail can be soldered in place. There are four points to be made, two Ys , a left and a right. These are going to be copies of the ones custom made for me by Marcway [on Arigna/Belmullet], only this time I'll be making my own using the gauge I turned on my mini lathe. The Y point is a massive space saver, as can be seen from comparing the two pictures below. It is just 30 cm long, despite being 1.8m radius, the same as the standard ones, which are 45cm long. So, this afternoon, after cutting some 9' sleepers, I then taped basic tracings of the three point designs [Y, L & R] to some pieces of board and then marked where the sleepers, rail ends and point V went. The sleepers were then numbered on these and the strips cut to shape and likewise numbered. Double sided tape was then stuck to the boards and the sleepers placed on this. So, at long last, I'm now ready to start track building.
-
Must admit that was my thought too, probably because more 'traditional' modelling techniques have always been somewhat hybrid in nature, mixing materials too. However, it is interesting to see how 3D modellers are problem solving these days. There is little, it seems that cannot be sorted through ingenuity, the mouse and keyboard!
-
VERY neat work, especially when you think that, in a straight line, even a 0.5mm deviation would be a scale three inches out of alignment! Not sure the top of the stair post is the best place to do riveting though!
-
Humbrol or Precision 'Track Colour' are ok, especially for sleepers though weathering guru Martyn Welch uses a blend of Humbrol orange 82, leather 62 and matt black 33, adding grey 64 to show gatherings of oily sludge. That is for main running lines. Sidings tend to be darker, so he adds bauxite 133 and gunmetal 53. Dry brushing gunmetal on to sleepers painted with track colour gives a nice effect of weathered wood. Have used these methods and they work well. Ideally, you need colour photos of areas similar to what you are modelling to copy. On a large layout, a general spray of track colour can be enough, then use weathering powders to pick out areas of brake dust, or oily patches and so on. On a small layout, it can be fun [?] to really go to town on detailing humble track and when you see what the likes of Martyn and Gordon Gravett achieve, it is well worth aspiring to.
-
Dainty, fiddly things, signals - but very satisfying. MSE kits are great and am sure you will do well with them.
-
Somebody is getting a fine introduction to the gentle art of 7mm broad gauge, hopefully. There aren't many of us in this club, so a new edition will be very welcome!
-
Worst cases I've ever seen were on the Circumvesuvio Railway between Naples and Sorrento. In a pre-Covid age, a few years ago, it was impossible to know what the livery was because every square centimetre of every unit was covered with graffiti. Shame, but then with a Mafia presence still strong in the area, nobody is going to argue I guess...