Dhu Varren
-
Posts
547 -
Joined
-
Last visited
-
Days Won
1
Content Type
Profiles
Forums
Events
Gallery
Blogs
Everything posted by Dhu Varren
-
For the end blue stripe I cut the decal off at the door edge/handrail, matched up some blue paint and hand painted the blue. I then applied white edges using white lining of a suitable width, which then covered the edge of the brush painted blue. Much easier to apply narrow white stripes than the full width transfer.
-
A lot of hard work there, with all that cutting and filing of diecast material.
-

To all GNR(I) fans with a few minutes to spare ...
Dhu Varren replied to Galteemore's topic in General Chat
Found this in The Golden Years of The Great Northern Railway Part 1.
-
Providing plasticard of a reasonable thickness is used, it will last a lifetime. the attached picture has three scratchbuilt locos in plasticard, the 0-6-0 and 2-6-0 (tender is RTR) n the front row, and the 4-4-0 in the centre row. All scratchbuilt some 40+ years ago, and still going strong, although could do with more detailing. The two 4-4-0s in the back row are modified RTR.
-
Robert, it just came to me that recently I purchased from Model Irish Railways on ebay, some assorted brass etches of various coach parts. Included in these were some Mk 3 EGV vents. It might be worth contacting Ian McNally at MIR to see if he still has any. David
-
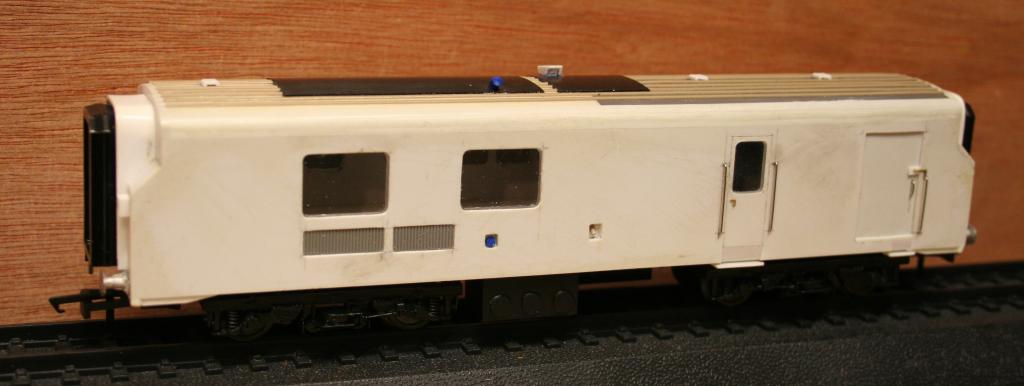
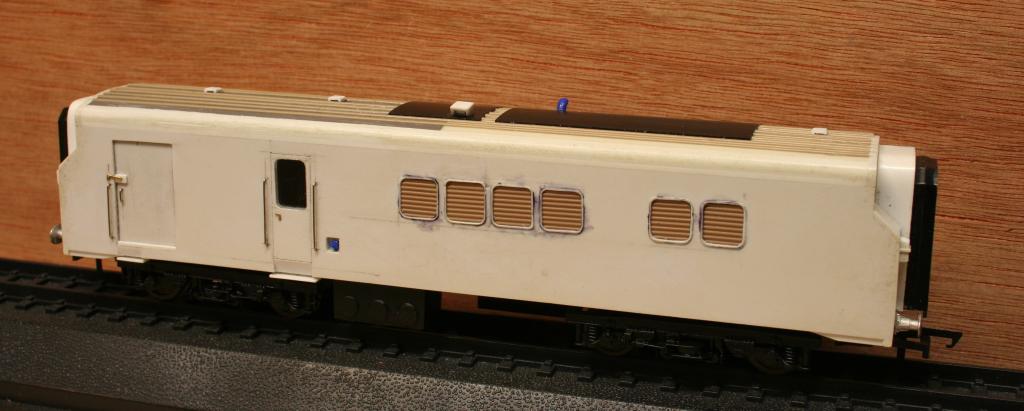
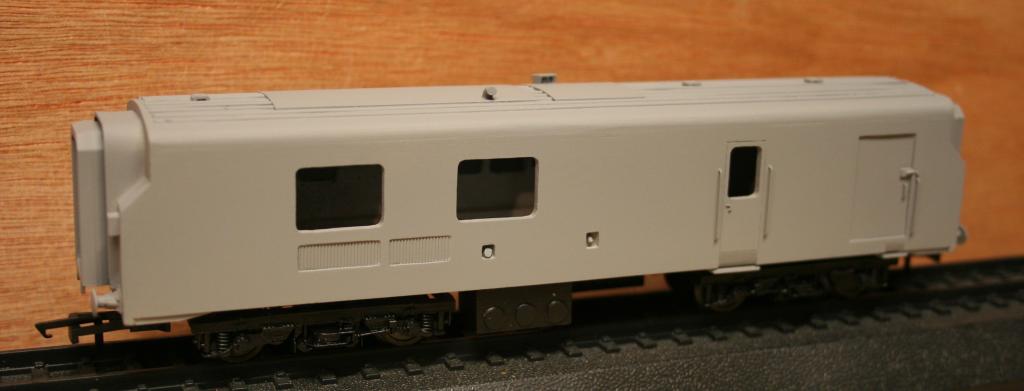
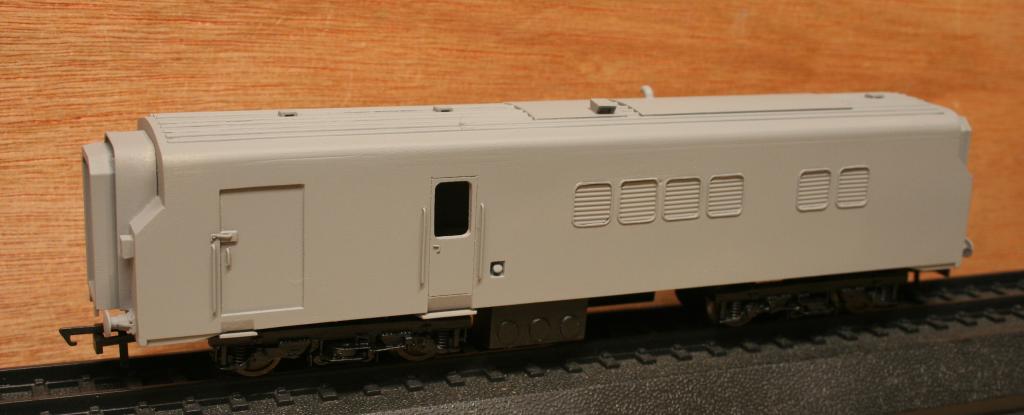
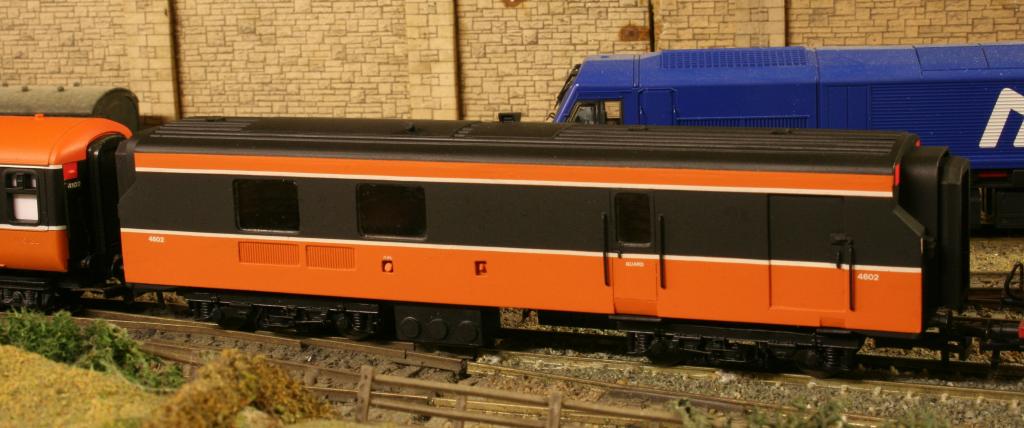
If all else fails, scratchbuild one. The van is entirely made from plastic sheet, rod and strip. The only commercial parts used, were the two Hornby brake van roofs used to form the basic roof profile, the gangways are by Jouef, and the buffers are by MJT. As shown, the EGV is running on Jouef Mk 3 bogies, but has now been fitted with correct pattern bogies from Silver Fox. The pictures show the completed van, firstly in bare plastic, then in Halfords grey primer, and finally fully finished and painted.
- 40 replies
-
- 13
-

-

-
NIR never owned any pure 'BFKs'. Brake vehicles on NIR were one of two types, either a Brake Driving Trailer for use with the Hunslets in push-pull mode, or a Brake Generator Van for use with GMs The Brake Driving Trailers 811 & 812 with Standard Class open seating were purchased new in 1970, with 813 with First Class open seating in 1972. 811 was subsequently converted to an 80 Class Driving Trailer in 1988. In 1981 NIR purchased three secondhand BR BFKs, 911, 912 and 913. They were all converted to Standard Class Generator Vans. Before conversion, they all had four compartments, but the compartment next to the Guard's accommodation became part of that, leaving only three seating compartments. The Guards Van section became the Generator Room. 911 was converted to Standard Class open plan seating in 1989. 912 was converted to First Class open plan seating in 1989. 913 was converted to an Executive vehicle in 1989, hence the large windows with toplights on one side, and aircon windows on the other. 911 subsequently had all passenger accommodation removed, and converted for use as a Brake Generator Van with the Gatwick coaches, and became 8911. In 1983 NIR purchased another two secondhand BR BFKs, 914 and 915. These were again converted the same as the earlier ones, to Standard Class. 914 was converted to open plan seating in 1988, and 915 in 1989. You have either better, or worse, eyes than me as I can't see any sliding doors in the first video clip. Of course that could be because the coach had already been converted to open plan seating some years before. The first coach in the second clip is indeed the Brake Executive Generator Van, but the second coach is in fact 813 now numbered 917, the original Driving Brake First from 1970. This vehicle would have had a large Guards Compartment as described by JHB.
-
If Aux 5 is at TTL power level, surely a TTL relay would suffice on it's own, apart from the clamp diode?
-
The red marker lights on the 201 work in conjunction with the white marker lights, i.e. when white lights are on at one end, the red lights are on at the other, unless the switch provided is used. to remotely switch on or off the red lights would require a modification to the loco circuitry, such as a micro relay added. The 071 on the other hand, is a different animal. The circuitry already exists to control ALL lights independently, and just requires a bit of Function remapping to achieve this. The Lokprogrammer is the simplest way of achieving this, but as murphaph says, it could be done by modifying CVs.
-
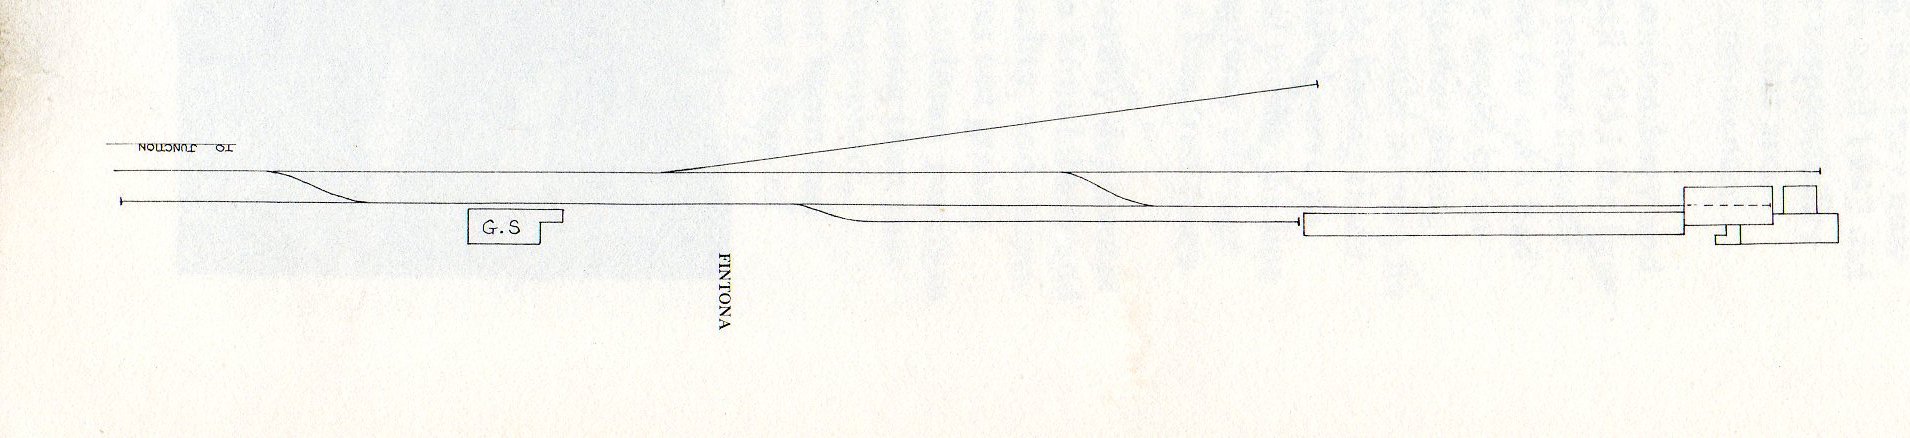
LOBITOS Petrol/Oil Storage Tanks at Larne
Dhu Varren replied to LARNE CABIN's question in Questions & Answers
I remember that the ESSO depot in Derry was rail connected from the Londonderry Port & Harbour Commissioners lines, but I suspect that oil traffic was only outbound from there, possibly to destinations on the Derry Road of the GNR. Inbound oil traffic would have been directly off coastal oil tankers docked at the quay next to the ESSO depot. The Lobitos Depot was a few hundred yards further along the quay, but it did not have a rail connection. -
There is nothing 'stretched' about Hornby, lima or Mainline BSK coaches. They are all correct length models of the BR BSK. However, the Hornby and Lima Full Brake coach models, (Mainline never produced one), have been stretched in order to utilise the tooling that already existed for the other correct length Mk 1 coaches in the range. The BR Mk1 coach bodies were 64'ft 6ins, if gangways fitted, mounted on a 63ft 5in chassis. The exception to this was the BG Full Brake, and some non-corridor suburban coaches, which were on 57ft chassis. The shorter length was to allow greater route availability. If using Mousa Models etched overlays, any of the Hornby, Lima or Mainline Mk1 coaches would be suitable as would the Bachmann Mk1s except for the BG Full Brake. If building a BR GSV by modifying a RTR coach, for one type, 3171 - 3176, a Bachmann BCK has the correct window spacings, some of which need to be blanked off. For the other type, 3177 - 3192, the Hornby, Lima, Mainline or Bachmann BSK all have the correct window spacings, some of which need to be blanked off. If building a weed spray coach by modifying a RTR coach, the donor vehicle needs to be a Hornby, Lima, Mainline or Bachmann BSK all have the correct window spacings, some of which need to be blanked off.
-
Yes, the Mainline version would be an option. The current Hornby BSK is an up to date version of a coach going back to the 1960s when it was introduced under the Tri-ang label. The Lima BSK would also be suitable. All three of these are the correct 63ft length, just different methods of construction. I have an old Lima BSK which I intend to convert into a weed spray coach.
-
The Bachmann BR Mk1 BG Brake coach is not suitable to convert to a weed spray coach as it scales at 57ft length. The weed spray coach is 63ft length. A better option is to use a Brake 2nd BSK coach, which is what the weed spray coach originated from having been a GSV which was a BSK before conversion. The length is spot on, and what windows are left are in the exact same position as a BSK. The one exception is the small window almost in the centre of the coach.
-
DCC Sound for locos in 2020
Dhu Varren replied to mmie353's question in DCC, Electrics and Electronics
Yes, any donor sounds not appropriate for the 201 should be deleted, and replaced by 201 sounds from the ESU 201 program. -
DCC Sound for locos in 2020
Dhu Varren replied to mmie353's question in DCC, Electrics and Electronics
I think you are missing or misunderstanding something here. What I tried to explain is that the prime mover sound files in sound slot 1 from the donor FT loco are replaced by the prime mover sound files in slot 1 of the 201. The 'complicated logic' to do with the FT features are obviously not included in slot 1 with the sound, otherwise my transfer would not have worked, and like I said, my 071/111s and 201s now all have FT function with original sounds from the ESU 071/111 and 201 programs. -
I never mentioned anything about which end is No1 or No2. I merely stated that with DCC the default 'forward' for diesel locomotives is with the radiator end leading. This seems to be the norm for British and Irish models, but it may not be so in the US.
-
On DCC control, the normal orientation of diesel locomotives is that the radiator end leads when going forward. This would mean that with a single cab loco the cab would be at the rear when travelling 'forward' on the controller, as per the Bachmann BR Class 20. However, it is possible that the MM 121 may be configured differently.
-
The original Hornby Mk 3 coaches were introduced in 1977. The window strip had seven windows with raised window frames. They were also shorter than scale by one window, to allow for use on train sets with 1st radius curves. In 1984 new window strips with eight windows were fitted. The new strips did not have raised window frames, the frames being printed onto the strip. In 1999 the 'shortie' Mk 3 was replaced by the current scale length model, which was basically a retooled Lima Mk 3.
-
DCC Sound for locos in 2020
Dhu Varren replied to mmie353's question in DCC, Electrics and Electronics
One advantage of owning a Lokprogrammer, which has not been mentioned so far, is the ability to reblow Loksound decoders by email. If you have a spare decoder, a number of suppliers of sound decoders, including Wheeltappers, will supply the sound programme of your choice as an email attachment. This eliminates the need to send the decoder to them by post for reblow, saves the cost of two lots of postage, and the possibility of the decoder getting lost in the post. All you need to do is to contact the supplier, give them the serial number of the decoder, make payment, which is usually cheaper than the cost of the supplier doing the reblow, and you will then receive the file by email. The file provided will only work on the decoder whose serial number you have provided, and the sound content cannot be adjusted, just like a new decoder supplied with sound, but all other facilities, such as CVs and function mapping are accessible for adjustment, My most recent purchase by this method was the sound file for an NIR 80 Class from Wheeltappers, which incidentally, is very good. After loading it, I discovered that some sounds were appropriate for the 450 Class and not the 80 Class. However, a quick email to Wheeltappers explaining the problem resulted in a new file being emailed within hours, with the correct sounds. -
I also use this method for producing decals. However, if I have a lot to do, I lay them out on a Word document to fill an A4 sheet, save it, copy the file to a memory stick, and go to my local print shop with a sheet of decal paper for Laser printers, and get them to print the sheet. I take my own paper as the decal paper used by print shops may not be suitable for models with raised detail and complex curves, as I found out once. The advantage with laser printed decals is that they do not run when immersed in water. An A4 sheet of decals is also relatively cheap to get printed.
-
Unmodified Hornby locos are notorious for poor running, especially on DCC. I have fitted decoders to numerous Hornby locos, both steam and diesel. Two days ago, I fitted a decoder to a Class 29 belonging to a friend, and although the motor ran perfectly on the workbench, once on the DCC track it would not budge. Investigation revealed two problems. The first is a problem I have dealt with before, and that is over oiling, particularly with steam engines. In the case of the Class 29 the driven wheel axles were swimming in oil. Too much oil acts as an insulator and affects electrical pick up. Removing the wheels and axles, cleaning off the excess oil and refitting the wheels cured that problem. Whilst doing this, I noticed that the axles on the trailing bogie were showing signs of arcing where they contacted the metal chassis block. The axles were cleaned up with a fibre pen and refitted. The loco ran better this time but still needed the odd shove. I noticed that by pushing gently down on the loco, it ran OK. I decided that the basic Hornby diesel loco is too light and pick up is poor as a result, and can cause arcing at the axles, thus making the problem worse. The answer was simple, add more weight. A suitable weight was fitted, and hey presto, the loco runs perfectly. The extra weight also helps with keeping the wheels and pickup axles clean. Three things that DCC operation requires. 1. Clean track. 2. Clean wheels. 3. Good power pickup.
-
I watched that video too, very painful to watch. I have tried various methods of removing numbers with varying degrees of success, but my favourite, particularly for Hornby locos is cocktail sticks and enamel thinners. The thinners softens the number, and It can be tedious, but does not damage the paintwork as the tip of the cocktail stick keeps the rubbing localised on the number. You have to keep wetting the number with thinners during the rubbing, as the thinners tends to evaporate. All you should be left with is a shiny patch which is ideal for applying new decals.
-
The photo in Irish Railway Rambler is actually dated 28 June 1998, not 1994 as stated. This would suggest that the large yellow panel, together with the renumbering to 8113, happened in 1998 or 1999.
-
Photo of 113 with small yellow panel in Irish Railway Rambler dated 6 July 1994. Photo in Irish Traction by Colm O'Callaghan shows 8113 with the large yellow panel at Drumcondra dated 16 Nov 1999.
-
Ernies Massive Irish 1930's to 2005 Photo Archive
Dhu Varren replied to Glenderg's topic in Photos & Videos of the Prototype
Indeed it is Grosvenor Road goods yard. There are a some pictures in Norman Johnson's book 'Parting Shot', one on P51, one on P96 & one on P140, the last two taken from the opposite direction, but showing the same features such as telegraph poles, yard lights and the leaning pole near to the large building on the right, the gable end of which shows up on the P140 picture, and not so clearly on P96.