Patrick Davey Posted December 1, 2023 Author Posted December 1, 2023 First a base coat of grey, then individual stones are picked out in varying shades of darker greys and some browns too, then a few washes of dark colours before dry brushing with white & black to highlight some detail. But I'm still experimenting! 1 1 1
Galteemore Posted December 1, 2023 Posted December 1, 2023 Thanks Patrick. I’m always trawling for good techniques like this. 2 1
Patrick Davey Posted December 2, 2023 Author Posted December 2, 2023 On 1/12/2023 at 5:27 PM, Galteemore said: Thanks Patrick. I’m always trawling for good techniques like this. A pleasure GM
jhb171achill Posted December 2, 2023 Posted December 2, 2023 1 minute ago, Patrick Davey said: A pleasure GM GM's are always a pleasure. Not like Crossleys. 4
Galteemore Posted December 2, 2023 Posted December 2, 2023 (edited) 22 minutes ago, Patrick Davey said: A pleasure GM That’s a relief. Was worried about angling after your help. Edited December 2, 2023 by Galteemore 2
Patrick Davey Posted December 5, 2023 Author Posted December 5, 2023 (edited) On 1/12/2023 at 5:27 PM, Galteemore said: Thanks Patrick. I’m always trawling for good techniques like this. Just noticing the 'trawling' pun here - sorry for being slow!! Never caught it....... must have been too deep..... Edited December 5, 2023 by Patrick Davey 3
Patrick Davey Posted December 5, 2023 Author Posted December 5, 2023 (edited) My friend has produced the valances for me for the main platform canopy - laser cut in 1mm balsa, very fragile!! But broken parts will fit with my 'dilapidation' theme. Also, the sea wall between the railway and the (future) beach is under construction - good to reduce further the amount of visible bright white foam board. The wall will be capped with DAS coping stones then a wire fence. Edited December 5, 2023 by Patrick Davey 14 1
Patrick Davey Posted December 6, 2023 Author Posted December 6, 2023 The canopy has been added to the platform side of the building. I want to create a paved area on the same side, running the full length of the building, using DAS clay, then the whole assembly will be ready to fix permanently in position. 14 1
Galteemore Posted December 7, 2023 Posted December 7, 2023 Amazing how that affects the scene. Really adds even more depth and body to what’s already a very splendid structure. Signature details such as the laser cut dagger boards really are worth doing properly as they have such an impact on the overall impression. 2 1
Tullygrainey Posted December 7, 2023 Posted December 7, 2023 Masterpiece, Patrick. I can smell the damp and mould and hear the rainwater dripping from leaking gutters. 2 1 1
Patrick Davey Posted December 7, 2023 Author Posted December 7, 2023 Checking how the building looks in position. 11 4
Galteemore Posted December 7, 2023 Posted December 7, 2023 Excellent. Can just see a grubby UG with CIE stencilled on buffer beam fussing with a few vans…. 1 1 1
jhb171achill Posted December 7, 2023 Posted December 7, 2023 2 hours ago, Galteemore said: Excellent. Can just see a grubby UG with CIE stencilled on buffer beam fussing with a few vans…. …..and one of those very early multi-coloured sixties excursions on the northern line, in which certainly no two coaches were alike. As well as ex-GNR stock, both steel and timber panelled, you could get a number of types of old GSWR vehicles - low and high roof, corridor and non-corridor; Bredins, Park Royals, brand new tin vans… and within one train, CIE green, black & tan, GNR navy & cream, GNR brown, and (very dirty) silver! And this, boys and girls, is the reason why if the black’n’tan era was more varied and interesting than (post 1972) “modern image”, the pre-1962 grey’n’green era is more interesting still! Plus of course, both steam and diesel working side by side. 2
JasonB Posted December 9, 2023 Posted December 9, 2023 The wall looks great. The colours you've used, work really well together. Brilliant modelling, as always. 5 1 1
Metrovik Posted December 10, 2023 Posted December 10, 2023 Having just read through this thread, may I just say Wow. Simply Wow. Love the slightly run down feel to everything. You're inspiring me Patrick. Keep up the good work! 1 3 1
Patrick Davey Posted December 11, 2023 Author Posted December 11, 2023 21 hours ago, Metrovik said: Having just read through this thread, may I just say Wow. Simply Wow. Love the slightly run down feel to everything. You're inspiring me Patrick. Keep up the good work! Very kind words MV - thank you and good luck with your project! 1
jhb171achill Posted December 11, 2023 Posted December 11, 2023 On 10/12/2023 at 1:21 PM, Metrovik said: Having just read through this thread, may I just say Wow. Simply Wow. Love the slightly run down feel to everything. You're inspiring me Patrick. Keep up the good work! From Capecastle to Brookhall Mill to Clogherhead, these layouts are a master class in mini / shunting layouts and show what’s possible ina small space. 2 1 1
Louth Posted December 11, 2023 Posted December 11, 2023 Patrick you are a craftsman and artist combined in one great railway modeller. Kevin 1 1
Patrick Davey Posted December 13, 2023 Author Posted December 13, 2023 (edited) This week I have been working on the paved area on the platform side of the station building. DAS clay was spread over thick card and held flat until it set. Then the clay was scribed to represent large paving slabs, then painted before thin beads of glue were spread between the slabs and scatter material added. More of the scatter material will be removed before the final effect is achieved. Edited December 13, 2023 by Patrick Davey 14
DJ Dangerous Posted December 16, 2023 Posted December 16, 2023 Great that the thread is back to modelling... Those fishy puns were a load of carp... 3
Patrick Davey Posted December 26, 2023 Author Posted December 26, 2023 Back to the station today and it has now been bedded in, along with the station nameboard. More vegetation shall be applied once the glue dries. 15 1
Gabhal Luimnigh Posted December 26, 2023 Posted December 26, 2023 That's top class, stunning realism Patrick. 1
Galteemore Posted December 26, 2023 Posted December 26, 2023 Fabulous work Patrick. Pure GNRI in all its faded glory. To quote Thomas Moore…. Let Fate do her worst, there are relics of joy, Bright dreams of the past, which she cannot destroy; Which come in the night-time of sorrow and care, And bring back the features that joy used to wear. Long, long be my heart with such memories fill'd! Like the vase, in which roses have once been distill'd -- You may break, you may shatter the vase, if you will, But the scent of the roses will hang round it still. 4 1
jhb171achill Posted December 26, 2023 Posted December 26, 2023 4 hours ago, Galteemore said: Fabulous work Patrick. Pure GNRI in all its faded glory. To quote Thomas Moore…. Let Fate do her worst, there are relics of joy, Bright dreams of the past, which she cannot destroy; Which come in the night-time of sorrow and care, And bring back the features that joy used to wear. Long, long be my heart with such memories fill'd! Like the vase, in which roses have once been distill'd -- You may break, you may shatter the vase, if you will, But the scent of the roses will hang round it still. Is this poetry O or OO scale? 2
Galteemore Posted December 26, 2023 Posted December 26, 2023 (edited) Although I thought poetry was more in metres…..I’ll get my coat Edited December 26, 2023 by Galteemore 7
DiveController Posted December 26, 2023 Posted December 26, 2023 1 hour ago, jhb171achill said: Is this poetry O or OO scale? Poetry? Live steam(ed), I’d say 2
jhb171achill Posted December 26, 2023 Posted December 26, 2023 2 hours ago, David Holman said: Looks 12" to the foot to me! Finescale, I’m thinking….
David Holman Posted December 27, 2023 Posted December 27, 2023 At least it rhymes! One definition of sophistication is, when listening to the William Tell Overture, you actually think of the Lone Ranger. I know my place... 1 1
Patrick Davey Posted December 30, 2023 Author Posted December 30, 2023 Getting back to working on the sea wall, between the station and the lower level beach…. Photos show the production line for making the large coping stones: 1. First I made plasticard formers 2. DAS clay is pushed into the formers 3. Once the clay has dried, it is removed and the blocks are cut into 1 cm lengths and smoothed off, any small fragments which break off, hopefully add to the realism 4. Using PVA glue, the blocks are fixed to the top of the wall sections 5. Once all the smaller wall sections are completed, they will be fixed into position at the bottom of the existing taller sections. 14
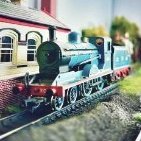
Patrick Davey Posted January 5, 2024 Author Posted January 5, 2024 Belated happy New Year greetings to all! My other half has come down with Covid, so I have been banished to my mother’s house in case I catch it, which apparently would be a disaster of seismic proportions…… In the spirit of clouds and silver linings however, this is where my railway activities take place and there has consequently been some decent progress on the new layout, details of which I shall reveal presently. My OO Works U class will probably never run on the new layout, unless I hook up a DC controller, but I couldn’t resist a few posed photos in the meantime 15 2
Recommended Posts
Create an account or sign in to comment
You need to be a member in order to leave a comment
Create an account
Sign up for a new account in our community. It's easy!
Register a new accountSign in
Already have an account? Sign in here.
Sign In Now