jhb171achill Posted August 13, 2021 Posted August 13, 2021 12 minutes ago, J-Mo Arts said: Would anyone know the width of these machines,what the width of a similar prototype would be or the width of a 00n3 model so that I can get that right on the model? The loading gauge dimensions on the Ballycastle Railway were: 8ft / 10ft / 9ft, somewhere midway between the biggest (CDRJC) and the smallest (Schull & Skib). Model dimensions best assumed by loco and rolling stock drawings.... 1
jhb171achill Posted August 13, 2021 Posted August 13, 2021 (edited) Now, I'm going to go through all the above. Pic 1 Loco dimensions from the side. Compare this, and the scale of it, with Pics 8, 9 & 10 and you'll get end dimensions; the 3ft gauge of the track providing a reference point from which to measure. Pic 2 WAGON dimensions; narrower, of course, than locos; and B & L wagons were not huge! Pic 3 This relates to the almost-broad-gauge huge corridor carriages, thus may be taken as the dimensions of the biggest vehicles possible to run on the B & L - for which they were built, rather than the Ballycastle line. Not hugely tall in the grand scheme of things, especially with a later CDRJC comparison, but long and as wide as possible. Height would have been restricted by some B & L bridges. Pic 4 Relates to wagons; will be of interest. Pic 5 This is important, as reference to this height on the drawings shown will assist in calculating scale for measurements. Pics 6 & 7 Yes, it's that van again (I've a thing about passenger vans!). Note the dimensions, with coupling height and gauge known. Likely to be close enough to loco width - slightly narrower perhaps, but roughly the same height. Pics 8, 9 & 10; see (1). Pic 11 Again, clues may be gleaned from this. Edited August 13, 2021 by jhb171achill 1
J-Mo Arts Posted August 13, 2021 Author Posted August 13, 2021 Thanks again Jhb, this is really kind of you! 1
J-Mo Arts Posted August 13, 2021 Author Posted August 13, 2021 I think for the sake of simplicity I will make my 00n3 couplings the same height regardless of prototype so that I can run my stock regardless of its heritage; I will probably only have a few Ballycastle pieces of stock and the rest CDR & LLSR. This is all a long way off though as I've only just bought the chassis for this first loco! 1
J-Mo Arts Posted August 13, 2021 Author Posted August 13, 2021 (edited) On 12/8/2021 at 6:43 PM, jhb171achill said: Just thinking, in this picture the loco looks fractionally wider than the carriage underframe and as tall as the carriage is, as you suggested. I'll probably add another few mm either side and see how it looks Edited August 13, 2021 by J-Mo Arts 1
jhb171achill Posted August 13, 2021 Posted August 13, 2021 4 minutes ago, J-Mo Arts said: Just thinking, in this picture the loco looks fractionally wider than the carriage underframe and as tall as the carriage is, as you suggested. I'll probably add another few mm either side and see how it looks Yes, and then perhaps take a picture of it from the same angle and compare with the picture. Next time I'm in the Casino I'll measure the NCC narrow-gauge tank engine there and post pics of it. Actually, if anything, I'd say the loco is fractionally narrower! 1
jhb171achill Posted August 13, 2021 Posted August 13, 2021 Just now, J-Mo Arts said: Now I can't unsee that! Very often, locos were narrower than passenger stock, but wider than wagons; see dimensions of wagons for guidance in all the above bumph! Carriages had people in them, and room was needed to stuff as many people (and thus fares) in as possible. 1
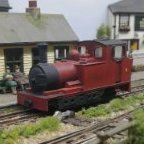
J-Mo Arts Posted August 14, 2021 Author Posted August 14, 2021 And now for something completely different: A freelance Lartigue tank engine While I wait for the 00n3 chassis to arrive I figured I may as well do something! 7 2
David Holman Posted August 15, 2021 Posted August 15, 2021 Might be a bit harder to find a chassis and track for that, though it has been done at least once. There was a circular layout at Expo Narrow Gauge a few years back that came over from France based on the Lartigue. 1
J-Mo Arts Posted August 15, 2021 Author Posted August 15, 2021 5 hours ago, David Holman said: Might be a bit harder to find a chassis and track for that, though it has been done at least once. There was a circular layout at Expo Narrow Gauge a few years back that came over from France based on the Lartigue. My idea is to make essentially the same system as the Newman one that Galteemore has posted above with magnets in the stock and under the board. I've made a few amendments to the cab of the loco as the previous design was far too small: 2
J-Mo Arts Posted August 16, 2021 Author Posted August 16, 2021 Here is the finished piece: Putting my Decauville alongside shows how dinky the monorail is. I think on my 2nd one I'll make it bigger, my excuse for the size of this one is that it's a demonstration/fair model. I'll also work on the wheels as this one unfortunately is too tight to run. The weatherboard is a bit too low, but I really like the loco and I'm definitely going to make some working stock for the system. Thanks for reading, any and all comments are welcome 9 4
David Holman Posted August 17, 2021 Posted August 17, 2021 (edited) Extraordinary, remarkable, amazing! There was me thinking you were 'just' having a bit of fun with CAD and here you are displaying a finished, painted model on some track and scenery. The Newman system says nothing about propulsion though. Is the slider being moved by hand, or could there be a conventional track and motor bogie beneath? Certainly has the potential for something very different. Edited August 17, 2021 by David Holman 1
J-Mo Arts Posted August 17, 2021 Author Posted August 17, 2021 11 hours ago, David Holman said: Extraordinary, remarkable, amazing! There was me thinking you were 'just' having a bit of fun with CAD and here you are displaying a finished, painted model on some track and scenery. The Newman system says nothing about propulsion though. Is the slider being moved by hand, or could there be a conventional track and motor bogie beneath? Certainly has the potential for something very different. Thank you very much for the kind praise! Mr Newman pushes his along by hand but I am intending to make a small track underneath mine. I am moving house (hopefully) before the end of the year and in that new house I'm hoping to make a big layout comprising of 00, 00n3, 009 and the monorail! Thanks again! 2 1
Midland Man Posted August 17, 2021 Posted August 17, 2021 On 16/8/2021 at 4:32 PM, J-Mo Arts said: Here is the finished piece: Putting my Decauville alongside shows how dinky the monorail is. I think on my 2nd one I'll make it bigger, my excuse for the size of this one is that it's a demonstration/fair model. I'll also work on the wheels as this one unfortunately is too tight to run. The weatherboard is a bit too low, but I really like the loco and I'm definitely going to make some working stock for the system. Thanks for reading, any and all comments are welcome looks amazing blue looks amazing on it. 1 1
Mayner Posted August 18, 2021 Posted August 18, 2021 Definitely fits in the "Now for Something Completely Different" modelling category. The Lartigue loco looks really well in lined blue. 1
J-Mo Arts Posted August 20, 2021 Author Posted August 20, 2021 The chassis for the 00n3 Ballycastle loco has arrived : I took the body off to have a look at the (rather simple) mechanism and unfortunately the bufferbeam and couplings are attached the the chassis. I don't really want to cut these off as the model is sort of 'vintage' and could be considered collectable by some, so I think I'll have to design around these constraints. The buffers themselves have come out though, which is a good thing. I'll design something to plug the holes.
Galteemore Posted August 20, 2021 Posted August 20, 2021 Excellent. Triang TT3 Jinty? May be worth joining 3mm Soc if not already a member. They have a most useful 2nd hand sales service for such items. Could be a useful way of getting 12mm stuff…. 1
J-Mo Arts Posted September 24, 2021 Author Posted September 24, 2021 Current state of play with the loco 3
J-Mo Arts Posted October 2, 2021 Author Posted October 2, 2021 Some more motivation means that the loco has been receiving some much-belated work. This angle is showing her more completed side; the backsheet needs some rivets, and I'm not sure if the fireman's side bunker is open on the outside of the cab. The driver's side houses the reverser so that needs adding to the other side. Then I need to add steps, a smokebox door, a whistle and finalise the hole in the bottom for the chassis. The end is in sight! Any C&C welcome and kindly requested. Thanks! 7
J-Mo Arts Posted October 9, 2021 Author Posted October 9, 2021 I've begun to add rivets, although I'm not sure I like them. I'm sure it'll be different once she's printed and painted though. 9 1
J-Mo Arts Posted October 17, 2021 Author Posted October 17, 2021 Photo-less update this time, I'm afraid. Rivets have been added to the other side and the hole for the chassis finished, so I'll be printing the loco soon. If it goes well I'll move onto some rolling stock, once I've sold some prints and acquired some funds! 2
J-Mo Arts Posted October 18, 2021 Author Posted October 18, 2021 While the loco is printing, here are some screenshots of the motion I'm working on for it. The TT jinty chassis has screws on the middle wheelset meaning I can just unscrew them slightly and fit the rods on without much hassle. Thanks for reading 5
J-Mo Arts Posted October 19, 2021 Author Posted October 19, 2021 Well, the print failed again and didn't fit the chassis anyway, and I'm starting to wonder if I should give up on this loco as the CAD file is very difficult to modify after some glitches it's had. It'd probably be easier to make a new freelance side tank loco, which I'll probably design at some point. For now I'm probably going to work on my 009 layout as this whole adventure has demoralised me a bit, although I've been tempted by the Branchlines small Beyer Peacock, which I would make as a Ballymena and Larne loco. When funds allow such a purchase I will think a little more about that. If anyone has any 00n3 going spare/ that you'd consider selling, that needs a good home, I'd be very happy to take it off your hands! 1
KMCE Posted October 19, 2021 Posted October 19, 2021 J-Mo, Can you clarify what failed in the print, (are you resin or filament printing?). Over the course of my printing experiences, I have had numerous print failures, and where the model was at fault was normally down to part thickness; other failures were normally a result of poor or insufficient supports. Some of the most stupid were due to lack of resin in the tank - normally after a run of prints and not topping up in time!! Without seeing your CAD model, it's difficult to comment on its complexity or recovering from glitches as you put it. If you can elaborate, I can try to help, if it is of interest. Ken 1 1
Westcorkrailway Posted October 19, 2021 Posted October 19, 2021 2 hours ago, J-Mo Arts said: Well, the print failed again and didn't fit the chassis anyway, and I'm starting to wonder if I should give up on this loco as the CAD file is very difficult to modify after some glitches it's had. It'd probably be easier to make a new freelance side tank loco, which I'll probably design at some point. For now I'm probably going to work on my 009 layout as this whole adventure has demoralised me a bit, although I've been tempted by the Branchlines small Beyer Peacock, which I would make as a Ballymena and Larne loco. When funds allow such a purchase I will think a little more about that. If anyone has any 00n3 going spare/ that you'd consider selling, that needs a good home, I'd be very happy to take it off your hands! Might be best to leave it for a while. My fella spent a long time bollocking around with fitting chassis to loco shells with the Bandon tank (which I still need to try out a Fowler 4F chassis under!) it was just getting depressing so we stopped development for a bit. You may never come back to it, but don’t get rid of it. Start out something else on your to do list in the meantime 1 1
J-Mo Arts Posted October 19, 2021 Author Posted October 19, 2021 5 minutes ago, KMCE said: J-Mo, Can you clarify what failed in the print, (are you resin or filament printing?). Over the course of my printing experiences, I have had numerous print failures, and where the model was at fault was normally down to part thickness; other failures were normally a result of poor or insufficient supports. Some of the most stupid were due to lack of resin in the tank - normally after a run of prints and not topping up in time!! Without seeing your CAD model, it's difficult to comment on its complexity or recovering from glitches as you put it. If you can elaborate, I can try to help, if it is of interest. Ken Hi Ken, thanks for the offer of help. I print using a resin printer. I've since thrown away the print however it was wonky in places and the inside of the tank was too short to allow all of the chassis to fit. The wonkiness tells me to add more supports, and I could cut the needed thickness out of the tank with an extrusion. The model has, somewhere down the line, become over 5000 bodies, which really slows down my computer when I try and modify it. I could probably trace this back but trying to merge all the bodies into one froze my computer so I'm not sure if modifying that in the time line would have the same effect. I was probably overreacting as I was disappointed with it failing, but I'll get back to working on it in a few days. I have a lot of work to be getting on with this week, which will allow me to come back in a short while with a clear head. I've just emptied the last of my resin into the tank, so hopefully I have enough for another try at the loco anon, if not I'll be buying another bottle soon anyway. Thanks again
J-Mo Arts Posted October 19, 2021 Author Posted October 19, 2021 3 minutes ago, Westcorkrailway said: Might be best to leave it for a while. My fella spent a long time bollocking around with fitting chassis to loco shells with the Bandon tank (which I still need to try out a Fowler 4F chassis under!) it was just getting depressing so we stopped development for a bit. You may never come back to it, but don’t get rid of it. Start out something else on your to do list in the meantime Thanks, yes that I think is what I'm going to do. Just out of interest, is that Bandon Tank a kit you're designing or a kit you're building? I'd like to see a picture of how you get on with it, if you'd be so kind as to share
KMCE Posted October 19, 2021 Posted October 19, 2021 10 minutes ago, J-Mo Arts said: it was wonky in places and the inside of the tank was too short to allow all of the chassis to fit. The wonkiness tells me to add more supports, and I could cut the needed thickness out of the tank with an extrusion. I think you may have identified the problems - I have on occasion added a stiffening piece inside a wagon or coach, something like 1.5mm x 1mm by the internal height or length as necessary. This has really beefed up the strength without being too obtrusive. I did this to strengthen the lower steps for the cattle brake I recently built. With reference to the CAD file becoming unwieldy - I found this happening to me, and it drove me mad. I traced the problem to the history associated with the objects as they are created. If you hightlight (or select) the objects, right click and select properties. There may be lines or surfaces etc that are selected as part of your selection box, so if the pull down box at the top say All, pull it down and select 3D Solid. Towards the bottom of the properties list is Solid History - in the HIstory pull down box, change this to None, and Show History pull down box, change to No. This should free up the model and allow you work with it without the long delays - worked for me anyhow. Hope this helps. Ken 1 1
J-Mo Arts Posted October 19, 2021 Author Posted October 19, 2021 Thank you very much for the advice Ken, much appreciated!
Westcorkrailway Posted October 19, 2021 Posted October 19, 2021 12 minutes ago, J-Mo Arts said: Thanks, yes that I think is what I'm going to do. Just out of interest, is that Bandon Tank a kit you're designing or a kit you're building? I'd like to see a picture of how you get on with it, if you'd be so kind as to share We have progressed a small bit since the initial bit of this thread. But upon realising that he would likely have to make up the chassis from complete scratch. We shelved the project in the meantime I do have (most!) of the SSM Bandon tank kit. With the same idea of just lobbing a chassis under it so no need to buy any motor or wheels or any of that…..or at least in my mind at the time 1
Mayner Posted October 19, 2021 Posted October 19, 2021 (edited) Don't get discouraged, we all face setbacks in our modelling, your rendering Ballycastle Tank is an impressive model. I have a soft spot for the Antrim Black Hawthorn saddle tanks and was hoping you would design the Ballymena 0-4-2 version in OOn3. Designing and printing a complex 3D model such as a locomotive or other railway rolling stock is challenging as there are so many variables, my 3D Modeller produced multiple revisions of the Brake Van before we produced acceptable prints. Similarily the CAD work for most of my etched kits goes through several revisions before we reach the production version. It might be worth approaching future models by designing, checking or even printing the basic outline before starting the fine detail. It would be worth saving the model as a separate version or revision as you progress to the next step, this would minimise the risk of loosing your work and having to re-start from the beginning if a file becomes corrupted. There are 11 separate versions or revisions of the Bulk Grain wagon although we only required two test prints to achieve an acceptable result. Saving a model such as the Brake Van chassis as a separate file before adding steps and brake gear was the first step in designing a "standard" GSR wagon chassis which we were able to modify with different wheelbase, springs, buffers and brake gear for different wagon types. I can't offer much advice on the actual printing and adding supports because I am still at the early learning stage on that front. Edited October 19, 2021 by Mayner 1 1
Recommended Posts
Create an account or sign in to comment
You need to be a member in order to leave a comment
Create an account
Sign up for a new account in our community. It's easy!
Register a new accountSign in
Already have an account? Sign in here.
Sign In Now