airfixfan Posted December 14, 2021 Posted December 14, 2021 The Barclay 4-6-0Ts were highly regarded by the Swilly crews. Two of them lasted until closure Nos 2 and 3. Often found on the Letterkenny line right up to 1953 and No 3 even saw some use on the lifting train work. 2 1
David Holman Posted December 15, 2021 Posted December 15, 2021 17 hours ago, J-Mo Arts said: Did a bit of work on her this morning. As the boiler is pitched higher, and I'm trying to keep it with the same loading gauge as the 4-6-0s, the chimney and dome look a bit small. I'm sure it'll look fine when painted and moving around on the layout. Maybe the chimney and dome need to be a bit 'fatter', rather than taller? Overall, looks rather good though.
J-Mo Arts Posted December 15, 2021 Author Posted December 15, 2021 1 hour ago, David Holman said: Maybe the chimney and dome need to be a bit 'fatter', rather than taller? Overall, looks rather good though. Thanks! Unfortunately I can't make the dome any fatter without it overflowing onto the tanks, but I'll thicken the chimney.
J-Mo Arts Posted December 15, 2021 Author Posted December 15, 2021 I couldn't make the chimney thicker without making it look really weird so I've added 1mm to it and the dome's height and they look much better to me now. I've also added a few more details and drawn up the front pony truck, taking inspiration from the Donegal class 5 and IoM Beyer Peacocks. It doesn't leave much room for cylinders but I'm sure I'll think of some way to add them. 3
Galteemore Posted December 15, 2021 Posted December 15, 2021 Looks the part. Nice NW Ireland narrow gauge look about it 1
J-Mo Arts Posted December 15, 2021 Author Posted December 15, 2021 I've been suggested a way to avoid pfaffing about with making cylinders and rods. The boiler is already higher than on the prototype so there is a bit more space to fit in inside cylinders driving the 2nd axle. A quick photoshop showed me this is vaguely plausible: It could even have the motion on the first axle, a bit like Dolgoch on the Tallylyn Railway. The size of the outside framed bogie would allow access to the inside cylinders. It could be an experimental design which didn't really catch on. As it's a freelance loco already I'm happy enough with this reasoning and it's always nice to have a little bit of 'backstory' to a freelance- if a real loco can have a history why can't it! Happy to hear any comments or criticisms. 1
David Holman Posted December 15, 2021 Posted December 15, 2021 The band round the dome makes a real difference. The alternative would be either to not worry about printing the dome in situ, but print a separate one, or even use a casting. Traditional model making creates a lot of hybrids and while I can see the attraction of solving problems via CAD, sometimes there are advantages to a bit of mix and match. As for having inside cylinders, the main reason narrow gauge locos have outside ones is lack of space between the frames. Clogher Valley 0-4-2Ts had 13.5 inch diameter cylinders, so when you add on the thickness of their casing, along with the thickness of the frames and that leaves little, if any space to fit everything. Outside cylinders are not too difficult to fit, at least as long as the valve gear is hidden inside the frames. 1
Galteemore Posted December 15, 2021 Posted December 15, 2021 Could always do a ‘Castlederg style’ where the trickier parts of the motion are covered….
J-Mo Arts Posted December 15, 2021 Author Posted December 15, 2021 (edited) Thanks for the numbers David and the suggestion Galteemore. I'd rather keep this loco skirts-free if possible, I've done so many trams in 009 it'd be nice to do a loco without covers. I may try and put some cylinders around the cuboid protruding from behind the pony truck (the original chassis buffer beam), but I'm a little worried about these obstructing the movement of the pony truck. The Barclay 4-6-0s on which this loco is based has 14" diameter cylinders which would be 2'4" for two, a very tight squeeze but potentially do-able? I'll see how I get on with adding cylinders. Edited December 15, 2021 by J-Mo Arts 1
J-Mo Arts Posted December 15, 2021 Author Posted December 15, 2021 Better pony truck design. I think I'll test print this tomorrow, although with some resin I don't quite know how to use yet so it may come out awfully! I think for now I'll leave off the cylinders, I can always try and add some later. Looking forward to finally having a 00n3 loco! 4
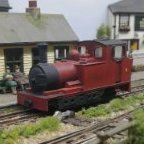
J-Mo Arts Posted December 19, 2021 Author Posted December 19, 2021 Some actual modelling! I've remotored and cut down a hornby 0-4-0 mechanism to suit: Southern Railway of Northern Ireland no.25, as I was watching Oh! Mr Porter and couldn't resist. She'll be a 2-4-0 just like Northiam, the loco used in the film but isn't a model of that loco. 4
Galteemore Posted December 19, 2021 Posted December 19, 2021 (edited) ‘Next train’s gone’ ! Lovely loco - good effort. Nice to see another fan of the movie. From 2009 to 2015 we lived a few miles from Cliddesden where the Buggleskelly scenes were filmed. My first O layout was a Southern 30s setup inspired by the line. Edited December 19, 2021 by Galteemore 2
J-Mo Arts Posted December 19, 2021 Author Posted December 19, 2021 24 minutes ago, Galteemore said: ‘Next train’s gone’ ! Lovely loco - good effort. Nice to see another fan of the movie. From 2009 to 2015 we lived a few miles from Cliddesden where the Buggleskelly scenes were filmed. My first O layout was a Southern 30s setup inspired by the line. Thanks- was a tad worried that I was Wasting My Time... That looks a lovely layout, and a fun place to base it on! 1
David Holman Posted December 20, 2021 Posted December 20, 2021 Well, that looks rather good. Full of character and dare I say a hint of the preserved 'Bellerophon' about it. The polished brass between boiler and smokebox is a nice touch too. 1 1
J-Mo Arts Posted December 24, 2021 Author Posted December 24, 2021 Not Irish I'm afraid, but wishing everyone a very merry Christmas and all the best for 2022! 7
J-Mo Arts Posted January 1, 2022 Author Posted January 1, 2022 (edited) Some tangible 00n3 modelling! I decided to make an 0-6-0T after issues with the front pony truck, here she is halfway through painting. I'm very pleased to have a physical 3ft gauge model now as opposed to the various digital designs I've made. The front buffer beam (rear coming shortly) is to try and disguise the fact that the loco sits rather high - running plate about the same height as my Adams O2. I will see how this looks compared to some Dundas wagon kits. I will have to design some lining for her to have printed, I'm thinking yellow lining with L&BER on the tanks as this was a livery worn by one of the real Barclay 4-6-0s, no.4 I believe (mine will be no.7). I'm wondering about chopper couplings but I read somewhere that the Branchlines ones can be unreliable - has anyone had experience with them? Edited January 1, 2022 by J-Mo Arts 5
Galteemore Posted January 1, 2022 Posted January 1, 2022 That looks wonderful. Real Swilly feel about it. 1
David Holman Posted January 1, 2022 Posted January 1, 2022 Great stuff J-Mo, full of character and am sure simple lining with a little light weathering, will lift it even further.The As for couplings, while choppers are prototypical correct, Kadees are a popular choice, while B&B work really well too. 1
J-Mo Arts Posted January 2, 2022 Author Posted January 2, 2022 Thank you both for the kind words. I'm thinking either choppers for accuracy or 009 bemo couplings for ease and expense, I saw a French layout at the Uckfield exhibition using this style of coupling and some cleverly placed shrubs/bushes/grass tufts in siding trackbeds to uncouple stock, as the bush lifts the coupling apart in the pushing direction but doesn't lift it up as it pulls. I daresay on an Irish 3ft line's rural sidings a few tufts wouldn't look out of place. 1
Andy Cundick Posted January 2, 2022 Posted January 2, 2022 I Choppers can be a pain to get to work properly in 4mm(been there tried it),Kadees too bulky and look wrong on Irish stock, Bemos are expensive bulky the plastic they are made from makes them a pain to fix to most stuff and not the easiest to uncouple remotely .I finally came round to using DG couplings in their various sizes going from Great Western broad gauge to 009.being brass they can be soldered, glued, bent round things, the steel droppers allow for automatic uncoupling and there is a brass dropper which allows for delayed uncoupling,Also at between £4 to £5 for sixteen not expensive.Andy. 1 3
David Holman Posted January 2, 2022 Posted January 2, 2022 Andy is right, was thinking of DG, not B&B! They work well. 1
Mayner Posted January 3, 2022 Posted January 3, 2022 The loco looks really well very neat finish though it tends to remind me of Hudswell Clarke rather than Barclay Did you 3D print or scratchbuild from plasticard? 1
Galteemore Posted January 3, 2022 Posted January 3, 2022 (edited) There’s definitely a family likeness to the big HC tank and tender locos. Almost as if HC took one of their Manchester Ship Canal loco designs and boil washed it to 3’ gauge size https://www.flickriver.com/photos/14581588@N05/48641741222/ Edited January 3, 2022 by Galteemore 1
J-Mo Arts Posted January 3, 2022 Author Posted January 3, 2022 6 hours ago, Mayner said: The loco looks really well very neat finish though it tends to remind me of Hudswell Clarke rather than Barclay Did you 3D print or scratchbuild from plasticard? Thanks! The loco is 3D printed but with a newer card buffer beam reinforced with plasticard. She has taken on a HC air after being bodged and bashed from the original drawing, that was one of my first thoughts looking at the printed model! Unfortunately I've written Andrew Barclay on the maker's plates although at that scale and after a bit of a mucky paint job I can barely read it anymore. Perhaps it could have been purchased with the bigger Hudswells, perhaps later used for shunting at the dual gauge yards in Derry Harbour alongside the 5'3" tanks. 5 hours ago, Galteemore said: There’s definitely a family likeness to the big HC tank and tender locos. Almost as if HC took one of their Manchester Ship Canal loco designs and boil washed it to 3’ gauge size https://www.flickriver.com/photos/14581588@N05/48641741222/ The cab and boiler fittings on that and my model are strikingly similar, and quite accidental! Thanks for the link. 2
J-Mo Arts Posted January 5, 2022 Author Posted January 5, 2022 The wagon kits arrived today so I've built two of the three: I'm pleased with how they've gone together, and although they sit a bit short of my Hudswell, I found a picture of a Swilly loco with an equally short wagon behind: I still intend to slightly lower the loco if I can, but I hope that this is plausible enough. Thanks for reading 6
David Holman Posted January 6, 2022 Posted January 6, 2022 Looks fine to me. A rather nice train is emeging. 1
J-Mo Arts Posted January 7, 2022 Author Posted January 7, 2022 Hi folks, I received this pin from my mother as a Christmas gift, does anyone know if it's meant to be anything in particular? It's (guesstimating!) about an inch wide, so too small I thought to be a cap badge, is it just a commemorative pin or is it the right size for a real badge somewhere on the railway? I'm not bothered if it's not a replica of a real badge, I'm very happy with it and was just wondering where such a small badge might have been worn if indeed it is not just a commemorative design. 2
Galteemore Posted January 7, 2022 Posted January 7, 2022 (edited) Is a nice enamel type replica of the coat of arms. Such things were flogged by the RPSI sales team thirty years ago, as I well recall, being one of the hucksters…..Nice gift. You can see a big version of it on No 30’s cab Edited January 7, 2022 by Galteemore 2 1
J-Mo Arts Posted January 7, 2022 Author Posted January 7, 2022 Thanks for the info Galteemore! Much appreciated. 1
J-Mo Arts Posted January 9, 2022 Author Posted January 9, 2022 Not much progress with this project: steps added, rear dumb buffers, nameplates and a few other details. I've decided that I'll give the wooden cab a go as it means I won't have to do the cab detailing, a lazy but time-saving decision. I think the next steps are to make room for the chassis, finish a few of the details and make pilot holes for details to add post-printing. I saw a nice tutorial using 'green stuff' rolled with a hair comb to make pipe for wargaming miniatures and I think I'll do that for the water pipe on this loco. Those of you who model in 7mm scale- do you have any suggestions for handrail knobs and smokebox door handles for this loco? I've seen that the Tonbridge exhibition has been cancelled, which I believe was one of the times when I could have brought the loco for running on David Holman's layout- a bit of a shame, but gives me more time to make the loco as good as I can. Thanks for reading! 5
David Holman Posted January 10, 2022 Posted January 10, 2022 Yes, shame about Tonbridge, though they may try to do something in May, so will keep you posted. Allypally next, in March - fingers crossed. Get my handrail knobs from Roxey Mouldings. They are Markits ones, and come with long, medium and short shanks. Tend to use short for the smokebox door and medium along the boiler. They take 0.7mm wire. Lots of good stuff in Wargaming - Gordon Gravett first put me on to that. That loco is not only very much in the Quarry Hunslet genre, it is also more than a bit Hornby 'Desmond'. 0n16.5 folk are very keen on these, because replacing the cab and chimney gives a very quick and easy conversion, while the chassis becomes a better slow runner in the larger scale, even if the outside cylinder rods are a bit crude. 1 1
J-Mo Arts Posted January 10, 2022 Author Posted January 10, 2022 2 hours ago, David Holman said: Yes, shame about Tonbridge, though they may try to do something in May, so will keep you posted. Allypally next, in March - fingers crossed. Get my handrail knobs from Roxey Mouldings. They are Markits ones, and come with long, medium and short shanks. Tend to use short for the smokebox door and medium along the boiler. They take 0.7mm wire. Lots of good stuff in Wargaming - Gordon Gravett first put me on to that. That loco is not only very much in the Quarry Hunslet genre, it is also more than a bit Hornby 'Desmond'. 0n16.5 folk are very keen on these, because replacing the cab and chimney gives a very quick and easy conversion, while the chassis becomes a better slow runner in the larger scale, even if the outside cylinder rods are a bit crude. Thanks David. I think I'll be using the metal coupling rods that came with the chassis I'm repurposing, but 3d printing a slightly better impression of connecting rods. As these aren't load-bearing I think the resin will be up to the stresses. I'm considering also making a 16.5mm gauge chassis with inside frames to swap out when I want to run it on a club member's layout, which is O16.5, as the 21mm gauge is rather niche and unfortunately I don't have space for another layout. I'm quite grateful to have built and painted wargaming figures before painting model railway stock, as although the techniques are different it's given me a good set of transferable skills. Looking forward to March then, fingers crossed! 1 1
David Holman Posted January 10, 2022 Posted January 10, 2022 Couldn't agree more - there is much to learn both outside as well as within our hobby! 1
J-Mo Arts Posted January 29, 2022 Author Posted January 29, 2022 (edited) Because I really didn't have enough projects on the go... Tonight I started, and am most of the way finished with, a 00n3 western Irish photoplank inside a shoebox: Edited January 29, 2022 by J-Mo Arts 6 1
Mike 84C Posted January 29, 2022 Posted January 29, 2022 Hi J-Mo, if you want a little Irish loco project to get your teeth into please pm. Its a lot different!
Recommended Posts
Create an account or sign in to comment
You need to be a member in order to leave a comment
Create an account
Sign up for a new account in our community. It's easy!
Register a new accountSign in
Already have an account? Sign in here.
Sign In Now