Aussie Phil Posted November 27, 2013 Author Posted November 27, 2013 Well it has been a while but I now have a place in Melbourne and have a small amount of time to start doing some quick modelling. Stay tuned and there will be some photos ASAP. Cheers phil
Broithe Posted November 27, 2013 Posted November 27, 2013 Well it has been a while but I now have a place in Melbourne and have a small amount of time to start doing some quick modelling. Stay tuned and there will be some photos ASAP. Cheers phil Great news. Waiting.....
Aussie Phil Posted December 1, 2013 Author Posted December 1, 2013 Baseboard one of four completed today. Have decided to build the layout as an exhibition layout and changed plans to maximise space in new room so will be an L shape. Photos and tracks plans to come.
Aussie Phil Posted December 1, 2013 Author Posted December 1, 2013 The layout has changed as the room is bigger and better than expected in the new house. The layout is going to be in four modular pieces and designed as an exhibition layout. Same profile as previous but with a little more wiggle room could explore the area more and make some alterations I was wanting too. The fiddle yard is gone and all staging will be completed in front of shop. There will be more room for a farm and the addition of a creek running along side the road. Two drying sheds have been added with the addition of extra conveyor belts. Will post photos of progress soon.
Aussie Phil Posted December 1, 2013 Author Posted December 1, 2013 Seeing as though I have been in new house a week thought it was time to get started on new layout. Ply board and pine are the timbers selected... Only because they were on special and dead cheap (I prefer MDF). Glue and screw technique used to bind and after three hours (I procrastinated for a little while) first board done and dry. So for the first time my buildings have somewhere nice and stable to sit
RedRich Posted December 2, 2013 Posted December 2, 2013 Looking good so far Phil. It's great that you have been able to expand the size of the layout due to more room. I love the buildings they are superbly modelled. Can't wait to see more. Rich,
Aussie Phil Posted December 3, 2013 Author Posted December 3, 2013 So today took a break from building baseboards and looked for a bit of a change. With a piece of spare plywood I decided to start building the farmhouse for the layout. It is based on the family home of my girlfriends Grandmother in county Clare. I visited the house last Christmas and have used a selection of photos I took on that occasion, along with some family photos from when the house was still lived in. It will be modelled with the original thatch roof and with stone whitewashed walls. The frame will be covered with DAS clay and sculpted while the thatched roof will be crafted using fibres from either old paint brushes or a broom. Will post more photos as I progress. Cheers for the continued support
jhb171achill Posted December 3, 2013 Posted December 3, 2013 A Bord na Mona model would be a very unusual and interesting subject. Looking forward to seeing how it develops. Looking great so far! I like the old shed...
Horsetan Posted December 3, 2013 Posted December 3, 2013 ....In 2008 I travelled to Switzerland and fell in love with the RhB and my first layout was born. Based on the bernina route it was a HOm layout with everything purchased commercially..... That would have been an expensive exercise. BEMO HOm stock doesn't come cheap; engines are generally over GBP £200 to £250 each, and even the tiny coaches are getting on for about £50 each new. Years ago, I bought a BEMO RhB G4/5, based on the preserved no.108 at Landquart. I felt intense pain handing £320 over the counter. For that reason alone, I have kept it. I will probably arrange for it to be put in my coffin when I die - the model owes me that much!
Aussie Phil Posted December 3, 2013 Author Posted December 3, 2013 That would have been an expensive exercise. BEMO HOm stock doesn't come cheap; engines are generally over GBP £200 to £250 each, and even the tiny coaches are getting on for about £50 each new. Years ago, I bought a BEMO RhB G4/5, based on the preserved no.108 at Landquart. I felt intense pain handing £320 over the counter. For that reason alone, I have kept it. I will probably arrange for it to be put in my coffin when I die - the model owes me that much! Similar for me. Have a couple of Bemo Metal Models which cost AU$600 each. When I was selling my stuff which was a collection around $5000 worth new I had to keep them for two reasons... One would never recoup close to the original cost and secondly they were the first locos I saw when first I Switzerland. BnM stuff far cheaper... scratchbuilding always is
Aussie Phil Posted December 3, 2013 Author Posted December 3, 2013 So after building the frame work it was time to add the DAS clay and detail the walls. Simple process 1. Apply wood glue to the walls 2. Roll out the clay flat and score side joining the timber 3. Remove air bubbles (make sure you keep your hands wet) 4. Add texture and detail - for the brick work I used blocks I purchased a while back from USA and for the lime rendered I used a piece of non stick cooking paper scrunched up and the rubbed onto the clay. 5. Add extra pieces of clay as required using score and wet then rub into place. 6. When dry carve into final shapes with small chisel or scalpel blade For the chimney I made it using 3 pieces. First the main body which is attached to timber. Then a small square for the decorative work. Finally a square for the top which after placed I then carve out the centre while wet and smooth when dry. You'll notice in the photos the chimney changed shape. Was after noticed in photo had detailed wrong type so quick snip and change took place easily. DAS clay is extremely easy to use and forgiving. I encourage everyone to have a go and build their own architectural models. Its great fun. Always free to answer any questions as well. Just post on thread or personal message me. Next is the roof which will be another experimental adventure using a feather duster and some balsa wood. Hope you like and will keep posting as the model progresses. Now have to get back to some baseboards for a little while Phil
Aussie Phil Posted December 3, 2013 Author Posted December 3, 2013 The best thing is too that on a cold wet day like we have today in Melbourne you can easily dry your model in front of the heater
Horsetan Posted December 3, 2013 Posted December 3, 2013 ...BnM stuff far cheaper... scratchbuilding always is ...and you can build trackwork which doesn't have to be flat!
jhb171achill Posted December 3, 2013 Posted December 3, 2013 That's actually an interesting point. BnM track almost always looks as it it's (a) three quarters submerged in weeds and mud, and (b) extremely uneven to an extent that in model form would just put locos off the track. I wonder how you would reproduce it - probably best smooth track with lots of grass growing round it?
Aussie Phil Posted December 3, 2013 Author Posted December 3, 2013 That's actually an interesting point. BnM track almost always looks as it it's (a) three quarters submerged in weeds and mud, and (b) extremely uneven to an extent that in model form would just put locos off the track. I wonder how you would reproduce it - probably best smooth track with lots of grass growing round it? The plan will be to have it twist and turn but not to the point where it will derail the trains. Won't be as dramatic as prototype but will be enough to make it noticeable. Have trialled a stretch and it worked well. I will just be using peco code 100 ho track (which is code 50 in O scale) as sleepers are never visible. In the yard area will build own track with metal sleepers. Hopefully, fingers crossed, it will all come together.
Horsetan Posted December 3, 2013 Posted December 3, 2013 .... extremely uneven to an extent that in model form would just put locos off the track. I wonder how you would reproduce it .... Build the track badly, but see if you can fit some form of suspension to your stock to cope with it.
scahalane Posted December 4, 2013 Posted December 4, 2013 Thanks for sharing your techniques, I'm a great advocate of Das clay myself, very versatile. Your layout plans look great as are your modeling skills, I'm looking forward to watching this progress.
David Holman Posted December 5, 2013 Posted December 5, 2013 That's actually an interesting point. BnM track almost always looks as it it's (a) three quarters submerged in weeds and mud, and (b) extremely uneven to an extent that in model form would just put locos off the track. I wonder how you would reproduce it - probably best smooth track with lots of grass growing round it? A mixture of fibres and/or ground foam [crumb] works well for grassy track. Goes without saying that anything too long will get in the way of wheels, pickups etc, though battery power could obviate that perhaps. Have used 6mm fibres & a static grass machine without problems, but 2mm also works in smaller scales. Remember to mix the colours and build up layers. Once PVA has set, a light smear of glue across the top of fibres enables fine crumb to be sprinkled on to give weed/leaves type texture. A puffer bottle works just as well but takes a little longer. One trick I have developed is to not be too careful when ballasting in the first place, so that there are random bare patches in the ballast. These then get the weed treatment, so it all looks quite natural. There again, for some parts of Bord na Mona, you could miss the ballast altogether! The building is already looking impressive, Phil. Will look forward to seeing it finished.
Aussie Phil Posted December 7, 2013 Author Posted December 7, 2013 So all is going to plan and progressing slowly. The thatch has been made using duster purchased at the $2 shop and is coated with wood glue while still on the pole and then trimmed and placed when ready. The colouring is a mixture of browns. The doors are made from balsa wood and cut to size and glued. Then painted and weathered. The windows have been cut out using a dremel and took some time but came together well. Thanks all for advise and tips regarding track and grass techniques. Will all come in handy and indeed will be used when I progress to that stage. Cheers again and hope you like the photos.
Aussie Phil Posted December 23, 2013 Author Posted December 23, 2013 Merry Christmas and a happy new year to all. The buildings are done and track will go down in the new year. Happy modelling to all over this festive season.
richrua Posted January 19, 2014 Posted January 19, 2014 This is a fantastic thread and even better modelling. Sometime I hope to add a bord na mona line to my layout - as a result of seeing yours. It is a uniquely irish train to model. Well done.
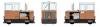
Aussie Phil Posted February 3, 2014 Author Posted February 3, 2014 Sorry for the quiet spell but have been using the time to build some models for the layout. Have built a; - BnM simplex... Body is scratchbuilt using styrene sheet and on a black beetle mech. Painted and detailing finished today. - Peat wagon... older style scratchbuilt using styrene sheet and painted by hand and weathered using powders - Ballast wagon... Scratchbuilt using styrene sheet and shapes then added the kitbashed tractor and finally sprayed and weathered with powders - Passenger carriage... was a modified Corgi model. Kit bashed using styrene sheet and shapes. Sprayed and weathered with powders. Still has frame detail to be added and painted. Prototype is used for school tours. At least now I have a train for the new layout Phil
heirflick Posted February 3, 2014 Posted February 3, 2014 superb work indeed! this pic has got to get top prize for the most unusual wagon i have ever seen...... i prersume the tractor engine works the tipper? again fantastic workmanship=D
Glenderg Posted February 3, 2014 Posted February 3, 2014 superb work indeed! this pic has got to get top prize for the most unusual wagon i have ever seen...... [ATTACH=CONFIG]11763[/ATTACH] i prersume the tractor engine works the tipper? again fantastic workmanship=D Well said HF, astonishing bit of work.
jhb171achill Posted February 3, 2014 Posted February 3, 2014 In the mid thirties, the forerunner to BnM, the Turf Development Board, made tentative investigations into establishing a turf harvesting operation at a site between Newport, Co Mayo, and Mallaranny (Mulrany), on the about-to-be-closed Achill branch. Had this come into being, an Arigna-style operation would have had narrow gauge wagons taking turf down to a long siding off the branch. There's an idea for a very unique layout. A cross between Shannonvale Siding, the 1940s GSR turf trains, Coolnamona, Arigna and BnM! Fast forward to today, and we have an 071 backing specialised wagons under a loading bay, where BnM trains dump turf into them.
heirflick Posted February 3, 2014 Posted February 3, 2014 Fast forward to today, and we have an 071 backing specialised wagons under a loading bay, where BnM trains dump turf into them. now theres a thought thats going to fester!!
jhb171achill Posted February 3, 2014 Posted February 3, 2014 I look forward to the festering process, Heirflick!
Rialto Posted February 3, 2014 Posted February 3, 2014 I've really enjoyed reading this build. Of all the fantastic detail, I do really like the vice on the side of that tractor driven tipper. Great modelling. Thanks for taking the time to post it all.
murrayec Posted February 4, 2014 Posted February 4, 2014 Hi Phil Here's something for your BnM info file and some may not know;- This is a BSA C15T trials bike that the BnM foremen rode around the bog on in the 60's, I know its not a train but I always wanted to make a model of one but never had a reason. I'm not sure if its applicable to your model location but they did have a fleet of them! When I saw the tractor tipping wagon- oh and the vice, I could see one of these bikes, weathered and leaning up against the side rail murrayec
Recommended Posts
Create an account or sign in to comment
You need to be a member in order to leave a comment
Create an account
Sign up for a new account in our community. It's easy!
Register a new accountSign in
Already have an account? Sign in here.
Sign In Now