David Holman Posted November 17, 2021 Posted November 17, 2021 Sorry to progress again, but that footage of East Lynn shows what a fabulous layout it is. S scale, EVERYTHING is scratchbuilt. Not only that, but the locos all have working inside valve gear, while the signalling all works and with proper interlocking. All that is, except for the harbour, which has local hand levers, as per prototype AND also features chain shunting, using bollards and capstans. Have had the immense privilege of operating it twice and it is every bit as good as it looks. Now back to the coaches! 1 3
connollystn Posted November 17, 2021 Posted November 17, 2021 I had a few Lima HO scale sets (CIE) back in the day. They were very basic and didn't look right. The Lima OO models were much better so those newly painted green coaches won't look out of place on your layout. 1
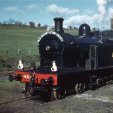
Westcorkrailway Posted November 17, 2021 Author Posted November 17, 2021 With the snails on, I decided to run the carriages in order to speed up drying of transfers. This is to insure I don’t accidentally mess up the transfers (one of my lines looked quite poor tanks to a misplaced finger!) A30 pulls through at 50 percent speed, a good comparison of the green to the railcar 2625 next door the mighty A class hauls them with my older stock. I have enough lining for at least 2 more small coaches. If the hattons gensisis coaches release I may put them in this livery IMG_1071.MOV A30 at a slightly more controlled speed with new “Laminate” coaches. Featuring all the mistakes made on my older stock! you may hear the clicking in the video and this is small bug my A suffers from. When it goes from a bend to a straight, pipes on the bogeys hit detail on the body, nothing major but I reckon after a while…..the pipe may fall off! 3
jhb171achill Posted November 17, 2021 Posted November 17, 2021 22 minutes ago, Westcorkrailway said: With the snails on, I decided to run the carriages in order to speed up drying of transfers. This is to insure I don’t accidentally mess up the transfers (one of my lines looked quite poor tanks to a misplaced finger!) A30 pulls through at 50 percent speed, a good comparison of the green to the railcar 2625 next door the mighty A class hauls them with my older stock. I have enough lining for at least 2 more small coaches. If the hattons gensisis coaches release I may put them in this livery IMG_1071.MOV 19.45 MB · 0 downloads A30 at a slightly more controlled speed with new “Laminate” coaches. Featuring all the mistakes made on my older stock! you may hear the clicking in the video and this is small bug my A suffers from. When it goes from a bend to a straight, pipes on the bogeys hit detail on the body, nothing major but I reckon after a while…..the pipe may fall off! Superb stuff, westcorkrailway. Your green is more accurate than Silverfox's, as it happens! That railcar is in BR green..... but to be fair, it's not that far off, and I have to say I like their latest version of the railcar.... thinking of ordering one, actually, as they were an absolutely essential part of the passenger scene in the 1950s and early 60s - every bit as much as an ICR would be today. 1
Westcorkrailway Posted November 17, 2021 Author Posted November 17, 2021 (edited) 1 hour ago, jhb171achill said: Superb stuff, westcorkrailway. Your green is more accurate than Silverfox's, as it happens! That railcar is in BR green..... but to be fair, it's not that far off, and I have to say I like their latest version of the railcar.... thinking of ordering one, actually, as they were an absolutely essential part of the passenger scene in the 1950s and early 60s - every bit as much as an ICR would be today. As I said before, After the surgery it had to go though to get it working, I’m relatively happy with the railcars as they are (aside from the snails, as soon as I get the chance those transfers will be replaced with EDN ones) meanwhile on the laminate front, transfers are complete and the coaches are more or less finished…and I must stay I’m quite staggered by now they turned out. I Thought I would have to wait for park royals/laminates for some decent coaching stock. These pictures don’t do justice to how sharp they look behind a 121/A class The enamel paint adds some wait to it, obviously enamel makes to much colder to the touch too. The reflections give very realistic metal finish. Due the flatt glossy surface, transfers stick like a treat. I commend railtec for there transfers whom without, this project would not be possible, the only thing I’d ask is if they would flip some of the snails around and replace 4th,5th,6th,7th,8th,9th and 0th class with more 1st, 2nd and 3rd!! as we can see on my “fictional semi rosslare stock based coach” the transfers had a much harder time sticking due to the bumps, something for somone with more skill and equipment then me can do a far better job, but for me is beyond passable. The average price of 1 coach including the coach, paint, transfers and all the shipping for all that stuff was 23 euro, and that only goes down the more you make as the paint and transfers I have will easily make 2 more coaches. Edited November 17, 2021 by Westcorkrailway 6 1
Westcorkrailway Posted November 18, 2021 Author Posted November 18, 2021 (edited) With the “Laminate Coaches” completed its newer longer term project is a go. Trying to figure out how to deal with the water tank situation on my Adams radial. The current plan I think is to either make it out of plasticard or to 3d print it at the expense of loosing the finish. the humps you see here in the running plant are proving to be an issue hence why I’m leaning towards 3d printing if possible I made a Card mock-up with rough but sound enough dimensions it makes a massive difference to the locomotive and while it would require that dreaded re-spray. It may well be worth it for the water tank, which feels much more natural Edited November 18, 2021 by Westcorkrailway 4
Westcorkrailway Posted November 18, 2021 Author Posted November 18, 2021 16 minutes ago, David Holman said: Definitely worth it. I’m starting to agree. I think this photo makes the water tanks look far more at home on the loco, and make it look like 479! 4
Galteemore Posted November 18, 2021 Posted November 18, 2021 This is great - good work. Simple tank extension, chop off the cylinders, take off the excess handrails, paint big yellow numbers on the tanks and you’re away! 3
DiveController Posted November 18, 2021 Posted November 18, 2021 On 17/11/2021 at 1:36 PM, Westcorkrailway said: you may hear the clicking in the video and this is small bug my A suffers from. When it goes from a bend to a straight, pipes on the bogeys hit detail on the body, nothing major but I reckon after a while…..the pipe may fall off! Yes, one of the first things is notice on my silver A class is that the tolerances are so tight that the bogie hits the detail. Was kinda disappointed at first but have got used to it, sort of. Another kicks out the side panel on the bogey Really nice to see some older stock such as then clerestory coaches. Badly needed but I'd settle for proper laminate stock right now 1
Mayner Posted November 19, 2021 Posted November 19, 2021 17 hours ago, Westcorkrailway said: With the “Laminate Coaches” completed its newer longer term project is a go. Trying to figure out how to deal with the water tank situation on my Adams radial. The current plan I think is to either make it out of plasticard or to 3d print it at the expense of loosing the finish. the humps you see here in the running plant are proving to be an issue hence why I’m leaning towards 3d printing if possible I made a Card mock-up with rough but sound enough dimensions it makes a massive difference to the locomotive and while it would require that dreaded re-spray. It may well be worth it for the water tank, which feels much more natural How about one of the WLWR tanks used by GSR & CIE on the Clonakilty and Baltimore branches. Should be simple enough to fabricate the side tanks out of plasticard 3
Westcorkrailway Posted November 19, 2021 Author Posted November 19, 2021 2 hours ago, Mayner said: How about one of the WLWR tanks used by GSR & CIE on the Clonakilty and Baltimore branches. Should be simple enough to fabricate the side tanks out of plasticard It could be done, I would worry about the height of the water tank, the Adams radials cab means that pulling this off probably would not look the best. The tank extention I intend to do is the same height. Something more similar to that of 479 and other CBSC 4-4-2t’s 3
Westcorkrailway Posted November 19, 2021 Author Posted November 19, 2021 Messed around with sheet brass today…..results were interesting considering the lack of tools I have at my disposal. Due to those bloody running plate bumps using brass is not that easy and probobly won’t be the used method, to be fair these were only mock-ups anyway so at least I can leave brass to the kit builders 4
Galteemore Posted November 19, 2021 Posted November 19, 2021 Well done for trying brass! Won’t the bumps (really coupling rod splashers) be hidden in the new tanks anyway? You could probably just cut those out of the running plate and cover them with the tanks. A strip of plasticard would cover the missing bit of valance. 1 1
Westcorkrailway Posted November 19, 2021 Author Posted November 19, 2021 14 minutes ago, Galteemore said: Well done for trying brass! Won’t the bumps (really coupling rod splashers) be hidden in the new tanks anyway? You could probably just cut those out of the running plate and cover them with the tanks. A strip of plasticard would cover the missing bit of valance. The current plans means that they stick outside the tank, it will be mounted to the loco via the continently square front to the splasher (you can see it in the image below, a pipe needs to be cut and that’s it) and the side of the existing water tank. the only issue then is would the coupling rods hit off the running plate… 2
Galteemore Posted November 19, 2021 Posted November 19, 2021 (edited) See what you mean. If tanks were flush with the valances you could let the rods disappear into the tanks….You could always go for a pastiche of a Coey/Ivatt class 37 (37-38, 317-20) or class 27 as that has curved splashers outside the tanks…. Edited November 19, 2021 by Galteemore 2
Mike 84C Posted November 19, 2021 Posted November 19, 2021 Would it not be possible to file the curve off? then put a piece of plastic card in the gap of the foot plating. I do like where you are going with this. 3
Northroader Posted November 20, 2021 Posted November 20, 2021 The brass tanks look promising, what tools are you missing? All you’re short of is a small halfround file, it seems to me, which is cheap to get. Then you can fit the lower edge of the tank to go round the “bumps”. 2
the Bandon tank Posted November 20, 2021 Posted November 20, 2021 I think the brass tanks look very good, a lot better then the plastic card mock ups 3
Mayner Posted November 20, 2021 Posted November 20, 2021 A set of good quality needle files would be a good starting point for scratchbuilding/ kit building. As Northroader stated it would be simple enough to file the crescents to go round the bumps with a half round needle file. An alternative would be to use the chassis (provided the Radial Tank body and chassis are separate parts) and scratchbuild a body out of plasticard or even metal. That way you can sell the loco as a Radial Tank if the conversion does not work out. Personally I always found it easier to build something from scratch than to re-build a rtr model into something completely different. 2 2 2
Westcorkrailway Posted November 20, 2021 Author Posted November 20, 2021 I might paint the brass black just too see how it would look if I just plastered it onto to side, I might as well since I have them
Mayner Posted November 20, 2021 Posted November 20, 2021 Try a motor aerosol primer and satin black rub down the surface with fine wet and dry before spraying, you will achieve a similar finish to a rtr loco. My biggest step in modelling was when I stopped brush painting locos and carriages about 40 years ago took a lot of practice both modelling and painting but I never looked back. 3
Galteemore Posted November 20, 2021 Posted November 20, 2021 Good advice there ! Little tricks to help the finish are also : 1. warm the can in the hot press for a while before spraying 2. never stop or start spraying on the model - sweep over the model with the paint coming out and stop spraying when you’re off it - avoids paint runs and drips 3. Two light coats always better than one thick coat ! 1 1
David Holman Posted November 21, 2021 Posted November 21, 2021 If you can get that far with some thin brass sheet, then you are already well on the way to scratchbuilding! 1 2 1
murphaph Posted November 21, 2021 Posted November 21, 2021 8 hours ago, Galteemore said: Good advice there ! Little tricks to help the finish are also : 1. warm the can in the hot press for a while before spraying 2. never stop or start spraying on the model - sweep over the model with the paint coming out and stop spraying when you’re off it - avoids paint runs and drips 3. Two light coats always better than one thick coat ! I was amazed how much better the finish was when I put the can in a warm water bath (not having a hot press). Totally changed the consistency. By the way my (German) missus once remarked that 'hot press' sounds more like an implement of torture than somewhere to make your towels nice and fluffy lol. 5
Westcorkrailway Posted November 21, 2021 Author Posted November 21, 2021 Forget scratch building for time being, I’ve plenty more years to learn that….for now I’m back to basics as ever since re-painted my LNER coaches into CIE green they derail every lap! The theory in my head was 3 coats of enamel paint had fecked up the centre of gravity. so with 10 5c coins And 6 10p coins with help with masking tape, the coaches have stayed on the track for 15 minutes, success many ways back to the topic of spray painting models. Right now I going great with the brush but I understand enamel paint is not going to take to well to an Adams radial….or even a bandon tank some day! now I have done some spray painting years ago. 1 coat and no primer! it’s not the best job but at least I’ve some handle on it 3
DoctorPan Posted November 22, 2021 Posted November 22, 2021 On 21/11/2021 at 7:47 AM, murphaph said: I was amazed how much better the finish was when I put the can in a warm water bath (not having a hot press). Totally changed the consistency. By the way my (German) missus once remarked that 'hot press' sounds more like an implement of torture than somewhere to make your towels nice and fluffy lol. Yeah I always imerse my rattlers in a saucepan of warm water before a paint job, makes for a world of difference. 1
Galteemore Posted November 22, 2021 Posted November 22, 2021 (edited) Jim McGeown of Connoisseur Kits also suggests ensuring the brass is warm and dry. I follow his guidance of sticking my brass models in the hot press for a while along with the can and it’s worked. Although as an Englishman he calls it an airing cupboard ….. Edited November 22, 2021 by Galteemore 1 1
Georgeconna Posted November 22, 2021 Posted November 22, 2021 On 21/11/2021 at 7:47 AM, murphaph said: I was amazed how much better the finish was when I put the can in a warm water bath (not having a hot press). Totally changed the consistency. By the way my (German) missus once remarked that 'hot press' sounds more like an implement of torture than somewhere to make your towels nice and fluffy lol. Same for the pots of Enamel, Always heat them up a tad. 1 1
Westcorkrailway Posted November 22, 2021 Author Posted November 22, 2021 I’ll be in cork today, might pop into some of those “game shops” @Mike 84Csuggested. Might stick with red enamel paint for the buffer beams 2
Westcorkrailway Posted December 4, 2021 Author Posted December 4, 2021 Work has started on the cb&csr 4-4-2 loco painting. After letting my paint have a sauna I’m the hot press, as many suggested The first and possibly only necessary coat due to how heavy the paint is, has been applied (the sides will need a second I have decided to go with the brass sides i already had as they pass my 2ft rule, and considering they now are going to colour match the rest of the locomotive, It may well look better decals will be made from some of the bandon tank decals I don’t intend to use from my Studio scale models kit, I can actually make 479 out of these (even if I reserve 470, 464 and 463 the only 3 Bandon’s I would make) 2
Westcorkrailway Posted December 5, 2021 Author Posted December 5, 2021 Next step, decals. After sacrificing “467” and “469” from my SSM kit the 479 was made, it was hard applying these due to the fact the bandon tank decals are made to not be cut apart and separated into different numberals the other side is a bit mothballed so I’m going to need to improve it a bit in the meantime (has more to do with the fact I used glue to fit it to the side of my loco!) I’ll also need some red paint as the front buffer beam has a decal of the origional southern running number and it needs a new front buffer decal anyway. “At least it has the Irish feel to it” 10
David Holman Posted December 5, 2021 Posted December 5, 2021 Just goes to show how effective a simple piece of cosmetic surgery can be in changing appearances. 1
Galteemore Posted December 5, 2021 Posted December 5, 2021 Really nice bit of work - you should be pleased with that 1
Westcorkrailway Posted December 5, 2021 Author Posted December 5, 2021 I am slightly chuffed with it. The black is exactly correct. Glue marks were removed this morning. It suits my “fictional semi rosslare” coaches very well. Can’t wait to finish the buffer beams in time 6
Recommended Posts
Create an account or sign in to comment
You need to be a member in order to leave a comment
Create an account
Sign up for a new account in our community. It's easy!
Register a new accountSign in
Already have an account? Sign in here.
Sign In Now