irishthump Posted November 22, 2013 Posted November 22, 2013 That Bus is fantastic, dirt in all the right places!
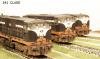
Georgeconna Posted November 25, 2013 Author Posted November 25, 2013 (edited) Ill stick all these in one post to save a bit of time: First up is the Q kits a Class, Got a little packet of buffers this am (Off a Hornby class 31) and test fitted them on, I am quite happy with them. Somethings bugging me though on this Model and that is the white stripe, Its a tad too wide, what do ye think lads? I might reduce the width a wee bit. The bit of Fibre optic is for the running lights so gonna have good fun with that now shortly. The white plastic patch was needed as the drillbit shattered the moulded raised light housing. You would not believe how brittle this it is . need to re drill a re paint that it too. Next up is the MIR 071, Painted black over the areas that needed and and she is a bit more presentable. Need to re fit that etch grill too. Next step is a gloss coat, Decals, Handrails, Lights. The 40fts got their bogies and I fitted some hornby tension lock couplings with a dab of the ol Superglue to test run them. They will be fitted with Kaydees so I am waiting on a sample pack that was picked up from Warley last weekend (Freaked out at the price of It!!!). I need o put a 2mm shim in between the bogie and the frame as the wheels where touching the frames when cornering. Little bit of plastic tube did the trick cut on a square. EDIT: just looked at these and the piccy quality is not great, I used a small setting on me camera so might up it a bit for the next ones. Edited November 25, 2013 by Georgeconna
Warbonnet Posted November 25, 2013 Posted November 25, 2013 I'd agree that the white stripe on the A Class is too wide George. It has to be said though that the Q kits cab looks so much better than the Silver Fox effort!
Glenderg Posted November 25, 2013 Posted November 25, 2013 Lovely work George, what you have done to that 071 is nothing short of a miracle! I believe, open to correction, that the white stripe was 6 inches wide, a scale 2mm, she looks a fraction fatter than she should. There's also a rounded kick and drop down at the lower tan banding to avoid the grille openings, shouldn't interfere with the decals though. A lovely looking thing nonetheless Richie
Warbonnet Posted November 25, 2013 Posted November 25, 2013 Well spotted on the tan band Richie. That livery was the finest hour of the A Class. My kingdom for a top notch one!
Georgeconna Posted November 25, 2013 Author Posted November 25, 2013 Found out!!!, knew about that kink but its a balls to mask as I have the handrails on, Gotta do it now though!!! Eagles Eyes Action Men!!! Cheers for the input boys..
josefstadt Posted November 25, 2013 Posted November 25, 2013 Fantastic work on the AR class. I'd agree with you that the white line looks a little bit too wide. The orange band along the side of the loco between the cab doors is more problematic. Barry Carse's excellent book 'Irish Metro-Vick Diesels' has a photo on the front cover showing A20R with the dipped orange band as described by Glenderg. However, inside the book there are photos of other members of the class, A39R and A51R, with the full width band as depicted on the model. Both these were rebuilt as GMs in 1969, while A20R was done the following year. I don't know if A20R originally had the full width band and this was later altered to the dipped version or whether it received the dipped version at re-building, but would suggest possibly the latter.
Weshty Posted November 25, 2013 Posted November 25, 2013 Eagles Eyes Action Men!!! Cheers for the input boys.. Eagle Eye action man? Clearly you got yours post '76 then Fab job on the A Class and I've had the pleasure of seeing the little honey in the flesh. I have no issue with the Silver Fox (particularly with some detailing added ..cough!!), but the Q-Kit version really does capture it on another level.
iarnrod Posted November 25, 2013 Posted November 25, 2013 MIR 40' wagons still look pretty good for their age and simplicity. Can't wait to see Weshty's offering of the 42' and 47' wagons. Test etchings must be due any day now The 40fts got their bogies and I fitted some hornby tension lock couplings with a dab of the ol Superglue to test run them. They will be fitted with Kaydees so I am waiting on a sample pack that was picked up from Warley last weekend (Freaked out at the price of It!!!). I need o put a 2mm shim in between the bogie and the frame as the wheels where touching the frames when cornering. Little bit of plastic tube did the trick cut on a square. [ATTACH=CONFIG]10266[/ATTACH][ATTACH=CONFIG]10267[/ATTACH] EDIT: just looked at these and the piccy quality is not great, I used a small setting on me camera so might up it a bit for the next ones.
Hunslet 102 Posted November 25, 2013 Posted November 25, 2013 First and foremost,that is one of the best builds of a Q kits A class I have ever seen,well done.I too have a Q kits A class done as A20r,only wish she was half as good as yours! With regards the livery,as pointed out the white band is too thick but that is easily overcome.Silver kicker plates below the doors were also a feature of this engine,again easily done.When re-engined,A20r was repainted with dipped orange band,along with most of the rest of the class,but as josefstadt has pointed out some members of the class had the full orange band.At the time of re-enginning,some members of the class were already painted with the full orange band,others were still in the all black livery.There does not appear to be any rhyme or reason for either variant,maybe as josefstadt suggests the dipped version was adopted from 1970 onwards,those done prior were left as they had originally been done,or were those already painted with the full orange band did they just have the r prefix added to their original number,while all black versions repainted with the dipped orange version.I think this is an interesting subject,because I also encountered the same problem when building my B101 Sulzer,again with research,some versions had the full orange band while the version that I modelled had the dipped version,so it is always a good idea to get as much info on your subject model and period as you can.
heirflick Posted November 25, 2013 Posted November 25, 2013 the more i see an A class metro, the more i pray someone will bring one out now.....i'd buy the fleet! beautiful job george - cant wait to see it complete.....and if you are selling - i'll buy it
Georgeconna Posted November 25, 2013 Author Posted November 25, 2013 Sorry HF, It is for a IE Driver so cant really flog it , Don't fancy getting thrown in the Tracks just yet!! LOL From me Metro Vick book I see some A Class had a straight line instead of the kinked one which was the one I was going with, The actual decision on the number came a bit late to change so is there a piccy of a Straight line orange A20r out there. I doubt it somehow...
Georgeconna Posted November 25, 2013 Author Posted November 25, 2013 Fantastic work on the AR class. I'd agree with you that the white line looks a little bit too wide. The orange band along the side of the loco between the cab doors is more problematic. Barry Carse's excellent book 'Irish Metro-Vick Diesels' has a photo on the front cover showing A20R with the dipped orange band as described by Glenderg. However, inside the book there are photos of other members of the class, A39R and A51R, with the full width band as depicted on the model. Both these were rebuilt as GMs in 1969, while A20R was done the following year. I don't know if A20R originally had the full width band and this was later altered to the dipped version or whether it received the dipped version at re-building, but would suggest possibly the latter. Yep have that book, As I mentioned or mad an excuse that the Decision on the number came a wee bit too late, I will change it I think for Accuracy sake anyhow along with the Back. Thanks for the feedback!!.
Georgeconna Posted November 25, 2013 Author Posted November 25, 2013 First and foremost,that is one of the best builds of a Q kits A class I have ever seen,well done.I too have a Q kits A class done as A20r,only wish she was half as good as yours! With regards the livery,as pointed out the white band is too thick but that is easily overcome.Silver kicker plates below the doors were also a feature of this engine,again easily done.When re-engined,A20r was repainted with dipped orange band,along with most of the rest of the class,but as josefstadt has pointed out some members of the class had the full orange band.At the time of re-enginning,some members of the class were already painted with the full orange band,others were still in the all black livery.There does not appear to be any rhyme or reason for either variant,maybe as josefstadt suggests the dipped version was adopted from 1970 onwards,those done prior were left as they had originally been done,or were those already painted with the full orange band did they just have the r prefix added to their original number,while all black versions repainted with the dipped orange version.I think this is an interesting subject,because I also encountered the same problem when building my B101 Sulzer,again with research,some versions had the full orange band while the version that I modelled had the dipped version,so it is always a good idea to get as much info on your subject model and period as you can. Excellent info. Bit of a minefield this or any railway stuff....!!!
heirflick Posted November 25, 2013 Posted November 25, 2013 george....what metro vic book do you have?
Glenderg Posted November 25, 2013 Posted November 25, 2013 I think joestadt has given you a get out of jail free card george, and i wouldn't touch it. Possibly cake it in muck and diesel
Georgeconna Posted November 26, 2013 Author Posted November 26, 2013 The MIL arrived tonight, Quick visit down the pub and back to the bench, 1st two 40fts are done, 2.5 hours soldering the attachment points along the side, Cleaning up and soldering them on took most of the time up. Quick wash, There are a bit wet still and touch of paint on em. The extra shim on the bogies came in handy as it is now nicley buffered up to the 141. There is some weight in these!! Quality model kit. It will be interesting to see the new version from SSM. I think will have a bash at the A Class in the correct scheme though.
Riversuir226 Posted November 26, 2013 Posted November 26, 2013 Excellent work George time well spent by the looks of things
Georgeconna Posted November 26, 2013 Author Posted November 26, 2013 Its amazing what the eye does not see and the camera picks up, Need to tidy up the buffer casting as well by the looks of it!!
Georgeconna Posted January 23, 2014 Author Posted January 23, 2014 Hi Lads, Aint done much in the Way of Building but have moved on and corrected the A Class over size white stripe and the little angle at the cab end. it was bugging me. Also restarted a Bill Bedford Mk.3 EGV Van, Not a good as SSM ones to be sure.. Hope to be able to stick a bit more up and I am getting back into the Swing of thing now. Cheers George
RedRich Posted January 23, 2014 Posted January 23, 2014 Great work George. If I remember the Bill Bedford etches had no roof detail, only sides, steps, and 12 grilles for the generator ends. Rich,
Georgeconna Posted January 23, 2014 Author Posted January 23, 2014 Cheers Rich.This had roof detail in the form of a Square section where the Exhaust pipes pop out. Has BB on the Etch though. The Grills aer soldered onto the inside.
Garfield Posted January 23, 2014 Posted January 23, 2014 The A class looks great George... love the paint job. If I could be awkward, though, the GM rebuilds had extra gubbins on the roof.
scahalane Posted January 23, 2014 Posted January 23, 2014 That a class does look sweet, love that livery as well.
heirflick Posted January 23, 2014 Posted January 23, 2014 The A class is a super job. agree with you eamonn - shes tee dogs!
Georgeconna Posted January 24, 2014 Author Posted January 24, 2014 Well the Postie arrived yesterday with a Parcel from the southern Hemisphere and by god what a package. Upon opening the box you are greet with a fairly substantial instruction sheet as well as some illustrations and a bit of history of the van. The brass was each packaged in its own Tissue paper,Lovely white metal pieces in a separate bag, Clear Acetate for the windows, Pre rolled roof and pre rolled side. In fact Mr Mayner has not left much out in all fairness. The kit looks exquisite. I told myself to hold back but I started as small bit tonight. There are some Fiddly bits to do, The Gangways probably the most difficult part. Over all a well thought out kit with Clear and Concise instructions that don't Confuse a Nation!! 10 out of 10 form me so far!! Heres some shots of the bits n bobs. Thnak you John for the Excellently Pre rolled Sides and roof!! Heres the Start. Sides and Ends Folded. Could not help Myself, Test fit of the Fantastic Roof Cheers G
scahalane Posted January 24, 2014 Posted January 24, 2014 In fairness to John that does look like a nice detailed kit all right, well done and have fun with it!
Weshty Posted January 24, 2014 Posted January 24, 2014 Wow, that looks lovely, a fine kit, well done George, glad you didn't resist temptation.
Kirley Posted January 24, 2014 Posted January 24, 2014 Well done to John for making what looks like a fantastic kit. Looking forward George to your build. Thanks for sharing.
David Holman Posted January 24, 2014 Posted January 24, 2014 Lovely artwork on the kit and the A class looks good too. Never realised CIE ran jets though...
Georgeconna Posted January 25, 2014 Author Posted January 25, 2014 LOL, That jet wont be Oragne for sure, Thats was meant to be a quick build but is now in its 4 month. anyhow 1.5 hours later we have reached this stage: Everything went together pretty well except for the W irons where one set of tabs is fouled by the Solebars but 2 mins with a needle file and it was sorted. No problem. The roof is just placed on at this stage. Looking forward to the Next bit!!
RedRich Posted January 25, 2014 Posted January 25, 2014 George I'd say that the kit is one of those that when you start to build it you don't want to stop. It really is a credit to John. Kit builders have an approach to building that is unique to each individual, and John seems to have designed it to appeal to everyone. You're doing a great job on her George and I look forward to more updates. Judging by what else is on the bench you must be up to your eyes. Rich,
Recommended Posts
Create an account or sign in to comment
You need to be a member in order to leave a comment
Create an account
Sign up for a new account in our community. It's easy!
Register a new accountSign in
Already have an account? Sign in here.
Sign In Now