Shinkansen Posted November 1, 2013 Posted November 1, 2013 Very nice weathering on 080, as true to the real thing as I've seen. Not overdone, but just right. Looking forward to seeing how the Grey 071's turn out. Cracking stuff as always
Weshty Posted November 1, 2013 Posted November 1, 2013 Been busy over the last few days but time is not aplenty due to the other half working late evenings, Downside of the cabin is I cant leave the kids inside on their tod so stuck inside the house and the work rate has plummeted... Done a 071 for myself this week and bunged a sound chip in, Eamons Vids really show the best of the sound off. I have some Taras built of which is one behind the loco. As my tripod is loaned to fiend I have not got shots of those.Had these done for some time but had to finish them off. [ATTACH=CONFIG]9811[/ATTACH] Oh my Lordy. That is a honey George. Very well done. Definitely a Father Dougal moment. ("these are small, those are far away...")
Kirley Posted November 1, 2013 Posted November 1, 2013 I was really disappointed the 071 as Class Leader was not issued in orange & black livery and now I see your repaint I am more convinced that was the livery it should have been supplied in. Excellent work George as usual.
RedRich Posted November 1, 2013 Posted November 1, 2013 That's top work George. It's not too overstated, the dirt is in all the right places. Panel lines have dirt encrusted in them, the difference in the shades of dirt from the bogies, the body sides and roof looks really effective. Plus the bleaching effect of fading orange paint is spot on. Put up a few pics of the cabin when you have time, I'd love to see it. Rich,
Georgeconna Posted November 2, 2013 Author Posted November 2, 2013 Been mucking about with this for the last year or so and decided to get it ready for the fair to pose some stuff on. I gonna get a layout done for next year for sure....Oh and thanks for the comments lads. The paint and Glue as you can see is still drying....
enniscorthyman Posted November 2, 2013 Posted November 2, 2013 Sure is a nice job George,and nice weathering to boot.
irishthump Posted November 2, 2013 Posted November 2, 2013 Fantastic work! Sorry to ask for trade secrets, George, but for the panel lines do you use a wash? I have been experimenting with thinned enamel washes and Tensocrom myself.
Georgeconna Posted November 2, 2013 Author Posted November 2, 2013 No worries, No trade Secrets, everything is out there and yes I do a wash of a thinned dirty black and more of less take the whole lot of again. I only use he Tenscrom for the fuel and oil, nothing else. For rust I use pastels only as other rust effects are too proud. any things else just ask. G
Dunluce Castle Posted November 2, 2013 Posted November 2, 2013 What a superb diorama, really beautiful work there.
irishthump Posted November 2, 2013 Posted November 2, 2013 No worries, No trade Secrets, everything is out there and yes I do a wash of a thinned dirty black and more of less take the whole lot of again. I only use he Tenscrom for the fuel and oil, nothing else. For rust I use pastels only as other rust effects are too proud. any things else just ask. G Appreciate that, George. Lot of guys don't like giving you too much info! Just a couple of questions... Do you use an enamel or acrylic wash? And do you give the model a matt coat before starting? (I find the washes work much better with a coat of matt acrylic varnish.)
Georgeconna Posted November 2, 2013 Author Posted November 2, 2013 I know what you mean!! Enamel all the way for me, I find If you matt coat it the wash wont flow as I want it too. Interested to hear about your technique though. I leave it the model as is but be careful of the printed letters when your taking the wash back off as some of the baccy stuff comes of pretty easily!!
Glenderg Posted November 2, 2013 Posted November 2, 2013 Lovely work as always george, and love the little diorama. You posted a vid somewhere of Humbrol Gloss Cote, and it has some handy tricks on doing panel lining and using washes to make joints stand out. My favourite technique of late, thx. Richie. youtube.com/watch?v=ByMhacC5vAE
Georgeconna Posted November 2, 2013 Author Posted November 2, 2013 Been uses washes for the Aircraft models for eons so it is a nice effect when done right an when using the right shade and not too dark or black. you should check out some tank weathering vidoes on the Hairspray technique, How would apply that on a loco!!
irishthump Posted November 2, 2013 Posted November 2, 2013 I know what you mean!! Enamel all the way for me, I find If you matt coat it the wash wont flow as I want it too. Interested to hear about your technique though. I've been using the Humbrol washes which I find pool on the surface of the model unless it's been giving a matt coat. I use Windsor and Newton acrylic varnish which comes in a spray can but I decant it into a jar and apply it with the airbrush which gives a much finer coat. I apply the Humbrol by just dabbing small amounts onto the panel lines and details. Then I use Revel thinners and dab it over the Humbrol and it runs straight into the detail and crevices. Then like yourself I remove most of the wash with cotton buds and brushes. Sounds a pretty long process but it gets results that I like.
Georgeconna Posted November 14, 2013 Author Posted November 14, 2013 (edited) Started this last year and have got the decks clear of some other stuff so need to complete it once and for all. I have the main brass and bits n bobs on and have spray the White first using Revell Satin white. The masked that off using 1mm masking tape. Then the black, Masked that off and Phoenix precision paint. I used a MM 071 as the template for the location of the white lines as as you can see the decal supplied by MIR are way too narrow hence the two white lines on the front, so I need to remedy that next when the decals dry. Microset was used to melt the decal around the raised detail. sorry piccys are great as I shot them on low size file Edited November 14, 2013 by Georgeconna
Georgeconna Posted November 14, 2013 Author Posted November 14, 2013 Few an Post Vans on the go too. These are oxford Diecast with Studio Scale Models Decals.Need one or two coats or Varnish to Finish off.
Kinvara-Train Posted November 14, 2013 Posted November 14, 2013 Few an Post Vans on the go too. These are oxford Diecast with Studio Scale Models Decals.Need one or two coats or Varnish to Finish off.[ATTACH=CONFIG]10084[/ATTACH] First Class=D
enniscorthyman Posted November 14, 2013 Posted November 14, 2013 Lovly job on the An post vans George,and super paint job on the MIR 071.
Broithe Posted November 14, 2013 Posted November 14, 2013 Could take a while to produce a suitable driver figure - it's a fiddly job, sanding the hair off...
RedRich Posted November 14, 2013 Posted November 14, 2013 Super work George. Doing the extra bit of work on the roof of the MIR kit makes a huge difference, can't be to many kit's around now. The An Post vans are smashing and who better than Eamonn to cast a critical eye over them in his post. Rich,
WRENNEIRE Posted November 14, 2013 Posted November 14, 2013 Could take a while to produce a suitable driver figure - it's a fiddly job, sanding the hair off... And putting a pillow up his jumper....... 1
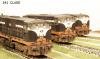
Georgeconna Posted November 22, 2013 Author Posted November 22, 2013 There 40ft and there flat, Mir kits from some chaps loft and it looks like he got them before I was born looking at the price!! Soldered together using carrs 70 Deg Solder and an adjustable iron. Lots of tidying up to do and I need to put a spacer between the bogies and the frame due to the fact if you have a curve in your layout there gonna get stuck. Had to cut back the under frame too as the bogies snag that. White metal is great to work with but a tad messy with the filings etc.
Georgeconna Posted November 22, 2013 Author Posted November 22, 2013 Knocked this out during the week. No idea of the type of Bus, Brief was to paint it Schooly like an a biteen of country dirt. Decals from Wizard Whesty. He has Expressway decals one out know as well
Glenderg Posted November 22, 2013 Posted November 22, 2013 Damn george, not a bus man either, but that is sweet workmanship. Can nearly smell the cow dung off the drivers wellatons! Richie
heirflick Posted November 22, 2013 Posted November 22, 2013 Damn george, not a bus man either, but that is sweet workmanship. Can nearly smell the cow dung off the drivers wellatons! Richie that statement has to get the 'best description of excelence award'.....and well deserved - great work george:tumbsup:
UP6936 Posted November 22, 2013 Posted November 22, 2013 Lovely job on the flat wagons. Can't wait to see the finished painted model.
Weshty Posted November 22, 2013 Posted November 22, 2013 Wow George. The whitemetal 42' looks great. Plenty of weight on the track too. Given the pricing, I figure that kit is from c.'85. That bus is a work of art (thanks for the shout out!). Really lovely weathering, colours, everything (the rear lights are a delight). It just looks so right. I want one!
Georgeconna Posted November 22, 2013 Author Posted November 22, 2013 that statement has to get the 'best description of excelence award'.....and well deserved - great work george:tumbsup: If there was a like button I would hit it!!! LOL. Spent many a frantic minute doing the homework on the school bus back in the day!! Thanks for the comments as well lads.
Recommended Posts
Create an account or sign in to comment
You need to be a member in order to leave a comment
Create an account
Sign up for a new account in our community. It's easy!
Register a new accountSign in
Already have an account? Sign in here.
Sign In Now