Georgeconna Posted February 21, 2014 Author Posted February 21, 2014 I use the Deluxe Odourless Superglue with Accelerator, Its in a Green bottle in Marks, E8.99 I use it for all the Clear parts especially on the Plastic kits! Thanks for the comments as well. Looking at it I should of put Door hinges on the Doors, but I will do that on the next one. Cheers G
heirflick Posted February 21, 2014 Posted February 21, 2014 george, in all fairness to you ,she is a beaut! if you were to charge for labour etc - what would that beauty cost guving the time involved...and be honest!!!!
Weshty Posted February 21, 2014 Posted February 21, 2014 Wow,wow,wow. Perfection. You ( and j.m.) have nailed it. Horse on a few cravens and laminates with a durty a class and you'd off!!
popeye Posted February 22, 2014 Posted February 22, 2014 She looks beautiful. and very well finnised, great work.
Georgeconna Posted February 22, 2014 Author Posted February 22, 2014 george, in all fairness to you ,she is a beaut! if you were to charge for labour etc - what would that beauty cost guving the time involved...and be honest!!!! Thats a though one to fathom out HF. I had bought this for a Friend along with 2 more for myself. He decided he could not do it so offered me E50 to build it. If you were to add in labour, Heat, Leccy, paints etc E50 would not Cover it really but even E50 extra makes it an expensive bit of rolling stock. It not a Golden age Dyno car but all in I would hazard around E150-E170 if you added in time. It Certainly does not pay to build kits TBH but I enjoy it and that the main thing. Ask me in two weeks as I will be starting some N gauges Autoballasters!! Put it this way the ESB went up an extra E60 when I started this and the Brake vans!! The war office is not happy!!
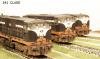
Georgeconna Posted February 22, 2014 Author Posted February 22, 2014 Heres the Latest on the BVs. and the Glue to keep an eye out for...
scahalane Posted February 22, 2014 Posted February 22, 2014 Superb work, I love the finish on that carriage particularly around connection gangway.
Georgeconna Posted February 24, 2014 Author Posted February 24, 2014 Great day today, Wife at work, Kids away so I made a Start in the tranquil peace I had on these. These are kits from the N gauge Society of the Familiar Autoballasters however these may not be Irish, probably Railtrack but I will throw it on here as these are used on IR and some folks may be tempted or unaware these are available. You have to join the N gauge Socieyy to Purchase these and they have a fantastic kit selection and some RTR. They came to me like this: The formidable etch: The underside of the Wagon: and its in place but not glued: The End Supports in place: thats it for now.
Dunluce Castle Posted February 24, 2014 Posted February 24, 2014 Very nice small fine detail there, looks good.
Weshty Posted February 24, 2014 Posted February 24, 2014 Wooooooow!!! Lovely lovely kits George. The etch detail is damn tasty.
Georgeconna Posted February 25, 2014 Author Posted February 25, 2014 Another Small bit done over the last two hours... Kinda Therapeutic this etch is... Tim for bed now..
RedRich Posted February 25, 2014 Posted February 25, 2014 They are smashing kits George, lovely work. The RMC JGA's from the society are a fantastic kit also. Rich,
Georgeconna Posted March 12, 2014 Author Posted March 12, 2014 Nearing the Finish line with the Autoballaters, These are gonna be Network Rail so sorry bout the BR Content!! Great kits though, Maybe we will see an Irish rake on Wellington Bheag someday...Come on Paul!!!! Taken with a point and shoot after I applied a few decals. They will be finished with a final gloss coat and then a Matt coat on top. G
scahalane Posted March 12, 2014 Posted March 12, 2014 God bless your eye sight and nimble fingers, mighty job!
Glenderg Posted March 12, 2014 Posted March 12, 2014 God bless your eye sight and nimble fingers, mighty job! I'm just scratching me head here when I see the tinlet for scale, stunning work. How the brake vans coming along, they look sweet as a nut. R
Georgeconna Posted March 12, 2014 Author Posted March 12, 2014 Cheers boys, Just need to do the Duckets on the brakes and stick em on and a bit of Weathering and there done...well as long as the lads in the white coats stay away for a bit!!
Weshty Posted March 12, 2014 Posted March 12, 2014 Wowza. What a fab little kit, great etches there, and great work there George. Mighty detail for an N gauge kit.
enniscorthyman Posted March 12, 2014 Posted March 12, 2014 Hell of a job George,and great detail for such small wagons.
Shinkansen Posted March 15, 2014 Posted March 15, 2014 (edited) [ATTACH=CONFIG]12324[/ATTACH] Exquisite work George. They're freakin tiny! Very well done. Could imagine these on an N-gauge Irish layout alright, 201 or 071 hauled. Now there's a thought! Tom. Edited March 15, 2014 by Shinkansen
heirflick Posted March 15, 2014 Posted March 15, 2014 george, any chance of showing us how to do the yellow strioes on the lookout on the breaks sometime please?
Georgeconna Posted March 21, 2014 Author Posted March 21, 2014 Well the Ballasters are Done and a Selfie pressie for me!!. Just Because...A Baccy 9F And heres a tip, Using tin foil as a Superglue Reservoir makes the super glue last a whole lot longer!! enjoy the weekend G
Georgeconna Posted May 20, 2014 Author Posted May 20, 2014 (edited) george, any chance of showing us how to do the yellow stripes on the lookout on the breaks sometime please?[ATTACH=CONFIG]12387[/ATTACH] Hi lads, Proceeding with Glacial progress on the Brakes so need to edge them over the line as I more stuff on to go!! On the stripes I tackled them with some masking tape and that failed as the paint got pulled off the brass despite used etch primers, Tried Hand painting them and was not happy with the out come so I turned to my trusty aircraft decal box and pulled out an old extradecal Black Line set I had bought years ago, Well I got a few of em!!. You can get them From Hannants in the UK So in the end I sprayed them Humbrol 69 (the wifes fav Paint colour) gloss yellow,after a few coats left it dry for a week of so and then the fun began!. using a new blade I roughly cut the angles in the Transfers so as to make them match up a bit easier onthe Corners and cut them into 3 pieces an then lined each one up and evenly spaced them as best I could with out losing more hair. I used some setting solution to soften the decals, Its called Microsol and thenI will seal them in with a coat of Gloss varnish or Clear. The one in the pic is still setting as I only put the decals on 5 mins beforehand Thats it really. Sorry about the 1st piccy, dunno what happened. This modelling larks is a battle! Hope that helps. All the best. Edited May 20, 2014 by Georgeconna
heirflick Posted May 20, 2014 Posted May 20, 2014 Great info there George - thanks and its good to know that you are still alive!!!
Georgeconna Posted May 30, 2014 Author Posted May 30, 2014 Finally got these over the line. Need a better way to attach the foot steps they are a right bugger to keep put.
UP6936 Posted May 31, 2014 Posted May 31, 2014 Those look great, especially the ir logo one. What where they used for in ir days do you know?
ttc0169 Posted May 31, 2014 Posted May 31, 2014 Those look great' date=' especially the ir logo one. What where they used for in ir days do you know?[/quote'] I remember seeing one at Inchicore coupled to some oil tank wagons and being used for the regular Inchicore-Alexandra road-Inchicore stores oil transfer on this occasion being hauled by loco 210. Fantastic job on those brake vans George.
Georgeconna Posted August 21, 2014 Author Posted August 21, 2014 SteveiB, They for a couple of Chaps and have new homes now. I am not taking up making kits anymore as I have got a mountain of stuff to get through and the time to build vs time I actually have is not quite working out!. If your looking for a brake van, Try DLSAnthony as he makes stuff for people I think still or Tony Mirolo?
iarnrod Posted August 21, 2014 Posted August 21, 2014 So do you still do weathering George? SteveiB, They for a couple of Chaps and have new homes now. I am not taking up making kits anymore as I have got a mountain of stuff to get through and the time to build vs time I actually have is not quite working out!. If your looking for a brake van, Try DLSAnthony as he makes stuff for people I think still or Tony Mirolo?
Georgeconna Posted August 21, 2014 Author Posted August 21, 2014 Still doing that, Post most of the stuff on Face Book these days as its much quicker loading up shots etc.... Link is here: https://www.facebook.com/pages/Wonderful-weathering/111818828902939?ref=hl
Recommended Posts
Create an account or sign in to comment
You need to be a member in order to leave a comment
Create an account
Sign up for a new account in our community. It's easy!
Register a new accountSign in
Already have an account? Sign in here.
Sign In Now