Georgeconna Posted April 17, 2015 Author Posted April 17, 2015 Well I got a couple of my own to do and got 4 more for a chap I know to do for him so they were sitting there calling to be started. Although GD ones was Superglued and an immaculate job too I decided to go down the soldering route for these. I wonder why but anyhow this is the 1st one with about 4 hours work in it, Try to figure out the couplings not for the ends and then the white metal bits n bobs, had to give it a break for a short while so I took a few snaps. I found I had to look a a good few shots of these wagons to get where things went, I think a few more diagrams for chaps that dont know the ins and out of these wagons would help immensely. I have a few Roxly coaches to make and the instructions are all hand written then I read about Queenposts!!, WTH are they I thought, I was not long finding out but certainly a few piccys would he of great assistance. .
richrua Posted April 17, 2015 Posted April 17, 2015 Wow. That is great. The bogie flats are awful tempting. Always look good in a rake . Would I be right to say they have had a long running period too ? That would allow use with various livery locos ?
Georgeconna Posted March 21, 2016 Author Posted March 21, 2016 Hi Lads, Just tackling two of the fine kits from SSM. Went for the soldering option for all the etch. Everything goes together nicely with only the roof being the main challenge but when rolled the profile it Soldered on quite nicely. I used Carrs solder with 70 and 177 degree used. I rolled the roof using a Scalpel knife handle and a Tea towel Wrapped over itself like a cushion of rolled the brass on that. Primer now next and then the dreaded yellow, I hate painting yellow!
shamrock712 Posted March 21, 2016 Posted March 21, 2016 Lovely stuff George! Nice to see your still on the scene!
Weshty Posted March 21, 2016 Posted March 21, 2016 Sweet little job on the ploughvan there George. Almost seems a shame to paint it
Georgeconna Posted March 21, 2016 Author Posted March 21, 2016 (edited) Double post not sure how to delete this!!! Edited March 21, 2016 by Georgeconna double post.
Georgeconna Posted March 21, 2016 Author Posted March 21, 2016 (edited) Thanks for the comments lads. Don't want to bore you lads with kit building bit here are a few more bits passing through on the Work bench this week. MIR Resin Flats with Keg loads, Mir 4W Flats and Containers (Not finished just yet), MIR 4 Wheel Cement Bubbles. The eagled eye amongst you will notice the Bubbles are up for sale on Done Deal if anyone is interested. Edited March 21, 2016 by Georgeconna
RedRich Posted March 21, 2016 Posted March 21, 2016 Top work George. The plough van is a lovely kit and the finished model looks fantastic. Hope you are keeping well George and how is the portakabin working out as a workshop. Rich,
Georgeconna Posted March 21, 2016 Author Posted March 21, 2016 Cabin is fine rich,Cold thee evenings though. Kinda wish a spent a few more pound for a better one really. Great as a Sanctuary with the radio for my friend. Trying to Ween off this building lark now shortly and will focus on planning a Southern Region layout probably 8 ft Scenic and 4ft fiddle yard before the Magnum opus and how to work out how to intersperse Irish with my Southern stuff!! Plenty of inspiration here though for the time being in the layout sections! There just never enough time is there. Appreciate the comments lads.
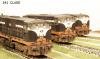
Georgeconna Posted March 21, 2016 Author Posted March 21, 2016 Few more piccys of some re painting /decalling on Dapol Pocket wagons and a Weathered 071. Apologies for the Backgrounds. The ol Laptop gave up a few weeks back.
DiveController Posted March 21, 2016 Posted March 21, 2016 LOVE the weathered Orange bubbles. +1 Yes, indeed. Hoping for an rtr
Georgeconna Posted March 22, 2016 Author Posted March 22, 2016 PM sent GeorgePhone not working? oops had it switched off kid.
Georgeconna Posted March 24, 2016 Author Posted March 24, 2016 Hi Folks, Some more bits and bobs on the go or just finished. Jim Poots KD Bus, Center Coach of an 80 Class, 18 MIR White metal Flats.
Georgeconna Posted March 24, 2016 Author Posted March 24, 2016 Here 4 of the Only Fab Studio Scale Models Brass flat Wagons. I must admit to have great satisfaction in building these and seeing them run around behind a Loco. After making one complete wagon I decided to adjust they way I approached these. I started with the task of cutting and folding each part off of the etch for the remaining 3 wagons. This Took about 4 hours to do, Each wagon took about an hour then to solder. Primer and painting and a small bit of weathering sets them off. Sorry about the quality of the photos, The resizer seem to take some clarity off of them and my laptop is kaput.
Georgeconna Posted March 24, 2016 Author Posted March 24, 2016 (edited) Final Installment is the Plough vans, Used Holts Primer for to cover the brass. Tidied up any gaps with Squadron putty, Tidied up the putty then with a cotton bud and some nail varnish remover to remove any excess. The Nail Varnish remover makes the putty nice and plyable. I then sparyed some preshading with Humbrol Black, this takes the flat boring yellow finish and creates some dark and light patches. You can do this with white as well to brighten colours up. I noticed that I put on the steps the wrong way with the cutout facing outward and I think one of the roofs should have it panel lines lining up with he Side panel lines but we live and learn!! Edited March 24, 2016 by Georgeconna
John-r Posted March 24, 2016 Posted March 24, 2016 Hi George , what a finish you have done on the ssm flats, outstanding, So realistic .every so often I look at my etchs and think one day! , No way could I achieve that sort of finish, You are gifted my friend. Cheers. John.
Railway Lyons Posted March 24, 2016 Posted March 24, 2016 Looking good George. Must pick up a ploughvan myself at some stage. One question, what did you do to get the couplings on the flats? I have 3 at home and cannot figure out a nice way to couple them with enough space for Kadees.
scahalane Posted March 24, 2016 Posted March 24, 2016 That's some sweat shop you've got going. The MIR white metal flats look great alot more solid than their resin ones.
enniscorthyman Posted March 24, 2016 Posted March 24, 2016 Always love looking at your workbench. Great job on the 42's and plough vans.
Weshty Posted March 24, 2016 Posted March 24, 2016 Oh very nice Georgie. VERY nice. Love the plough van and you got the plough rail kink just right.
Georgeconna Posted March 24, 2016 Author Posted March 24, 2016 Hi George , what a finish you have done on the ssm flats, outstanding,So realistic .every so often I look at my etchs and think one day! , No way could I achieve that sort of finish, You are gifted my friend. Cheers. John. Afflicted more Likely John!! small bit of time and patience kid, right tools and solder and you will have no issues. On the couplings. There a standard NEM couplings and are just cemented onto the bogie etch and there is enough space for these to lie flat and not foul the buffer beam. The Kaydees are possibly thicker so the buffer beam might need to be reduced to accommodate the coupling? Would you need to mount the Kaydees onto the wagon body itself. I have a few kaydees lying about and will take a look tonight Might change the couplings on the brake vans too as they look bloody awful.
Dave Posted March 24, 2016 Posted March 24, 2016 Jasus George! Absolutely superb, the attention to detail is phenomenal.
Georgeconna Posted March 24, 2016 Author Posted March 24, 2016 Jasus George! Absolutely superb, the attention to detail is phenomenal. thanks, Des can take a bow for the Details Really, I did not add on anything extra.
Glenderg Posted March 24, 2016 Posted March 24, 2016 I love when you're away in the real world, changing nappies and so on, and you come back to a thread like this bursting with photos of top notch stuff. Even moreso when Wrenn's looking for you (Don't answer ) and Weshty uses the word "kink" with such wild abandon. The 071 is beautifully subtle, the 4 wheel flats look far better than they should, the pocket containers look far better than I expected. I thought the lack of length would make them look like MK3 shorties, but damn do they look like they are languishing in a siding beside a St. Josephs in Limerick. As for the 42' flats, I've ditched the superglue, and all are soldered now - I love the tonal variation across them from almost pure grey to the full on solebar bauxite. I have to say I'd have saved my sanity on the plough with white primer, rather than doing the underspraying lark and a bazillion coats of yellow, but I love to see your aircraft techniques slip so neatly in here. Such a tidy finish, your Client, one assumes is one of IRM's and looking for top quality from loco to tail....? Anyway, I'd doff my cap, but I've done it so many times on this thread, it's fallen off. Savage work altogether. Richie.
Recommended Posts
Create an account or sign in to comment
You need to be a member in order to leave a comment
Create an account
Sign up for a new account in our community. It's easy!
Register a new accountSign in
Already have an account? Sign in here.
Sign In Now