murphaph Posted July 18, 2024 Posted July 18, 2024 32 minutes ago, BSGSV said: Very different from each other on the prototype too! As a general comment, I am a bit taken aback at the heat that seems to be there regarding the buffer spacing, given most folk seem to use tension lock or kadee or similar to couple their vehicles. I would notice these rather more than buffer spacing. The buffer spacing was very different between the 121 and 141/181 on the prototype? I'm not detecting any heat or disrespect in this thread to be honest, just a good mannered discussion about the merits of both ways of doing things. I would counter the "sure we're using tension locks" argument by reminding readers that IRM provides an alternative to said tension locks by including much more prototypical coupling options in the accessories bag. The tension locks are fitted by default but the magnetic hose type couplings supplied with the new coaching stock for example are superb and far closer to reality. 1
Warbonnet Posted July 18, 2024 Author Posted July 18, 2024 46 minutes ago, DJ Dangerous said: I don't think anybody's being disrespectful, yet, are they? Hi David, I complimented the thread on being respectful, and something we could then engage in. My remark about disrespectful behaviour goes back to more historical incidents on here, some of which you defended IRM on, or indeed witnessed even in recent weeks. I think it's a perfectly fair comment. 21 minutes ago, murphaph said: The buffer spacing was very different between the 121 and 141/181 on the prototype? The buffer spacing between both real 121s and 141s is the exact same. It is just the models that are different, both of which were conscious decisions and understandable. Thanks, Fran 3 2
DJ Dangerous Posted July 18, 2024 Posted July 18, 2024 11 minutes ago, Warbonnet said: Hi David, I complimented the thread on being respectful, and something we could then engage in. My remark about disrespectful behaviour goes back to more historical incidents on here, some of which you defended IRM on, or indeed witnessed even in recent weeks. I think it's a perfectly fair comment. Yeah, the threads can get a bit, I dunno, rabid, at times, with people stamping all over anybody with different opinions etc, but this one is surprisingly pleasant, no tantrums nor attacks nor anything. 2
murphaph Posted July 18, 2024 Posted July 18, 2024 17 minutes ago, DJ Dangerous said: Yeah, the threads can get a bit, I dunno, rabid, at times, with people stamping all over anybody with different opinions etc, but this one is surprisingly pleasant, no tantrums nor attacks nor anything. You might say it's a model thread. I'll get my coat. 8
DJ Dangerous Posted July 18, 2024 Posted July 18, 2024 28 minutes ago, murphaph said: You might say it's a model thread. I'll get my coat. Oh Lord, not another pun-itive comment, dragging us down to the bowels of literary wit. 1
RedRich Posted July 18, 2024 Posted July 18, 2024 The MM 201, 121, MK2d, and Cravens have wider spaced buffers. The 141 - 181 and 071 locos have narrower width buffer spacings. I can see the reasoning in the IRM choice of buffer width when you take into account that modellers would have bought Dapol wagons in flying snail and CIE logos and repainted Bachmann wagons. A lot of people have bought and converted Parkside Dundas kits to resemble CIE wagons and not bothered widening the buffer spacing. I am sure that some have widened them but would be a very small percentage of Irish modellers. I worked on a job once where we were installing an air conditioning along with air extraction system in other areas in a welding and metal fabrication company. Some of the curtains outside the welding booth's had to be removed to allow us access. Anyway one chap working in the fabrication section complained that every time he turned around to look over at the work we and the welders were doing he claimed the arc flash from the welding was annoying and affecting him in doing his job. The union got involved with management and tools were downed for 2 days. The way an agreement was reached on both sides was he was told to stop looking over. That is something that we have to do in this hobby, we have to adjust to certain aspects and returning models for a refund or not buying them in the first place are other choices that are available to us all. 3
MAL Posted July 18, 2024 Posted July 18, 2024 10 hours ago, murphaph said: The buffer is glued into a hole on the buffer beam. To move mine out I reckon I'll drill new holes and glue the buffers into those, assuming I can extract the glued in buffer cleanly. If the buffers are glued it might be easier to remove them and mount them in the right position. I tried to remove one buffer but failed up to now. Buffer is still in place, no broken frame yet. Did you remove a buffer already? Could you suggest a good way to remove the buffer?
Galteemore Posted July 18, 2024 Posted July 18, 2024 I would be very wary of removing and re-applying buffers individually. The visual effect of drooping or misaligned buffers will be far more visually distracting than this small discrepancy. In the 7mm world we certainly find that applying buffers individually requires careful checking to ensure horizontal and vertical alignment 1
murphaph Posted July 18, 2024 Posted July 18, 2024 23 minutes ago, MAL said: Did you remove a buffer already? Could you suggest a good way to remove the buffer? I haven't tried it yet Al.
MAL Posted July 18, 2024 Posted July 18, 2024 (edited) update: I just took my magifier lenses to check the buffer mounting to the frame. To me it seems that the the base plate of the buffer (rectangular with 4 bolts) is part of the frame molding. The "tube" (highlighted in yellow below) with 4 fins seems to be glued to the frame. The buffer itself is a metal part (turned to shape) sitting with a small spring inside the "tube" and fixed by a snap (the little thicker end of turned part) fit via a narrow hole inside the "tube". (sorry. I am fighting to use the correct words). Replacing the buffer would need to toucht the base plate which could not be cut off easily as it sits in an I or C beam. The idea of respacing just became far more difficult as desired. Edited July 18, 2024 by MAL 1
MAL Posted July 18, 2024 Posted July 18, 2024 20 minutes ago, Galteemore said: I would be very wary of removing and re-applying buffers individually. The visual effect of drooping or misaligned buffers will be far more visually distracting than this small discrepancy. In the 7mm world we certainly find that applying buffers individually requires careful checking to ensure horizontal and vertical alignment You are right, man. It is mandatory to make a jig for mounting the buffers. Otherwise it is as you said. I just experienced the removal isn't that easy as expected. The multiple damages the removal process will leave behind will make the thing even worse.
Mayner Posted July 18, 2024 Posted July 18, 2024 8 hours ago, DJ Dangerous said: The older MM locos and the MM coaching stock have relatively wide buffer faces, so the misalignment doesn't stand out. @Mayner has (very justifiably) prided himself on the accuracy of his models, and they have the older narrow buffer faces. You'd probably notice even more with one of his brakevans, but I can't verify this, it's only speculation. CIE locos/stock built/bought from the early 50s (post 53?) onwards tended to be fitted with larger buffers than earlier stock, but older stock often continued to run with their original buffers. Larger buffers heads may have been introduced to allow any item of stock to run anywhere on the system and reduce the risk of bufferlock during shunting. All my wagons are based on photos and drawings of wagons built before 1953. Photo of a van sandwiched between an A Class and a flat wagon makes a good comparison of the different diameters of buffer head and vehicle width, the Brake Vans were narrower in width than most wagons. The different in size/possiblly misalignment between the buffers on the open and Brake in the 1956 Cork photo is quite noticeable. 1 1 2
BSGSV Posted July 19, 2024 Posted July 19, 2024 23 hours ago, murphaph said: The buffer spacing was very different between the 121 and 141/181 on the prototype? I'm not detecting any heat or disrespect in this thread to be honest, just a good mannered discussion about the merits of both ways of doing things. I would counter the "sure we're using tension locks" argument by reminding readers that IRM provides an alternative to said tension locks by including much more prototypical coupling options in the accessories bag. The tension locks are fitted by default but the magnetic hose type couplings supplied with the new coaching stock for example are superb and far closer to reality. My apologies. The preceding posts were about the chassis and that's what I was commenting on. With the benefit of hindsight, I should have known you were asking about buffer spacing! 2
derek Posted July 19, 2024 Posted July 19, 2024 (edited) Hi, just wondering why my post on this tread was removed. I was merely trying to point out that, regardless of the buffer spacings, the models themselves were still excellent. I didn't think I was being insulting or abusive to anyone . Just saying that people were getting very excited about very little. Maybe someone could enlighten me. Trying to ask this as pleasantly as I can. Maybe @Warbonnet, @Garfield, @BosKonayor @MOGUL might be able to help. Thanks, Derek Edited July 19, 2024 by derek 1
DJ Dangerous Posted July 19, 2024 Posted July 19, 2024 2 hours ago, derek said: Hi, just wondering why my post on this tread was removed. I was merely trying to point out that, regardless of the buffer spacings, the models themselves were still excellent. I didn't think I was being insulting or abusive to anyone . Just saying that people were getting very excited about very little. Maybe someone could enlighten me. Trying to ask this as pleasantly as I can. Maybe @Warbonnet, @Garfield, @BosKonayor @MOGUL might be able to help. Thanks, Derek Probably best to move this post into @Gabhal Luimnigh's thread HERE, in order to keep both threads on-topic. 1
MAL Posted July 20, 2024 Posted July 20, 2024 (edited) (OFFTOPIC) I wrote: I just converted a Kato DD51 (JNR) into a kit by touching the loco with the caliper while measuring the Craven and the Mark 2D. The level of tracks was 125 cm and the drop of the Kato engine was hard. All parts seem to be fine but apart. Lucky that Kato uses a good plastic material and that the loco was only one year old. My other DD51 is from 1995 or so. Details of the kit coversion will be checked later. On 17/7/2024 at 8:14 PM, Galteemore said: That’s a shame. I loved my Kato trains. Especially the ones that looked like GNRI railcars !! Now I checked the damage of the 125cm drop (equivalent free fall over a prototypical 100m down to the ground). Some snap hook were cracked - could be glued. 2 stirrups, front and rear on one side were broken - might be able to glue - at least good for the rear side in display case. One bogie is broken apart and one side frame lost it's guide and snap pin. This is bad as it turns her to spend the remaining live in display case. The broken bogie cannot hold the worm gera and the intermediate gear in place. And the plastic used for bogies is an ugly thing to glue. All these kind of repairs I did before did not last long. Most often less than one operating hour. (now BACK to TOPIC with the next entry) Edited July 20, 2024 by MAL 2
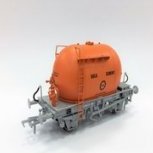
MAL Posted July 20, 2024 Posted July 20, 2024 (edited) This is an idea I had how the models could have been made to fit both IR and BR buffer spacing. I made a very rough 3D sketch to show the idea. Some details will have to be improved and adjusted to make the idea feasible for molding and assembly. I thought to have buffers as extra parts to be either applied by the customer (one item for all) or applied at the factory (which would make 2 different items for either IR or BR). My first idea was to have one buffer&baseplate with a 1.15mm but assymetrical extension on one side. The buffer beam (is this the right wording) has room to take the buffer mounted to the inside (BR spacing) or the outside (IR spacing). Checking the Bulleids models I saw the buffer center are offset by 0.15mm (you can see it on my recent picture I posted last Thursday at 21:37). Therefore I had to make a left and a right buffer. You get IR spacing by placing the left buffer on the left and the right on the right - BR spacing by placing left to the right and right to the left. To show the design I decided to do it with the more simple buffer of the tank wagon which has no reinforcing ribs. Maybe this idea might find its way into other new toolings (we all need brake vans ) or into a re-run of the bulleids somewhen in the future. --- --- --- Edited July 20, 2024 by MAL 4 1
DJ Dangerous Posted July 20, 2024 Posted July 20, 2024 Brilliant stuff, @MAL! This is what I was wondering about for future Bulleid runs, future loose-coupled stock and future brake-vans. If the buffers were applied in the factory, but were friction-fit or NEM-pocket-style clipped in, rather than glued, and mounted on a reversible rectangular plate, IRM customers could then pop them off to swap them around as needed. You want to run an IRM brake-van coupled to an A or a Park Royal? Run it straight out of the box! You want to run that same IRM brake-van with the Bulleids? Ten seconds to swap the buffers around and you're sorted! 2 1
murphaph Posted July 20, 2024 Posted July 20, 2024 It would be great if we could pick the buffer widths ourselves like this on future product lines. On a related note....If I may be so cheeky to get my own request in....would it be possible to include wider spaced holes under the chassis/bogies and include wider spaced brake gear that we can insert in those holes after snipping off the 16.5mm brake gear? (for those of us doing 21mm that is) 2
MAL Posted July 20, 2024 Posted July 20, 2024 (edited) I first thought to include the doubled holes for all the brake rigging into my sketched design. But then I decided to keep this for later. Mainly because I would have to draw the remaining frame instead of just the end beam. Edited July 20, 2024 by MAL 1
MAL Posted July 24, 2024 Posted July 24, 2024 I think about to cut the buffers and mill the beam. The bulleids need to be fixed in a jig I have to build to avoid unneccessary damages. The only problem I have is that I have not yet found buffers as detailing parts (white metal or such) which are British/Irish enough and 1/76 scale to be mounted in wide spacing. My knowledge about detail parts and sources is 90% US and 10% Germany. Does anyone know a source of buffers that would look good enough to be applied to the bulleids? THey do not need to be 100% accurate but should be of a good size and similar shape. The 1/87 buffer I have here are a bit too tiny and look too German or completely different. Any hint will be appreciated. Thanks in advance
Mayner Posted July 24, 2024 Posted July 24, 2024 2 hours ago, MAL said: I think about to cut the buffers and mill the beam. The bulleids need to be fixed in a jig I have to build to avoid unneccessary damages. The only problem I have is that I have not yet found buffers as detailing parts (white metal or such) which are British/Irish enough and 1/76 scale to be mounted in wide spacing. My knowledge about detail parts and sources is 90% US and 10% Germany. Does anyone know a source of buffers that would look good enough to be applied to the bulleids? THey do not need to be 100% accurate but should be of a good size and similar shape. The 1/87 buffer I have here are a bit too tiny and look too German or completely different. Any hint will be appreciated. Thanks in advance A number of British suppliers including Alan Gibson Works (AGW) http://www.alangibsonworkshop.com/and Dart Castings https://www.dartcastings.co.uk/ produce 4mm -1:76.2 scale buffers and detail parts. There may be no direct British equivalent of the buffers fitted to the CIE H Vans and Bulleid wagons. David Malone who published a number of articles on modelling Irish Railways to P4 Standards in the 80s and 90s turned his own buffer bodies (brass) and used Alan Gibson buffers heads and springs in models of the early version of the CIE H Van and the Corrugated Open Wagon. The abstracts are from RailModel Digest which was published for a short period during the mid -late 90s David notes that sagging buffer heads were often a feature of Bulleid wagons and H Vans! If you consider correctly positioned buffers important enough, one option for re-producing these buffers may be to use Gibson or Dart (MJT) buffer heads in conjunction with a brass "lost wax" body reproduced from a 3D modelling file. Some precious metal/jewellery suppliers have the capability to cast from a 3D modelling file. Some of the detail castings I use in locomotive kits are cast in brass from 3D prints or direct from a stl. file, eliminating the brittleness problem inherent in resin prints 1 2
Garfield Posted July 25, 2024 Posted July 25, 2024 FYI: We're hoping to provide both the spindle and heavy duty buffer types used on these wagons as separate accessories. Further details will be revealed in due course! 7 1 1 2
DJ Dangerous Posted October 3, 2024 Posted October 3, 2024 Just wondering if there's been any time to look at the feasability of reversible buffers, magnetic / friction fit etc for future runs of wagons using this chassis?
James Regan Posted November 1, 2024 Posted November 1, 2024 The corrugation idea was interesting but not new. Anyone know where Bullied got his inspiration? An Irishman Walther Murphy had come up with this idea and patented it in the United States in 1921 and for many year Murphy ends were common on US boxcars. Long before Bullied introduced it on Irish railways. Walter Patton Murphy was born in Pittsburgh, Pa., January 26, 1873. His paternal grandfather had emigrated from Ireland and settled in Vermont about 1840. His parents were Peter Henry and Jennie Elizabeth Patton Murphy. Walter was the second-born of six children, of whom the eldest died in early childhood. He had three brothers, Clint, Albert, and Dwight, and a sister, Beulah. 3
Mol_PMB Posted November 3, 2024 Posted November 3, 2024 On 1/11/2024 at 5:38 PM, James Regan said: The corrugation idea was interesting but not new. Anyone know where Bullied got his inspiration? An Irishman Walther Murphy had come up with this idea and patented it in the United States in 1921 and for many year Murphy ends were common on US boxcars. Long before Bullied introduced it on Irish railways. Walter Patton Murphy was born in Pittsburgh, Pa., January 26, 1873. His paternal grandfather had emigrated from Ireland and settled in Vermont about 1840. His parents were Peter Henry and Jennie Elizabeth Patton Murphy. Walter was the second-born of six children, of whom the eldest died in early childhood. He had three brothers, Clint, Albert, and Dwight, and a sister, Beulah. The LMS was using corrugated ends on vans from 1924 (D 1663), and later on open wagons of various types. Bulleid would have been familiar with these when he was working on the LNER and SR. It wouldn't be a big step to consider using corrugated sides as well. Bulleid was also widely travelled in Europe and no doubt obtained inspiration there too. On these wagons, the triangulated underframe and galvanised corrugated body were neat and efficient designs. On the other hand, the brakes appear remarkably crude, probably only effective as a parking brake. Were any opens built on the vacuum brake fitted underframe like the H vans?
Galteemore Posted November 3, 2024 Posted November 3, 2024 (edited) Bulleid was also a former officer in the Royal Engineers, seeing service on the western front in WW1. Military engineers will do amazing things with whatever is at hand (some mighty constructions were made with Hesco Bastion in Iraq and Afghanistan). It’s not unlikely that he drew some inspiration from what he saw in France, where corrugated iron would have been used for all kinds of purposes. Edited November 3, 2024 by Galteemore
Mayner Posted November 3, 2024 Posted November 3, 2024 (edited) 2 hours ago, Mol_PMB said: The LMS was using corrugated ends on vans from 1924 (D 1663), and later on open wagons of various types. Bulleid would have been familiar with these when he was working on the LNER and SR. It wouldn't be a big step to consider using corrugated sides as well. Bulleid was also widely travelled in Europe and no doubt obtained inspiration there too. On these wagons, the triangulated underframe and galvanised corrugated body were neat and efficient designs. On the other hand, the brakes appear remarkably crude, probably only effective as a parking brake. Were any opens built on the vacuum brake fitted underframe like the H vans? I saw one Bulleid Open wagon with Vac brakes stored awaiting scrapping at Mullingar around 1981-2. The majority of traditional opens and vans built during the 50s were unfitted with handbrake only as the majority of goods trains ran unfitted.. Although no "fitted" open wagons are listed in Locomotives and Rolling Stock of CIE & NIR the need would have arisen for a 'fitted' Open following the closure of the Derry Road and the diversion of freight traffic for Donegal to run in a fully fitted freight to Waterside. Before the introduction of the Back to Back Fertiliser trains in the late 60s fertiliser traffic from Shelton Abbey was carried in conventional open wagons often Corrugated Opens, its possible that CIE fitted some opens with Vac brakes for this traffic. Its likely the body pressings for the Bulleid opens were manufactured by companies like the Pressed Steel Company a subsidary of Budd a US company that pioneered the use of corrugated pressings in railroad rolling stock. CIE experienced a shortage of end pressings when building the Pallet Wagons in 1964 which resulted in three different end designs on these wagons. Interestingly CIE turned out 11 vans with all metal bodies and corrugated ends during the early 50s but did not repeat the design. I suppose it would be simple enough to swap the chassis between an IRM Bulleid Open and their fitted H Van if someone wants a fitted Open. Edited November 3, 2024 by Mayner 1
Mol_PMB Posted November 3, 2024 Posted November 3, 2024 I started looking through Ernie's photos on Flickr in the hope of finding a fitted corrugated wagon. I haven't found one yet, but I have found some examples with a different hand brake arrangement, which is quite interesting. This first photo shows the arrangement as represented by the IRM models, and illustrated in the Doyle & Hirsch stock books. This was also used on the unfitted H vans. On each side, there is a push rod to a single brake shoe inboard of the left-hand wheel, connected by a crank only to the brake lever on the same side. Wagon 12359 in 1959: This one, on the other hand, has a brake shoe outboard of the left-hand wheel, and what appears to be a pull rod running between the wheels. It appears that there is another brake shoe on the far side, left hand end, and a crosspiece connecting them. There are no brake shoes inboard of the wheels: This is only a partial view, but a close-up, again showing a wagon with a brake shoe outboard of the wheel: This photo shows the crosspiece connecting the two brake shoes at this end of the wagon: Which can also be seen here, a bit less clearly: And here. None of these wagons have vac brake cylinders or pipes, it's just a different configuration of the handbrake: This pair of wagons have the same arrangement. On all these photos it's very hard to see if it's the same both ends, but I expect it is and these wagons therefore have 4 brake shoes (rather than 2 on the type modelled by IRM). On the other hand, the fitted H vans have full clasp brakes with 8 brake shoes and a handwheel instead of a lever, as shown in this snail-liveried example: Whereas the Palvans had a 4-shoe Morton vac braked arrangement with the brake shoes inboard of the wheels, and a conventional lever brake: So the triangulated underframe may not have been quite as standardised as I'd thought! 1
jhb171achill Posted November 3, 2024 Posted November 3, 2024 23 minutes ago, Mol_PMB said: I started looking through Ernie's photos on Flickr in the hope of finding a fitted corrugated wagon. I haven't found one yet, but I have found some examples with a different hand brake arrangement, which is quite interesting. This first photo shows the arrangement as represented by the IRM models, and illustrated in the Doyle & Hirsch stock books. This was also used on the unfitted H vans. On each side, there is a push rod to a single brake shoe inboard of the left-hand wheel, connected by a crank only to the brake lever on the same side. Wagon 12359 in 1959: This one, on the other hand, has a brake shoe outboard of the left-hand wheel, and what appears to be a pull rod running between the wheels. It appears that there is another brake shoe on the far side, left hand end, and a crosspiece connecting them. There are no brake shoes inboard of the wheels: This is only a partial view, but a close-up, again showing a wagon with a brake shoe outboard of the wheel: This photo shows the crosspiece connecting the two brake shoes at this end of the wagon: Which can also be seen here, a bit less clearly: And here. None of these wagons have vac brake cylinders or pipes, it's just a different configuration of the handbrake: This pair of wagons have the same arrangement. On all these photos it's very hard to see if it's the same both ends, but I expect it is and these wagons therefore have 4 brake shoes (rather than 2 on the type modelled by IRM). On the other hand, the fitted H vans have full clasp brakes with 8 brake shoes and a handwheel instead of a lever, as shown in this snail-liveried example: Whereas the Palvans had a 4-shoe Morton vac braked arrangement with the brake shoes inboard of the wheels, and a conventional lever brake: So the triangulated underframe may not have been quite as standardised as I'd thought! In the wagon world, there were many, many variations of most things - just like locos and carriages, also, in the steam era. Thus, I cannot state as an absolute fact that not a single solitary one of those was ever vac braked, but I would consider it to be exceptionally unlikely. Of course, when they became "double-decked" for beet in much later years, those were vac braked - but on a different chassis. 1
Mol_PMB Posted November 3, 2024 Posted November 3, 2024 I think you're probably right that few or none were vac fitted, but there were two or three different people posting recollections of vac-fitted ones so maybe there were a few examples? On the topic of the atypical, I have finally found a photo clearly showing the brown chassis variant, when it was clean enough to be clearly brown paint rather than just dirt. Link to Jonathan Allen's photo on Flickr here: https://www.flickr.com/photos/152343870@N07/39075106620/in/album-72157714061635252 But most of them seem to have had grey chassis, even this example from Ernie, as late as 1987, is grey: Other mid-1980s examples in Ernie's albums (including beet-branded wagons) mostly look to have grey chassis, though it can be hard to tell under the dirt. A good dose of weathering is needed anyway, regardless of the nominal 'livery' you start with. 2
jhb171achill Posted November 3, 2024 Posted November 3, 2024 2 hours ago, Mol_PMB said: I think you're probably right that few or none were vac fitted, but there were two or three different people posting recollections of vac-fitted ones so maybe there were a few examples? On the topic of the atypical, I have finally found a photo clearly showing the brown chassis variant, when it was clean enough to be clearly brown paint rather than just dirt. Link to Jonathan Allen's photo on Flickr here: https://www.flickr.com/photos/152343870@N07/39075106620/in/album-72157714061635252 But most of them seem to have had grey chassis, even this example from Ernie, as late as 1987, is grey: Other mid-1980s examples in Ernie's albums (including beet-branded wagons) mostly look to have grey chassis, though it can be hard to tell under the dirt. A good dose of weathering is needed anyway, regardless of the nominal 'livery' you start with. Indeed. In original form, as per recent IRM models, the bpdy was just galvanised steel. They were never painted at all in "single deck" days. The chassis, like those of all CIE wagons before 1970, were grey. Very few ever saw a coat of paint again; any that did had brown paint roughly slopped on them in sugar-beet days, again as per the IRM model of that. In their last days, when double-decked, all brown and all fitted, That's actually the first time the corrugated bodies ever had paint on them - no wonder they just looked like a "dirt colour". 1
jhb171achill Posted November 3, 2024 Posted November 3, 2024 11 hours ago, Mol_PMB said: On these wagons, the triangulated underframe and galvanised corrugated body were neat and efficient designs. On the other hand, the brakes appear remarkably crude, probably only effective as a parking brake. Were any opens built on the vacuum brake fitted underframe like the H vans? Pretty sure they weren't. 1
Garfield Posted November 4, 2024 Posted November 4, 2024 Re. "fitted" Bulleid opens, I've never seen evidence of any such things. However, a small number of vacuum-braked 20ft flat wagons received open bodies fabricated from the same galvanised panelling with 'extender' sections to cross the gaps at either end. The body sections were likely sourced from scrapped Bulleids. 1
leslie10646 Posted November 5, 2024 Posted November 5, 2024 On 3/11/2024 at 1:02 PM, Mol_PMB said: I started looking through Ernie's photos on Flickr in the hope of finding a fitted corrugated wagon. I haven't found one yet, but I have found some examples with a different hand brake arrangement, which is quite interesting. This first photo shows the arrangement as represented by the IRM models, and illustrated in the Doyle & Hirsch stock books. This was also used on the unfitted H vans. On each side, there is a push rod to a single brake shoe inboard of the left-hand wheel, connected by a crank only to the brake lever on the same side. Wagon 12359 in 1959: This one, on the other hand, has a brake shoe outboard of the left-hand wheel, and what appears to be a pull rod running between the wheels. It appears that there is another brake shoe on the far side, left hand end, and a crosspiece connecting them. There are no brake shoes inboard of the wheels: This is only a partial view, but a close-up, again showing a wagon with a brake shoe outboard of the wheel: This photo shows the crosspiece connecting the two brake shoes at this end of the wagon: Which can also be seen here, a bit less clearly: And here. None of these wagons have vac brake cylinders or pipes, it's just a different configuration of the handbrake: This pair of wagons have the same arrangement. On all these photos it's very hard to see if it's the same both ends, but I expect it is and these wagons therefore have 4 brake shoes (rather than 2 on the type modelled by IRM). On the other hand, the fitted H vans have full clasp brakes with 8 brake shoes and a handwheel instead of a lever, as shown in this snail-liveried example: Whereas the Palvans had a 4-shoe Morton vac braked arrangement with the brake shoes inboard of the wheels, and a conventional lever brake: So the triangulated underframe may not have been quite as standardised as I'd thought! Hi Patrick, Fran et al: take note of the FOURTH Ernie picture above - same chassis - and much demanded by this forum! Even though they're a bit outside my period - I'd buy a few for variety on the Cross border goods coming through Portadown.
Recommended Posts
Create an account or sign in to comment
You need to be a member in order to leave a comment
Create an account
Sign up for a new account in our community. It's easy!
Register a new accountSign in
Already have an account? Sign in here.
Sign In Now