Leaderboard

Popular Content
Showing content with the highest reputation since 07/12/25 in all areas
-
More to follow this week, folks….
 17 points
 -
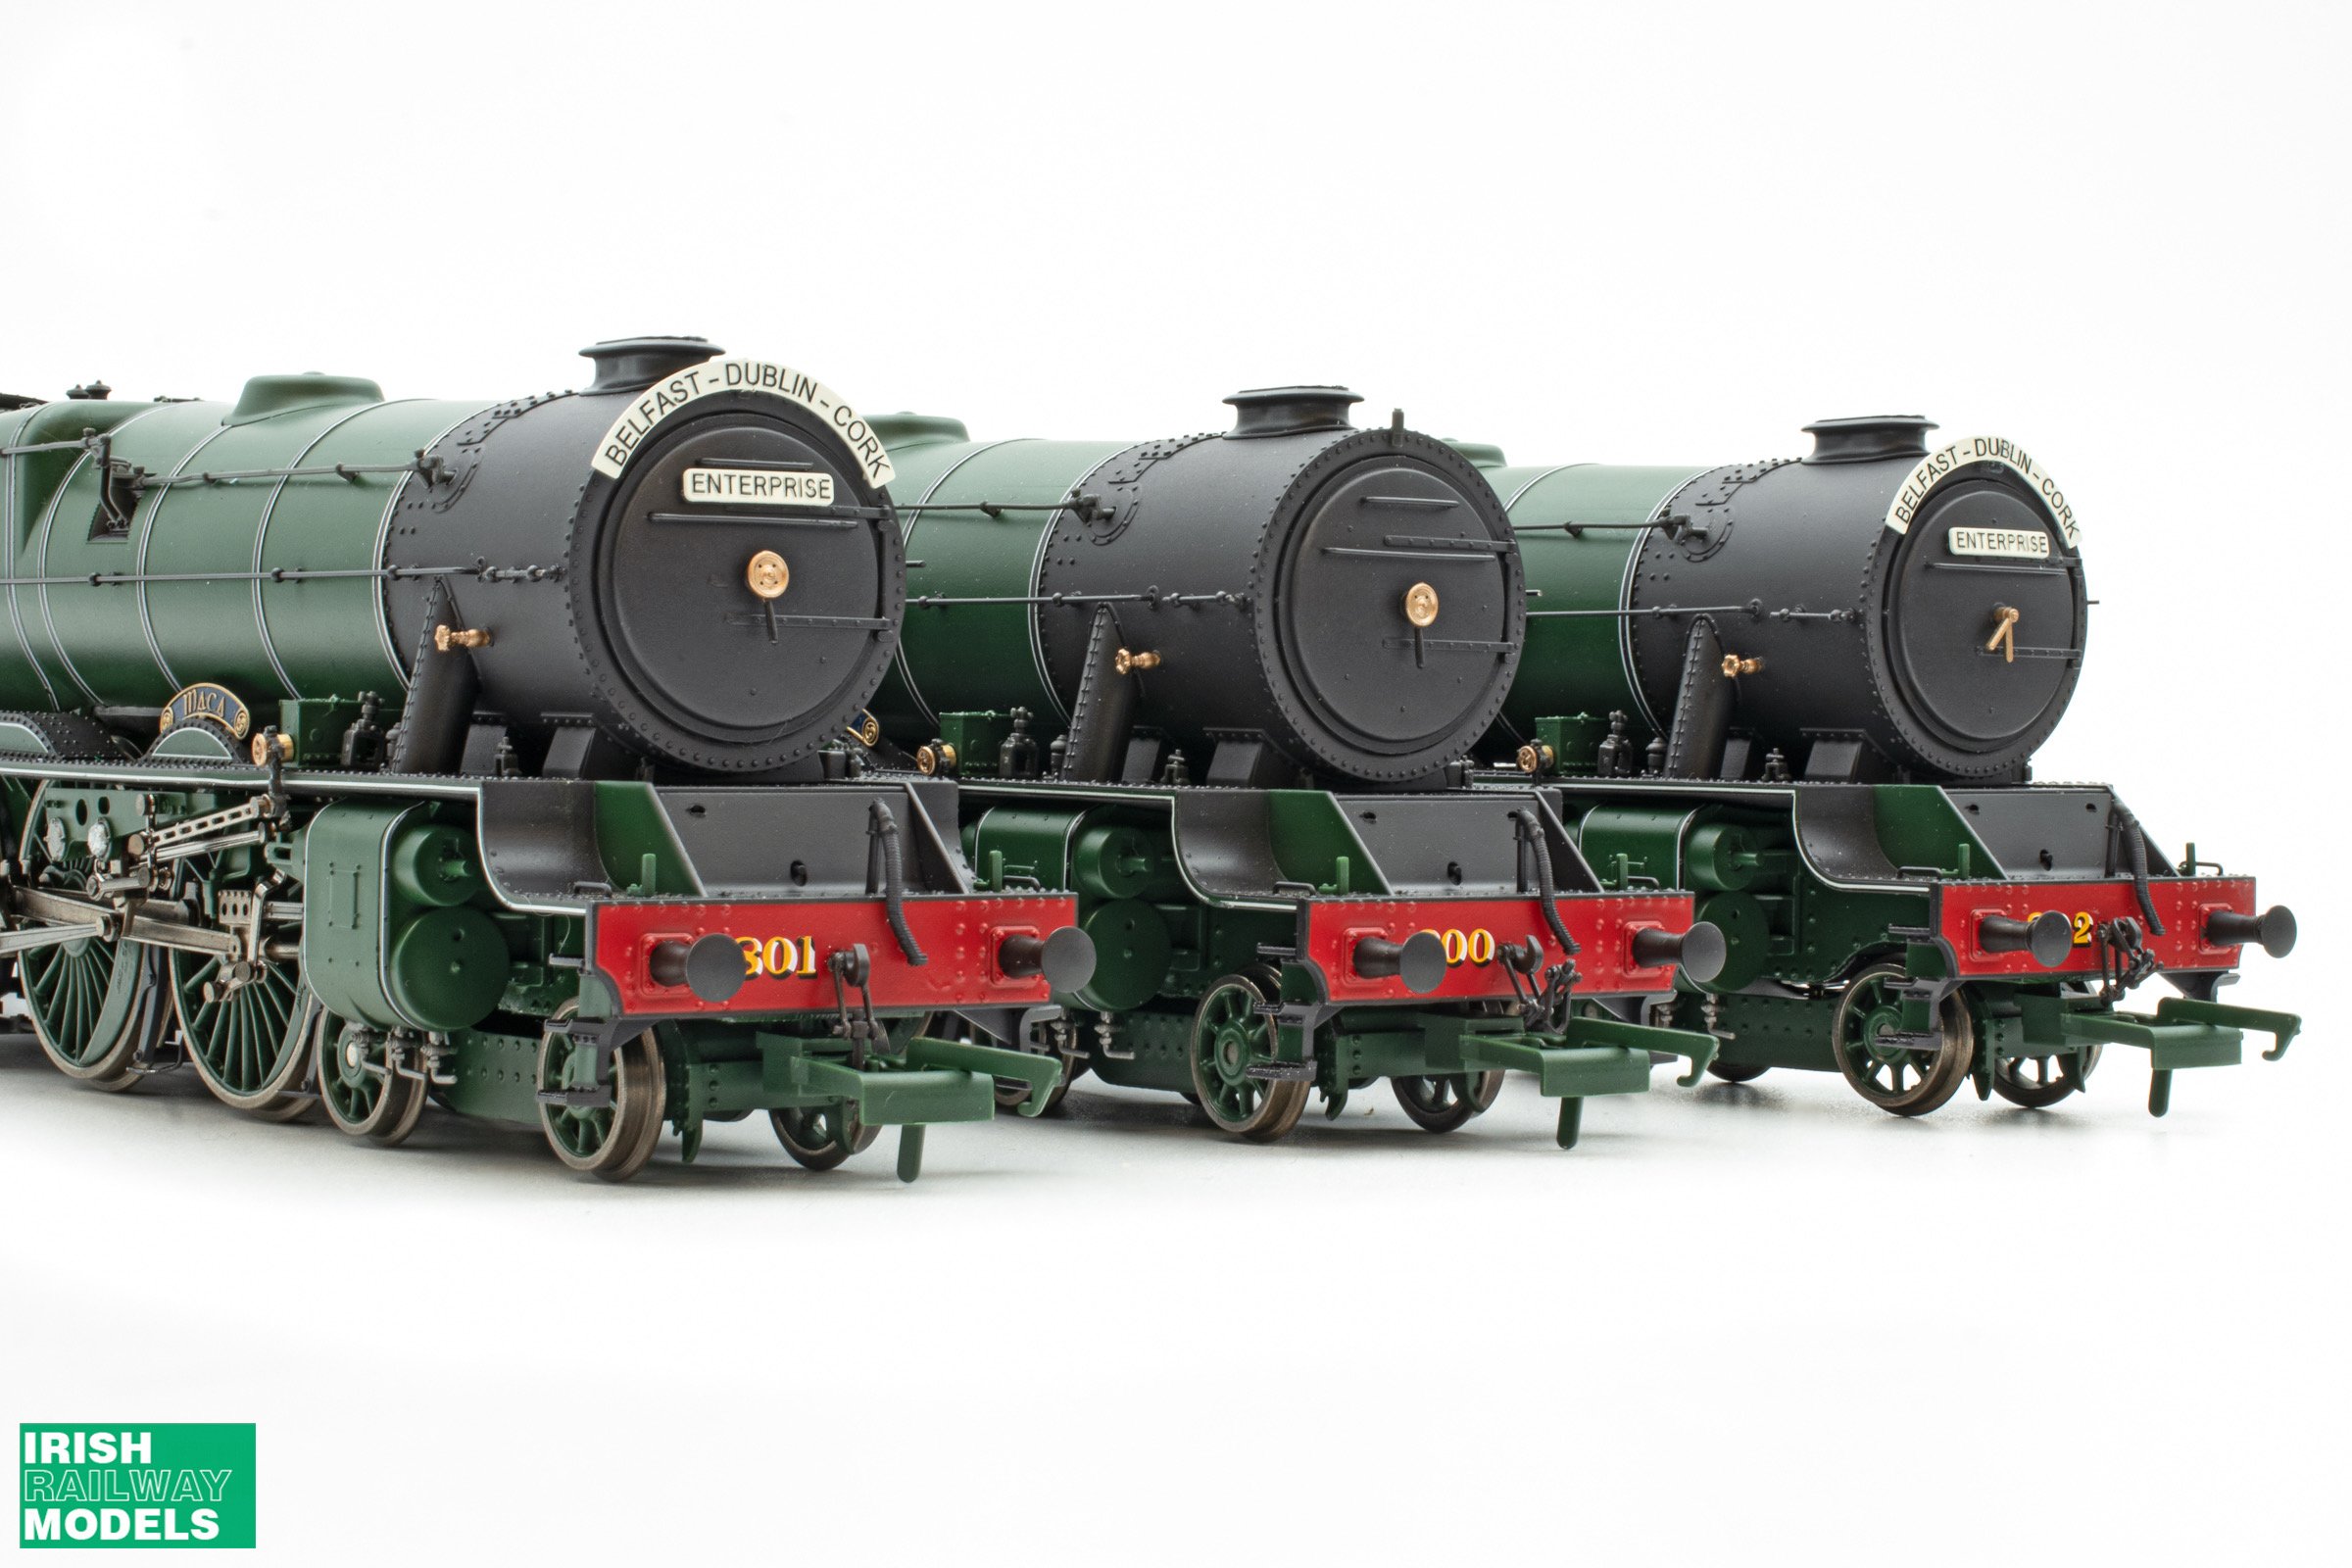
1960's today. CIE 1964-06-xx Drogheda A11 yj340. CIE 1961-06-04 Dublin Amiens St 170 yj308. CIE 1960-07-09 Bagnealstown 184 yj307. CIE 1961-05-xx Killarney A33 yj309.13 points
-
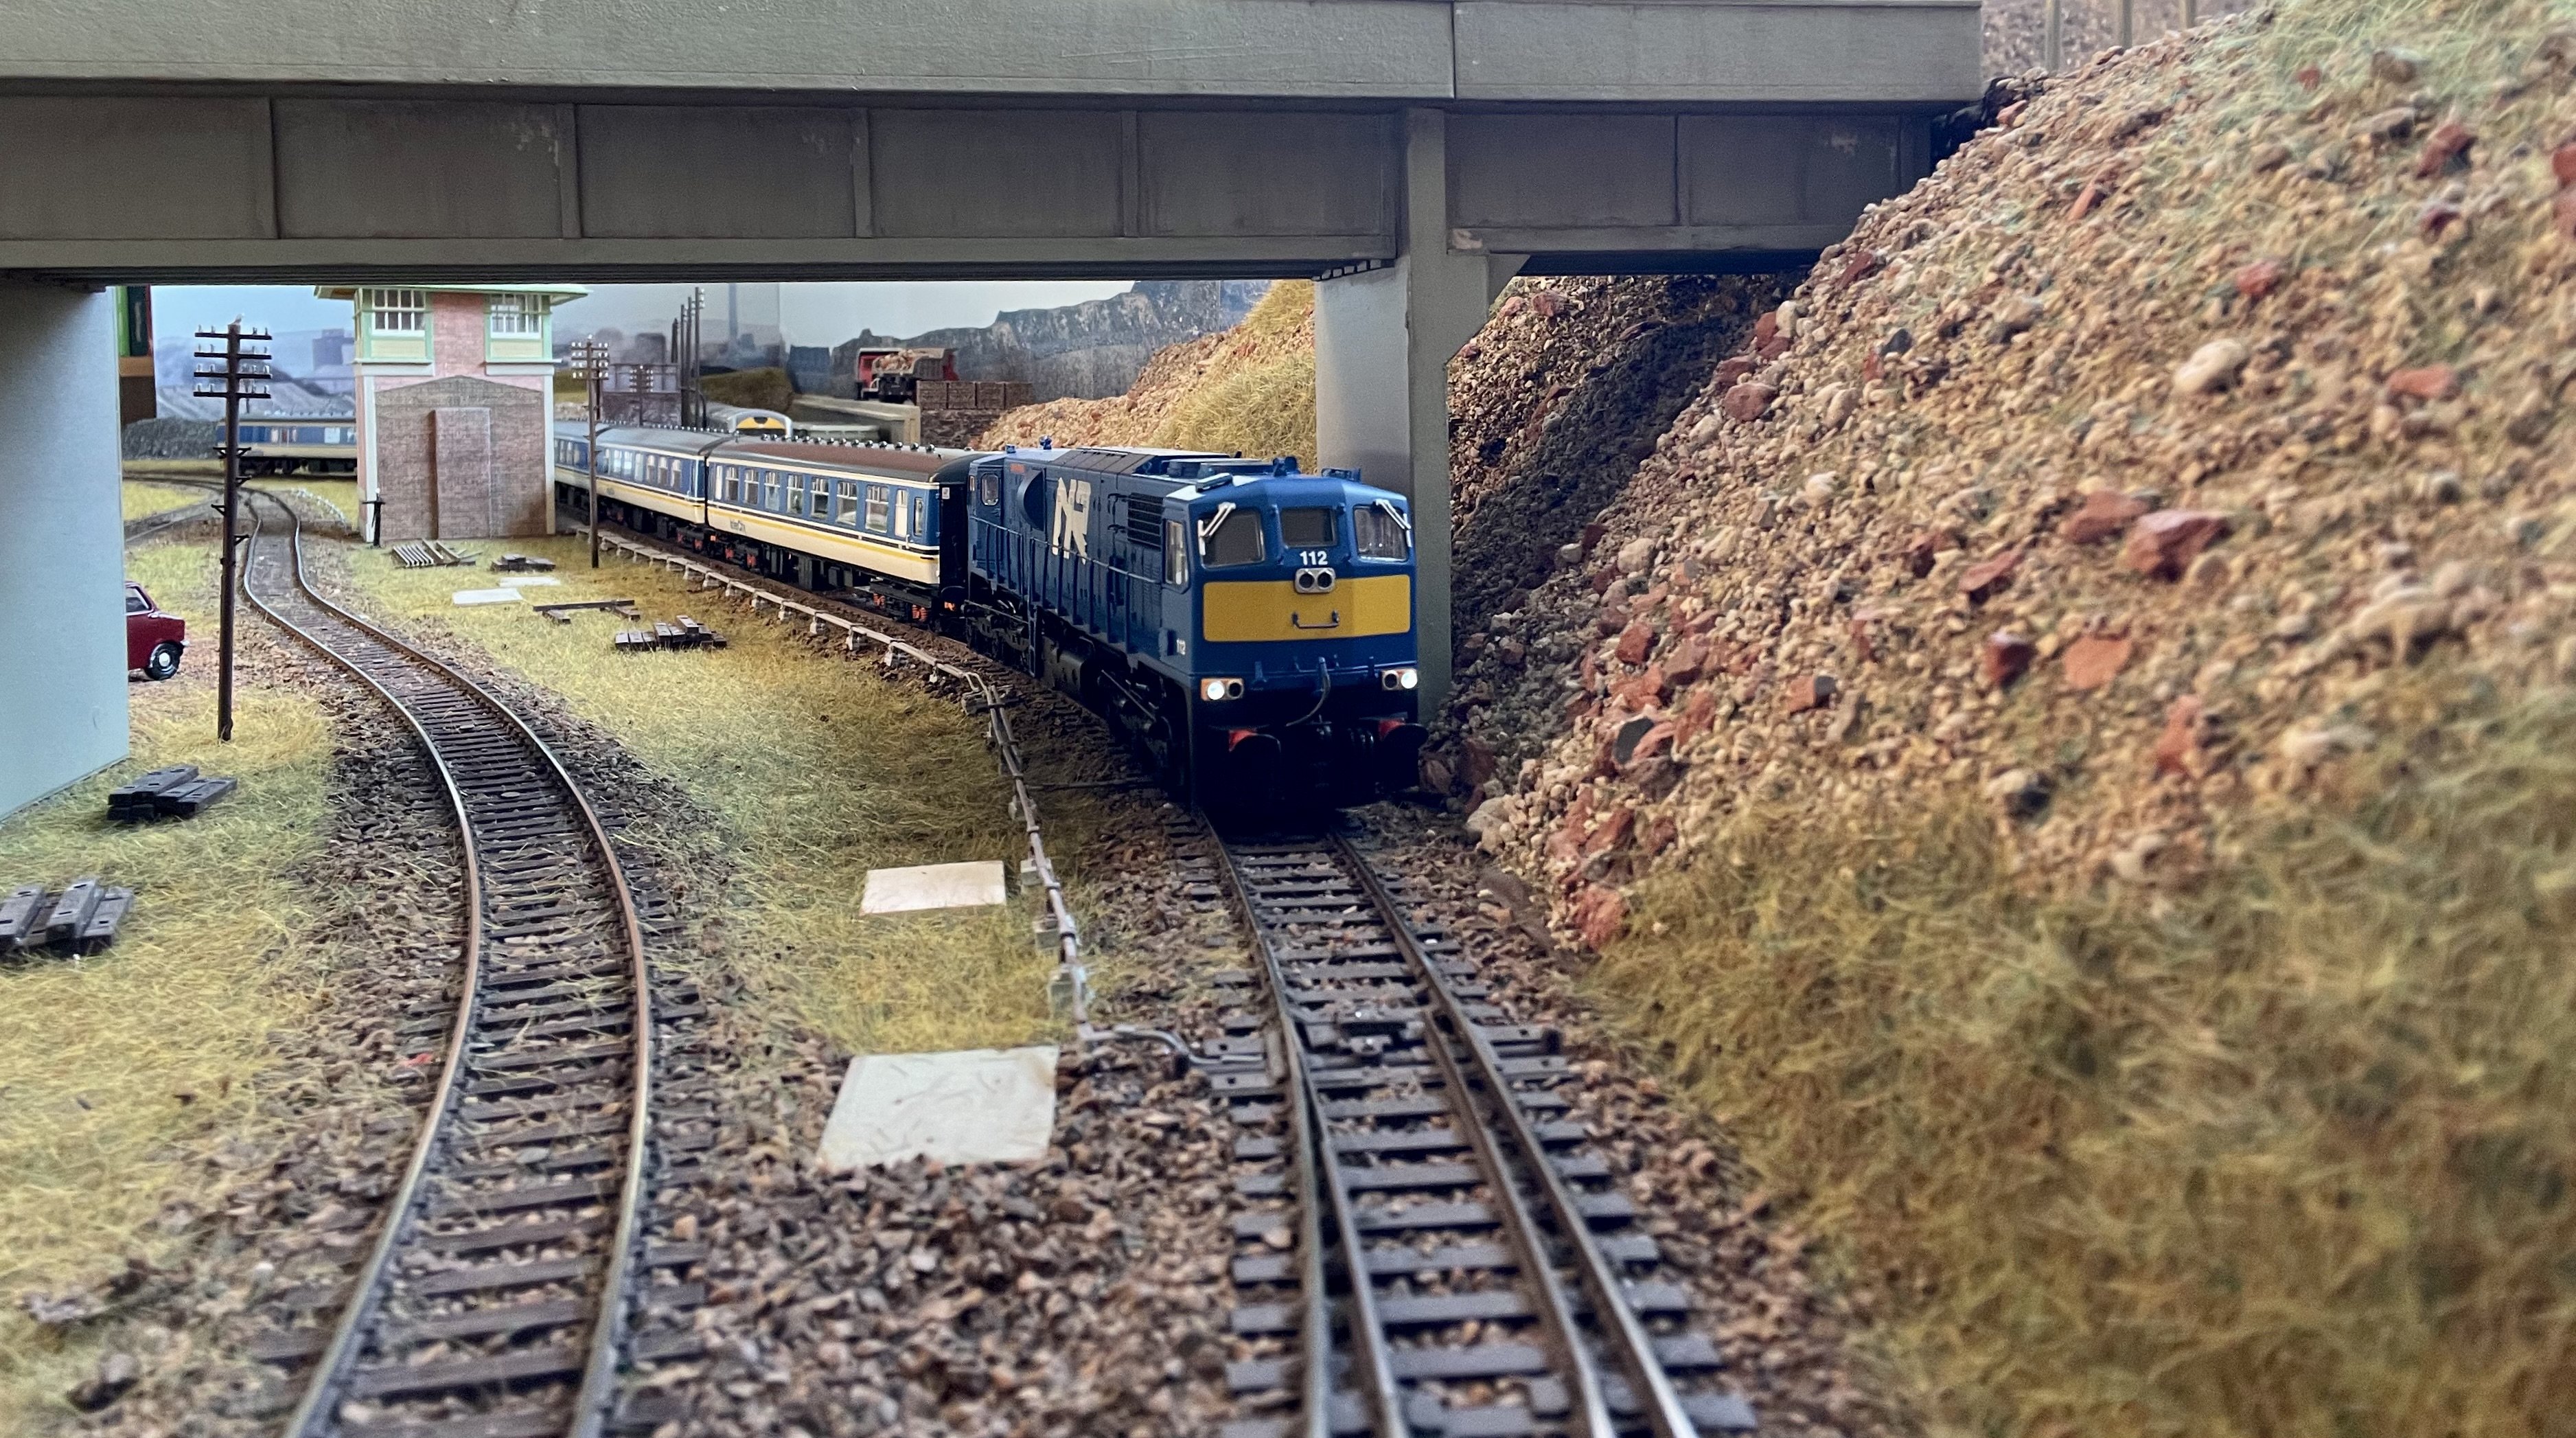
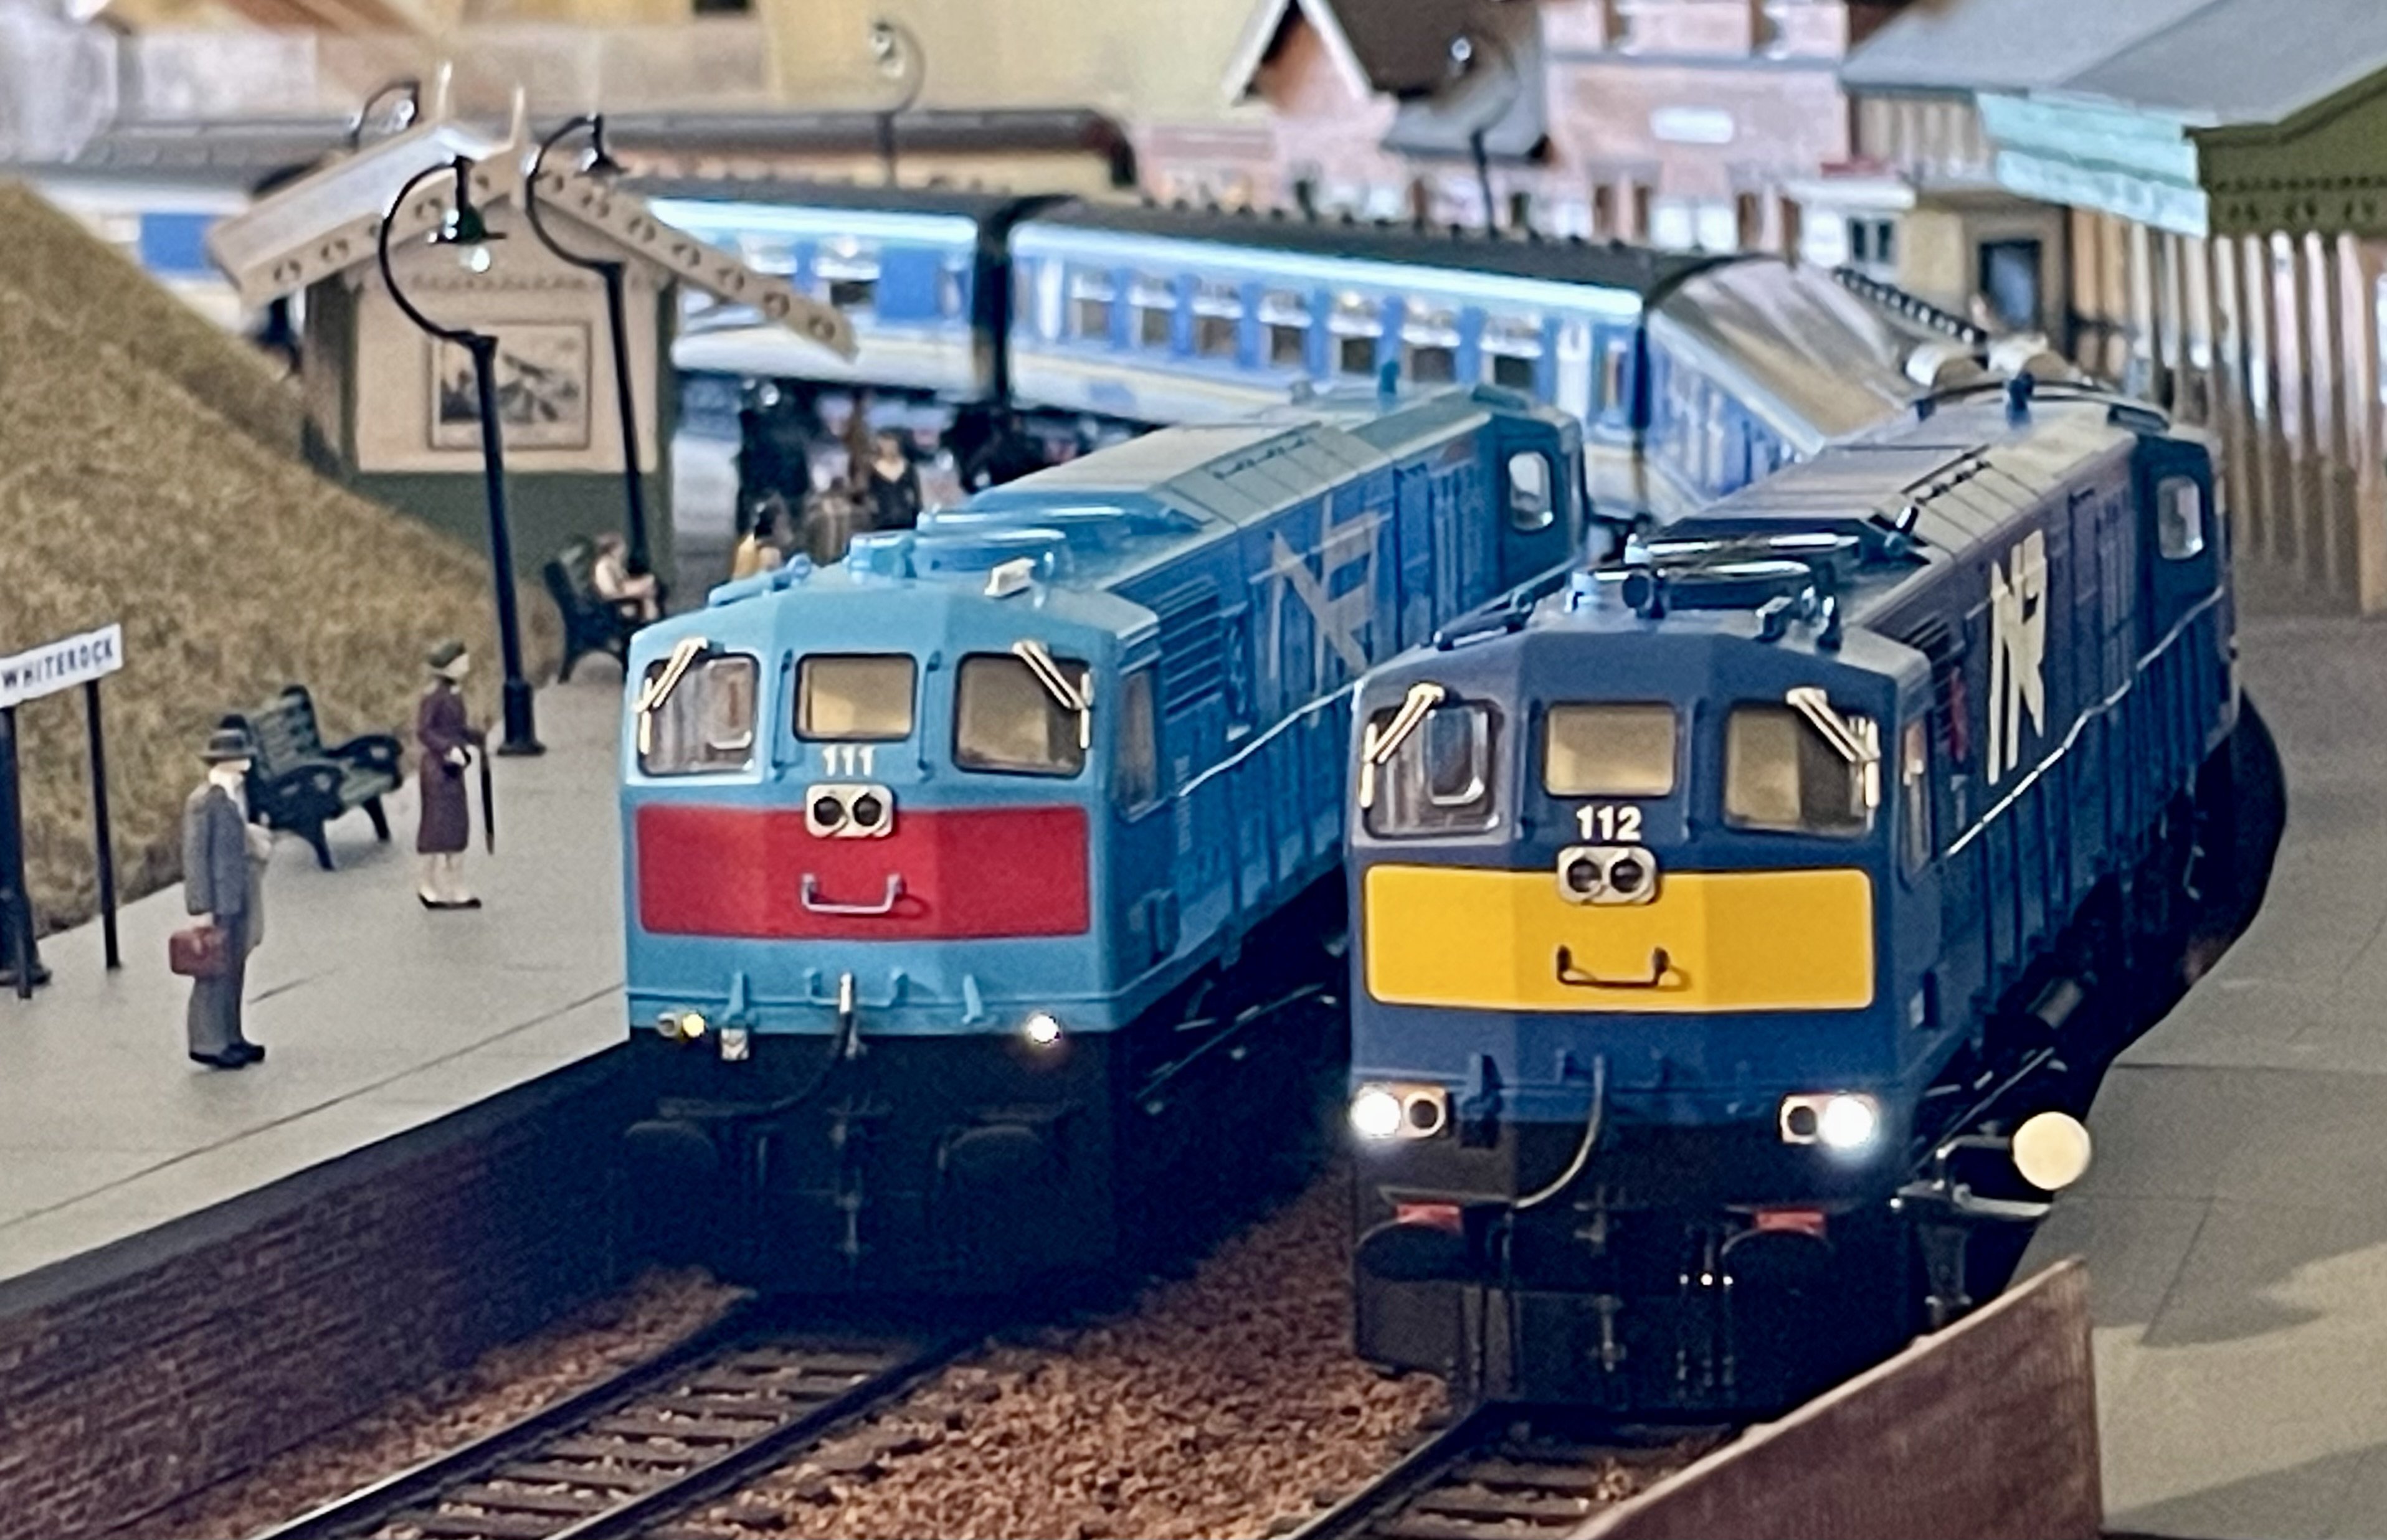
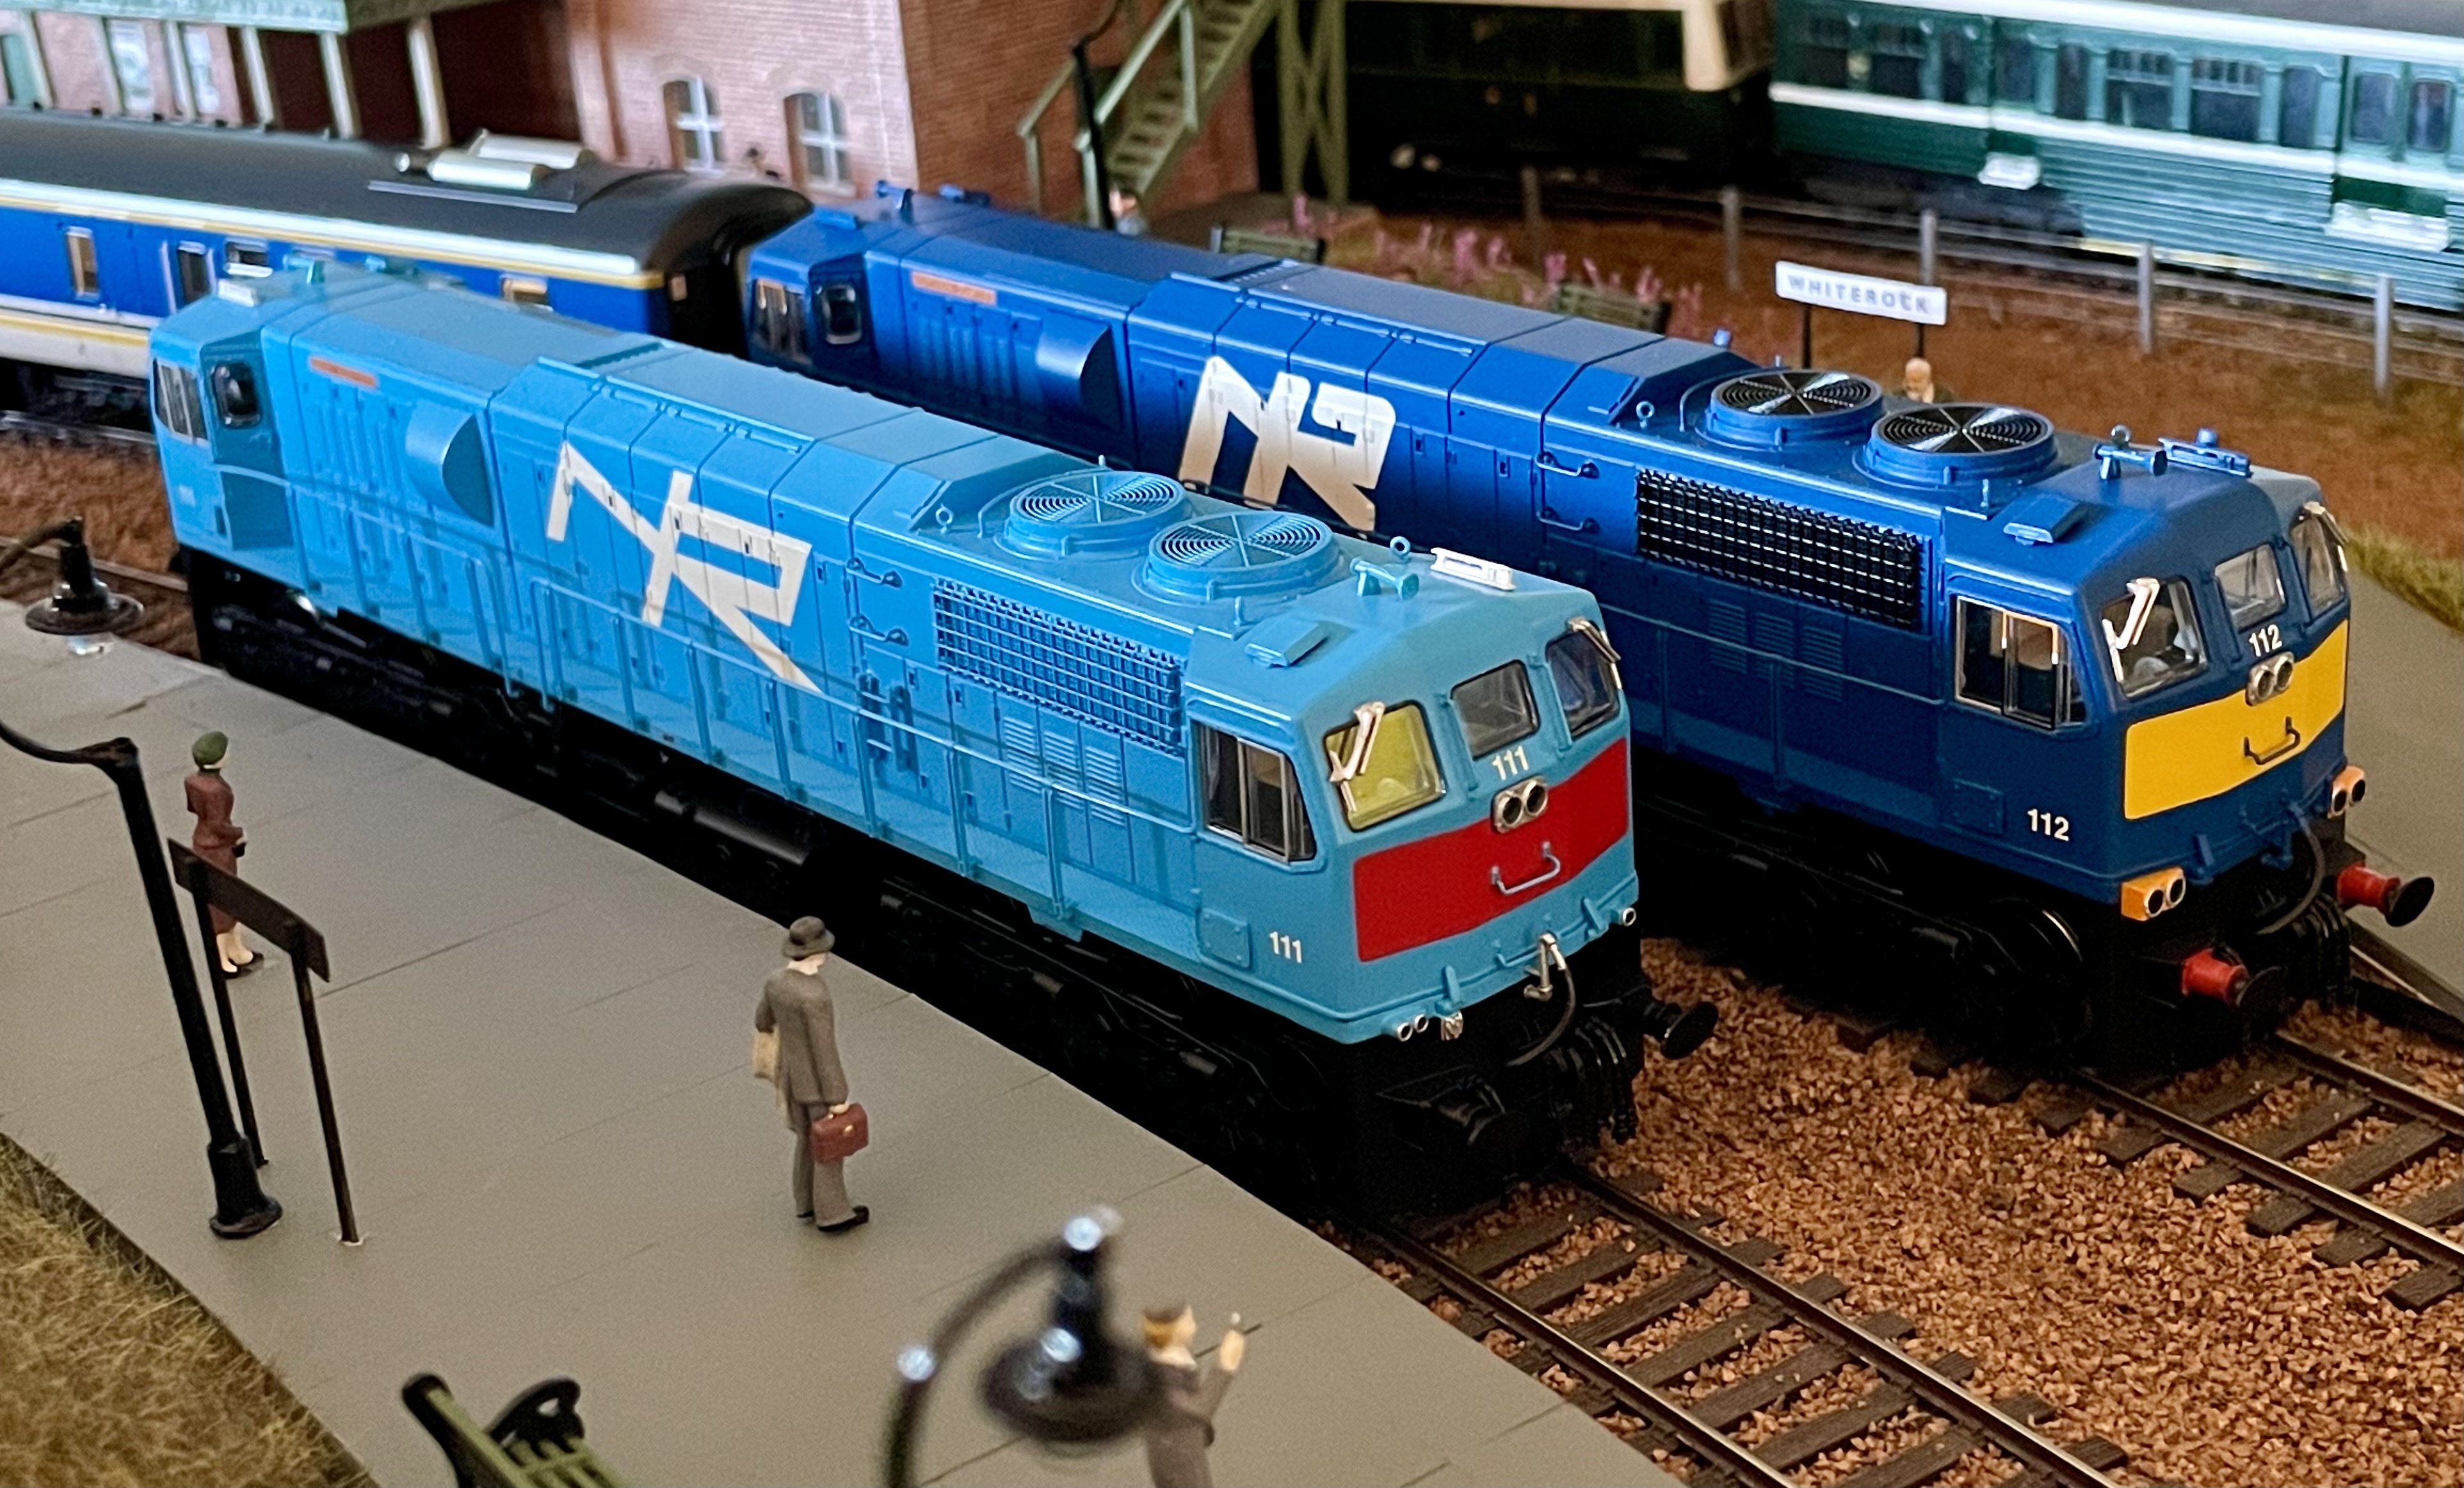
Unboxed Class 110 No.112 “Northern Counties” and gave it an outing. Cheers Darius
11 points
-
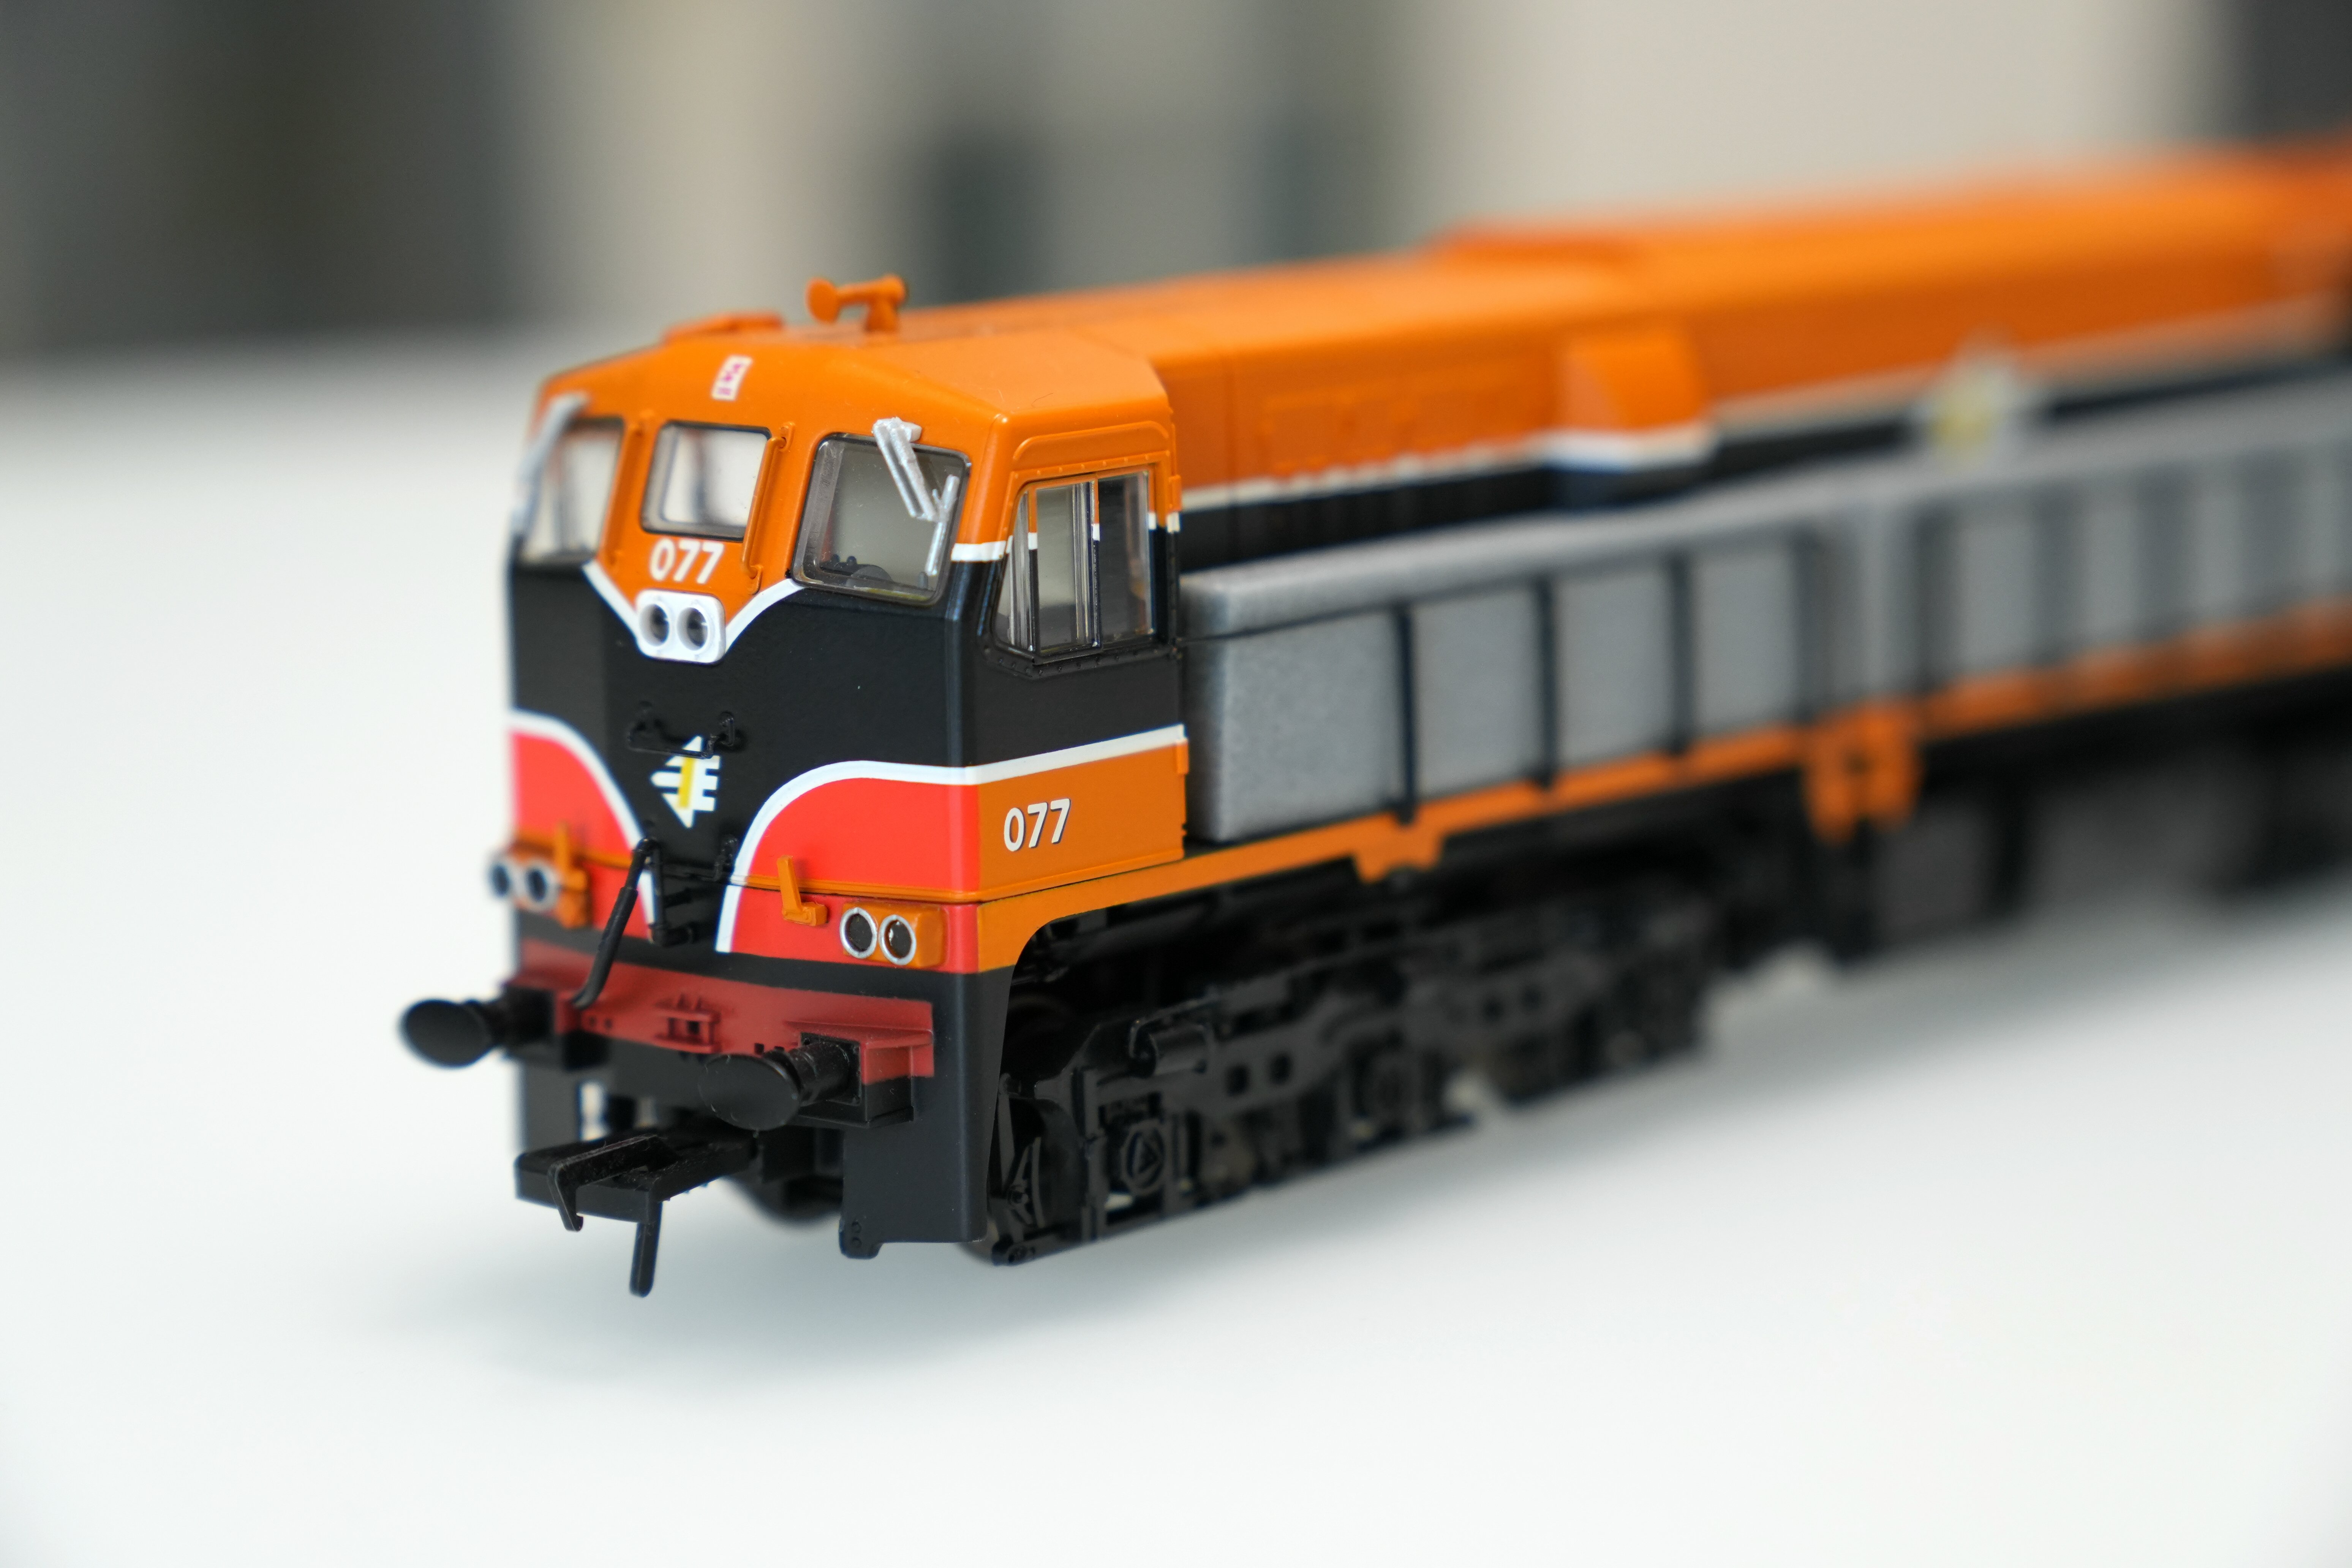
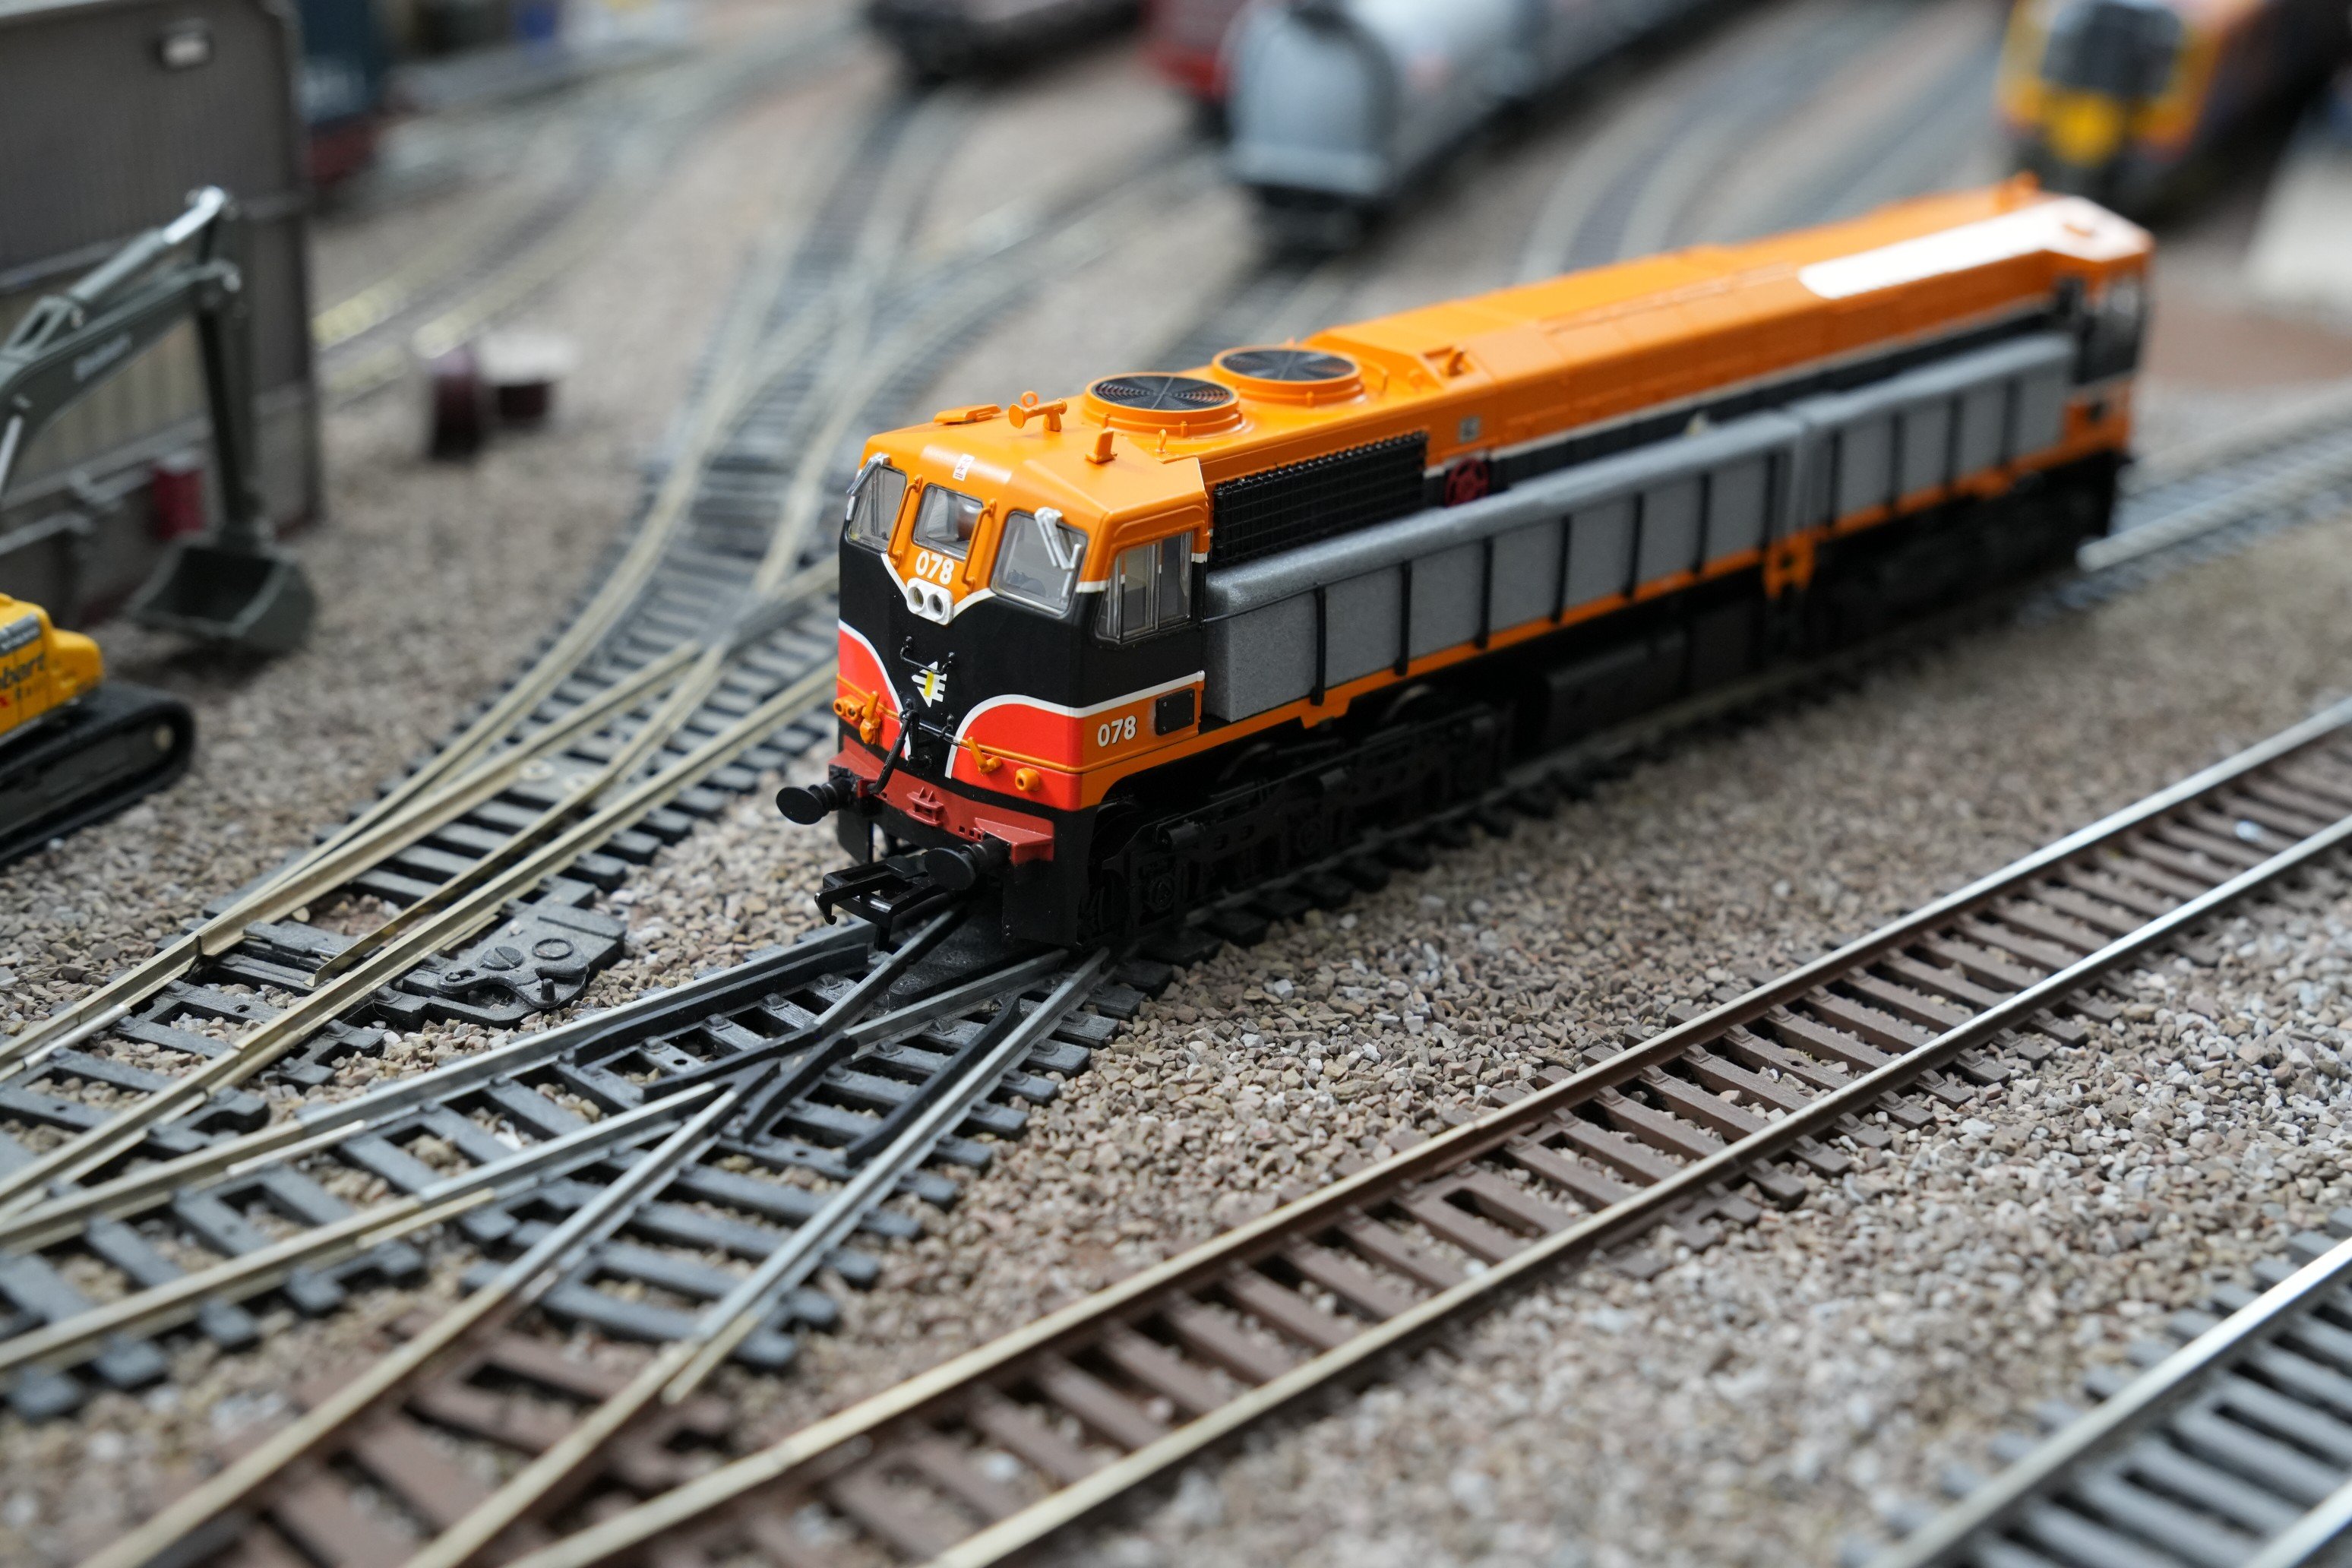
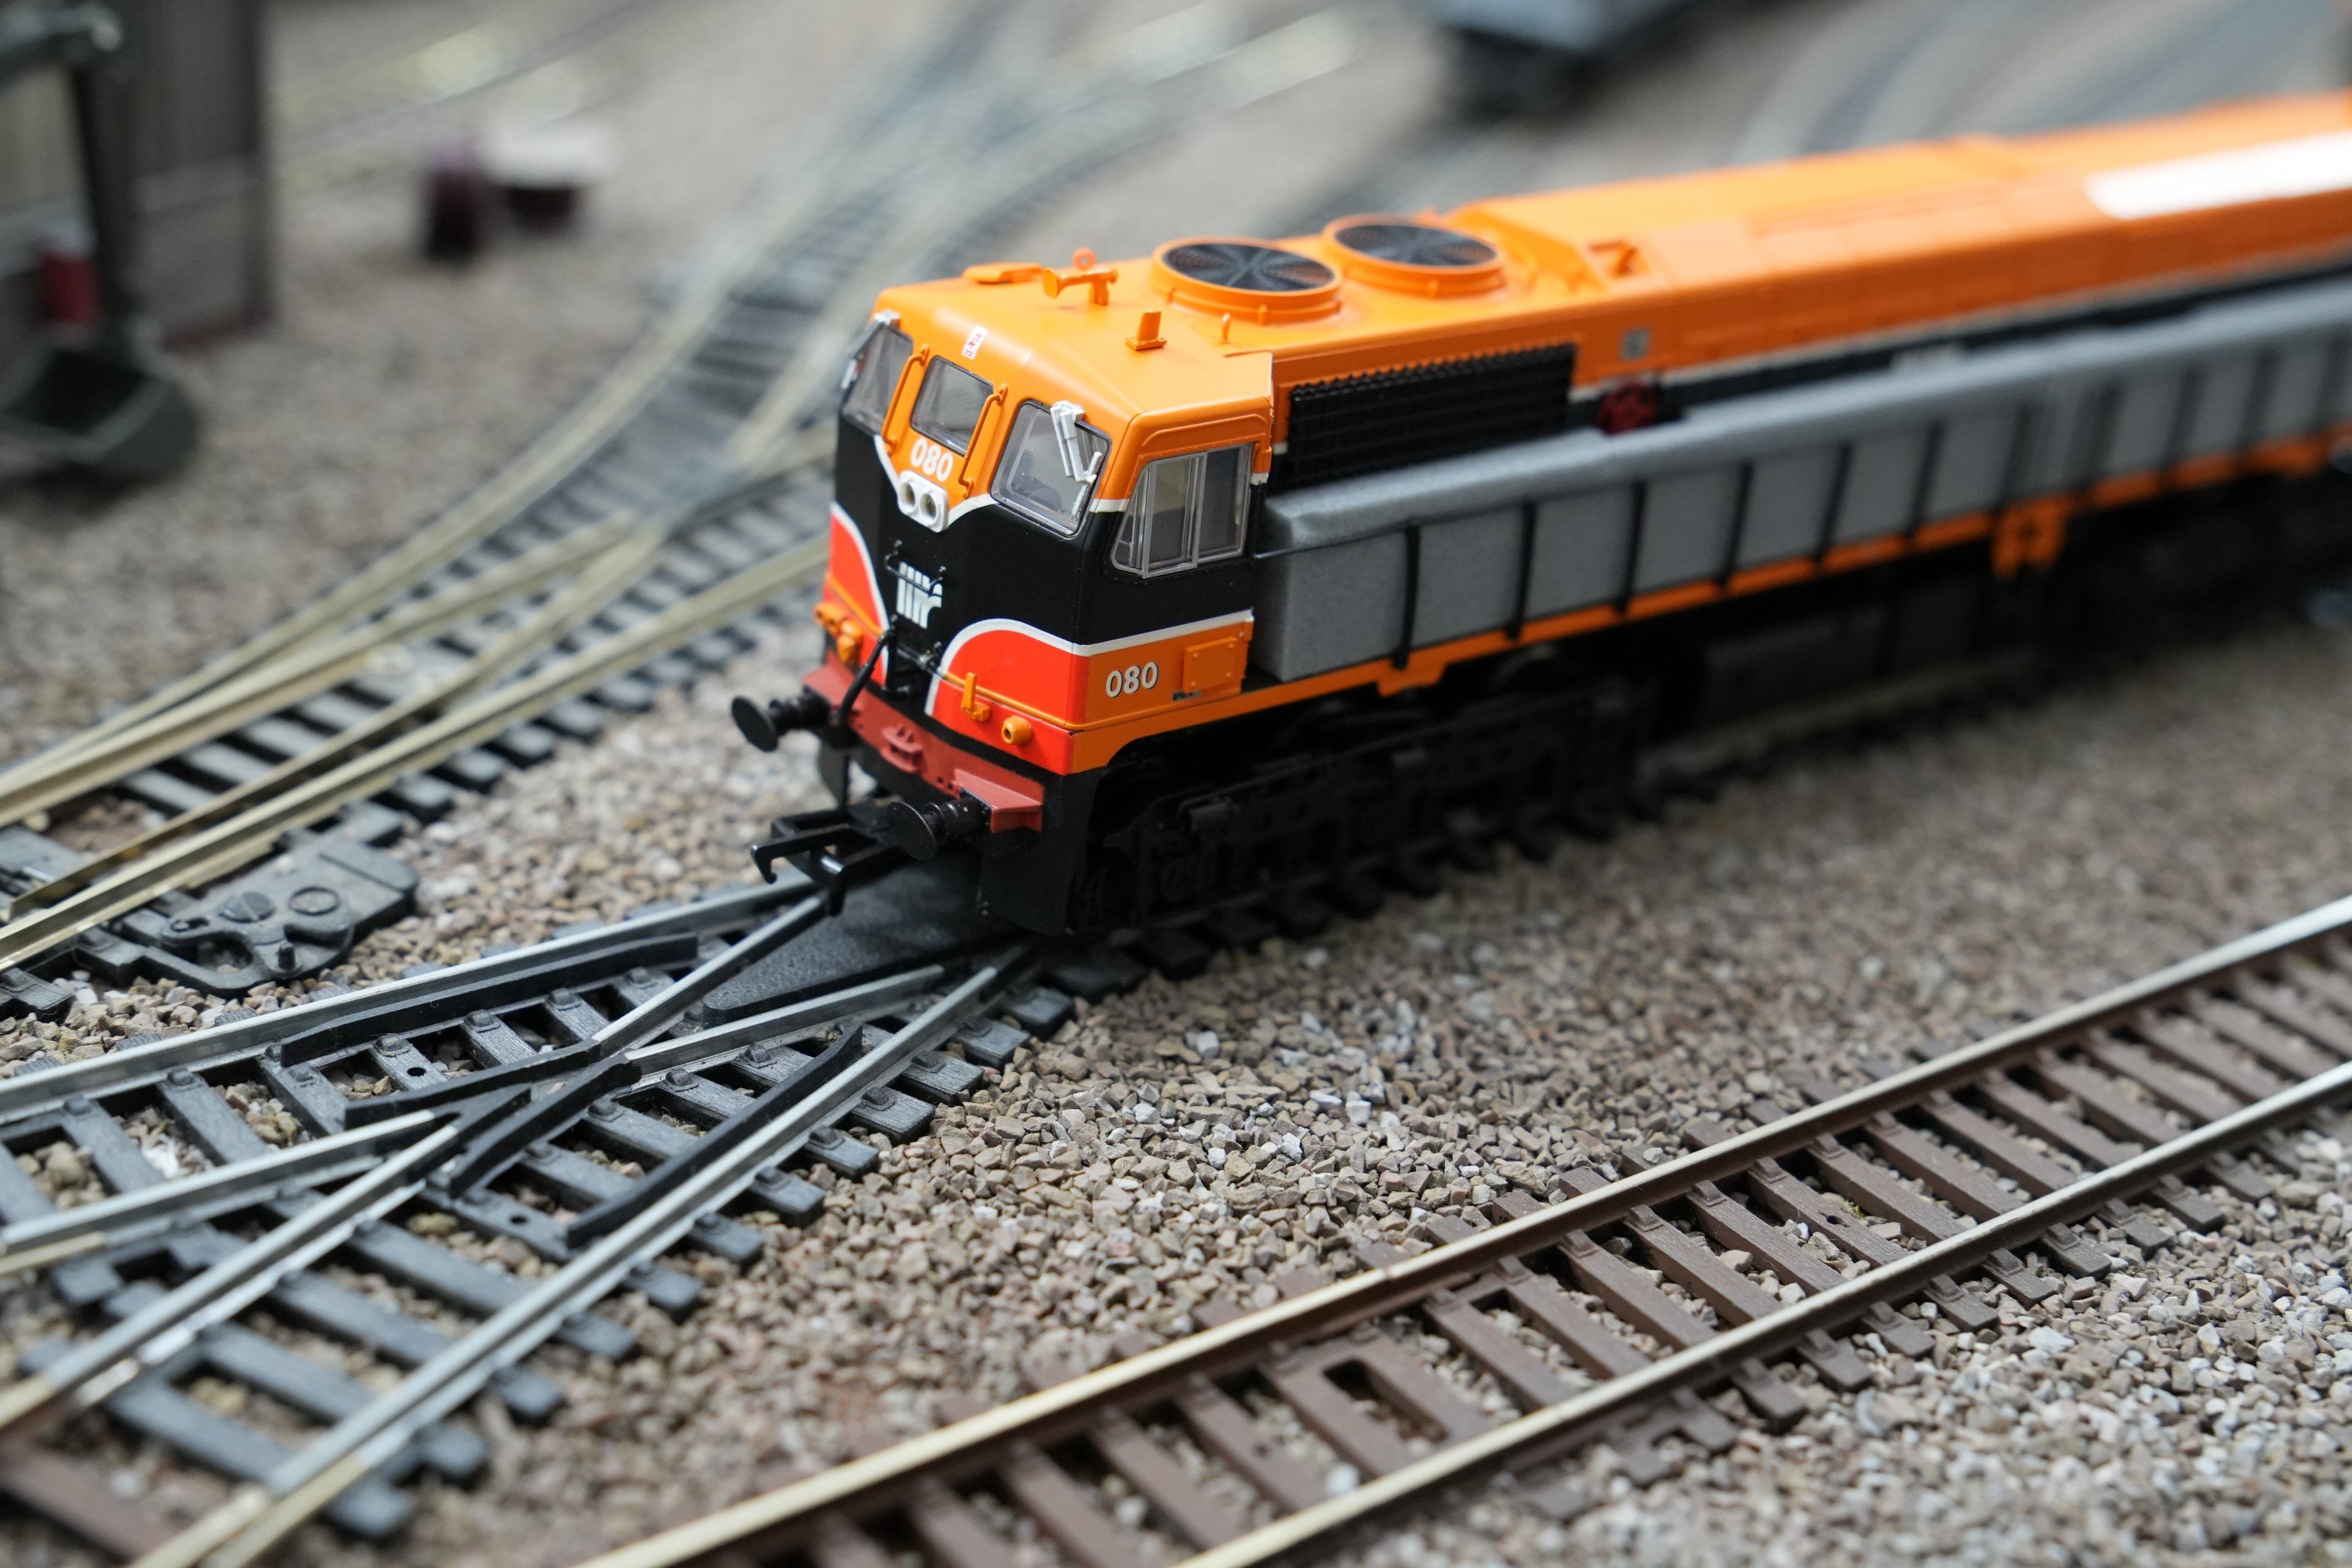
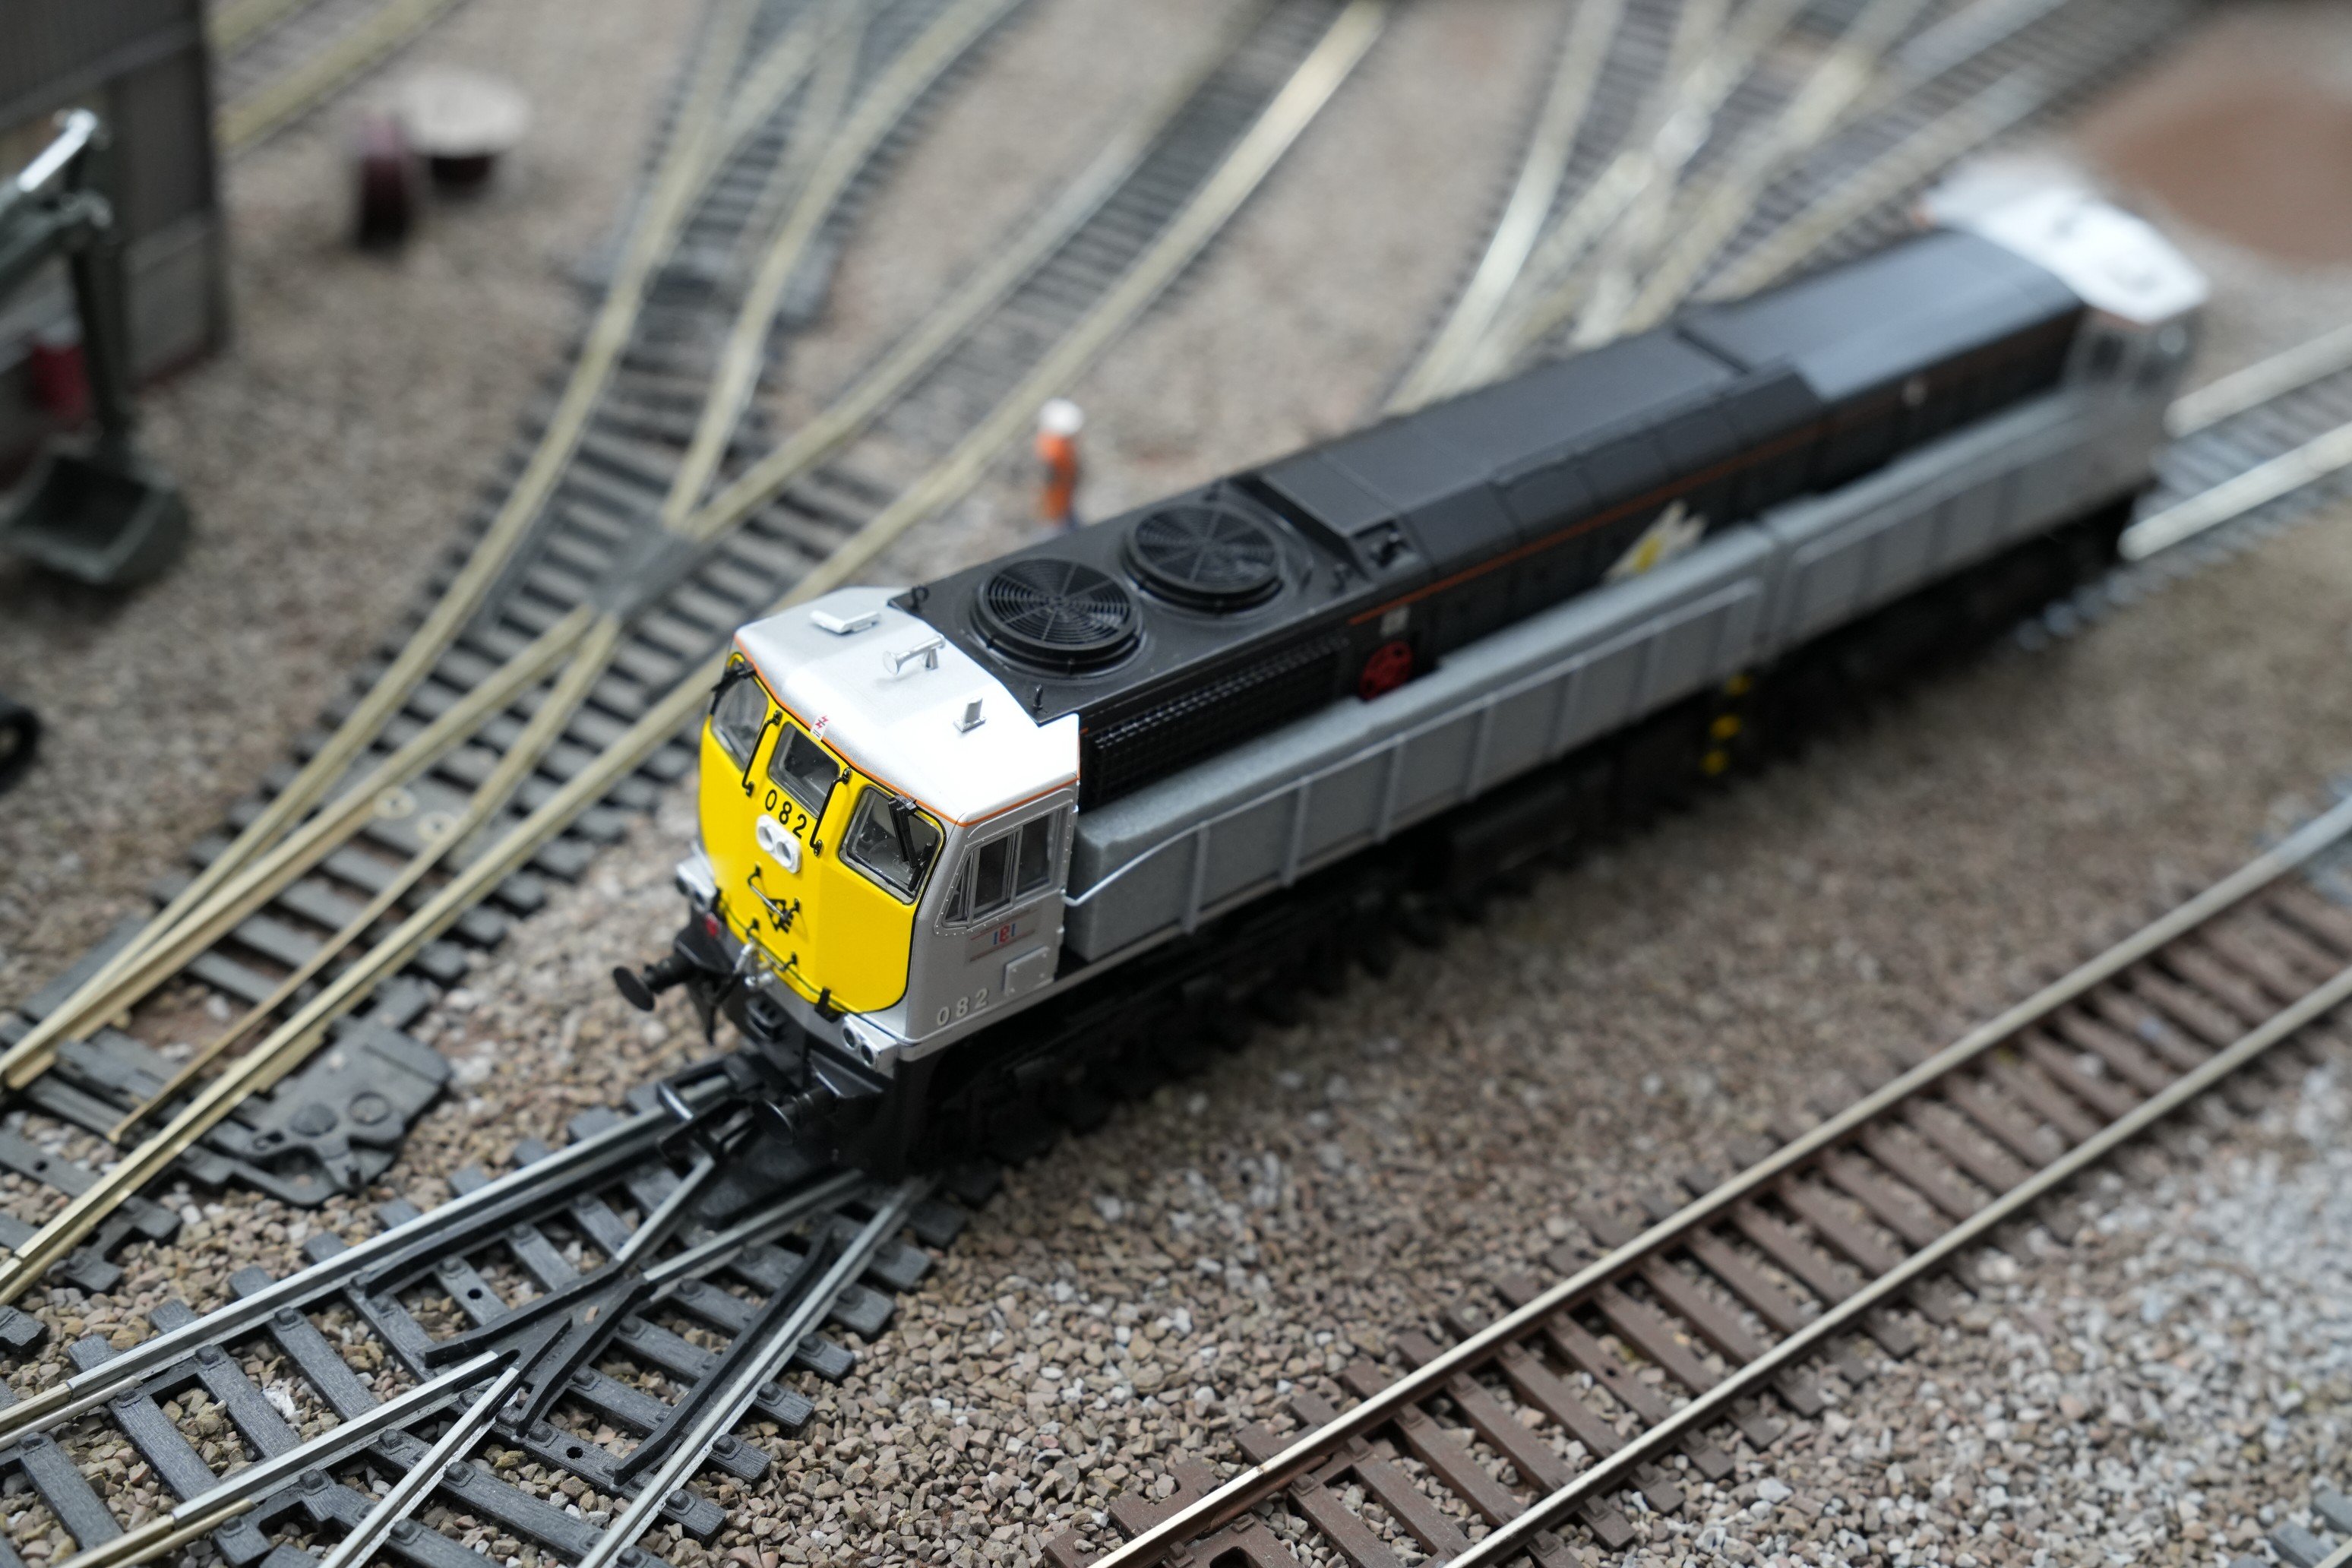
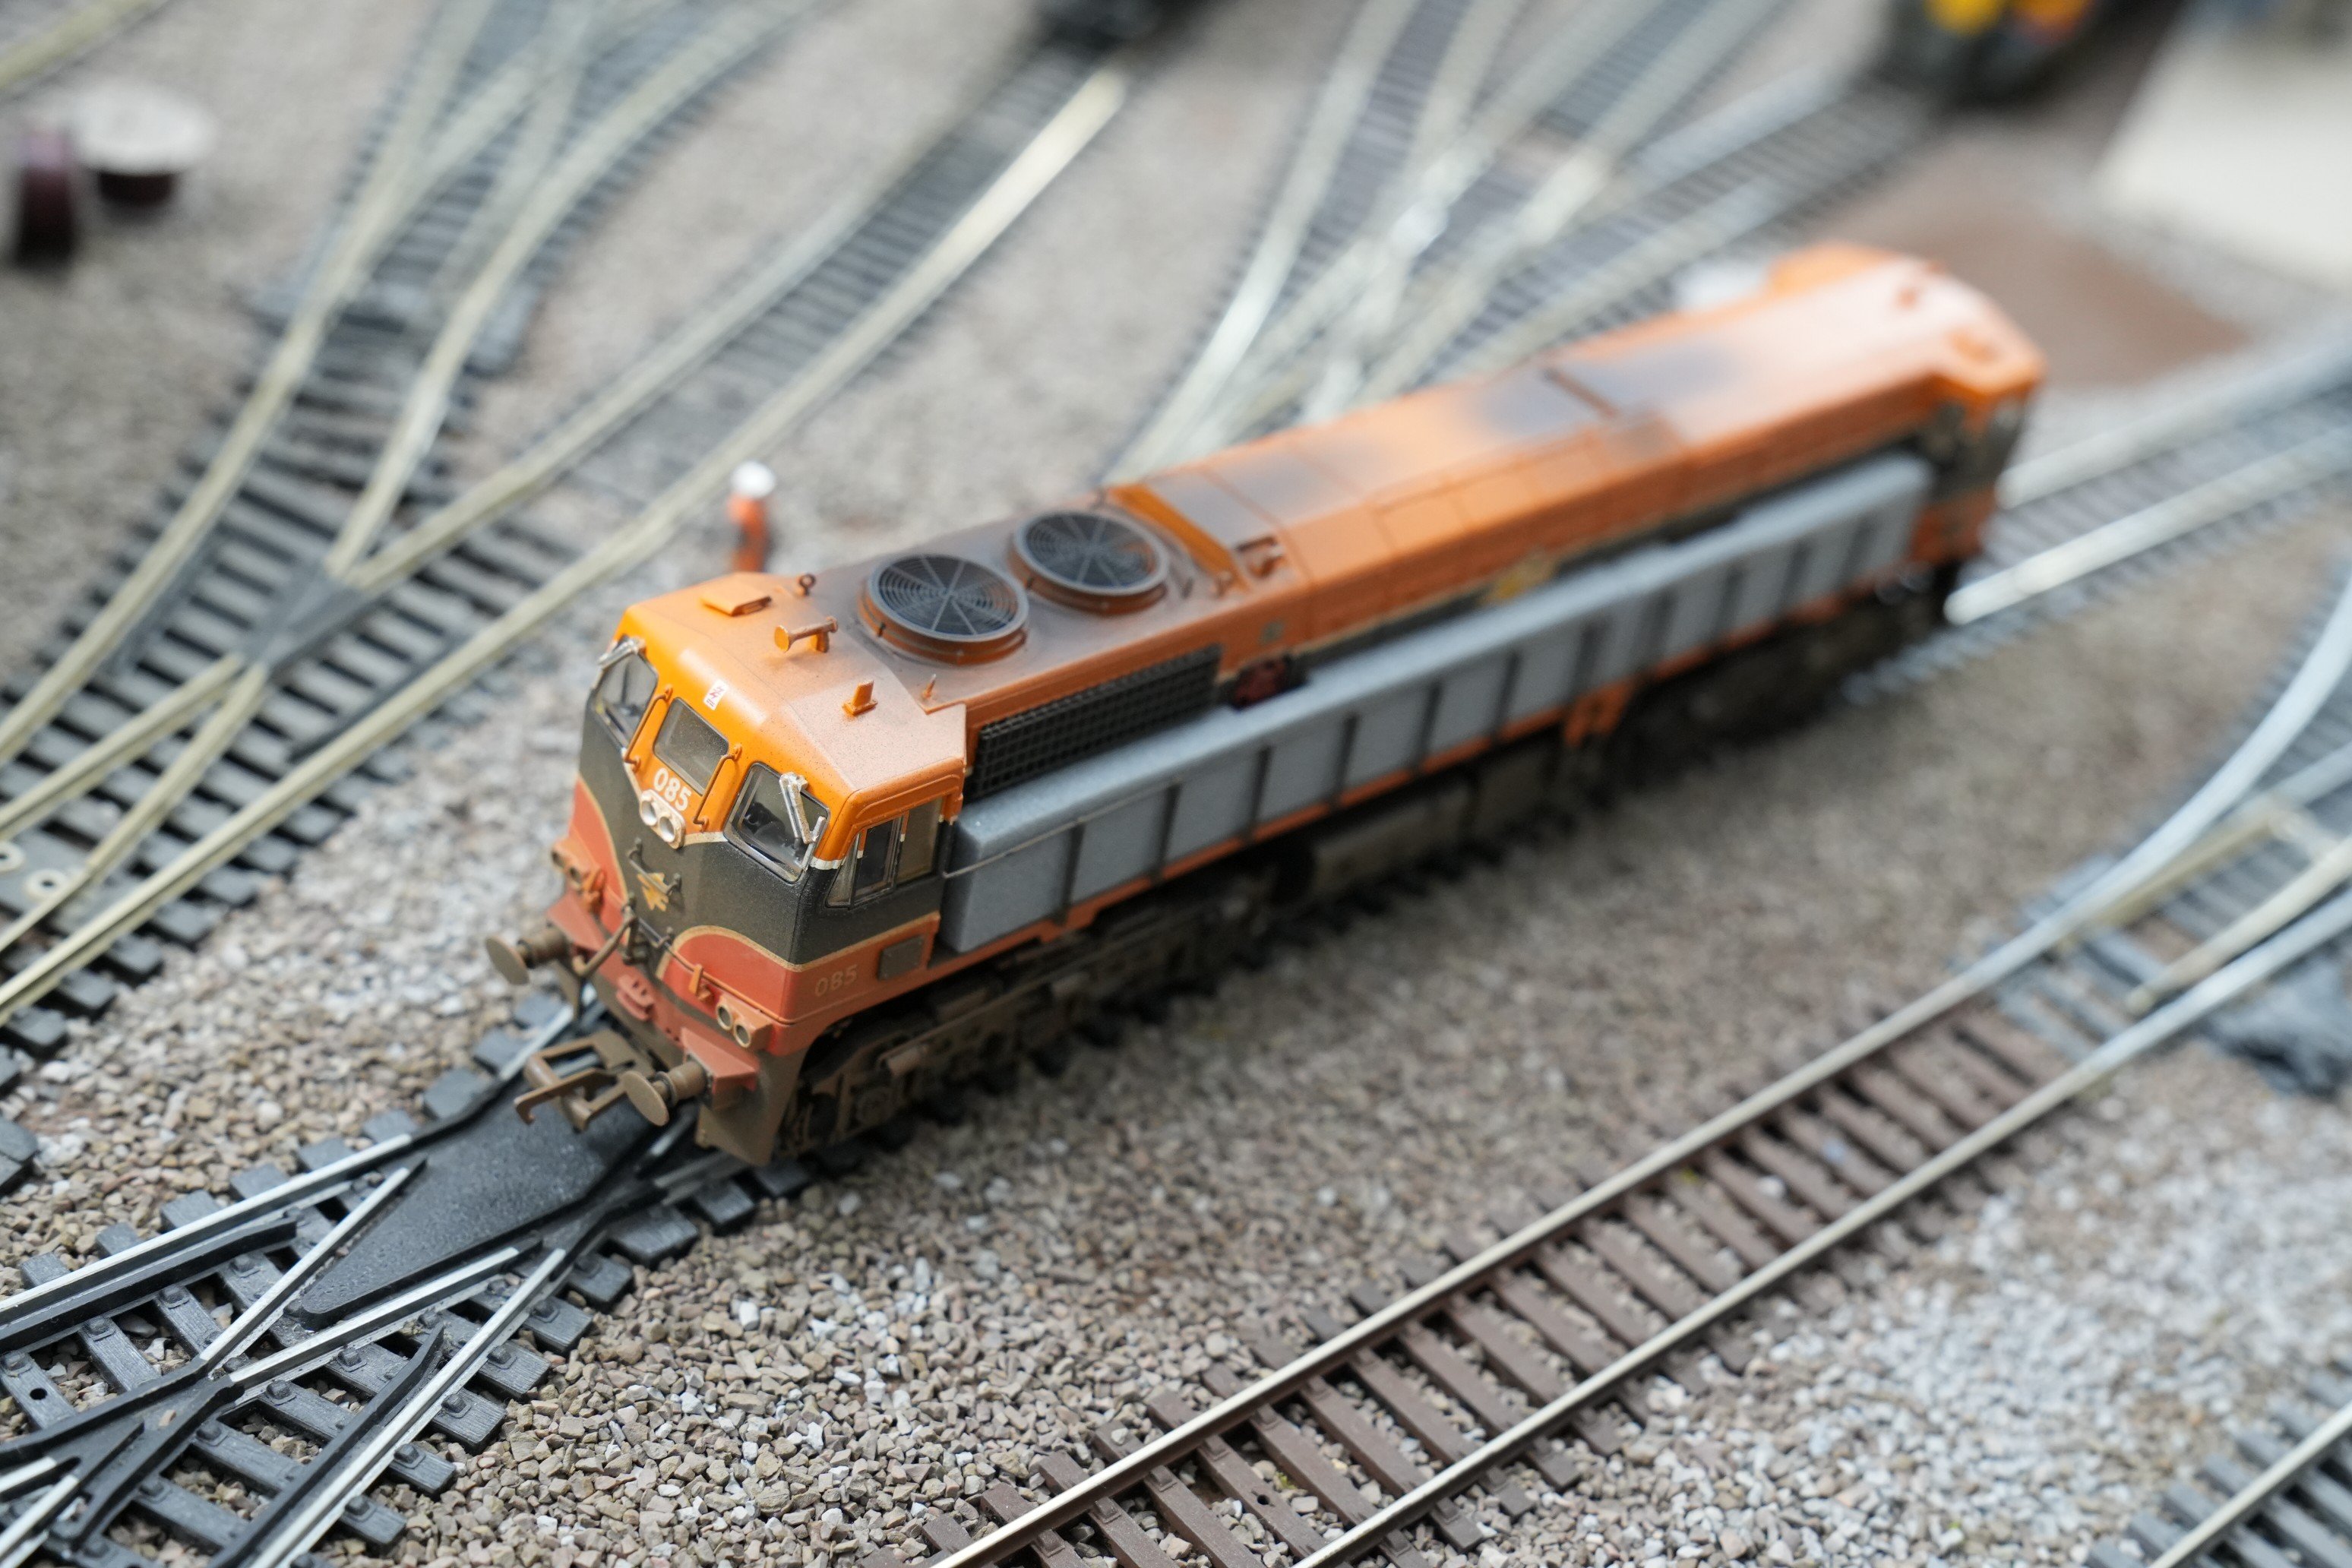
Hi folks, I'm engaging in a long overdue clear out of Irish and UK material. Below are the Irish items. I'll do a separate post for the UK material. All asking prices are in euro and exclude postage. I am based in Galway but I can arrange for items to be collected in Dublin between now and Christmas. Cash on collection or payment via Paypal if posting. Will update below as buyers come forward. Locomotives: MM7078 Class 071 IE Grey 7078 - 300 - Buyer MM0078 Class 071 IE or/blk 078 - 280 - Buyer MM0077 Class 071 IE or/blk 077 - 280 - Buyer MM0082 Class 071 IE Blk/Sil 082 - 250 - Buyer MM0085 Class 071 IE Orange 085 - 250 - Buyer MM0080 Class 071 IR or/blk 080 - 250 - Buyer MM0073 Class 071 IR or/blk 073 - 250 - Buyer MM0088 Class 071 CIE Supertrain 088 - 200 - Buyer All have been test run only and have not been run in. The first 7 are smooth and silent runners. MM0088 is one of two MM0088s I have - both were smooth but relatively noisy runners out of the box - relatively speaking as 071s are very quiet runners in general. I use the 2nd one with DCC Sound so it doesn't bother me and I'm hanging on to that one. Coaches: MM5202 CIE MkII Std - 55 - Buyer MM5224 CIE MkII Std - 55 - Buyer MM5102 CIE MkII 1st - 55 - Buyer MM5152 CIE MkII Comp - 55 - Buyer MM5223 CIE MkII Std - 55 - Buyer MM5201 CIE MkII Std - 55 - Buyer MM5151 CIE MkII Composite - 55 - Buyer MM5101 CIE MkII 1st - 55 - Buyer MM5604 CIE MKII EGV - 65 - Buyer MM5403 CIE MkII Diner - 65 - Buyer All of the above have been little used and half never run at all since they were purchased. A post on the UK material will follow on Wed. I'll be offline most of Tues so apologies if I don't get back on any PMs until Wed.
10 points
-
Some painting, lining and decals today for the Bredin Parcels/Luggage Van and the Corridor. The window frames are a pain in the arse to paint! I'm thinking of painting the other side of these in the later light green to have "more" coaches for little effort!
10 points
-
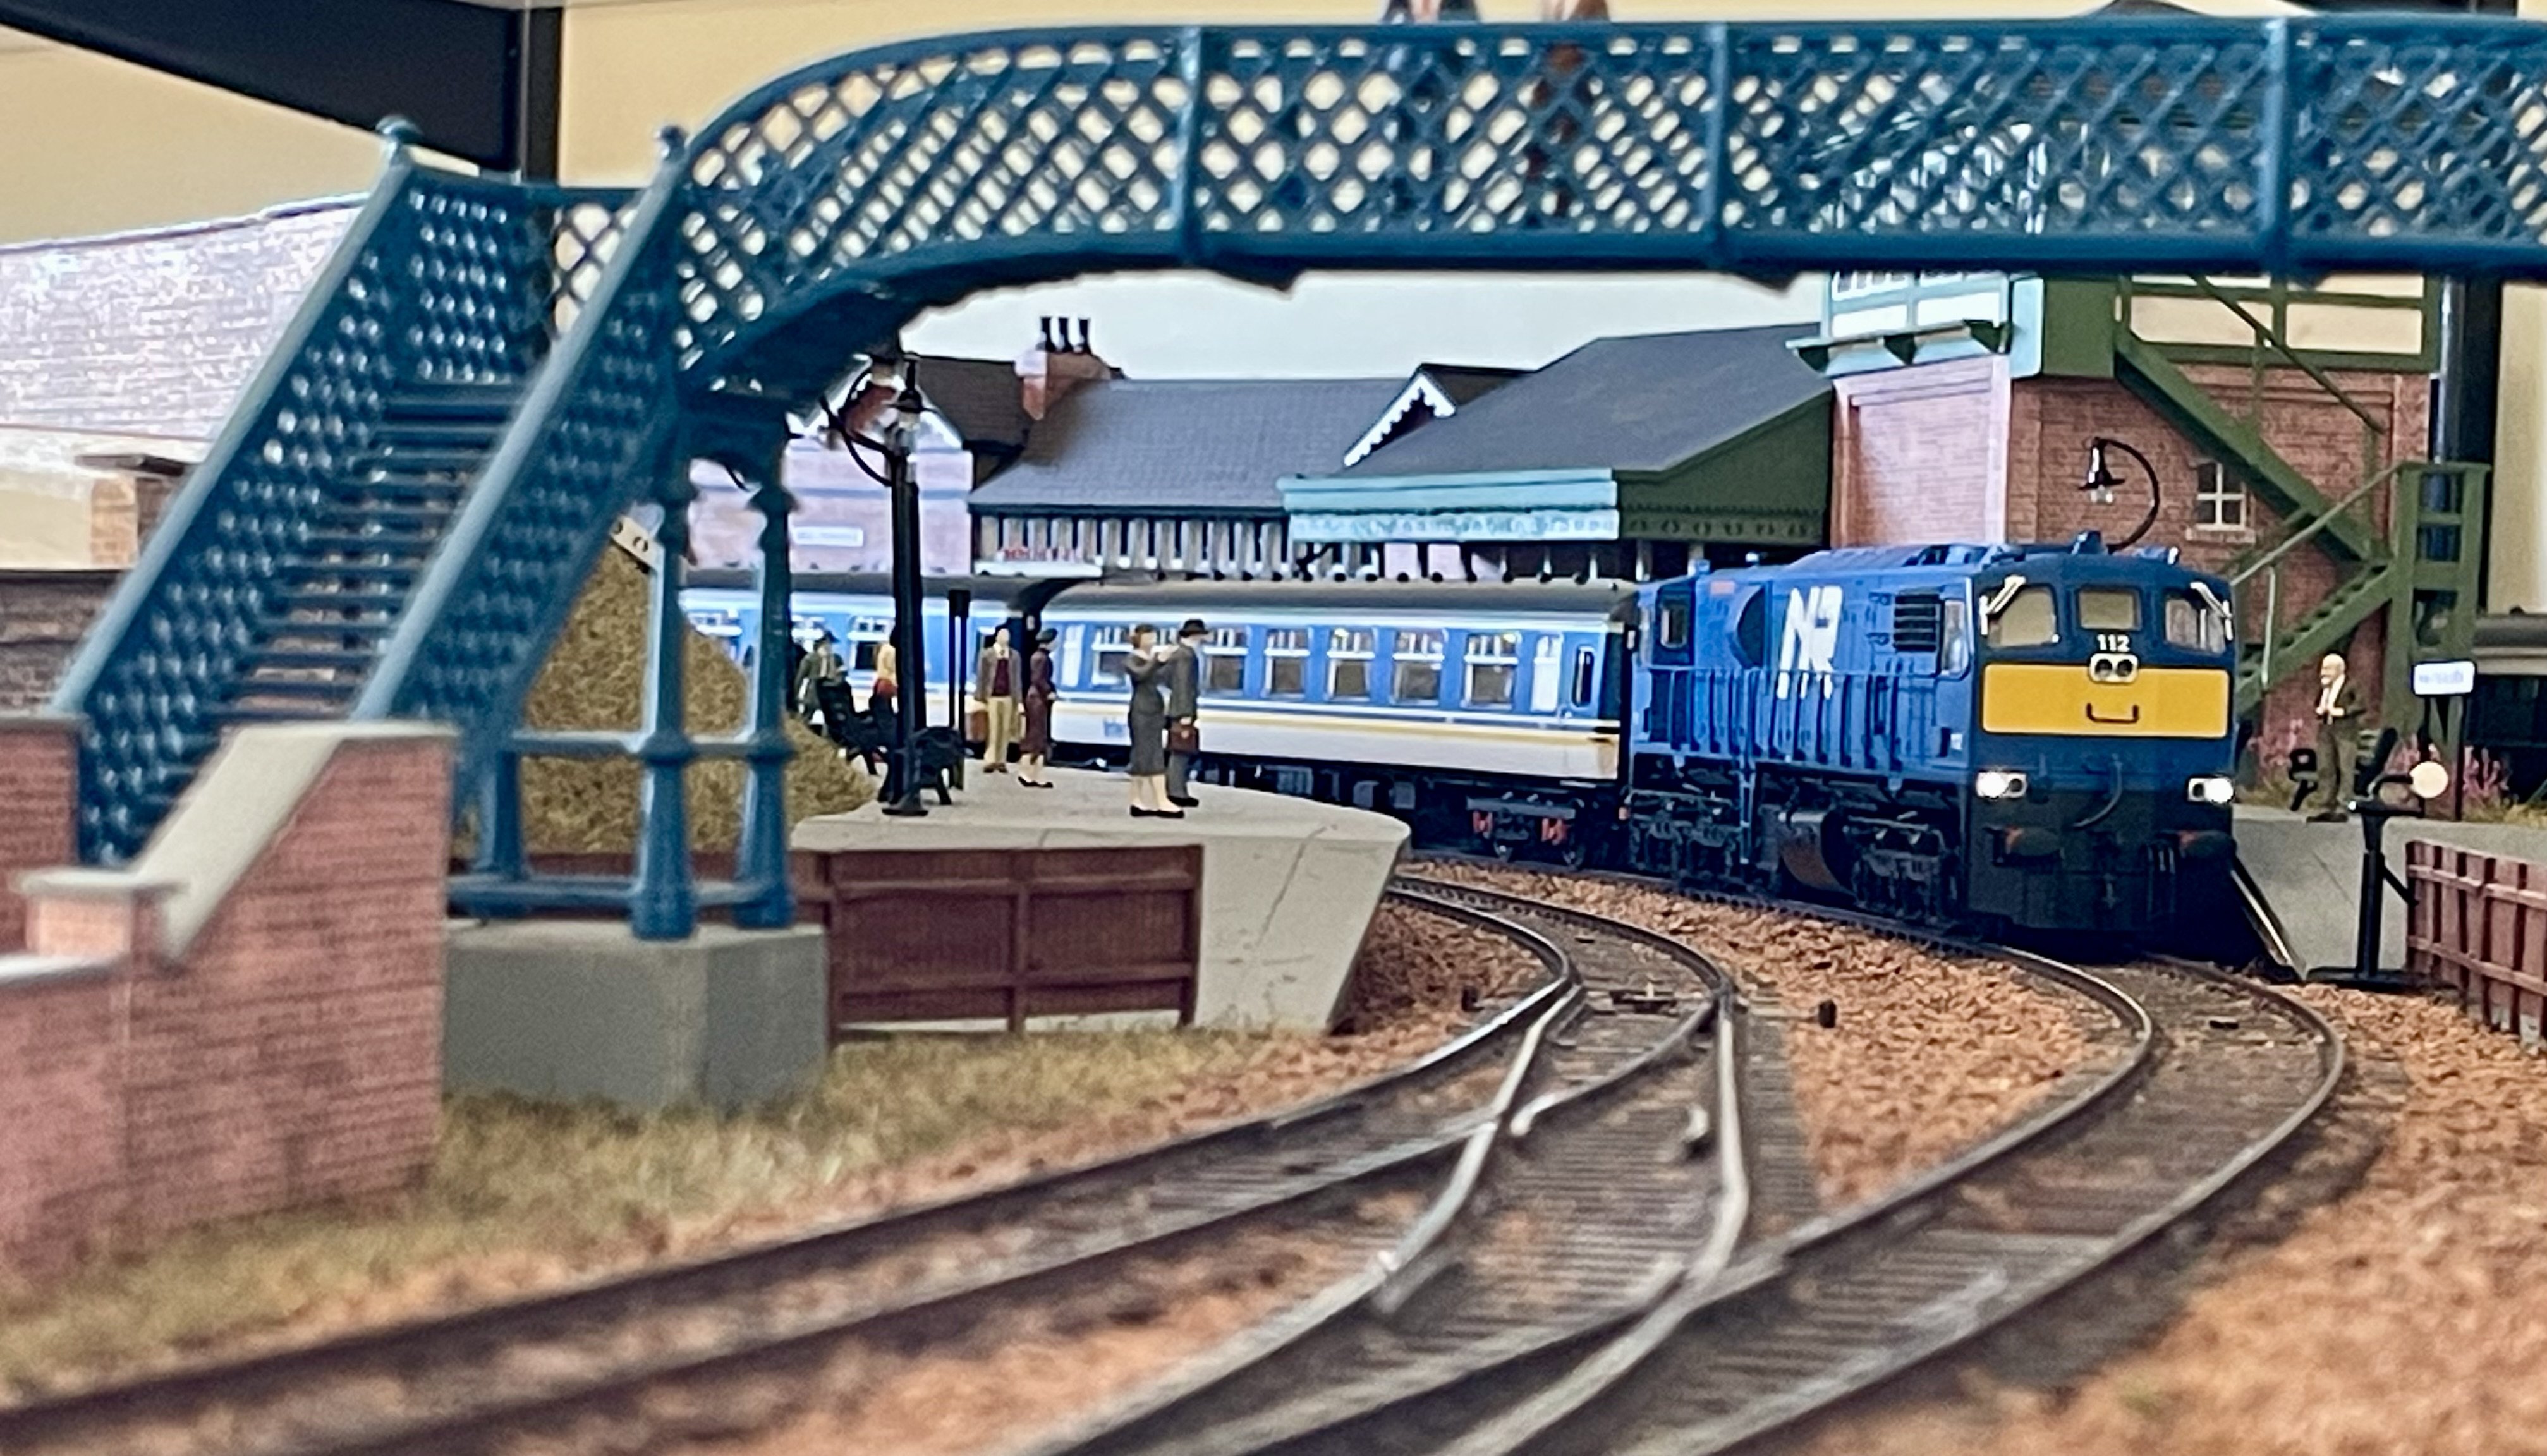
No.111 “Great Northern” joins the party. Cheers Darius
9 points
-
Won’t matter as they are brass so you’ll have to paint it yourself anyway - is not like the card preprinted kits. I have made up a J26 and 2 MGW coaches. Straightforward as David says / they are also designed for 32mm primarily rather than 36.75, and most of my building heartache came from the 5’3 bit!
9 points
-
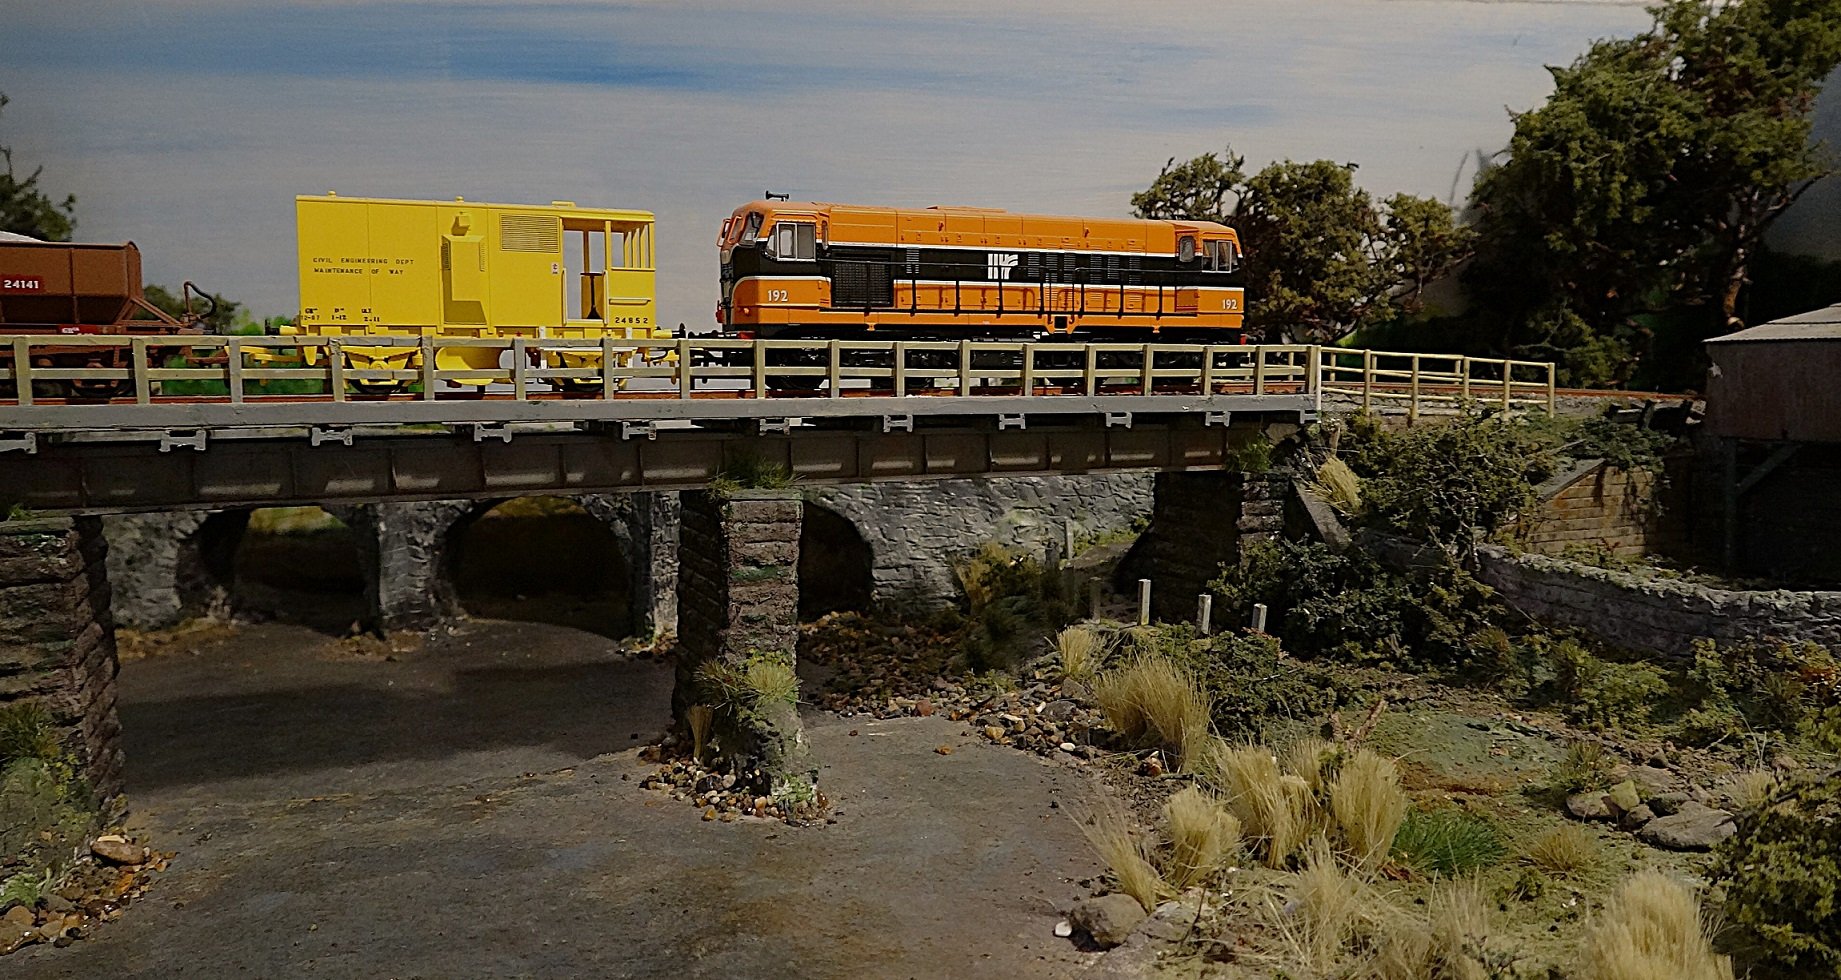
I havn't been able to do much work on the layout this year, however I recently acquired a Rapido Highland Railway Jones Goods which I photographed for the records and took the opportunity to run a ballast headed by 192. I have done a little work on the scenery for the extension to the left of the bridge but I'm not really up for it at the moment. Roll on 2026!
9 points
-
I've been trying to resist that temptation David. Kilmore needs some attention to get it properly operational, I have half finished wagons that need doing and other bits of rolling stock I'd like to have a go at. But then again....
8 points
-
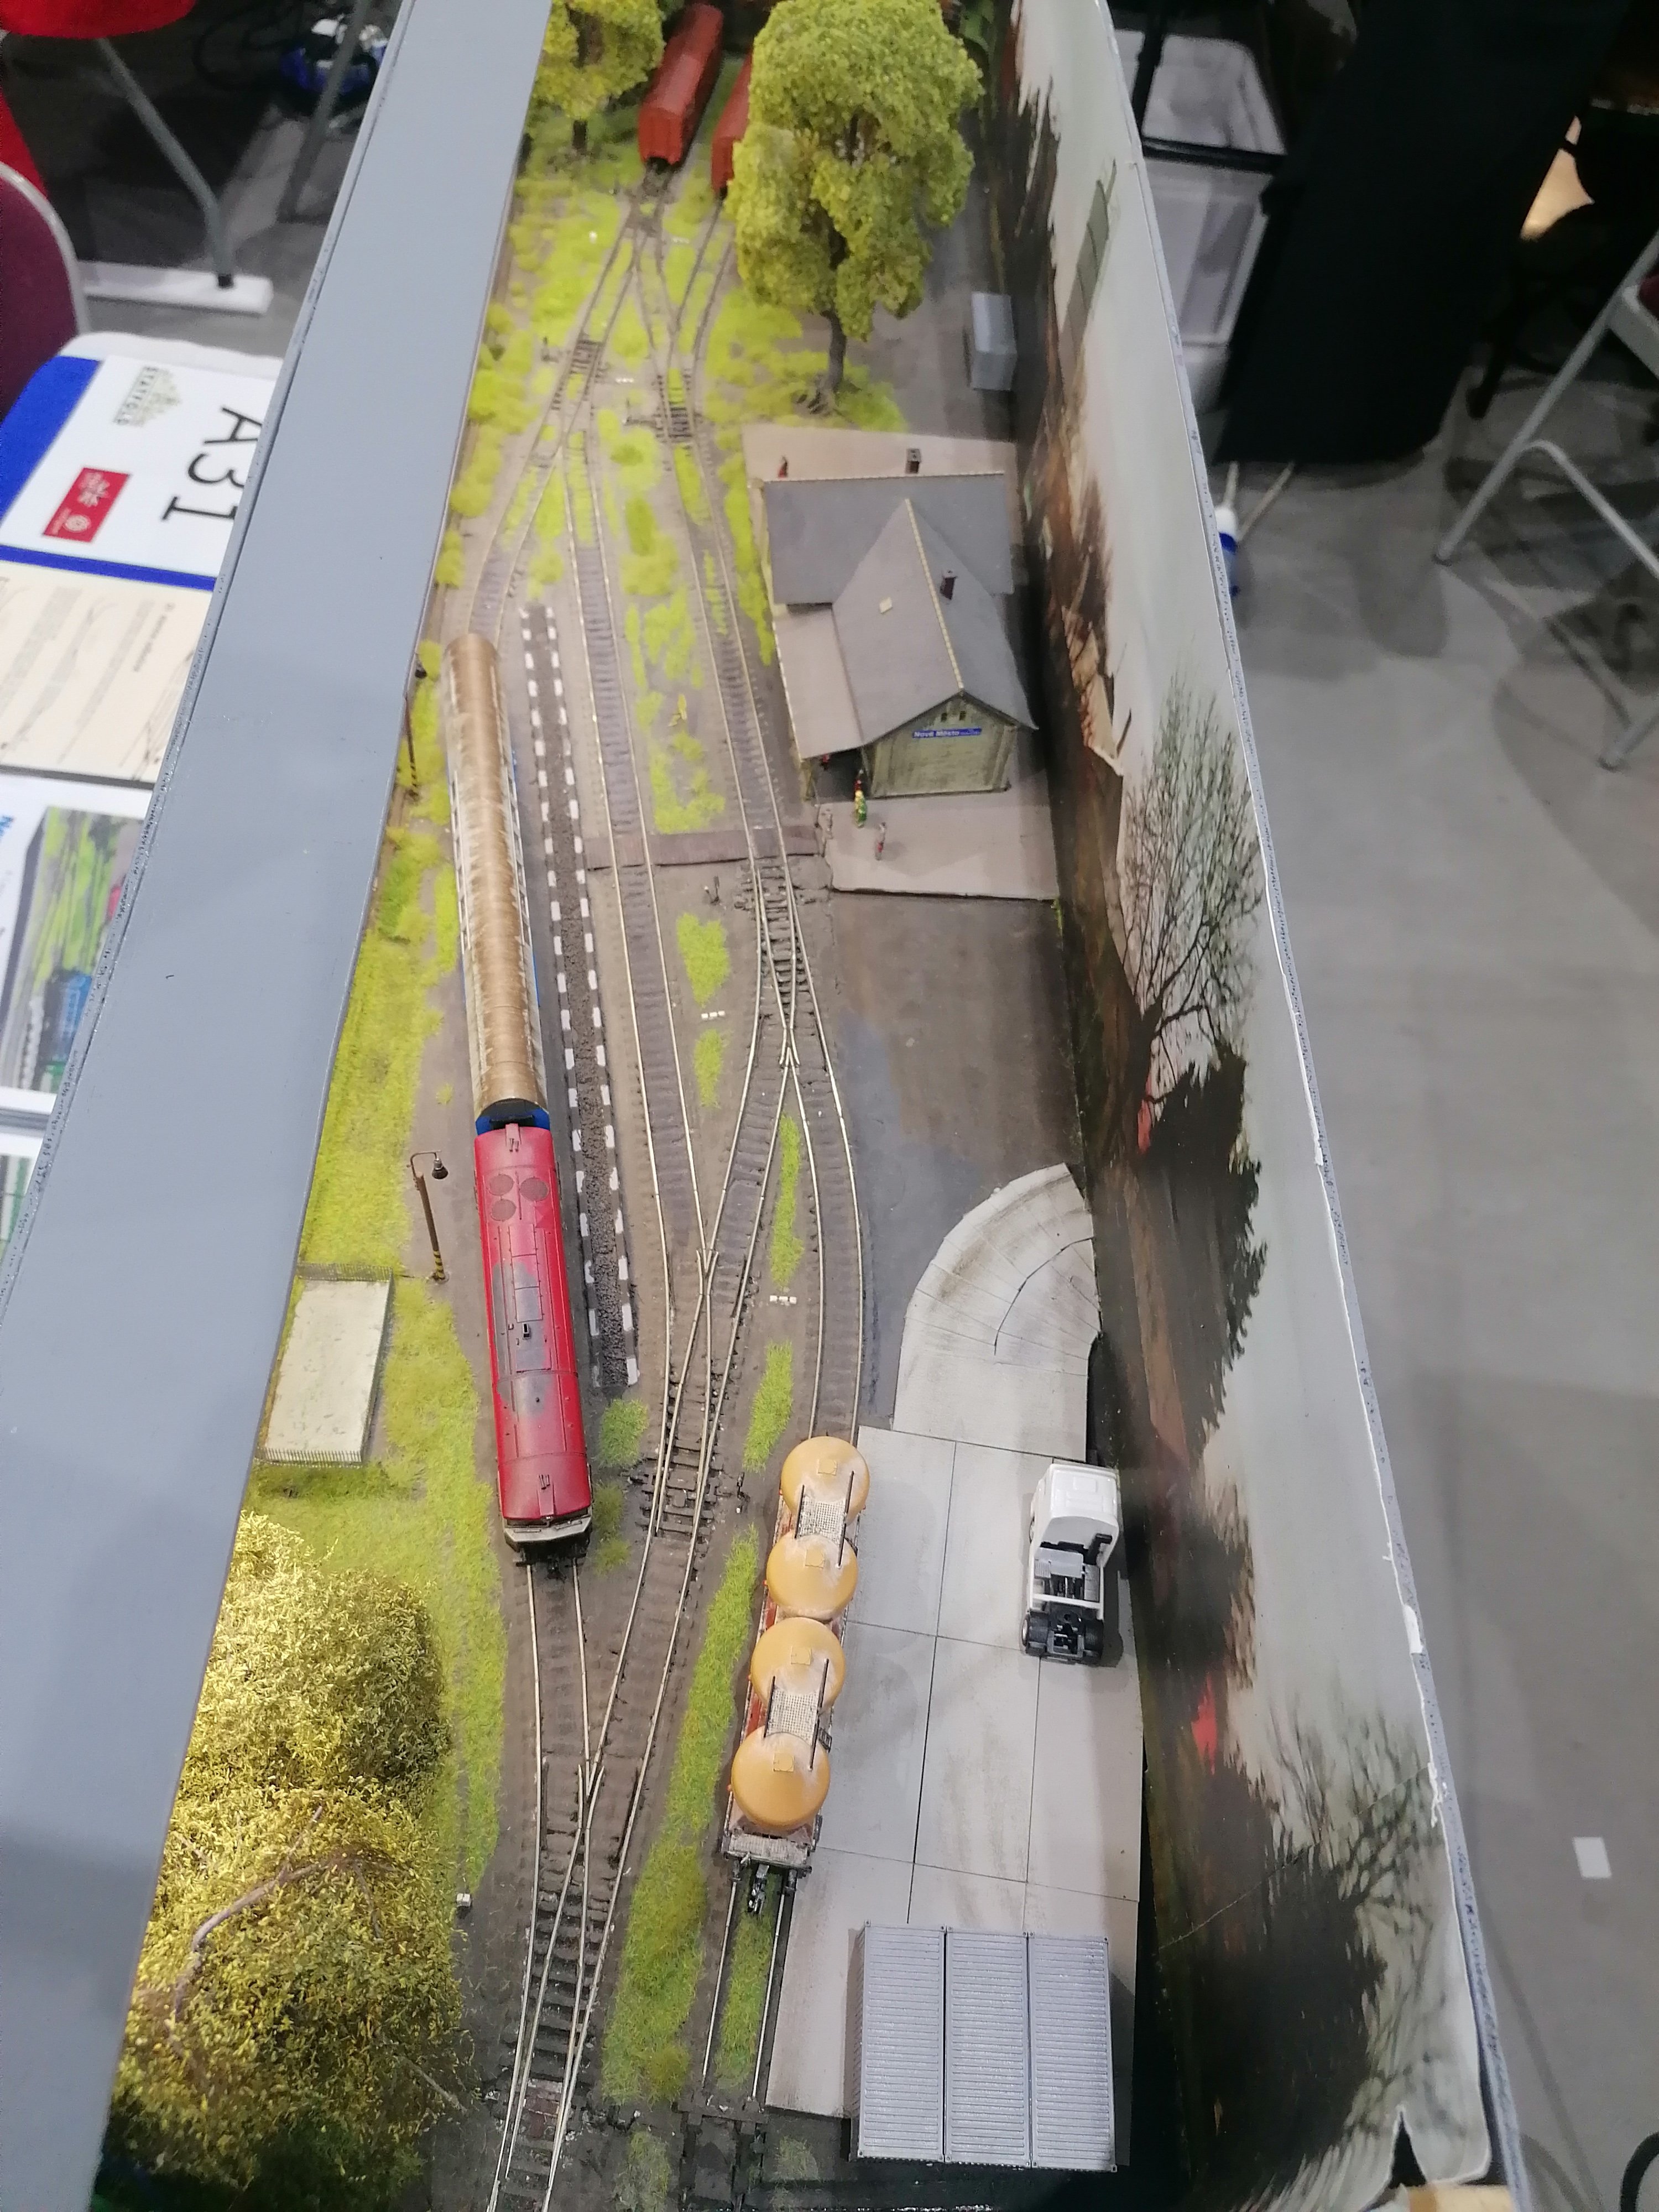
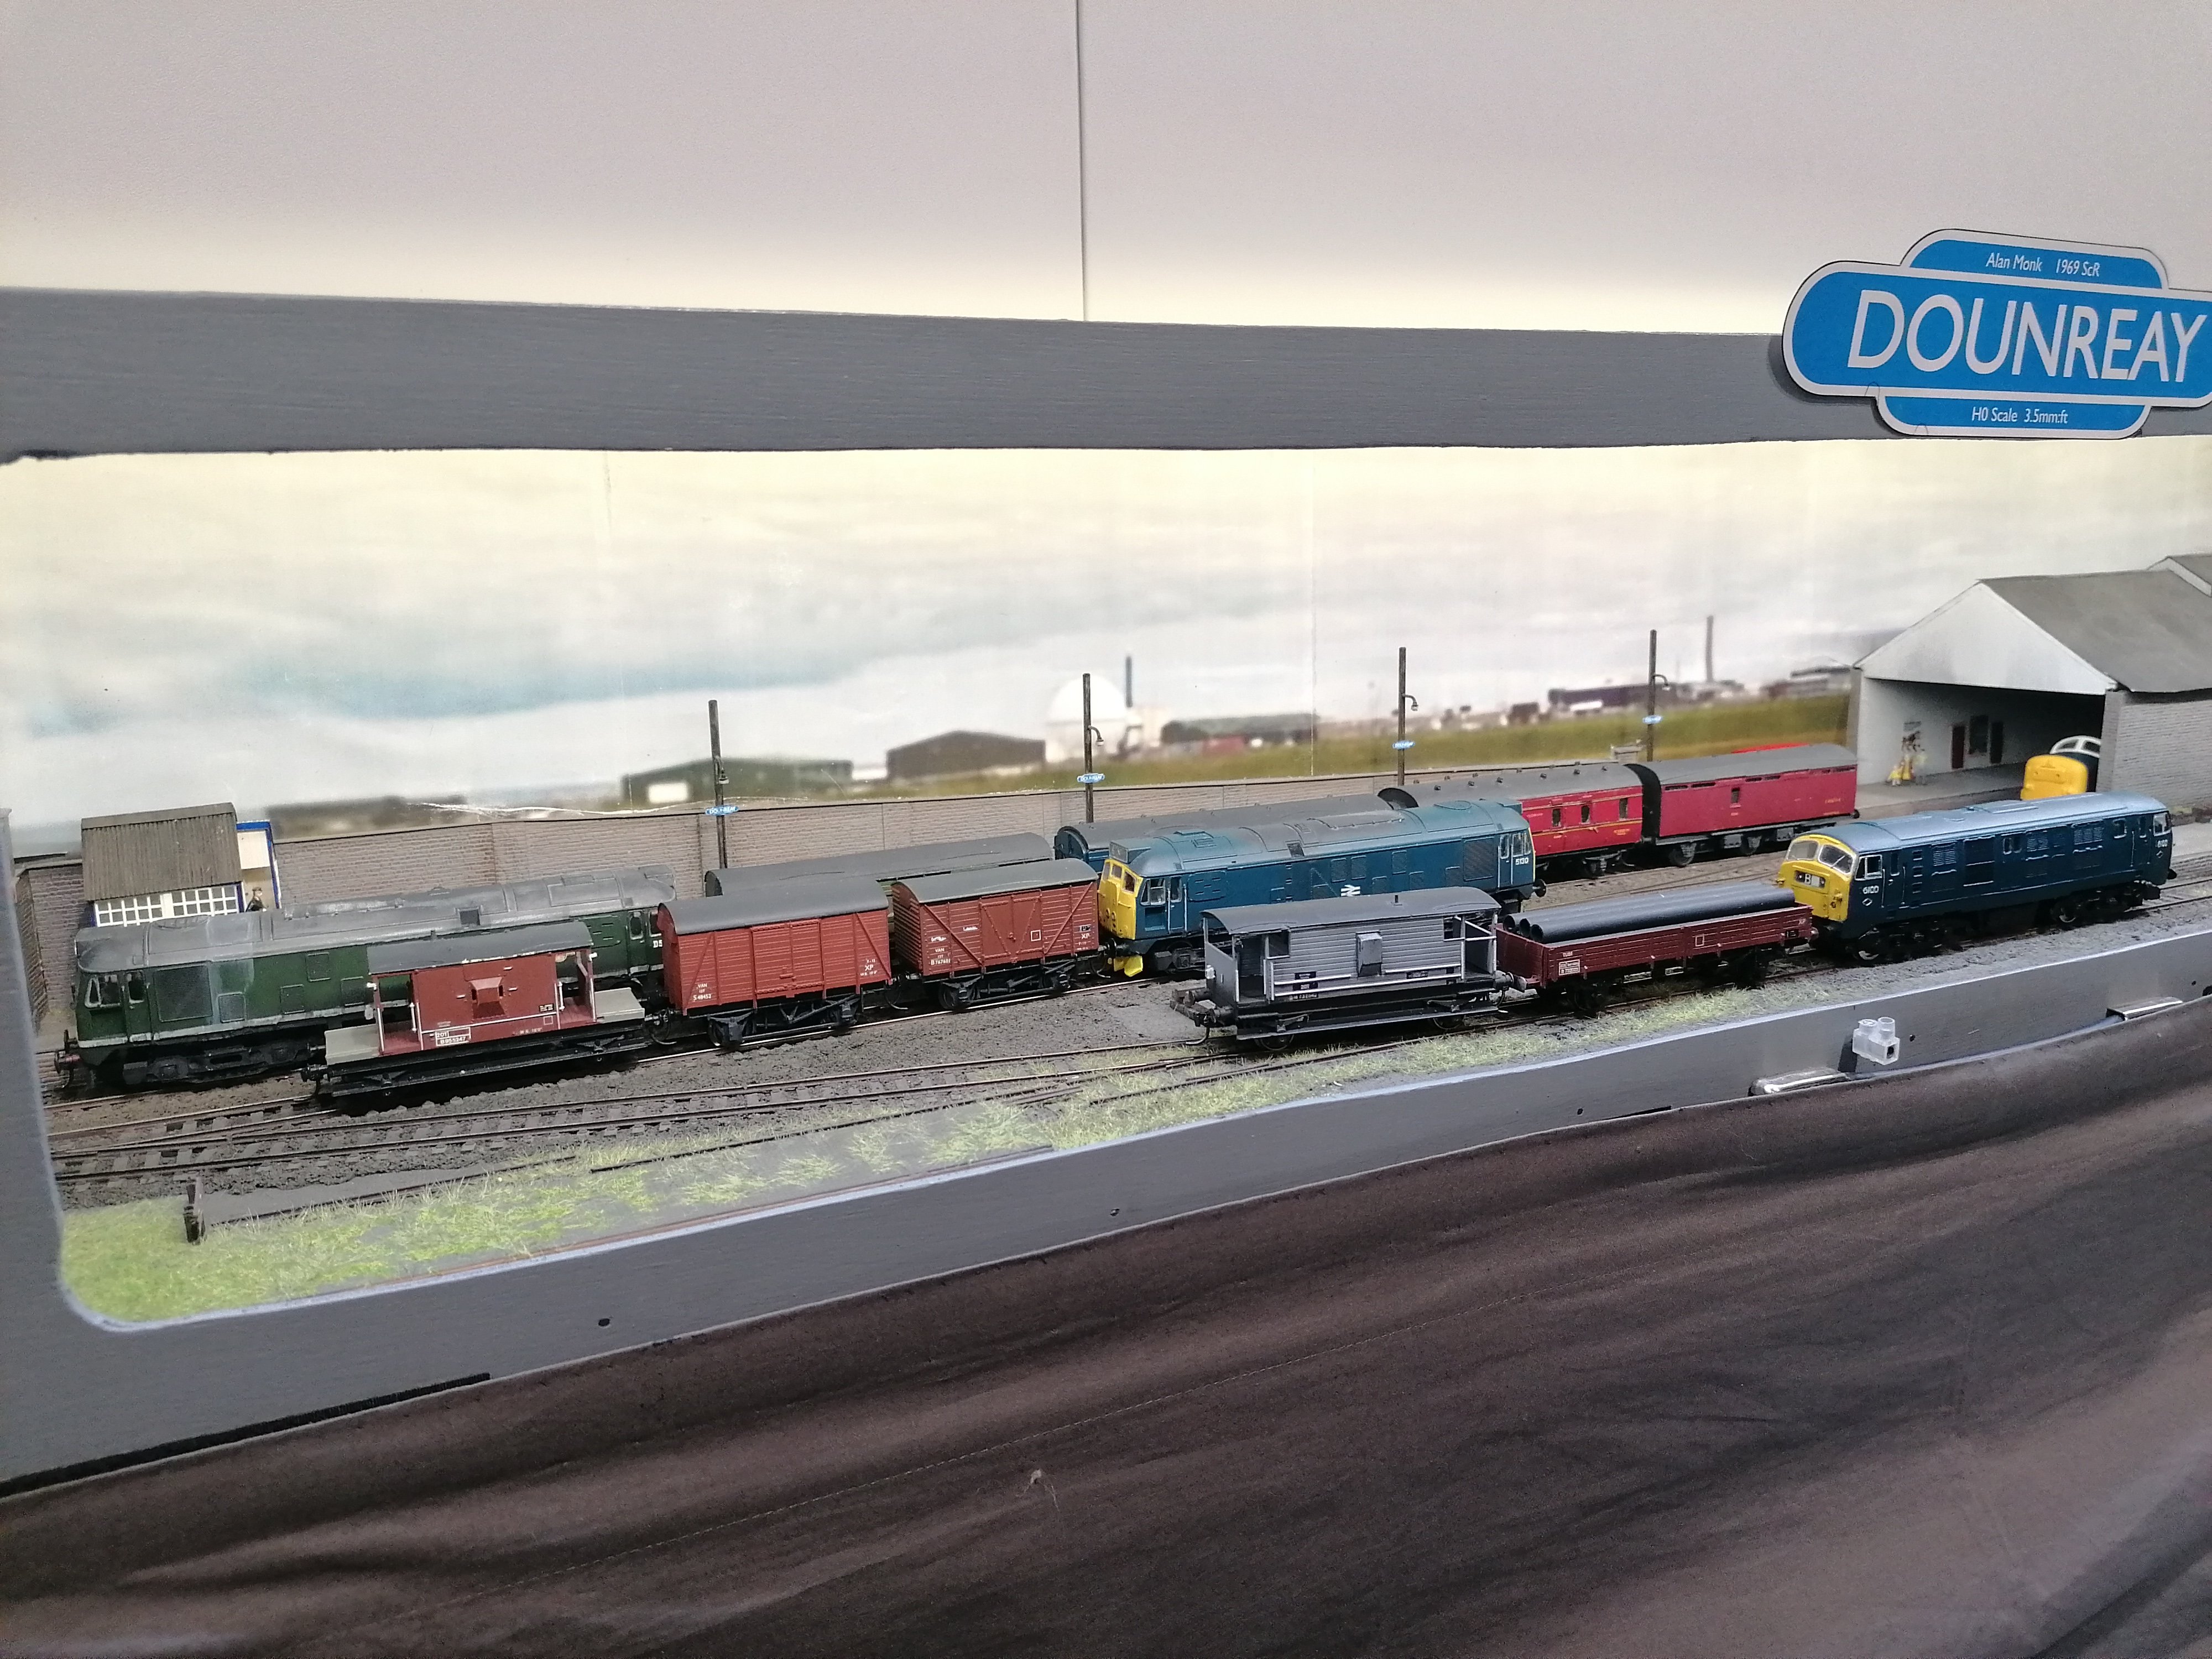
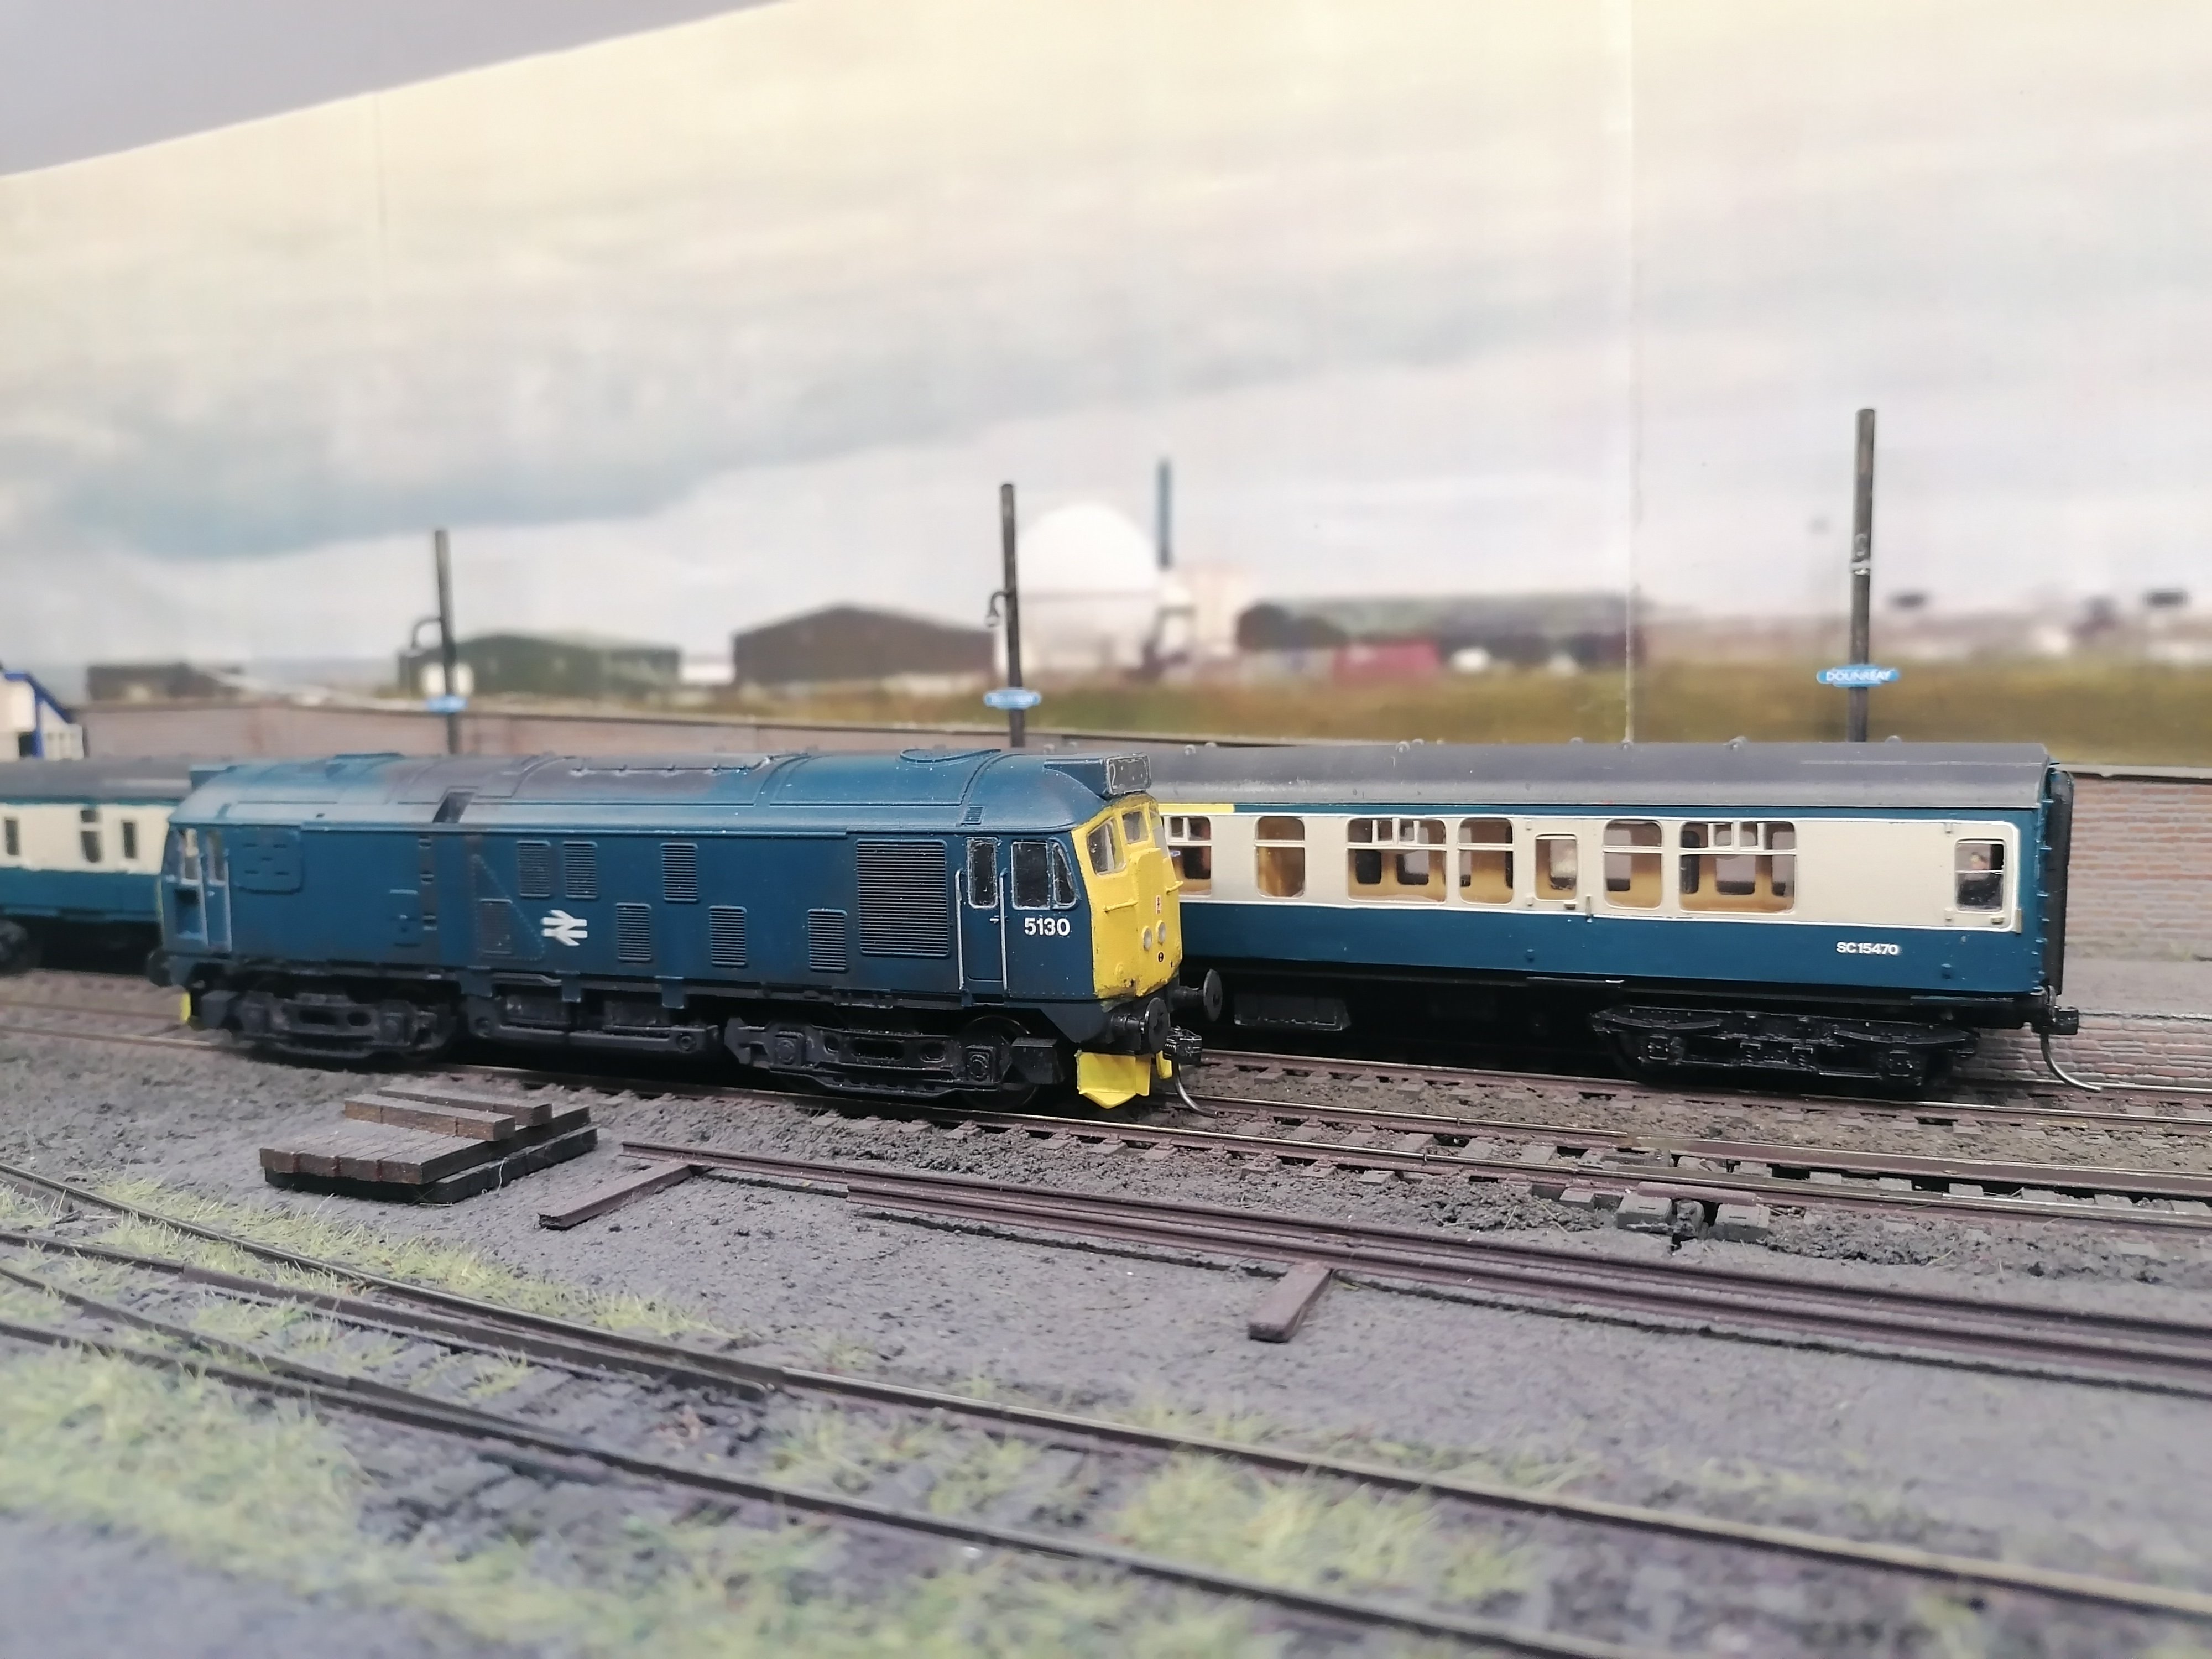
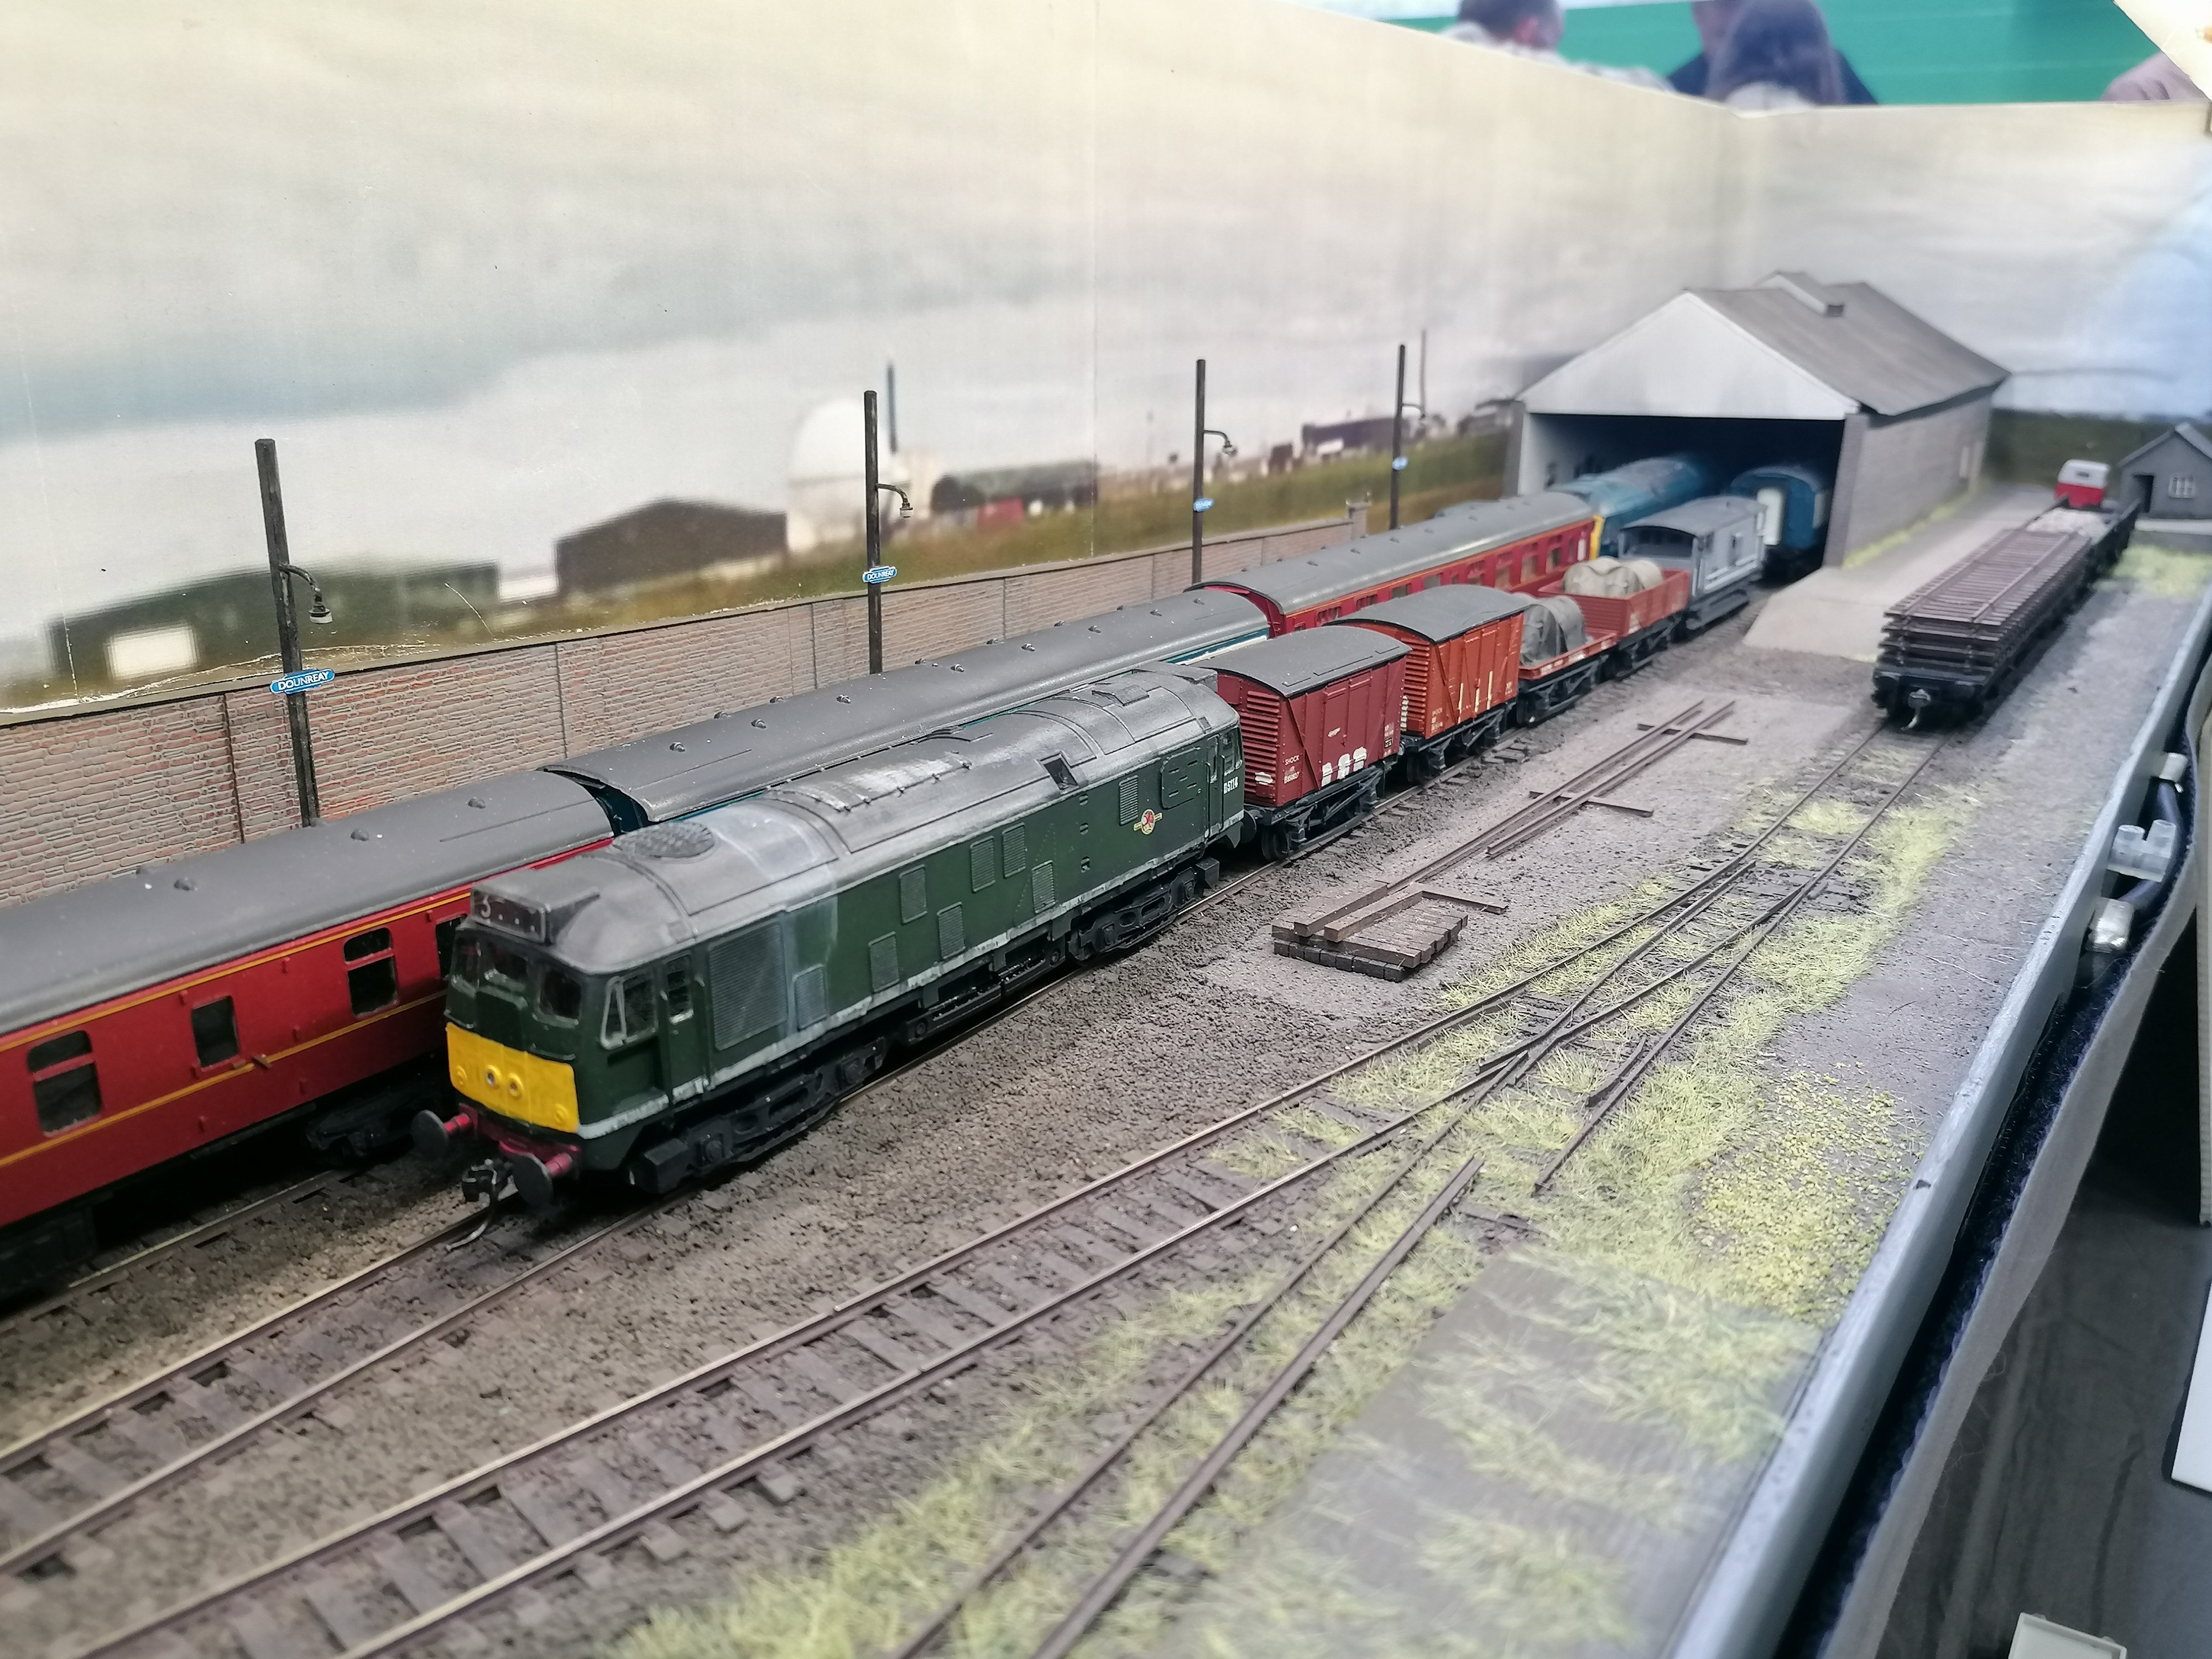
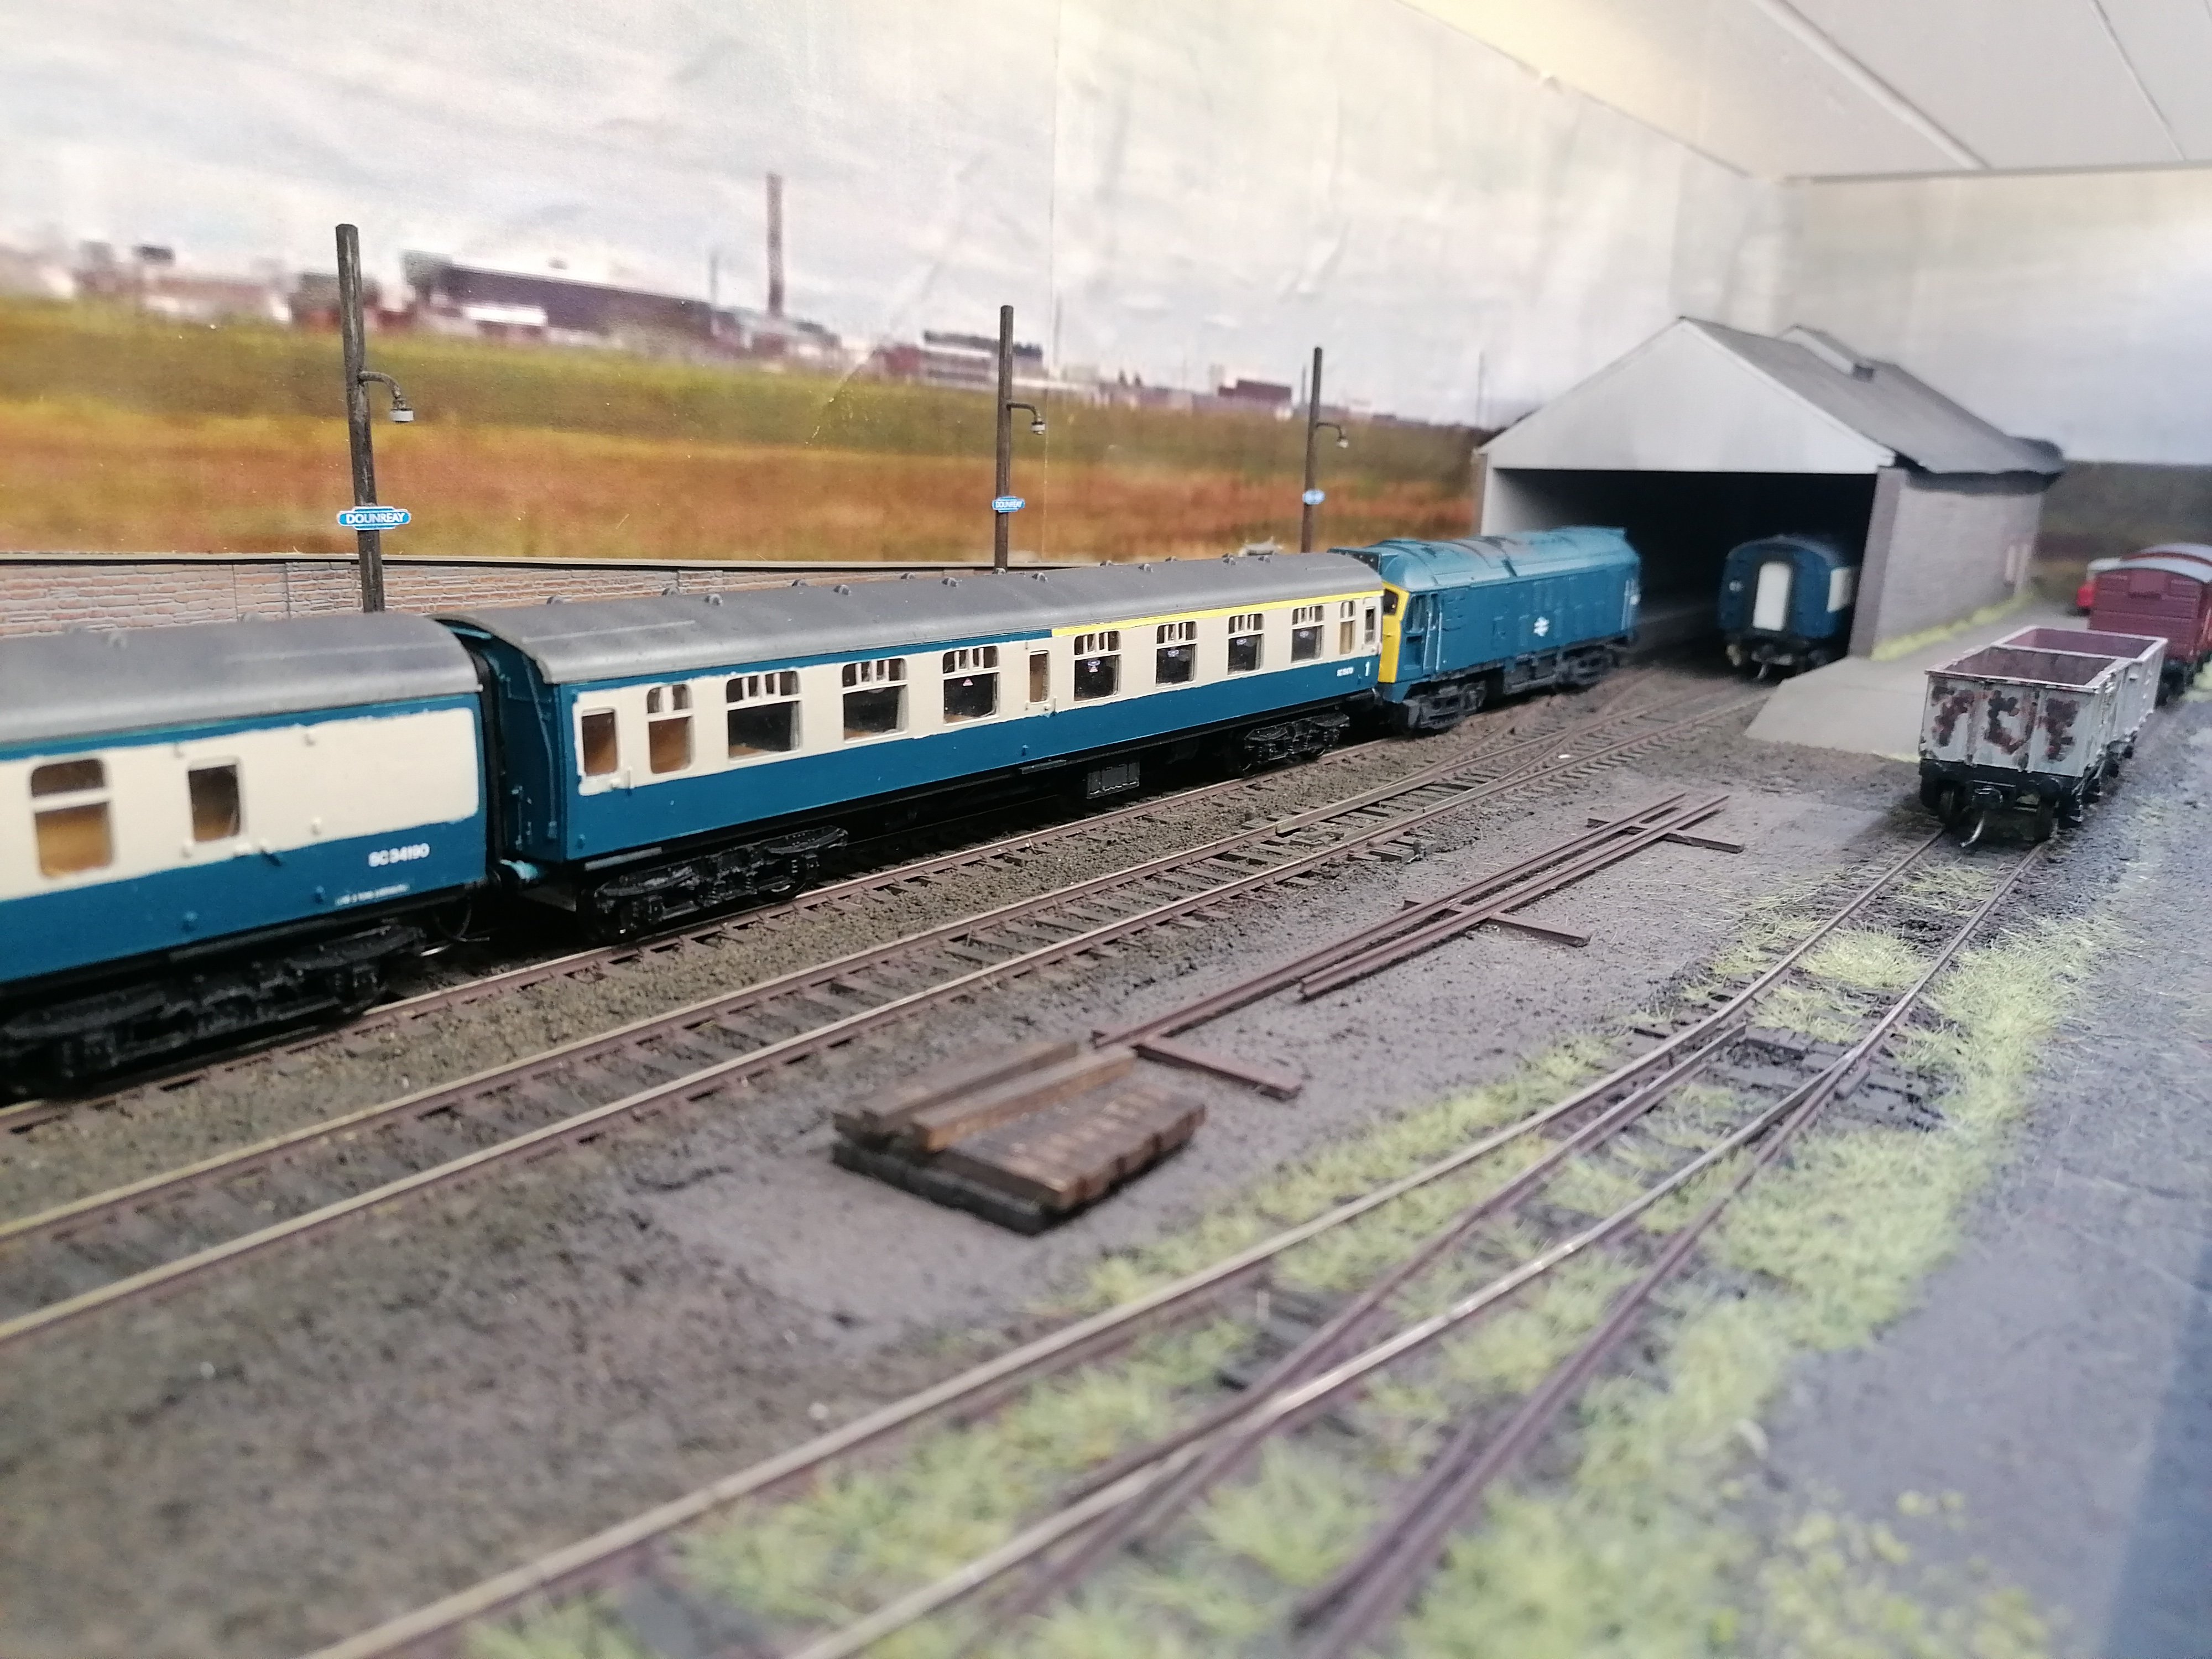
A few years ago I constructed a small terminus based loosely on Wick/Thurso in H0 scale. Set c1970 in the BR green/blue transition era. Baseboard is an Ikea Lack 110cm x 26cm shelf with a thin ply display box surround. Peco code 75 track, structures all scratchbuilt using a lot od Slaters embossed sheet and plasticard. Locos are 3D prints from Lincoln Locos on modded Roco mechanisms, stock is reworked ancient Lima, Fleischmann and Rivarossi rtr, plus some scratchbuilds. Featured in the March 2025 Railway Modeller, Dounreay has been exhibited around a dozen times so far. The choice of H0 scale was deliberate to encourage/force myself to do more modelling!
8 points
-
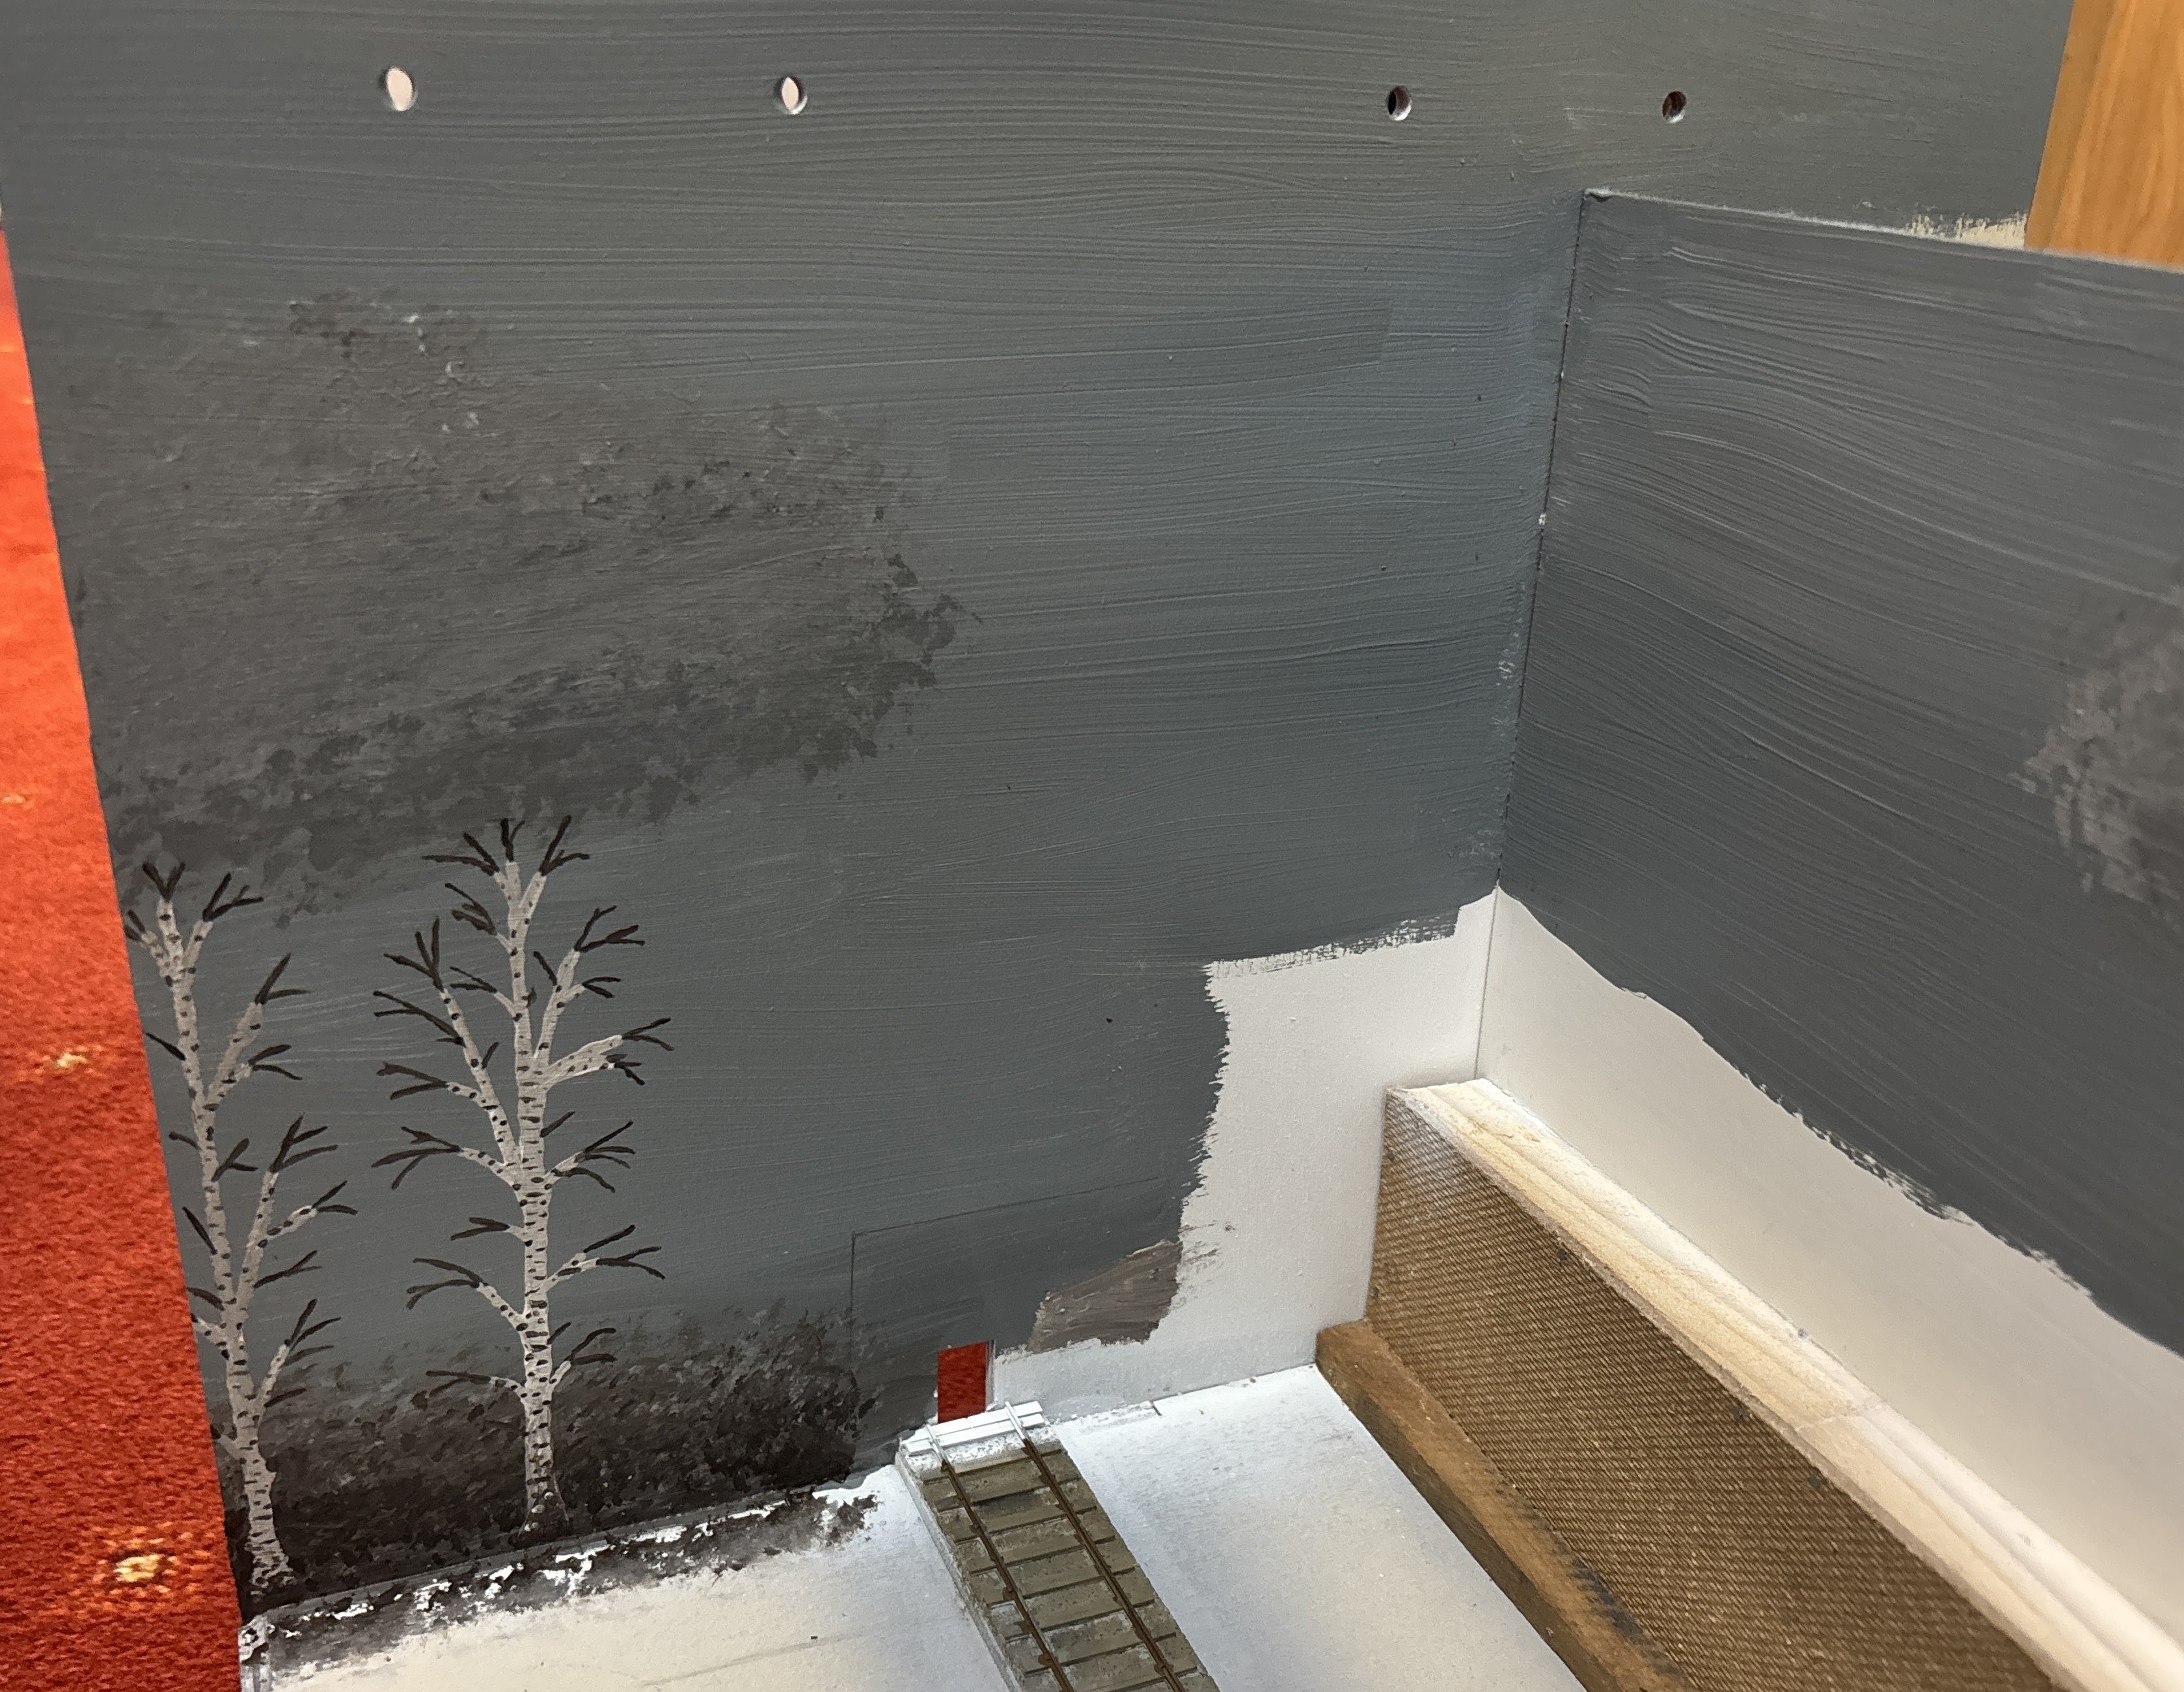
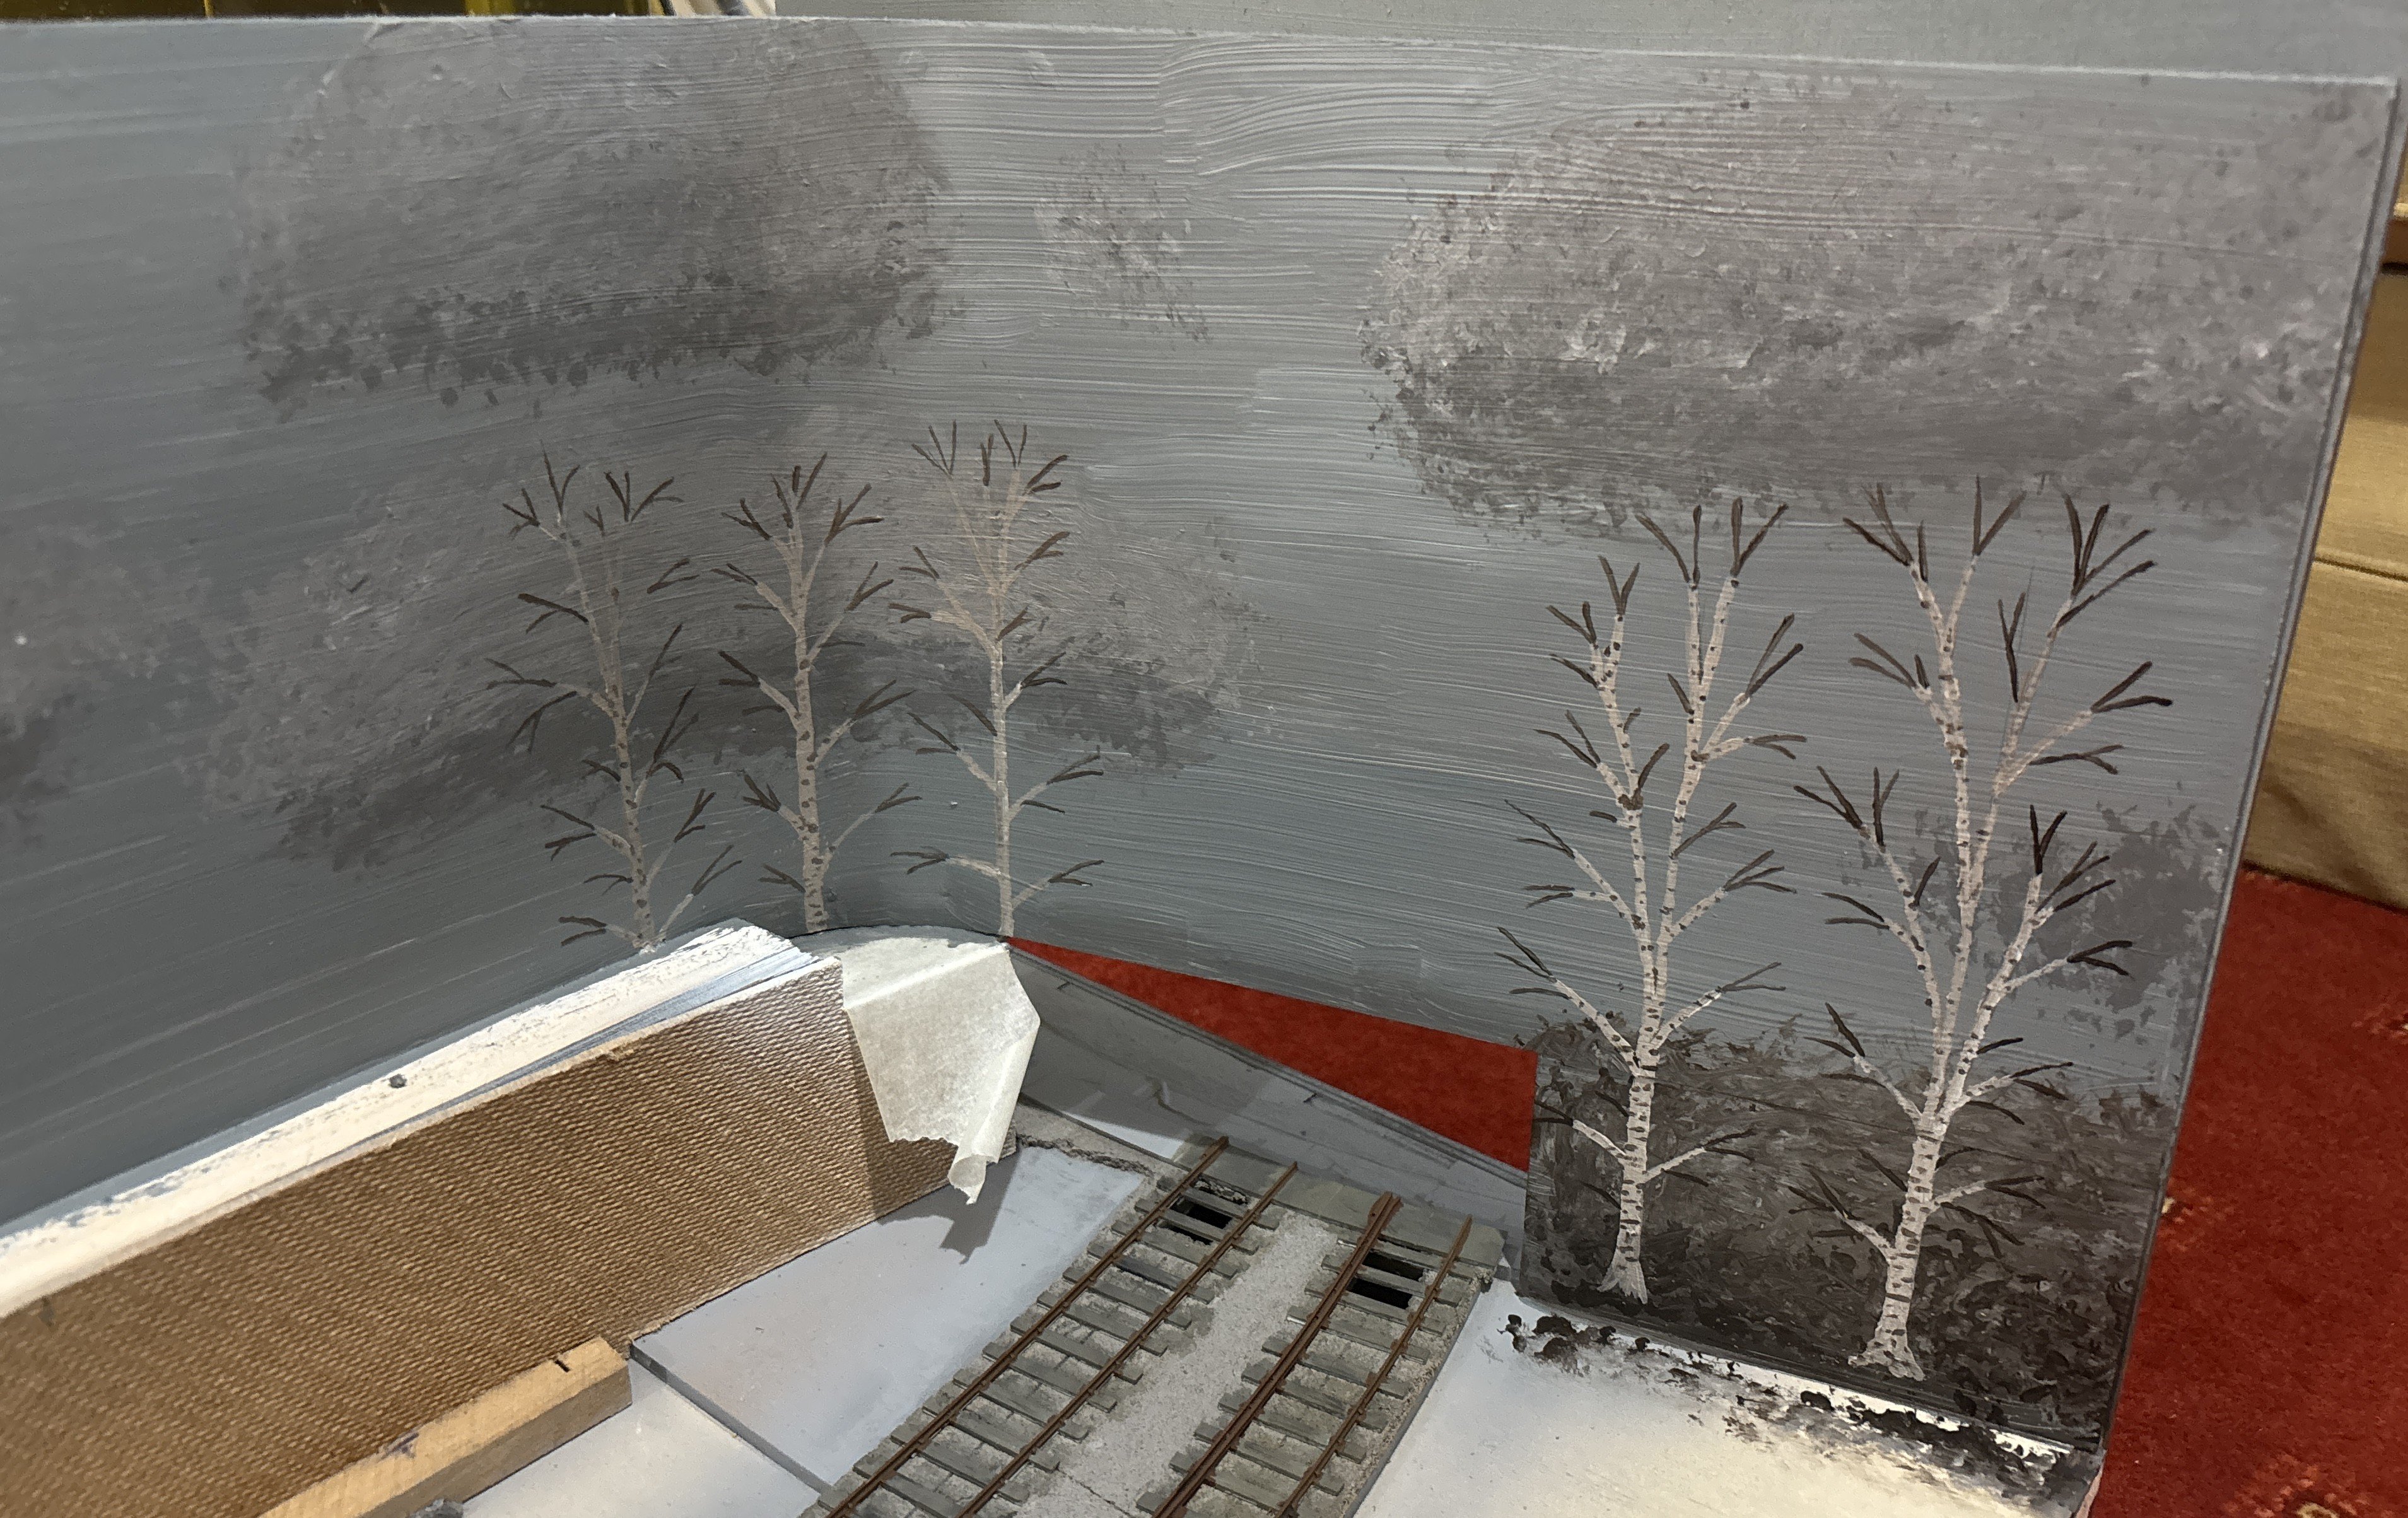
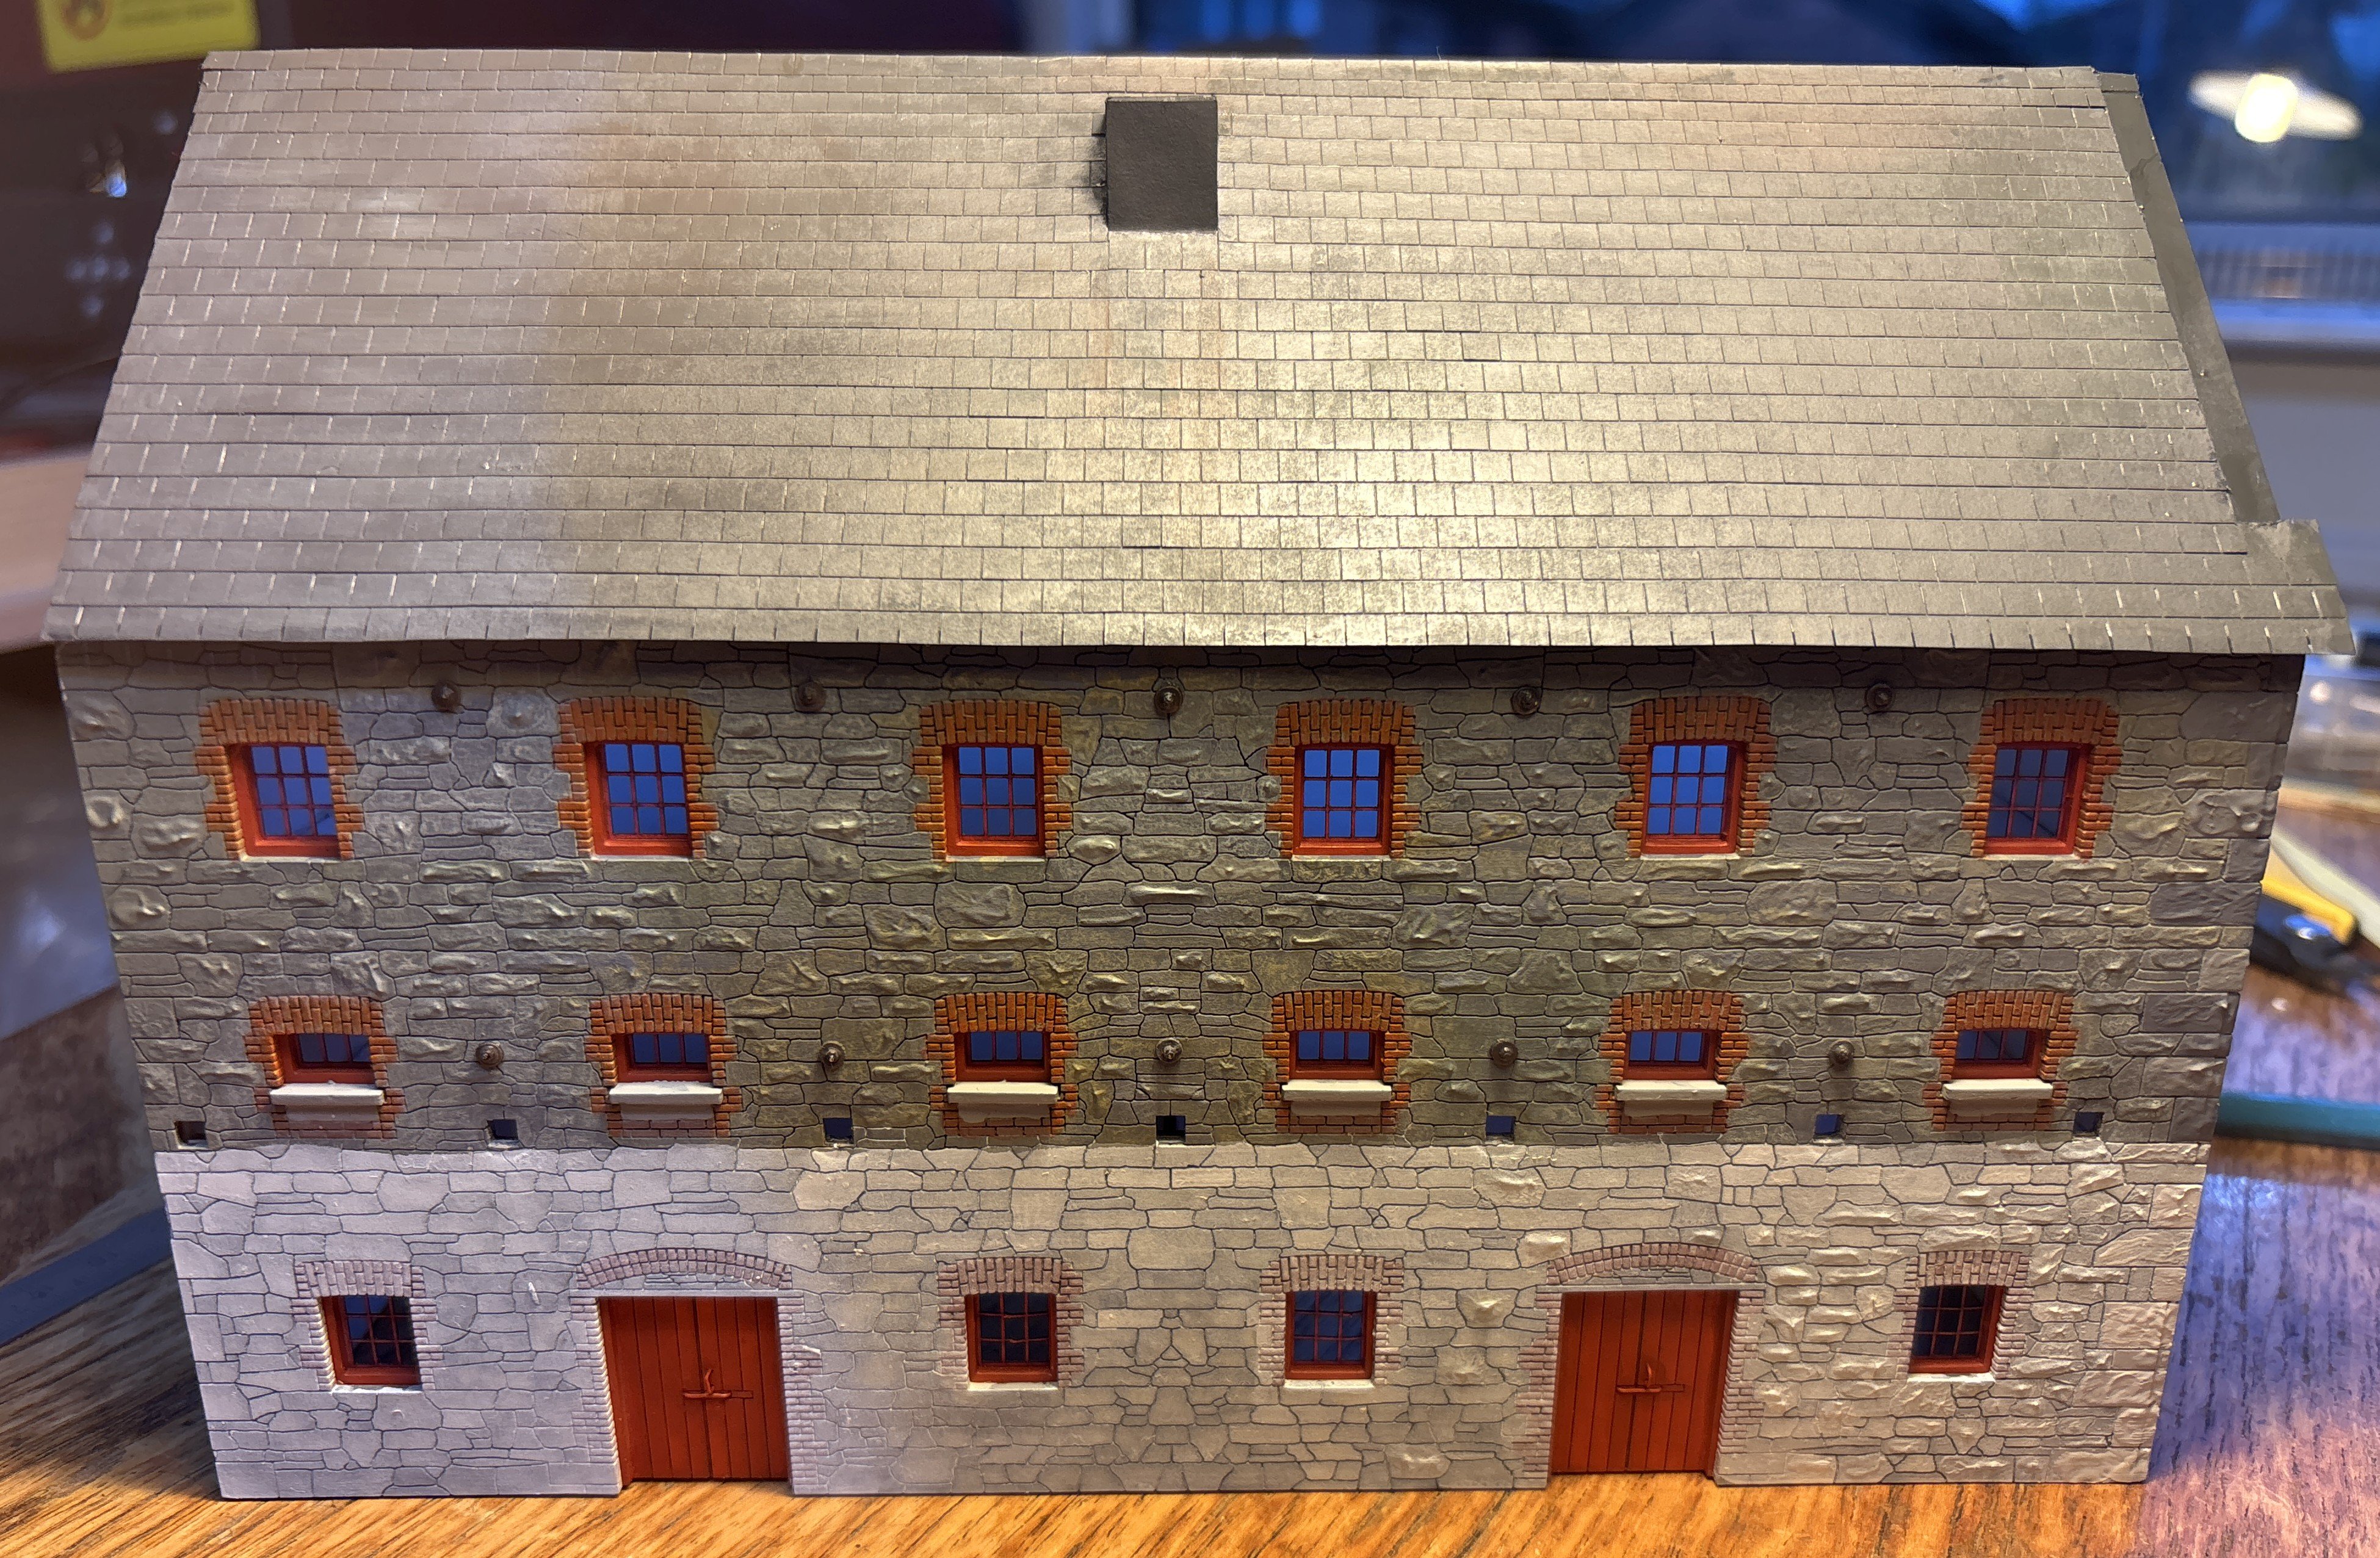
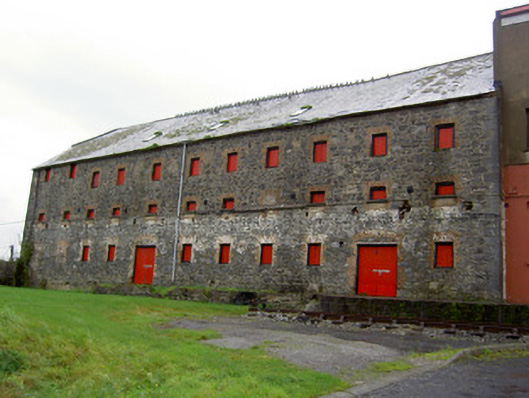
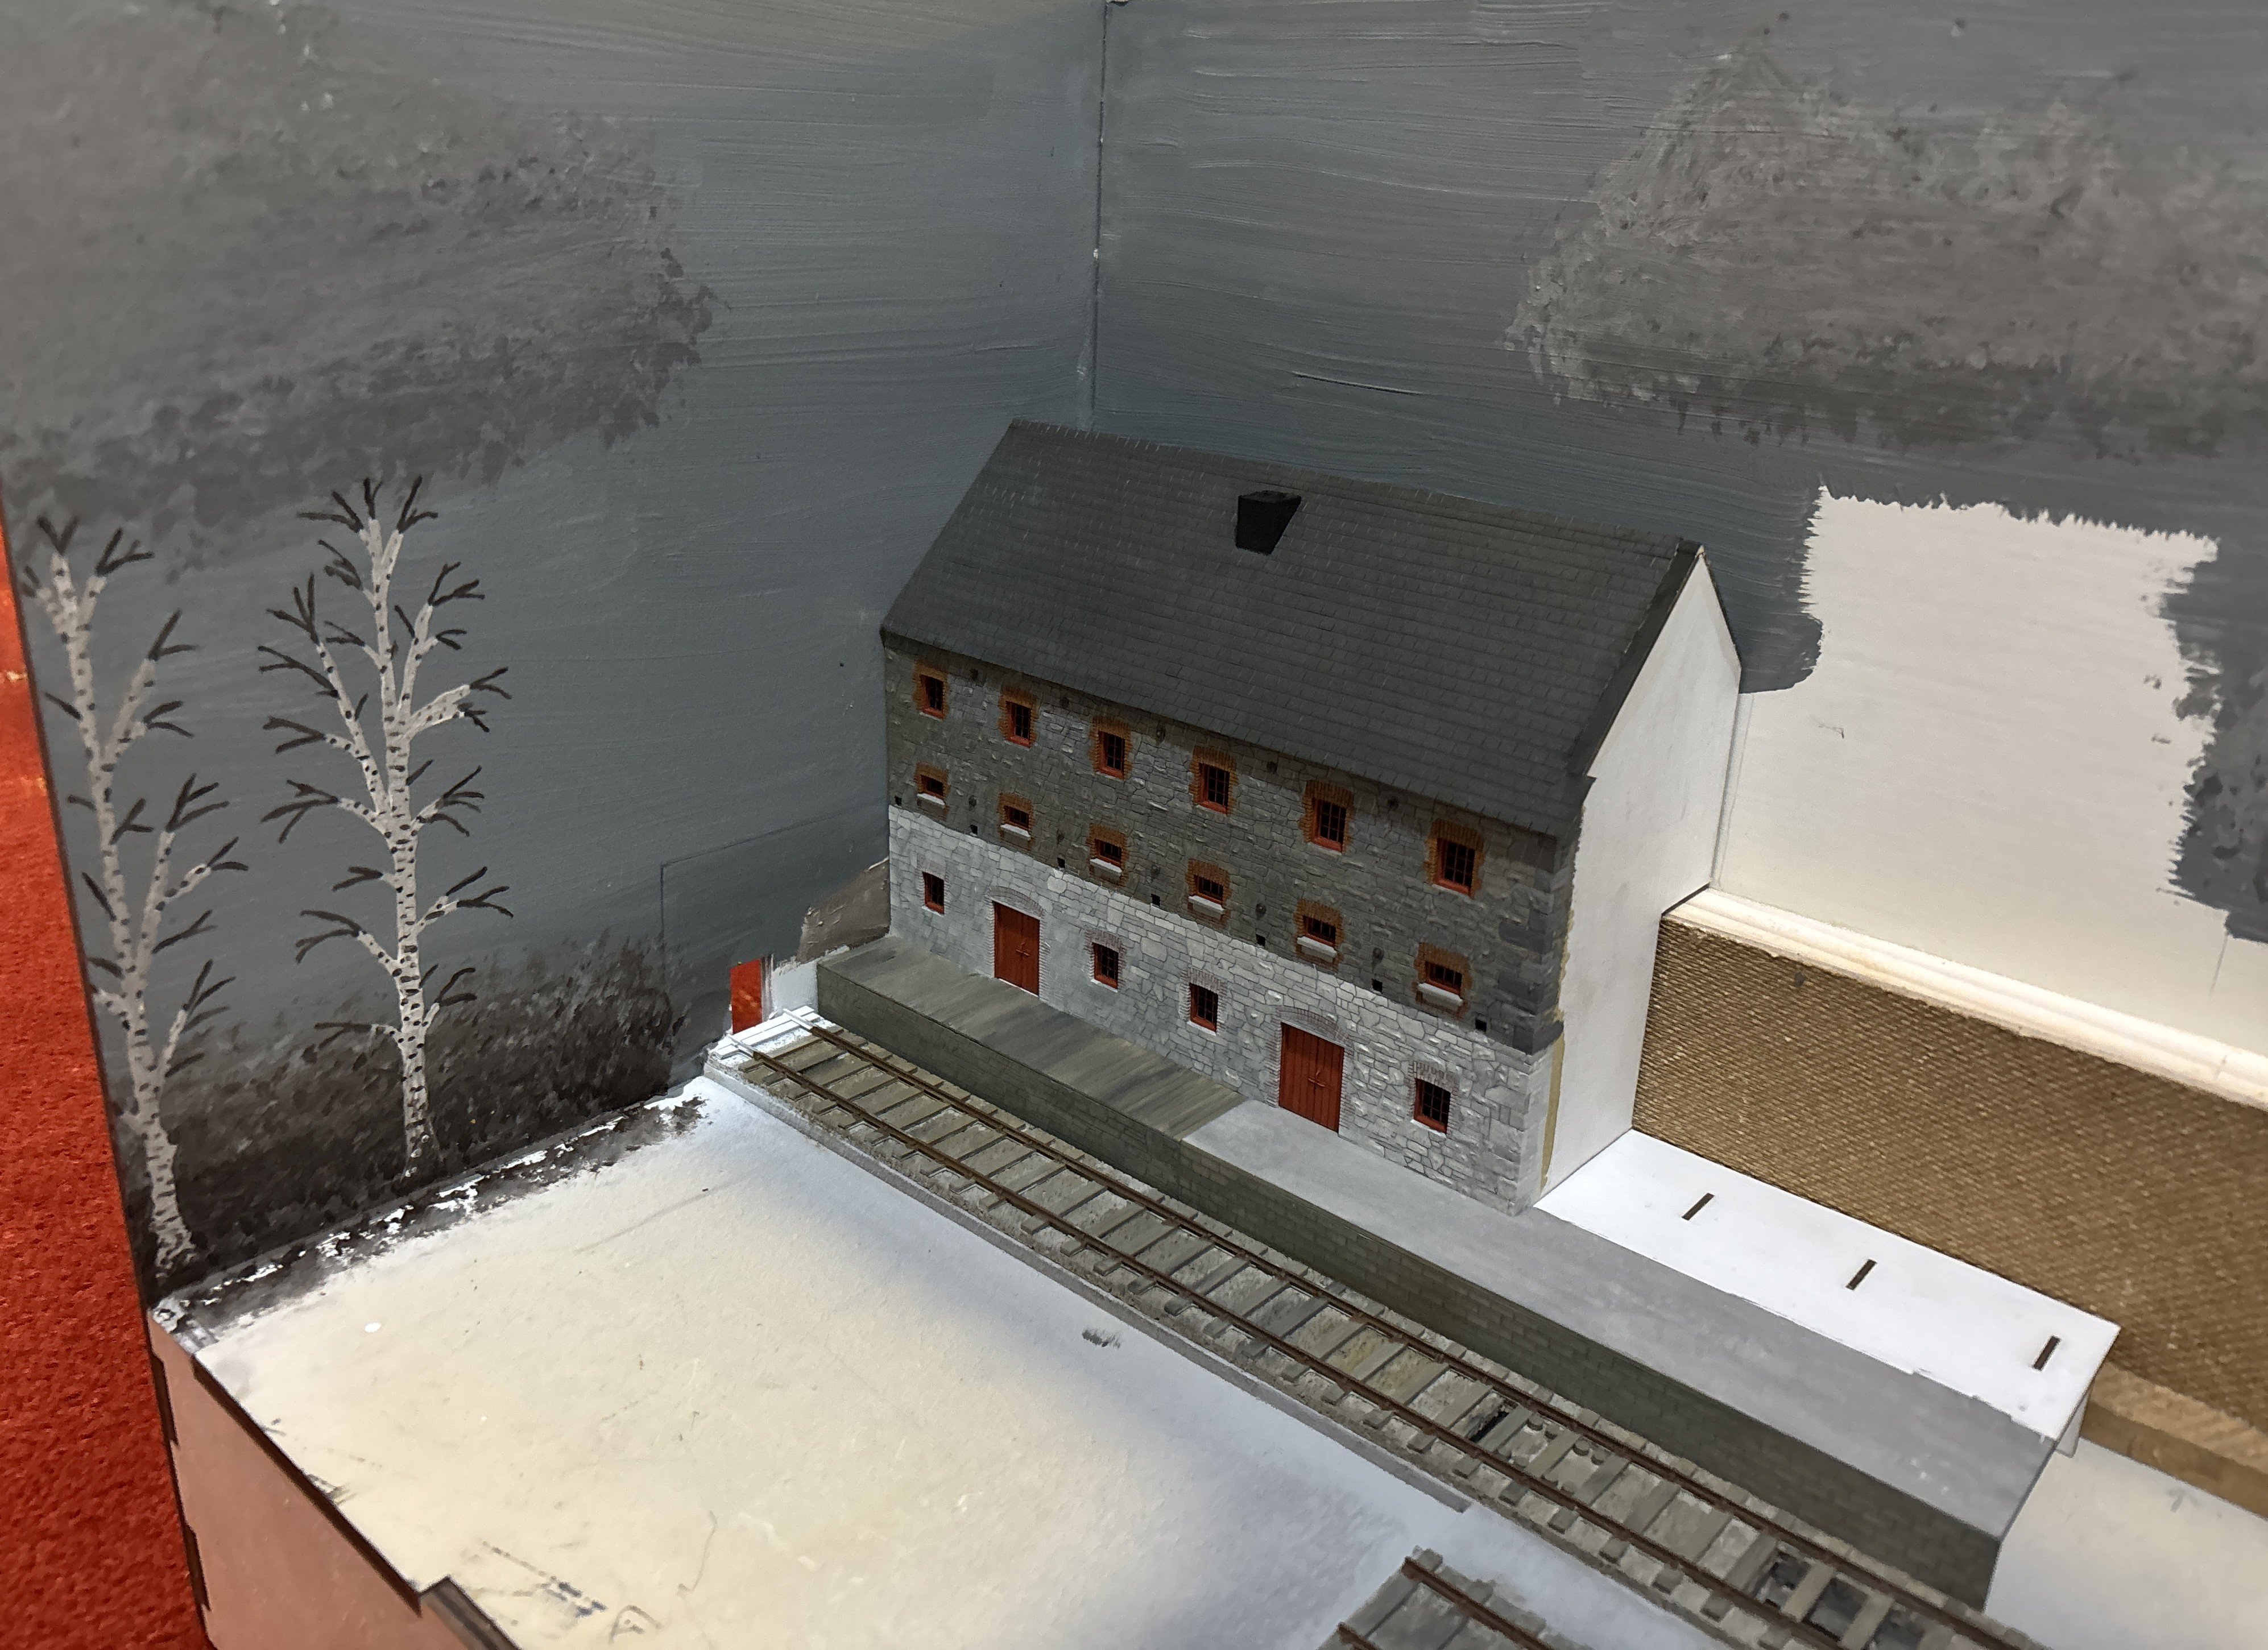
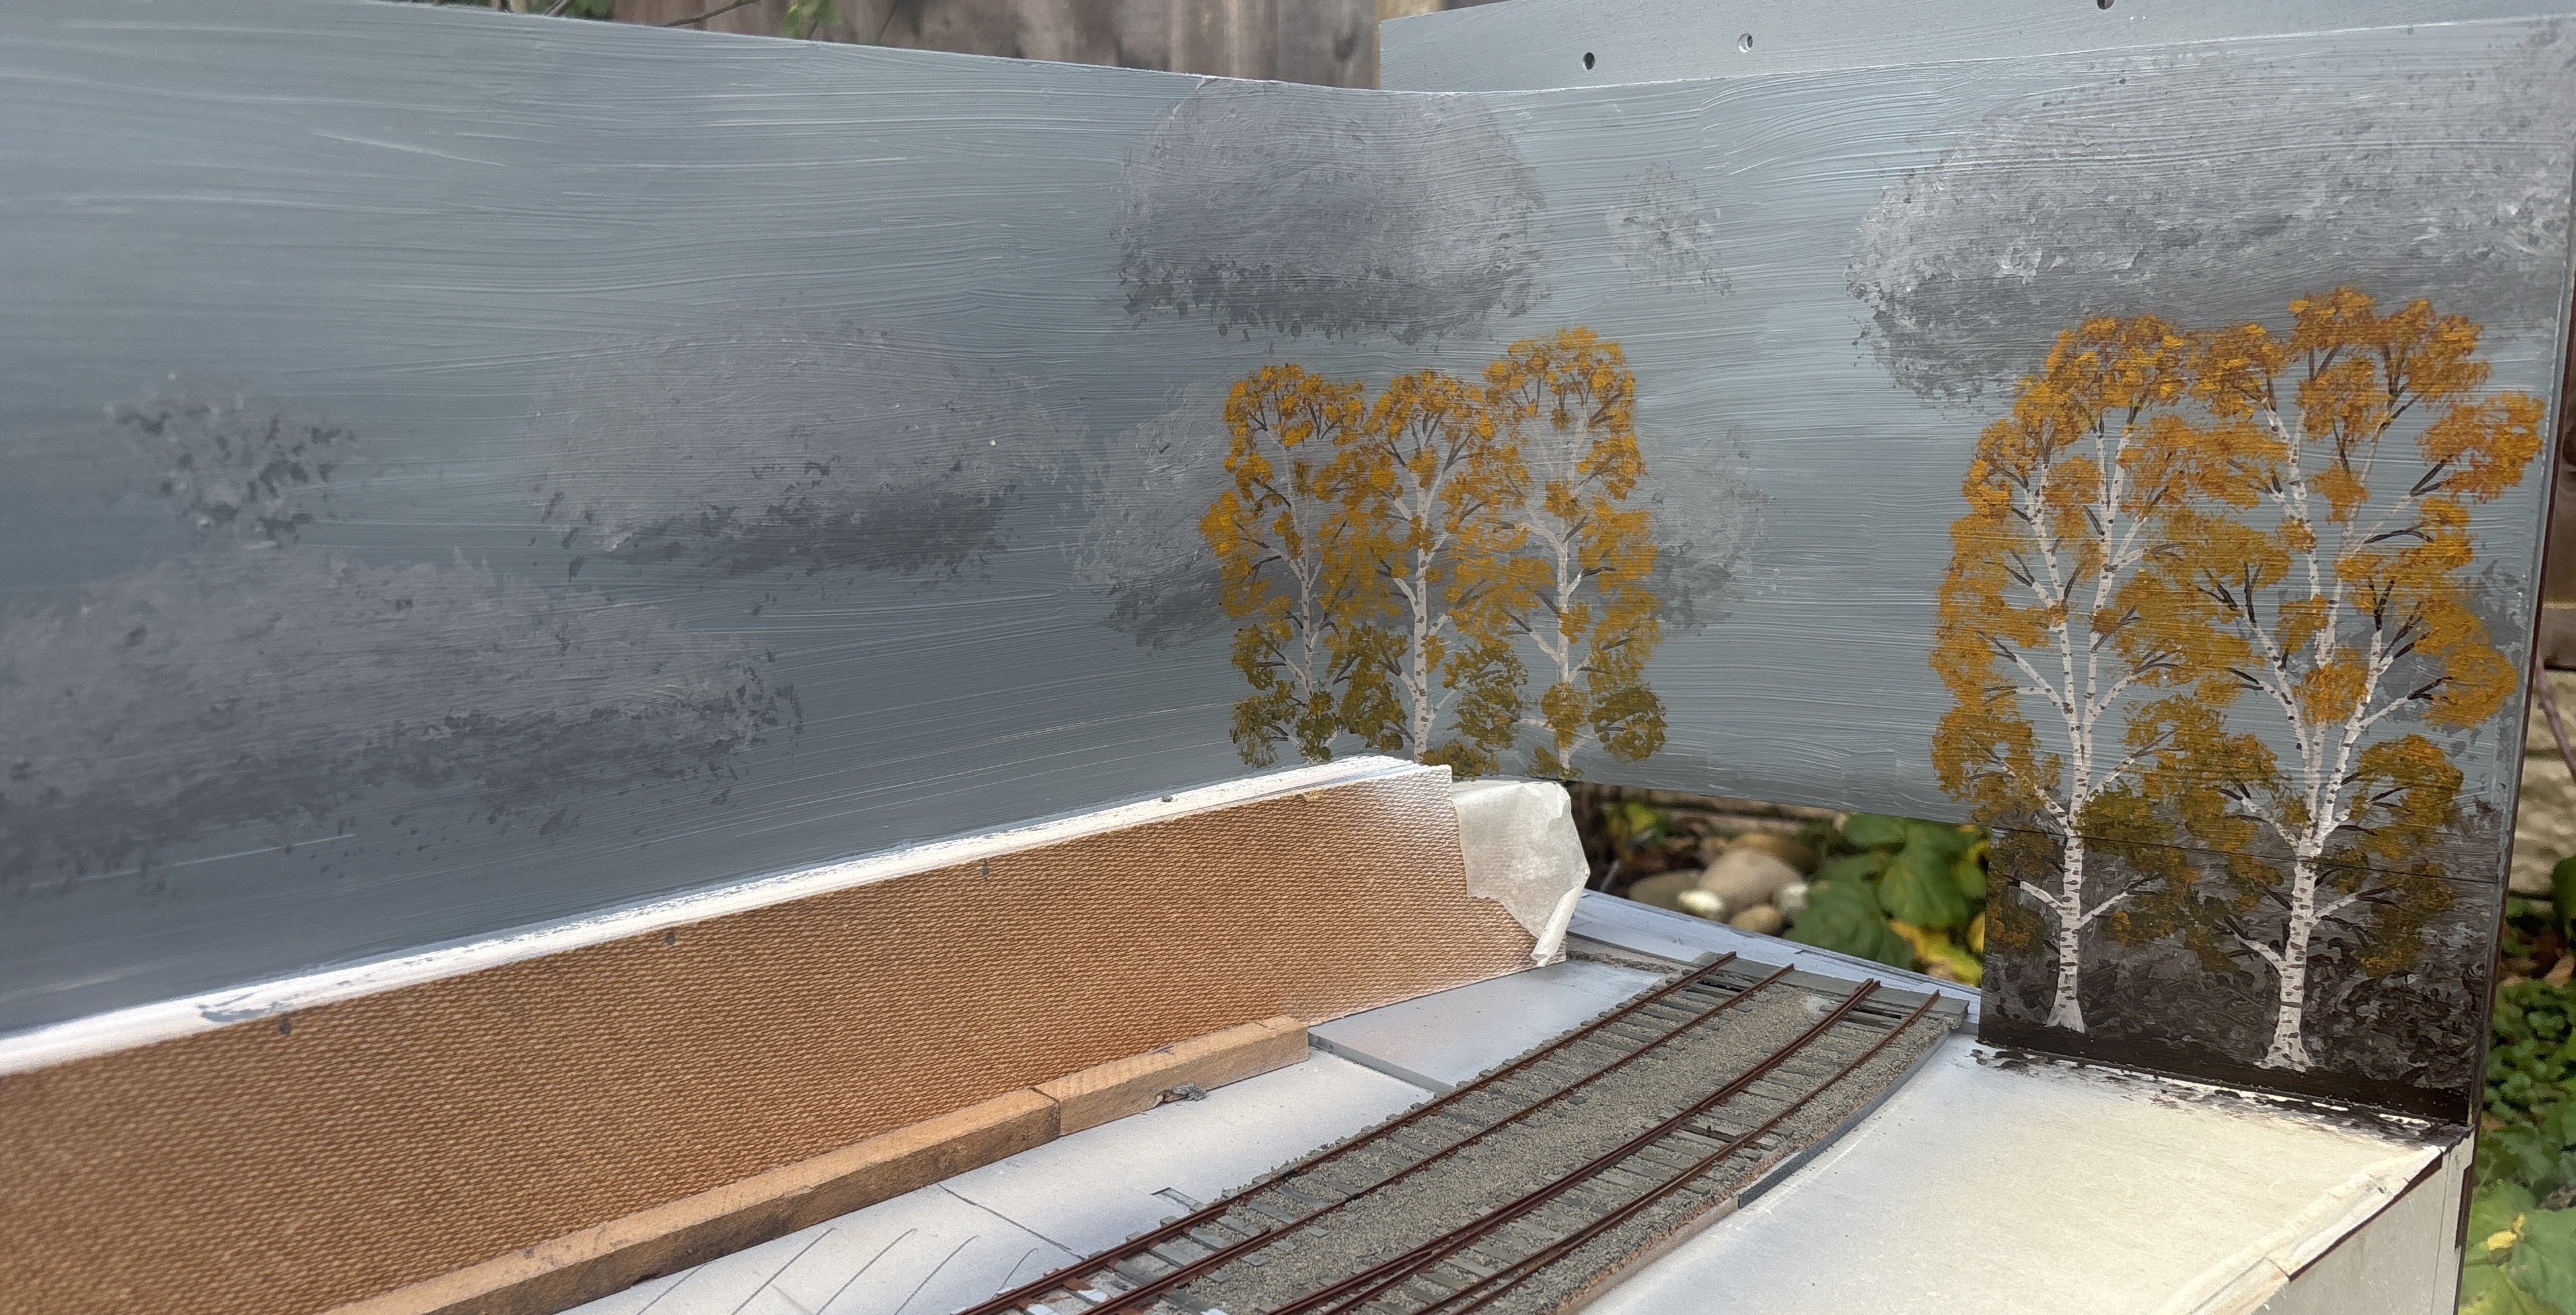
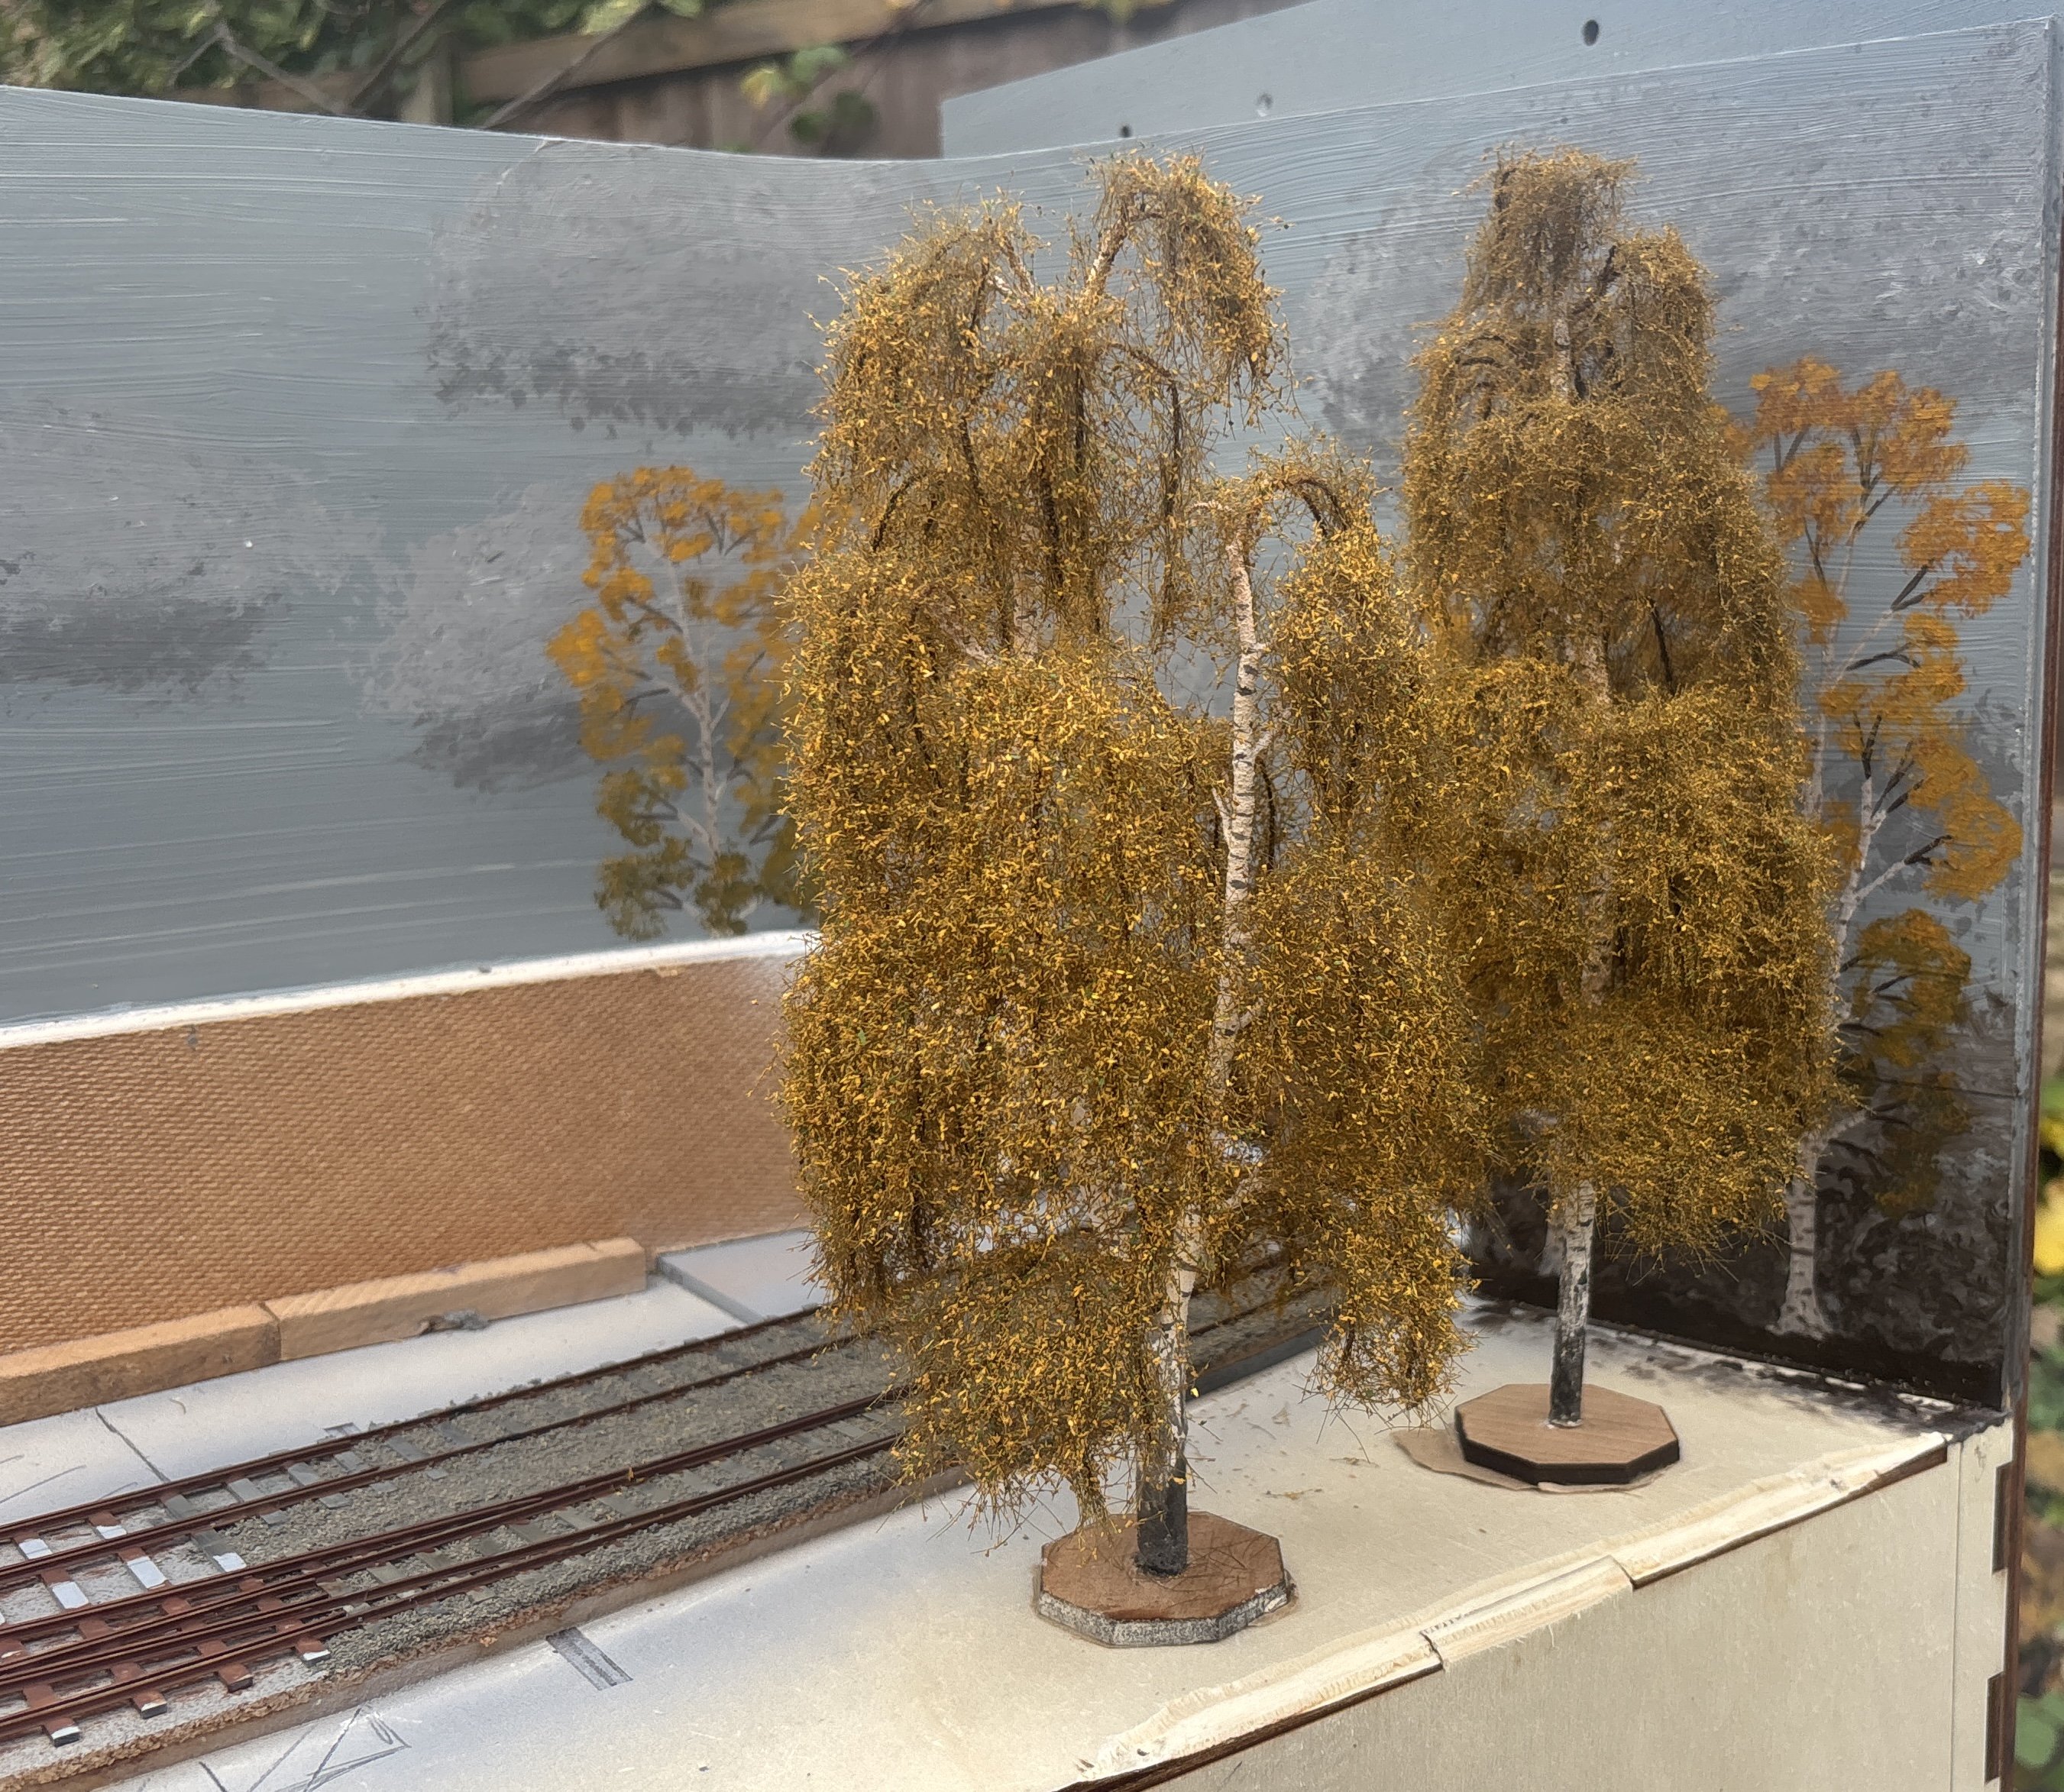
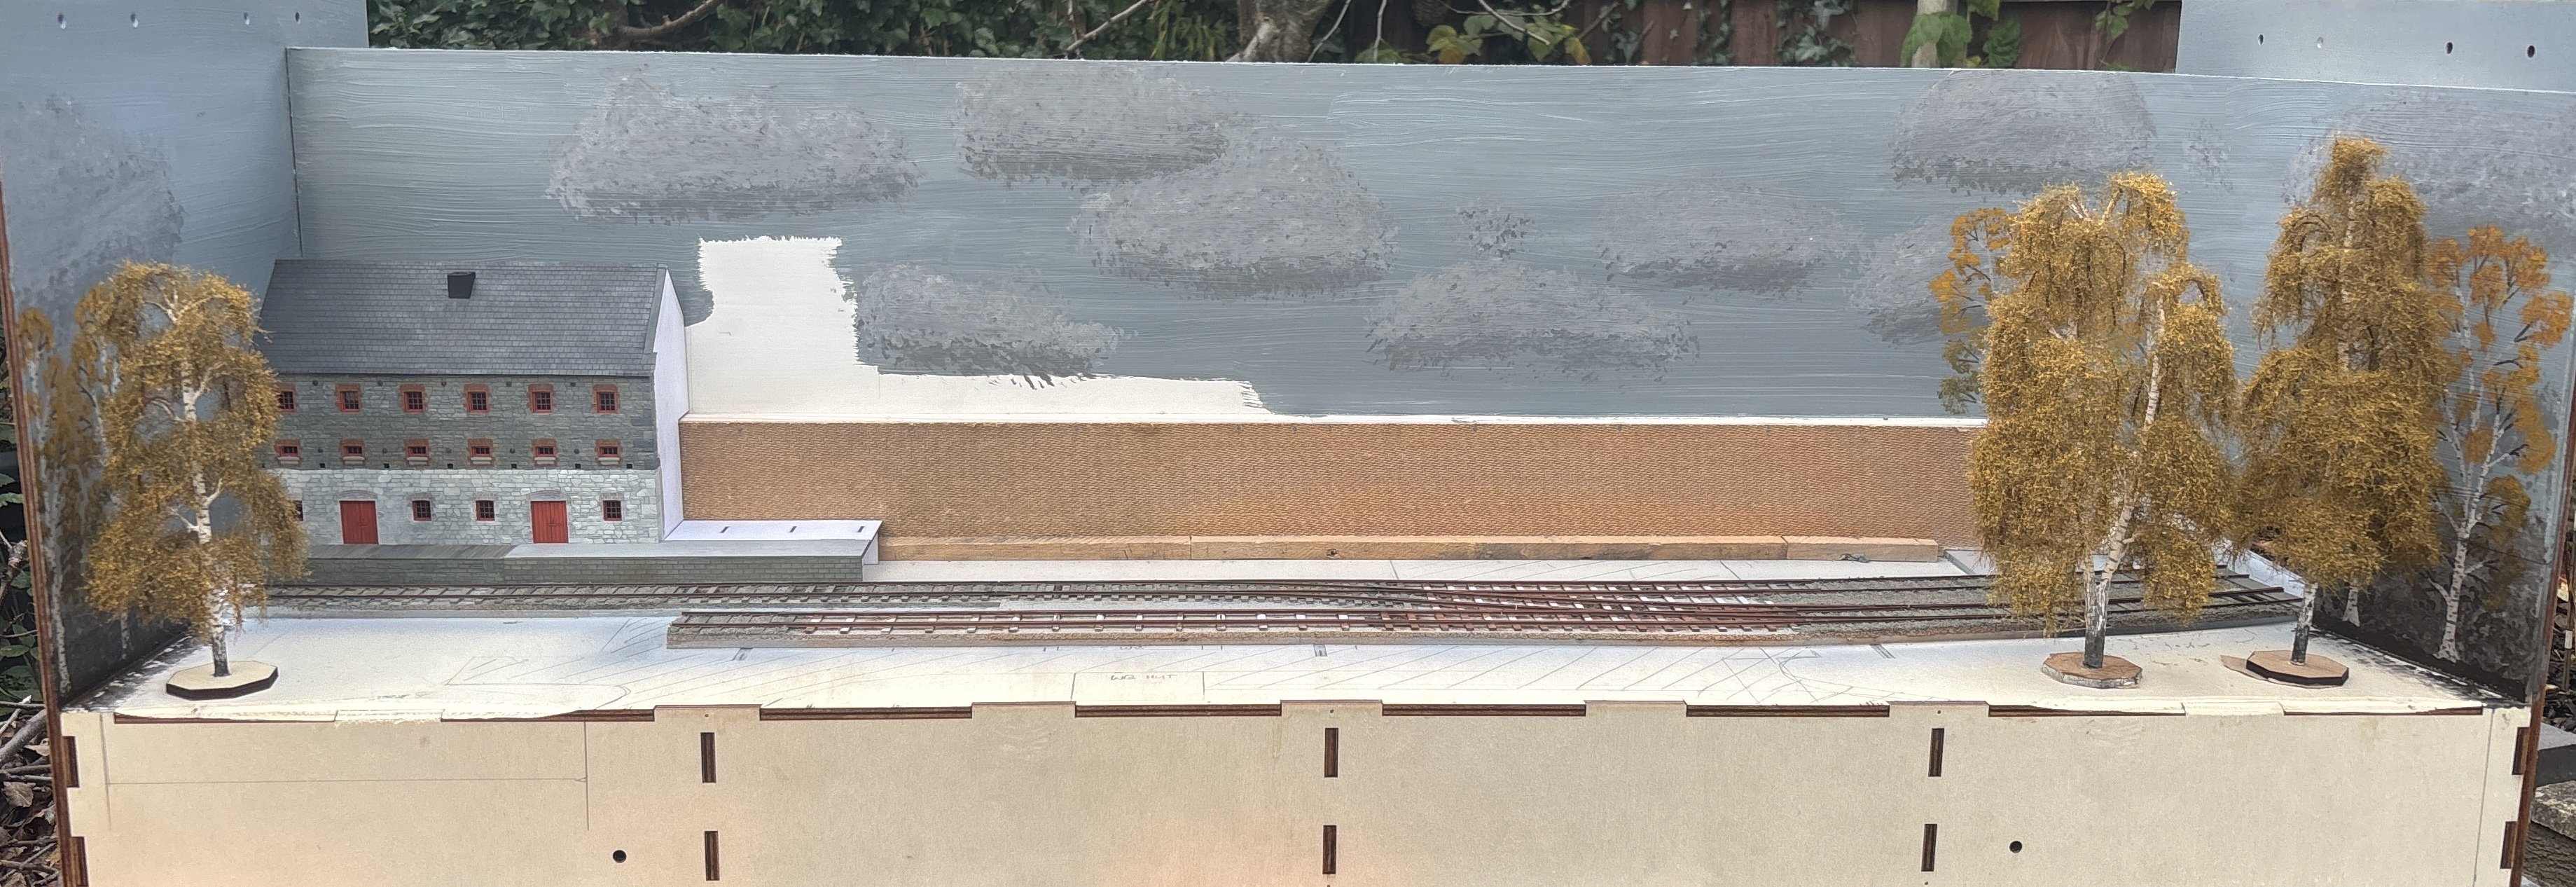
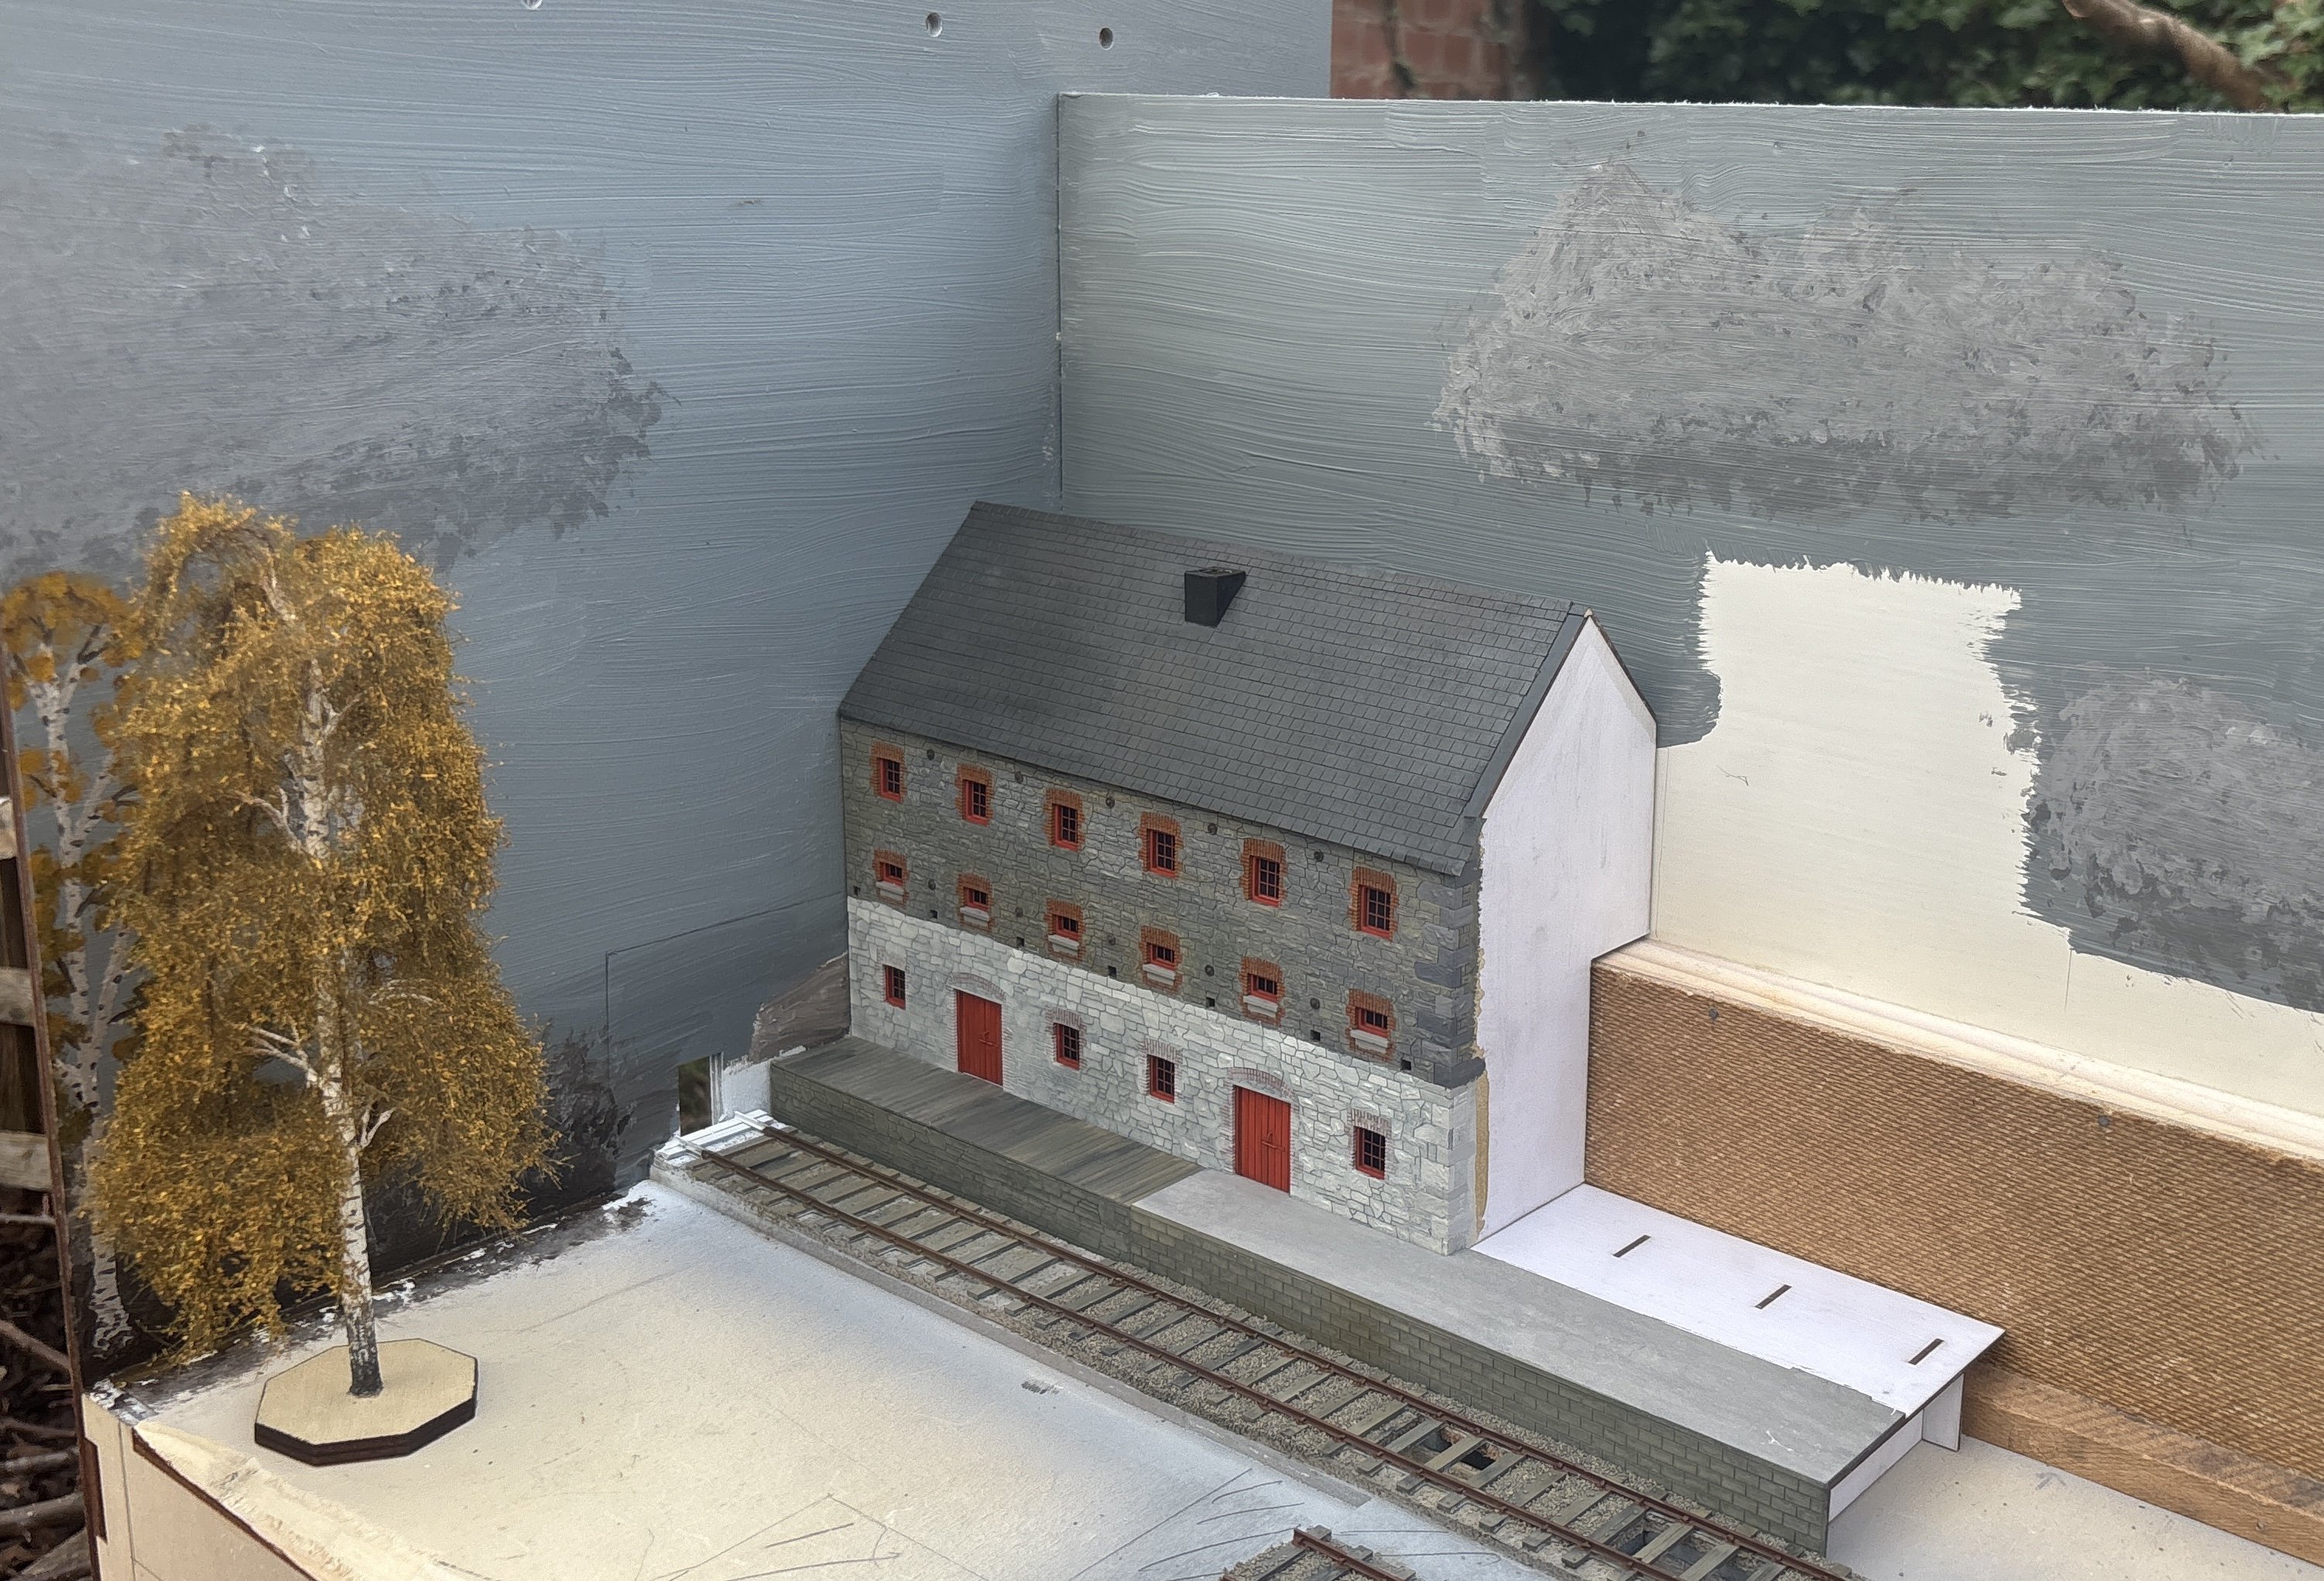
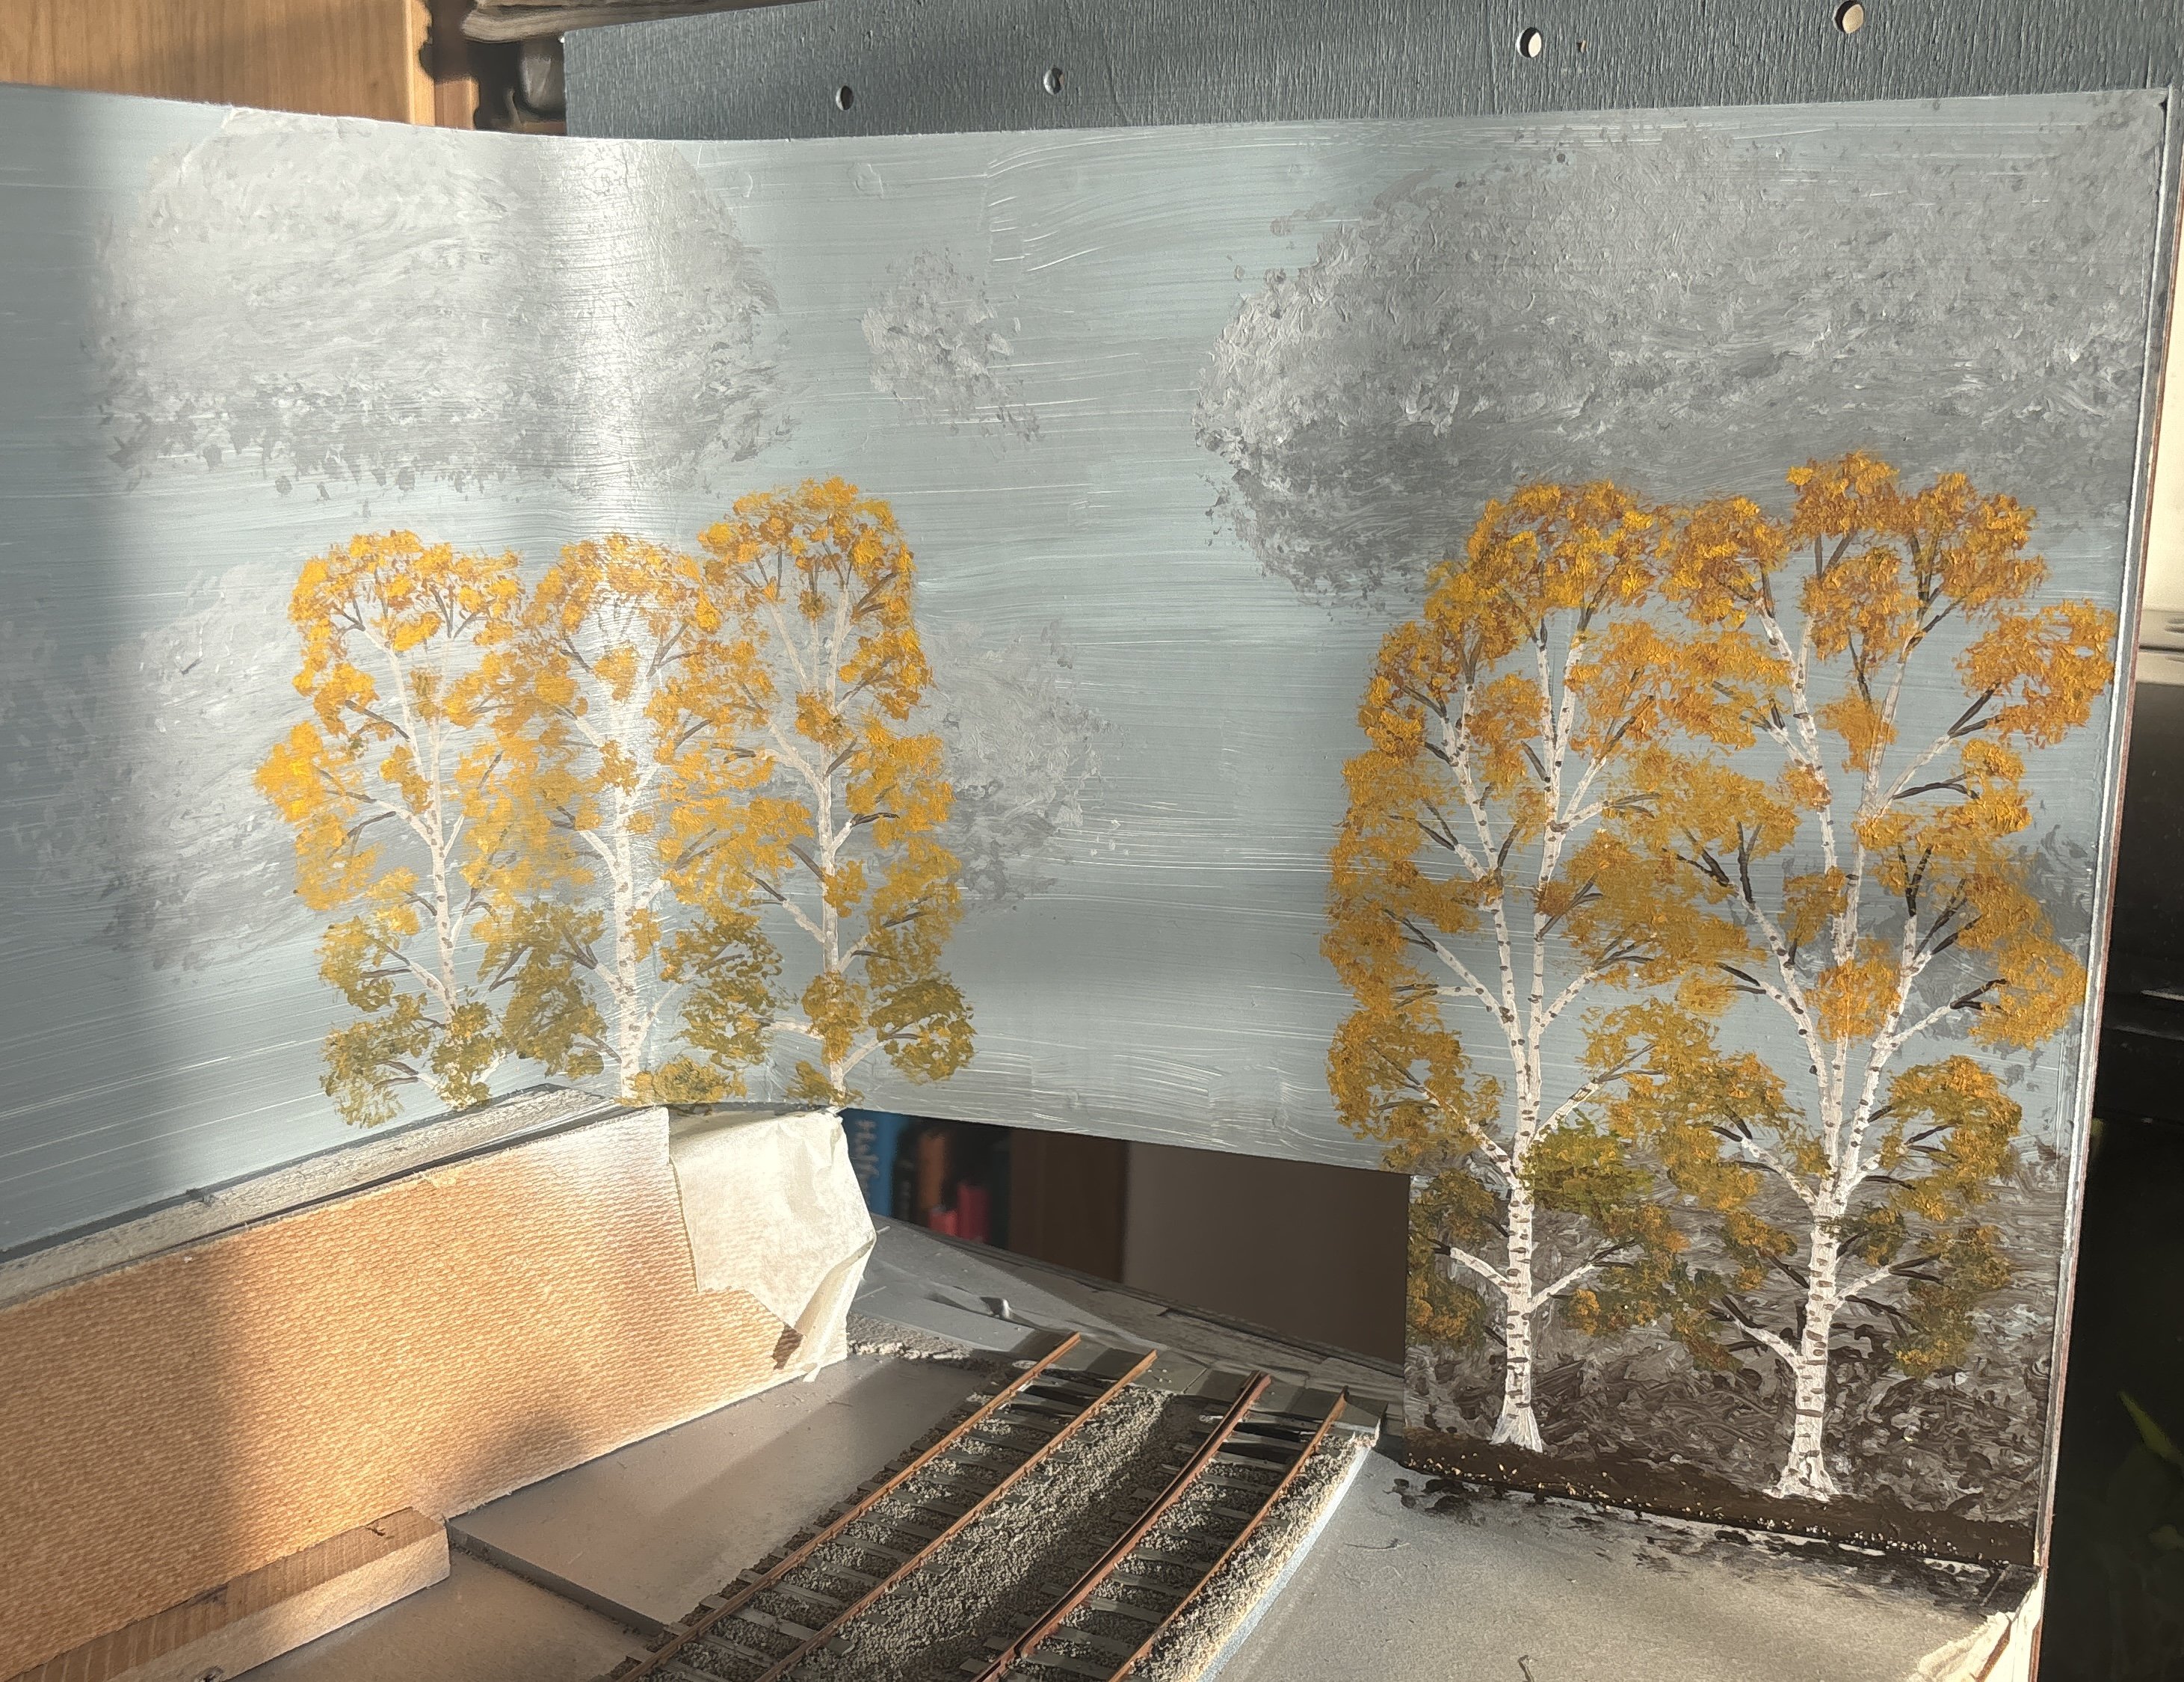
Yesterday I went to the O gauge show in Wigan, which was worth a visit for the number of small traders, and an opportunity to browse the Squires stall at leisure without a crowd. I stocked up on quite a lot of scenic items and a few tools. There were also some very nice small layouts, and I was able to take inspiration from the way they were presented. I particularly liked this one, which (albeit in O gauge) is similar in size and composition to my Quartertown Mill: Today I have made some progress on the layout backscene and the mill building. The layout now has some painted birch tree trunks (still awaiting foliage). In front of these will be some homemade sea moss trees (which I'm also working on) and then in the foreground I'll use the Primo trees. So there will be a gradual progression in quality. The old mill now has a roof and a few other details. It's nearly there now, still a few details to add and some more weathering. And of course the canopy which will mostly hide the lower (whitewashed) part. This building is going to be partly hidden behind others, perhaps I've put too much effort into it? But I've enjoyed making it. Here it is placed in situ:
8 points
-
Hi folks, We're a little behind on our update which will now come next week, but here is something for the weekend.... Honestly, you DO NOT want to miss out on these! Cheers! Fran
7 points
-
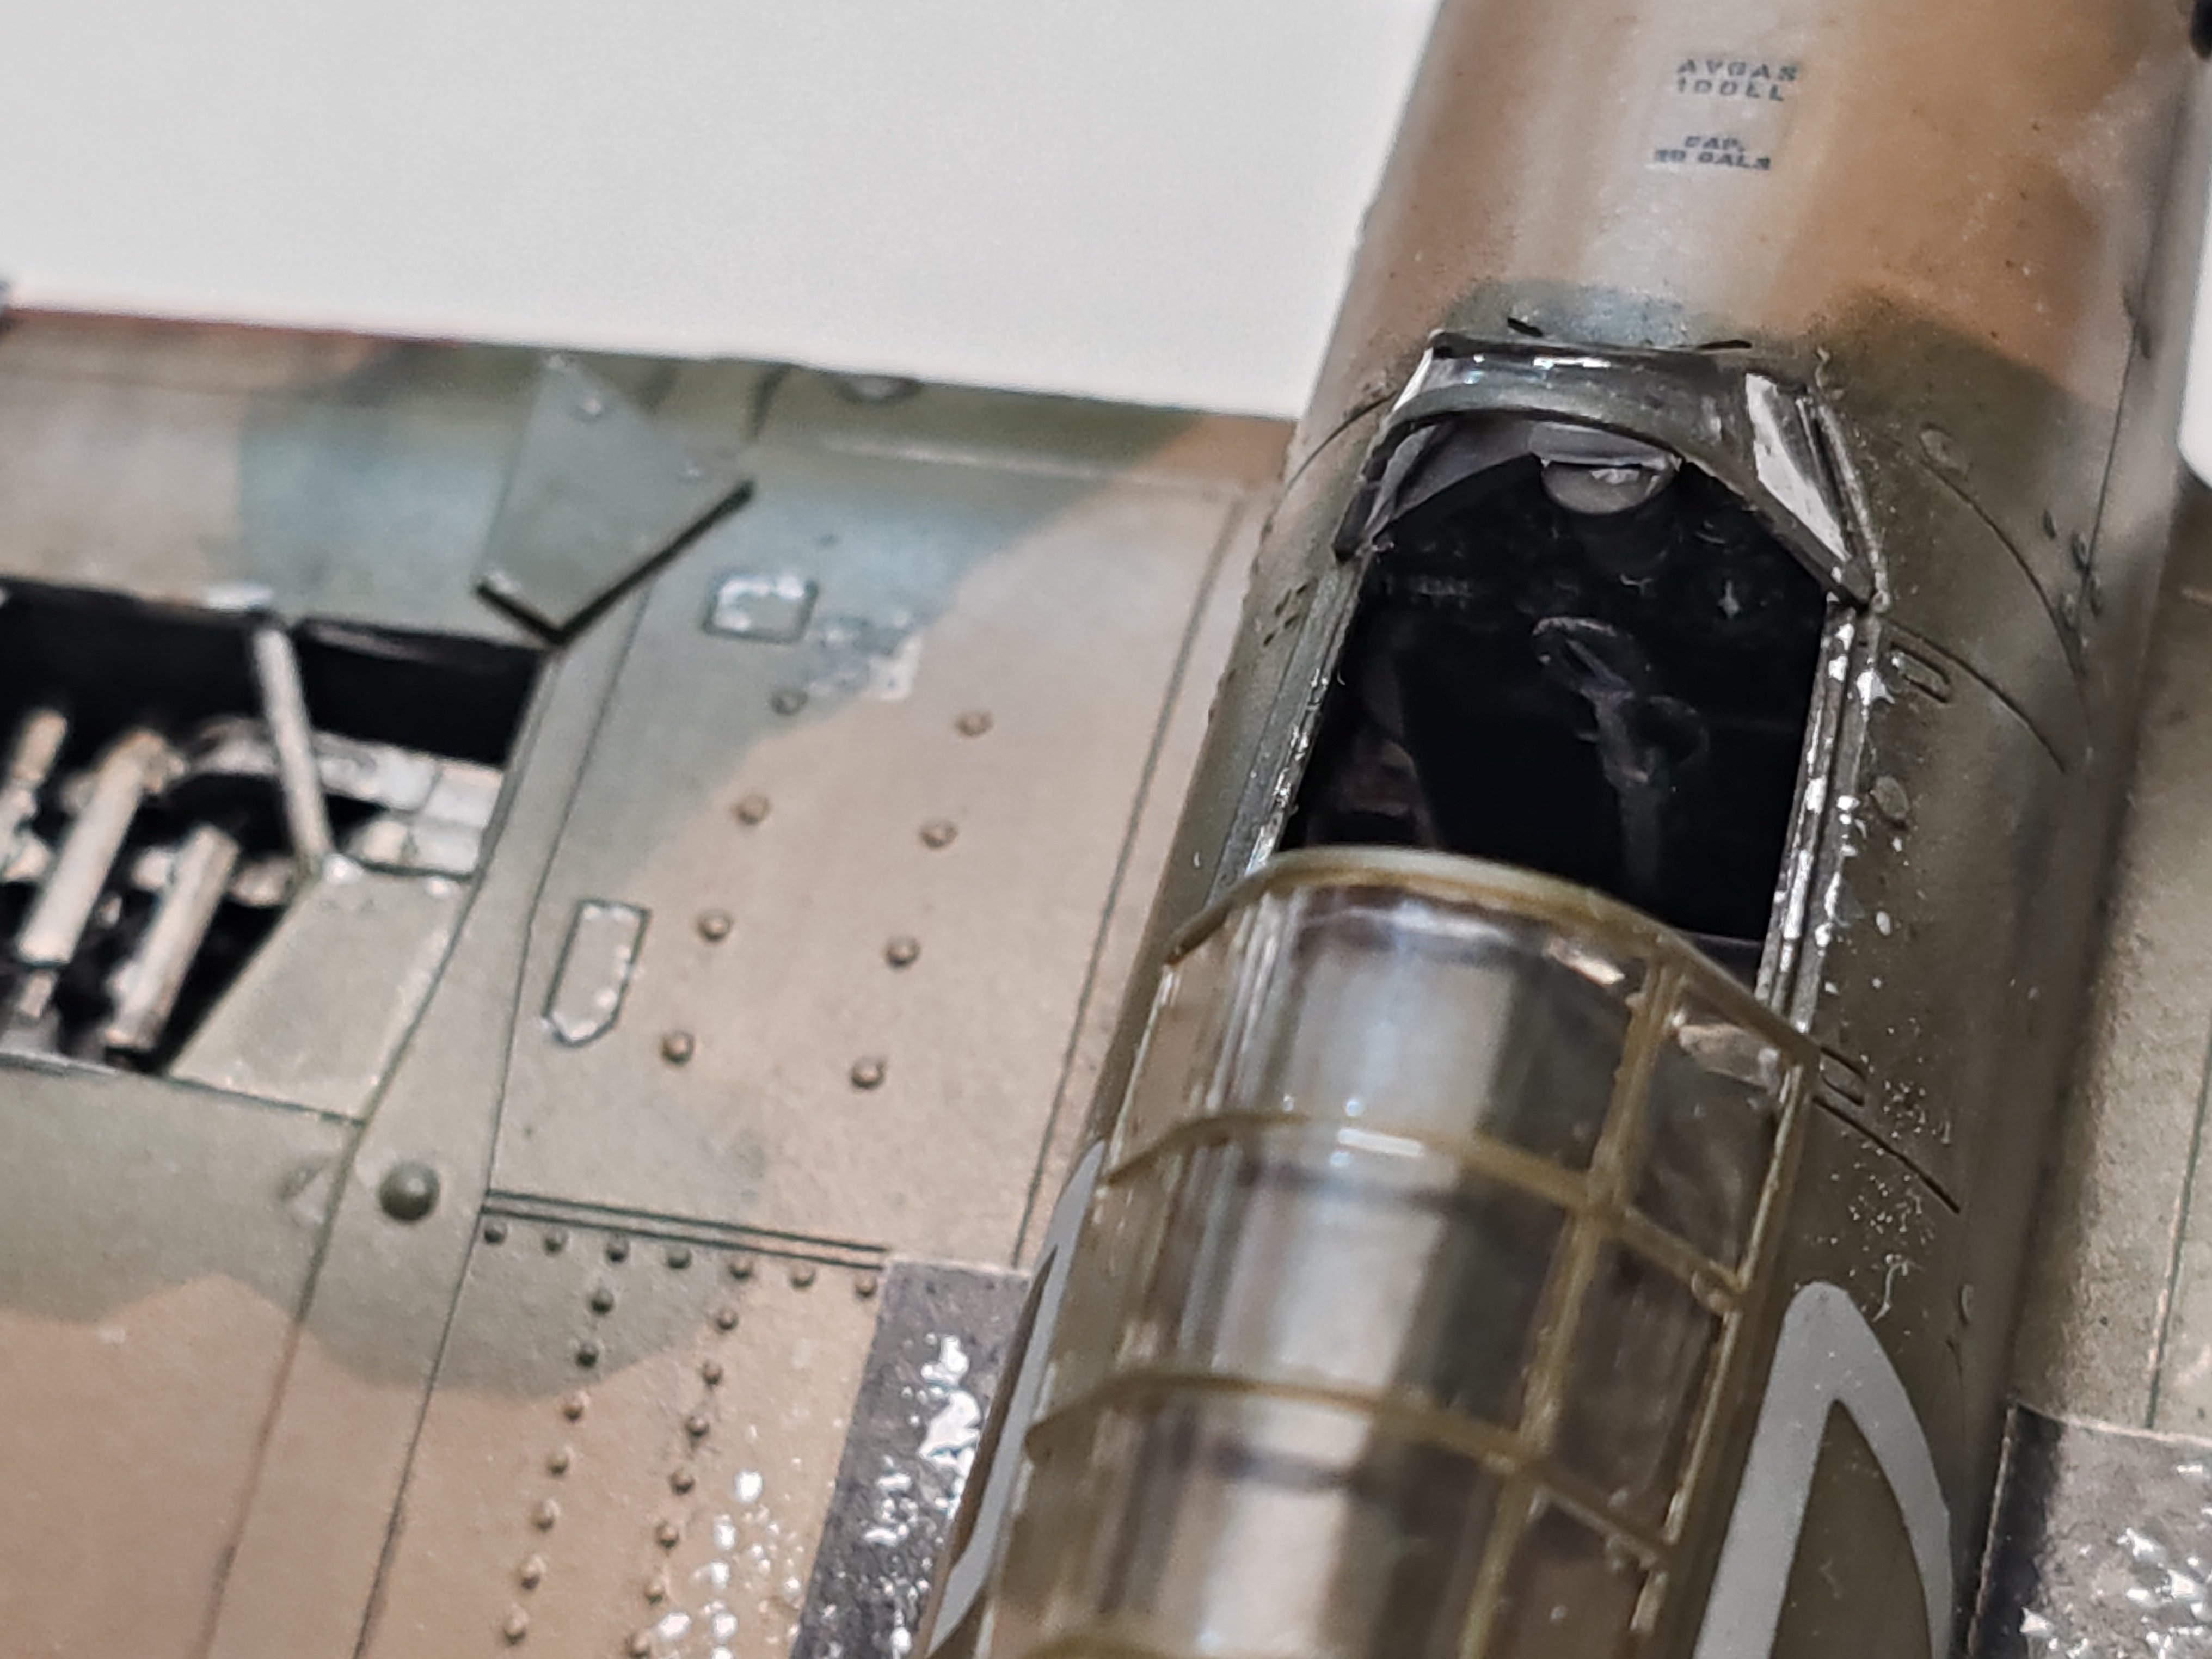
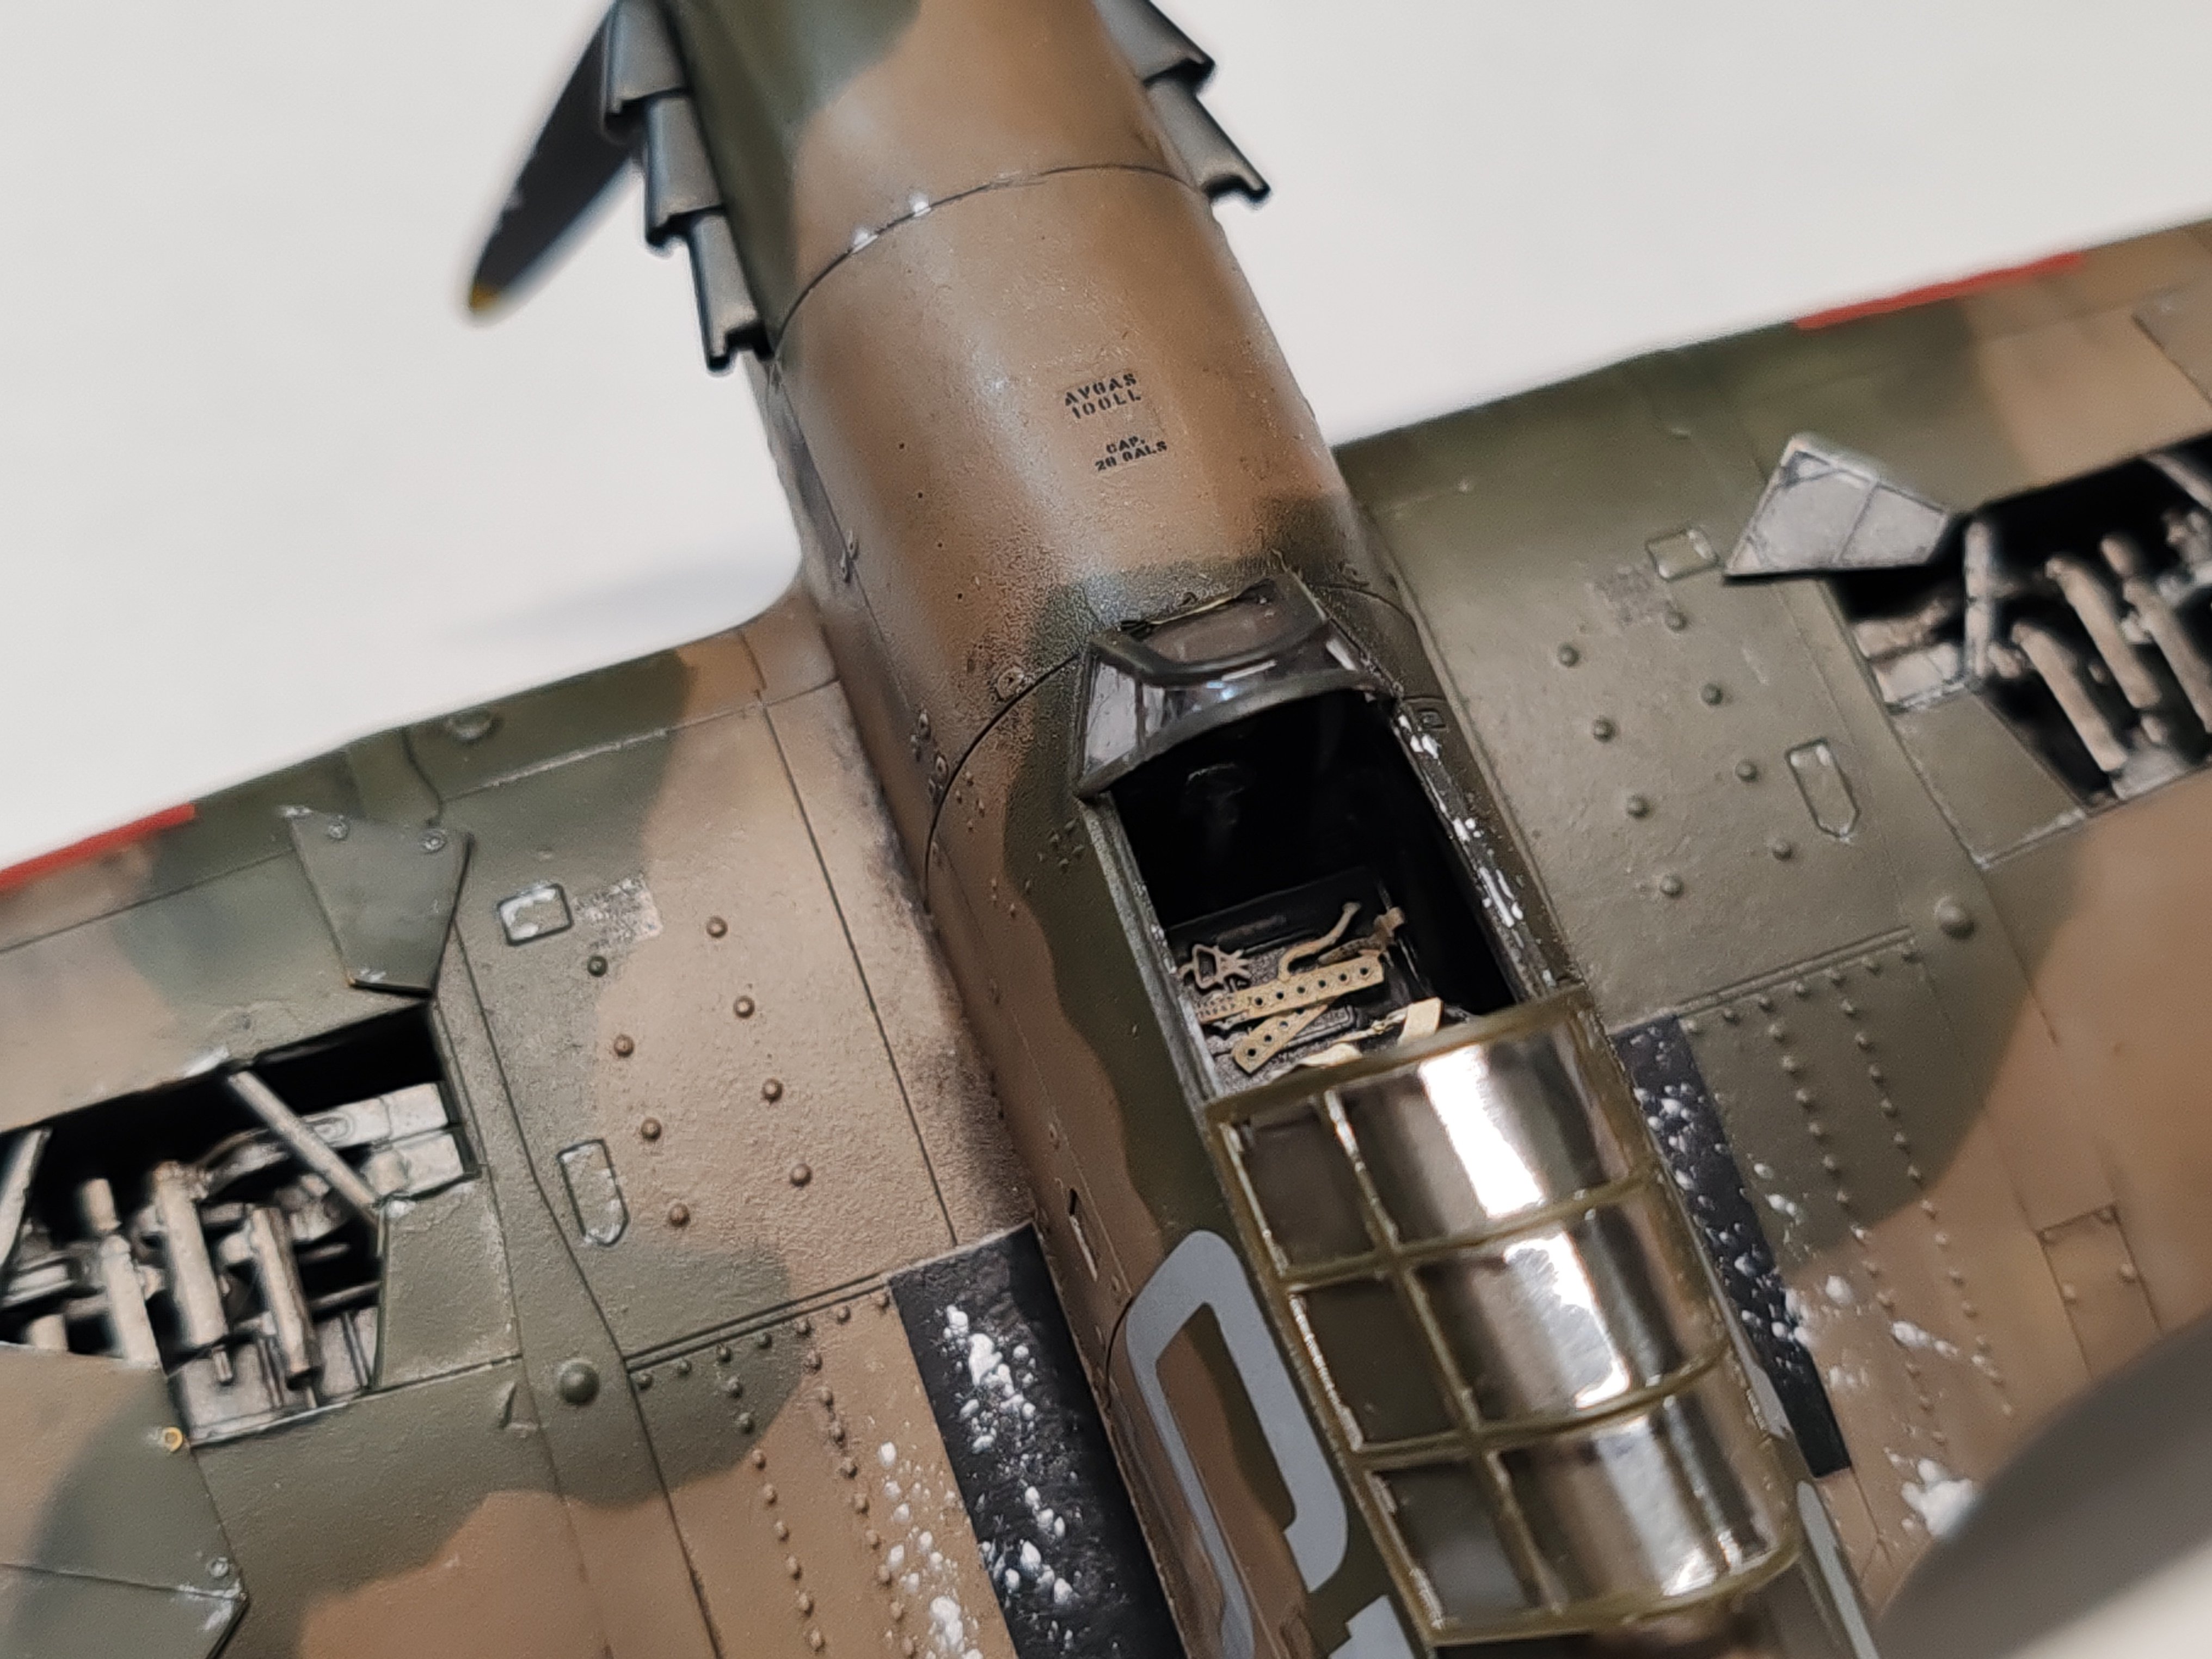
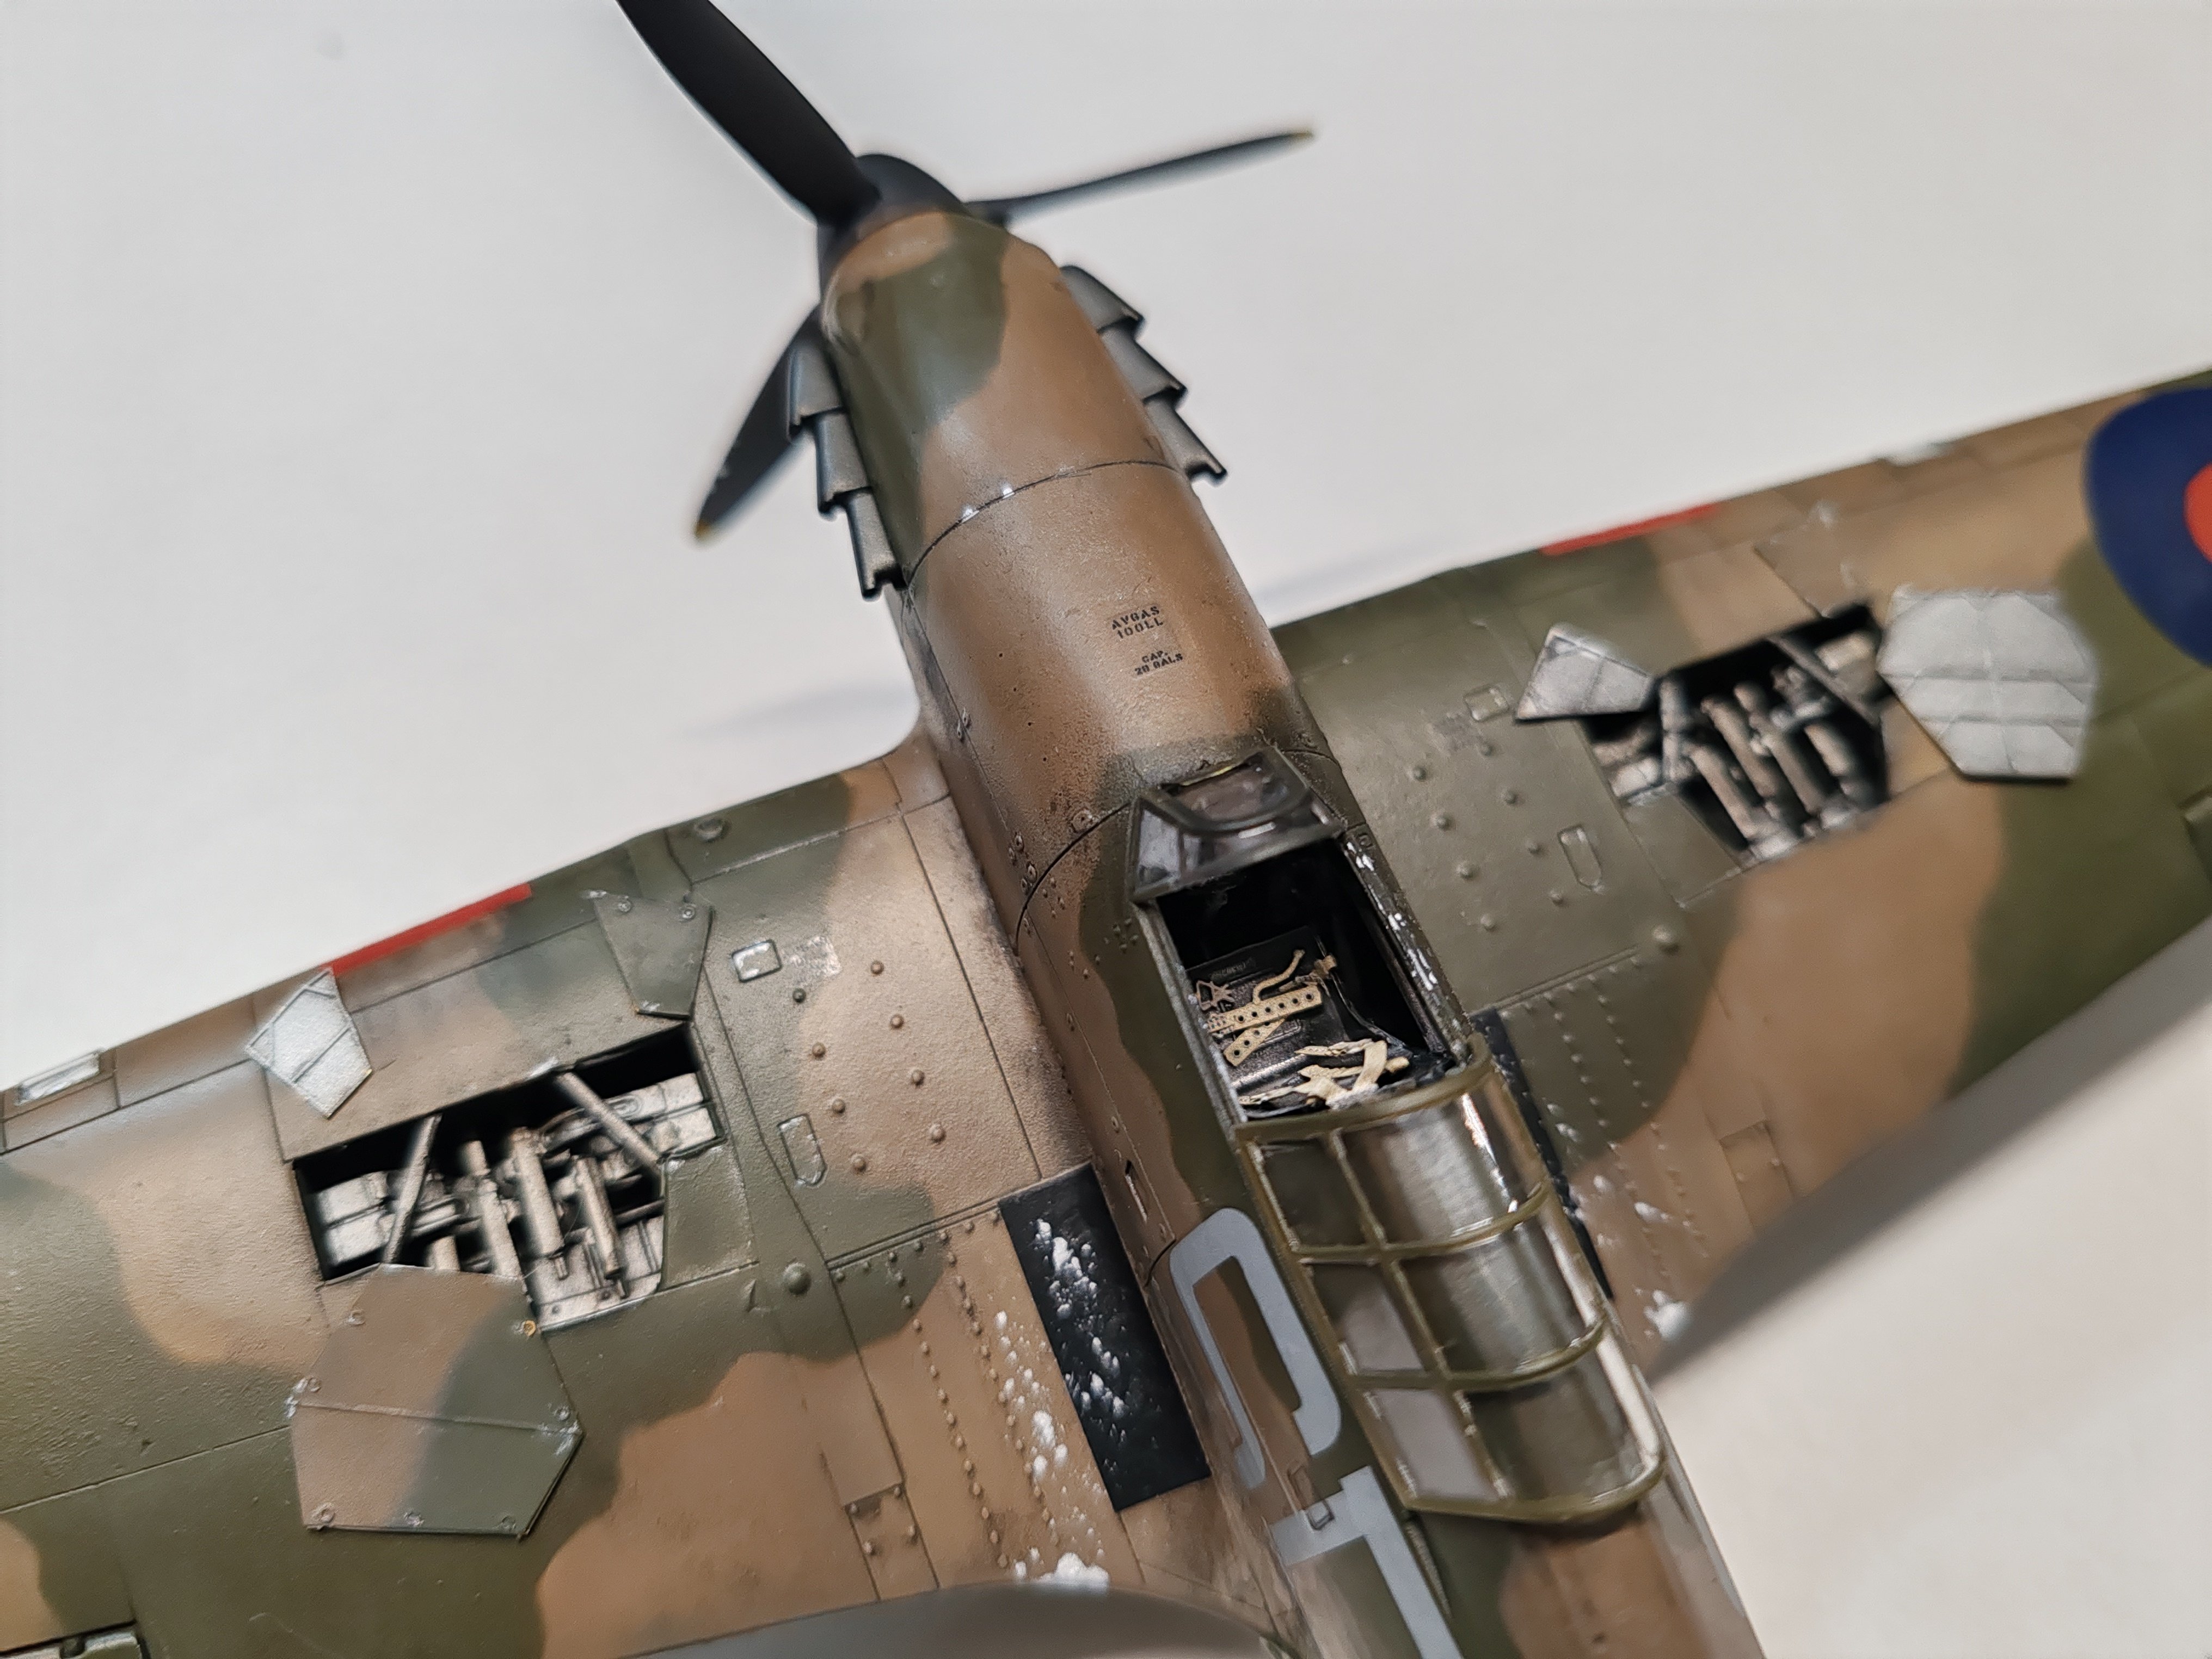
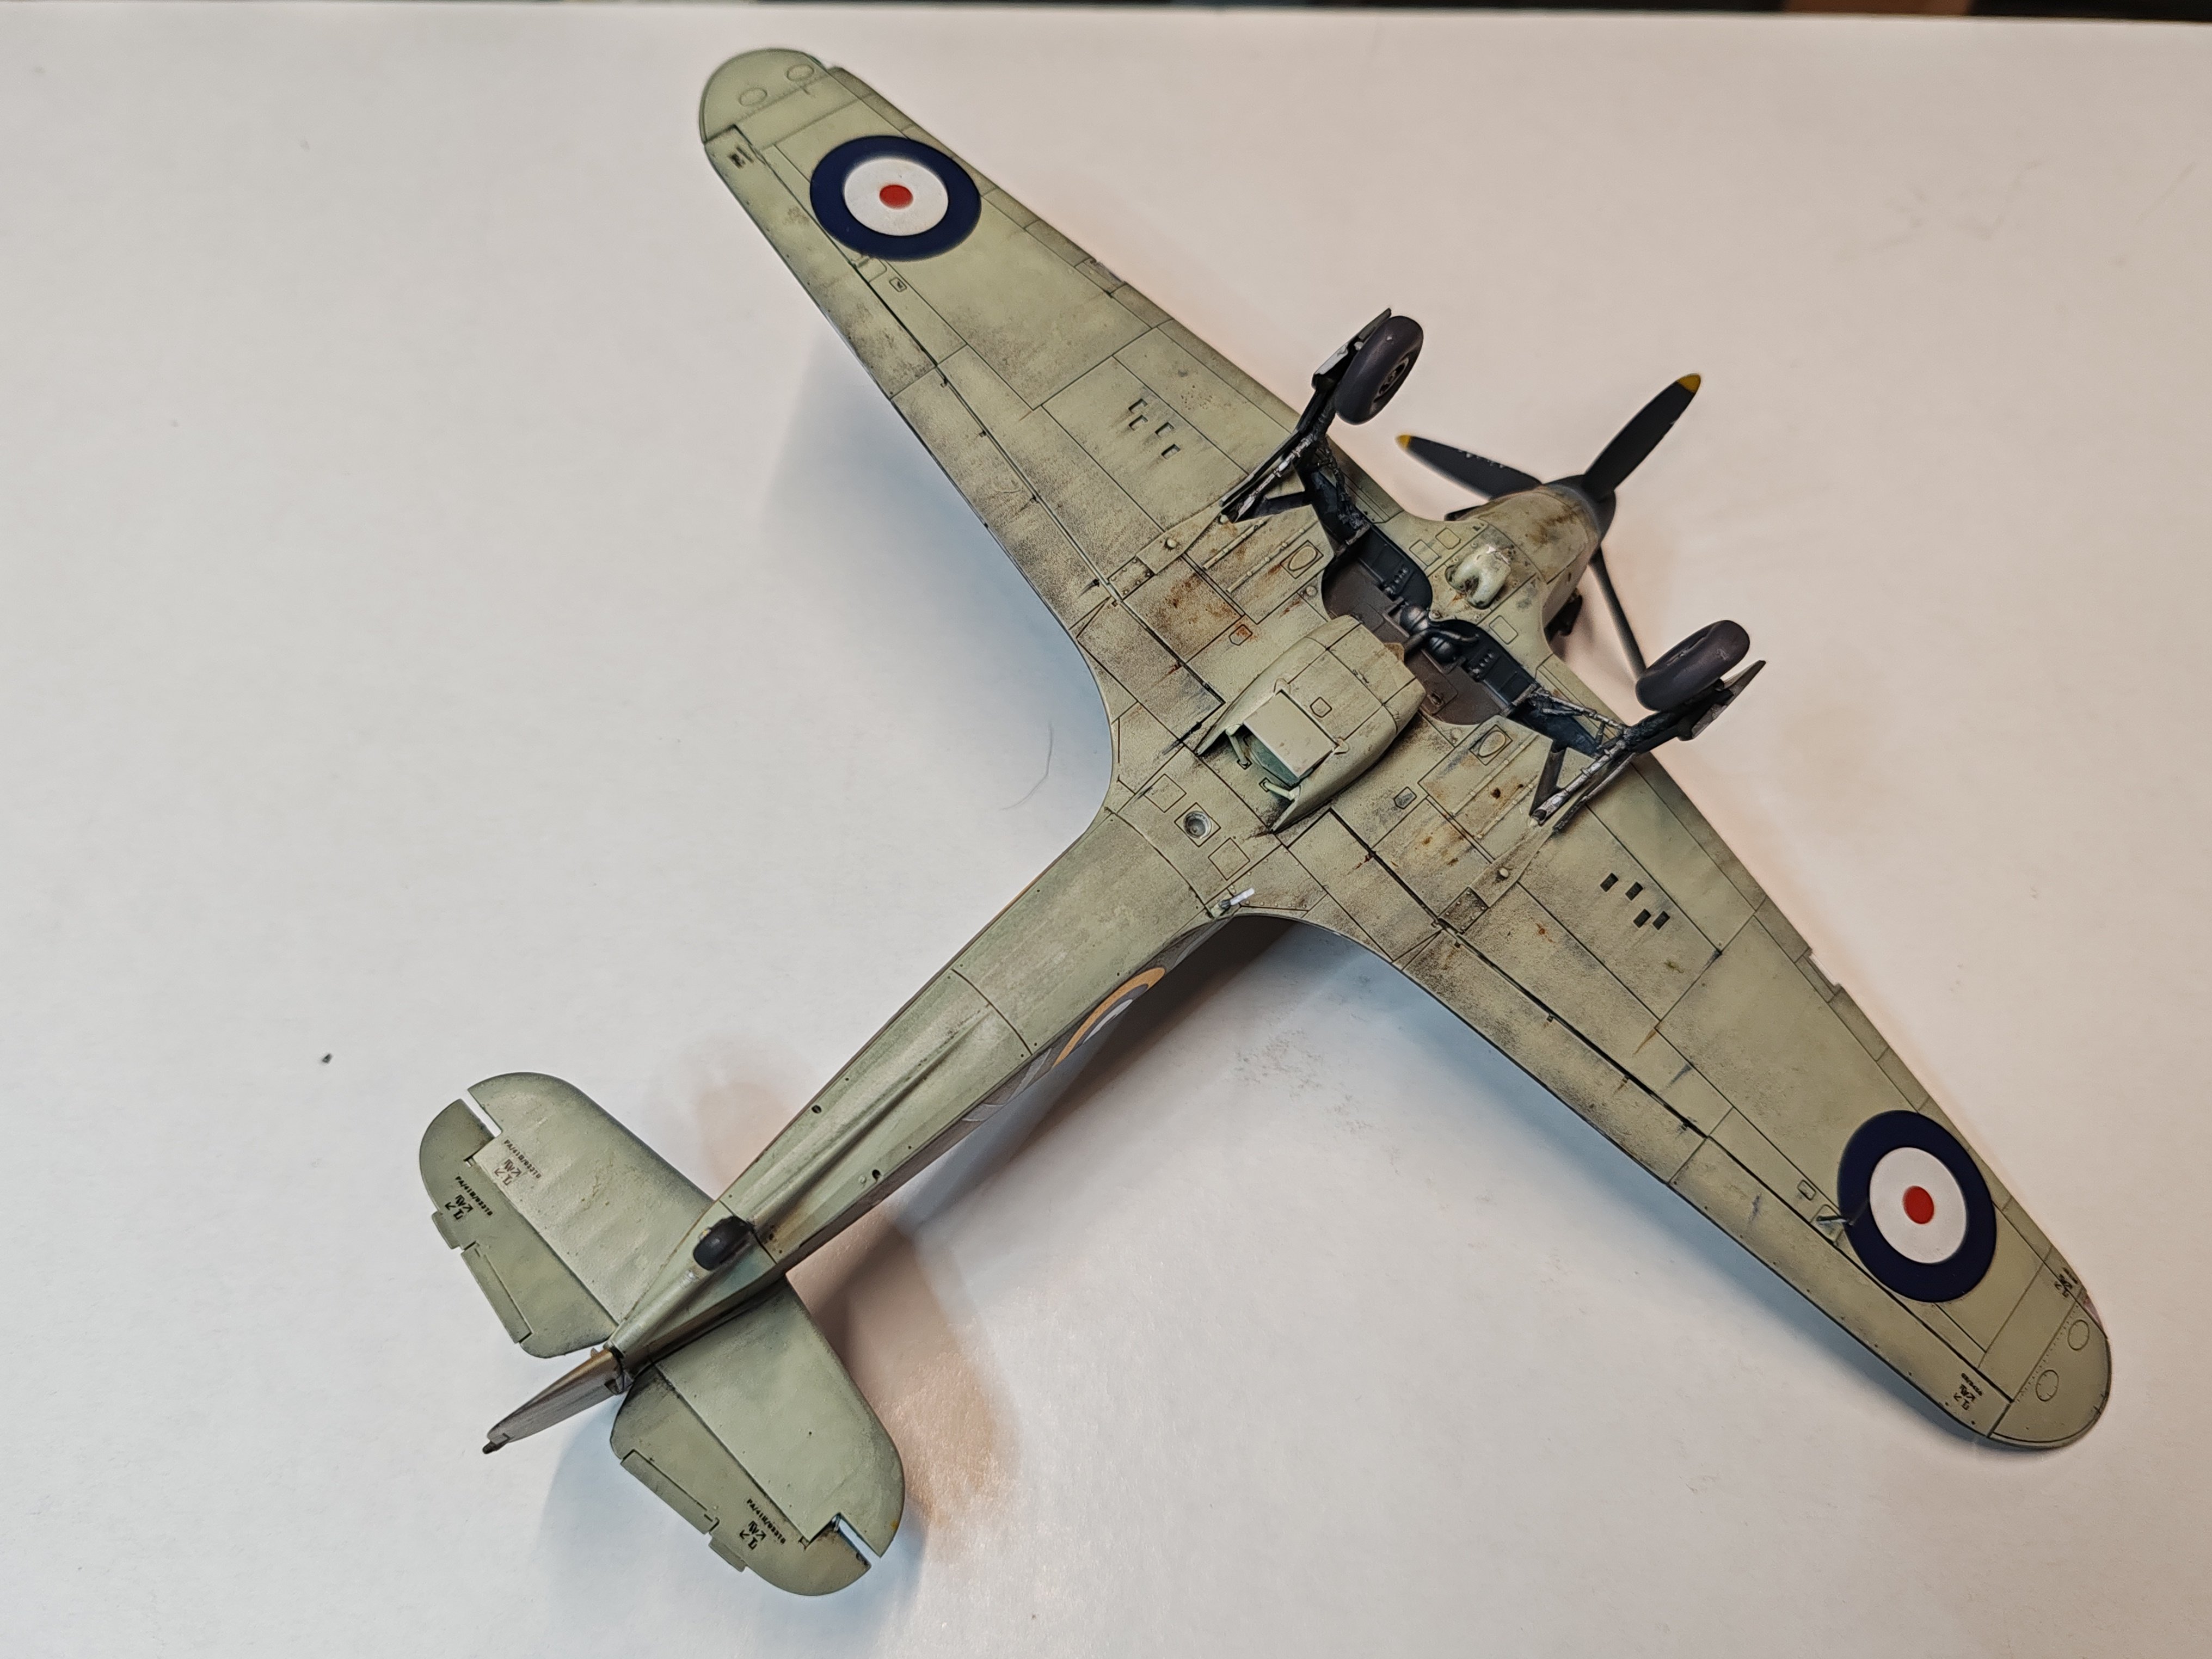
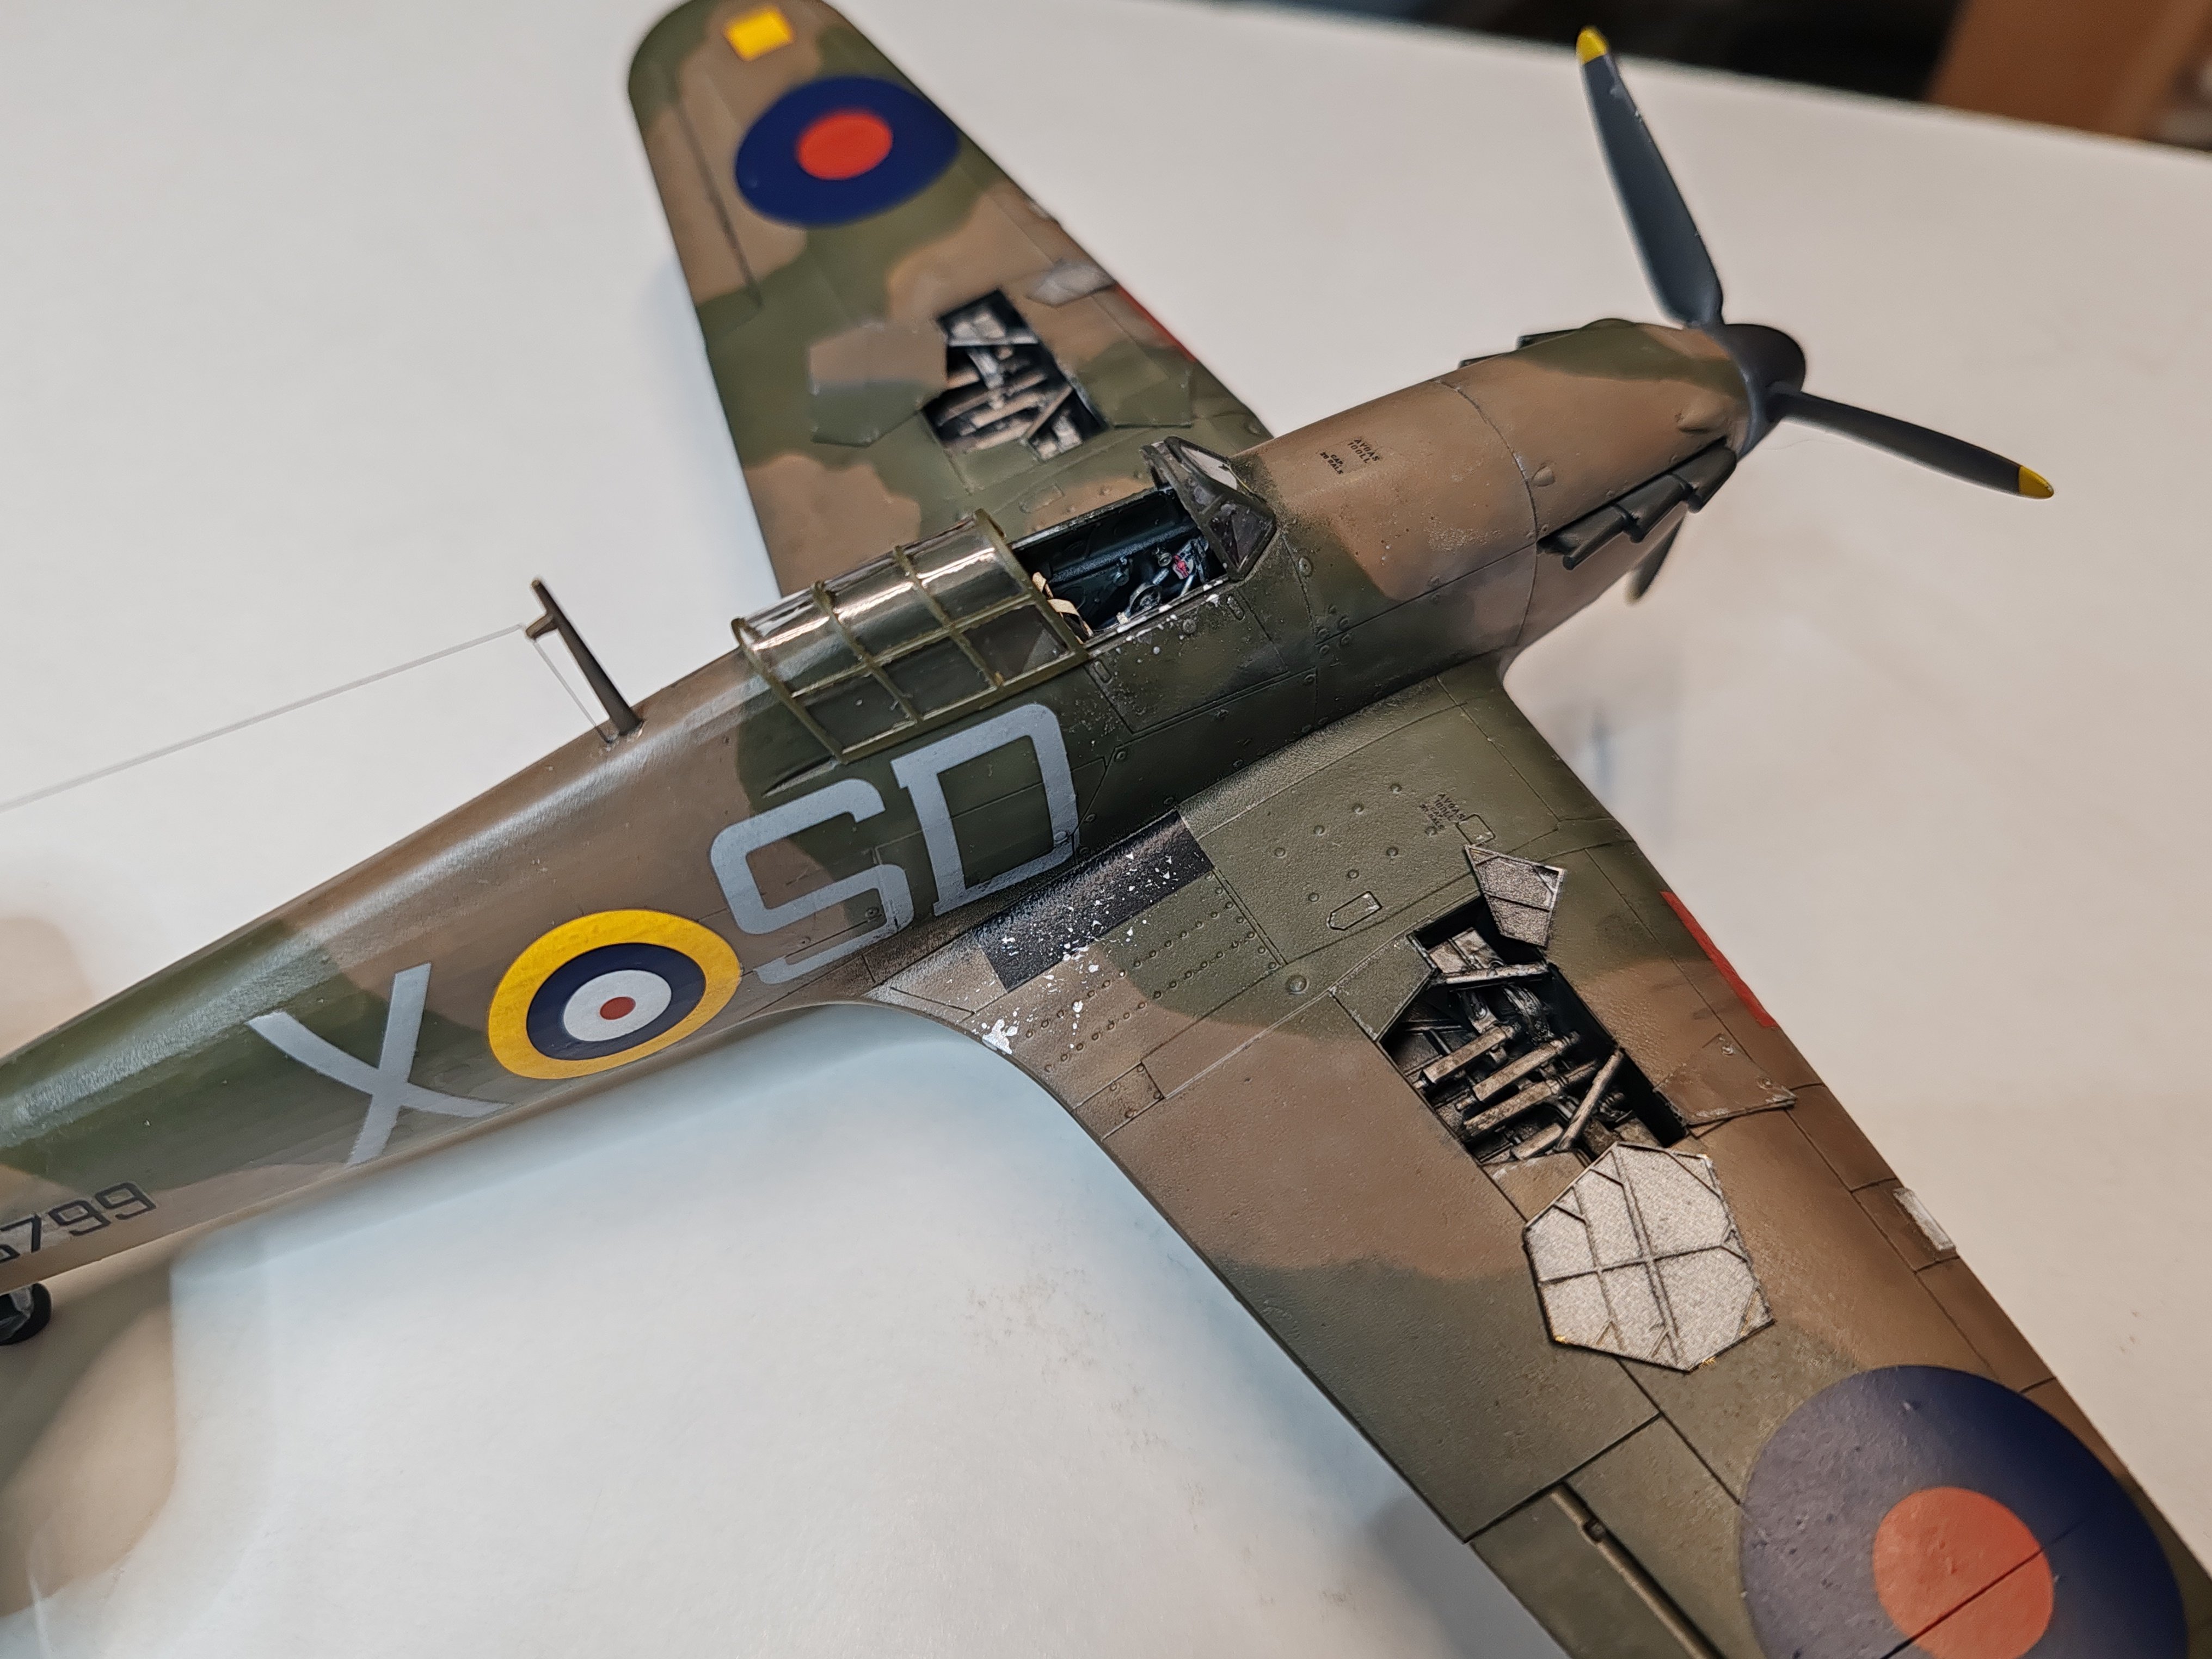
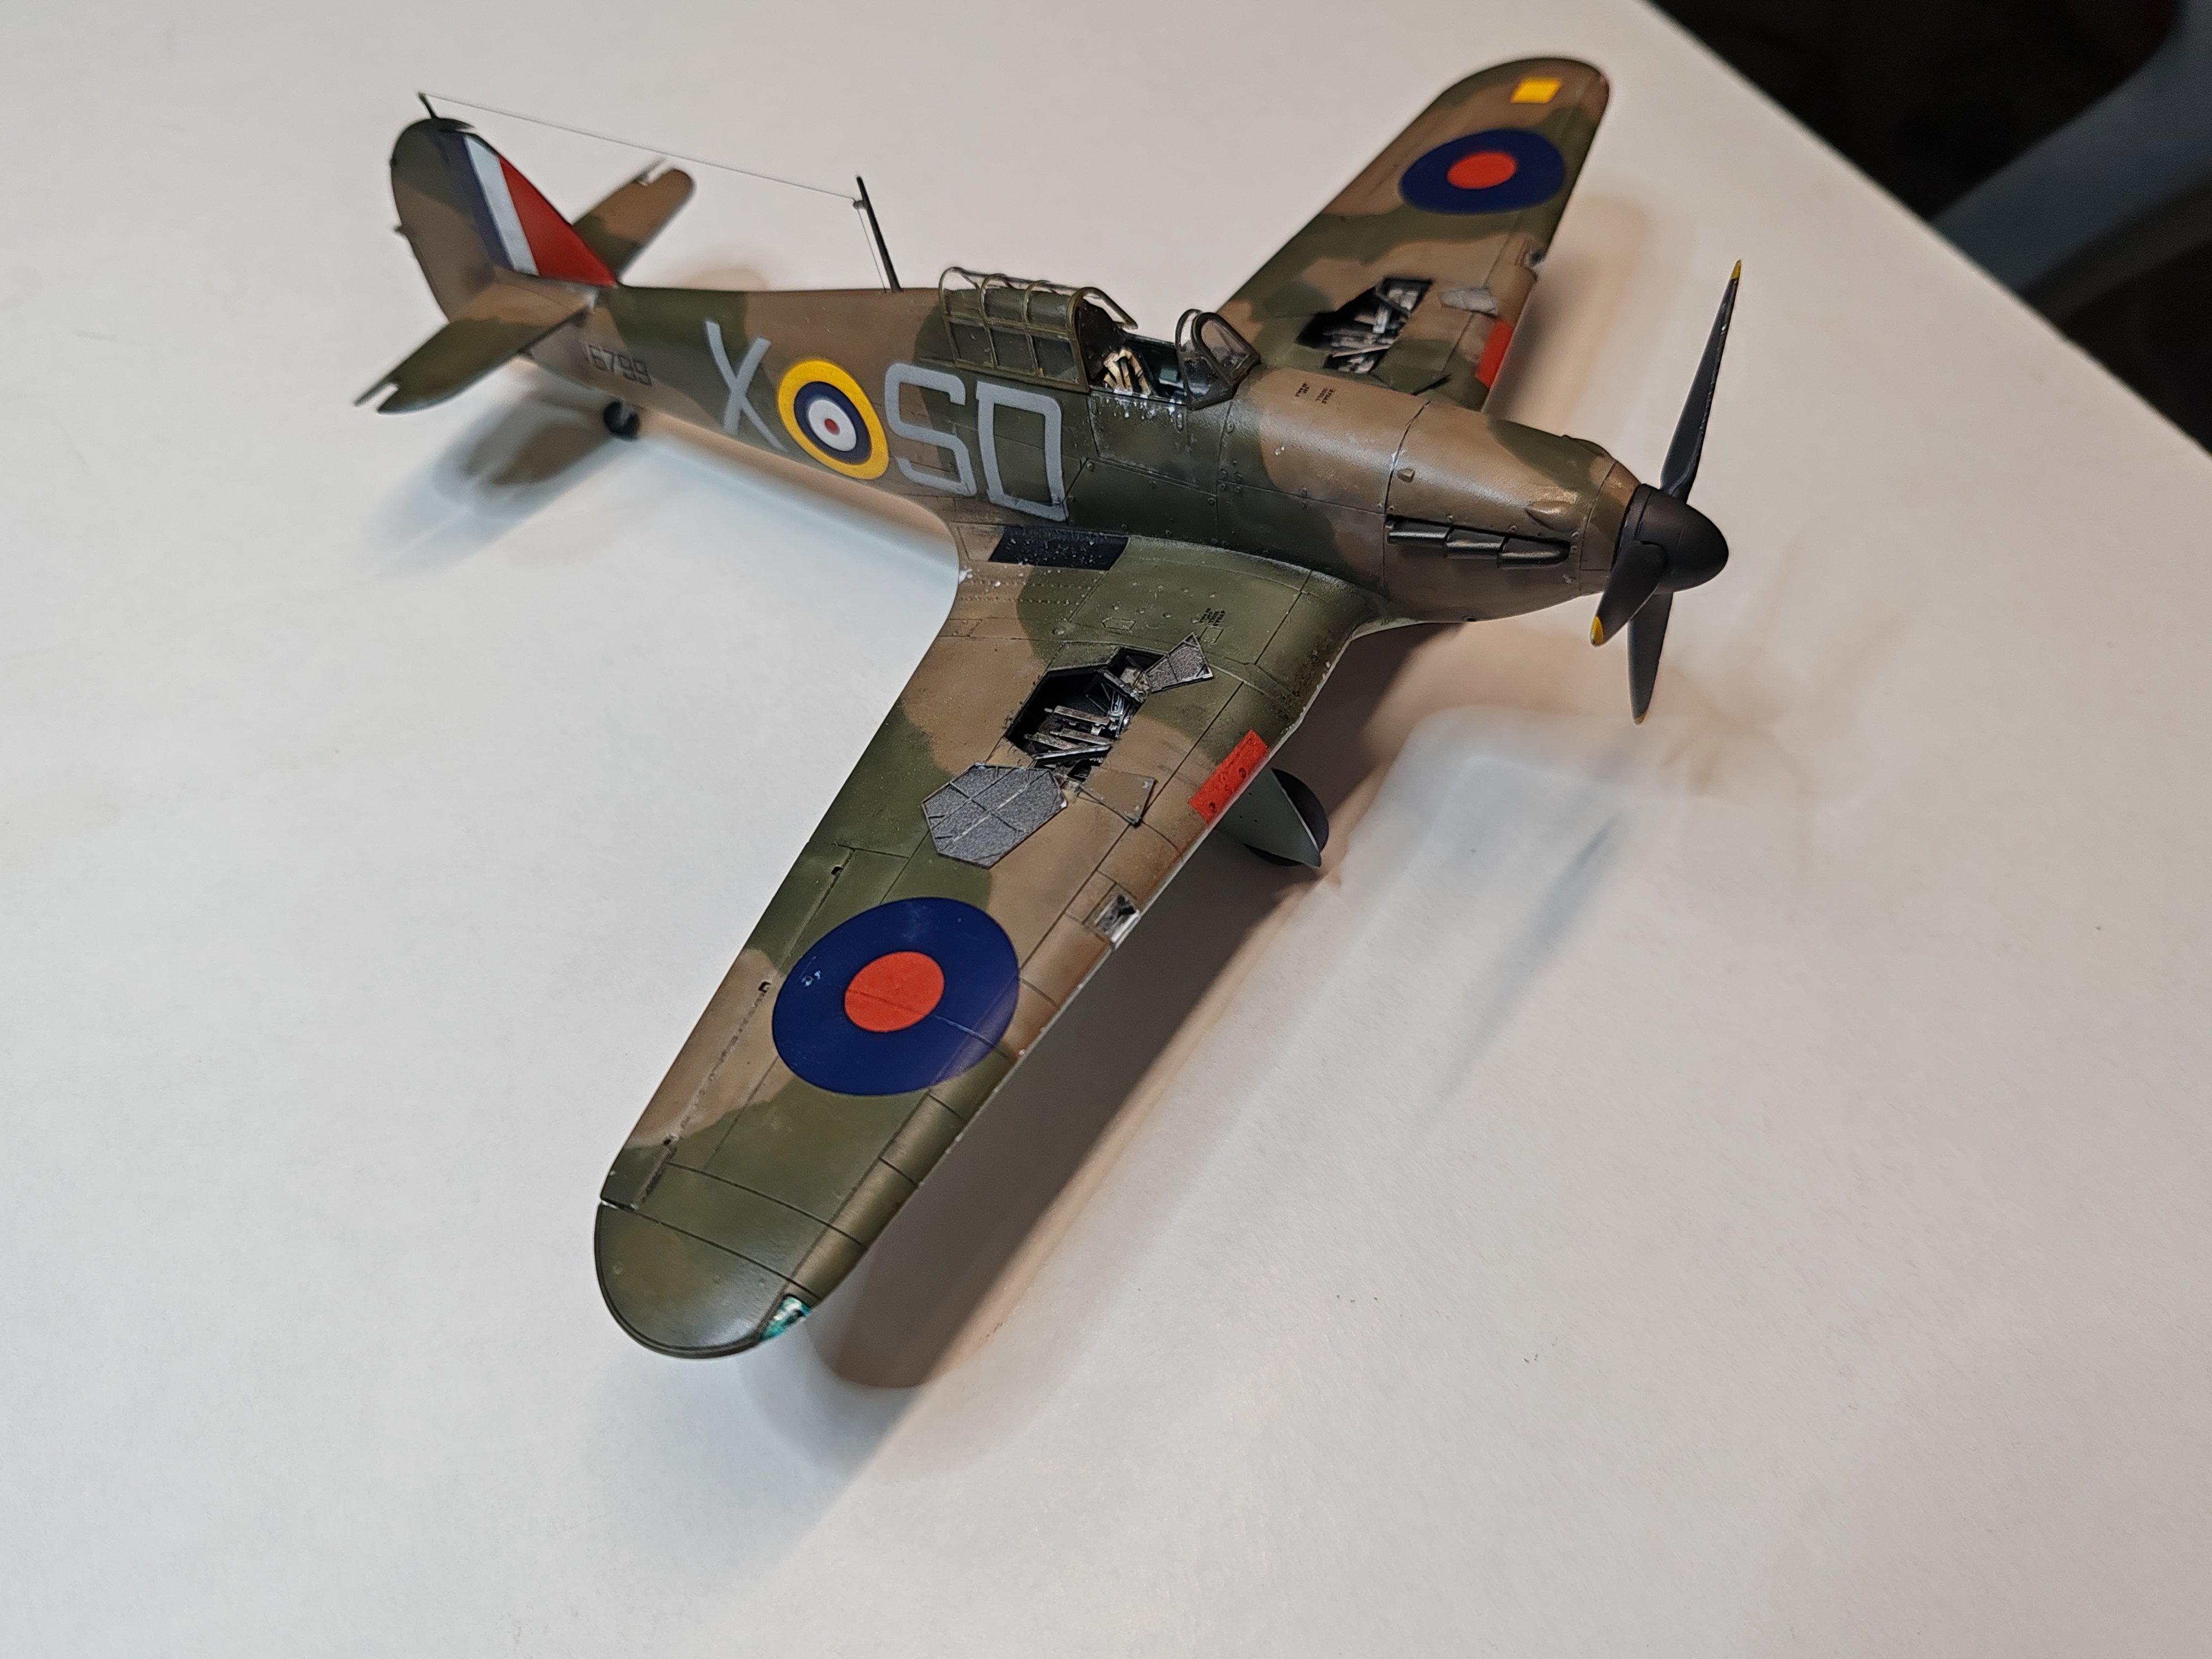
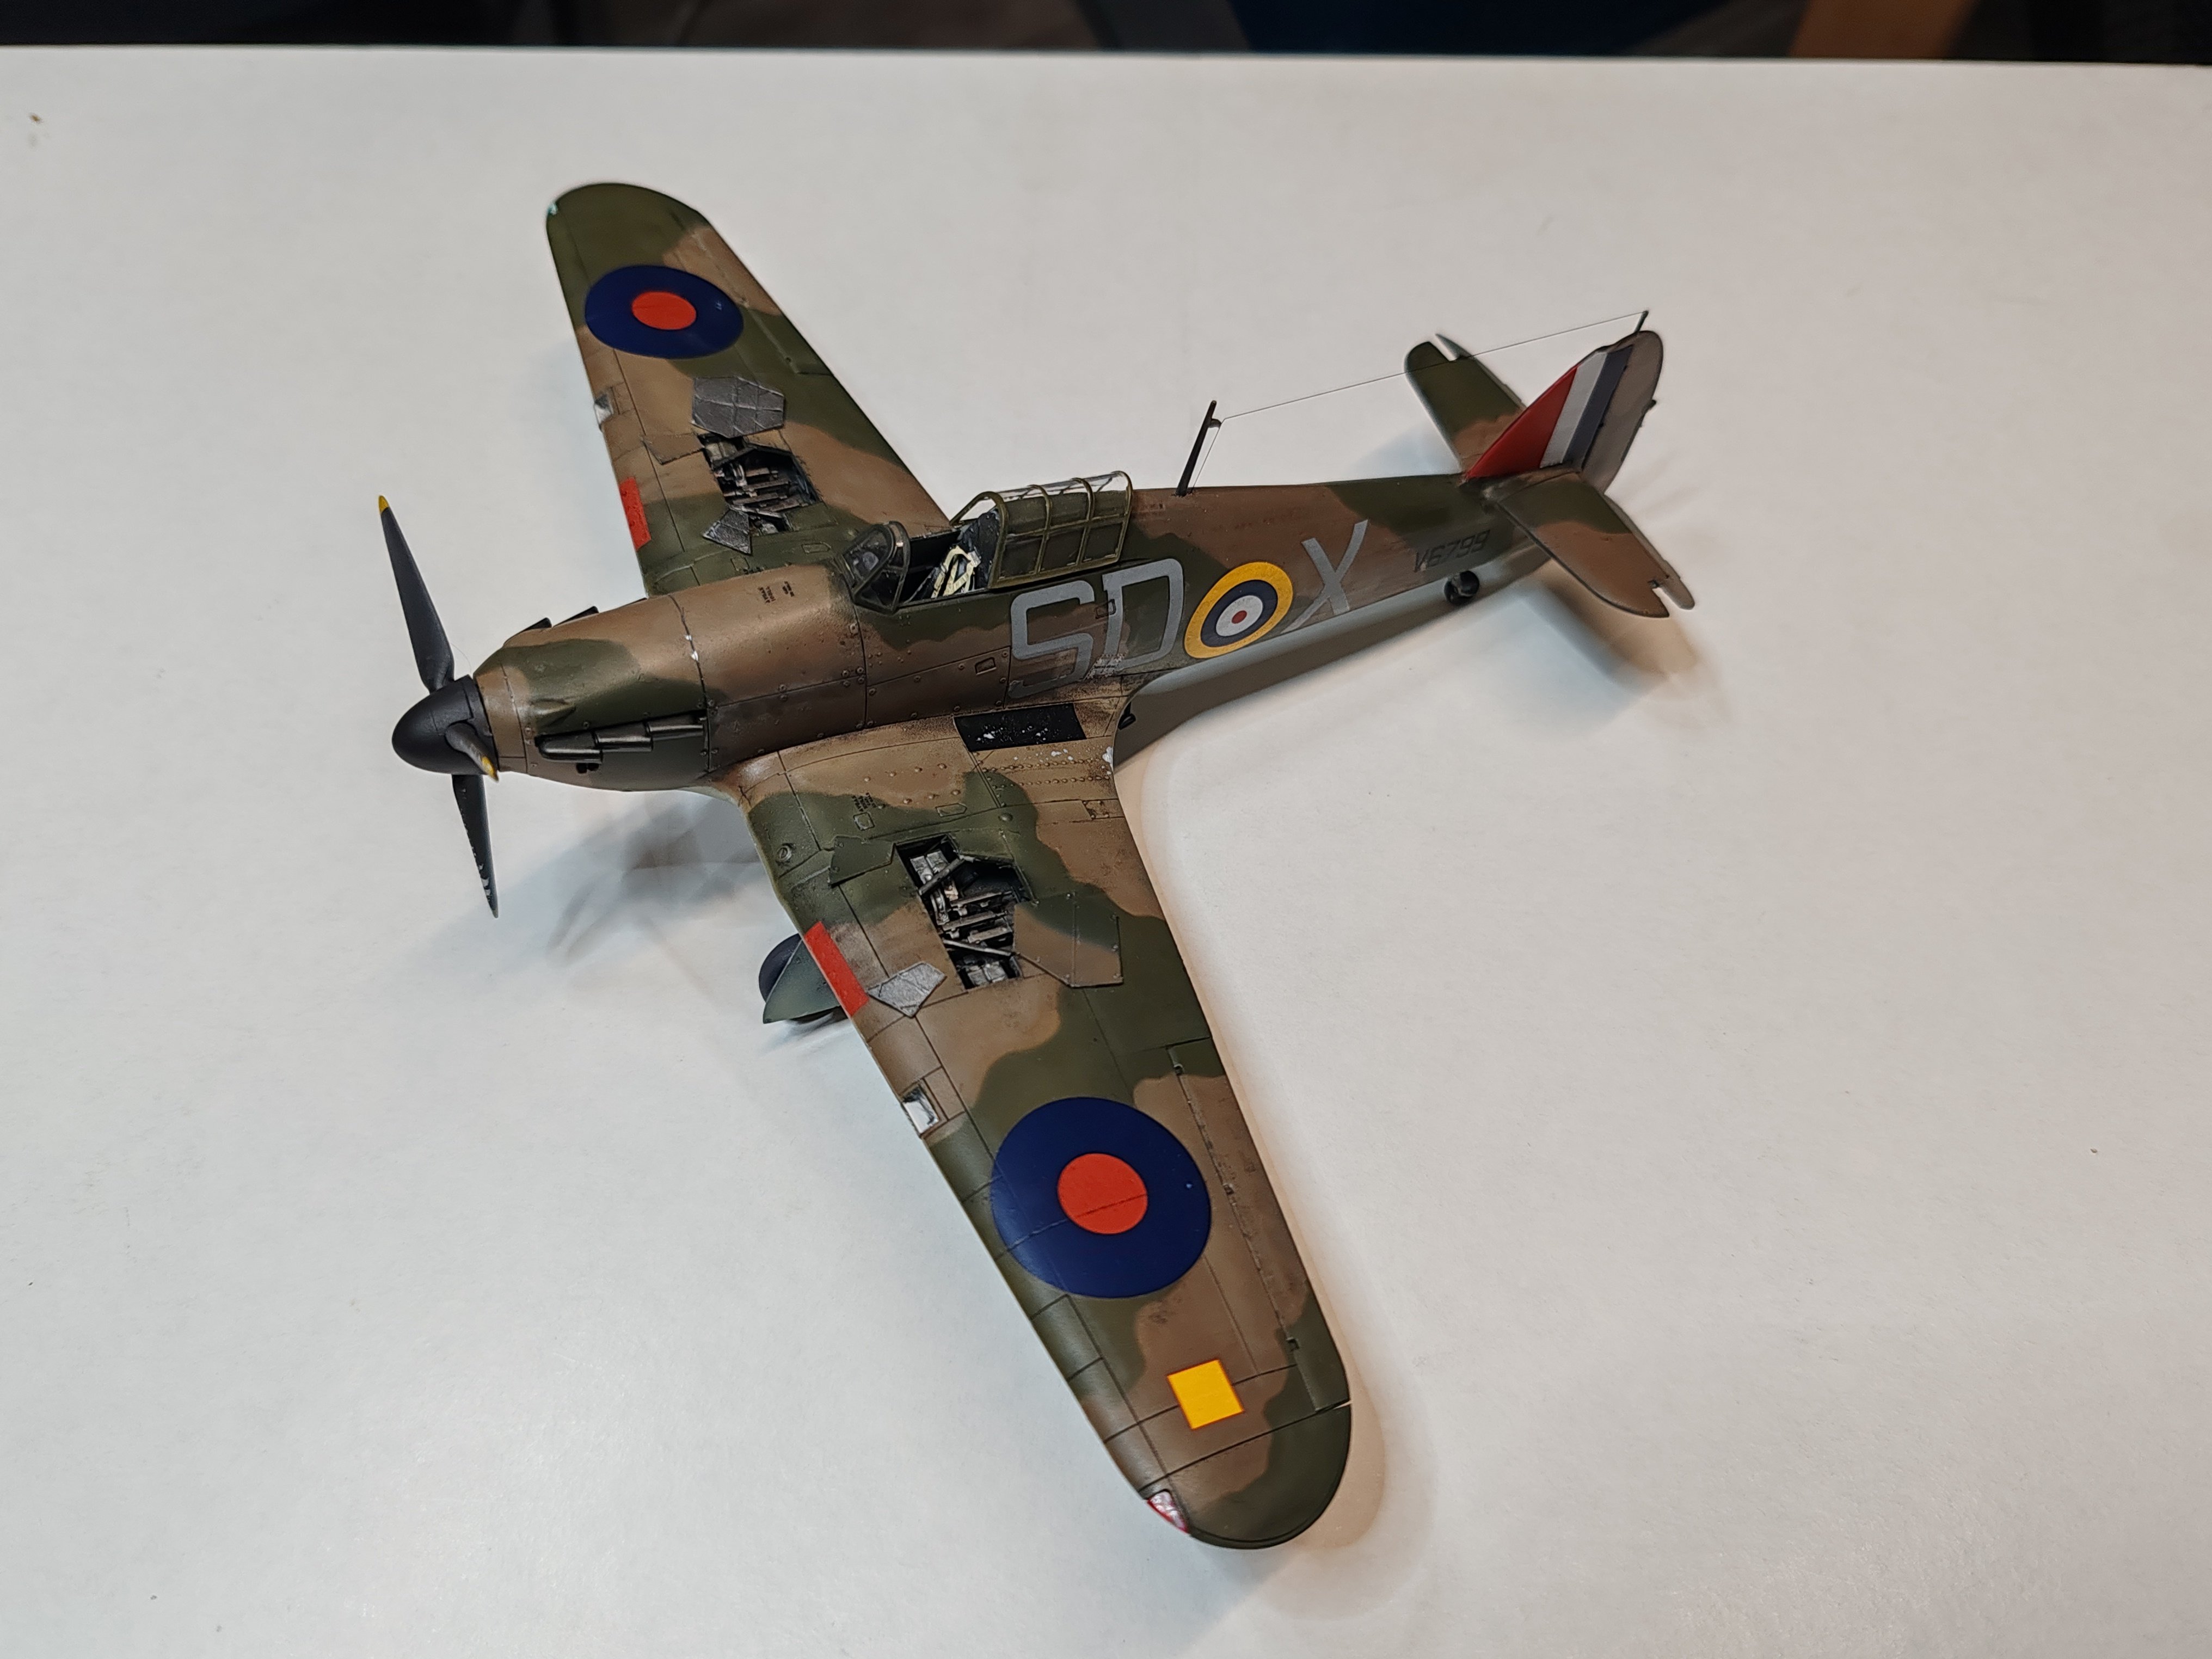
Airfix 1/48 Hurricane completed . Oct 7th 1940, Battle of Britain was nearing its climate, Pilot Officer Ken McKenzie (born in Belfast) of 501 Sqn, after expending all his ammo, he used his wingtip to knock the tail plane of a Me.109 causing it to crash into the sea. The RAF pilot made a forced landing near Dover. McKenzie eventually shot down 13 German Aircraft and was shot down in 1941, pretending to be mad was repatriated to England in 3 years later he died on 200 aged 92. Awarded the DFC he was a true hero.
7 points
-
Thanks - first effort at lining a loco! Hopefully some day it will appear at a show alongside Mr Hs! . @Northroadermade one too, so there’s a few about!
7 points
-
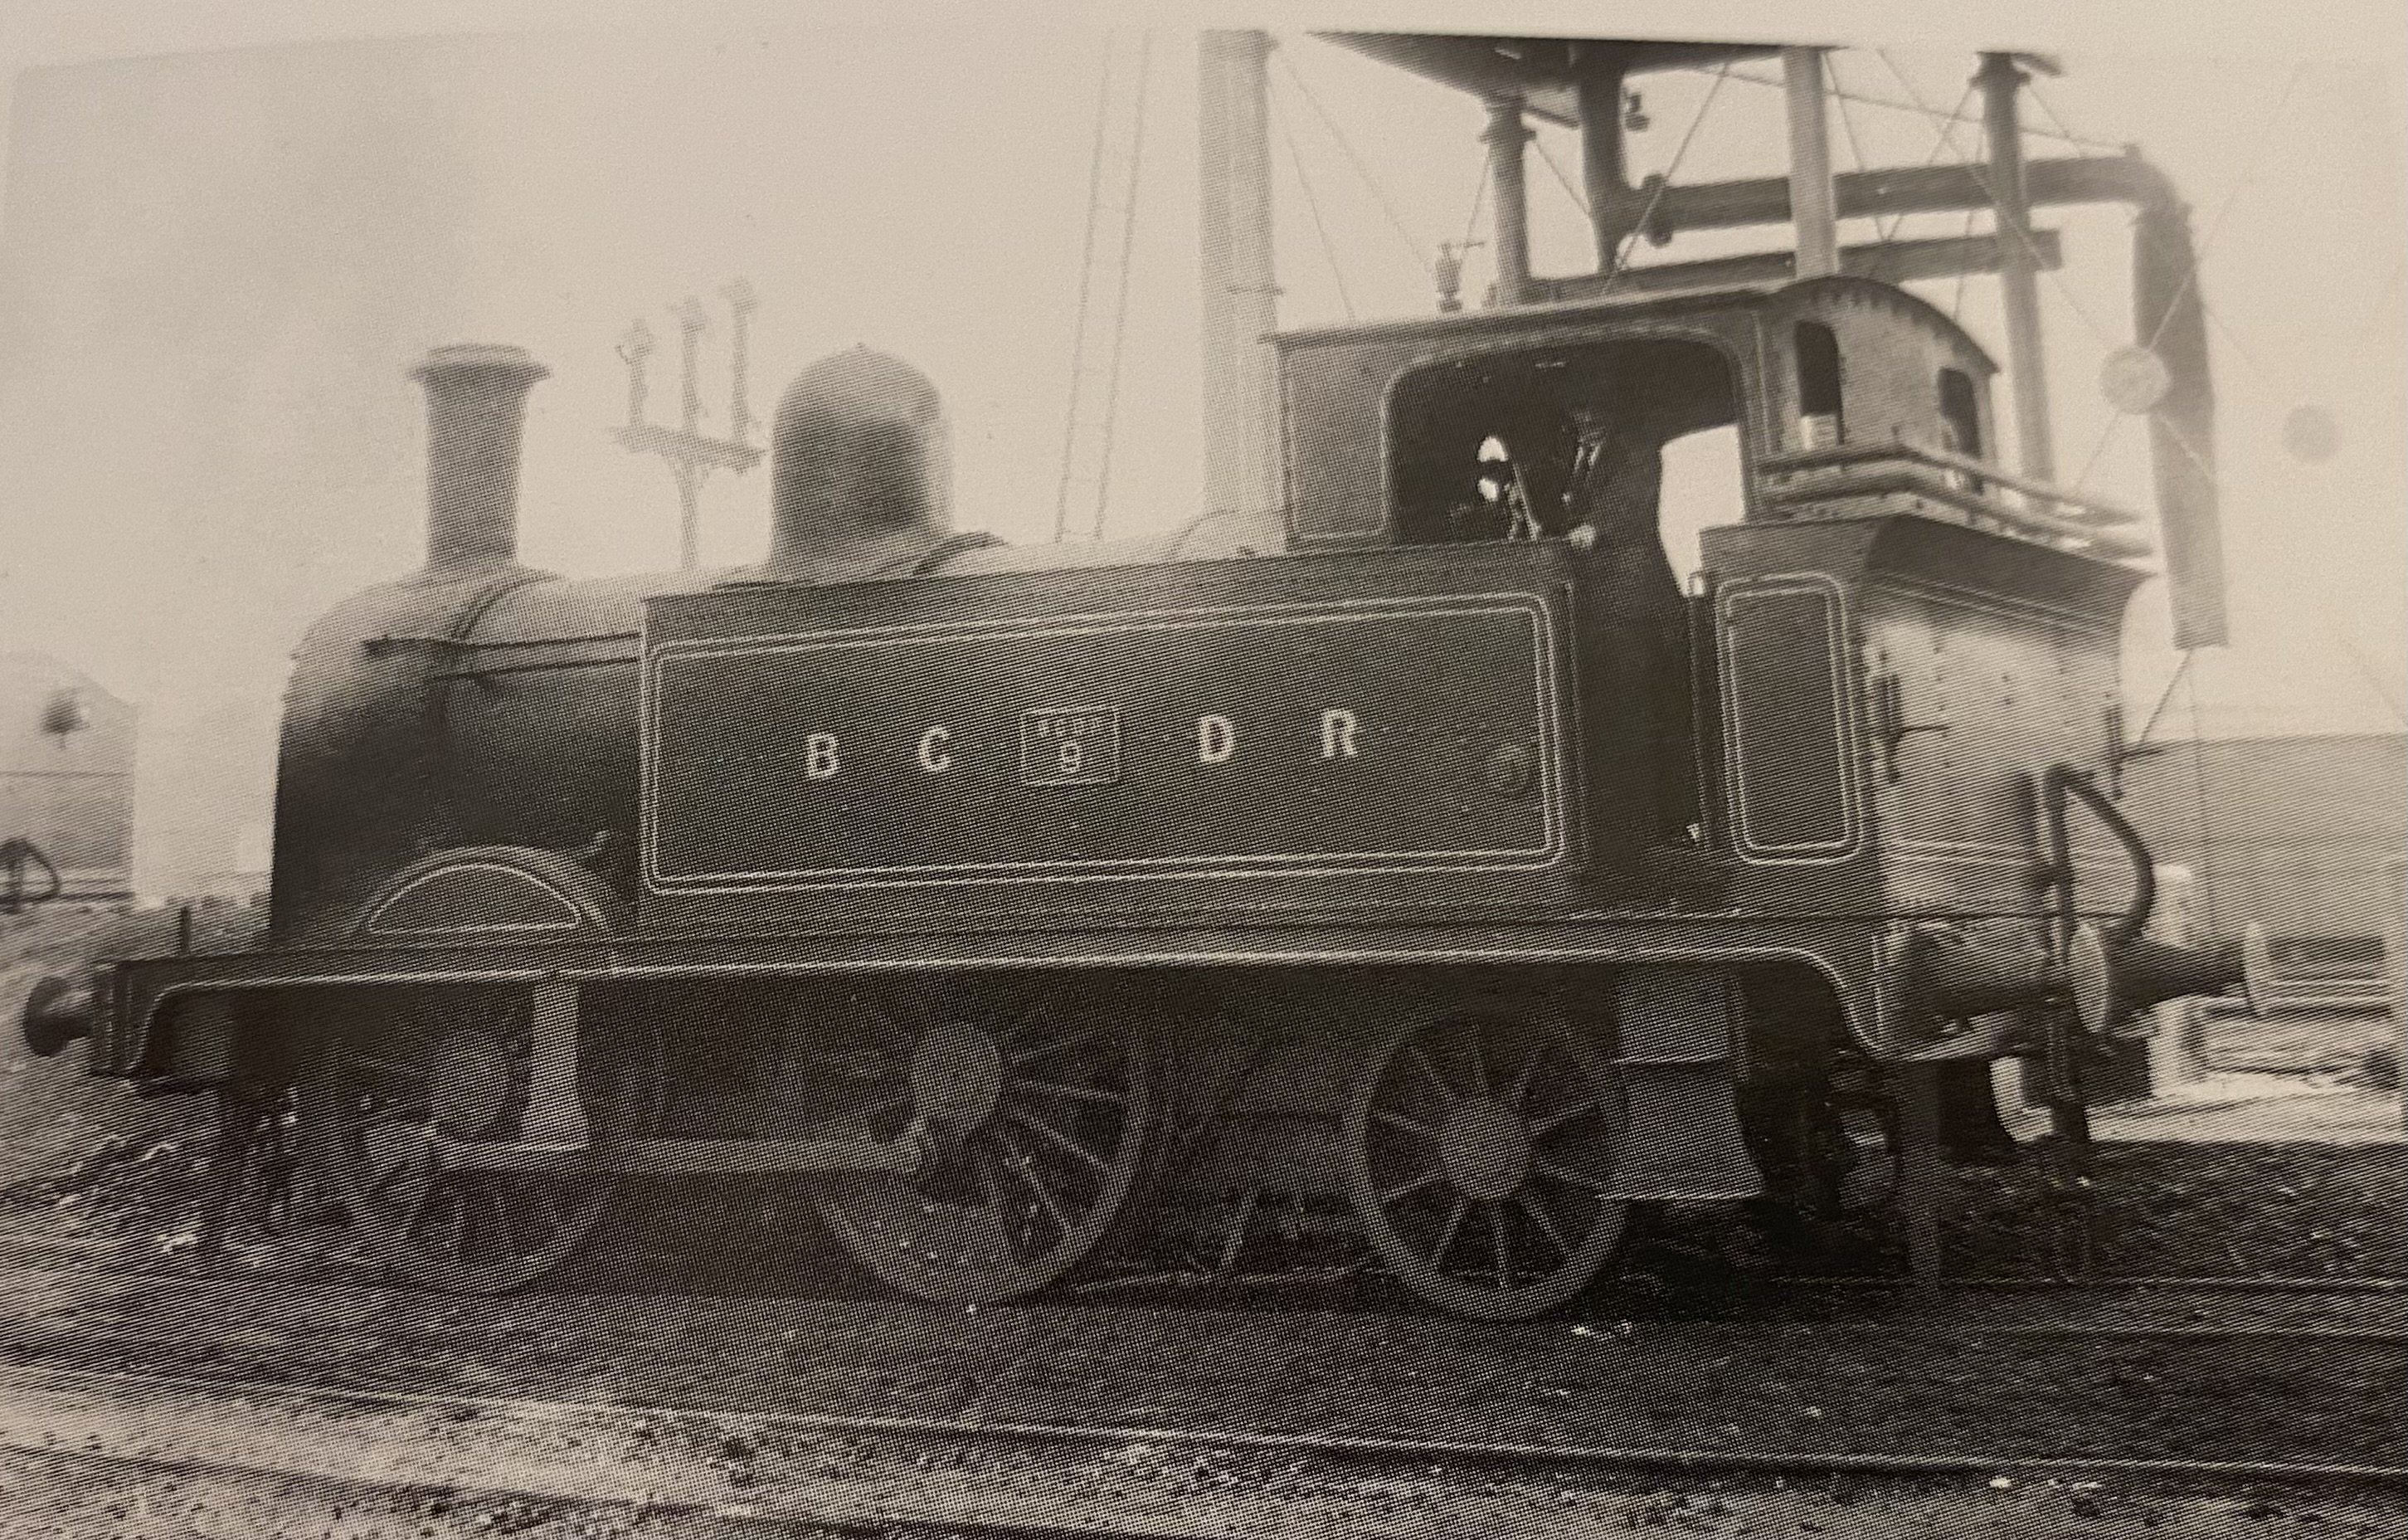
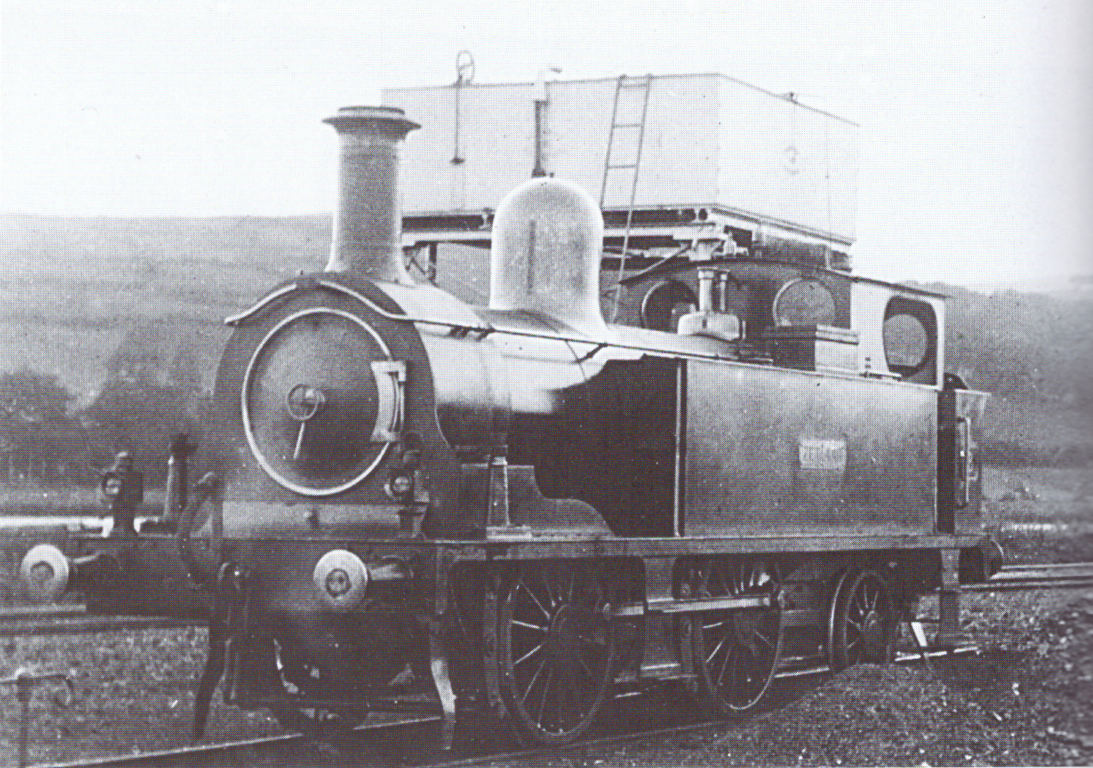
0-4-2 tank, a rare type in Ireland, tender versions were common enough in the 19thC The WLWR did however have a very handsome example
7 points
-
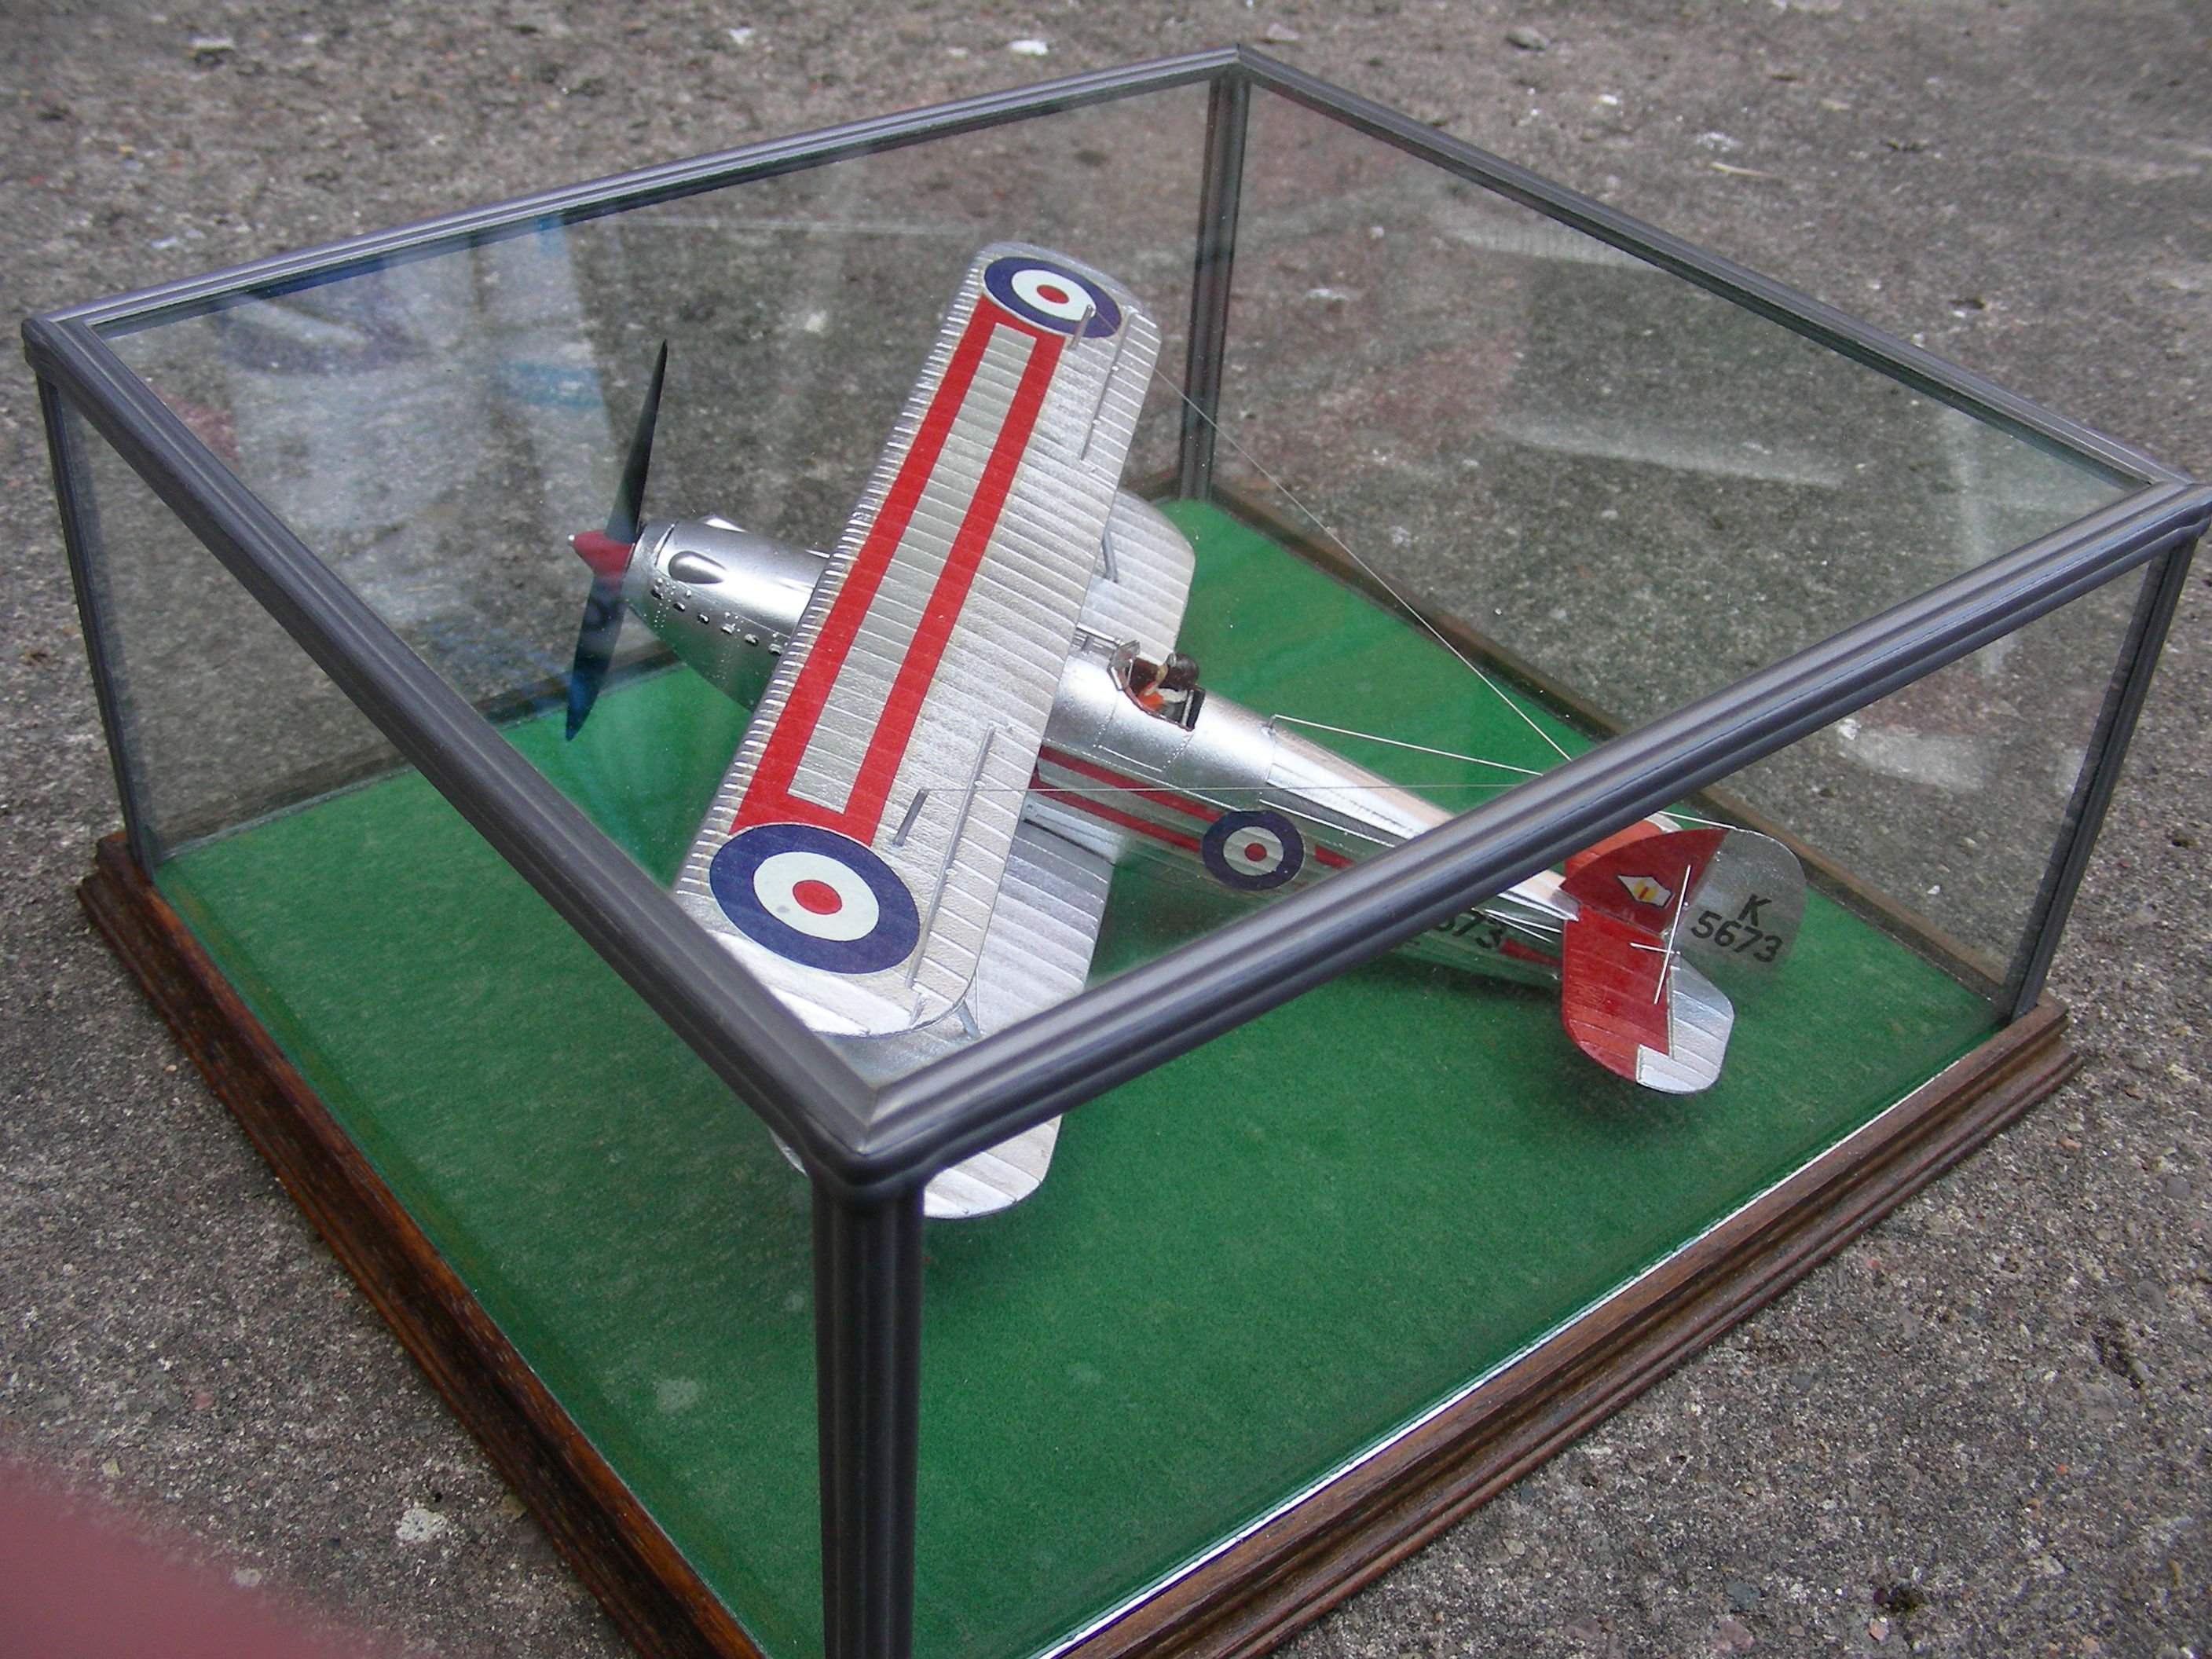
I came up with a system to make these, glass and lead. I made a couple of hundred in the 90s. This is the original prototype that I made for myself, around 1990, as I didn't fancy this getting full of dust. That's a 1/48th, so the case is about 210 x 180 x 90mm.
7 points
-
Delighted to hear of this! If modelling a line which would have been operated like the Achill branch, it's a diet entirely of 4.4.0 D16s 1903-1925, an a mix of these and "foreign" 4.4.0s after that. The odd G2 2.4.0 crept in there too. In its very earliest period (1895-1901) the G2 2.4.0s (MGWR "D" class) and also their "E" class (GSR J26) 0.6.0T. The Clifden line probably had the least variety of motive power of any line in steam days; in early days the 2.4.0s, but quite quickly replaced by J18 0.6.0s, which would be the sole power on the line after that. However, imagine this; your line is actually a GSWR one, from maybe Tuam or ballyglunin, heading through Headford and Cong to the other end of the Maam Valley. That gives you an excuse to use GSWR stock, which was more varied and plentiful! Bearing in mind Galteemore's comments about four-wheeled locos and their layout-wandering quirks, and the availability of the Hattons 6-wheelers (which are close to a GSWR design) and 00 Works J15s, as well as Provincial Leslie's GSWR brake vans, perhaps a scenario like this might be an idea? As it happens, this is precisely what's behind my own Dugort Harbour. There is a real Dugort - it's a small village on the north side of Achill Island, and at one stage there was a vague proposal to extend the Achill branch across Achill Sound (on what would have been quite a spectacular bridge over a narrow bit of sea containing a quite vicious sea current). It was my original intention that the layout was to be based on this extension as it might have been. With no JM Design 2.4.0 G2 as yet on the scene at that time (as I would have bought 3 or 4!) but various British 0.6.0s available which I could butcher into a vague equivalent of a J15, I thought I'd switch it to West Kerry, wher you'd lines like Valentia and Kenmare and Newmarket which rarely saw anything but J15s. I had also considered a Tuam - Headford or Tuam - Cong branch. Had such a thing been built, it would have been originall WLWR, then GSWR. So several interesting scenarios there. I'm a great fan of both detailed models of actual locations and "might-have-beens". Wandering off-topic, a thing I am more adept at than actually doing anything about it, two other "might-have-beens" which i had seriously considered were both based on the Achill line; in one, it survives into the diesel era with B141s on all trains; in another it was nrrow gauge, survives to the modern era, and becomes a happoy stamping ground for F class diesels, a transferred Dingle 6T after the C&L closed, Walker railcars and so on..........7 points
-
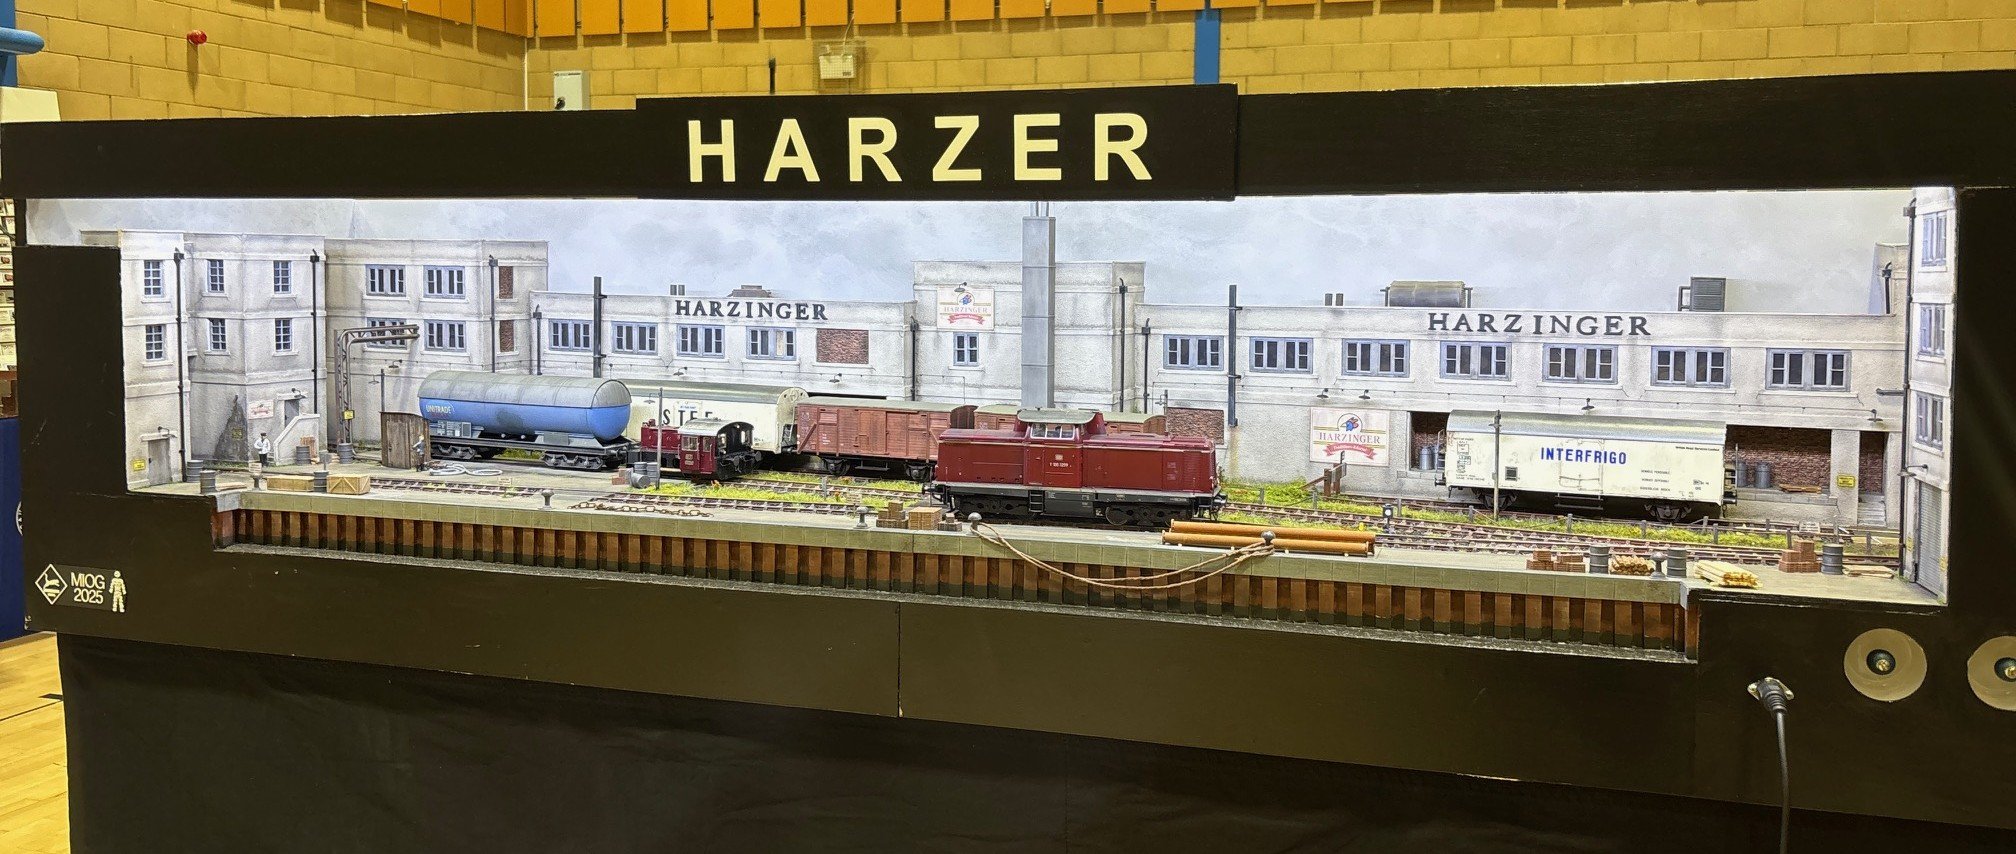
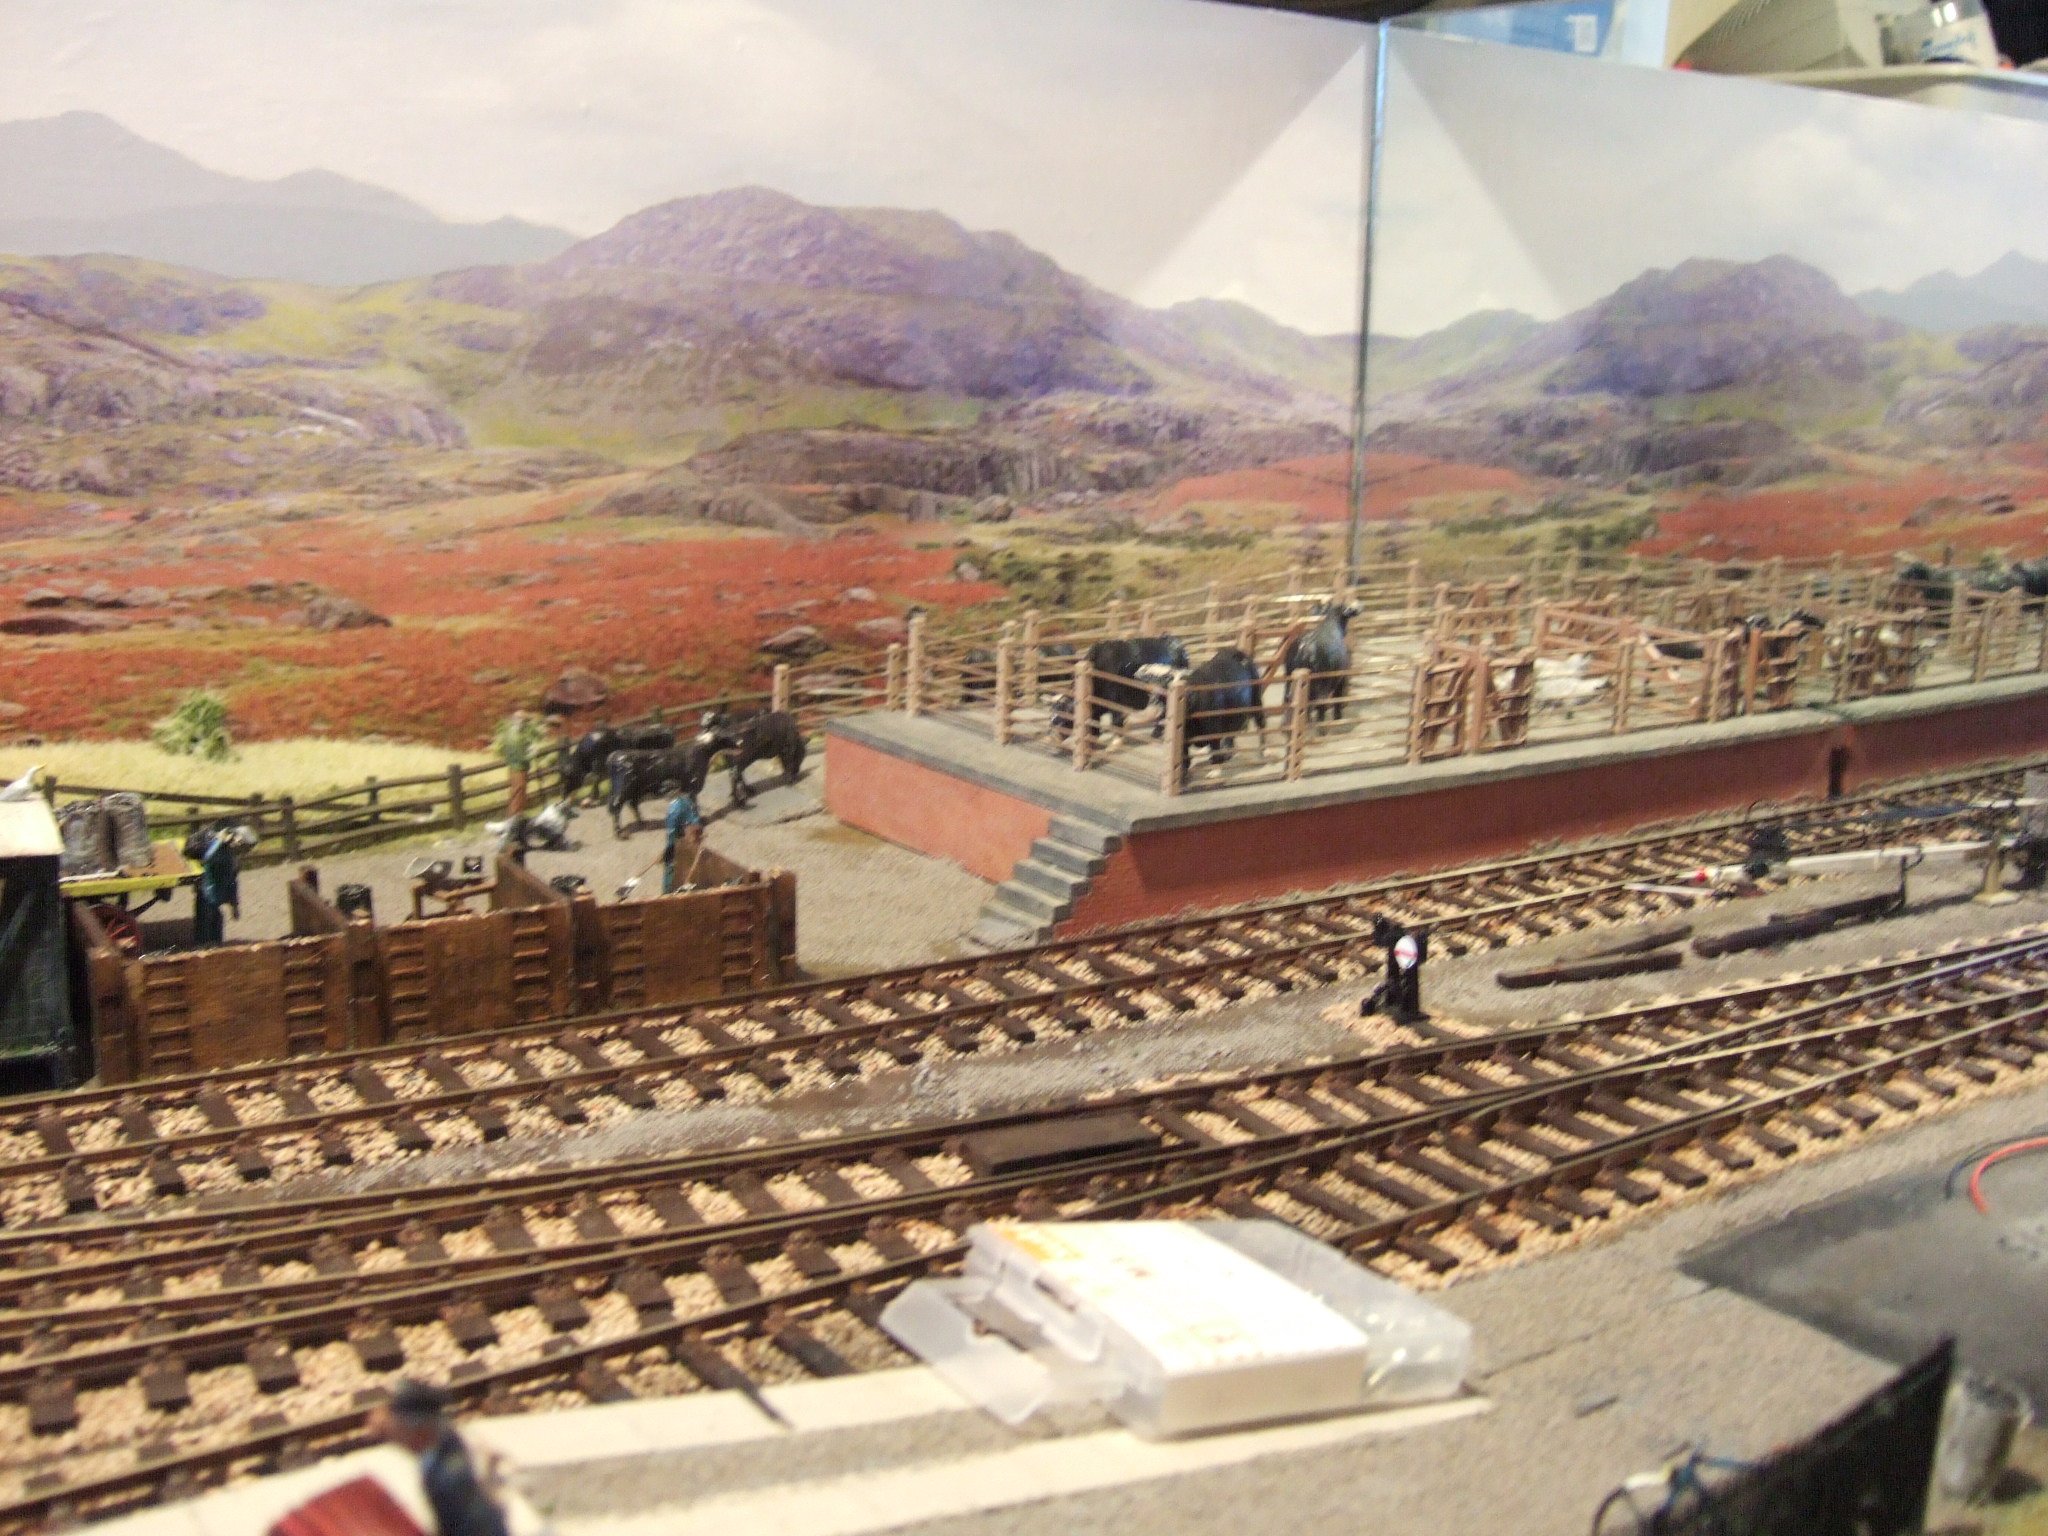
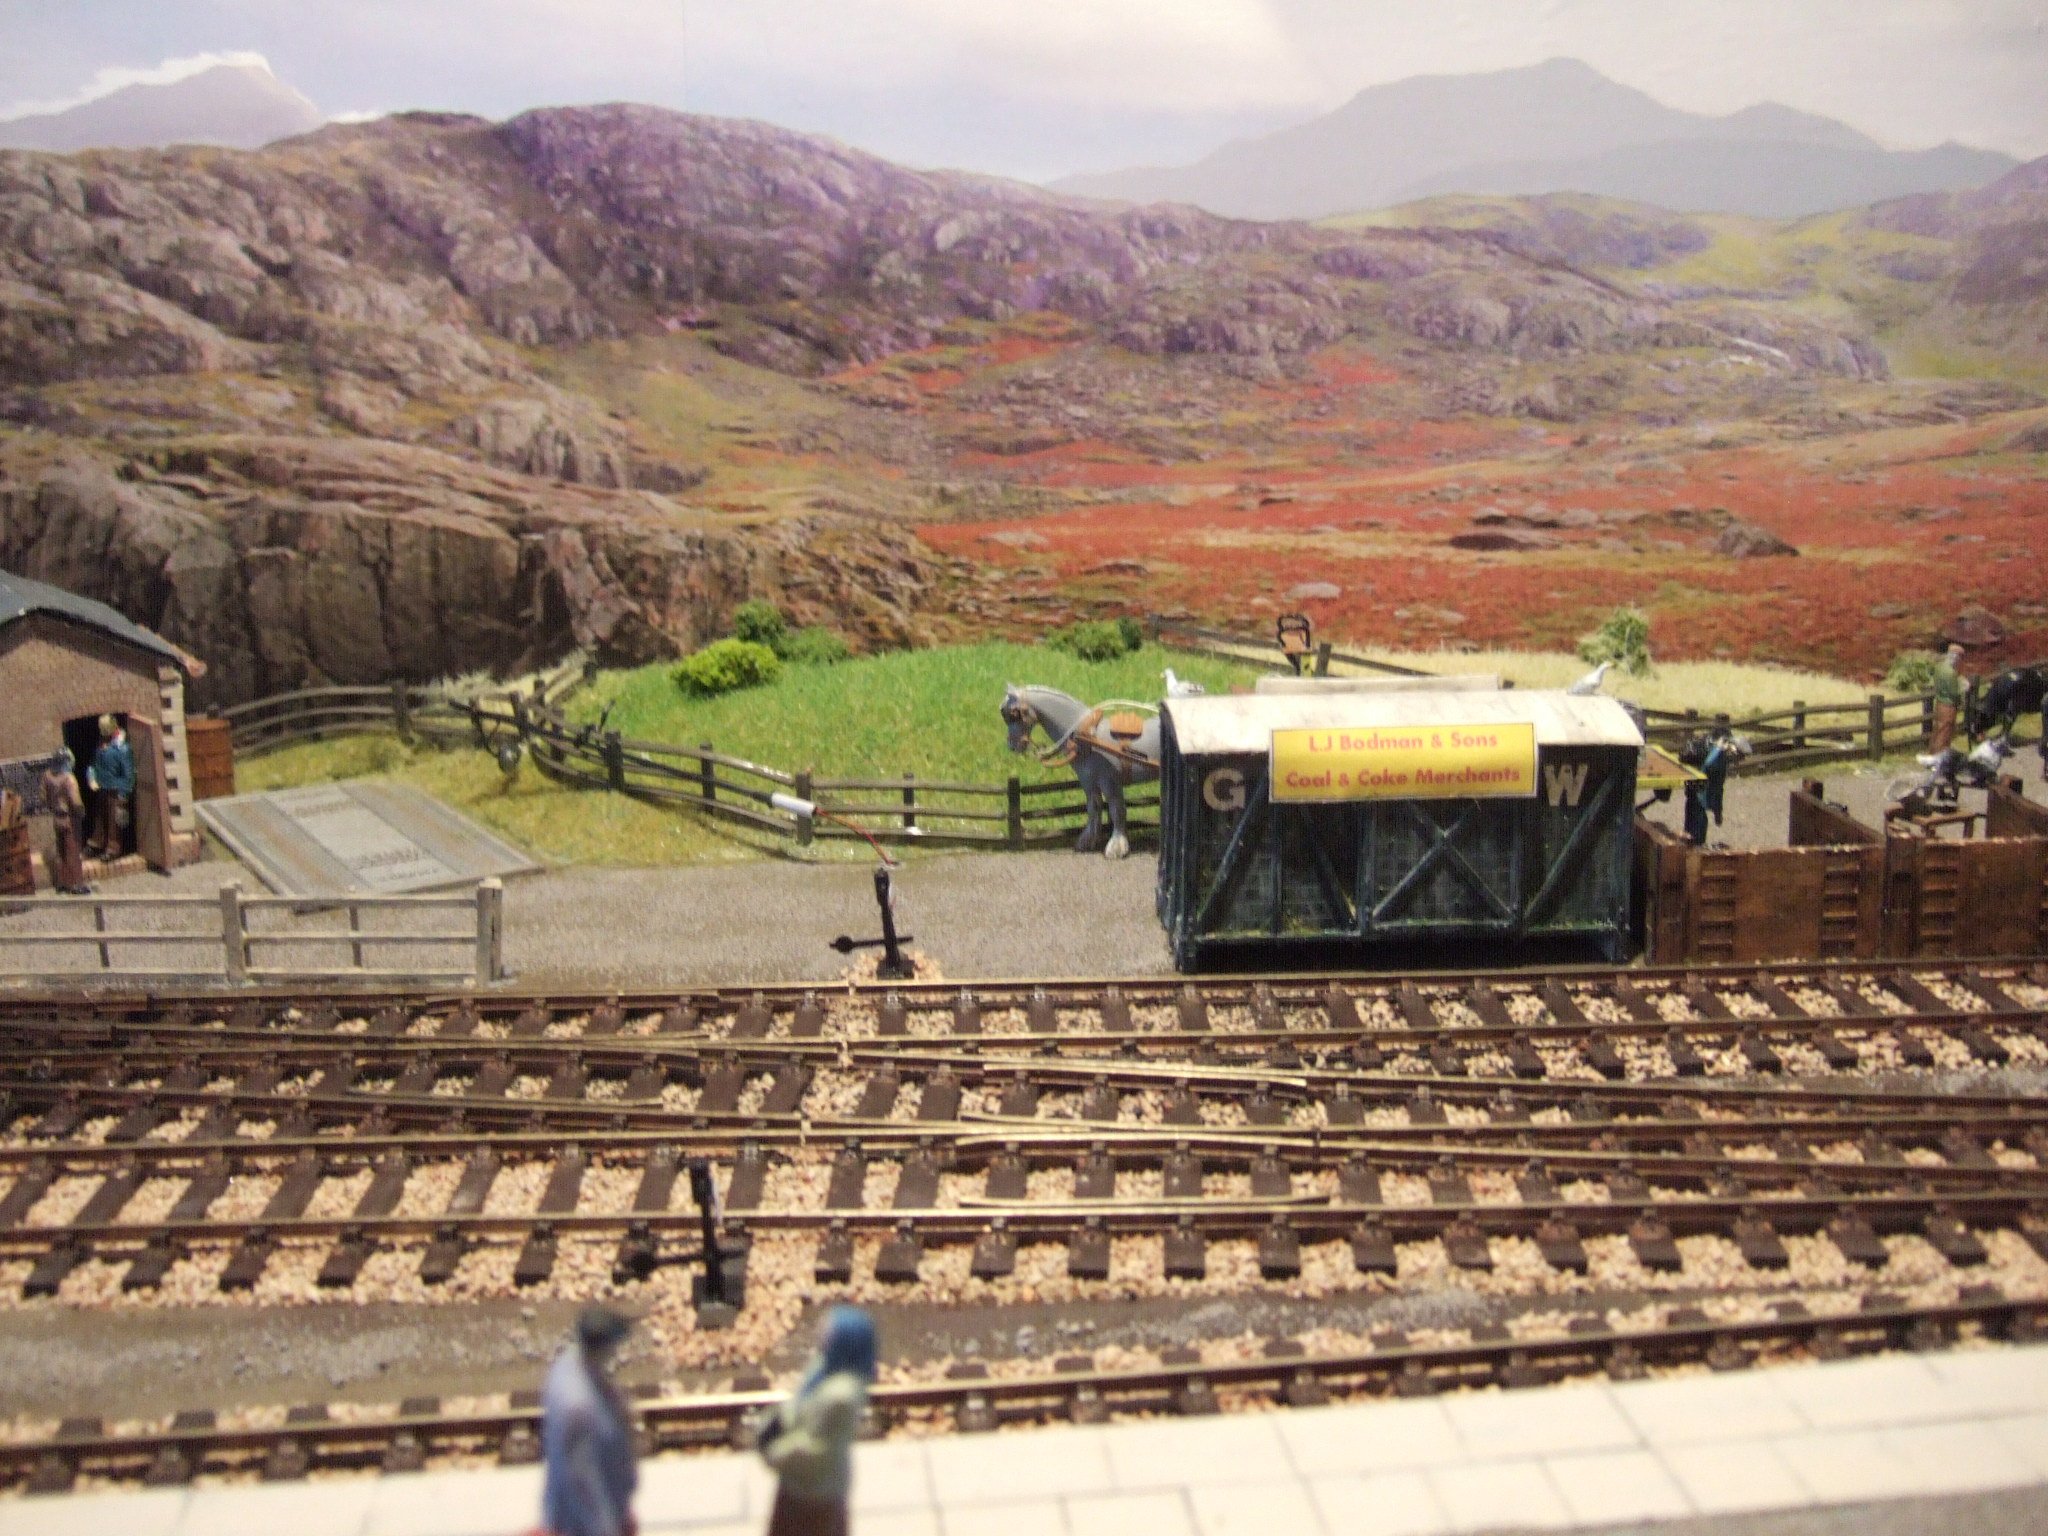
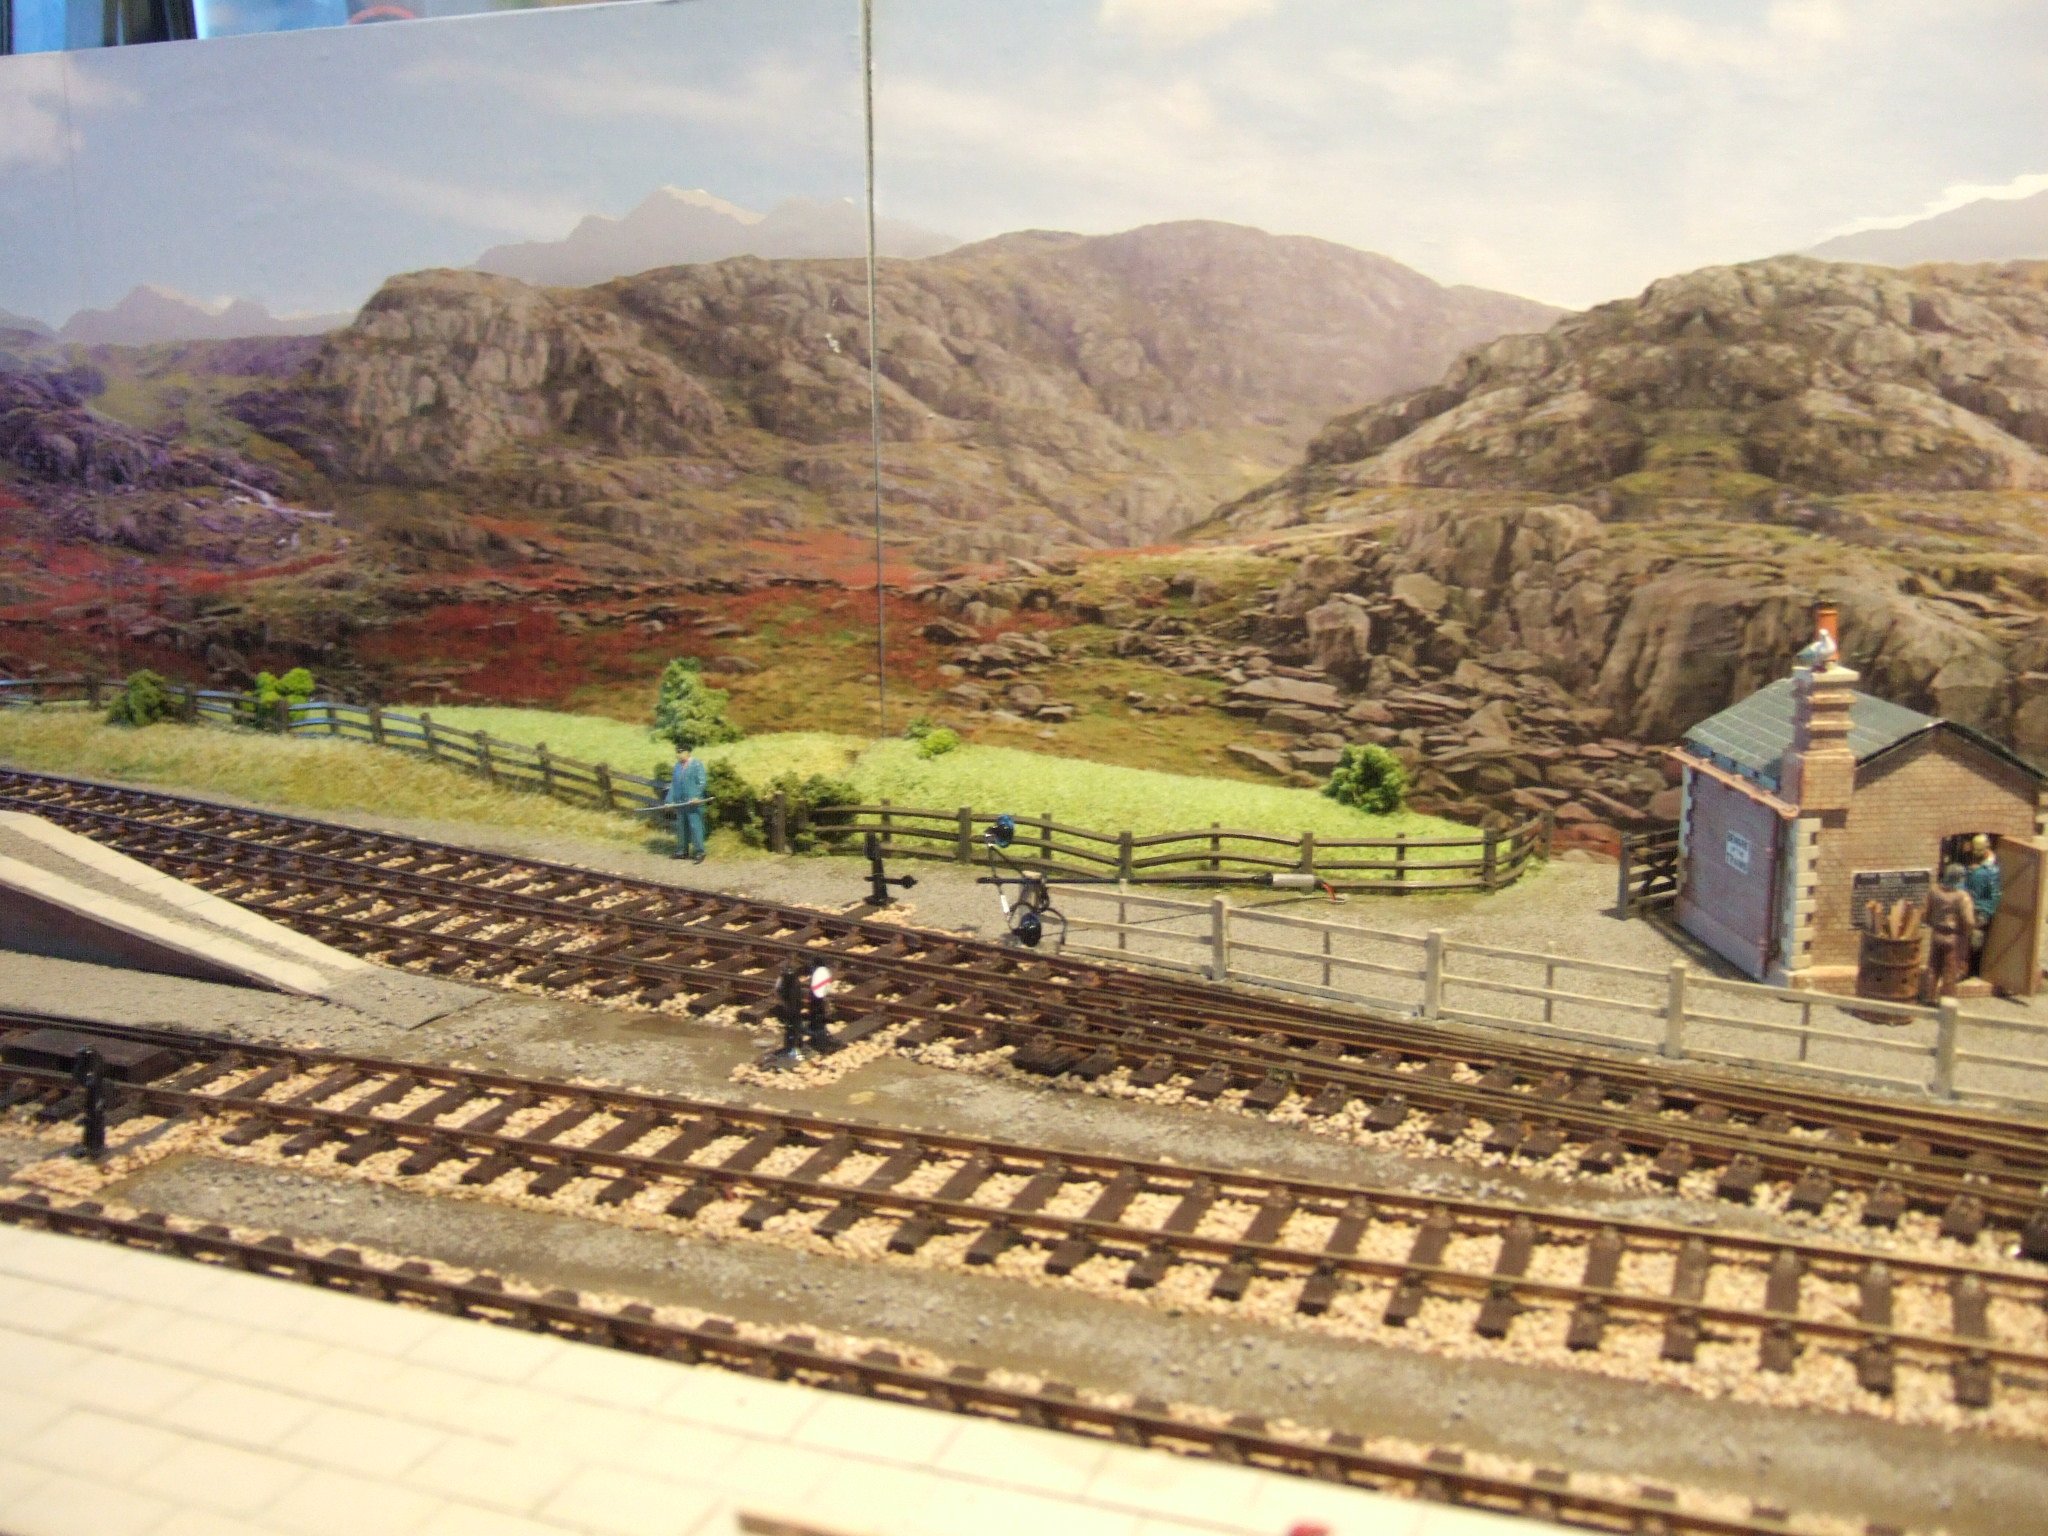
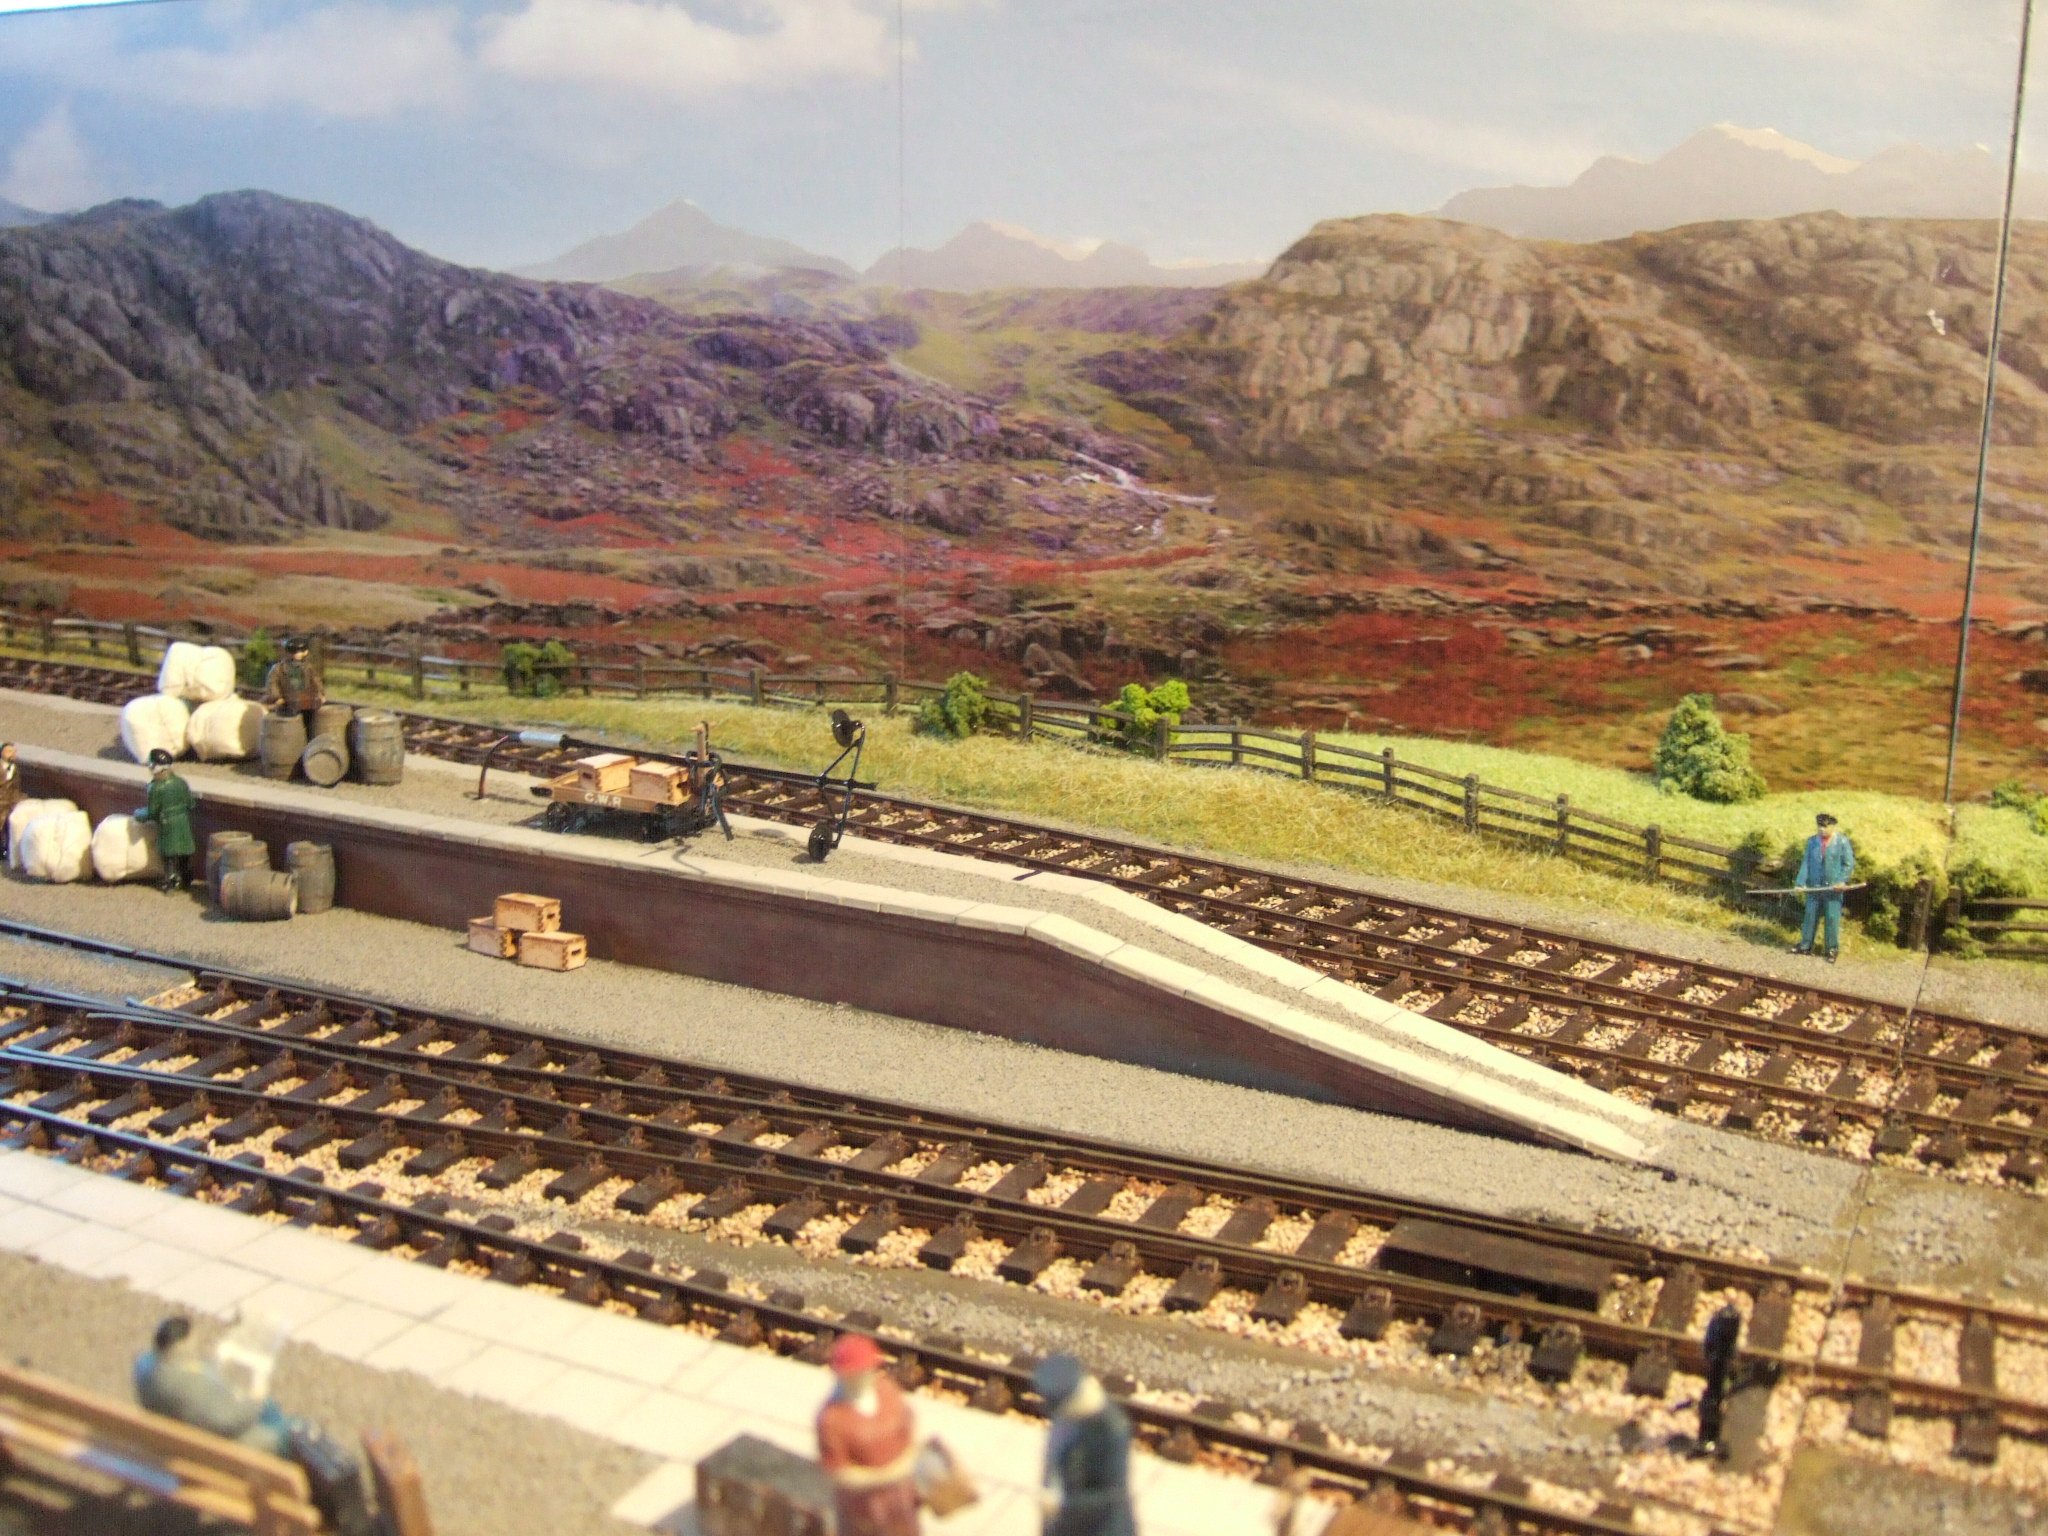
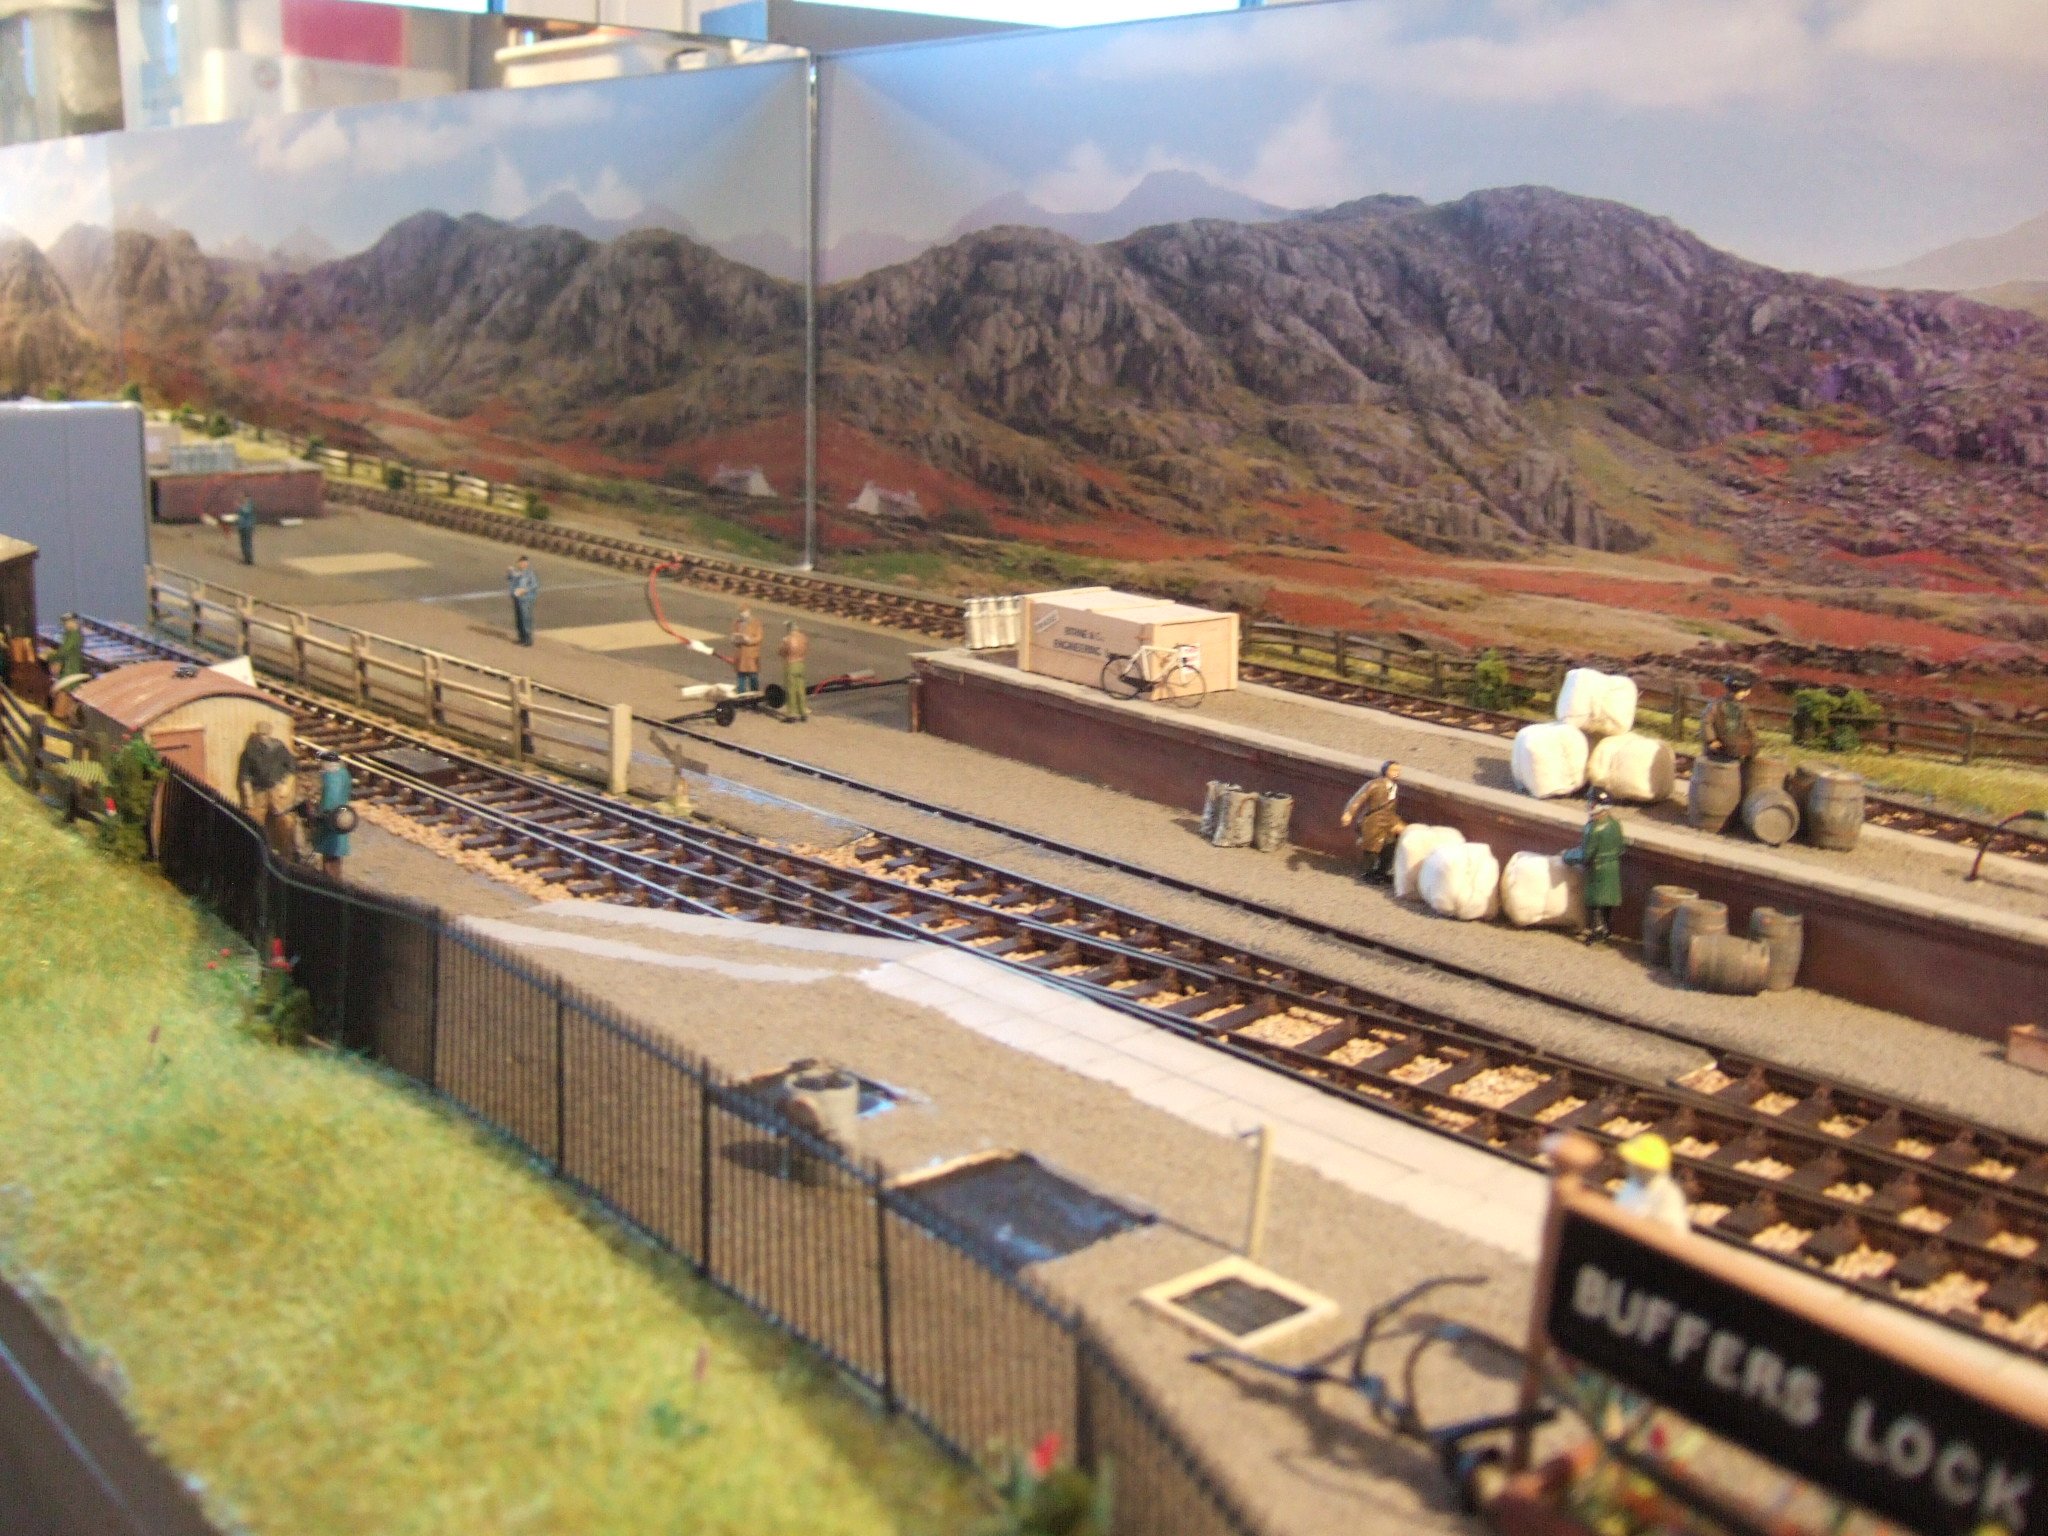
Some of you may know of my GWR UK outline O gauge layout "Buffers Lock". I have detailed the story of it's build and exhibition life elsewhere on irm.com (see: Buffers Lock). Basically, this is a 16.5 feet long exhibition layout with a scenic area of 8.5 feet by 26.5 inches. Two four foot long fiddle-yards (three lines each) feed trains from either end allowing through trains to be run. One fiddle-yard is a traverser and the other is a train turntable. Originally the electrical set up was DCC to run trains and the point motors/semaphore signals. The "brick" outline station building, signal box, goods shed and other fittings are all typical of GWR practice. The backscene is of a UK village in the middle distance (Ross-on-Wye I believe). I have now started a project to develop the layout to allow for alternating use as an Irish outline layout. To accomodate a variety of rolling stock that might become available, I have rewired the layout to be easily changed from DCC to DC use with Double-Pole Double-Throw switches. DCC control will continue to use the Roco/Fleischmann's Z21 system while DC power is now supplied by a Morley Controller Vanguard Zero One unit delivering 2.5 Amps per track. In either mode the signals and point motors will be controlled by DCC. In time, I am working to have suitable alternate buildings developed with a "stone" outline matching actual Irish prototypes. These will fit directly in place of the GWR outline buildings when running in irish outline mode. CK Prints (Enda Byrne) has developed Irish outline brake vans in flying snail grey and roundal brown versions. Enda plans to produce other Irish outline wagons in time including beet and other wagons. Alphagraphix have a range of MGWR outline locomotives and passenger carriages available in metal kits which are worth considering. Once the layout is further developed, I plan to invite other modellers to run their Irish O gauge rolling stock on this layout perhaps attending exhibitions together as a joint venture. The alternate layout has been named "Maam Road" translated in Irish to "Bóthar an Mháma" (which means the road to the mountain pass). Many rural irish railways had stations some distance from the towns they served and so had the "road" designation. My idea is to situate the layout somewhere in the West of Ireland within a wild mountain landscape similar to those the Clifden or Achill lines ran through. There was a station at Maam Cross/An Teach Dóite but my layout is not intended as a copy of that station. I have mounted a suitable backscene on new boards (to alternate with the existing "Buffers Lock" backscene). I attach a few photos to show what the scene looks like without buildings.
6 points
-
HI All The Next batch of C Rail OO 40ft Hc containers are almost finished . Maersks new all Blue livery and a run of MSC 40ft hcs in Sand Regards Arran6 points
-
A few photos taken outdoors in overcast daylight: And indoors but with a brief glimpse of sunlight (dark lines are shadows from window bars) Compared to the photos in artificial light there’s a massive difference to the appearance of the sky. This was in artificial light: I suppose the real test will come when I have got the layout’s own lighting installed. That’s a long way off!
6 points
-
Sounds like a particularly incompetent murderer talking to defence brief !6 points
-
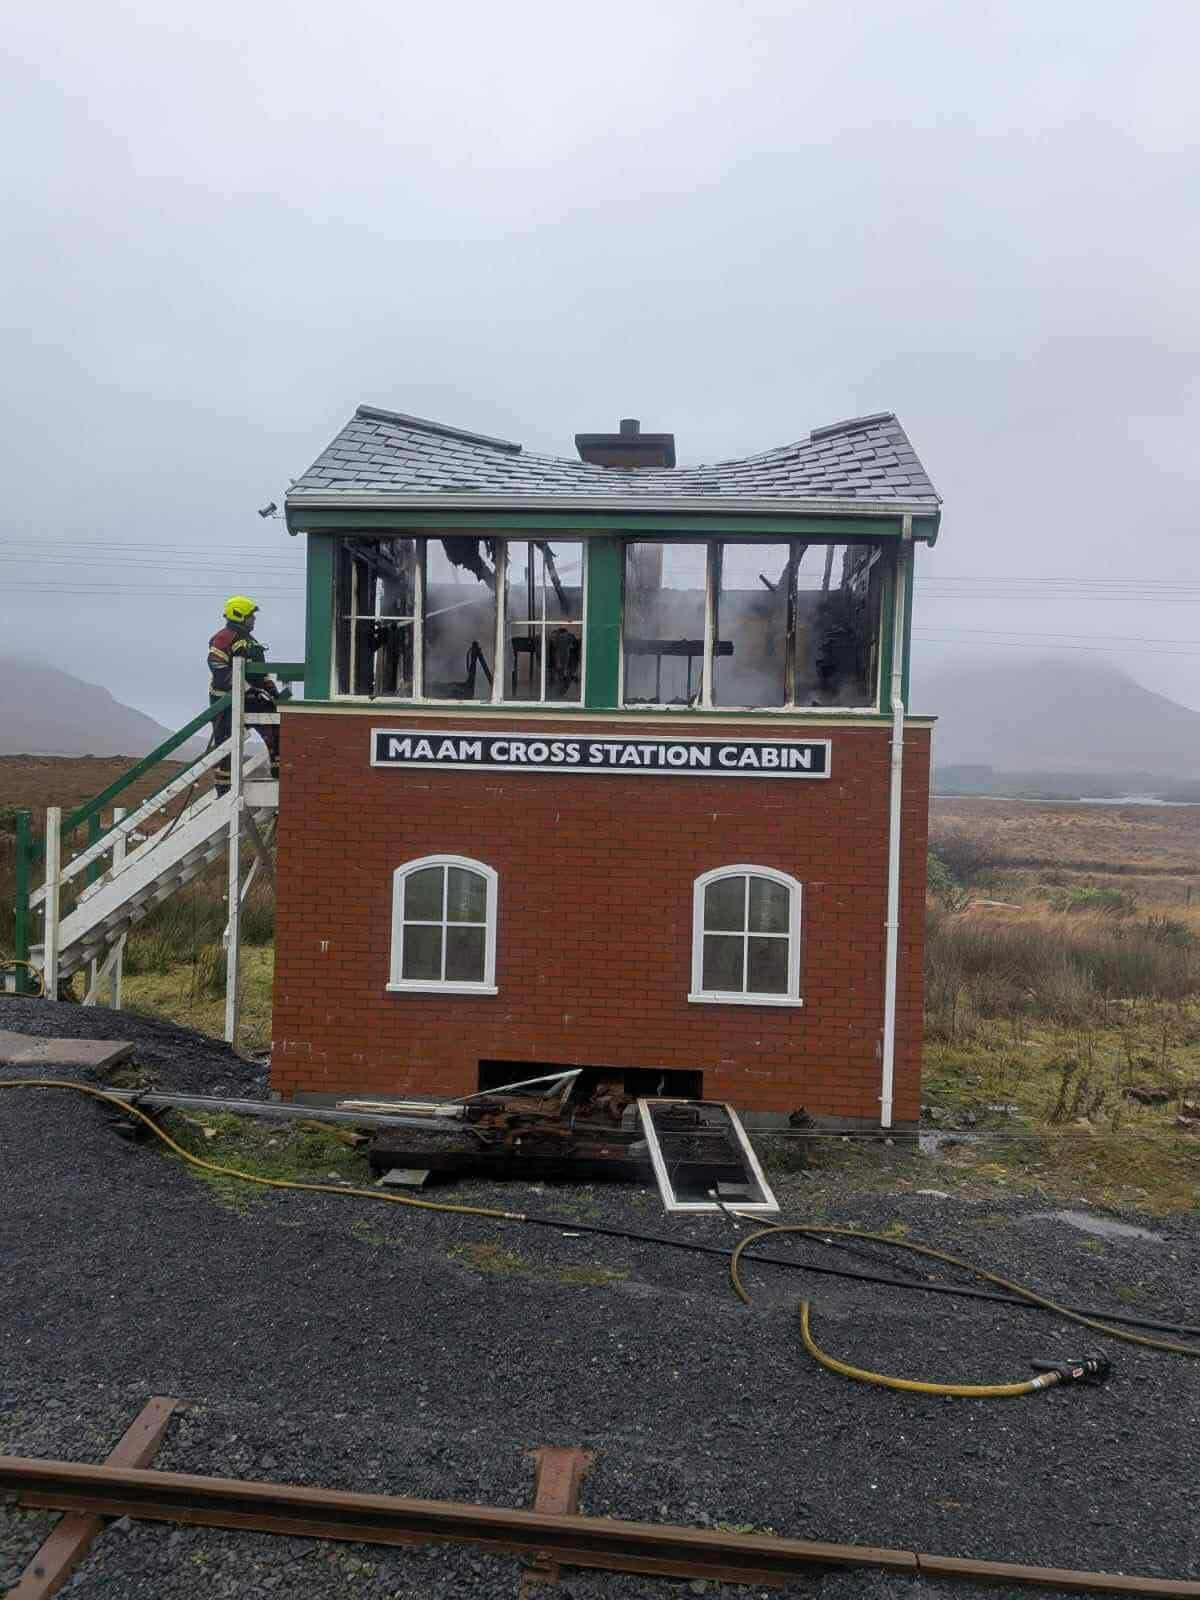
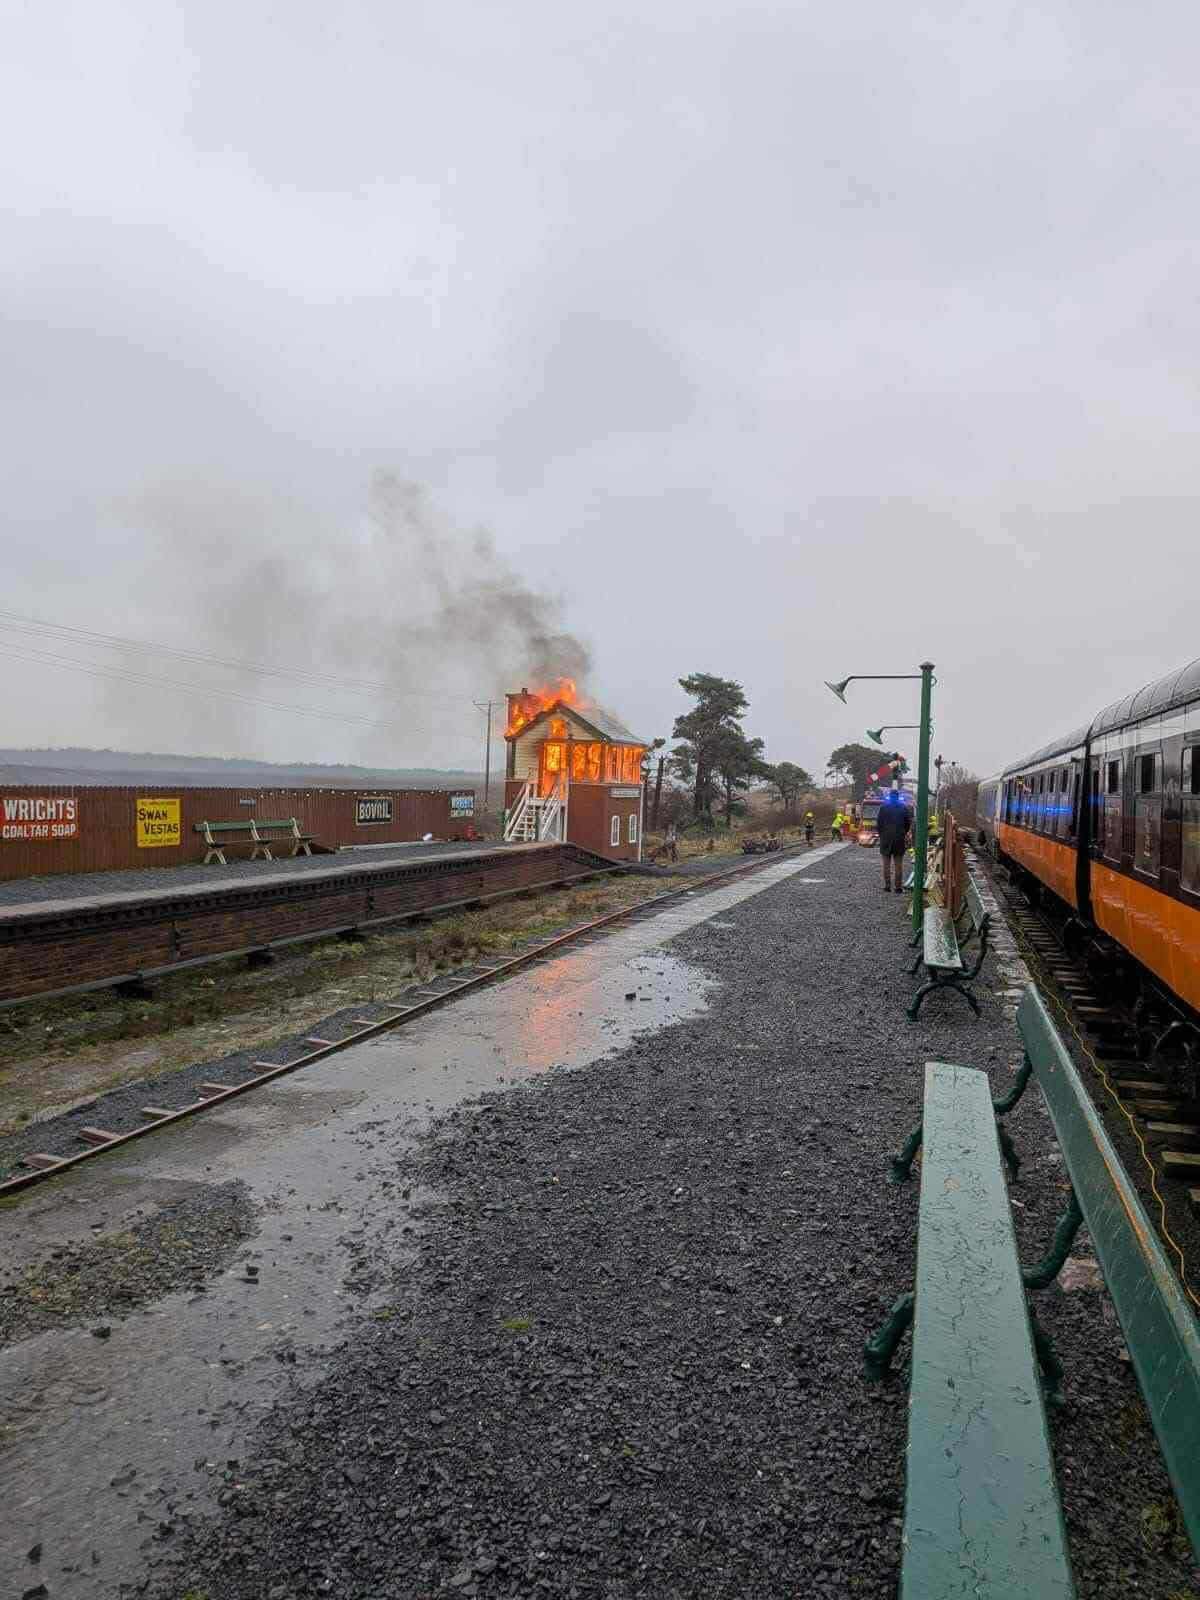
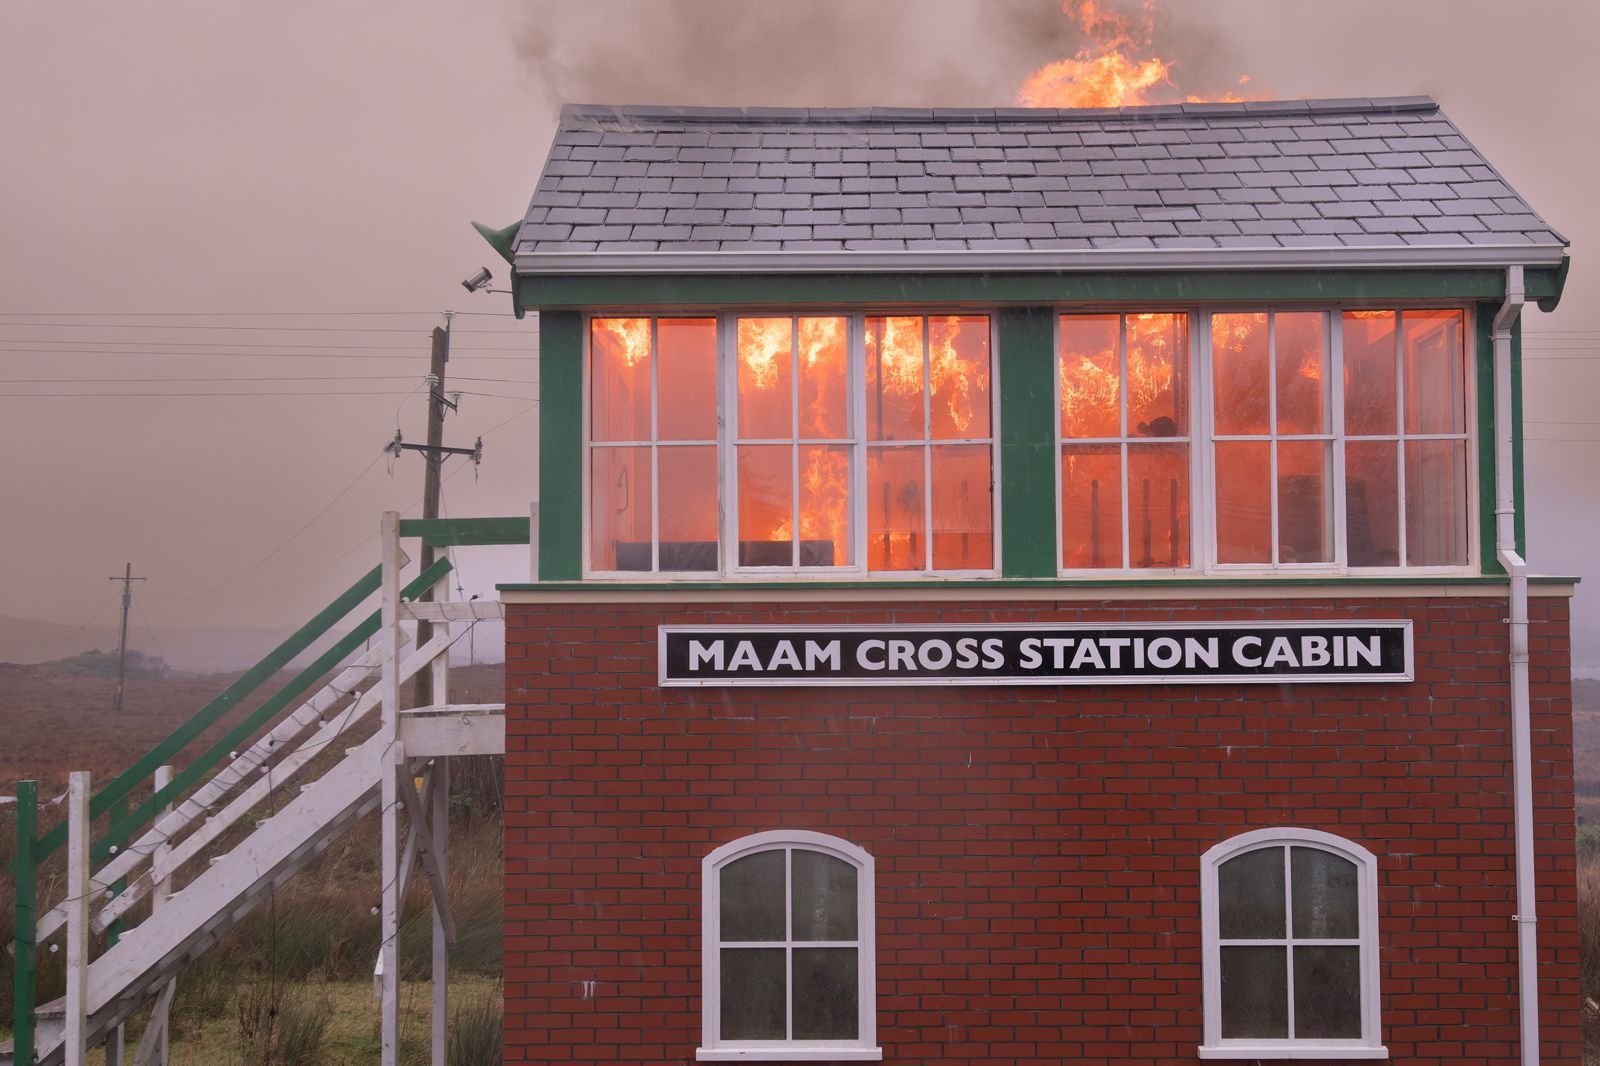
I saw these photos on the news/social media. Horrible to see the signal cabin go up in flames and sending best wishes to the great volunteers at Maam Cross. No doubt they will build back better, and a horrible day like today will be nothing more than a memory in the not-too-distant future. https://www.dailystar.co.uk/news/latest-news/breaking-horror-fire-engulfs-entire-36397136 You can donate on the Connemara Railway Project Gofundme page.
5 points
-
Savage prices compared to what they go for on eBay, @declan64! Can’t see them hanging around too long. And, if that’s just the clearout stuff, I can’t imagine what the actual collection is like.5 points
-
The Alphagraphix J26 is pretty simple, especially the chassis. It's a single etch, so you just solder in the wheel bearings before folding up the sides and folding down the frame spacers. No alignment jobs required. I've built two and you can have a rolling chassis in a couple of hours. Very satisfying and very effective.5 points
-
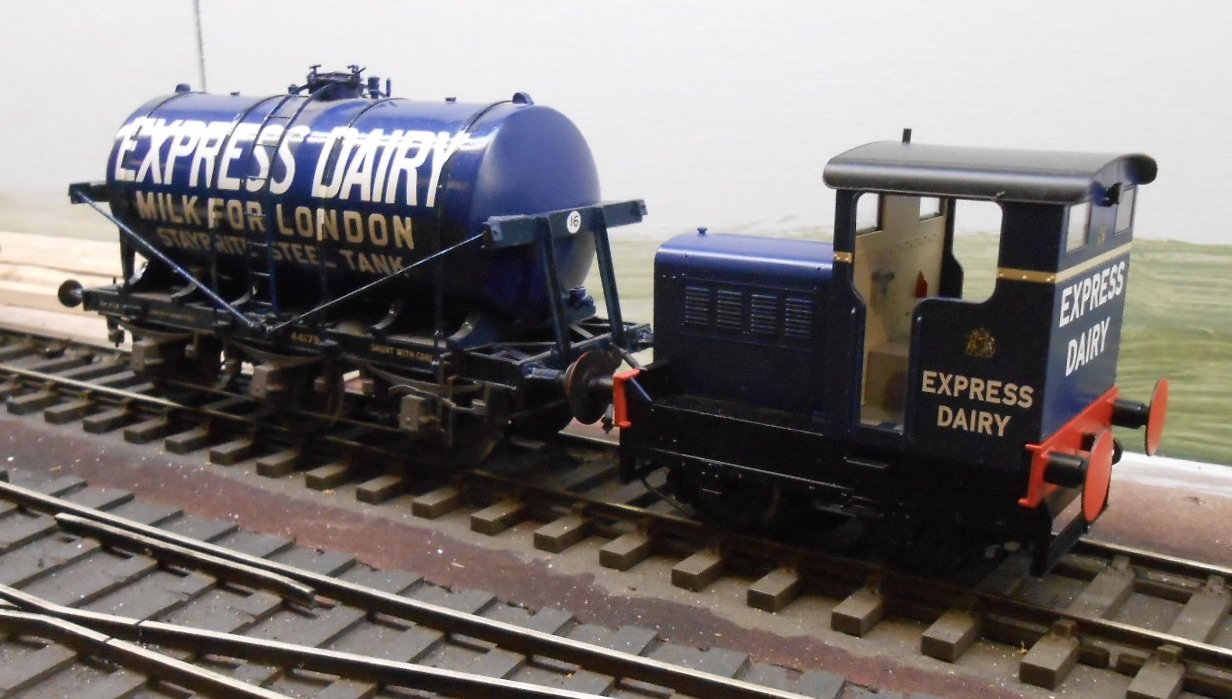
I actually bought a ready to run, 0 gauge engine this week - a rare occurrence for me. indeed, had to look up my journals to see when the last time was. Turns out that was in 2010 & even then it was a couple of Bachmann Brassworks models [08 shunter and Derby Lightweight DMU], which required painting and detailing, so certainly not rtr in the accepted sense. The same year, I also bought a couple of Shays, one a two truck 0n16.5, the other an HO three truck and these were fully finished. Otherwise, have to back to the 1980s and everything else has since been kit or scratch built - a total of 75 locos to date. So, you ask, what is it that prompted this extravagance? Well, it's about as small as it gets in 0 gauge: a Heljan Ruston 48 DS and very dinky it is too. Needs work, as far too clean for my liking, while also crew and [eventually] AJ couplings. The version I've bought fits in with the aim of there being a dairy on my new project and the Ruston fits the bill nicely as I already have three six wheel milk tanks, one [a Slaters kit] in full Express Dairy livery. A bit more work has been done on the layout, with the station master's house now well under way. The 'chassis' is mounting board, covered with Howard Scenics embossed brick paper. Back in the last century, I used to paint all the bricks individually, until sanity prevailed when I realised I could do it far quicker with water colour pencil crayons. Windows will be from York Models.
5 points
-
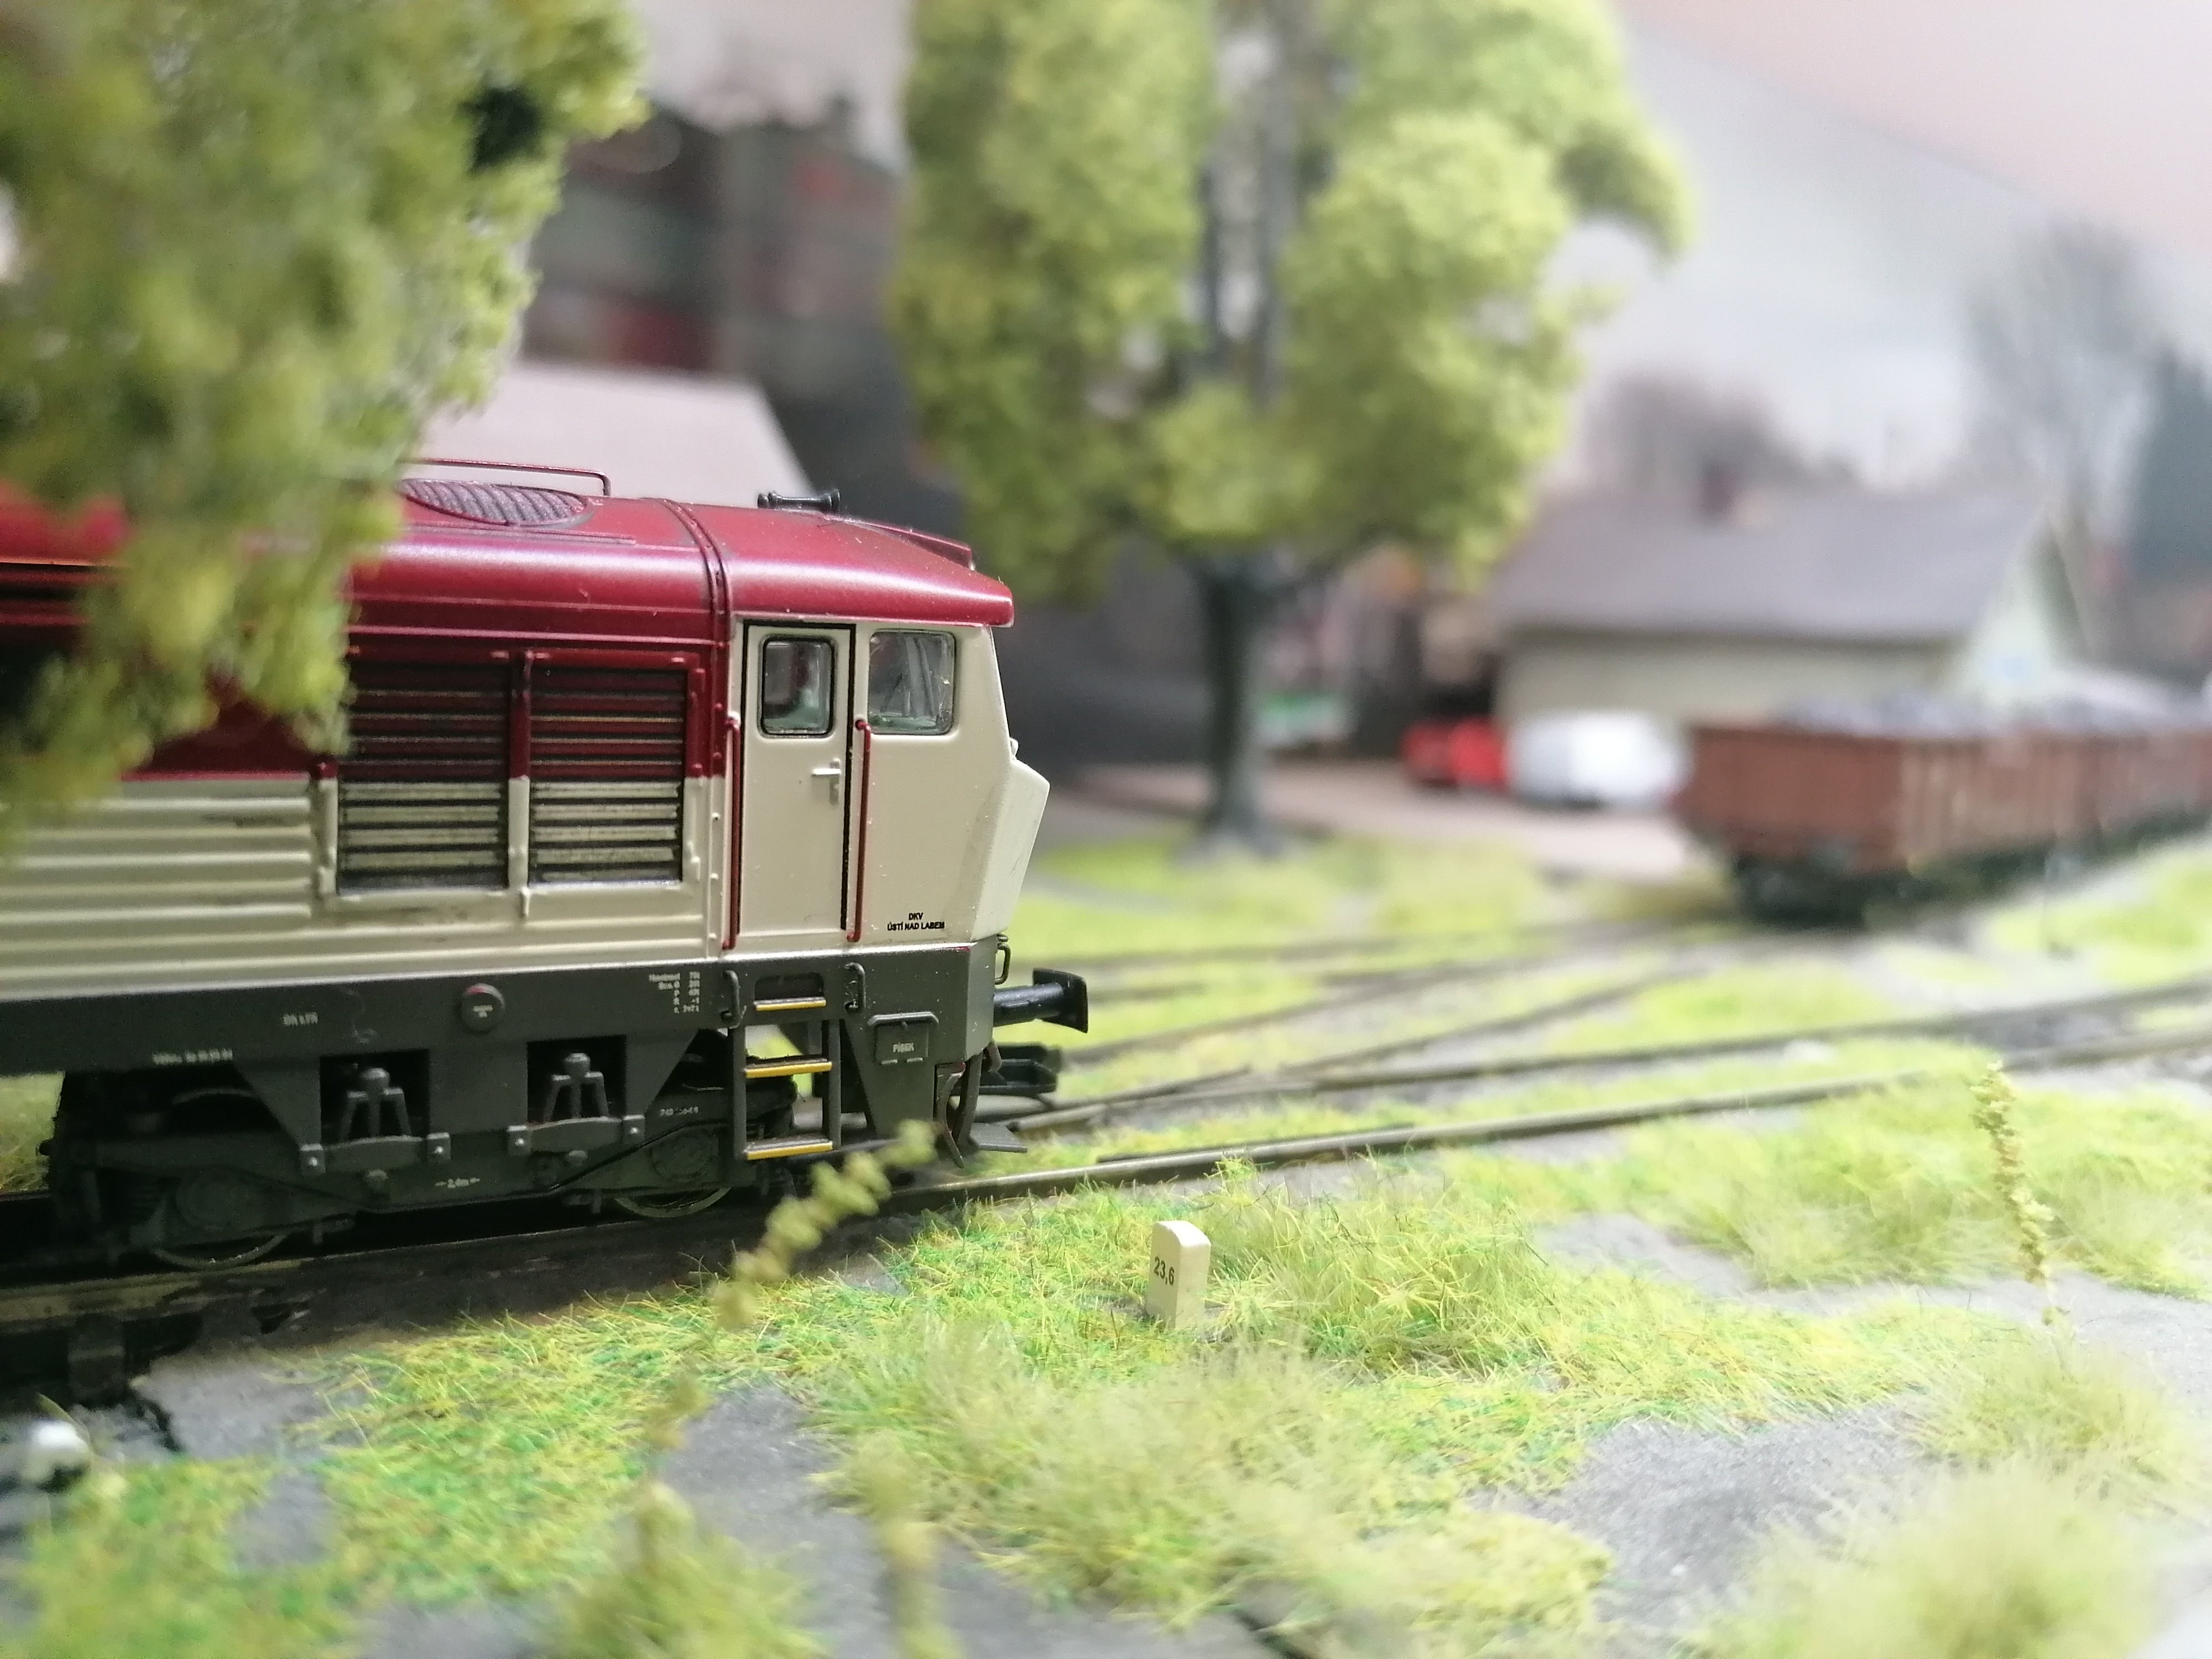
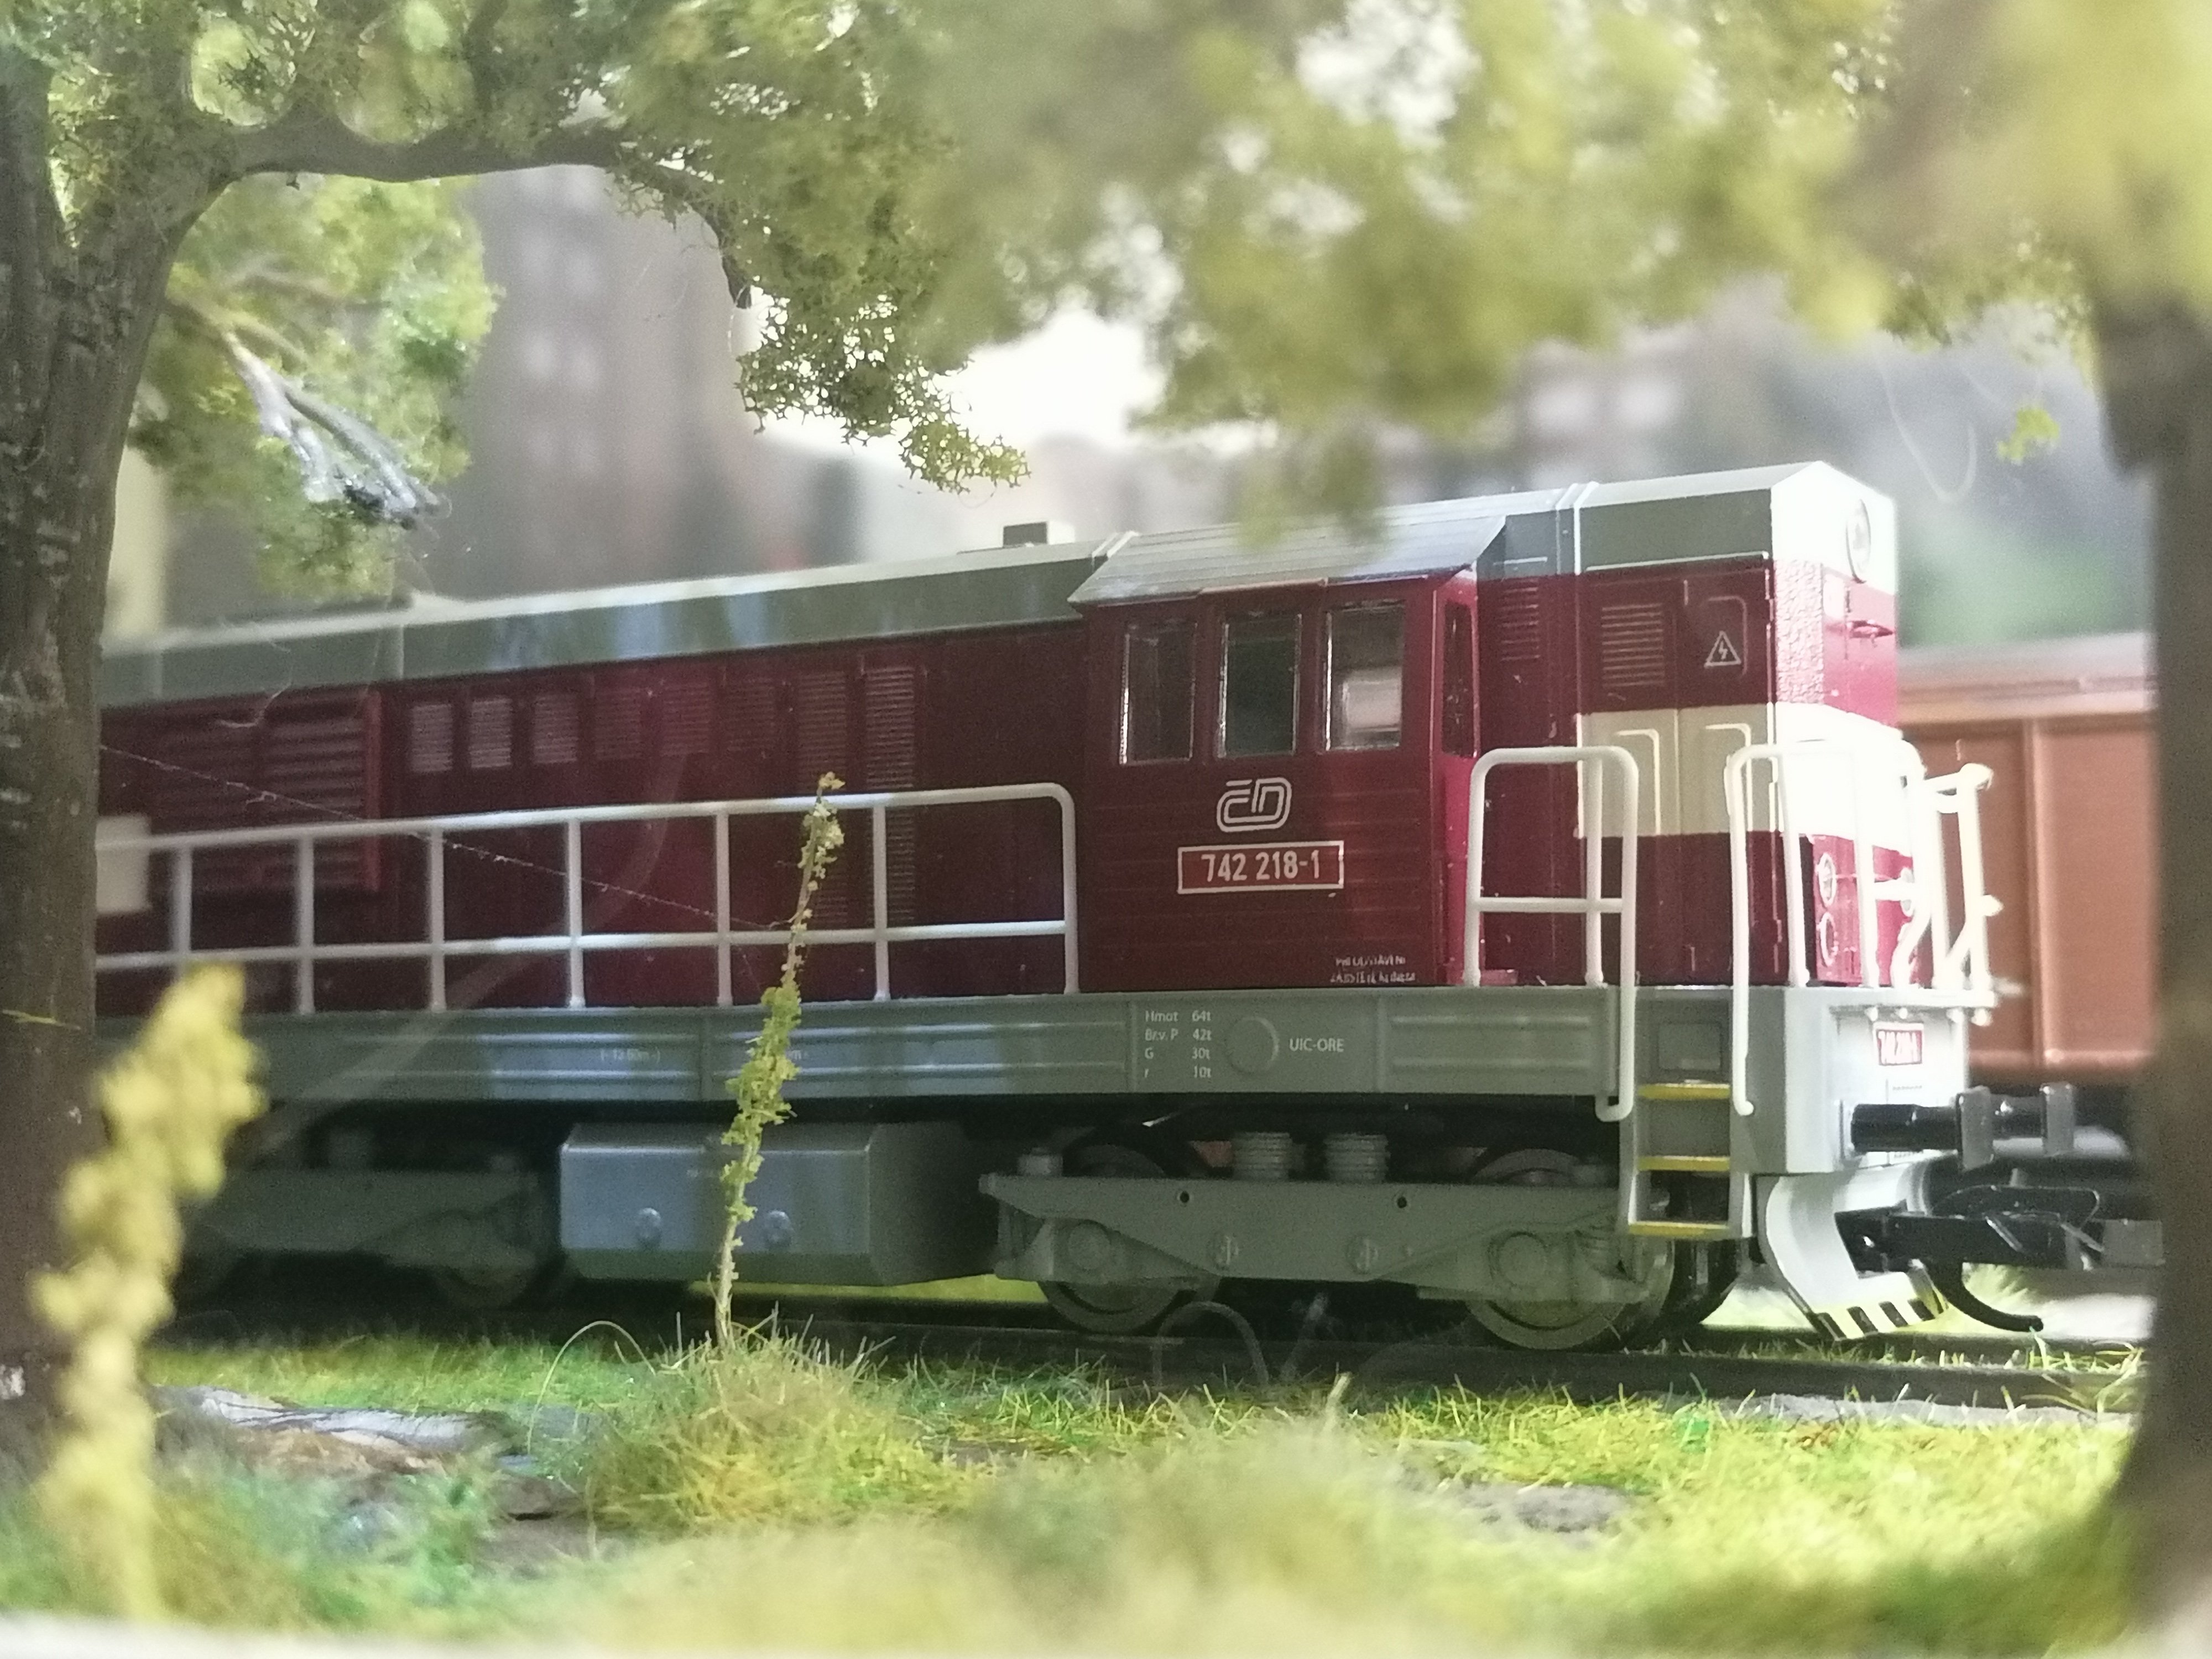
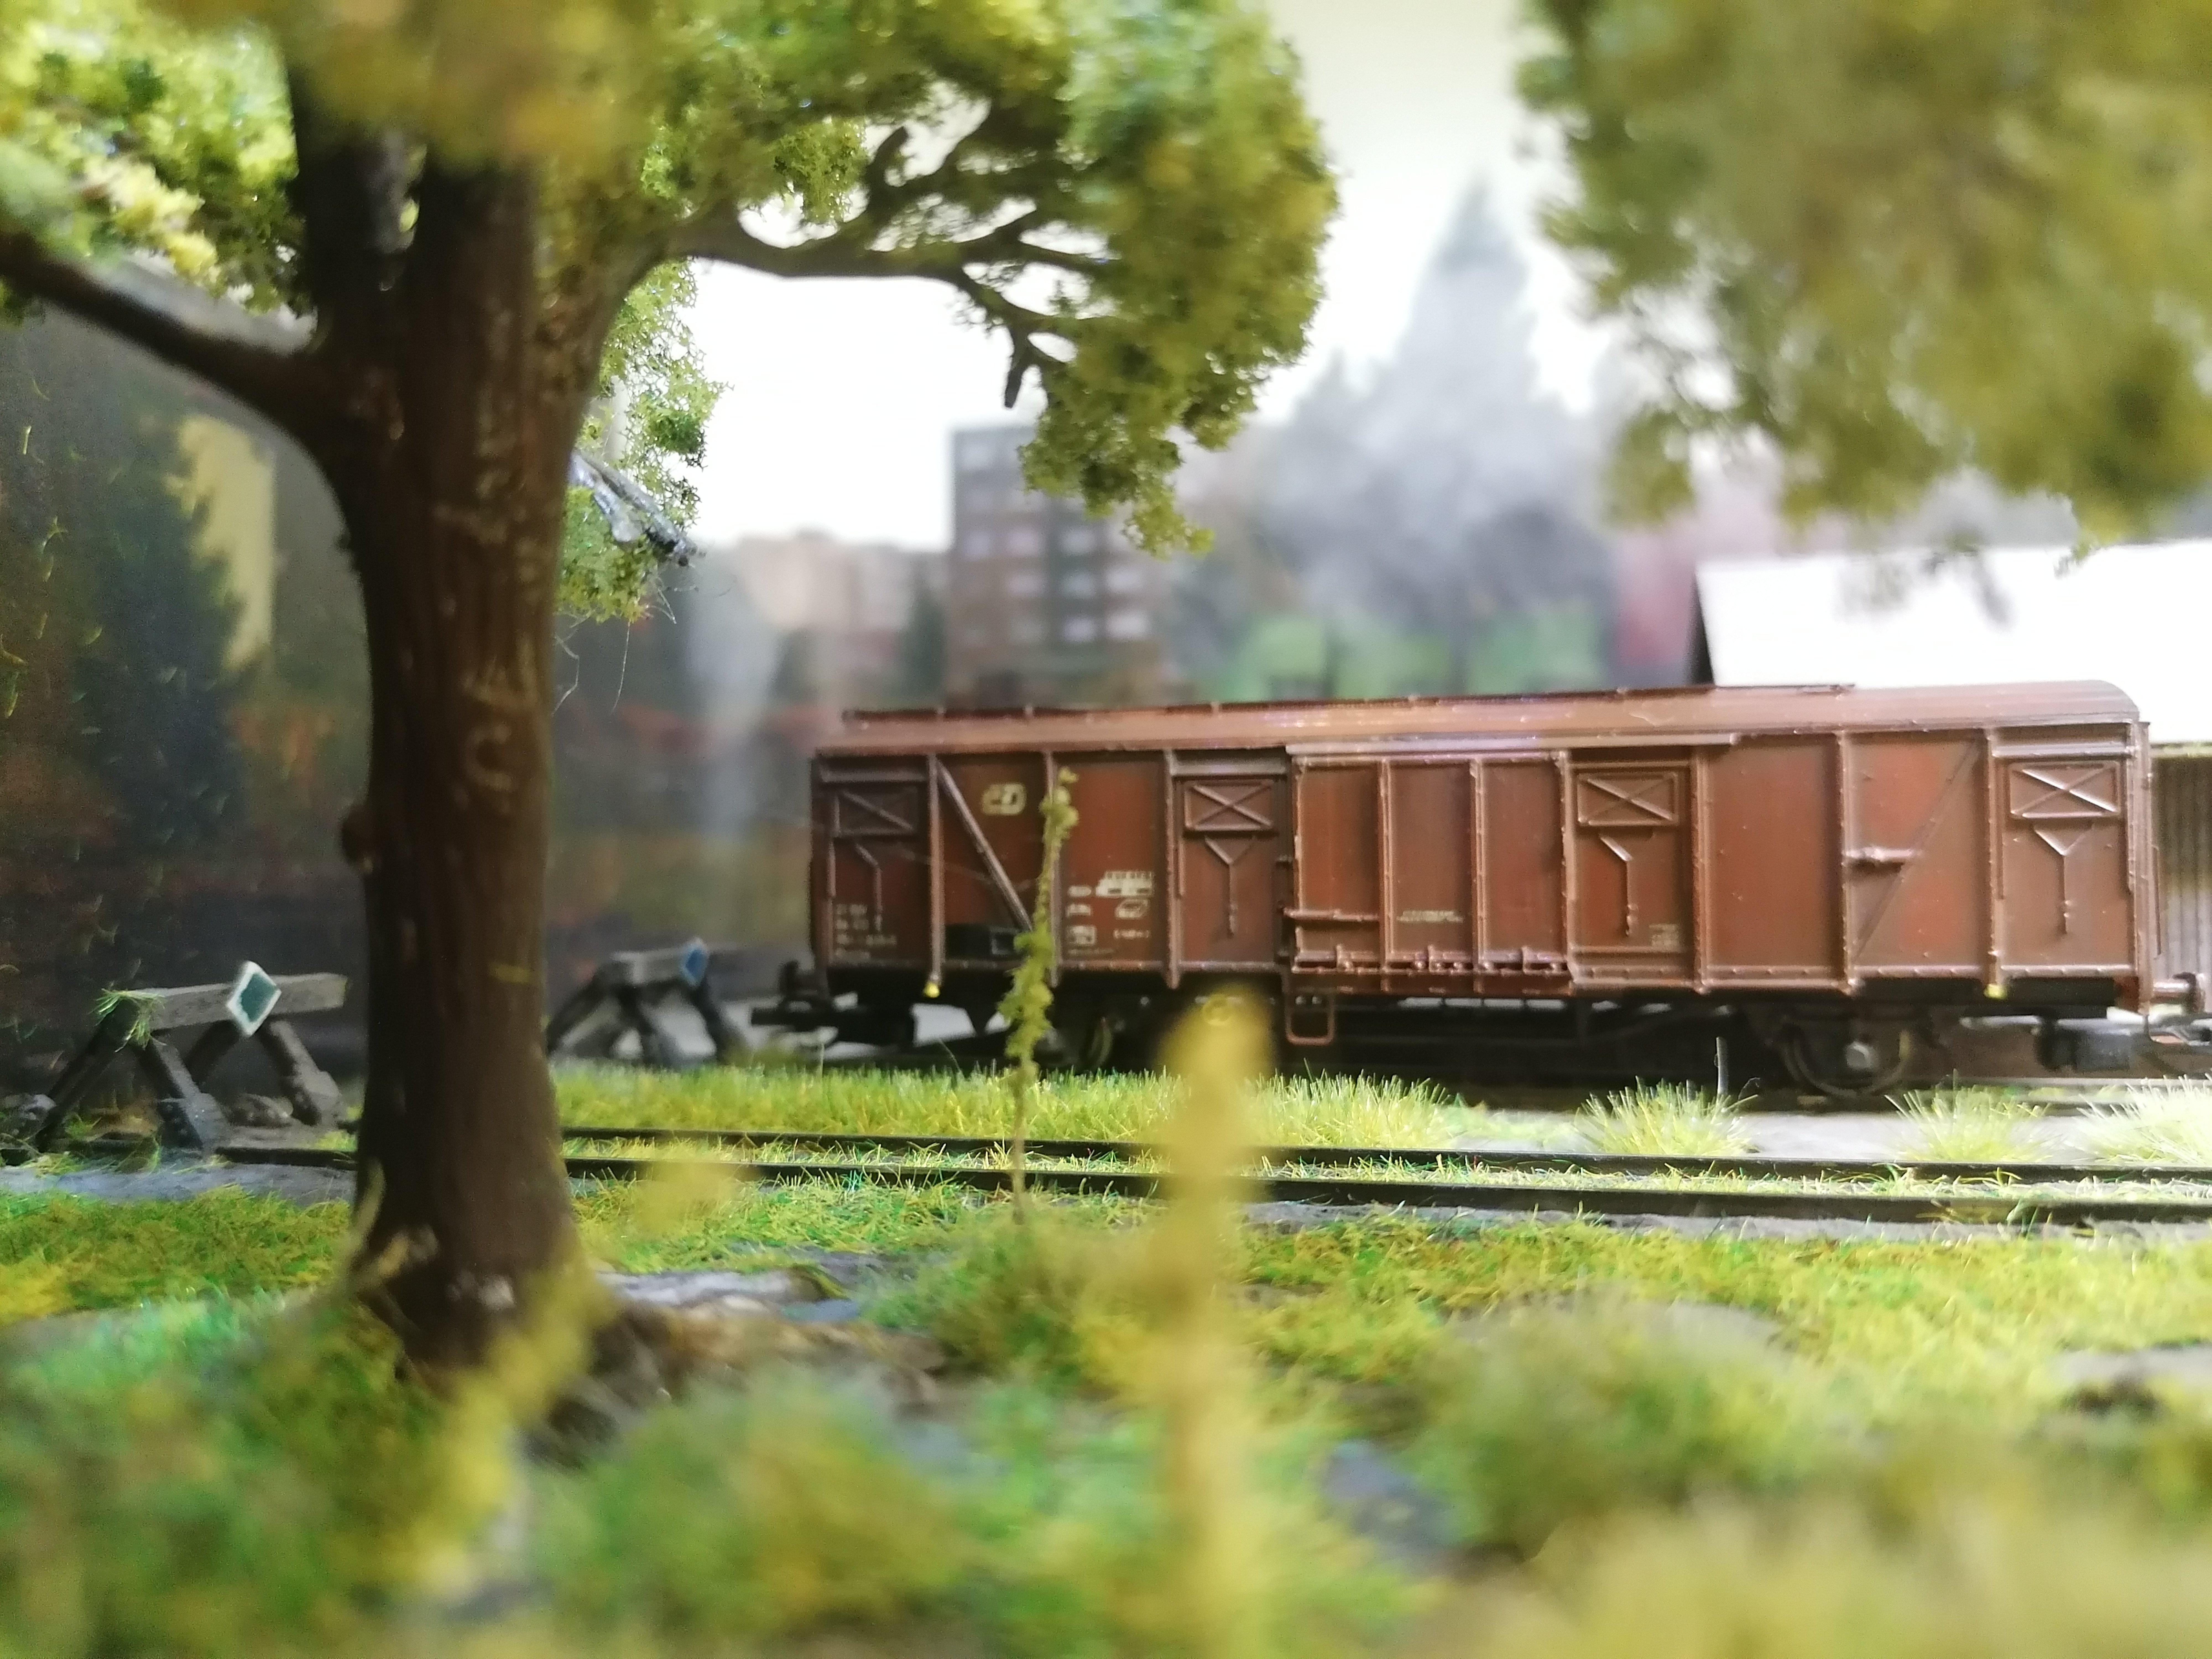
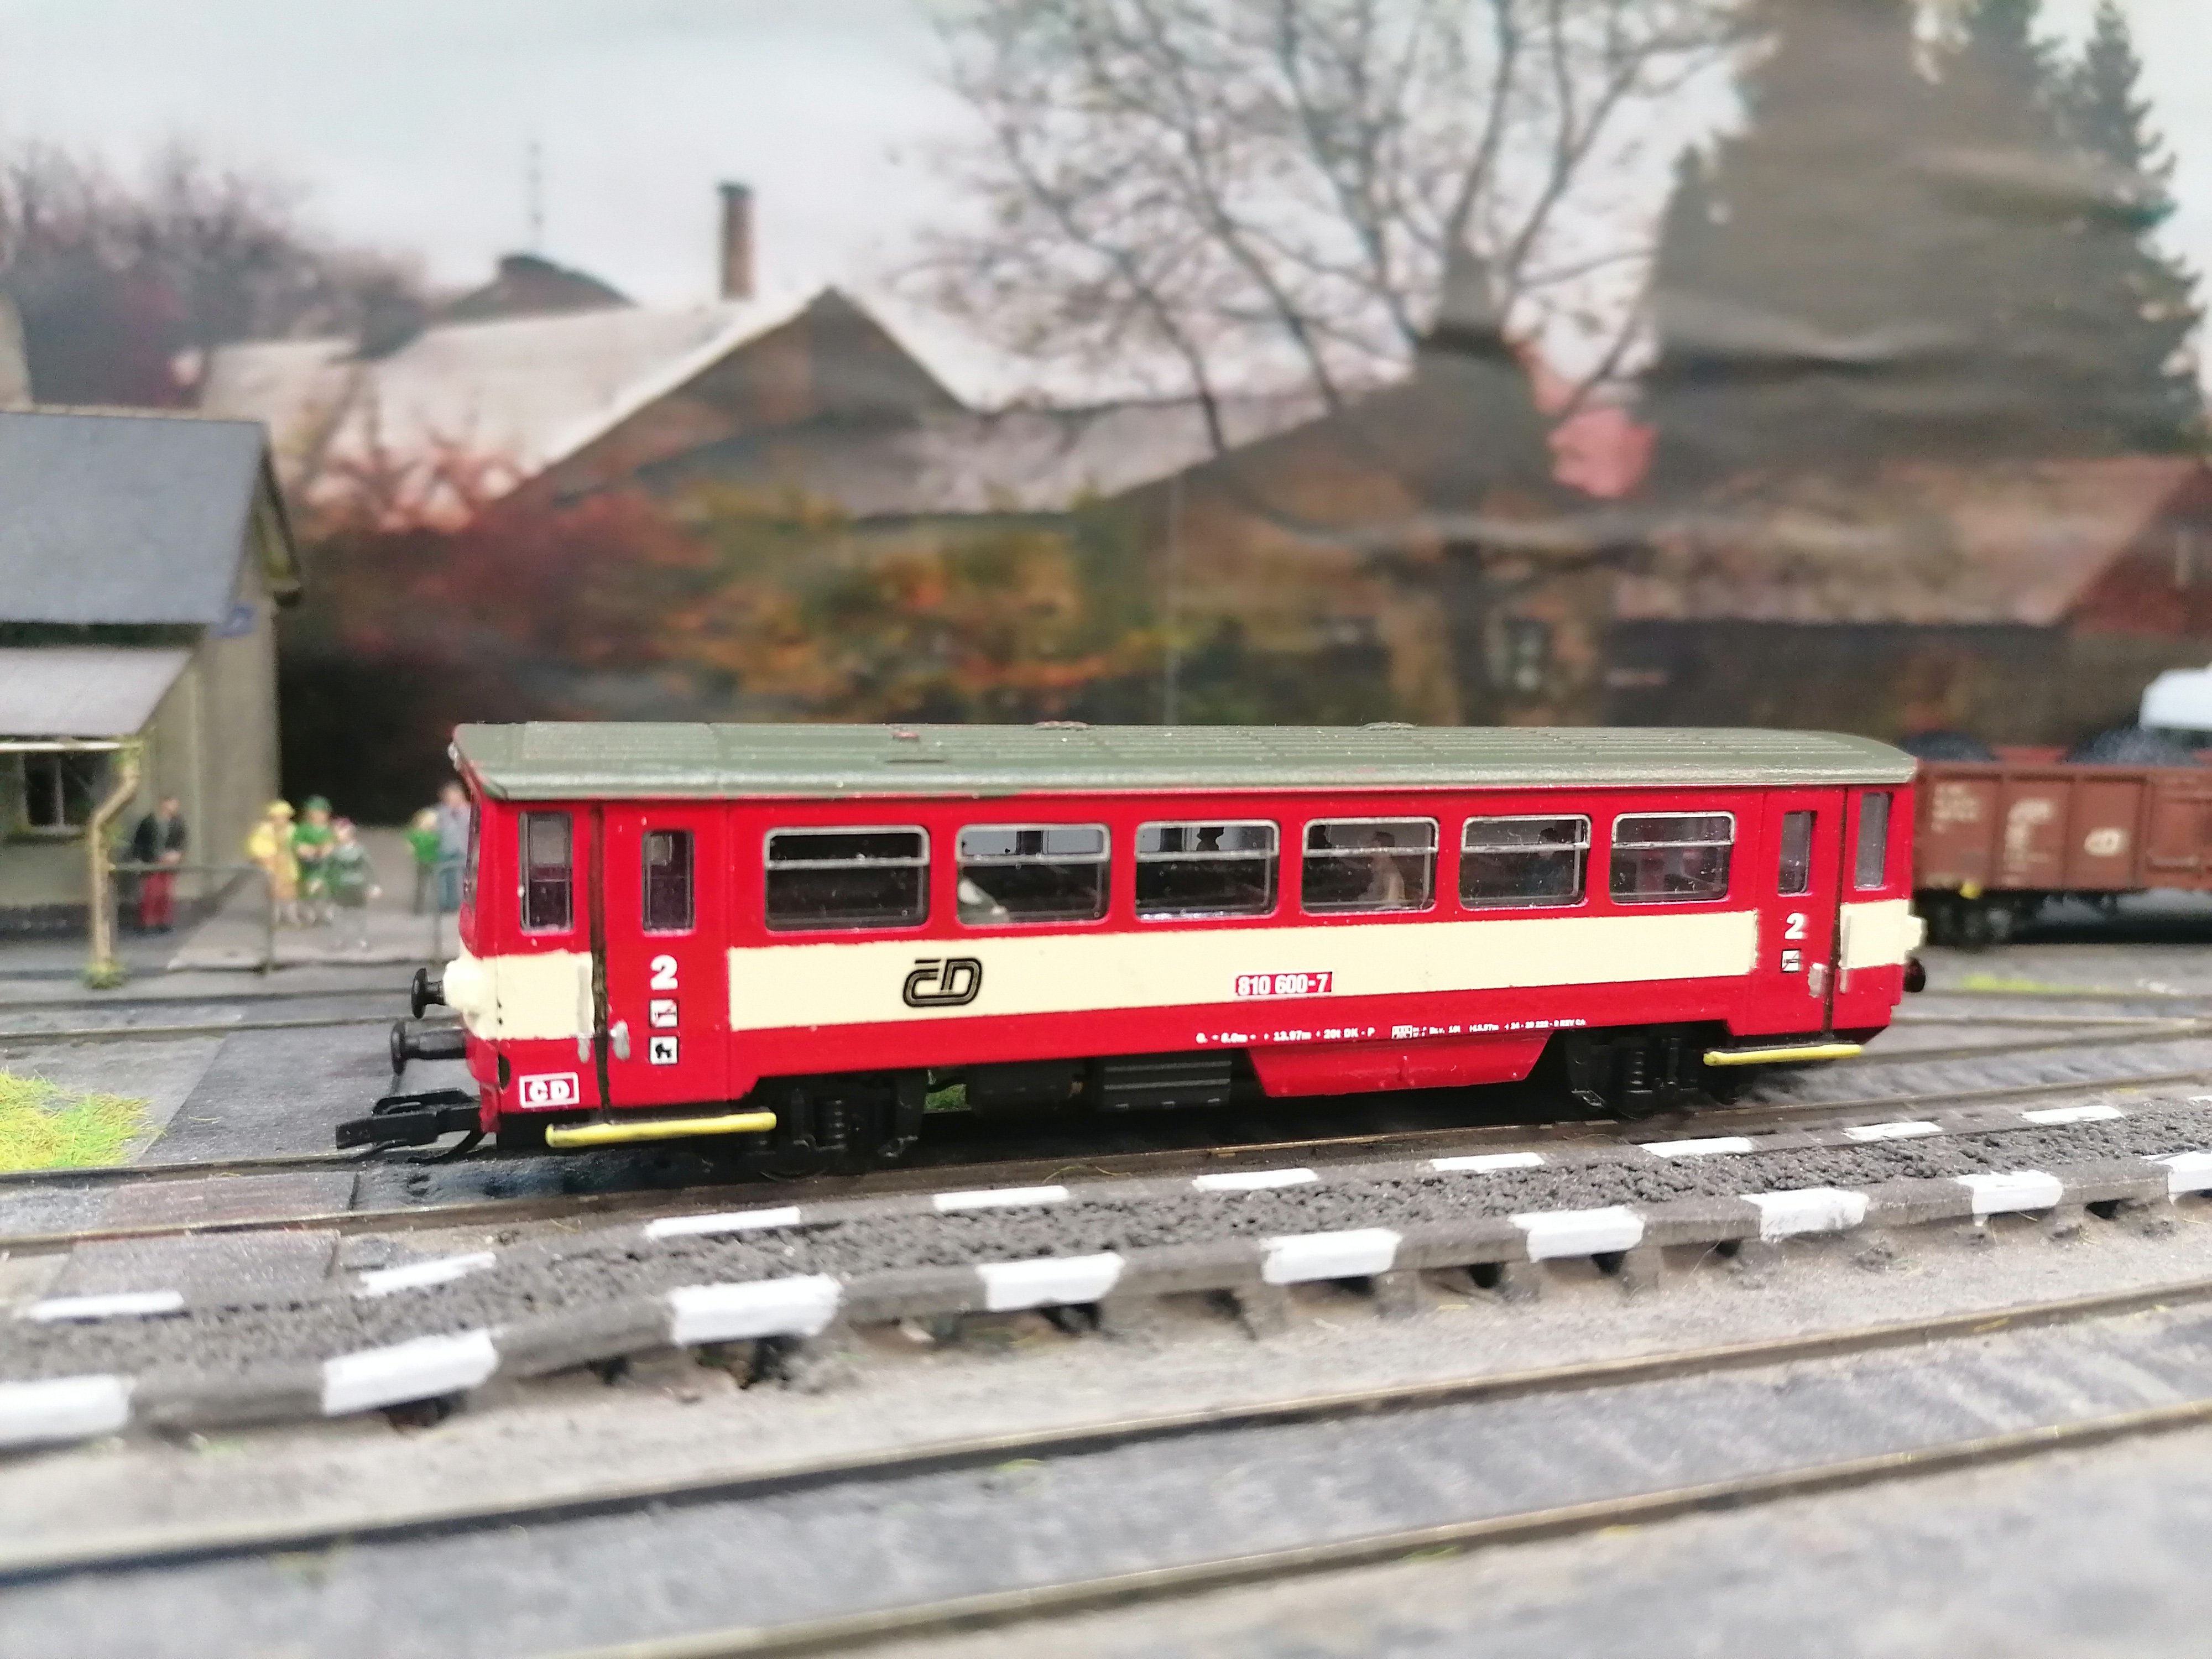
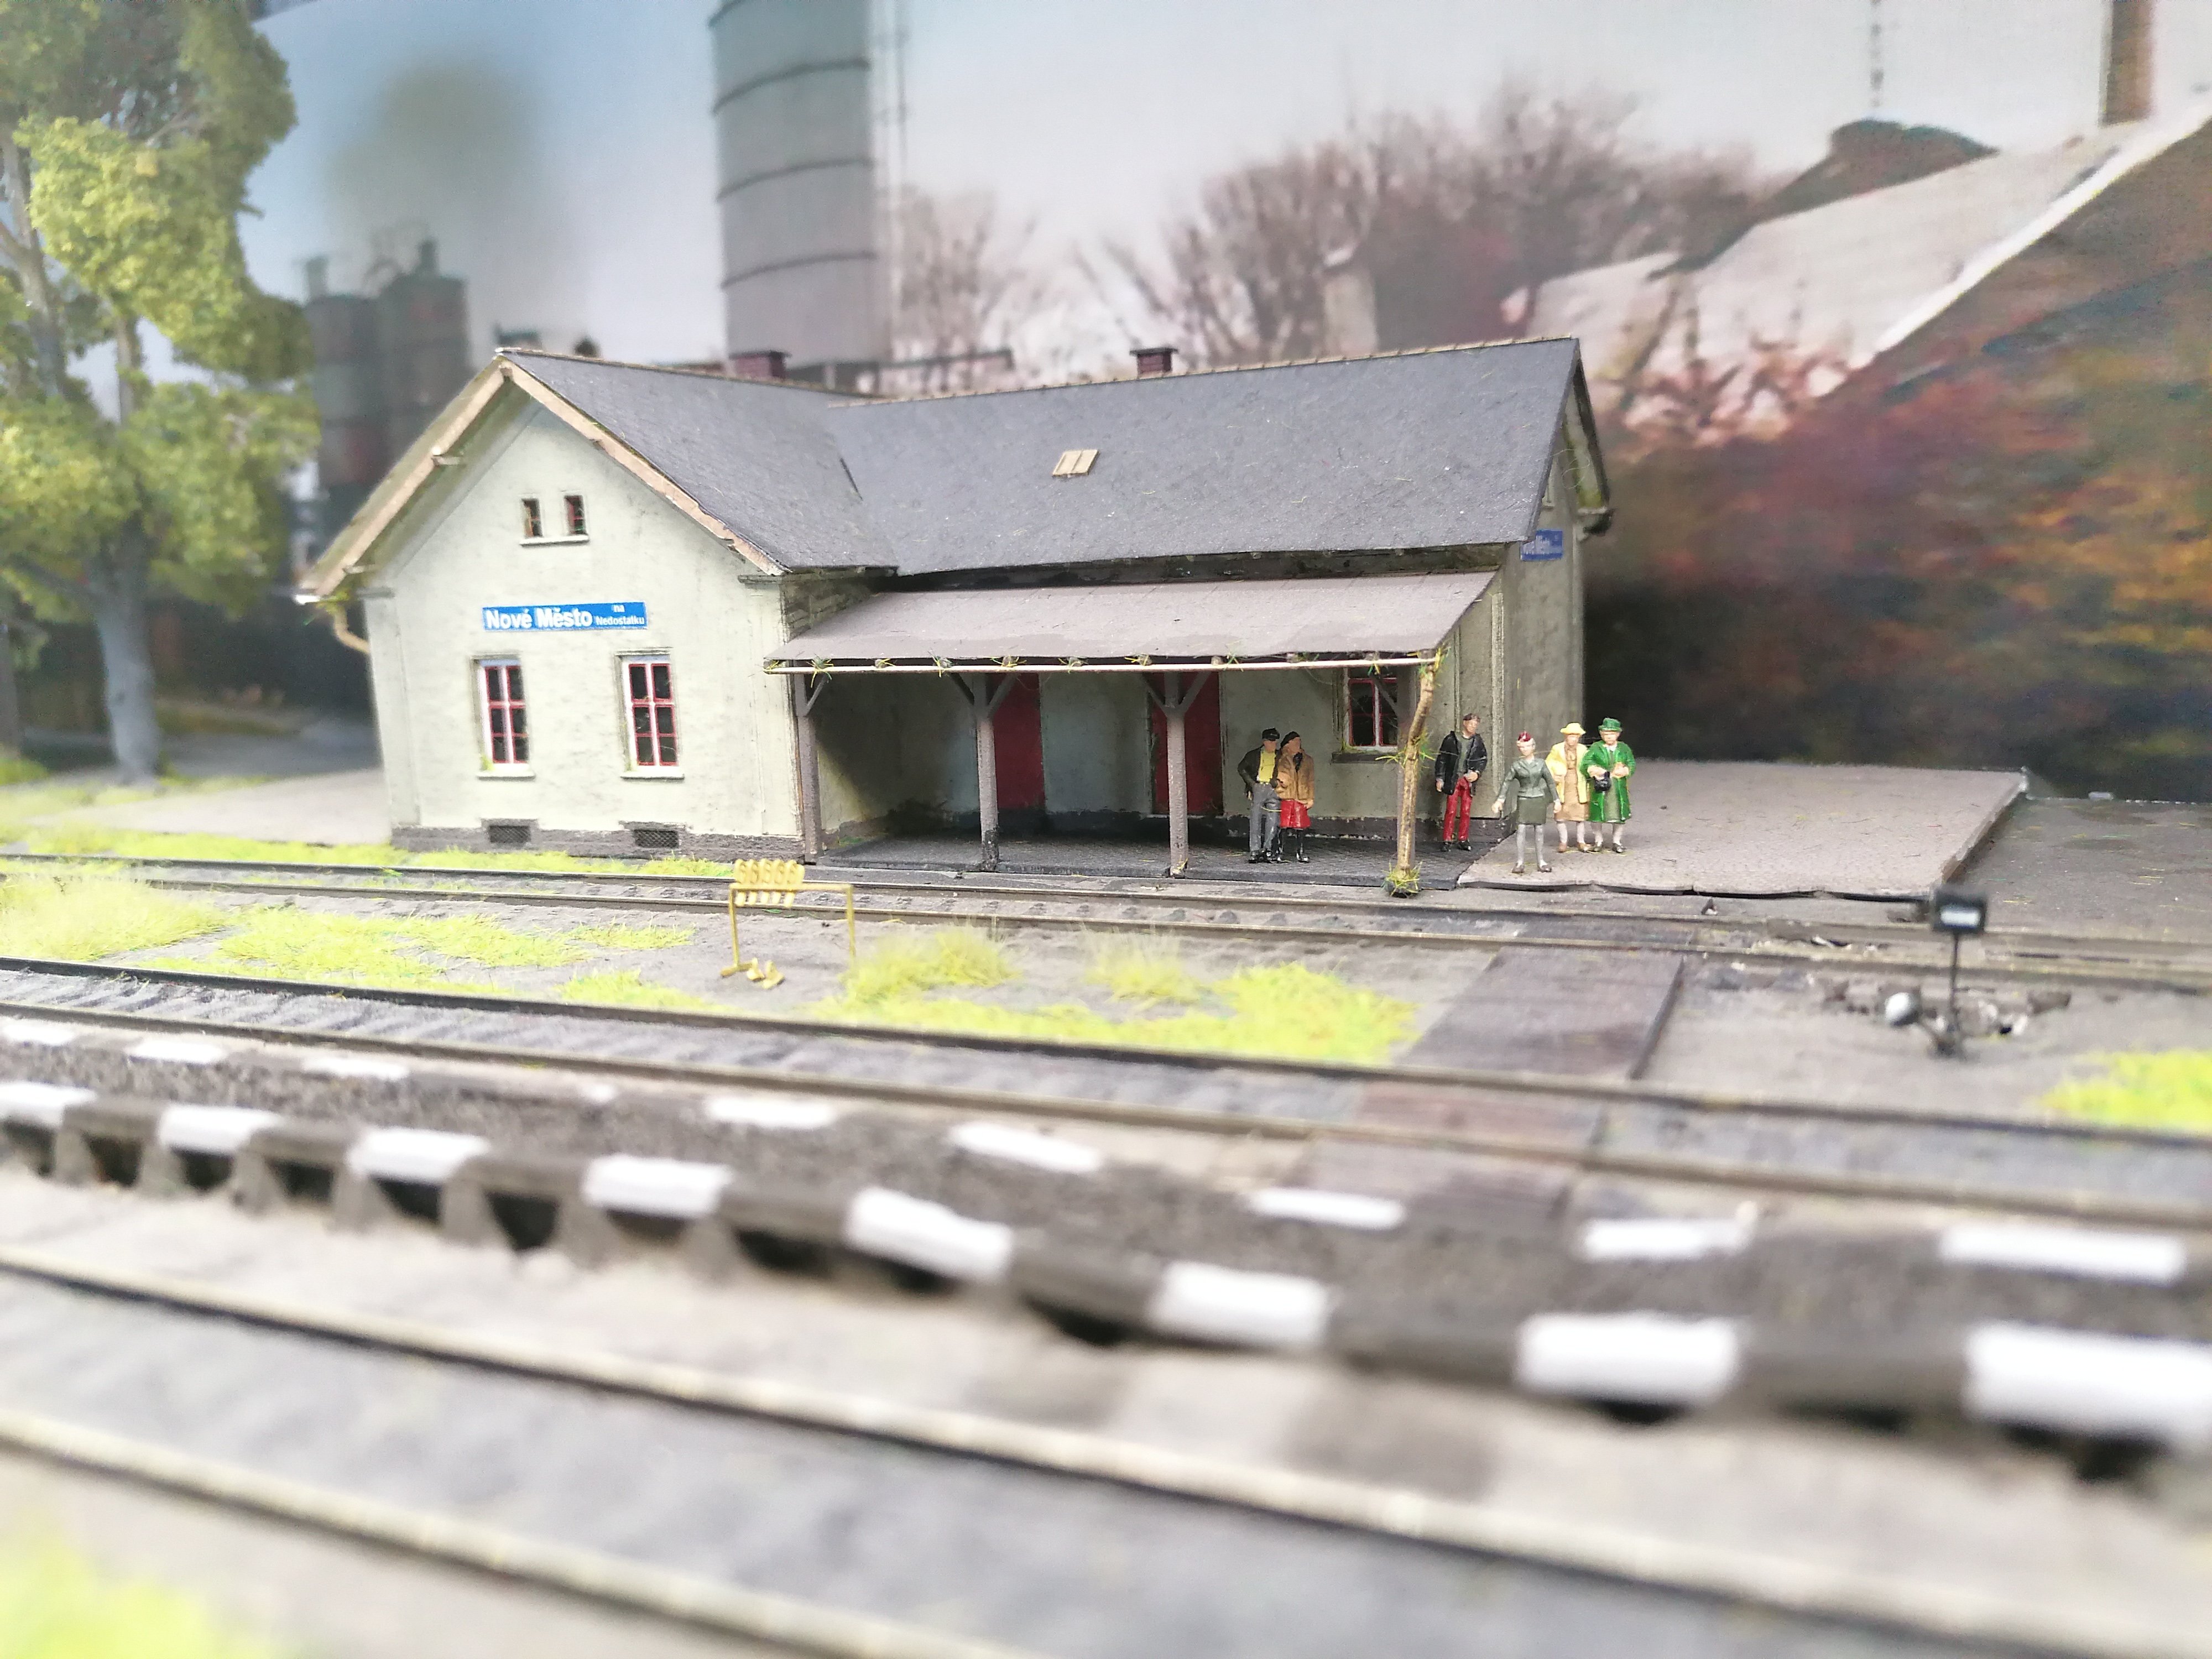
Built on yet another Ikea Lack 110cm x 26cm shelf, this is my Czech TT:120 micro layout. 'New Town on Lack' is set in the north of the Czech Republic circa 2010 and was inspired by an eventful railtour I did with a group of friends pre-Covid. Track is all Kühn (now part of Roco's range), structures and details are Czech kits. Locos are rtr, stock a mix of rtr and kits - the Czech modeller is very well-supported by their cottage industry, particularly in TT:120. Nové Město was featured in the October 2022 issue of Continental Modeller.
5 points
-
This pic just appeared on Fn which may help your plans
5 points
-
Sligo, Leitrim & Northern Counties Railway today. SLNC 1957-09-26 Dromahair, 'Enniskillen' shunting 11.15 S-E goods. PFF037. SLNC 1957-09-26 Collooney lkg West. PFF036. SLNC 1957-09-26 Belcoo 'Enniskillen' 11.15 mixed S - E. PFF048. SLNC 1957-09-26 Glenfarne 11.15 S-E gds shunted to allow 2A to pass. PFF041.5 points
-
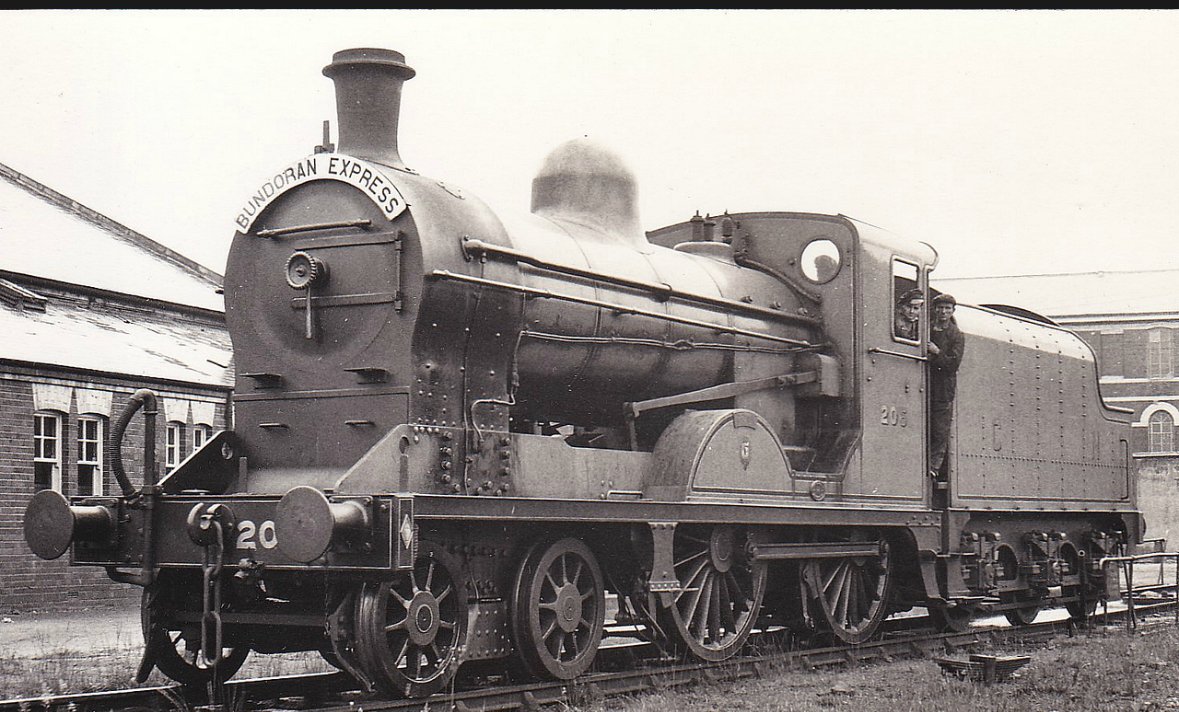
The last market day before Christmas, 1957. On a bleak December morning, Thursday 19th December 1957, an “A” class replaces the usual J15 on the morning passenger train, which has an extra coach on today. An influx of dealers had the pubs in Castletown busy last night. Here it is seen crossing a badly flooded Carrowmore Bog about 8 in the morning, halfway down the Dugort Harbour extension line.
4 points
-
Messing about some more with the Retro vibe. Some Freight movements and some ECS getting ready for the weekends pilgrims.4 points
-
Roger's 7mm scale kits feature a one piece etched chassis. Have mentioned before that you solder in the bearings, then simply fold the sides and spacers. They are designed for 32mm gauge, so you fit the top hat bearings inside out for broad gauge. Never had any problems with clearances for splashers and other bodywork, so presume things should be ok in 4mm. However, if there are no castings, what you will get is the same as with Worsley Works, so that means sourcing or making everything from chimney, dome, buffers, cab details, whistle tender axle boxes, brake standard, etc, etc. Without wanting to rain on anyone's parade, finding such things is a lot harder now than it was ten or even 20 years ago, when there were many more whitemetal and brass castings available, though 3D printed options may be possible now.4 points
-
Nickle silver basically a superior material to work, basically stronger, easier to solder and easier to paint compared to brass. Best contact Des on availability, Studio Scale models traditionally held kits in stock though may have shifted to supplying kits to order. Des supplied tender etchs and castings at relatively short notice for a GSWR 52 Class 4-4-0 I produced several years ago.4 points
-
An important point to check with Roger is whether a 4mm loco chassis produced from 7mm artwork/photo tooling will be suitable for a OO gauge loco. The width over chassis on a 4mm loco produced from re-sized 7mm/Gauge 0 artwork may be too wide for OO. Alternatives would be: (a) to re-design the existing chassis so that its suitable for OO gauge (width over frames 12mm) or (b) the buyer purchasing proprietary etched or turned frame spacers and assembling the chassis as a conventional chassis. Although my 4mm MGW vans were designed to be assembled to OO or 21mm gauge, it was necessary to re-design the chassis when I re-scaled the artwork to 2mm scale for a customer.4 points
-
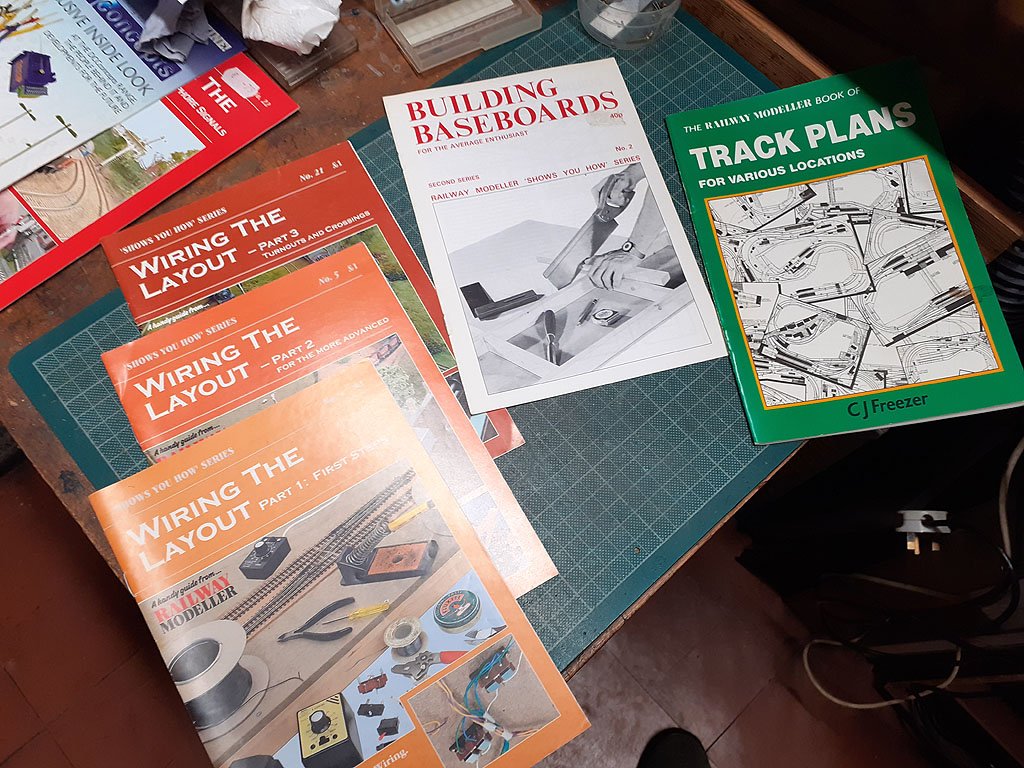
@Adrian bolton You may be able to buy a standard base board in Marks Models if they still have them in stock, if you are going for non standard to fit into the attic you would need to know your track plan and build the boards to suit. Marks Models used to stock these helpful booklets, which could give you an idea on how to proceed;- Give them a call to see if they are in stock? There is also a wide range of books online which are very helpful, some helpful members on here should have more recommendations. Eoin
4 points
-
Good luck @Irishrailwayman with your "re-purposing" of your layout. When I have time, I'll wind everyone up with pictures of Portadown Jct with GERMAN (think of a German Class 50 on a goods at Richhill!) and Southern Railway rolling stock (all electric of course!). Back to the real Thread. The little E Class should serve you very well. Reference has been made by @Galteemore to his build of one - and very nice it is too - that's downstairs in my Railway Room on "Rosses Point" (on 36.75mm track!). Then there's @Northroader's one (on 32mm track). I must place that in the engine shed and take a photie! Almost as bad as pre-Major General Pasley's Big Decision - I have TWO Irish gauges within a couple of feet of each other (and on the SAME railway company!). .......4 points
-
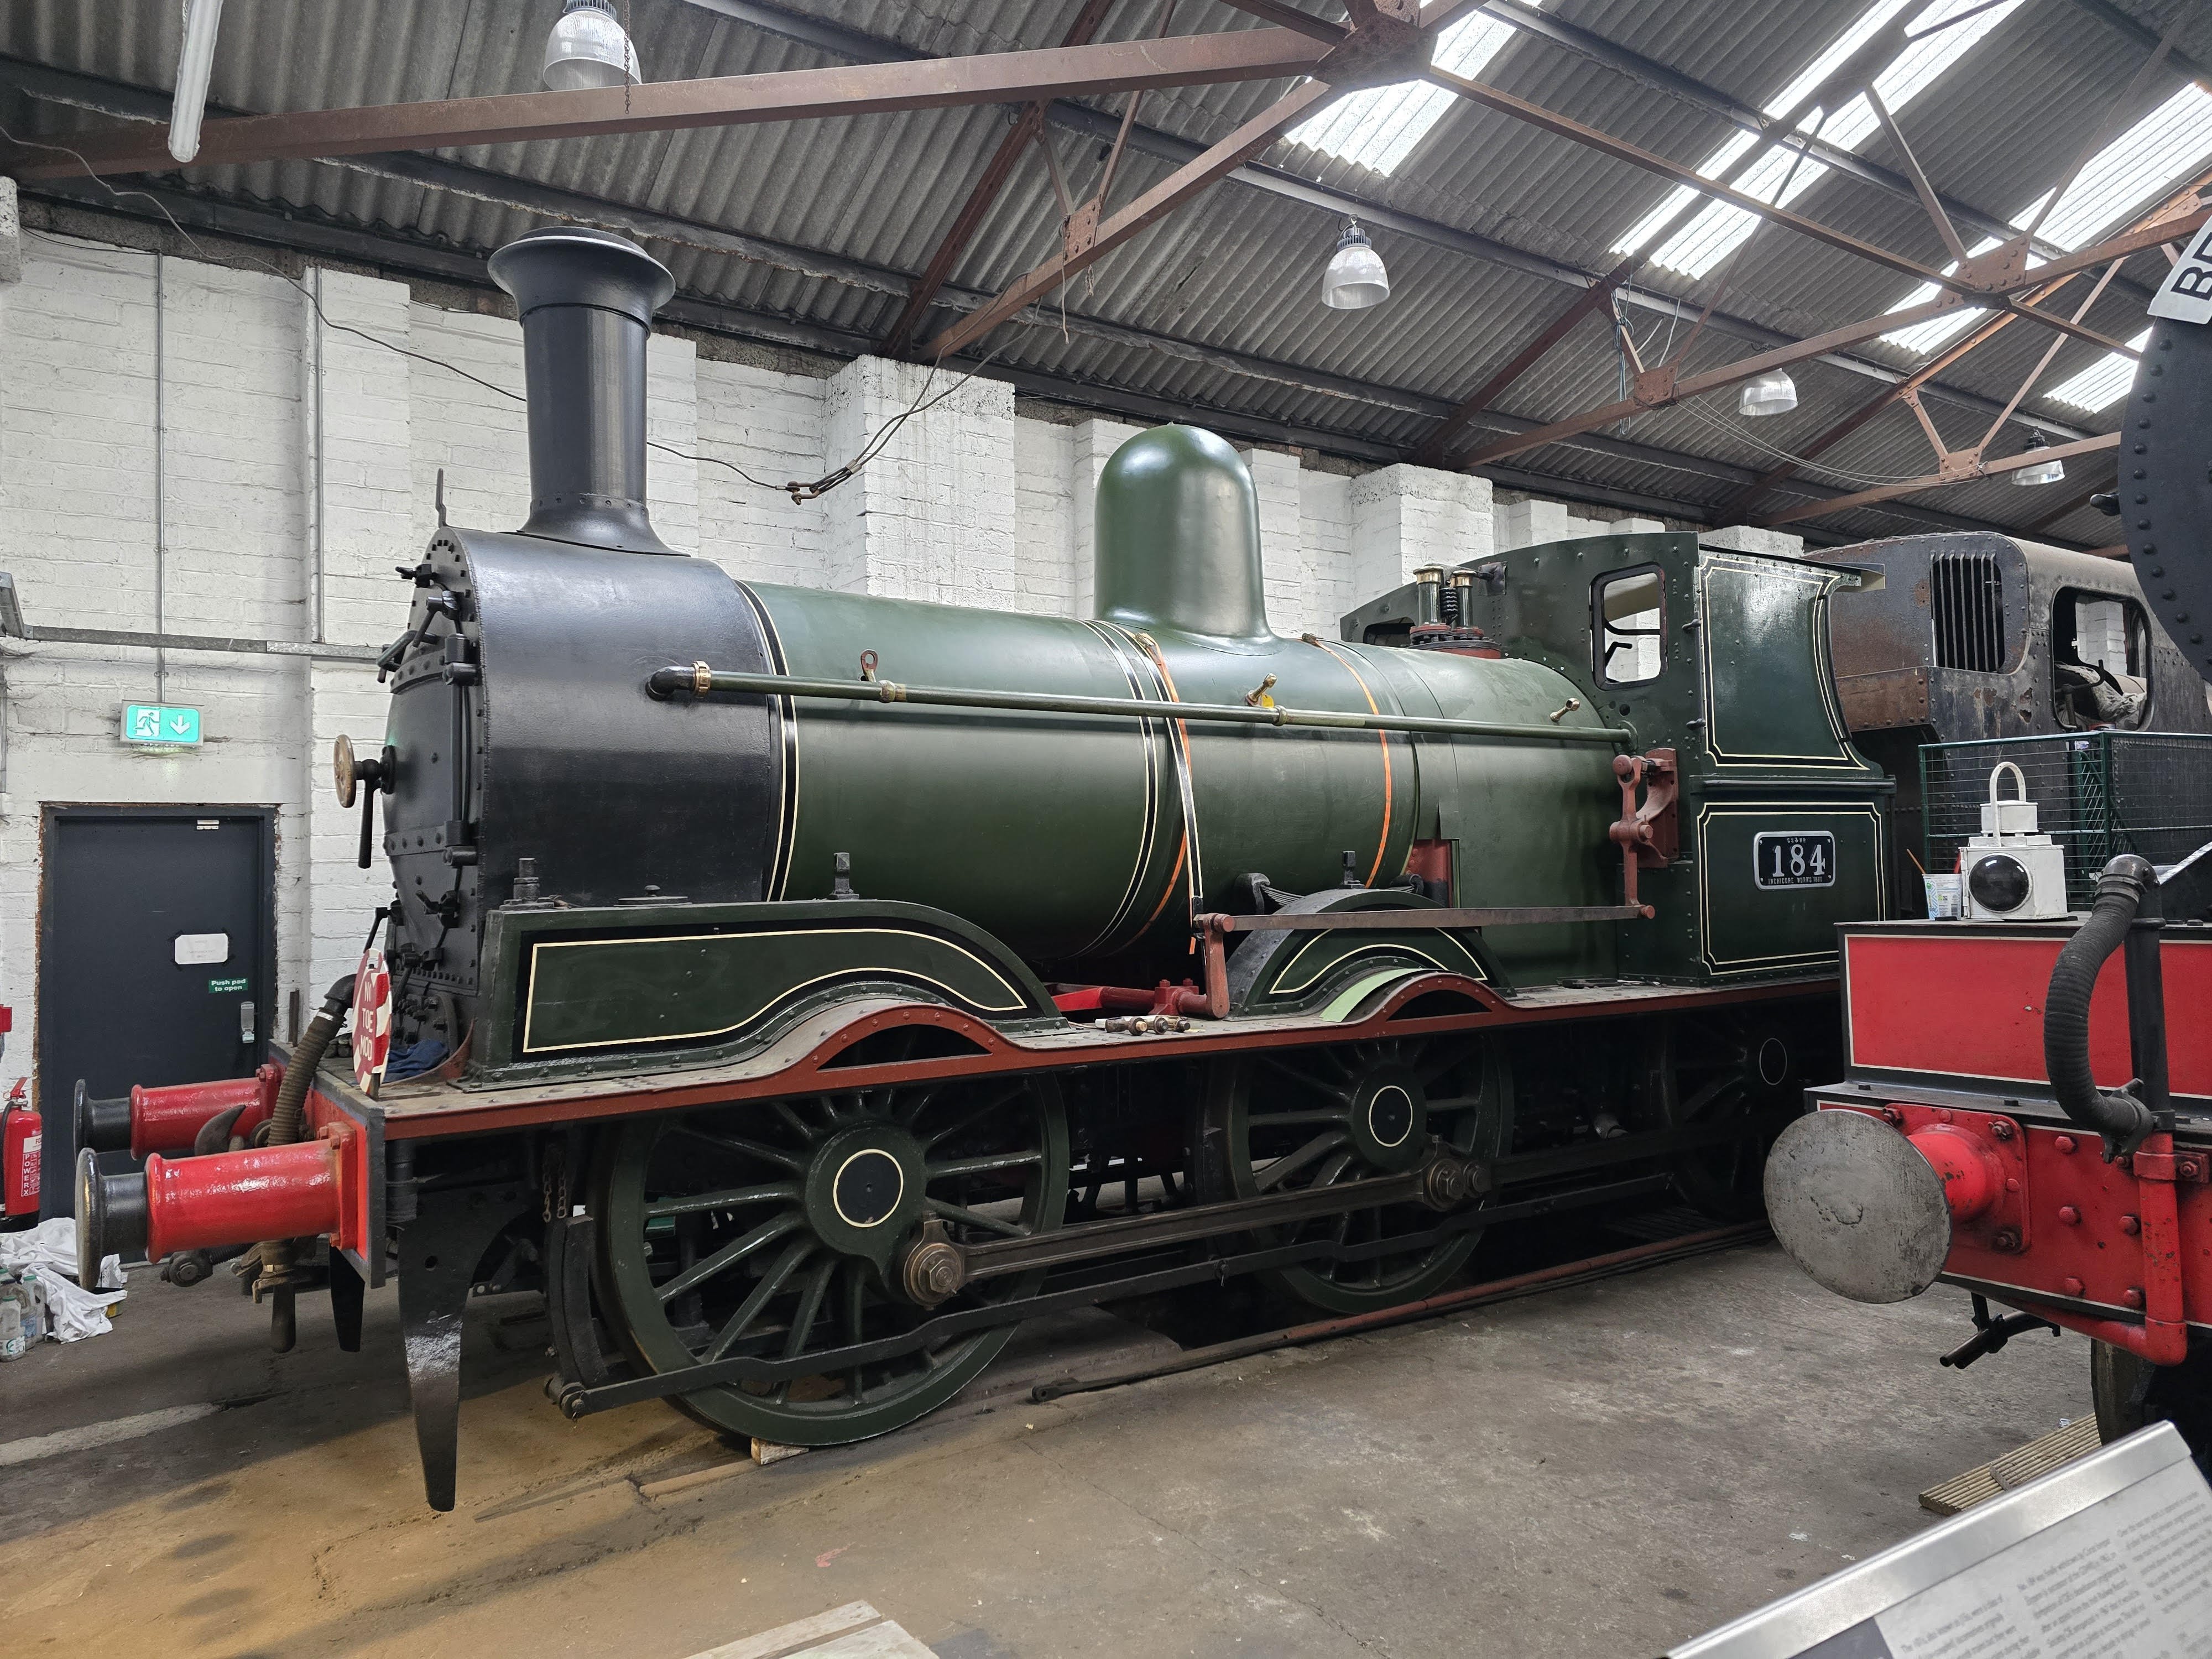
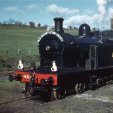
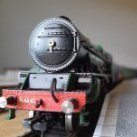
184 will look great when finished. The paint on it is based on a swatch taken from No. 90, which is in turn based on a swatch taken from a model in the Science Museum in London that has original GSWR paint. Always nice to see some inter-society cooperation! We are almost at the point where every 5'3" Irish steam loco will be in restored condition apart from Lough Erne
4 points
-
184 the day I visited whitehead a few months ago, boiler cladding being re-applied.
4 points
-
https://www.railwaygazette.com/traction-and-rolling-stock/electro-diesel-stadler-flirt-trains-selected-to-renew-dublin-belfast-enterprise-fleet/70100.article It seems like the contract's been signed now. (It'll be a right mess if CAF win their case after this point, as far as I know the stay on the contract signature was lifted, but the case wasn't thrown out.) It's a Flirt variant, running on the Dart's wires and on diesel the rest of the time. Some small batteries are included for short movements. There will be toilets and provision for catering is given. Delivery scheduled for 2028, in service from 2030.4 points
-
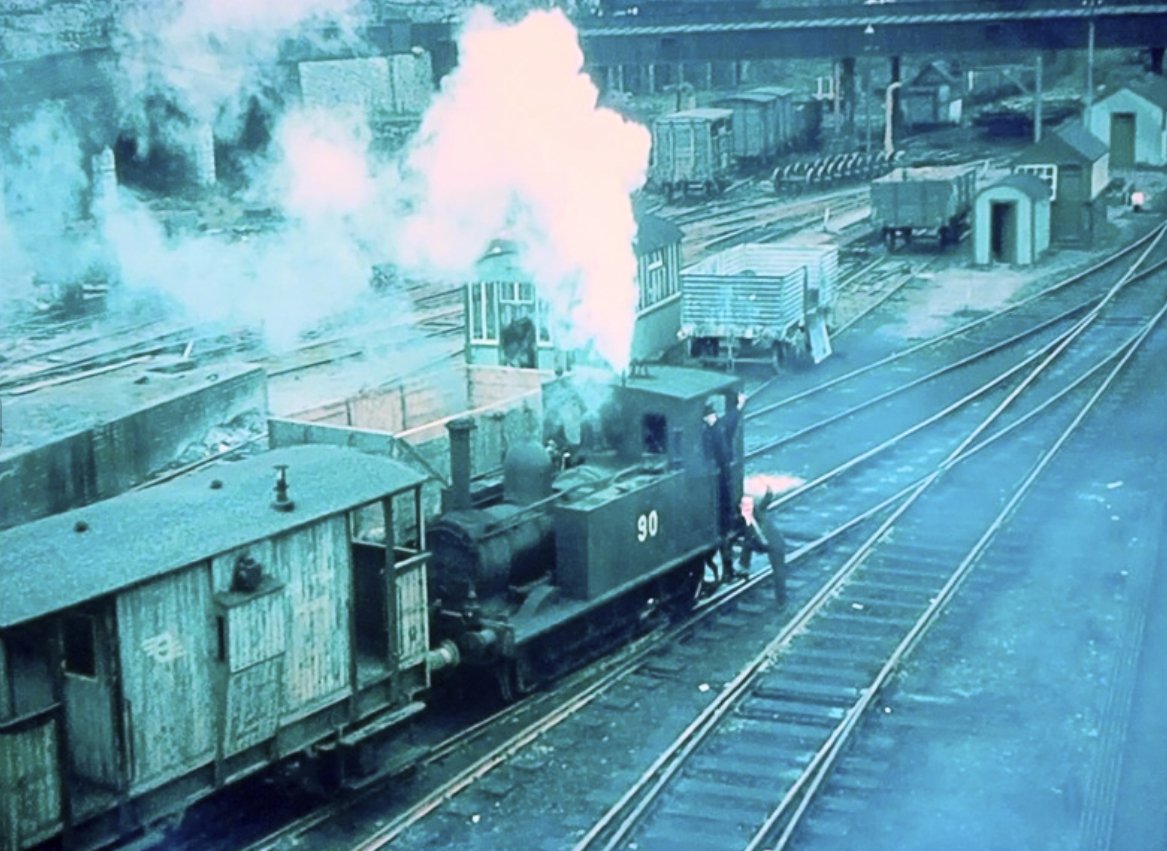
A photo of No.90 in Albert quay on the 31st of March 1961 as the last Ex-Cork Leaves for Bantry. (Brian Baker)
4 points
-
The class 44 works a trans pennine express from Newcastle to Liverpool through Ashburton grove.
4 points
-
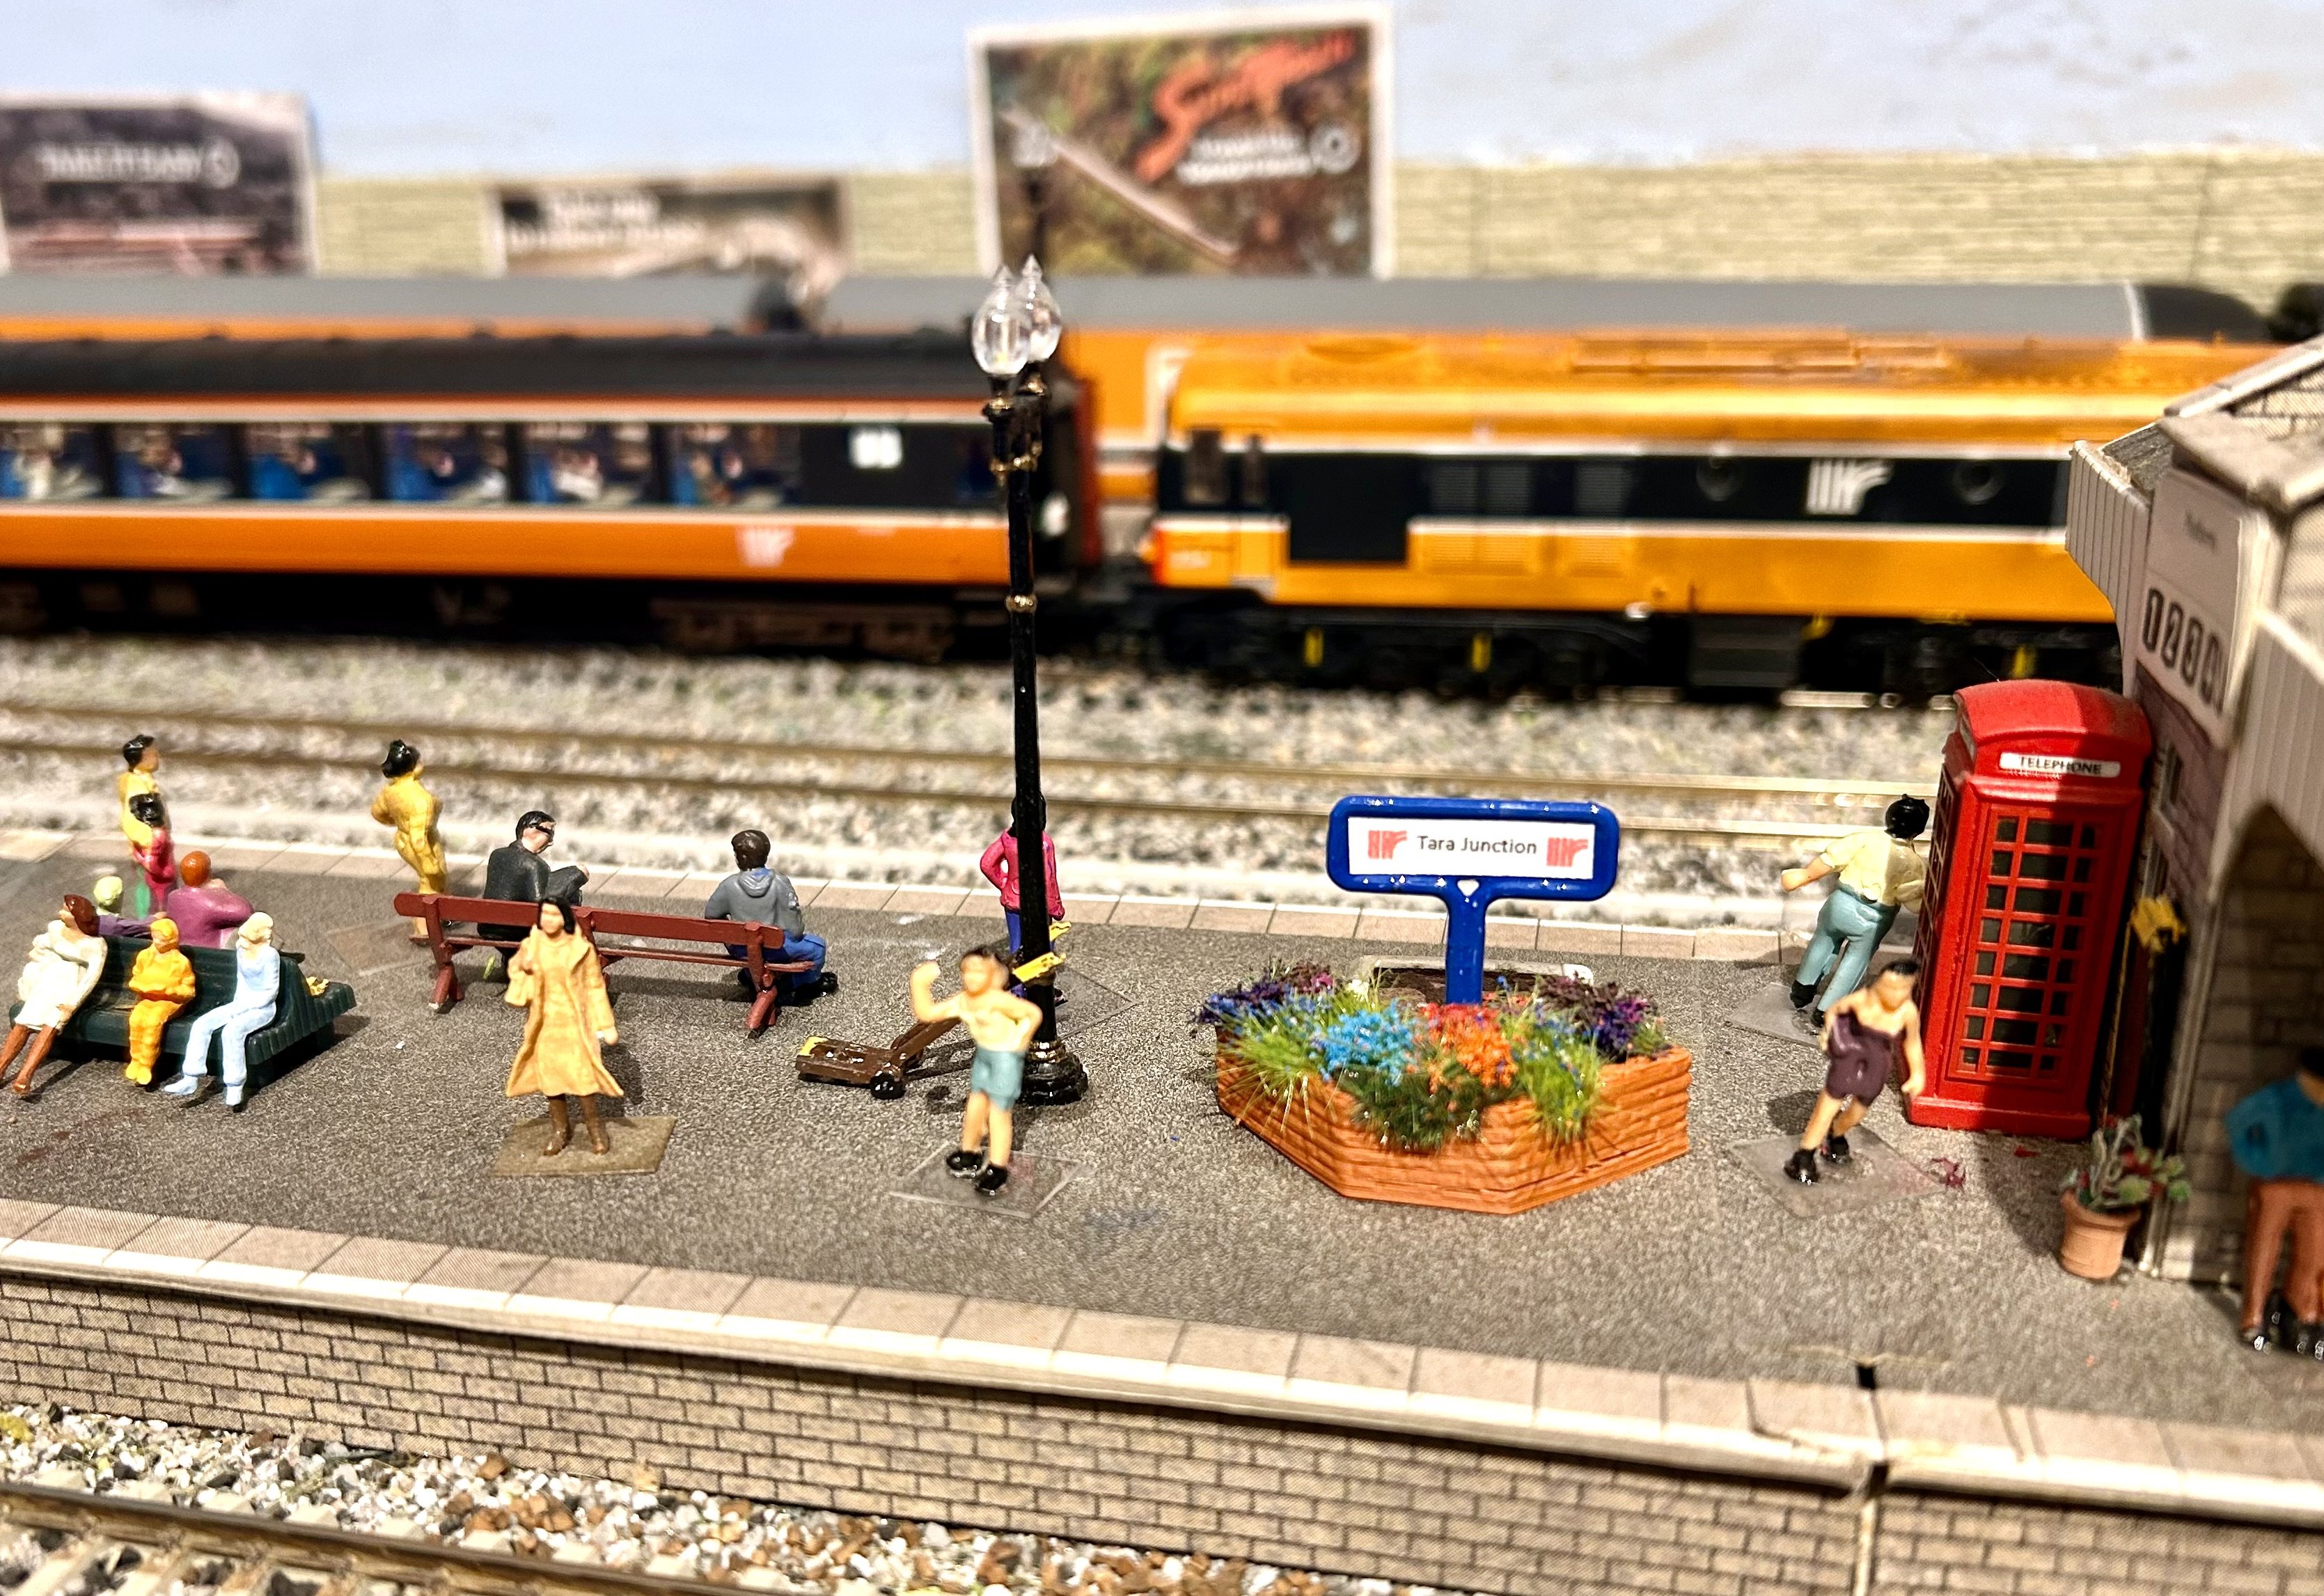
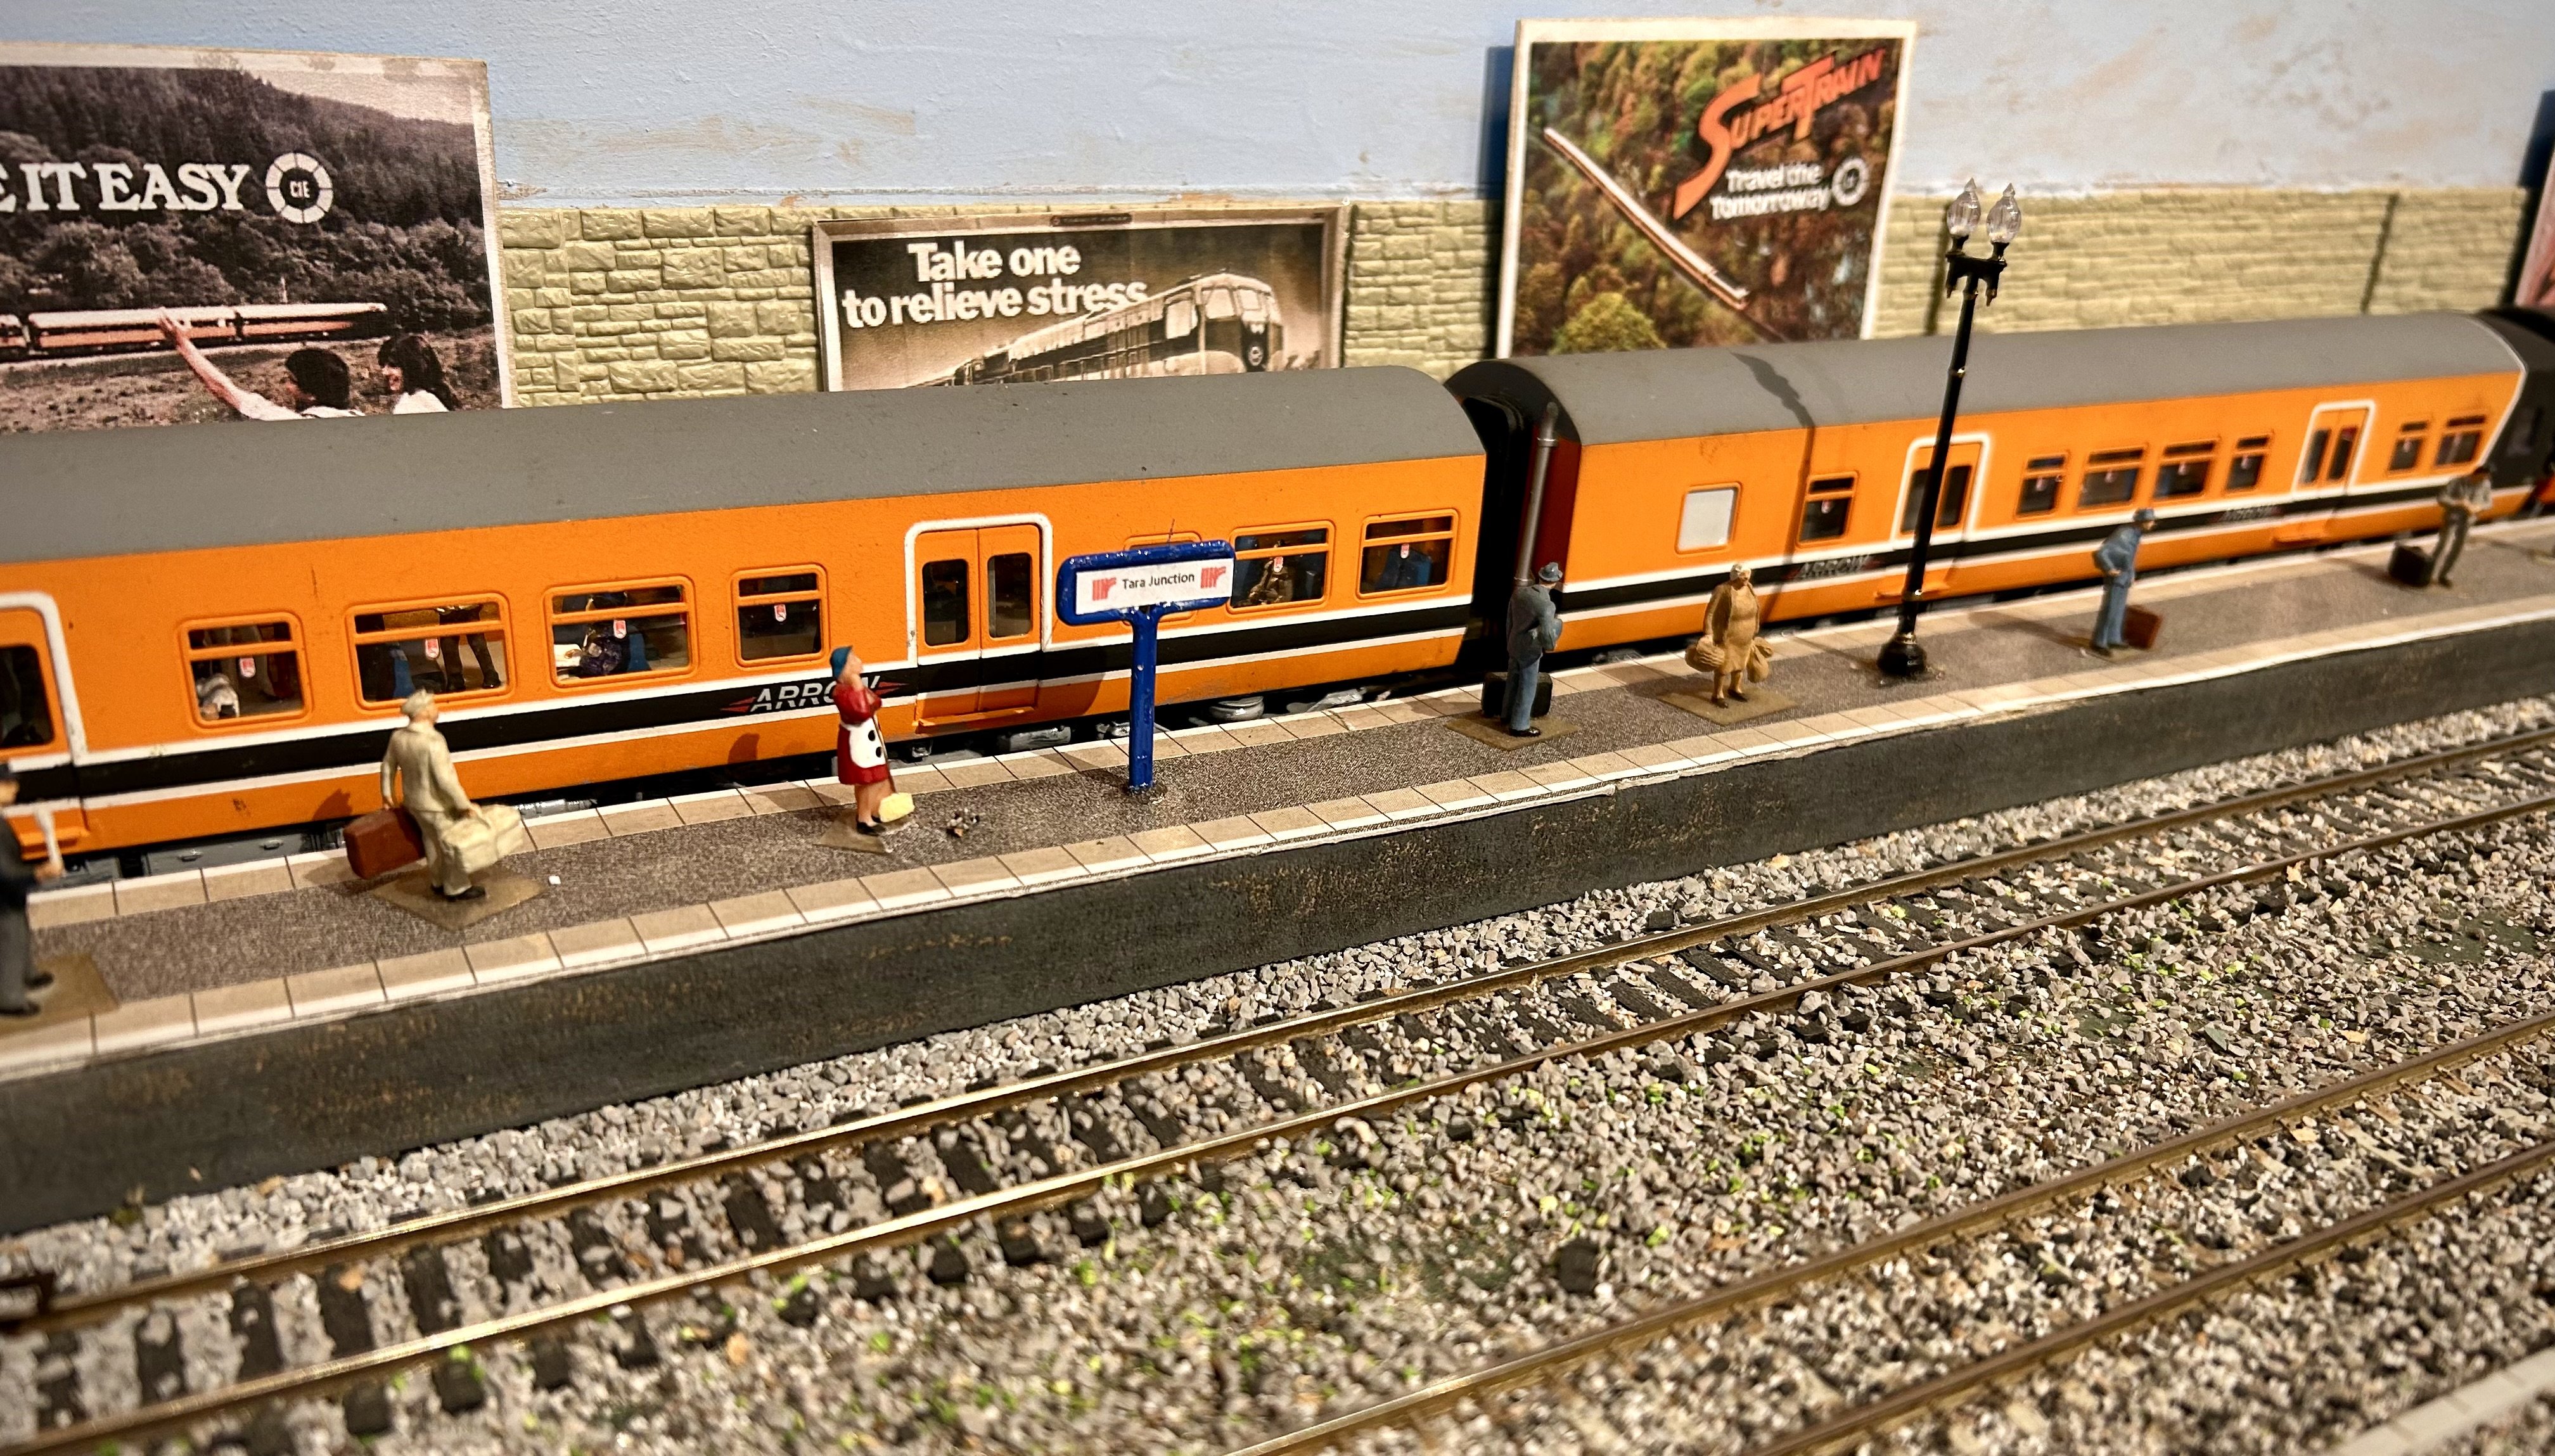
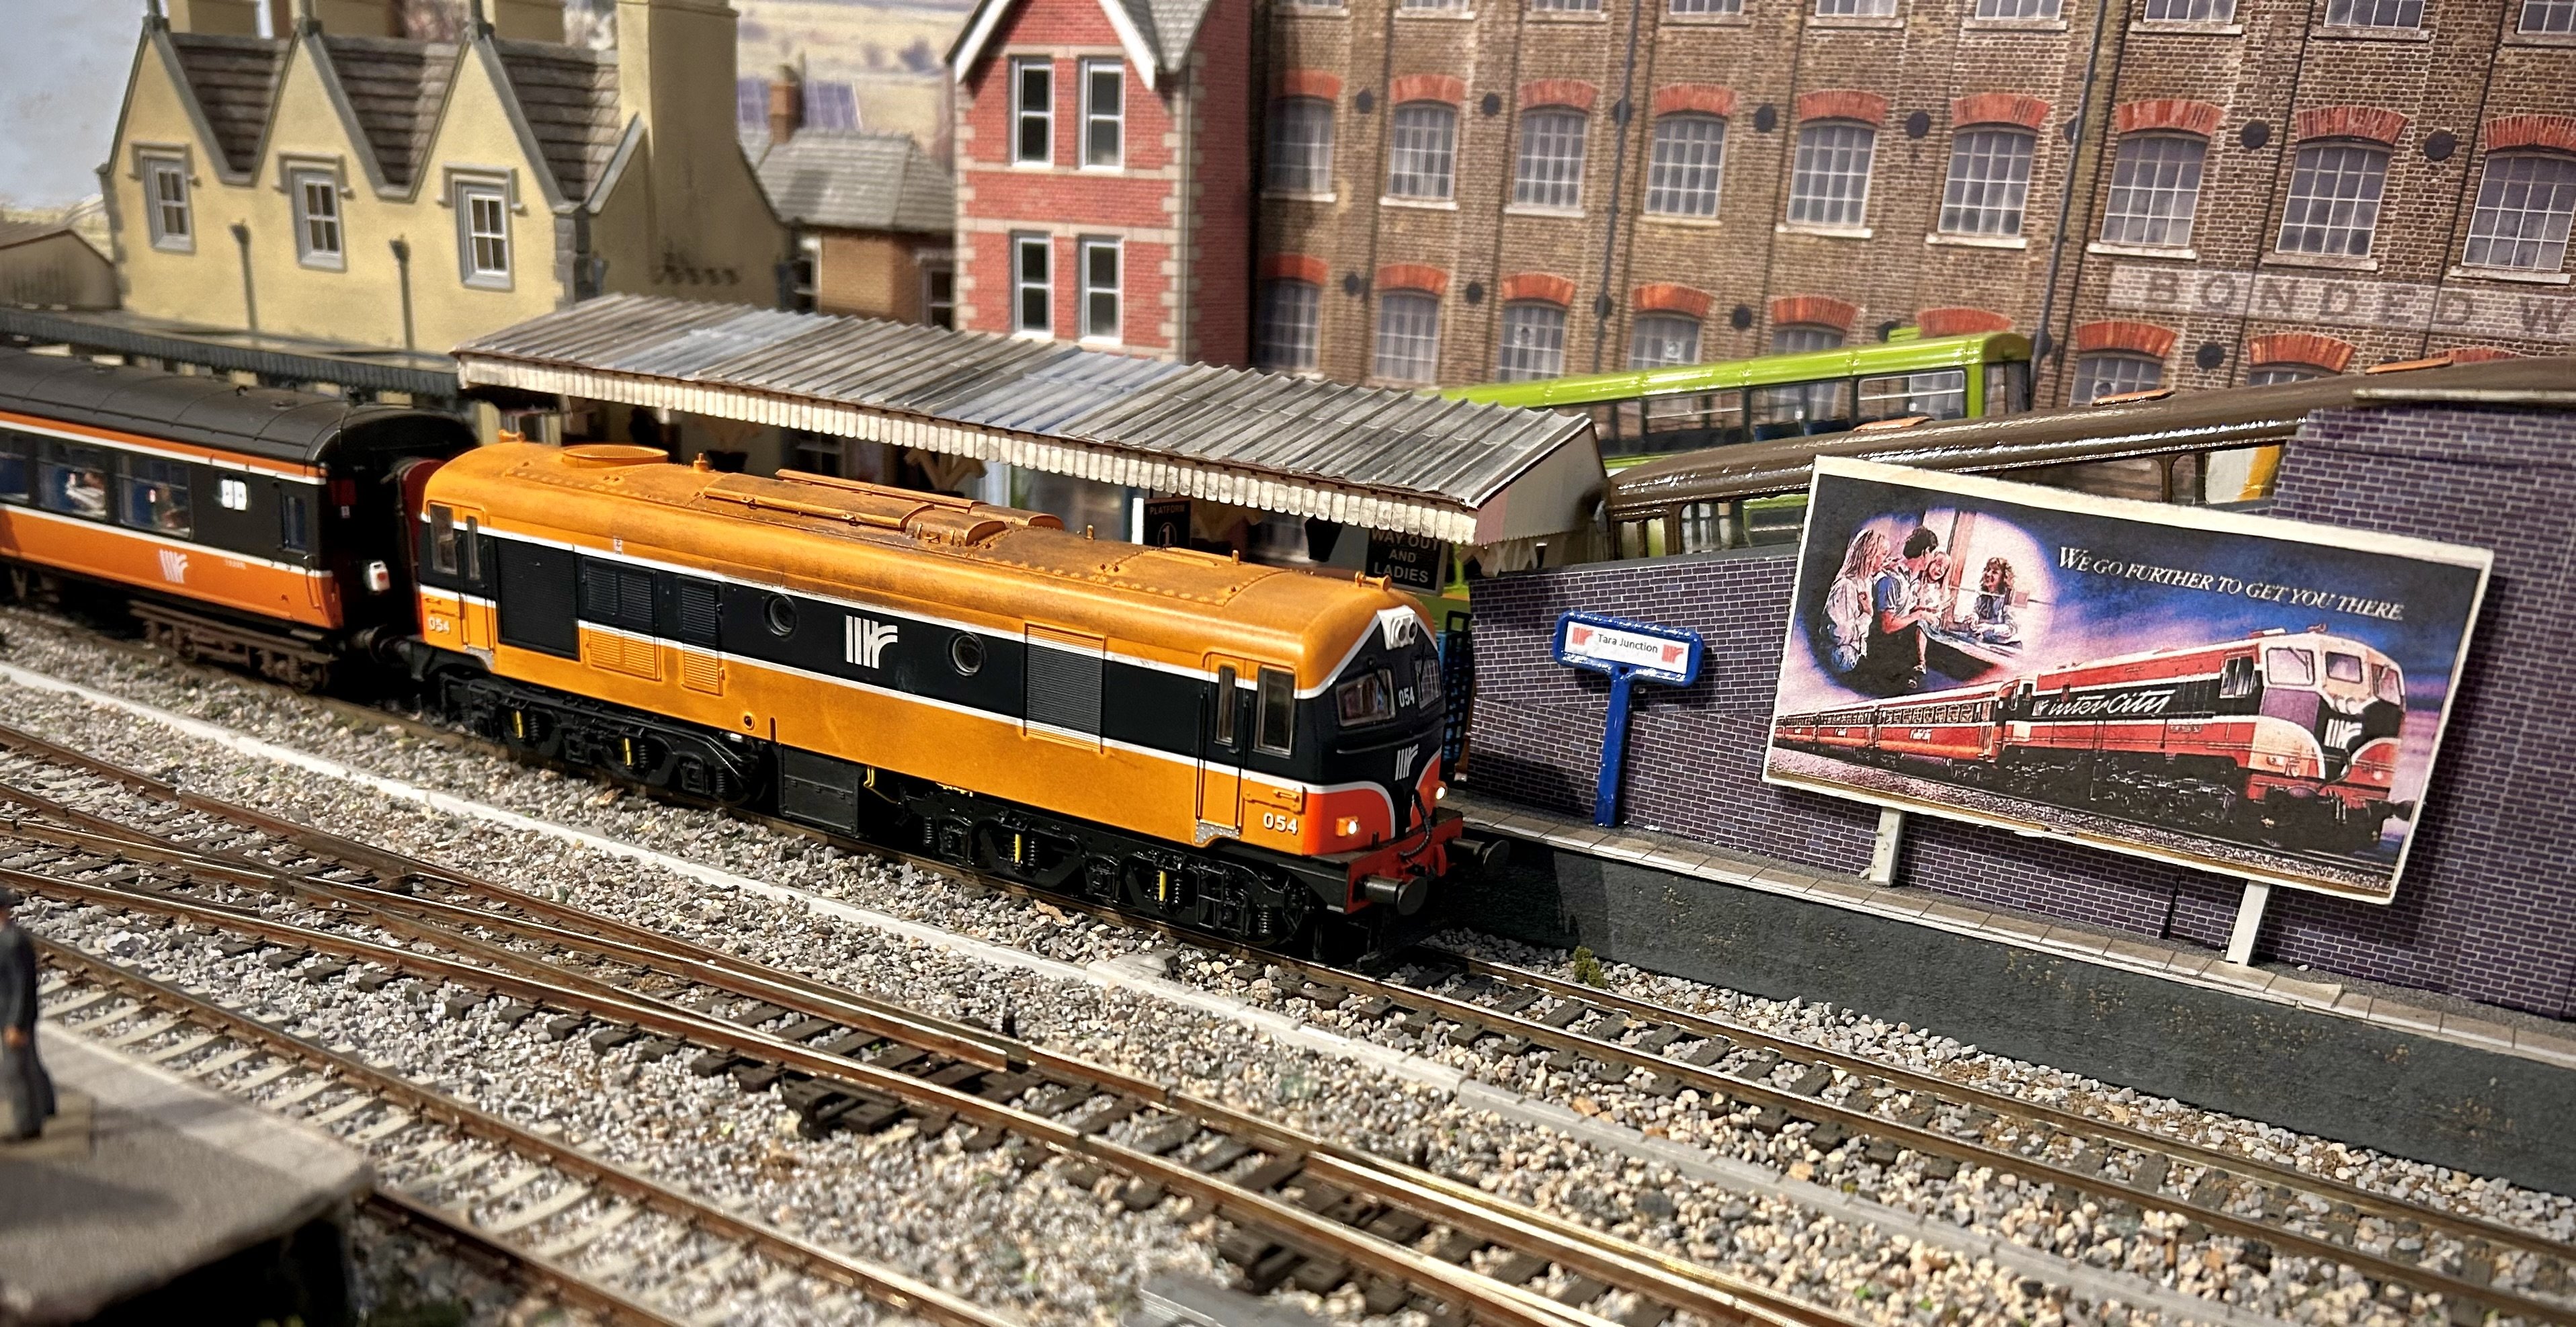
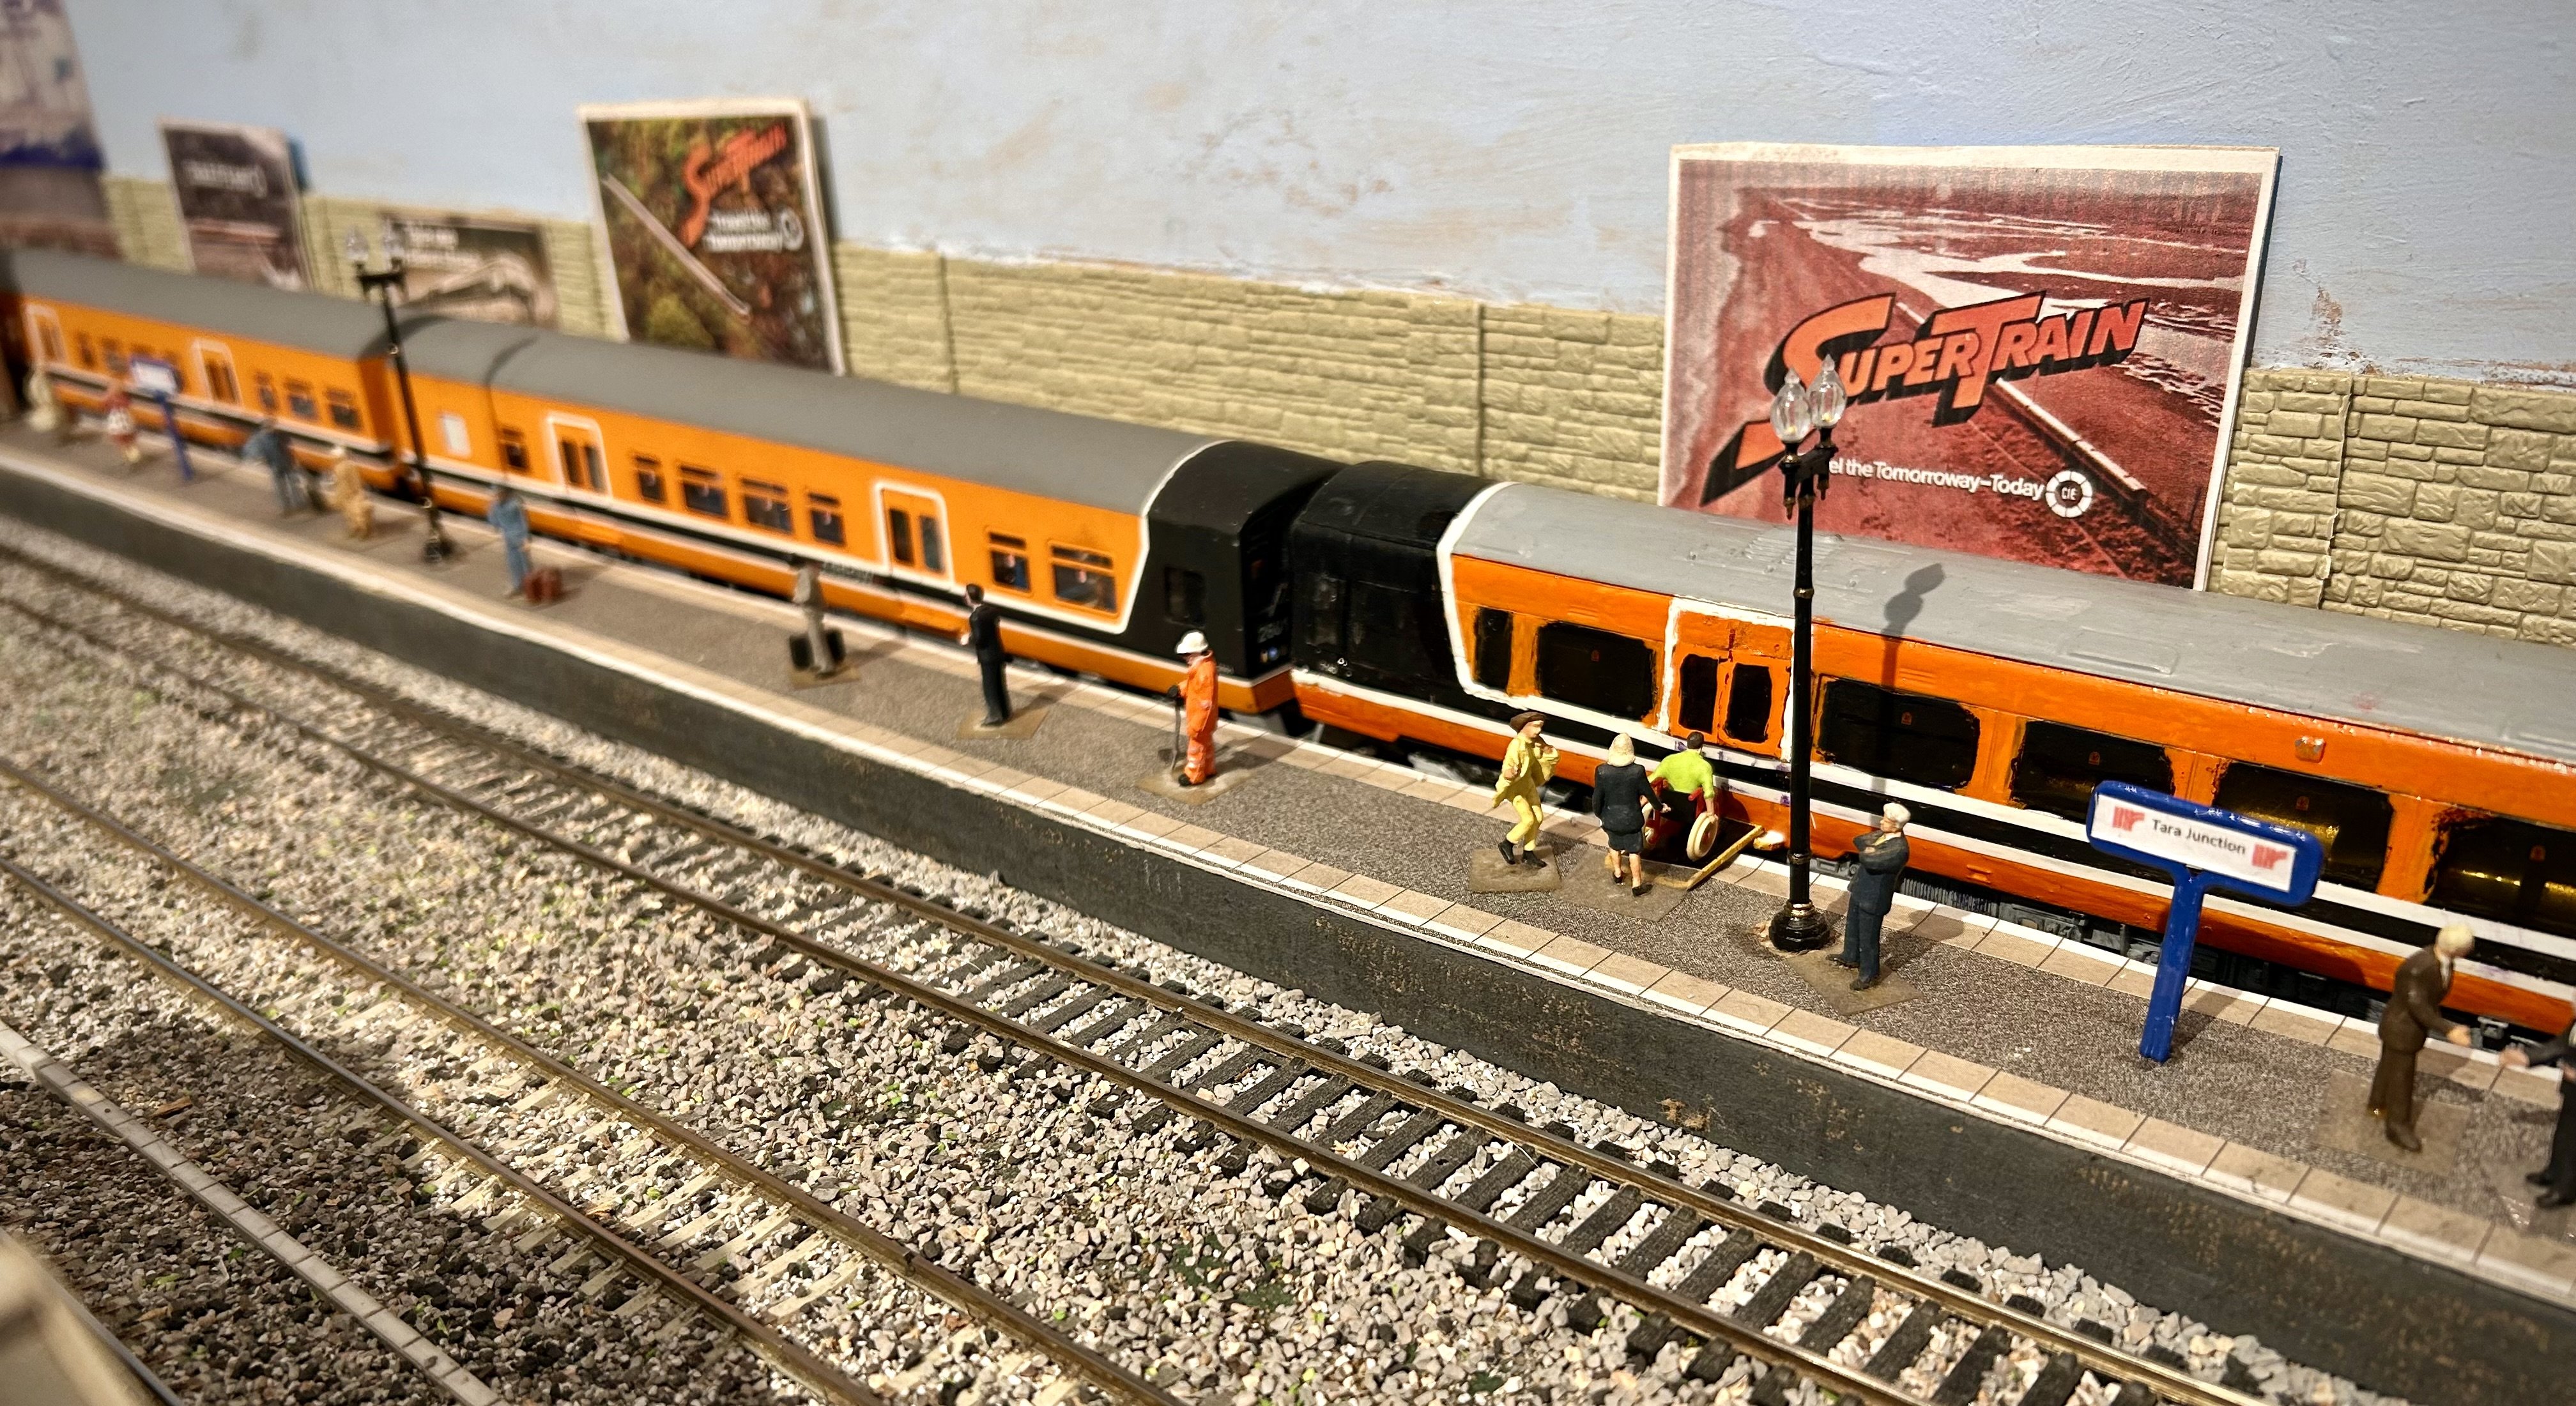
Thanks to @past avenue for supplying the name boards which were recently installed on Tara junction.
4 points
-
Hmmmm indeed. I have many such "safe places", wherein dwell model railway stuff, one set of house keys, an IR£4 winning lotto ticket, two sets of car keys, at least one mobile phone, an expensive jacket, a practically unused 10-day CIE runabout ticket from summer 1979 and gawd only knows what else. Trouble is, they are VERY safe. VERY safe indeed.4 points
-
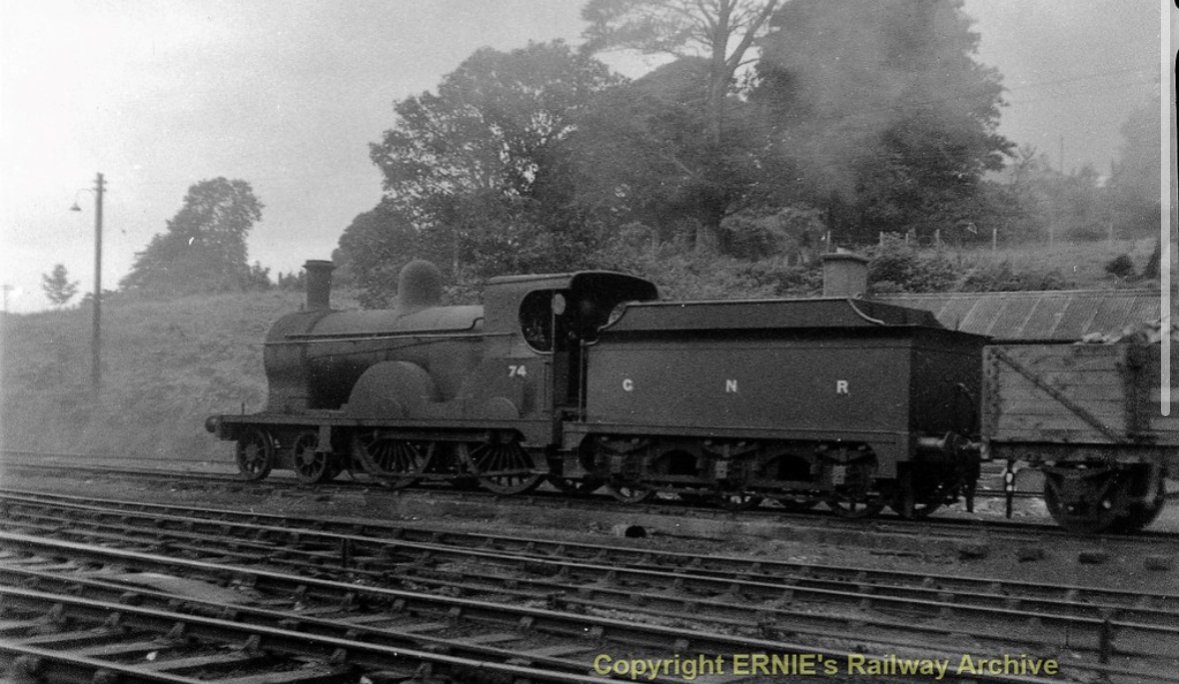
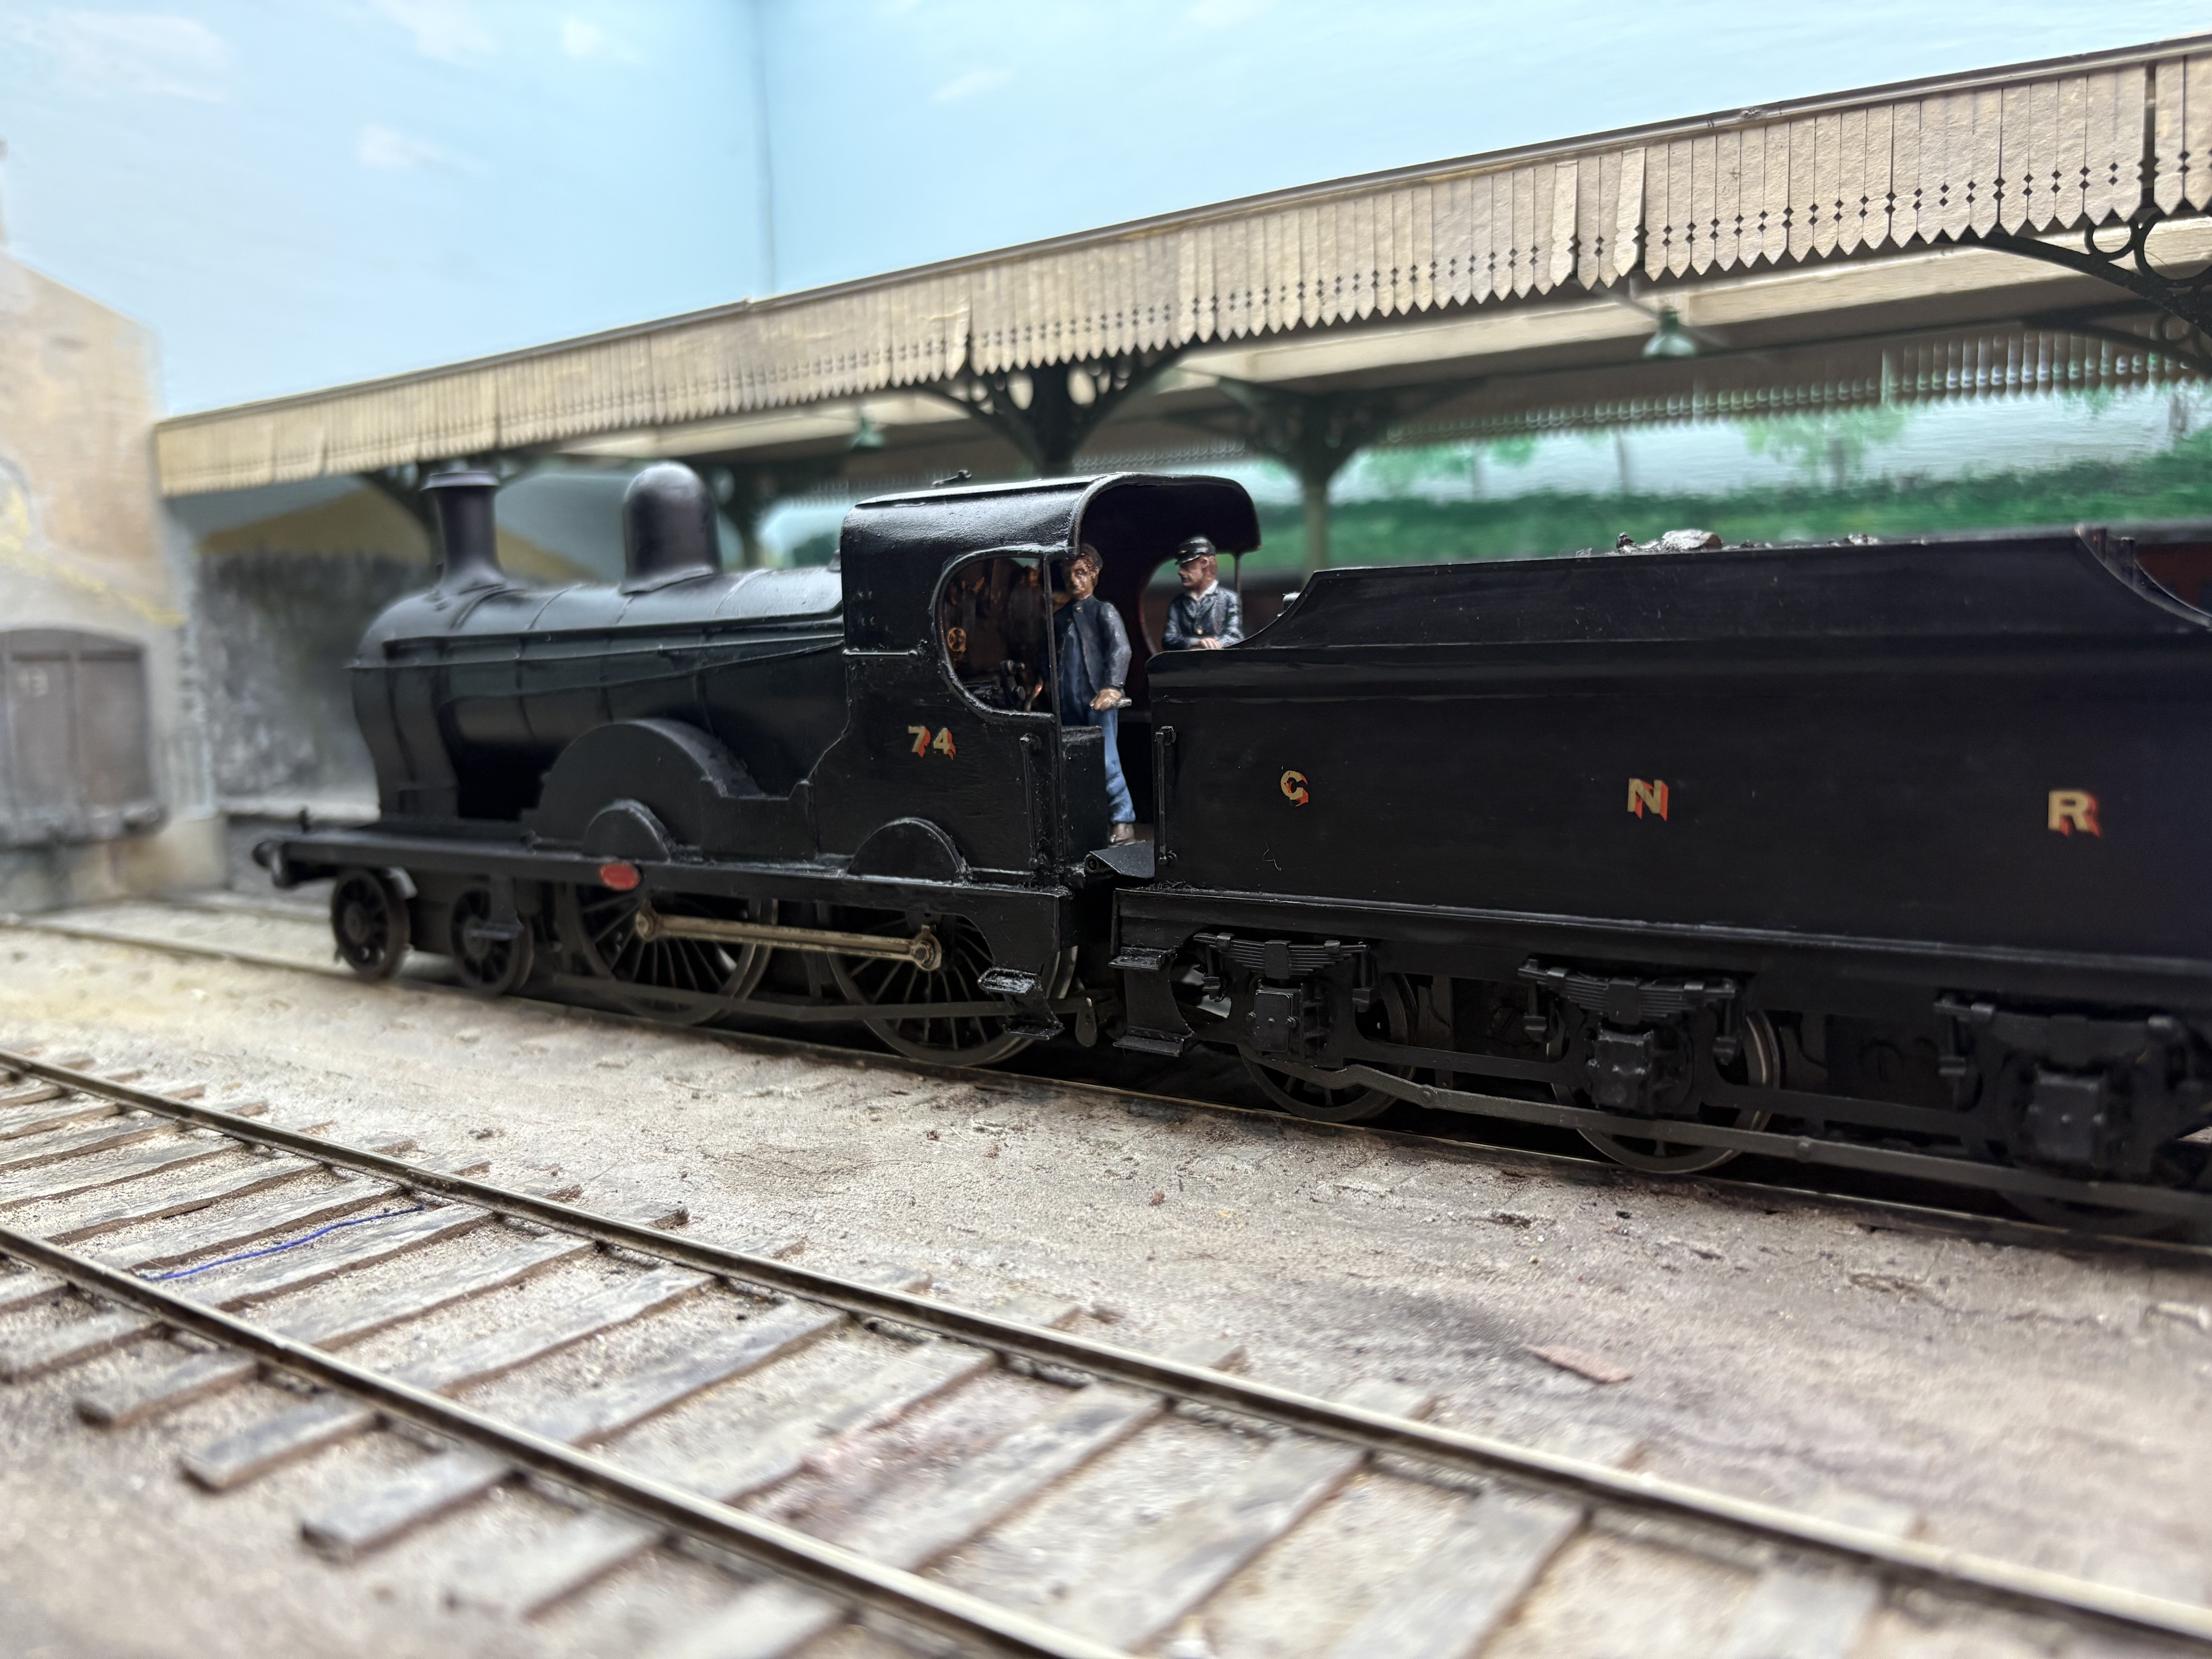
Ernie’s Railway Archive on Flickr. I can do you 74 at Enniskillen in 7mm scale !
4 points
-
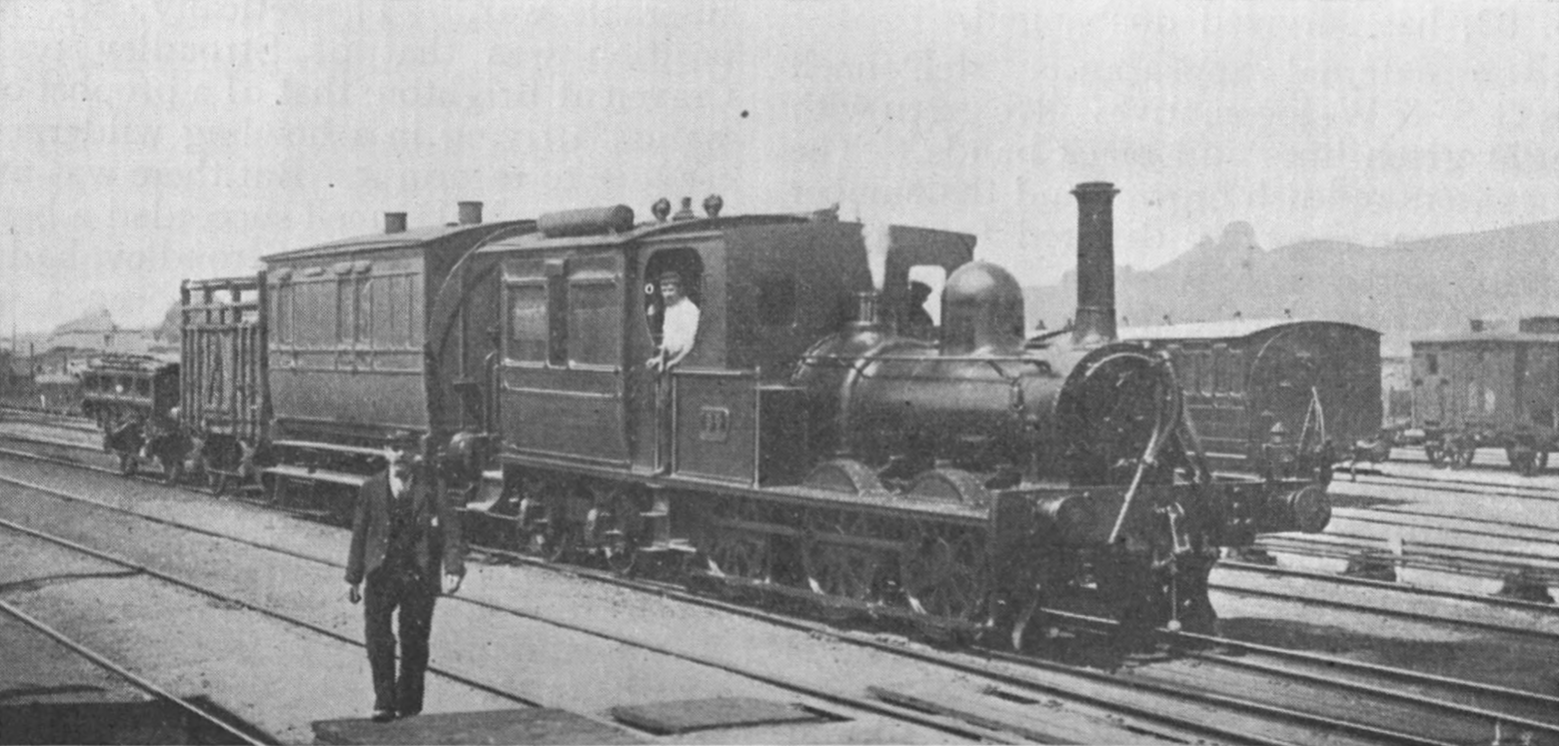
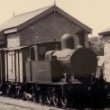
Railmotor no.92, location unknown
3 points
-
This is still In Limerick. It's been noted.3 points
-
It's been a locomotive long associated with, with it being mooted as a possible commission as we began our journey as a fully fledged British outline model railway manufacturer. That sadly did not work out, but it seemed a real shame to leave the research and an exclusive agreement with GB Railfreight to produce the locomotives in 00 gauge to gather dust on the shelf. This is especially so when it fits into our range so seamlessly, you all want to see it in model form, and it fills a significant gap in ready-to-run current outline locomotives. So, let's get to it, and welcome the Wabtec/GBRf Class 73/9 locomotives to the Accurascale Exclusives range! The Class 73/9: A Modern Hybrid Force Watch Our Launch Video The Class 73/9 subclass consists of 13 rebuilt Class 73 locomotives originally constructed in the 1960s. These rebuilds were split into two groups based on their new power units: MTU Engines (11 locomotives): Converted by GBRf and Wabtec at the former Brush works (Loughborough) starting in 2015. These form the bulk of the modern fleet and are the focus of our Class 73/9 model. Cummins Engines (2 locomotives): Converted by RVEL in Derby for Network Rail. These differ significantly from the MTU fleet and are currently treated as a separate entity due to their variation and uncertain future. (Sorry, but we are not doing these!) A Brief Look Back: The Original Class 73 The Class 73 started life with a unique mission. It could draw power from the Southern Region’s 750V DC third-rail network or use its onboard English Electric 4SRKT diesel engine. Unfortunately, early power unit development meant the diesel engine generated only 600 hp—less than half the power available from the third rail. This meant the '73s primarily relied on "the juice," using diesel only for non-electrified areas like yards and engineering work. Construction was split between BR’s Eastleigh Works (Class 73/0) and English Electric's Vulcan Foundry (Class 73/1). They were built to the narrow Hastings Gauge, making them invaluable across the network. By the 2000s, the remaining fleet was showing its age, with power units having lost significant horsepower. The choice was clear: replace them entirely or invest in a full re-engineering project. The latter was chosen to maintain the locomotive's crucial "grandfather rights" on the network, avoiding the costly and lengthy certification of new rail vehicles. The Repower Project: Creating a "Half-HST" The repower and re-engineering project was undertaken by Wabtec at Loughborough, led by Bob Tiller of GBRf. Tiller, who previously led the successful HST repower, chose the same successful strategy for the 73. The ageing English Electric unit was replaced with a new MTU 8V4000R43L engine capable of a massive 1600 hp, coupled with a new AC alternator. This power profile effectively earned the 73/9 the nickname of a "half-HST." Key Visual and Mechanical Changes: Cooling Upgrade: The new engine required extensive cooling. The most visible change is the addition of large bodyside grilles on both sides of the locomotive, along with new vents and fans along the cantrail. Weight Management: The MTU engine was 3 tonnes lighter than the original, necessitating the fitting of additional ballast within the body to maintain the required weight for traction and braking. Total Overhaul: The project involved more than just an engine swap. The entire locomotive was stripped down, with only the bogies, drawgear, and bodyshell being retained and subject to a "nut and bolt" overhaul. Power Supply: Crucially, the increased output of the new diesel engine now allows the locomotive to supply train power (ETH) while still providing traction current.. Advanced Startup: For reliability, the traditional traction batteries were replaced by a CAPOS (CApacitor POwer Storage) system for starting the power unit. This system also incorporates a pre-heater to reduce engine wear. Phase 1 vs. Phase 2: A Subclass Within a Subclass While all MTU 73/9s come from the same drawing board, they quickly split into two visually distinct groups based on their primary operator and duties. Phase 1 Locomotives (The Southern Fleet) Feature Description Operator/Livery GBRf House Colours (Southern England-based) Primary Use Network Rail Test Trains, Transit Moves, Rail Head Treatment Trains (RHTT) Front End Details Retain the characteristic original Class 73 face with high-level air pipes, blanked centre window, rubbing plate, and buckeye coupler. Updates New BMAC LED lights, AAR multiple working socket, and recent addition of brackets for Network Rail monitoring equipment. Service Entry 2015-2016 Phase 2 Locomotives (The Caledonian Sleeper Fleet) Feature Description Operator/Livery Caledonian Sleeper Teal Primary Use Operating sleeper services in Scotland where overhead wires are absent. Initial Front End Retained rubbing plate and buckeye coupling for Mk2/Mk3 stock. Fitted with a new fabricated single-piece snowplough. High-level pipes removed for a "tidied up" appearance. Key Roof/Cab Changes Aerial, air conditioning module fitted above each cab corridor, and snow covers on the roof horns. Fuel Capacity Upgrade The air receiver was replaced to install a large, extended capacity fuel tank after the original capacity proved insufficient for long-distance diesel-only operation. The Mk5 Coach Conversion The arrival of the new Mk5 Caledonian Sleeper coaches necessitated further changes to the Phase 2 fleet: The buckeye coupler was replaced with a Dellner, requiring the removal of the centre section of the large snowplough. The rubbing plate was removed. The centre cab window was opened and fitted with toughened glass and a dedicated wiper. More recently, the third-rail shoes were removed, along with bogie flash guards, and two bodyside windows were replaced with grilles. Despite their dedicated home ranges, both Phase 1 and Phase 2 locomotives occasionally venture far afield to cover maintenance or service needs, proving the continued utility and flexibility of this thoroughly modernised bi-mode workhorse. Meet The Range 73962 – GBRf, Early This locomotive started life as E6032 and entered service in May 1966. Under TOPS renumbering it became 73125, and later 73204 when allocated to the Gatwick Express fleet. 73962 was unveiled to the public (almost) at the Wabtec/Brush open day in August 2014, carrying a unique all-over GBRf blue livery. It was named Dick Mabbutt in a ceremony held in memory of respected Brush engineer Richard Mabbutt, who passed away unexpectedly in 2013 after 40 years of service. Our model recreates 73962 as it first entered service with GBRf, adorned with full Europorte branding. 73963 – GBRf, Early 73963 provides the perfect partner to 73962 as one of the original three rebuilt locomotives to enter traffic in 2014/2015. It began life as E6030, also in May 1966, becoming 73123 under TOPS and later 73206 as part of the Gatwick Express fleet. After conversion at Wabtec/Brush it was named Janice, the name previously carried by 73204 (73962) before rebuilding. Our model covers 73963 shortly after introduction, complete with full Europorte branding. 73961 – GBRf, Current 73961 was the first 73/9 to enter traffic during 2014. The former E6026 / 73120 / 73209 underwent test running at the Great Central Railway in Leicestershire in 2014, pairing with a variety of interesting traction. Although its paintwork weathered well, by 2024 it was looking distinctly work-worn and became the first 73/9 to re-enter the paint shop—this time at Eastleigh—where it received the slightly darker shade of GBRf blue currently in use. Our model represents the locomotive in present-day condition, including the cab-front bracket for NR equipment. 73965 – GBRf, Current 73965 entered GBRf service in 2015 alongside 73964. Completed alongside some of the Phase Two locomotives, it features several paint differences from the first three rebuilds, most noticeably on the grilles and the area above the cab windows. Originally unnamed, it was later given the name Des O’Brien in memory of a GBRf colleague who passed away from cancer. Notably, the naming took place at the same time—and on the opposite end of the train—as that of former Accurascale Exclusive 66769 Paul Taylor. Our model represents the locomotive in its current condition with nameplates, early “Brush” blue paint, cab-front bracket, and current GBRf branding. 73967 – Caledonian Sleeper, Early This locomotive is one of two 73/9s that began life as JA-type Class 73s—although all traces of the JA specification were removed during rebuilding. E6006 was built at Eastleigh in November 1962 and later renumbered 73006 under TOPS. It was rebuilt at Brush/Wabtec during 2015 and entered Caledonian Sleeper traffic the same year. Our model represents 73967 as first adapted to work with the new Mk5 coaches, featuring the drop-head Dellner coupler and two-part snowploughs, while still retaining its third-rail equipment. 73968 – Caledonian Sleeper, Early Partnering 73967 for the early Mk5 period is 73968. This locomotive was introduced as one of the first JB-type Class 73s in October 1965 as E6009, later becoming 73103. Our model represents 73968 in its initial Mk5-ready condition, equipped with a drop-head Dellner coupler and two-part snowploughs, while still retaining third-rail equipment. 73966 – Caledonian Sleeper, Current Our current-day lineup includes 73966, the first of the Caledonian Sleeper 73/9s to be converted. Built in August 1962 at Eastleigh as E6005, it was the other ex-JA rebuilt machine, later becoming 73005 under TOPS. Our model depicts 73966 in its present condition, featuring the drop-head Dellner, removal of third-rail equipment, and replacement of the bodyside windows with grilles. 73970 – Caledonian Sleeper, Current The current-condition partner to 73966 is 73970. Converted from JB-type E6023 / 73117, built in March 1966 at the Vulcan Foundry, it entered Caledonian Sleeper service in 2016. On 24 May 2024, at a ceremony at the Bo’ness and Kinneil Railway, it became the only named Caledonian Sleeper 73/9 when it received the name W. S. Sellar in memory of a founding member of the SRPS—a name previously carried by 37175 before its sale from preservation to Colas Rail. Our model depicts 73970 in its current condition with drop-head Dellner, third-rail equipment removed, bodyside grille modifications, and nameplates. A Tooling Hungry Model One of the significant characteristics of the Class 73/9 is the sheer amount of modifications over an original Class 73, and not to mention the variations between class members. While this sets up the sort of research challenge we relish, it also does mean that the tooling cost for this model is significant to say the least, as we move to cover all the versions of the Wabtec/GBRf class members. This means that it is not a cheap model to produce due to the amount of tooling required! However, price is a conscious consideration as ever here at Accurascale, and in order to give you the museum quality model of the 73/9 at the most reasonable price-point possible, we can confirm that this new locomotive will be the latest addition to our "Accurascale Exclusives" range of models, available only direct via our website. This helps keep the cost affordable for modellers! We also love to add value to our offerings, and our famous bundle deals will be offered on these locomotives as they're famous for running in pairs. So, how about this for prices: DC/DCC Ready single locomotive: £179.99 DCC Sound Fitted: £279.99 Buy 2 locomotives, get 10% off! Amazing value, and that's before we mention free UK postage and packaging, our 3% cashback as loyalty bonus points and our lifetime warranty! So, what are you waiting for? Place your pre-order below for a Q4 2026 delivery! Need to sleep on it? Or "need some sleepers to go with one?" Well, keep an eye out for an announcement in the coming days which may suit your needs.... Browse The Class 73/9 Range And Pre-Order Here! View the full article3 points
-
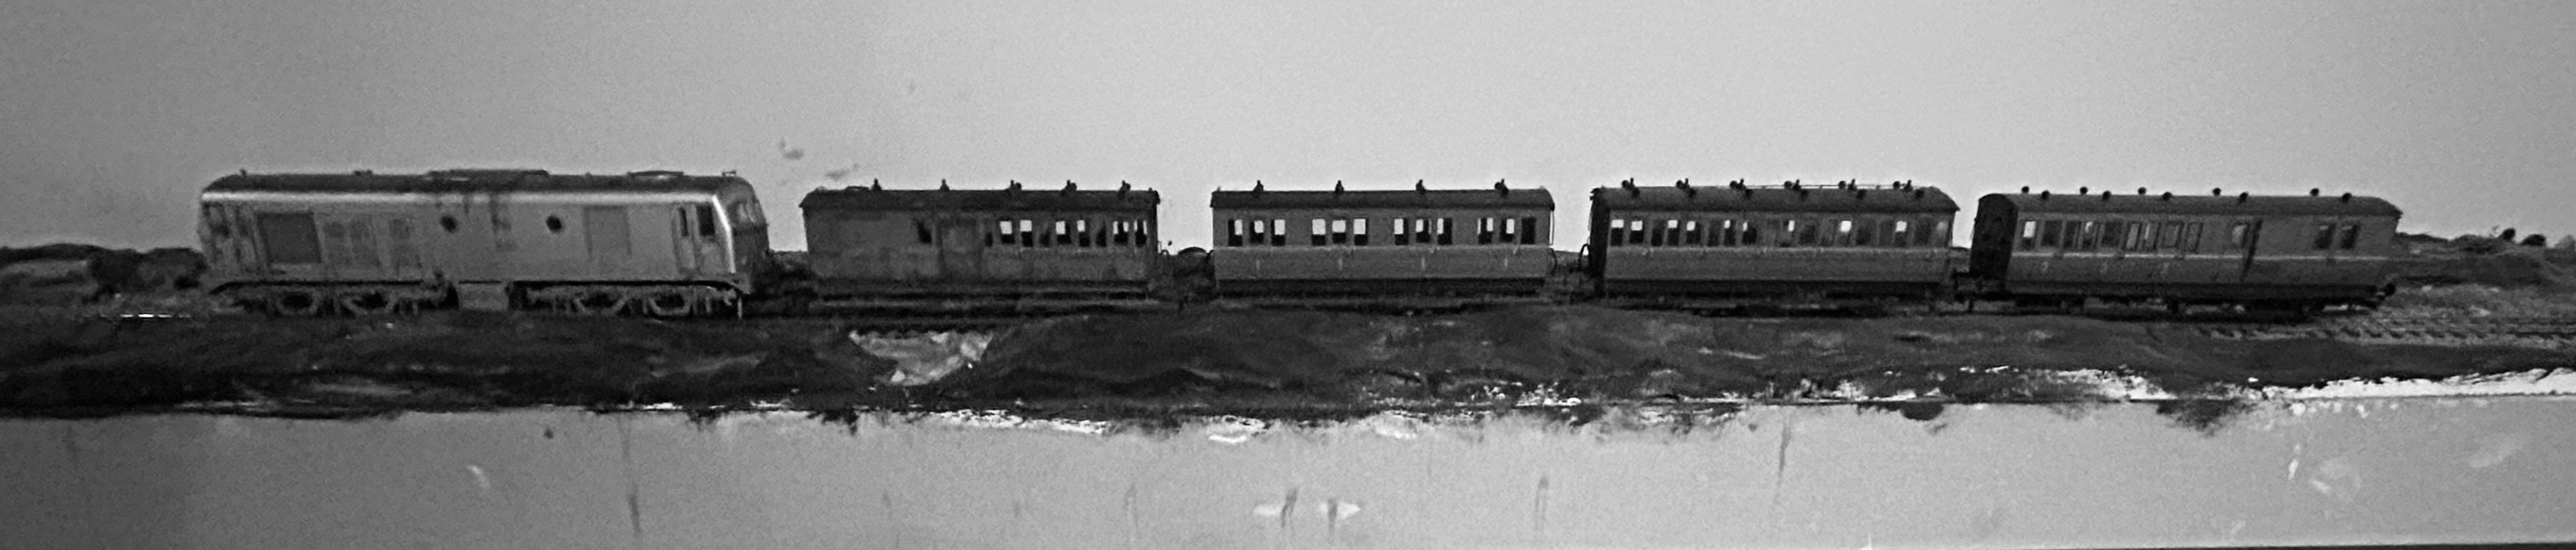
I5 or so years ago i painted one side of my Worsley Works Laminate & Park Royal CIE late 50s green opposite side in Black & Tan and picked out the windows on a SSM Bredin in silver, I finished my Bredin set (1 Full Brake, 2 Comp) in late 50s green, though none of these (21mm gauge) coaches have ever operated on a layout, perhaaps some day?3 points
-
Last photo looks a great place to work from. As for mixing co!ours too dark or bright, got lots of t-shirts in that drawer!3 points
-
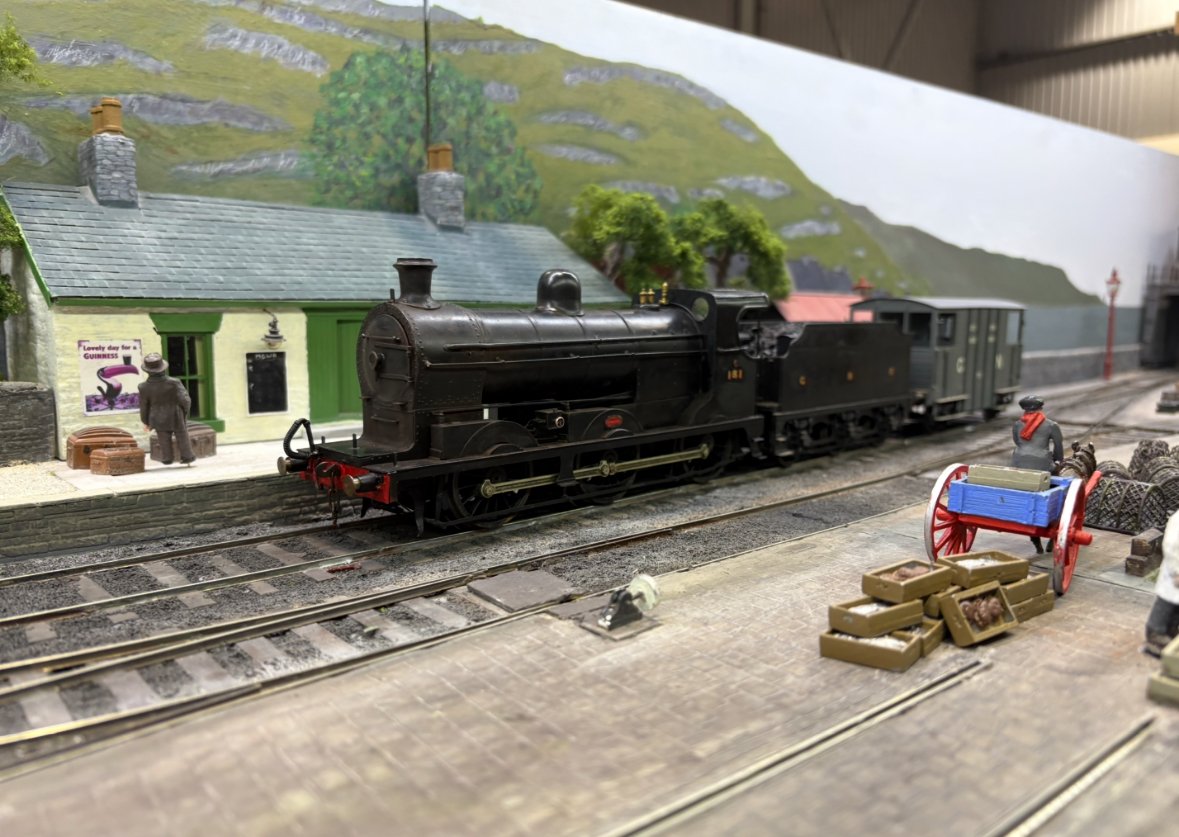
Funny you post a pic of 181 with a van - here’s proof they eventually got to Mayo ;). Seriously, I don’t think GN stuff tended to travel too far off its old territory. But if you have one photo of a van in Cork then that’s all you need!
3 points


.jpeg.48e6a5d418c4a4188c2e619e165e86ba.jpeg)