Glenderg Posted February 1, 2014 Posted February 1, 2014 Nelson, Roket Max or Zap Medium superglue work fine on that kit, plenty time for adjustment, can be applied by fine nozzle or cocktail stick. Looking good George, as always, and I now know what a "strake" is!
Georgeconna Posted February 2, 2014 Author Posted February 2, 2014 Heres the Latest on the Brakes, All the Side Strakes or T Section as Des Calls them are on, The End ones were soldered on first,4 per van, A tab had to be cut off of one and as there was no hole in the End of the Veranda to sit it into. No big deal just some extra time taken. The last of the Strakes in the Side of the Body were soldered on, There are four lengths that you have to cut to size yourself and this took a wee bit of time but all good fun!!
Georgeconna Posted February 2, 2014 Author Posted February 2, 2014 Heres the update on the Bulleid Van. Paint went on and the Mask Came off. Window are blank off with masking tape here so it looks a bit Strange. I may go for a Draker grey on the roof as it looks a bit out of place as it is too light, that was Phoenix Precision roof Dirt.
Warbonnet Posted February 2, 2014 Posted February 2, 2014 Excellent work as always George. Nice to see step-by-step results on here to as they really help the rest of us get our heads round things!
Shinkansen Posted February 2, 2014 Posted February 2, 2014 Luggage van looks sweet George, well done. Look forward to having a crack at one of those 25ton brake vans sometime. They're a nice bit of kit alright Tom
josefstadt Posted February 2, 2014 Posted February 2, 2014 Brilliant, just brilliant. An excellent kit superbly put together.
Weshty Posted February 2, 2014 Posted February 2, 2014 Ahhhh. Now that's the job. A great kit , great construction and great finishing. Strake eh? Sounds like how a kerrywoman would describe her visit to a nudist colony...
Georgeconna Posted February 3, 2014 Author Posted February 3, 2014 bit more of a update on the Brake Vans. Got the Lamp Irons Soldered one, Side lamps, Ash vent, Window Frames, and door ends. good bit of time on these spent, the vans look pretty bad at this stage but one I give em a little love and a wash they should come up nicely. Heres the Lamp Irons on The I tackled to Duckets, It would be great to have these cast in Resin so you can just glue em on!! Handy too for Scratch building. I et the solder flow out of the Joins so I can sand them flush and the join will be filled. Thats the plan anyhow!! Next was the Door ends and to solder these in place and the window Frames, Pretty straighforward to do this. Frames in place Door ends in place Ashpan flap soldered on, This is a 2 part piece Here with have the little Side lamps soldered on. Also on the go is an SSM MK.3 EGV. I have this a long way through the build and just spraying the Dayglo on the ends. Need to fix back on a step by the looks of it. Finally not everything goes to plan, I had these mark 3s sprayed up and Decalled, 95% complete, just needed to glue on Etch Window surrounds and the Shawplan Windows and they were done however I used y own mix of orange which was a tad too light when matched up to another EGV I had so I soaked them in oven cleaner and fairy power spray and now have re-primed them again and will used the Phoenix precision CIE Orange which is back on sale in Marks, Big and Small tins. Big tins E9.99.
heirflick Posted February 3, 2014 Posted February 3, 2014 lovely stuff george...hows the 071 comming on?
Weshty Posted February 3, 2014 Posted February 3, 2014 Some workrate George, that EGV looking damn good!
Georgeconna Posted February 3, 2014 Author Posted February 3, 2014 lovely stuff george...hows the 071 comming on? Handrails are going on at the moment, will stick a piccy up soon G
Georgeconna Posted February 4, 2014 Author Posted February 4, 2014 Another push to get the Brass on and just have the duckets to do now, I am thinking of leaving the those off and paint and mask them seperatly as it is a bit easier to do.
Georgeconna Posted February 5, 2014 Author Posted February 5, 2014 All the soldering done with the handrails taking the most time, 2 hours spent tonight and the last 8 rain strips will be done tomorrow if my shed is still there!! Then a prime and the chassis to build. The roof dims I used were:Width 36mm x Length 83mm is used some KS brass at work which is very thin and easy to bend while soldering.
wexfordloco10 Posted February 5, 2014 Posted February 5, 2014 Hi George the work you are doing on the Vans and coaches are brilliant you could almost leave one van in bare metal and just add a little rust David
scahalane Posted February 5, 2014 Posted February 5, 2014 Lovely clean work on the brake vans your really after mastering the soldering. I can't believe you striped back the paint on the mk3's having nearly finished, that would do my head in, your a perfectionist all right.
Georgeconna Posted February 5, 2014 Author Posted February 5, 2014 Lovely clean work on the brake vans your really after mastering the soldering. I can't believe you striped back the paint on the mk3's having nearly finished, that would do my head in, your a perfectionist all right. The chap they are going to is!!. But they were bugging me big time. The Burnt fingers have their won tale to tell Sean!!
Georgeconna Posted February 6, 2014 Author Posted February 6, 2014 Slowly losing the will to live, Maybe Solder poisoning...anyhow another 2 hours tonight doing the handrails on my own one and the Chimneys and a general tidy up, Definately plastic fix tomorrow I can smell the glue form here!! The Chimney collar is plastic Tube widened out with a mini File and brass Tube used for the Chimney available from all goodish model shops....
Horsetan Posted February 6, 2014 Posted February 6, 2014 There is a lot to be said for batch building.
Glenderg Posted February 6, 2014 Posted February 6, 2014 There is a lot to be said for batch building. Ha ha, batch fitting 32 brake shoes on prestwin chassis' would suggest otherwise. Keep on trucking george - what liveries you going for? Grey? Bauxite? Richie
Georgeconna Posted February 6, 2014 Author Posted February 6, 2014 Lucky you!!, Might do 2 grey and 2 Brown so!! Grey would look nice I think...
Georgeconna Posted February 7, 2014 Author Posted February 7, 2014 Well got all of the Chassis down last night and they bodies are being primed right now. Used Liquid lead to weight them down and sealed off the gap in the chassis floor to get as much lead in as possible. Glued in with wood glue watered down with soap and water. O took the wheels out and adjusted the ballast and gave them a clean up before the glue set.
David Holman Posted February 7, 2014 Posted February 7, 2014 Lovely work George - was a bit concerned when read you were using liquid lead and PVA, but as it is exposed you should be alright. A lot has been written about the stuff in sealed spaces like boilers and fireboxes. After a while a chemical reaction sets in and it expands, with often horrible results...
Georgeconna Posted February 7, 2014 Author Posted February 7, 2014 (edited) Oh!! Will Take note on this bit of info. Had not heard of it before but thanks for the Gen. On a footnote I added deluxe Liquid lead to a brake van about a year ago and no expansion has taken place. It is the Deluxe stuff that I am using and there is no reports if that Expanding.Maybe the Traditional lead shot causes that issue. Edited February 7, 2014 by Georgeconna
irishthump Posted February 7, 2014 Posted February 7, 2014 Oh!! Will Take note on this bit of info. Had not heard of it before but thanks for the Gen. On a footnote I added deluxe Liquid lead to a brake van about a year ago and no expansion has taken place. It is the Deluxe stuff that I am using and there is no reports if that Expanding.Maybe the Traditional lead shot causes that issue. The acetic acid in the PVA reacts with lead to cause the expansion. It happens when a large amount of weight and glue are added, so it's more common in larger scales. Using it in an enclosed space such as a loco boiler is also a factor, so using it on the underside of a wagon shouldn't be a problem. As far as I know the Deluxe Liquid Gravity is not pure lead so doesn't react the same way. Mind you they recommend using thin CA glue to fix it in place.
Georgeconna Posted February 7, 2014 Author Posted February 7, 2014 noted!! super glue is expensive for that though and unforgiving!! I will keep an eye on it, Any developments I will inform ye. They do say card glue as well which is a pva based glue.
Mike 84C Posted February 7, 2014 Posted February 7, 2014 I use lead flashing sheet attached with Evostick. Used it for years with no problems even on plastic. And i just love the smell!! Cheers Mike
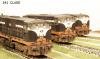
Georgeconna Posted February 21, 2014 Author Posted February 21, 2014 Got the Decals on the Van this week, One Decal which has the Weight restriction is a little too big lengthwise for the van side, Nothing I could do about that now. Its there to stay. Roof is now on Permanently but not in these photos. The Glazing has been adjusted as well as this was a dry run. I used Non odour Superglue to stick those in.
Glenderg Posted February 21, 2014 Posted February 21, 2014 Absolutely stunning looking!!! + 1. Cant come up with words to describe it... wow. Props to mayner for such a great kit. Now that i've gathered my thoughts, what odourless glue would you recommend? Richie
Recommended Posts
Create an account or sign in to comment
You need to be a member in order to leave a comment
Create an account
Sign up for a new account in our community. It's easy!
Register a new accountSign in
Already have an account? Sign in here.
Sign In Now