David Holman Posted April 4, 2020 Posted April 4, 2020 (edited) Looking good so far. Whose chassis kit is it? Edited April 4, 2020 by David Holman 1
Galteemore Posted April 4, 2020 Author Posted April 4, 2020 (edited) Thanks David. It’s Roger’s. I’ve got a few learning points about building it to 5’3” - the lugs for 36.75 brake gear end up concealed under the folded in beams which need ground away at that point. Usual nice little compensated axle feature though. The CIE works plates are exquisite, although that’s not what I said when I was sweating them on. Edited April 4, 2020 by Galteemore 1
Galteemore Posted April 9, 2020 Author Posted April 9, 2020 On 4/3/2020 at 11:46 PM, leslie10646 said: A, Mountain Man, that's the trouble with brass - it looks so nice that you don't want to cover it up! Leslie - not up to your standard of production but here’s an H van underway. It’s not got measles - every pink dot is an individually cut out and stuck on bolt head... 6 4
Noel Posted April 9, 2020 Posted April 9, 2020 1 hour ago, Galteemore said: Leslie - not up to your standard of production but here’s an H van underway. It’s not got measles - every pink dot is an individually cut out and stuck on bolt head... Fabulous. I nearly fell off my perch when I saw this wagon. Superb build. 3 1
JasonB Posted April 9, 2020 Posted April 9, 2020 Individual bolts! Now that's attention to detail. Lovely build, very impressive. 1
Warbonnet Posted April 9, 2020 Posted April 9, 2020 Love that van, shows what can be accomplished with brass, plastic and scratch building. The very best. Well done! 1 1
leslie10646 Posted April 9, 2020 Posted April 9, 2020 Great stuff, Mountain Man, 7mm DOES have its advantages in that you can see every detail and with your skill - we do! 1 1
Galteemore Posted April 12, 2020 Author Posted April 12, 2020 (edited) Forced myself back to the brass tonight. Bunker extension and footplate valances fitted plus some minor bits such as steps and front handrail on tanks - paying due heed to the the form these took on 42, my chosen loco. Having looked carefully at the loco in recent days, it was clear that much of the roof was wrong, not matching the side profile. Most of the evening was thus spent with the large 80w iron out, using its brute power in unsoldering the cab and then rebending to better achieve the Inchicore profile. I also discovered a dry joint on the front end which led to the entire buffer beam falling off, with other sundry bits and pieces also falling off as I put things right. On more than one occasion I was ready to ring the Hammond Lane Foundry to see if they still accept steam locomotives for disposal..... Edited April 13, 2020 by Galteemore 4
Galteemore Posted April 13, 2020 Author Posted April 13, 2020 (edited) Spent the day with my soldering iron, in a challenge to finish this loco. Main construction now complete. The etches are now empty! What slowed things down was my decision to replicate the smokebox door clips as used on my prototype 42. This took some trial and error to work out a way of fabricating from 2 brass strips with high-temp solder, sticking on with 145. It’s a messy finish as lots of fettling was required to make it all fit - thanks to my mistakes earlier in the build. Rather than find nasty surprises at the end, I have also regularly tested the fit of the body and chassis, which means a bit of reworking at times. Thus the boiler unit was on and off several times today alone. I also like to solder on my white metal castings, which is more solid but can be a bit solder-heavy. This caused some angst when I realised that my first effort on the chimney needed fixed...So lots of tidying up and filling in gaps to come. But it’s progress....already spotted that ejector pipe on fireman’s side is wrong for 42 - that’s going to go! Edited April 14, 2020 by Galteemore 4
Galteemore Posted April 15, 2020 Author Posted April 15, 2020 (edited) One of my favourite SLNC pics hangs on my wall at work - it shows a ‘Holy Well’ or ‘Garland Sunday’ excursion at Glenfarne. Lurking on a siding is an H van, which although only in traffic since 1953, made regular appearances on the Sligo Leitrim up to closure. So I had to have one. As pics above show, basic plastic structure on an Alphagraphix chassis. A card kit from that source gave the dimensions, and one of @Irishswissernie ‘s excellent pics gave useful info. Pics below illustrate various of the themes above - including my attempt at a tribute to the original picture! Also a shot alongside my SLNC van shows how small traditional Irish vans are by comparison. And if @leslie10646 can have a consignment clip on his 4mm H van - I had to try and include one! Sorry the images are all over the shop and not in order, taken at various stages in the finishing process. And just for @jhb171achill, no black ironwork in sight ! Few useful learning tips from this including use of Limonene solvent, and a real fabric roof, ‘doped’ with PVA to seal the nap. It’s not perfect by any means, but given that I almost reduced the underframe to scrap during construction, it could have turned out worse! https://www.flickr.com/photos/irishswissernie/6593632857/in/album-72157628618688939/ Edited April 15, 2020 by Galteemore 6
Midland Man Posted April 15, 2020 Posted April 15, 2020 Wow looks so realistic. Was it srcatch built? Will look exellent with the 2-4-2. 1
Galteemore Posted April 15, 2020 Author Posted April 15, 2020 Thanks MM. Chassis is from a kit but body is plastic sheet and strip with a brass roof. A pic of the build is a few posts above. 1
leslie10646 Posted April 15, 2020 Posted April 15, 2020 Terrific model Mr R. Glad to know that the 4mm boys can set a few challenges for the 7mm guys! I did ask Michael to include a representation of the consignment clip if possible. If only that a dab of white to represent the the document would relieve the endless Halford's grey. I wonder do they realise how much of their primers are sold to non-car men! 1
Angus Posted April 15, 2020 Posted April 15, 2020 That's a very nice van you've built there Galteemore, the rivets stand out particularly well. 1
Galteemore Posted April 15, 2020 Author Posted April 15, 2020 Cheers Angus. This was what made me pause the build for a long time before starting it. I thought about building it from brass and putting the sides through my rivet press. But that wouldn’t sort the bolt heads running along the ribs. The only thing was to get red microstrip (so I could see it!) and cut off individual bolt heads one by one...the Limonene is a great find as it doesn’t dissolve tiny parts like that. When each bolt head turned translucent with solvent, I knew it was stuck on. This layout will have only 1 H van!! If I was clever, I’d have simply made one side and one end and made a resin casting..... 1
Galteemore Posted April 18, 2020 Author Posted April 18, 2020 (edited) After another soldering session today, fixing a few bits that had made a bid for freedom, and adding some details from various photos of the real No 42 (such as extra pipe on fireman’s side and some odd lifting loops on the tanks) the F6 had a thorough rub over with scrapers to get off the excess solder, followed by a number of washes. She won’t be brass for long.....waft of primer tomorrow will reveal additional areas for filler on top of those I can already see! I managed to knock off the white metal whistle - which is in a rather vulnerable spot anyway. Replaced with a Laurie Griffin brass one. Edited April 18, 2020 by Galteemore 2
Galteemore Posted April 19, 2020 Author Posted April 19, 2020 Old railway companies used to paint their locos grey for a workshop portrait which showed off the detail. A similar process with Halfords’ Grey shows the mistakes ! Lots of the 3 Fs ahead - filling, filing, and futering.... 4 1
Midland Man Posted April 19, 2020 Posted April 19, 2020 Looks amazing you say that the grey shows mistakes . Don't be so hard on you're self. Keep it up. MM 1
popeye Posted April 19, 2020 Posted April 19, 2020 Very nice. The primer will show up little flaws but then you can correct these before the final painting. 1
David Holman Posted April 21, 2020 Posted April 21, 2020 Looking good. Witness coats can be both friend and foe - covering things you don't expect them too and highlighting stuff you hadn't noticed. Worth it though, as better now than when the top coat goes on! 1
Galteemore Posted April 21, 2020 Author Posted April 21, 2020 (edited) Thanks David - a shameless borrow from your G2 build. This witness was mainly hostile as it turned out. After a bit of work it’s already improved though. There were a few gaps that have now vanished! It’s also blended the boiler in with the firebox. Almost at the end now. Frames have early painting and finishing in hand, including the odd CIE practice of painting the buffer stocks black (dark grey I mean ) Am so tempted to paint this loco in green with a flying snail on the tanks...... Edited April 21, 2020 by Galteemore 4
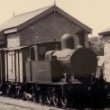
Galteemore Posted April 26, 2020 Author Posted April 26, 2020 (edited) Well it’s all over bar the shouting on this build. Although my wife would rightly tell you there’s been plenty of shouting on the way. It’s not perfect by any means but at least it has progressed from the tangled mess of brass it was last autumn. Loads of errors but lots of learning too. It is not black, be reassured @jhb171achilla truly black loco is included for comparison - I have been paying attention to the excellent livery tutorials here. A top tip from @Mayner in another thread pointed to me to a suitable Railmatch aerosol. And I think I’ve fixed the wonky 2 on the tank sides since the pics! The body is sitting loose on the chassis so there may be a tiny gap here or there. Edited April 26, 2020 by Galteemore 7 1
jhb171achill Posted April 26, 2020 Posted April 26, 2020 Wow, cab detail and all, Galteemore - that loco is an absolute beauty - well done indeed! Another little lady that would have been great at Downpatrick! 1
Midland Man Posted April 27, 2020 Posted April 27, 2020 Wow amazing stuff in my mind don't weather it as it looks so good. 1
David Holman Posted April 28, 2020 Posted April 28, 2020 Looks great, and particularly at home in the Rosses Point setting. What ever shade of 'black' that is, it looks very effective. Halfords 'rattle can' matt black is almost too dense and demands a degree of weathering to soften it a little, but this looks just right. Reminds me that I really must experiment with monochrome photographs too, though that station building oozes atmosphere in colour. 1
Galteemore Posted April 28, 2020 Author Posted April 28, 2020 Thanks gents - it’s taught me a lot. The colour is Railmatch weathered black, David. It’s like a well-used chalkboard in tone and just has that off-black look we want for 50s CIE. 3 hours ago, David Holman said: Looks great, and particularly at home in the Rosses Point setting. What ever shade of 'black' that is, it looks very effective. Halfords 'rattle can' matt black is almost too dense and demands a degree of weathering to soften it a little, but this looks just right. Reminds me that I really must experiment with monochrome photographs too, though that station building oozes atmosphere in colour. 1 1
Midland Man Posted April 28, 2020 Posted April 28, 2020 Forgot to mention that the real engine had the same amount of sut as a million fireplaces. One of the class worked on Cork tramway with Brandon tanks and number 90 and the J26 (560 I think) but I have to say that your engine has one of best paint jobs on this form. Plus the lighting on the layout is and the colur of the number is like a Jauguar E type. Just beautiful. 1
Galteemore Posted April 30, 2020 Author Posted April 30, 2020 (edited) A small but frustrating model is done. The humble platform barrow. This one consisted of some 17 separate parts. It has collapsed on numerous occasions during the build but seems to be holding up now....all part of my quest to replicate the platform as seen at Dromahair, a typical 50s SLNC station.... Edited April 30, 2020 by Galteemore 4 1
David Holman Posted May 2, 2020 Posted May 2, 2020 Glad I'm not alone in finding things like this a pain! Certainly looks the part though - especially the dark green paint job, while the bare wood boards look just right too. 1
Recommended Posts
Create an account or sign in to comment
You need to be a member in order to leave a comment
Create an account
Sign up for a new account in our community. It's easy!
Register a new accountSign in
Already have an account? Sign in here.
Sign In Now